
Monica is an open-source web application to organize and record your interactions with your loved ones. We call it a PRM, or Personal Relationship Management. Think of it as a CRM (a popular tool used by sales teams in the corporate world) for your friends or family. Monica allows people to keep track of everything that’s important about their friends and family. Like the activities with them. When you last called someone and what you talked about. It will help you remember the name and the age of their kids. It can also remind you to call someone you haven’t talked to in a while. In this step by step guide I will show you how to install Monica on your Synology NAS using Docker & Portainer.
STEP 1
Please Support My work by Making a Donation.
STEP 2
Install Portainer using my step by step guide. If you already have Portainer installed on your Synology NAS, skip this STEP. Attention: Make sure you have installed the latest Portainer version.
STEP 3
Make sure you have a synology.me Wildcard Certificate. Follow my guide to get a Wildcard Certificate. If you already have a synology.me Wildcard certificate, skip this STEP.
STEP 4
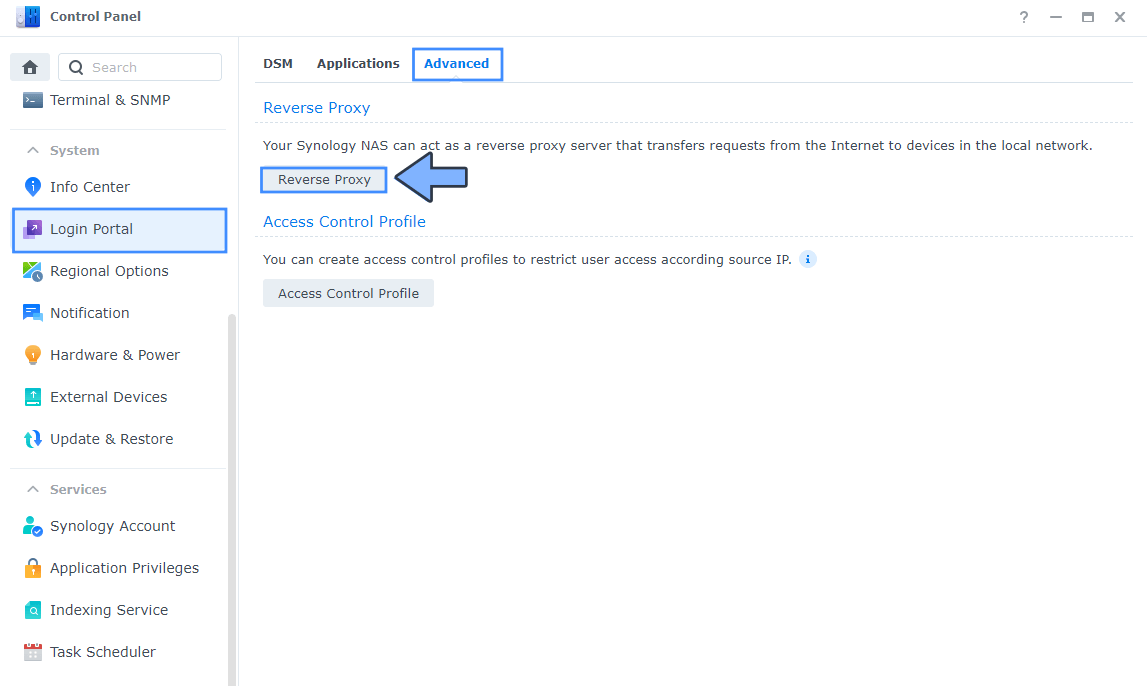
Go to Control Panel / Login Portal / Advanced Tab / click Reverse Proxy. Follow the instructions in the image below.
STEP 5
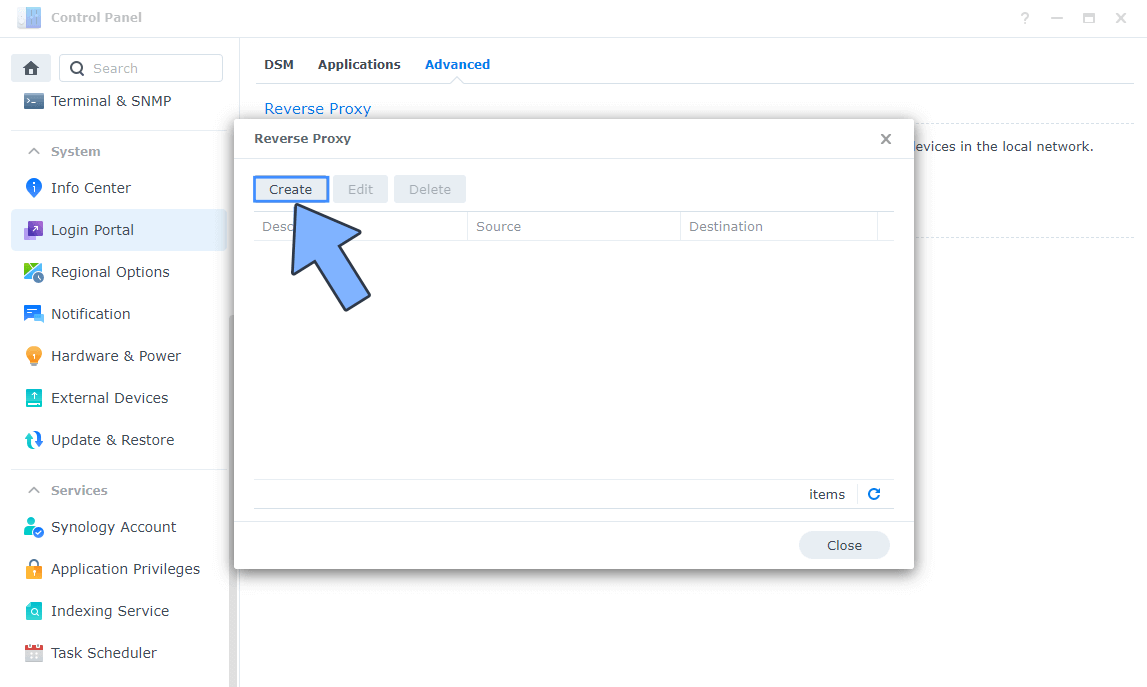
Now click the “Create” button. Follow the instructions in the image below.
STEP 6
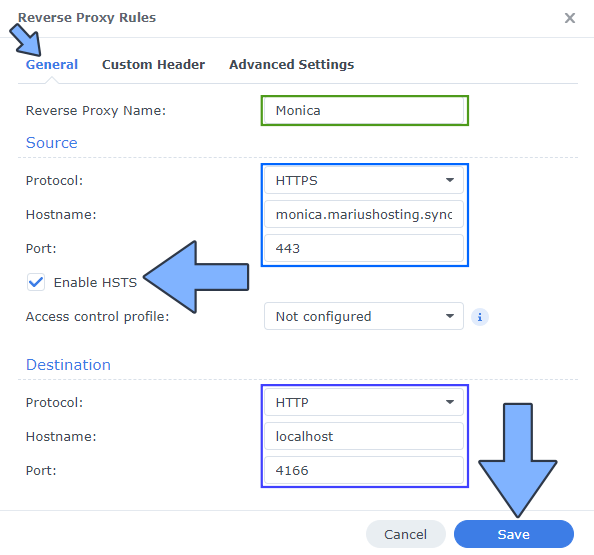
After you click the Create button, the window below will open. Follow the instructions in the image below.
On the General area, set the Reverse Proxy Name description: type in Monica. After that, add the following instructions:
Source:
Protocol: HTTPS
Hostname: monica.yourname.synology.me
Port: 443
Check Enable HSTS
Destination:
Protocol: HTTP
Hostname: localhost
Port: 4166
STEP 7
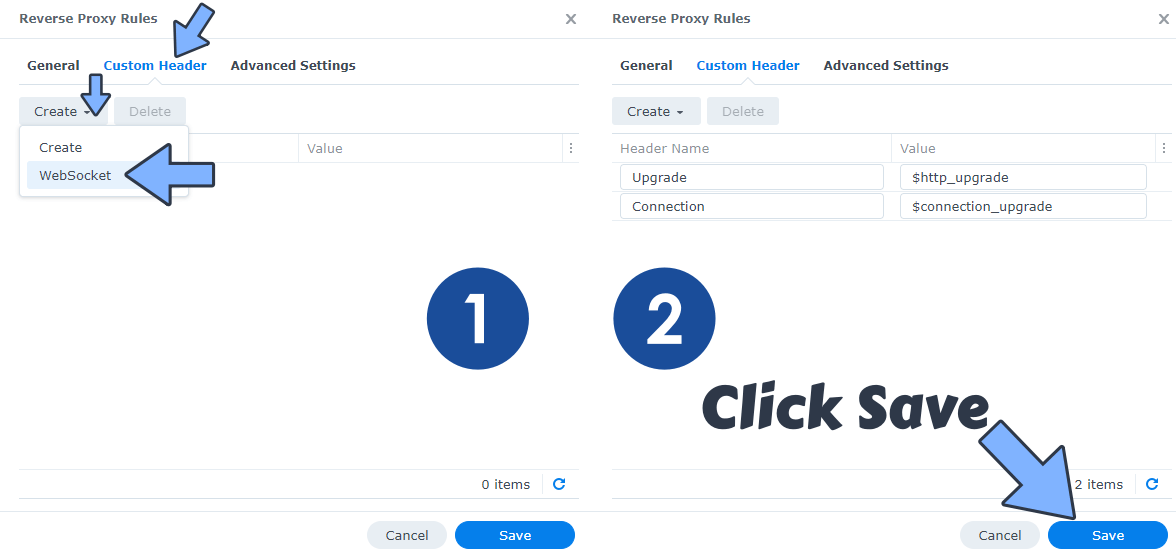
On the Reverse Proxy Rules click the Custom Header tab. Click Create and then, from the drop-down menu, click WebSocket. After you click on WebSocket, two Header Names and two Values will be automatically added. Click Save. Follow the instructions in the image below.
STEP 8
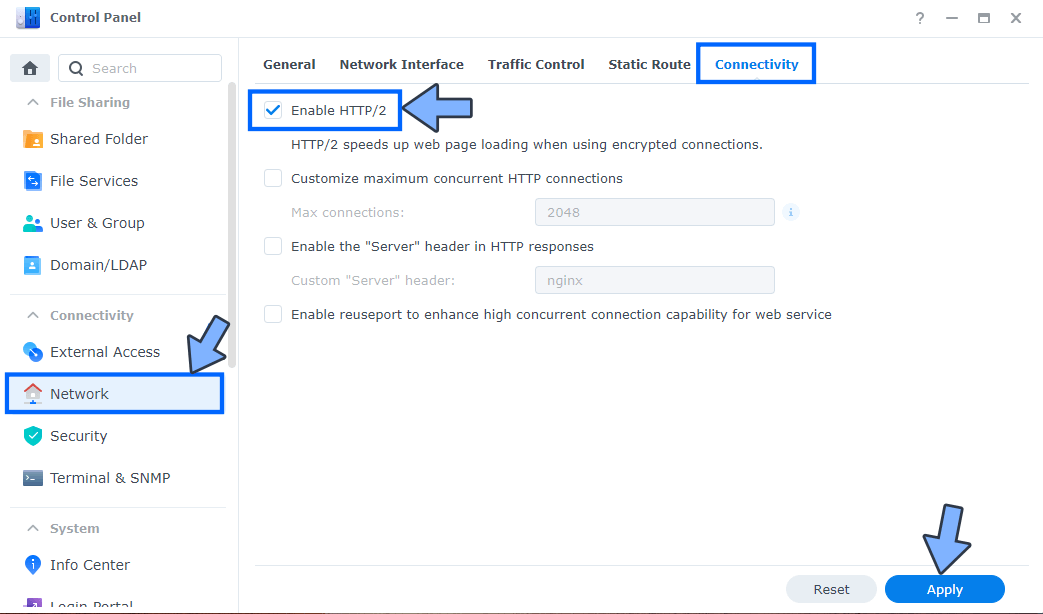
Go to Control Panel / Network / Connectivity tab/ Check Enable HTTP/2 then click Apply. Follow the instructions in the image below.
STEP 9
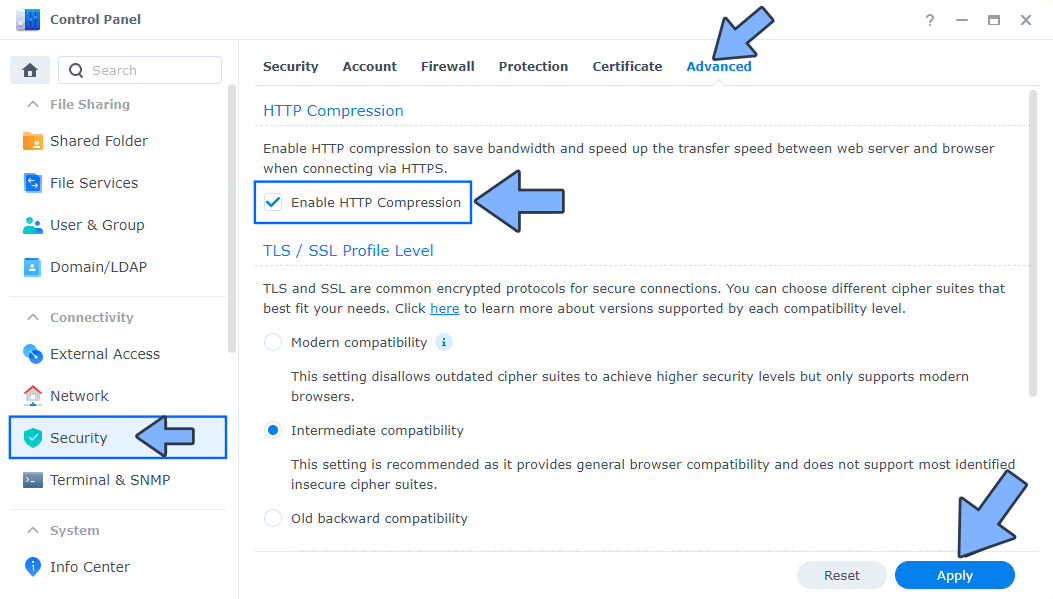
Go to Control Panel / Security / Advanced tab/ Check Enable HTTP Compression then click Apply. Follow the instructions in the image below.
STEP 10
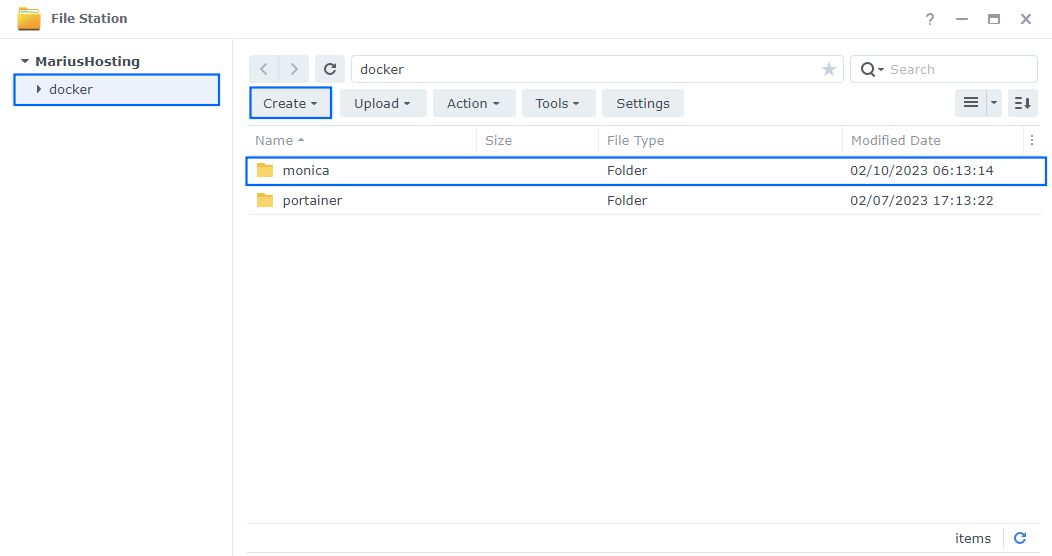
Go to File Station and open the docker folder. Inside the docker folder, create one new folder and name it monica. Follow the instructions in the image below.
Note: Be careful to enter only lowercase, not uppercase letters.
STEP 11
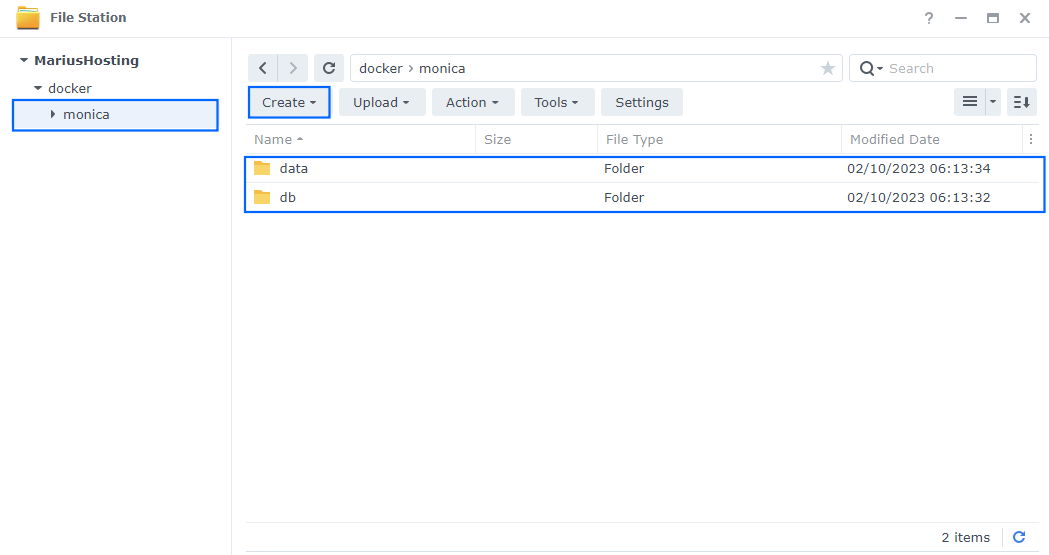
Now create two new folders inside the monica folder that you created at STEP 10 and name them data and db. Follow the instructions in the image below.
Note: Be careful to enter only lowercase, not uppercase letters.
STEP 12
Follow my step by step guide on how to activate SMTP for your Gmail account. This step is mandatory. Note: If you don’t want to use the easiest way for SMTP with Google and you already have SMTP details from your own Mail Server, you can just skip this STEP and use your personalized email SMTP details instead.
STEP 13
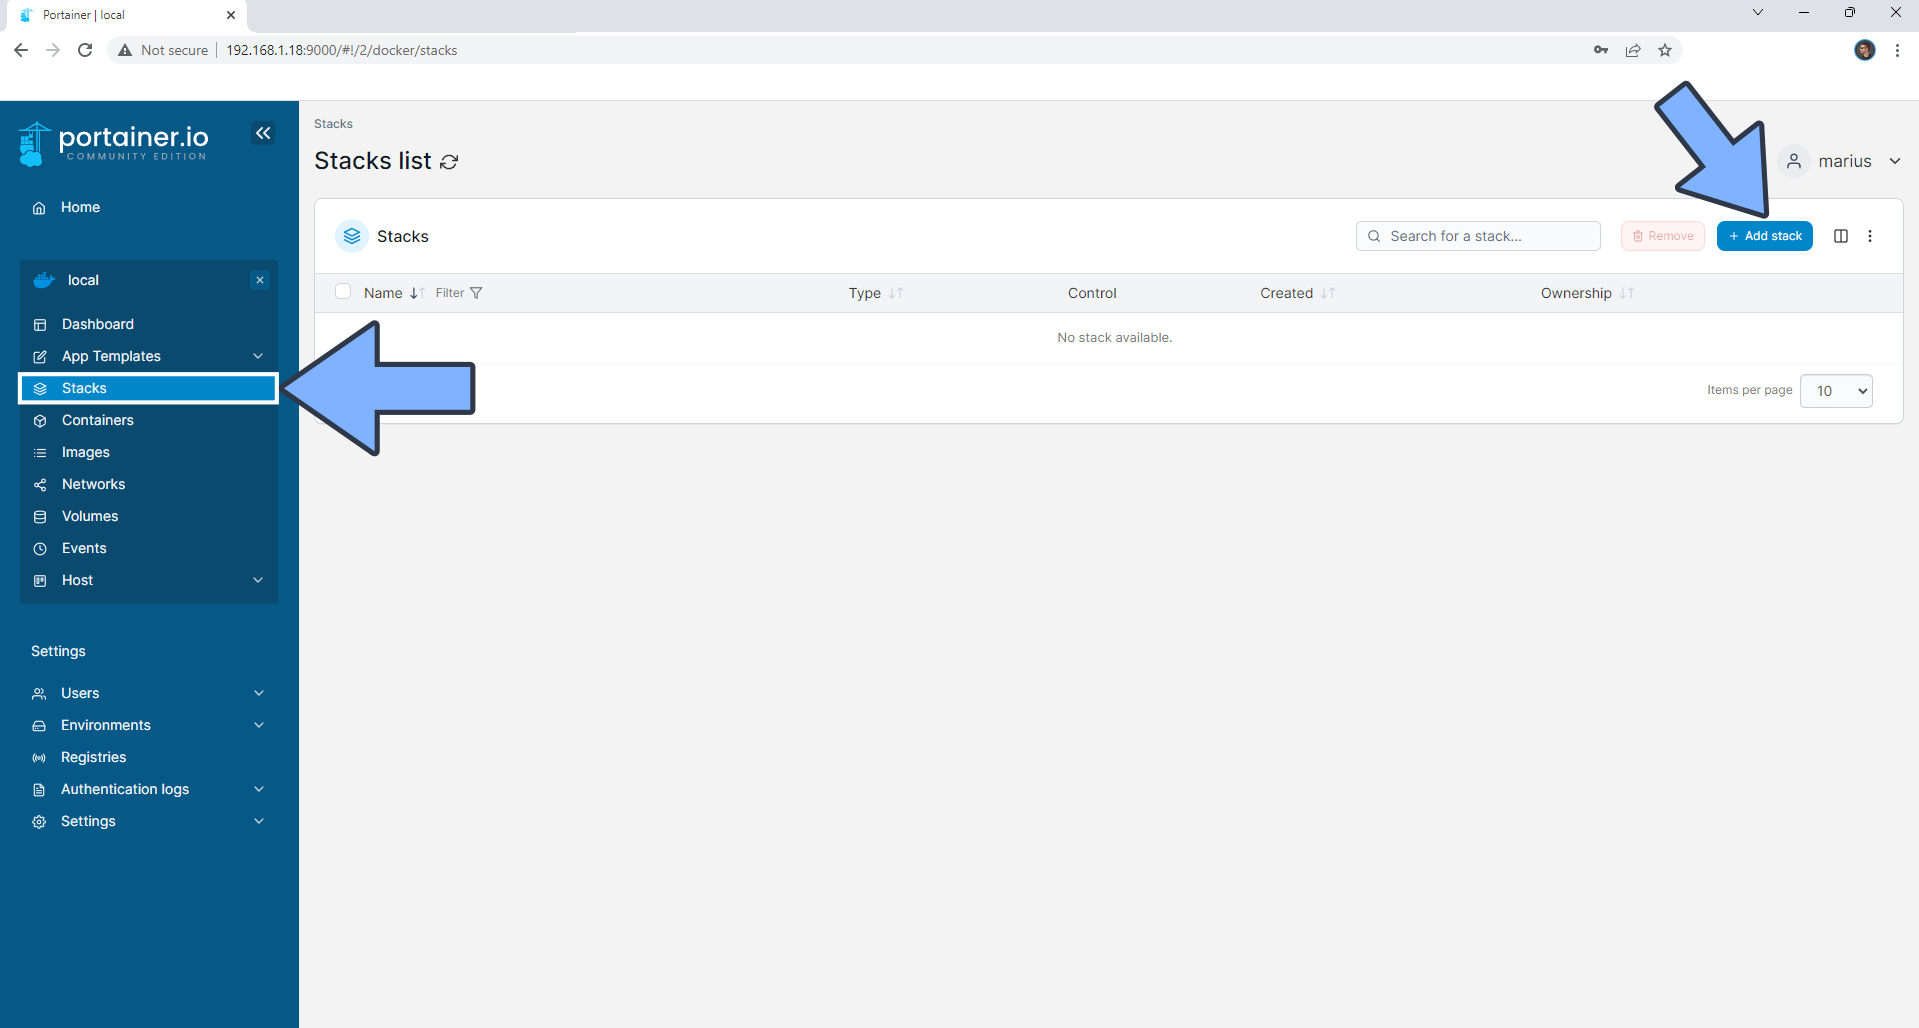
Log into Portainer using your username and password. On the left sidebar in Portainer, click on Stacks then + Add stack. Follow the instructions in the image below.
STEP 14
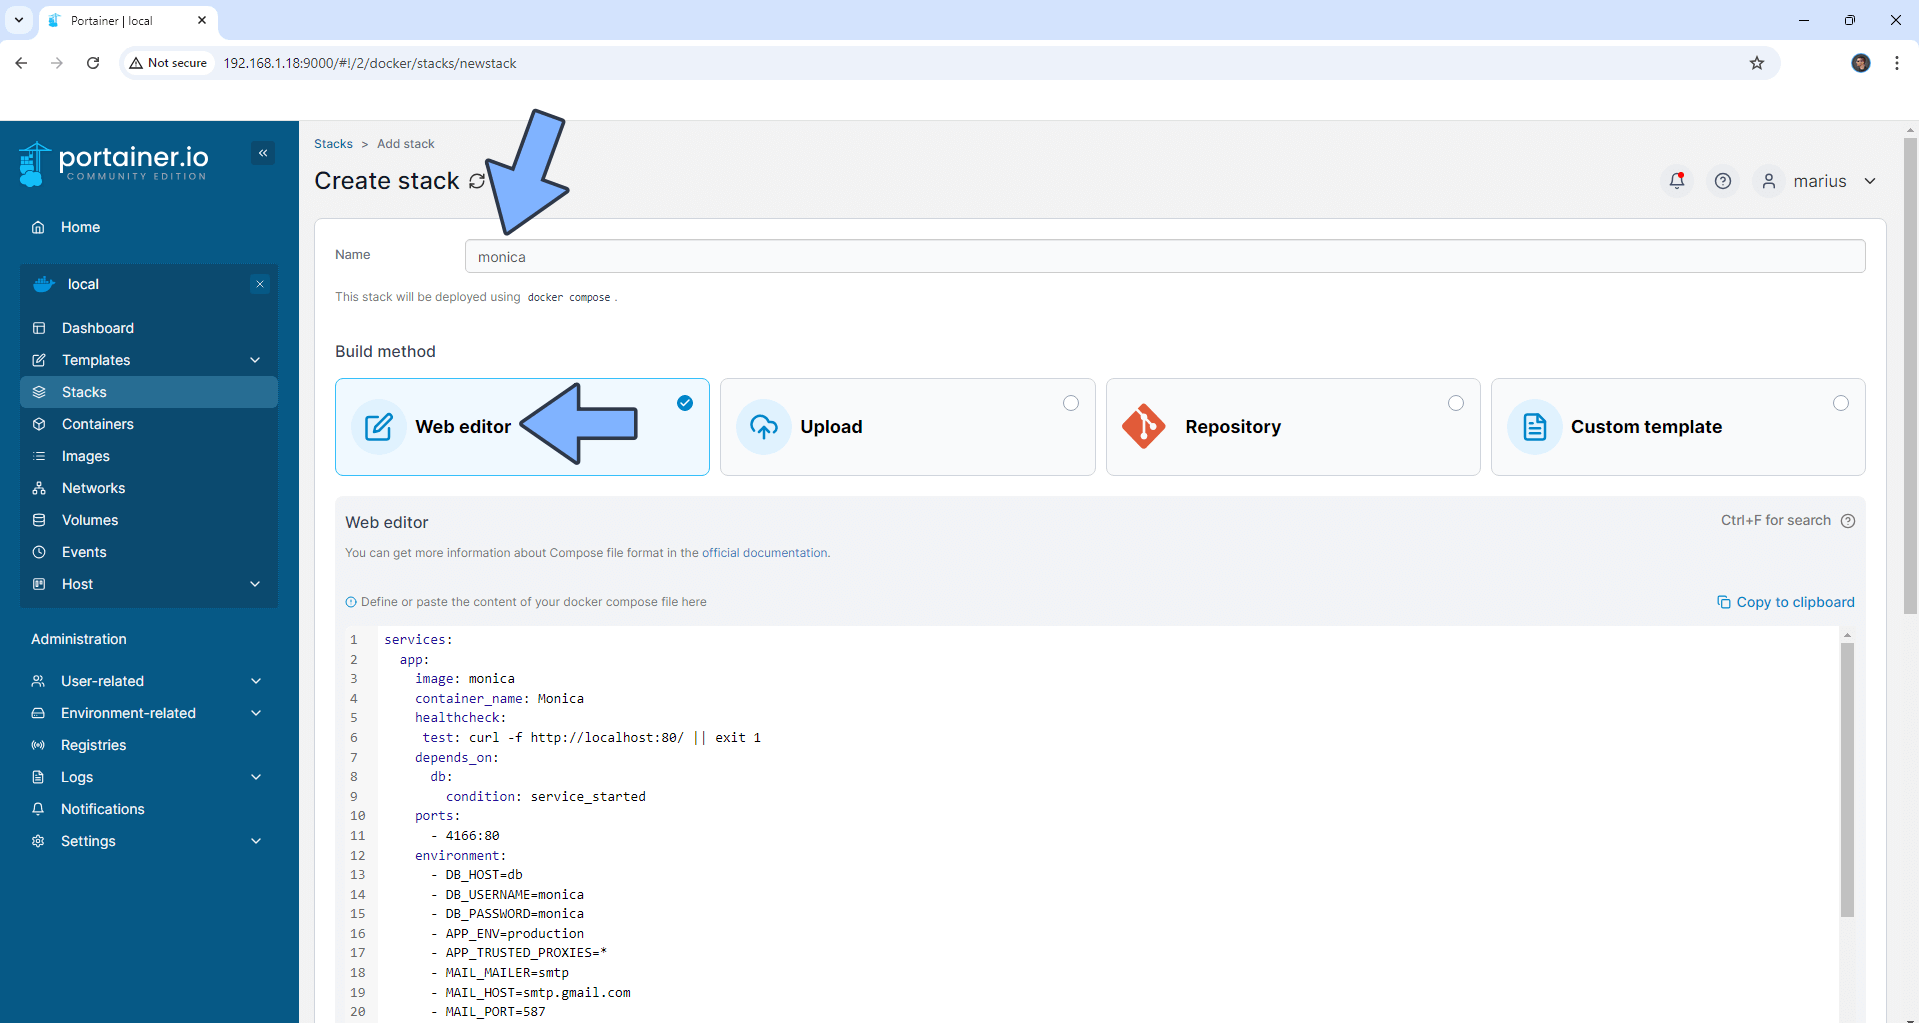
In the Name field type in monica. Follow the instructions in the image below.
services:
  app:
    image: monica
    container_name: Monica
    healthcheck:
     test: curl -f http://localhost:80/ || exit 1
    depends_on:
      db:
        condition: service_started
    ports:
      - 4166:80
    environment:
      - DB_HOST=db
      - DB_USERNAME=monica
      - DB_PASSWORD=monica
      - APP_ENV=production
      - APP_TRUSTED_PROXIES=*
      - MAIL_MAILER=smtp
      - MAIL_HOST=smtp.gmail.com
      - MAIL_PORT=587
      - MAIL_USERNAME=Your-own-gmail-address
      - MAIL_PASSWORD=Your-own-app-password
      - MAIL_ENCRYPTION=tls
      - MAIL_FROM_ADDRESS=Your-own-gmail-address
      - MAIL_FROM_NAME=Monica
    volumes:
      - /volume1/docker/monica/data:/var/www/html/storage:rw
    restart: on-failure:5

  db:
    container_name: Monica-DB
    image: mariadb:11.4-noble #LTS Long Time Support Until May 29, 2029.
    security_opt:
      - no-new-privileges:false
    environment:
      MYSQL_ROOT_PASSWORD: rootpass
      MYSQL_DATABASE: monica
      MYSQL_USER: monica
      MYSQL_PASSWORD: monica
      TZ: Europe/Bucharest
    volumes:
      - /volume1/docker/monica/db:/var/lib/mysql:rw
    restart: on-failure:5
Note: Before you paste the code above in the Web editor area below, change the value for MAIL_USERNAME and type in your own Gmail address. STEP 12.
Note: Before you paste the code above in the Web editor area below, change the value for MAIL_PASSWORD and type in your own Gmail app password. STEP 12.
Note: Before you paste the code above in the Web editor area below, change the value for MAIL_FROM_ADDRESS and type in your own Gmail address. STEP 12.
Note: Before you paste the code above in the Web editor area below, change the value for TZ. (Select your current Time Zone from this list.)
STEP 15
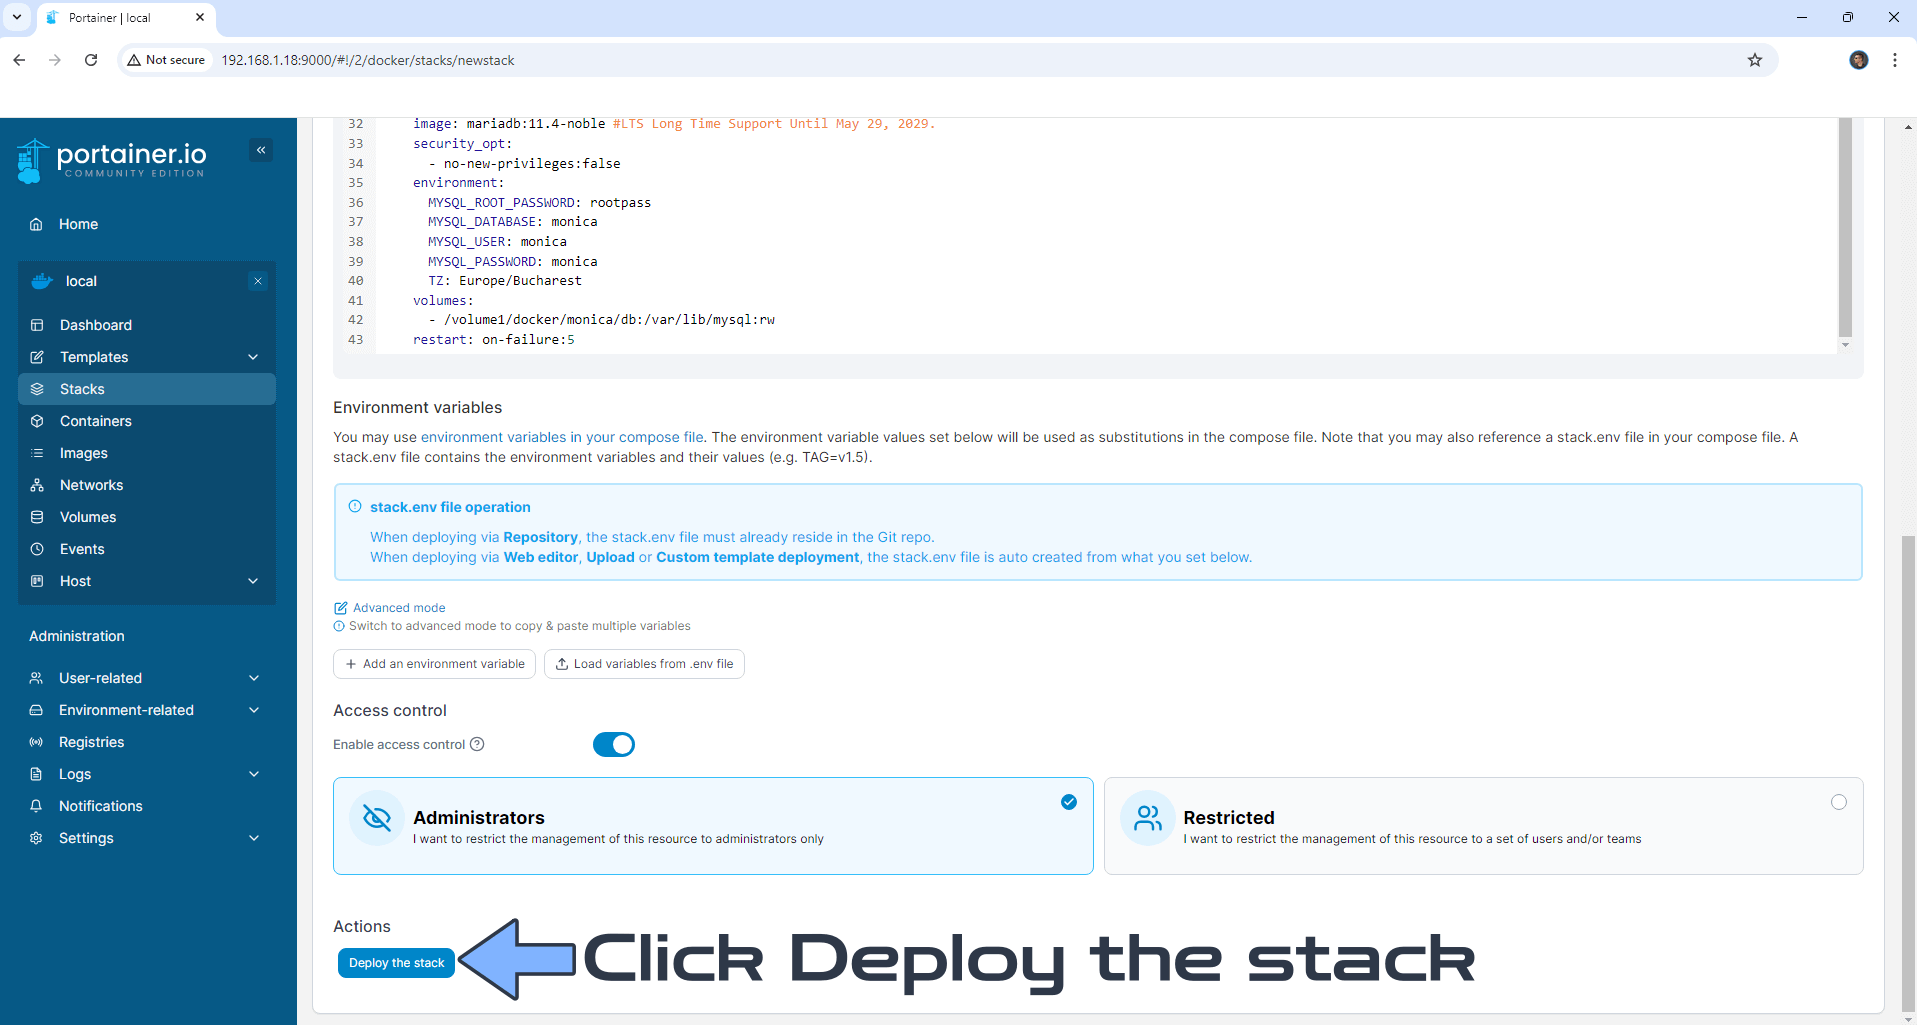
Scroll down on the page until you see a button called Deploy the stack. Click on it. Follow the instructions in the image below. The installation process can take up to a few minutes. It will depend on your Internet speed connection.
STEP 16
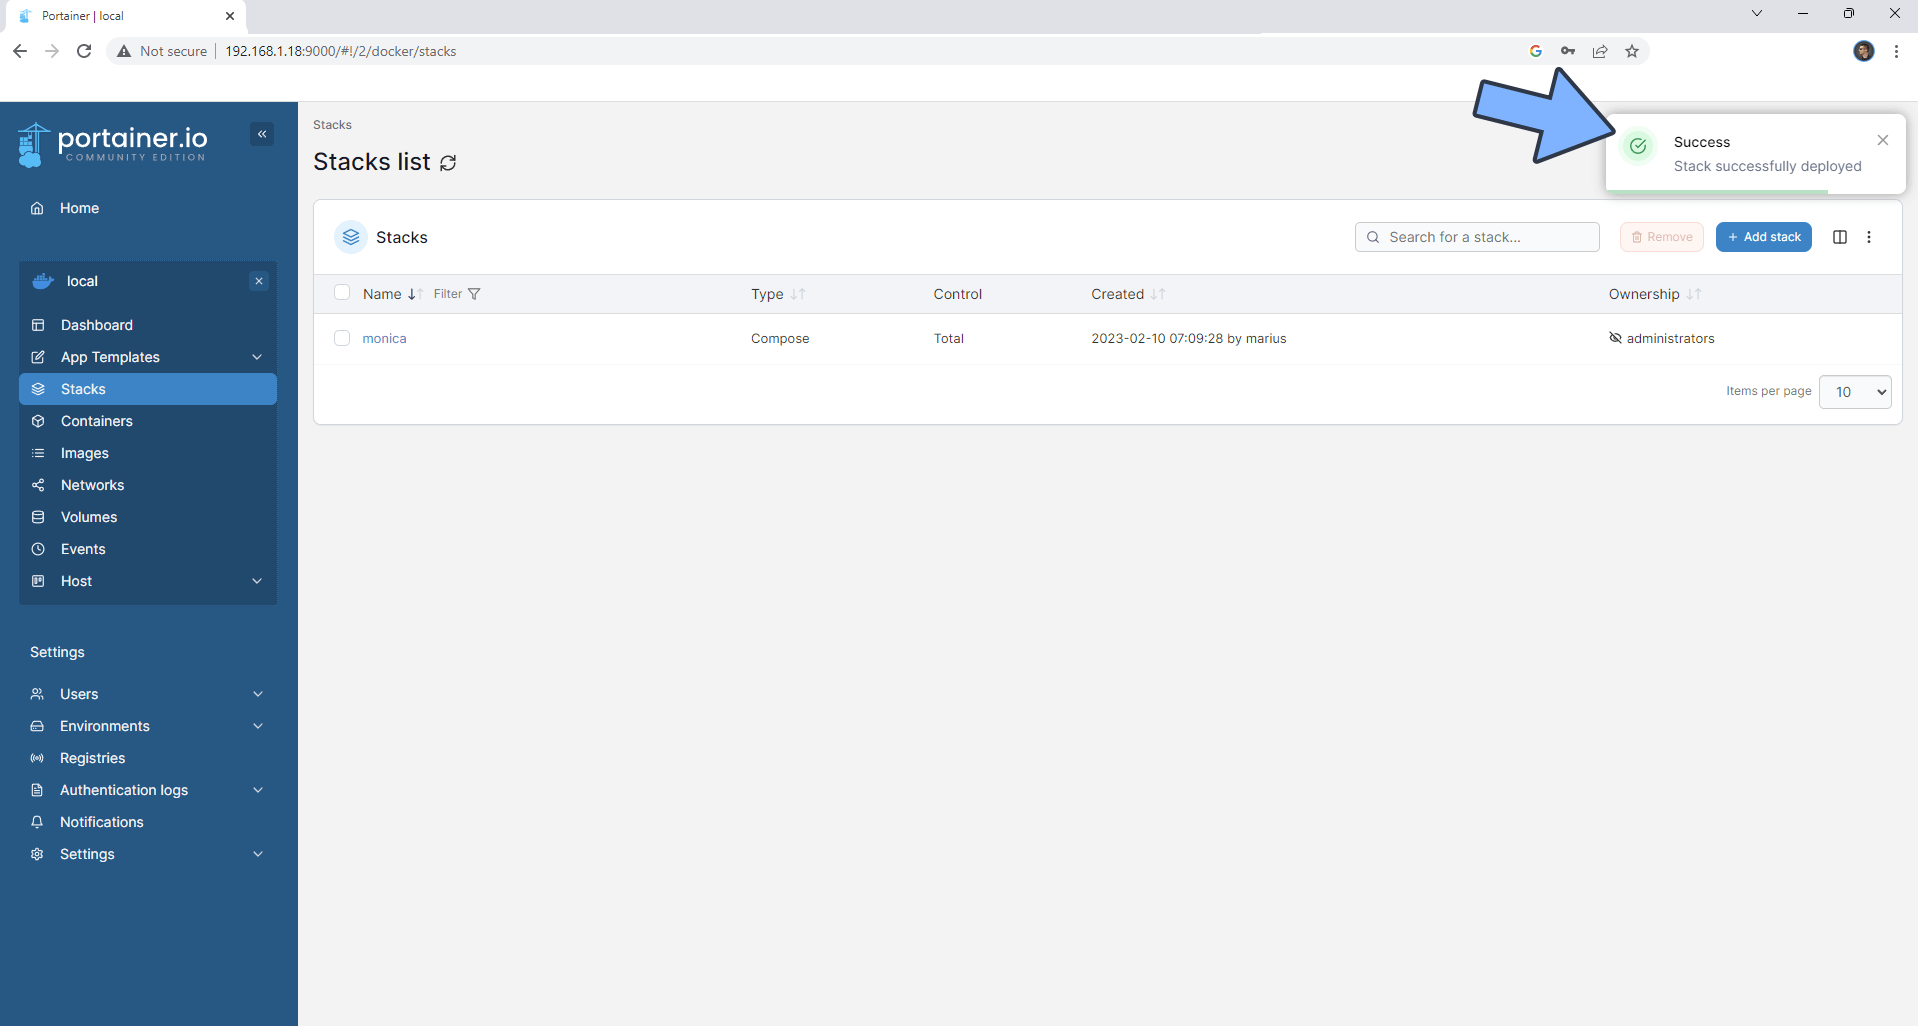
If everything goes right, you will see this message at the top right of your screen: “Success Stack successfully deployed“.
STEP 17
Your Monica instance will be orange with the Unhealthy State. The State will turn Healthy in approximately 5-10 minutes which is how long the Monica installations takes. Refresh the browser page from time to time until you see the State turn green.
STEP 18
🟢Please Support My work by Making a Donation. Almost 99,9% of the people that install something using my guides forget to support my work, or just ignore STEP 1. I’ve been very honest about this aspect of my work since the beginning: I don’t run any ADS, I don’t require subscriptions, paid or otherwise, I don’t collect IPs, emails, and I don’t have any referral links from Amazon or other merchants. I also don’t have any POP-UPs or COOKIES. I have repeatedly been told over the years how much I have contributed to the community. It’s something I love doing and have been honest about my passion since the beginning. But I also Need The Community to Support me Back to be able to continue doing this work.
STEP 19
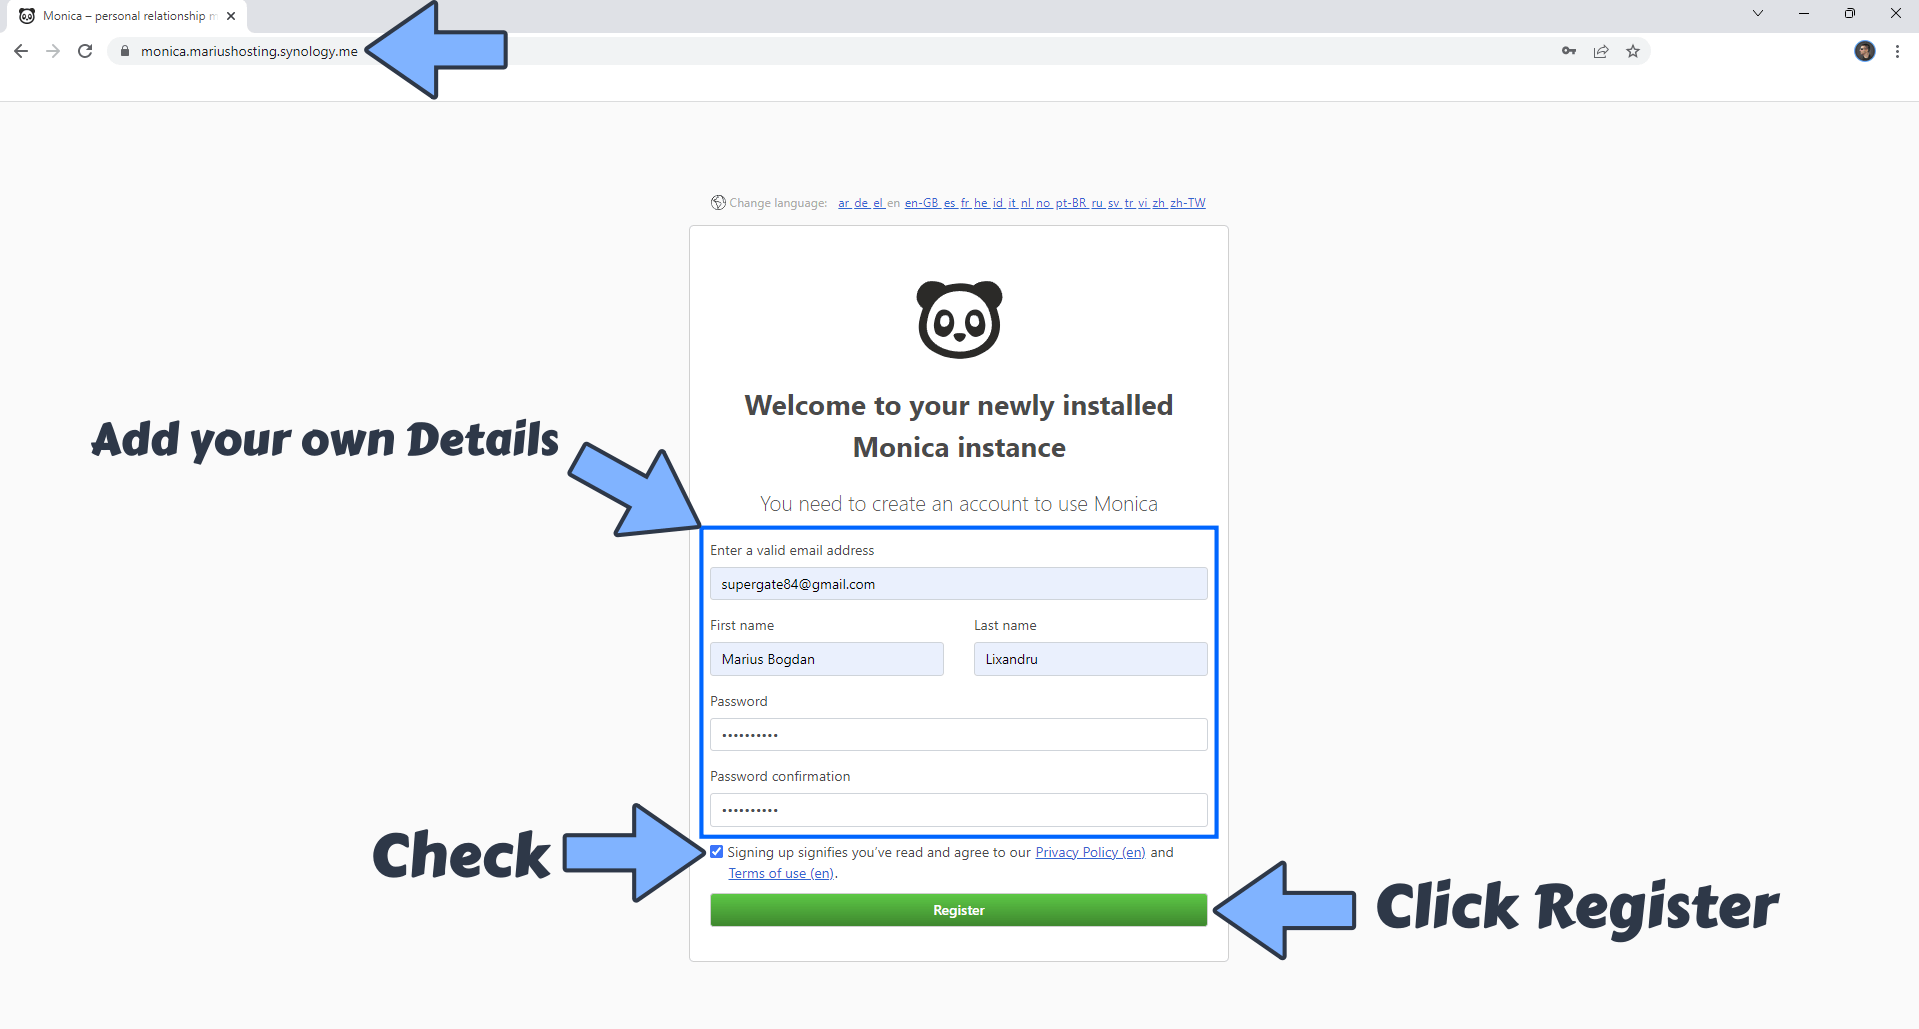
The installation process can take up to a few seconds/minutes. Please wait approximately 10 minutes or you will get a blank synology error page if you try to connect too soon. Now open your browser and type in your HTTPS/SSL certificate like this https://monica.yourname.synology.me In my case it’s https://monica.mariushosting.synology.me If everything goes right, you will see the Monica main registration page. Type in your own Email, First Name and Last name. Choose a password then confirm it. Check the box to agree to the Terms of use, then click Register. Follow the instructions in the image below.
STEP 20
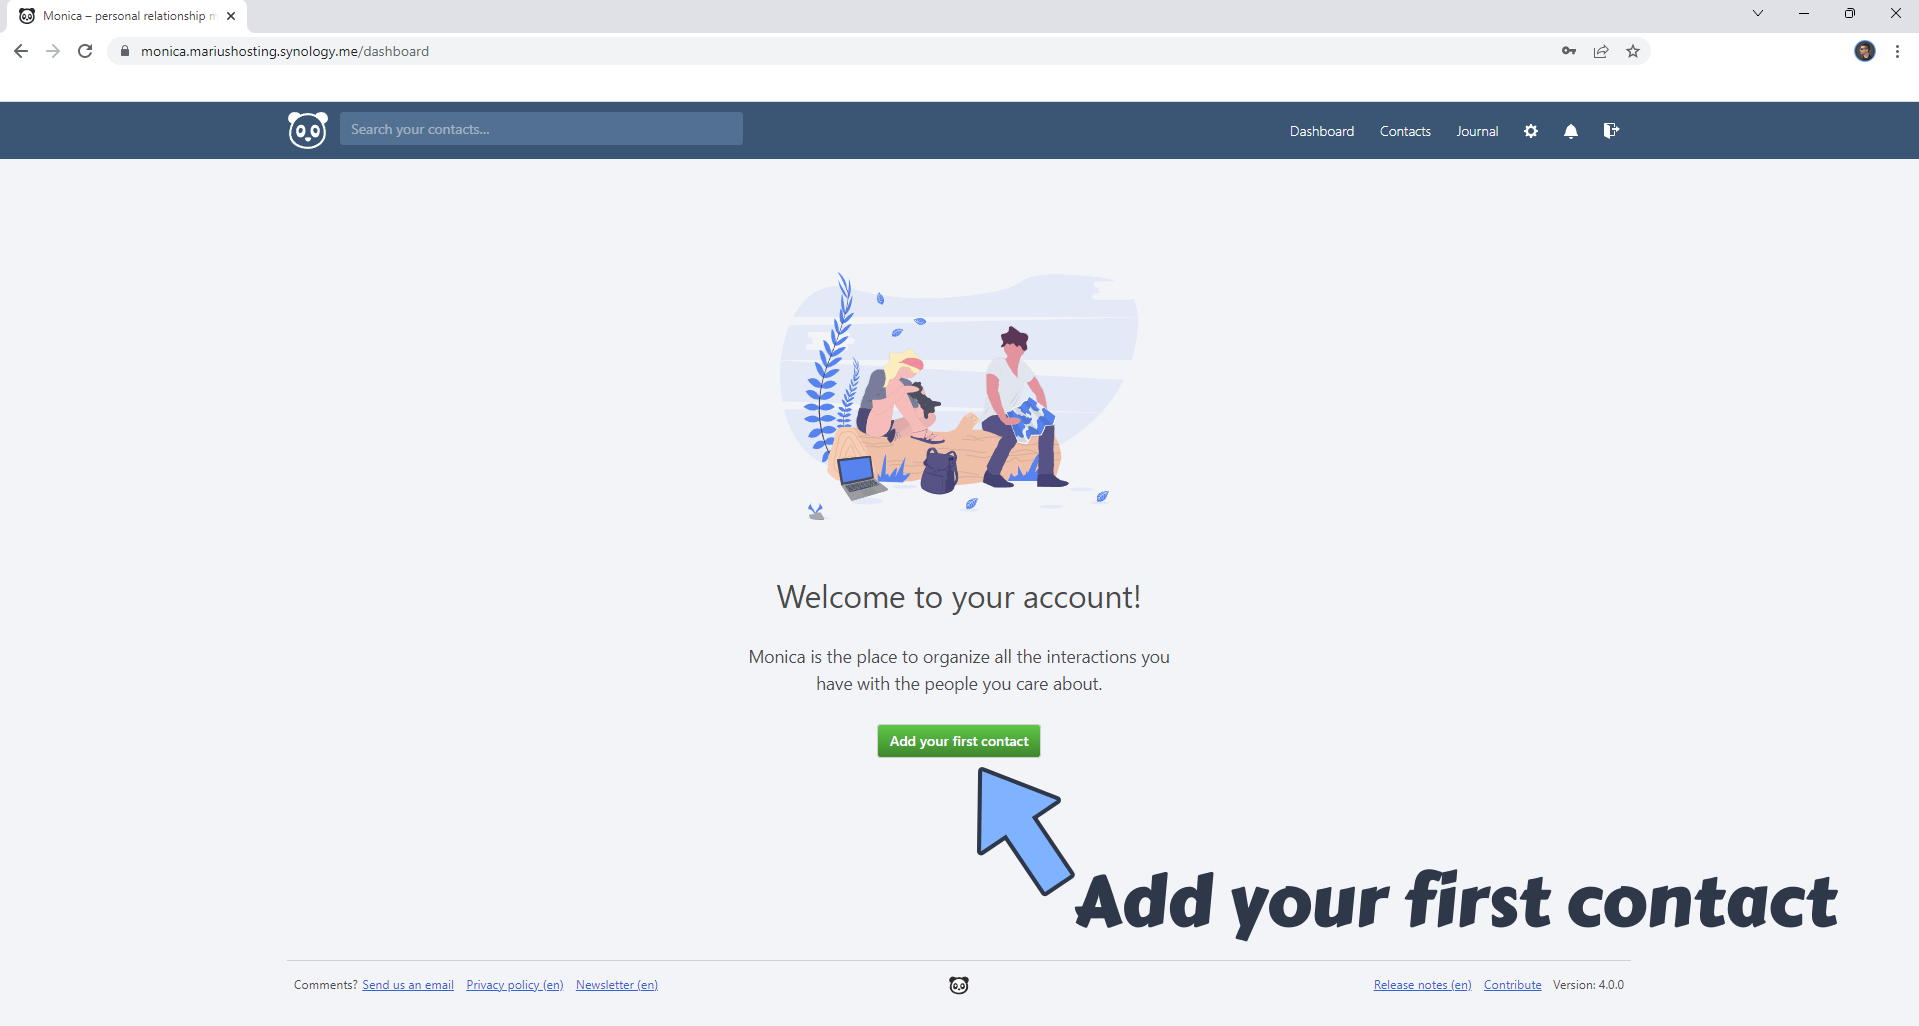
Add your first contact. Follow the instructions in the image below.
STEP 21
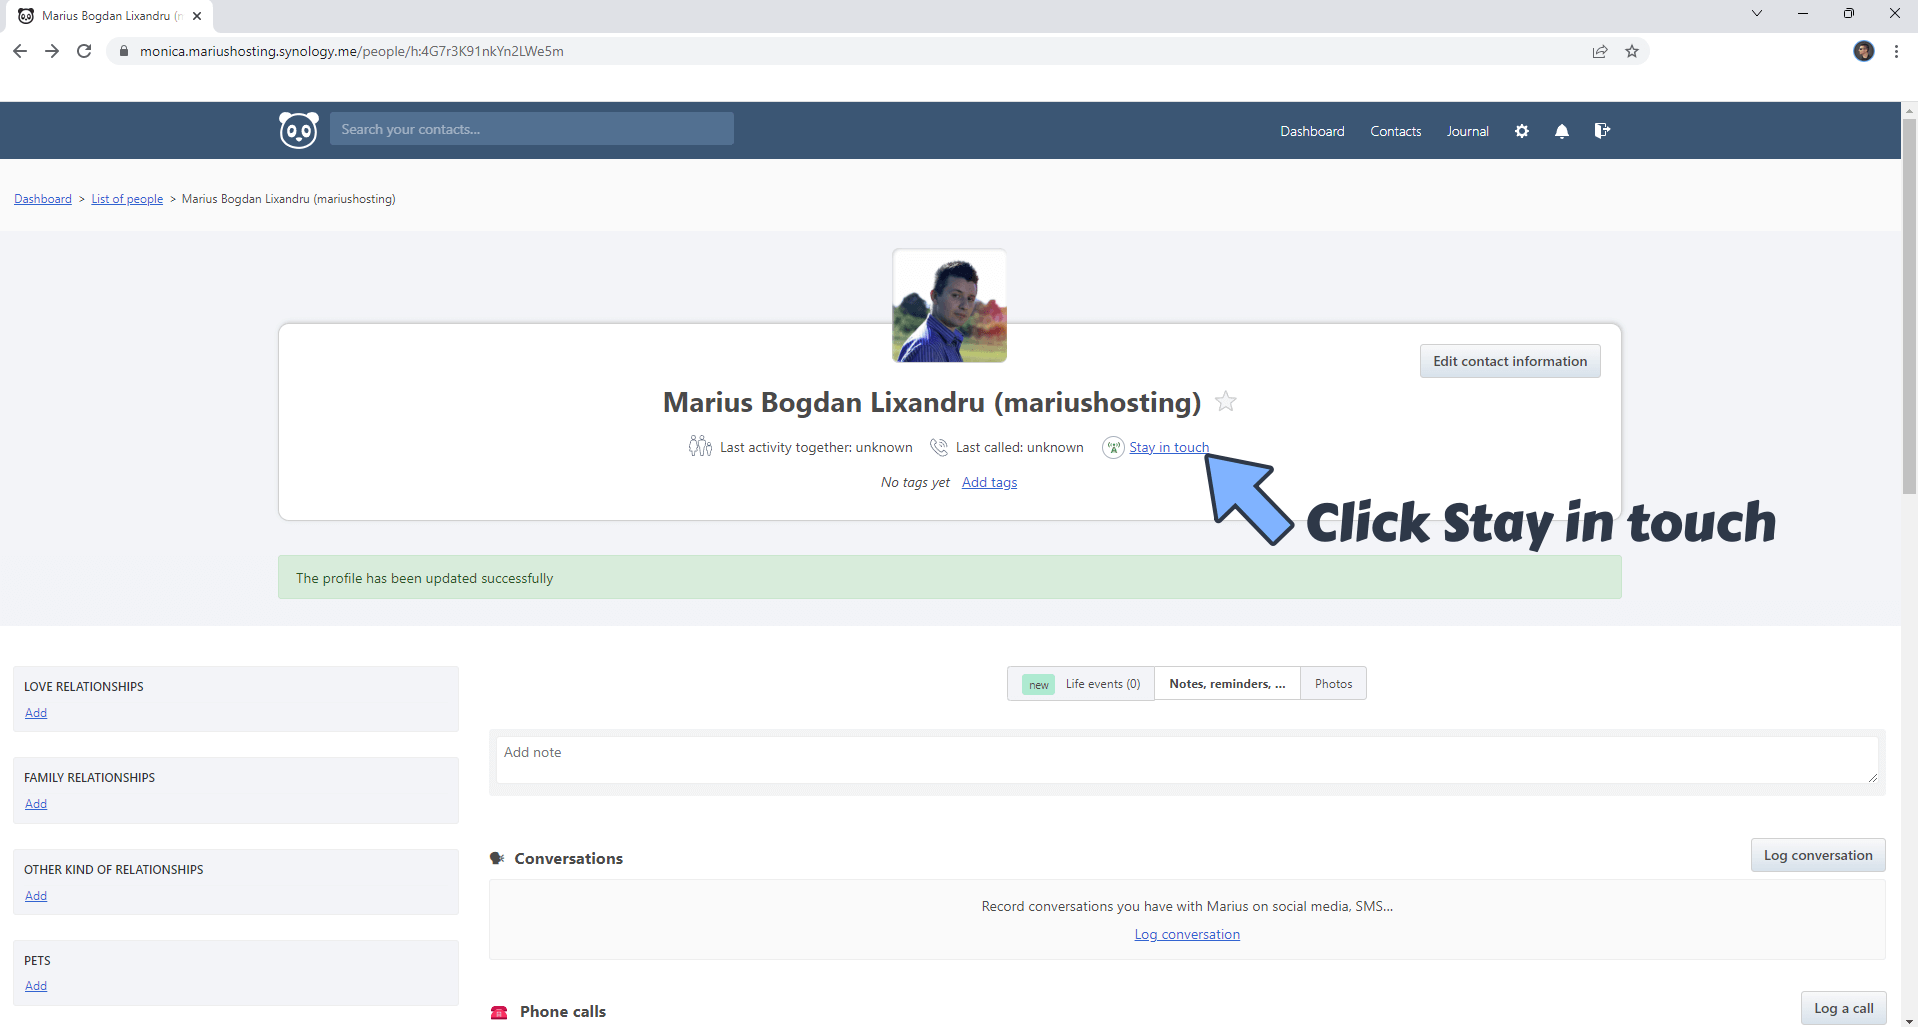
After you have added your first contact at STEP 20, click Stay in touch. Follow the instructions in the image below.
STEP 22
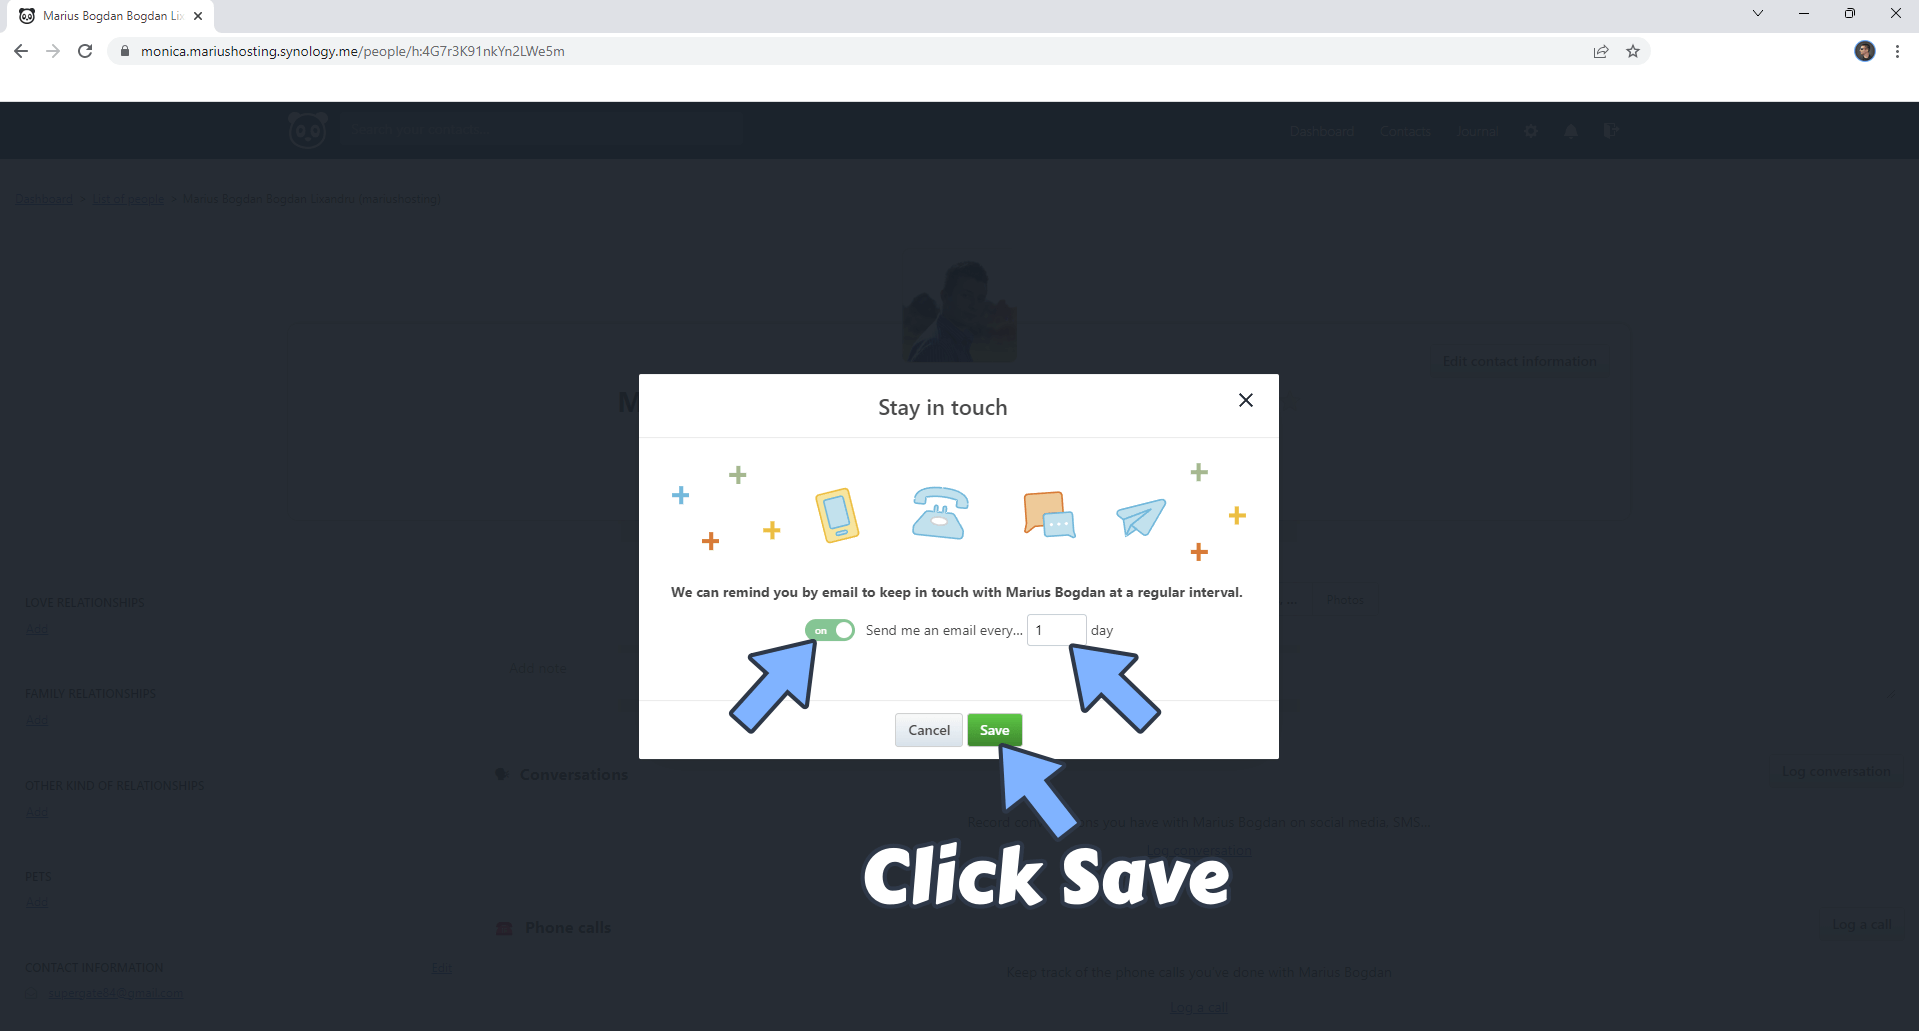
Monica can remind you by email to keep in touch with the people you like. Follow the instructions in the image below.
STEP 23
You can also invite someone to help you with your Monica instance. At the top right of the page, click the settings gear icon. A new left sidebar will open. Click Users then Invite someone. Follow the instructions in the image below.
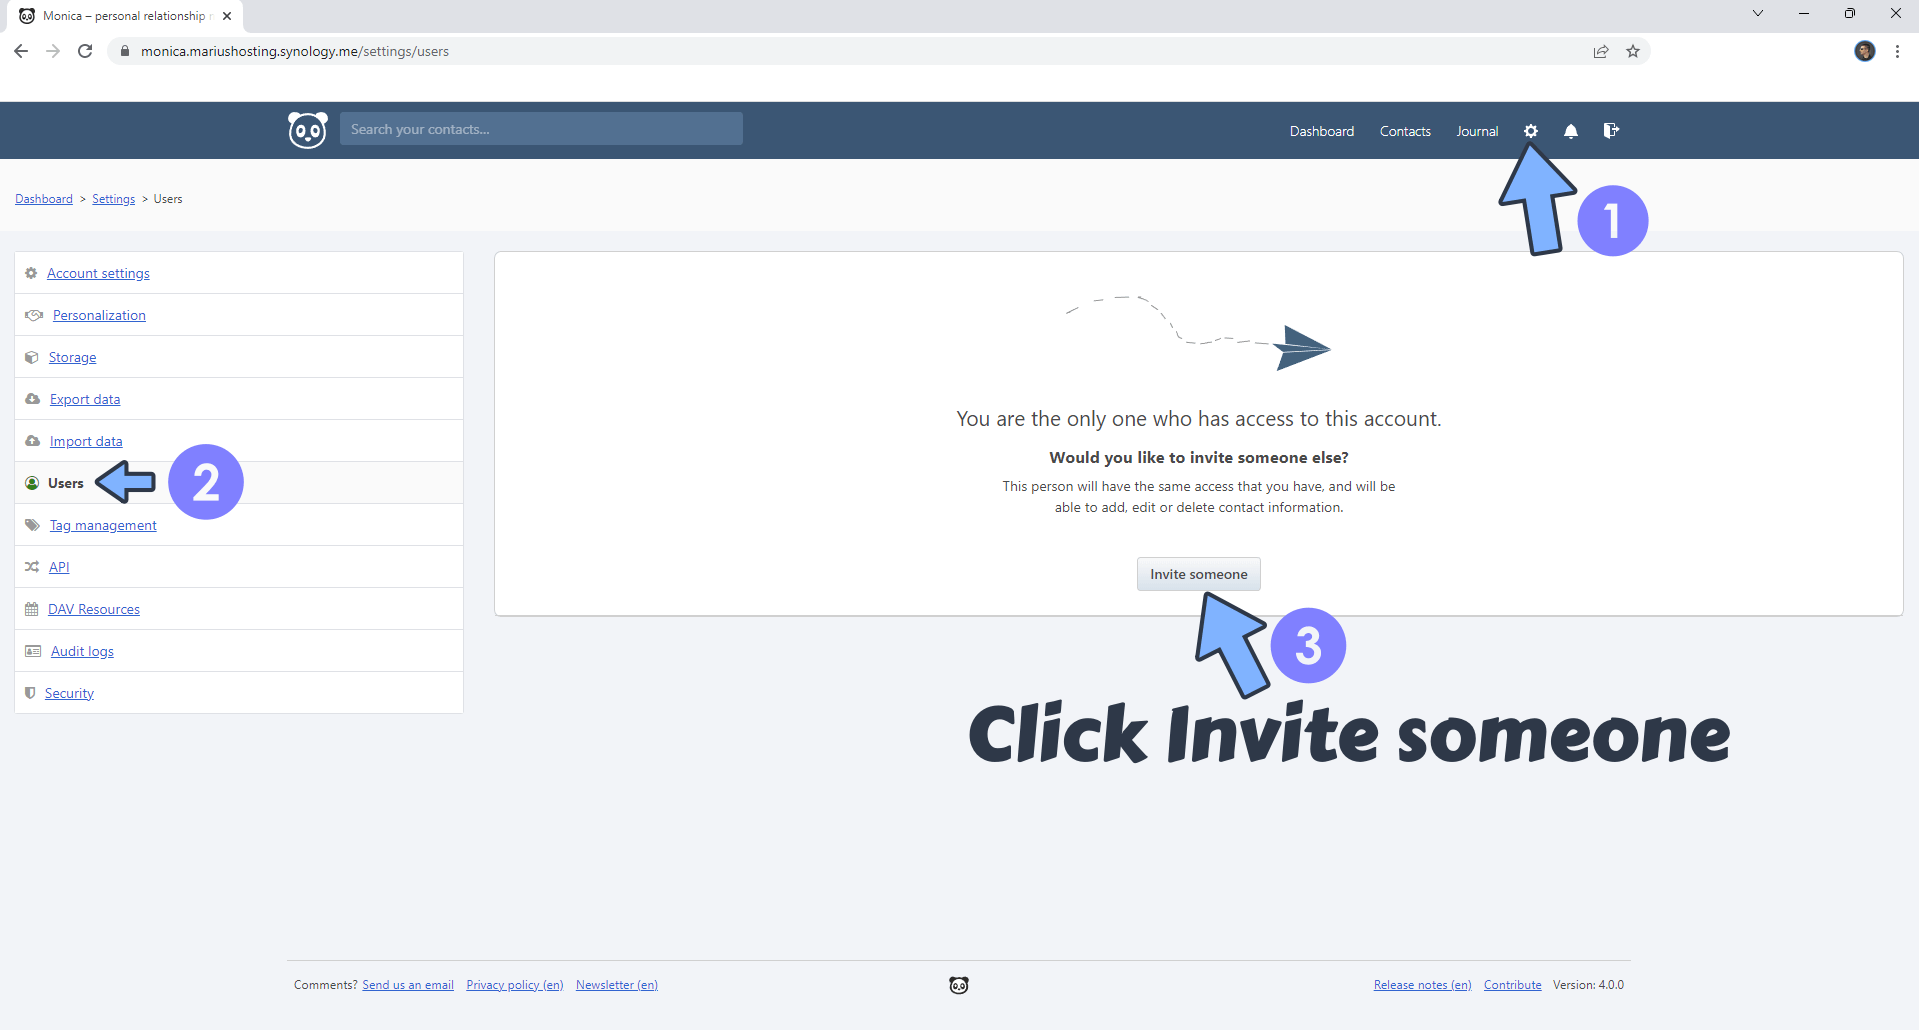
STEP 24
Type in the email of the person you want to invite then check to confirm. Click invite user by email. Follow the instructions in the image below.
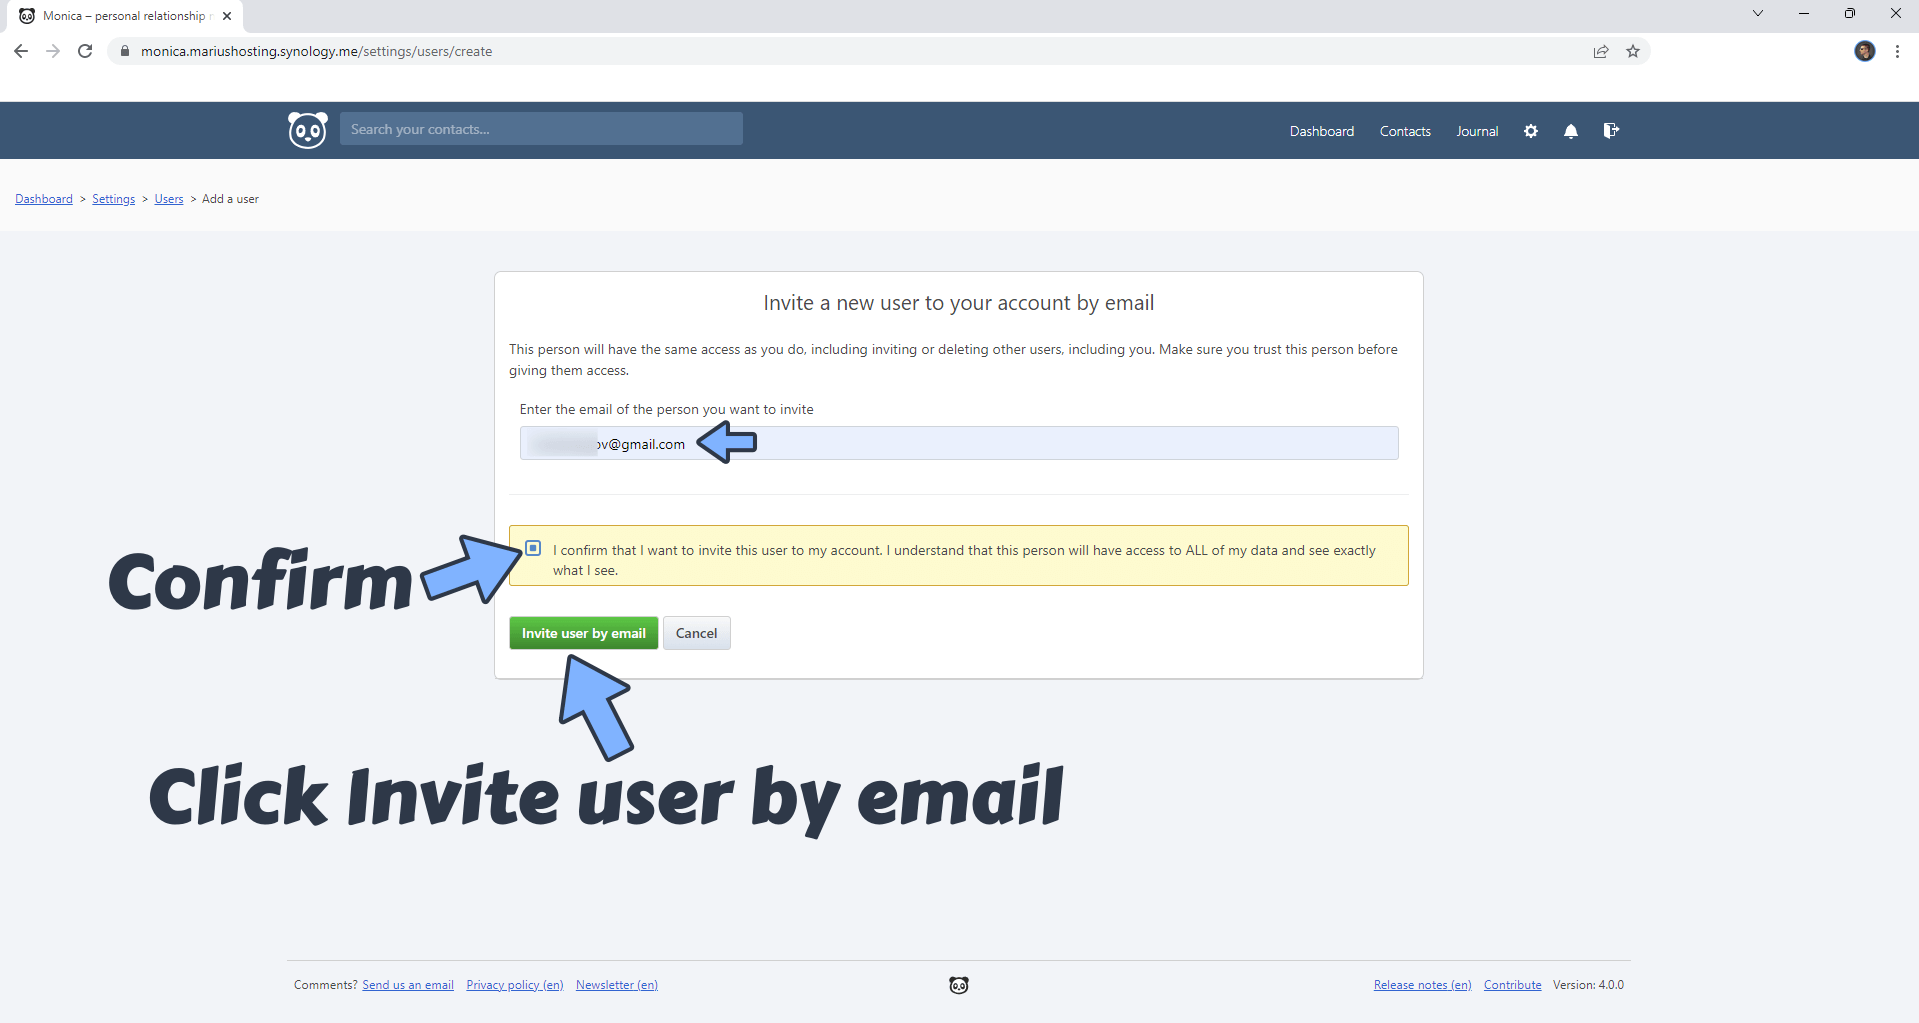
Tell your friend to check his email.
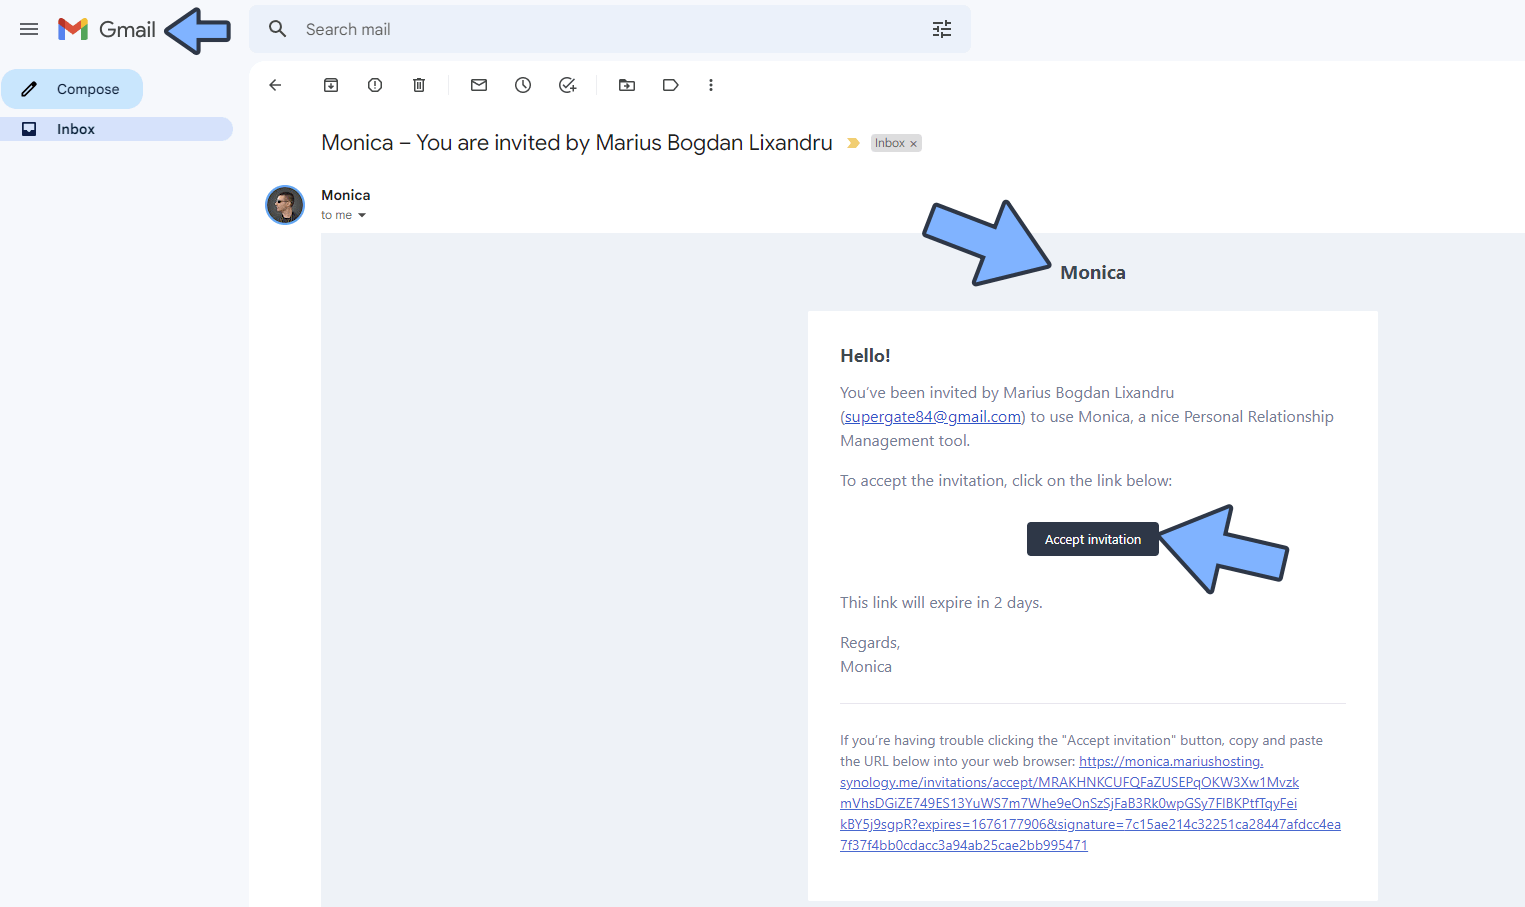
Enjoy Monica!
If you encounter issues by using this container, make sure to check out the Common Docker issues article.
Note: Can I run Docker on my Synology NAS? See the supported models.
Note: How to Back Up Docker Containers on your Synology NAS.
Note: Find out how to update the Monica container with the latest image.
Note: How to Free Disk Space on Your NAS if You Run Docker.
Note: How to Schedule Start & Stop For Docker Containers.
Note: How to Activate Email Notifications.
Note: How to Add Access Control Profile on Your NAS.
Note: How to Change Docker Containers Restart Policy.
Note: How to Use Docker Containers With VPN.
Note: Convert Docker Run Into Docker Compose.
Note: How to Clean Docker.
Note: How to Clean Docker Automatically.
Note: Best Practices When Using Docker and DDNS.
Note: Some Docker Containers Need WebSocket.
Note: Find out the Best NAS Models For Docker.
Note: Activate Gmail SMTP For Docker Containers.
This post was updated on Sunday / January 26th, 2025 at 9:17 AM
