On mariushosting I have always wanted to create Docker guides that are compatible with most Synology NAS devices. I have made great efforts in this direction over the years and, thanks to your emails and posts and messages on Discord, I have been able to compile a list of common problems that most users experience when installing some Docker containers. Not all Synology NAS devices are the same when it comes to getting Docker containers to work, even though they allow you to install Docker. Below is a list of common problems you can face when you’re running Docker containers on your Synology NAS, and some great solutions to solve these problems.
In all the Docker guides present on mariushosting you will find STEP 1 which says Please Support My work by Making a Donation. Almost 99,9% of the people that install something using my guides forget to support my work, or just ignore STEP 1. I’ve been very honest about this aspect of my work since the beginning: I don’t run any ADS, I don’t require subscriptions, paid or otherwise, I don’t collect IPs, emails, and I don’t have any referral links from Amazon or other merchants. I also don’t have any POP-UPs or COOKIES. The main reason for this is because I want to offer a clean, safe and pleasant user experience to anyone coming to mariushosting. And I truly think it’s important we have this kind of experience in today’s online climate where you never truly know if what you’re reading is genuine content anymore. But for this I require your support. I do self-host so I have devices running 24/7/365. I do all the technical support work, admin work, I test and create content, from informing you of what’s new to providing complex technical tutorials with images and exact instructions and code that I specifically make work for this type of devices, take care of security and all other kinds of updates, and work to improve user experience all the time. But I need to be supported to be able to continue doing this kind of work. I have repeatedly been told over the years how much I have contributed to the community. It’s something I love doing and have been honest about my passion since the beginning. But I also Need The Community to Support me Back to be able to continue doing this work.
Sometimes, when you’re installing a Docker container on your Synology NAS, you can run into issues with getting said Docker container to run. This usually occurs when you are using different tutorials from several sources, or when you attempt to install a Docker container several times. Or when you’re not using a tutorial from mariushosting. You can experience different kinds of issues and get error messages like: [Warning] Access denied for user ‘root’@’localhost’ (using password: YES). To fix issues like this, you need to follow all the STEPS in my How to Clean Docker tutorial. Many Docker images and containers that you install on your Synology NAS following various guides on the web leave traces in your system that should be deleted so that future installations may work flawlessly.
As you know, I’m always busy working on testing new Dockers for your Synology NAS. Aside from the high volume of work this process entails, and the headaches that come with it, getting the Docker containers to run flawlessly also means I get to discover important pieces of information. For instance, in the past few months I have found that some mariaDB Docker images are not fully compatible with all Synology NAS devices, like the mariaDB image from Linuxserver and the original one. So because this version does not work flawlessly for some Synology NAS devices, I have replaced all the mariaDB Docker images in my Docker guides that required it with mariadb:11.4-noble This version is the version for Ubuntu servers and it appears to fix all connection issues reported by various users over the years; it’s also fully compatible with Docker containers that require mariaDB as a database.
Sometimes, when you try to install a Docker container on your Synology NAS, you may get error messages in your Docker container logs that say “permission issue“, “connection refused“, “permission denied“, aborted connection“, “disconnected due to malformed packet“, “db unhealthy” or “unable to connect“. Most of these issues can easily be fixed by properly configuring your Synology NAS Firewall. Be especially careful when you configure RULE 1, RULE 5 and RULE 6 in my article that explains How to Correctly Set Up Firewall on DSM 7.
If you use software like Watchtower that automatically updates containers, you may encounter some issue in the future. If you get the error “The data directory was initialized by PostgreSQL version 16, which is not compatible with this version 17“, you will need to change the following line in your docker compose image: postgres to image: postgres:17 then update the stack in Portainer. If you use image: postgres:16 change it to image: postgres:17 If this does not solve the issue, you will have to reinstall your favorite containers from scratch or restore a previously made backup of the docker folders. On mariushosting, most database container images use the tag :latest which means that the mariadb or postgres database will be automatically updated if you use watchtower or do manual updates using Container Manager. This could cause issues when upgrading to a major database version.
Some people may have problems installing or running some Docker containers if they have special configurations for Pi-Hole or AdGuard. Try to temporarily disable Pi-Hole and Adguard and check if your connection issues were not due to the Synology Firewall, but rather to your Pi-Hole or Adguard configurations. If this is the case, just whitelist the domains that are used for a specific Docker container in Pi-hole or Adguard.
As it so happens, many users forget to add their PUID and PGID values to the Docker containers that require them. Always make sure the PUID and PGID number values that you add are your own. Use my easy tutorial to find your own UID (userID) and GID (groupID) in 5 Seconds.
When you deploy a stack, some NAS devices can get the following error message: ERROR: The Compose file ‘./docker-compose.yml’ is invalid because:
services.CONTAINERNAME.environment.CONTAINERNAME_READONLY contains false or true which is an invalid type, it should be a string, number, or a null. Note: Change from true to 1 and from false to 0. In short, change all values for the environment variables in the code that have ENVEXAMPLE: false or true with ENVEXAMPLE: 0 for false or 1 for true.
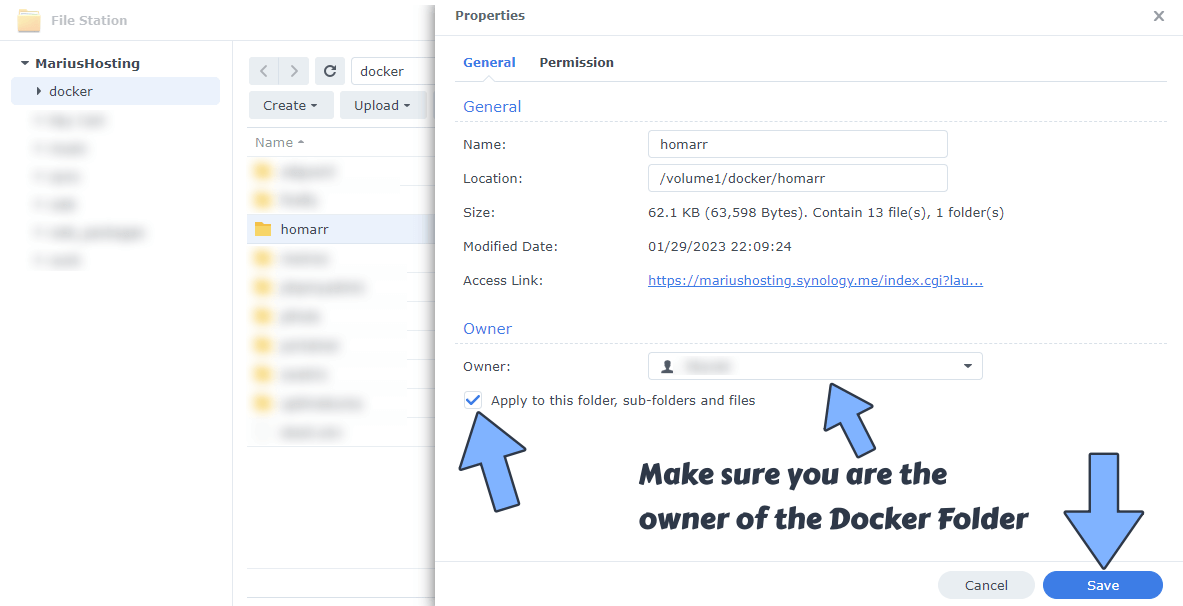
I still don’t know how this is possible, but some users have a different owner than the one stated in their UID and GID values on their Docker Folder. Right click on the folder for the Docker container, then Properties. Go to the General tab and make sure the folder has the “original” owner. Be sure to check Apply to this folder, sub-folder and files, then click Save.

Some Docker containers will not run on an older Linux Kernel, usually a Linux kernel version older than version 4. So if you have a Synology NAS device with, say, Linux Kernel 3.x then you will get the following error message for some Docker Containers: AH00141: Could not initialize random number generator. To fix this, you need a new Synology NAS that supports Linux Kernel 4.x. You can use my tutorial on How to Check Linux Kernel Version on your Synology NAS to find out what is your Linux Kernel version. If your Kernel is a version 3.x, then you can’t install some Docker containers, even if your NAS supports Docker. This aspect should be improved by Synology because it is not right for NAS owners to have a NAS that technically supports Docker, but which doesn’t support all Docker because of the outdated Kernel. Check out the Best NAS for Docker article and find out the models that support Linux Kernel 4+.
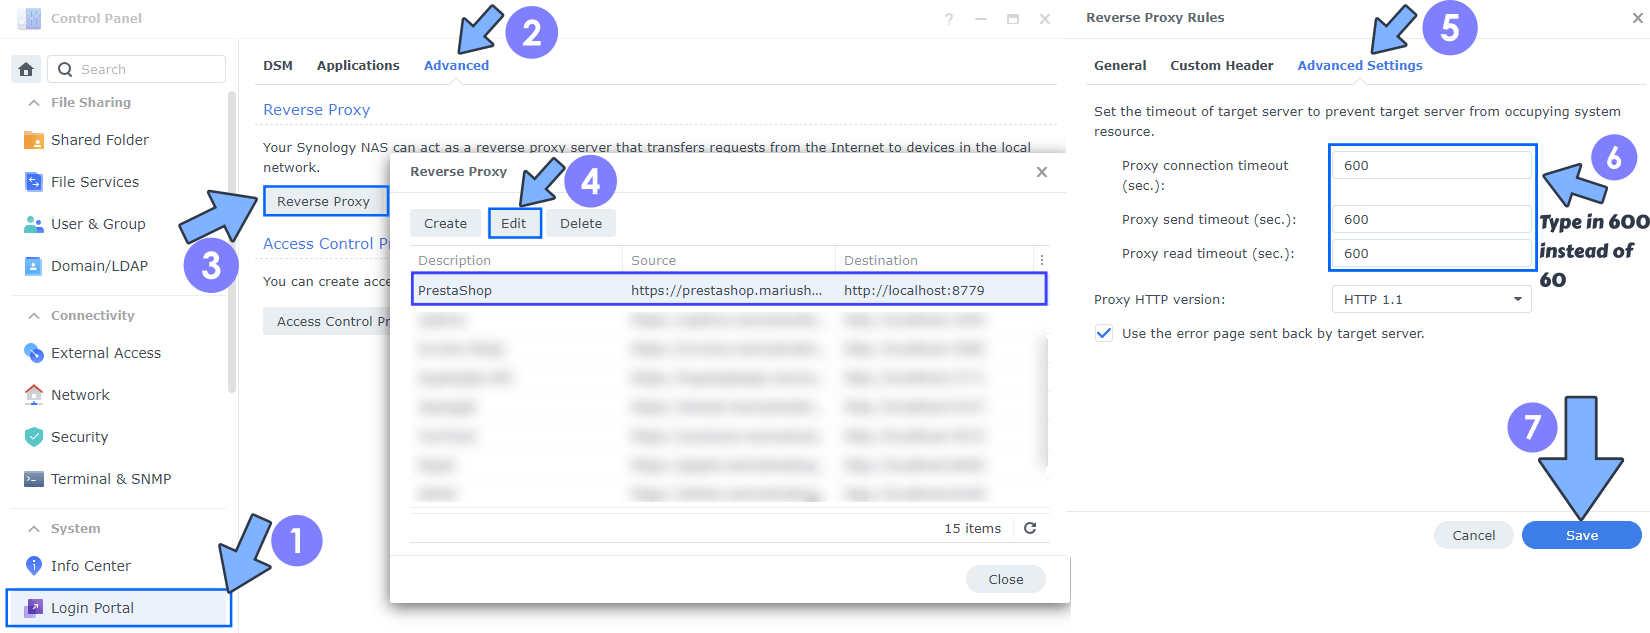
If you experience issues when installing some Docker containers that require the installation of a database, like the PrestaShop Docker container, Snipe-IT Docker container, OrangeHRM Docker Container, BudgetBee, Wavelog, Focalboard, and your NAS system is slow, for whatever cause, then you can increase your reverse proxy timeout in seconds to fix the issue. Go to Control Panel / Login Portal / Advanced tab / Reverse Proxy / select the container you want to modify, then click the Edit tab / Advanced Settings tab.
On the Reverse Proxy Rules, click the Advanced Settings tab.
- Increase the Proxy connection timeout from 60 to 600 seconds.
- Increase the Proxy send timeout from 60 to 600 seconds.
- Increase the Proxy read timeout from 60 to 600 seconds.
Click Save to save the settings.

Have you ever gotten this error message with some Dockers that require the mongo database? WARNING: MongoDB 5.0+, MongoDB 6.0 requires a CPU with AVX support, and your current system does not appear to have that! stderr – If you have also received this message, know that it means that your NAS CPU does not support AVX. Some Docker containers cannot be installed on some NAS models with outdated CPUs that do not have AVX support. Advanced Vector Extensions, AVX for short, are extensions to the x86 instruction set architecture for microprocessors from Intel and AMD Advanced Micro Devices. To help provide a fix for this, I have written a guide to help you to choose the BEST Synology NAS device for Docker.
If some Docker containers run well on your localhost, but you experience issues when you create a Reverse Proxy to access them online, most of the time you forgot to activate Web Socket.
Can you access your Synology NAS via DDNS address from outside your local network, but can’t access it from within your own network? Many users face this very common issue: they are unable to connect to their NAS-hosted website, their DDNS, directly from their local network, but they can easily connect from outside their local network. Why is that?
Many routers/modems/gpon devices that are provided by ISPs lack the NAT loopback feature and there are four solutions if you find yourself in this situation:
- Call your ISP and tell them to give you a compatible modem/router that supports NAT loopback.
- Call your ISP and tell them to put your actual gpon/modem/router in bridge mode so you can use your own router that supports the NAT loopback feature.
- If they are unable to help you, you have only one solution: change your ISP.
- Advanced: You can configure your ISP router to use your Synology NAS as the default DNS (for example 192.168.1.3) for DHCP by installing the DNS Server package from Package Center on your Synology NAS and configuring “https://myaccount.synology.me” to be an A record to 192.168.1.3
Note: Hairpinning or NAT loopback is a feature which allows the access of a service via the WAN IP address from within your local network. For example, you have a web server hosted on your Synology NAS on your local network or an active DDNS like the synology.me service. The web server is accessible from the outside via a public IP that is assigned to it. However, if you required local users to access this web server address using the same public IP address instead of its local IP address, they couldn’t because your router would need to support the NAT loopback feature.
Note: All Synology routers support the NAT loopback feature.
Note: ISP (Internet Service Provider).
This post was updated on Tuesday / May 20th, 2025 at 10:10 PM
