
Kuvasz (pronounced [ˈkuvɒs]) is an open-source, self-hosted uptime and SSL monitoring service built in Kotlin, designed to ensure the reliability of websites and services. Named after an ancient Hungarian breed of livestock and guard dog, Kuvasz offers a robust, user-friendly solution for monitoring HTTP(S) availability, performance, and SSL certificate validity. It features a modern, responsive web interface, a powerful REST API, and flexible configuration options, including YAML-based monitor setup for version control integration. Users can tailor notifications on a per-monitor basis, with support for multiple channels like Email, Slack, Telegram, and PagerDuty. Kuvasz allows customizable HTTP methods, intervals, and headers, with upcoming features like POST request support and response keyword matching. Licensed under Apache 2.0, it’s free, actively developed, and ideal for homelabs, side projects, or enterprise use, ensuring you’re alerted when services go down or certificates near expiration. In this step by step guide I will show you how to install Kuvasz on your Synology NAS using Docker & Portainer.
This guide works perfectly with the latest Kuvasz v3.6.0 release.
STEP 1
Please Support My work by Making a Donation.
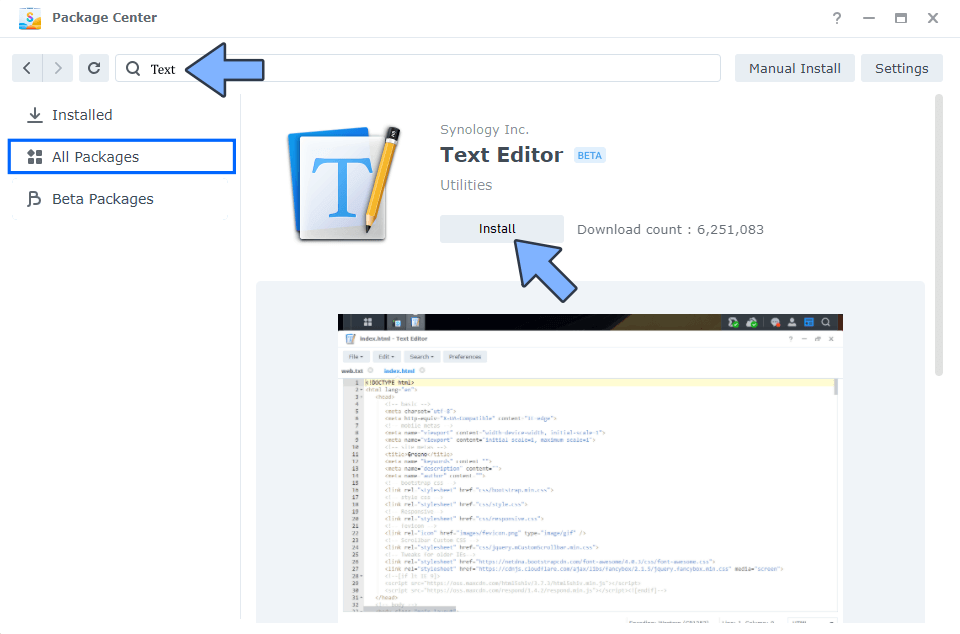
STEP 2
Install Text Editor via Synology “Package Center”. (Mandatory STEP.) If you already have Text Editor installed on your Synology NAS, skip this STEP.
STEP 3
Install Portainer using my step by step guide. If you already have Portainer installed on your Synology NAS, skip this STEP. Attention: Make sure you have installed the latest Portainer version.
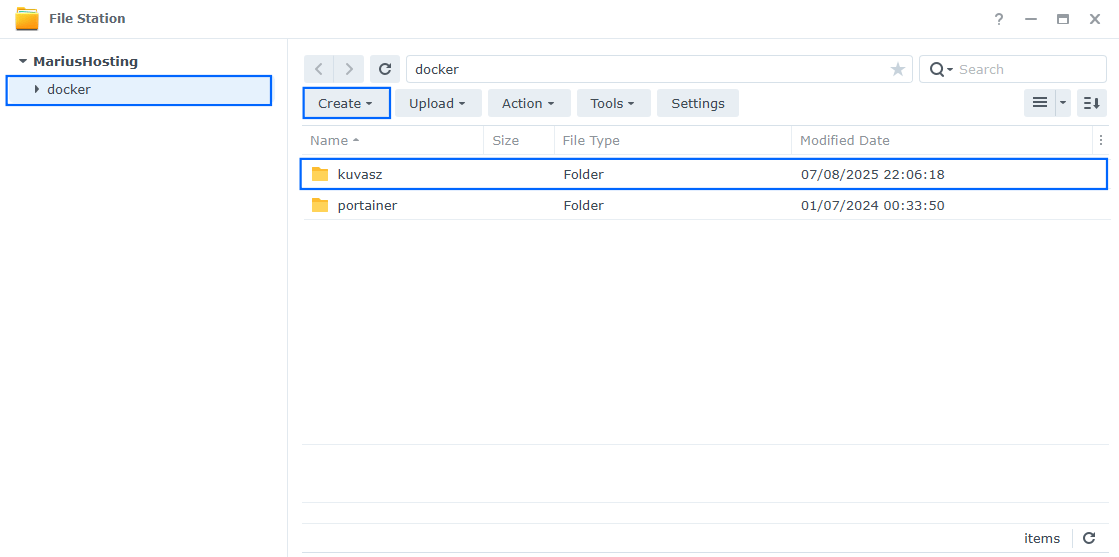
STEP 4
Go to File Station and open the docker folder. Inside the docker folder, create one new folder and name it kuvasz. Follow the instructions in the image below.
Note: Be careful to enter only lowercase, not uppercase letters.
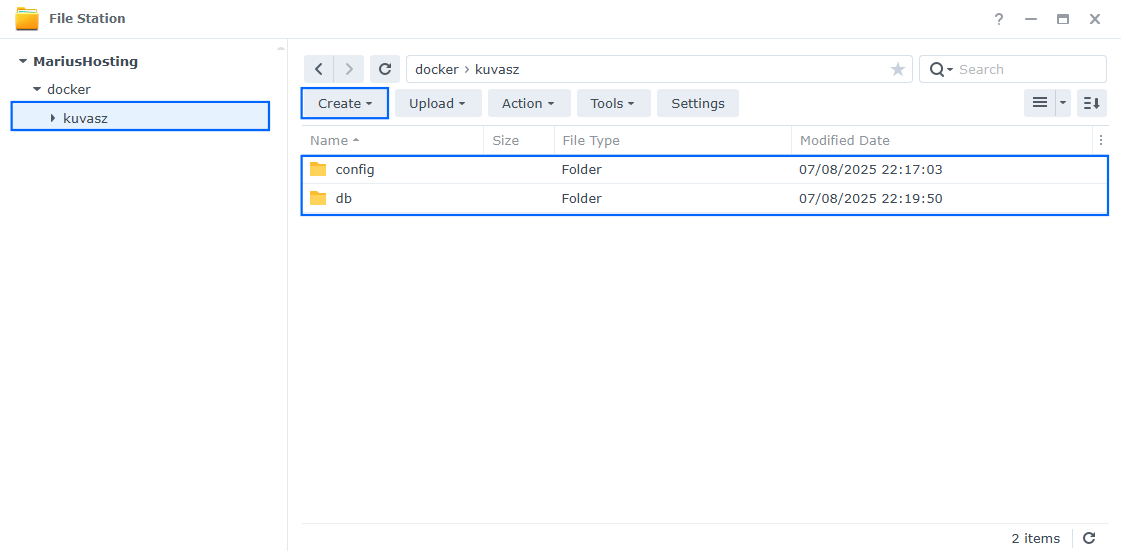
STEP 5
Now create two new folders inside the kuvasz folder that you previously created at STEP 3, and name them config and db. Follow the instructions in the image below.
Note: Be careful to enter only lowercase, not uppercase letters.
STEP 6
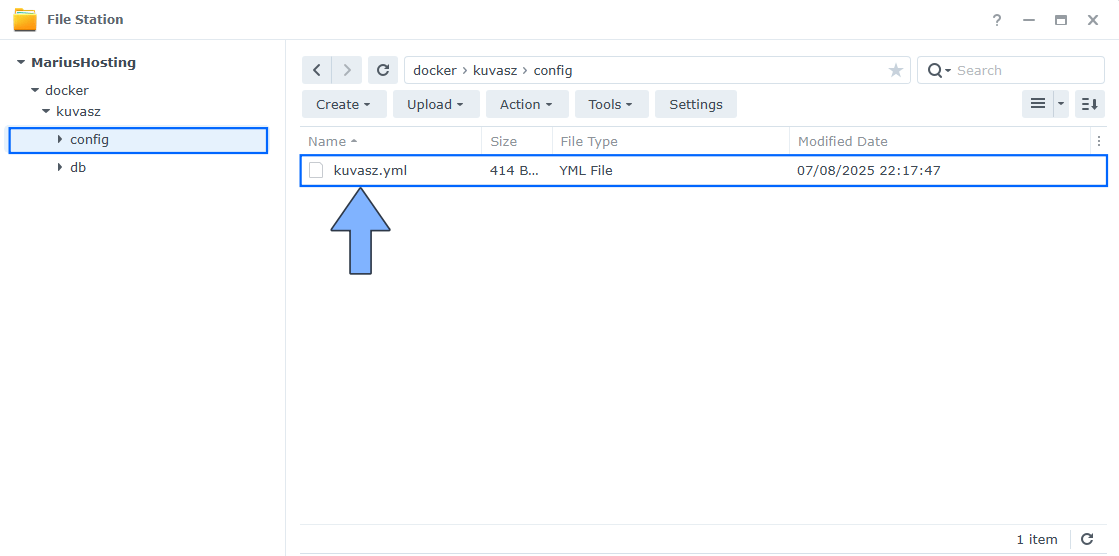
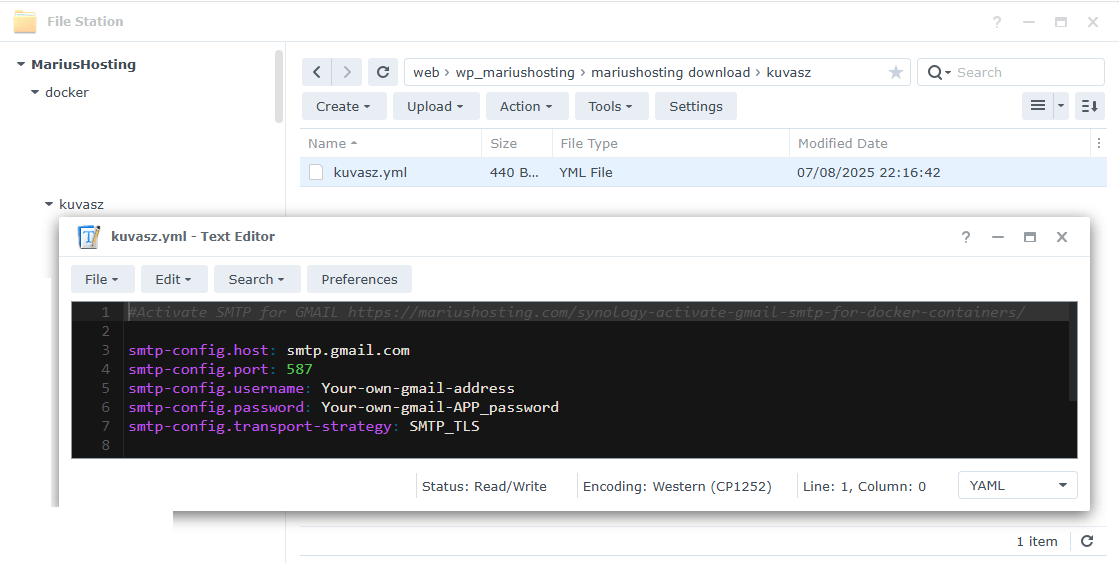
Download (click on the blue link below) and upload the kuvasz.yml file below in the dozzle folder that you have previously created at STEP 5. Follow the instructions in the image below. 🔒Note: Support my work to unlock the password. You can use this password to download any file on mariushosting forever!
STEP 7
Follow my step by step guide on how to activate SMTP for your Gmail account. This step is mandatory. Note: If you don’t want to use the easiest way for SMTP with Google and you already have SMTP details from your own Mail Server, you can use your personalized email SMTP details instead.
STEP 8
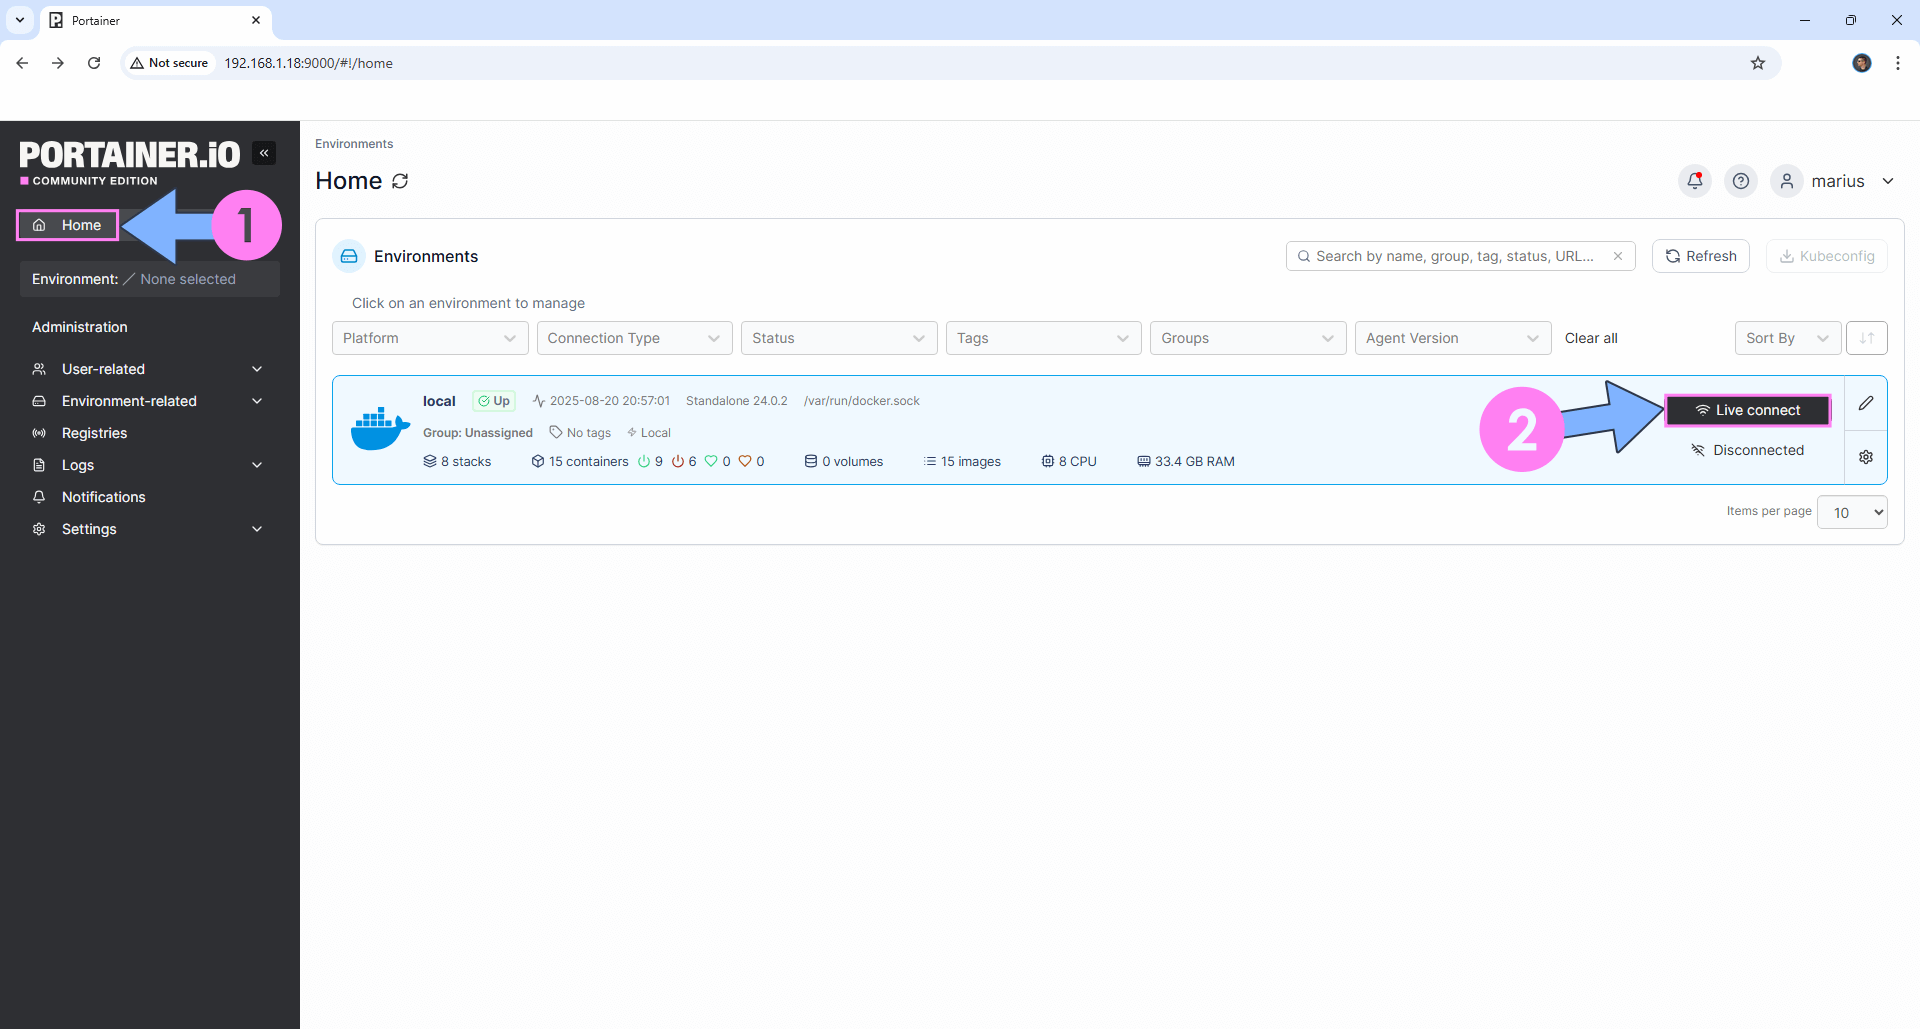
Log into Portainer using your username and password. On the left sidebar in Portainer, click on Home then Live connect. Follow the instructions in the image below.
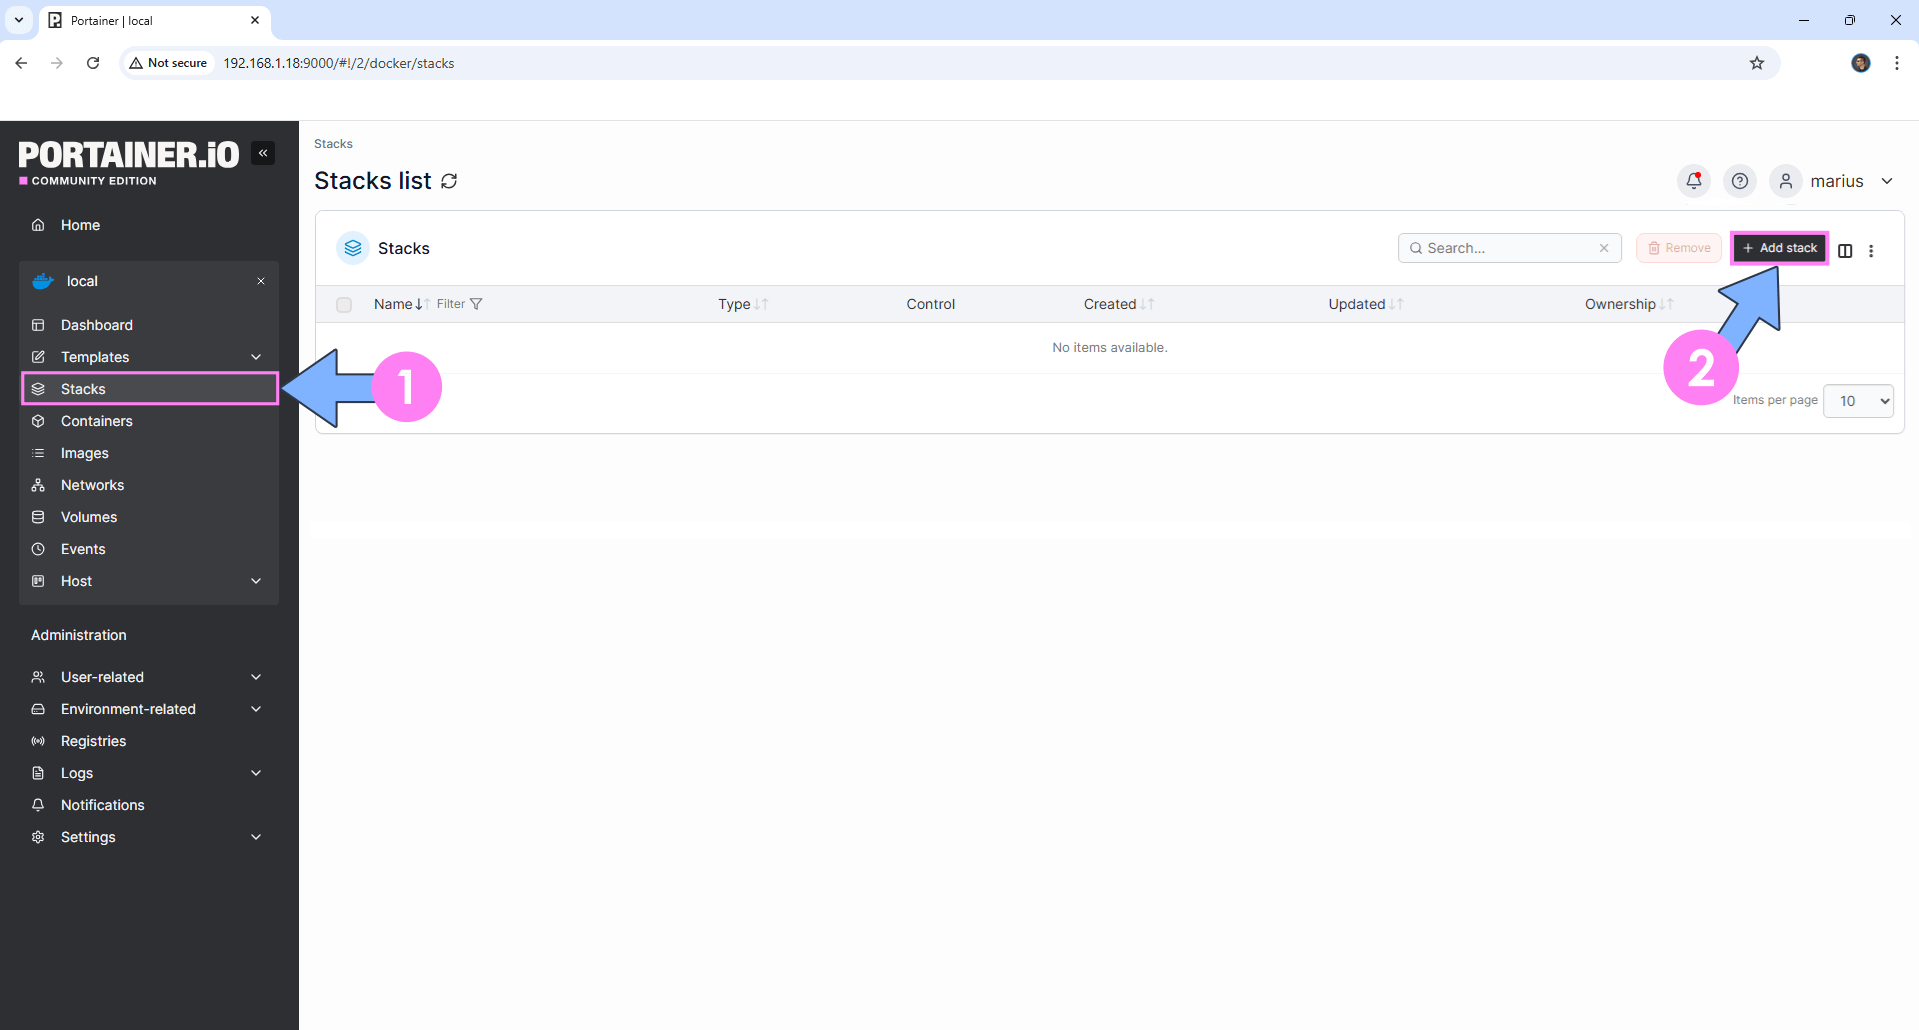
On the left sidebar in Portainer, click on Stacks then + Add stack. Follow the instructions in the image below.
STEP 9
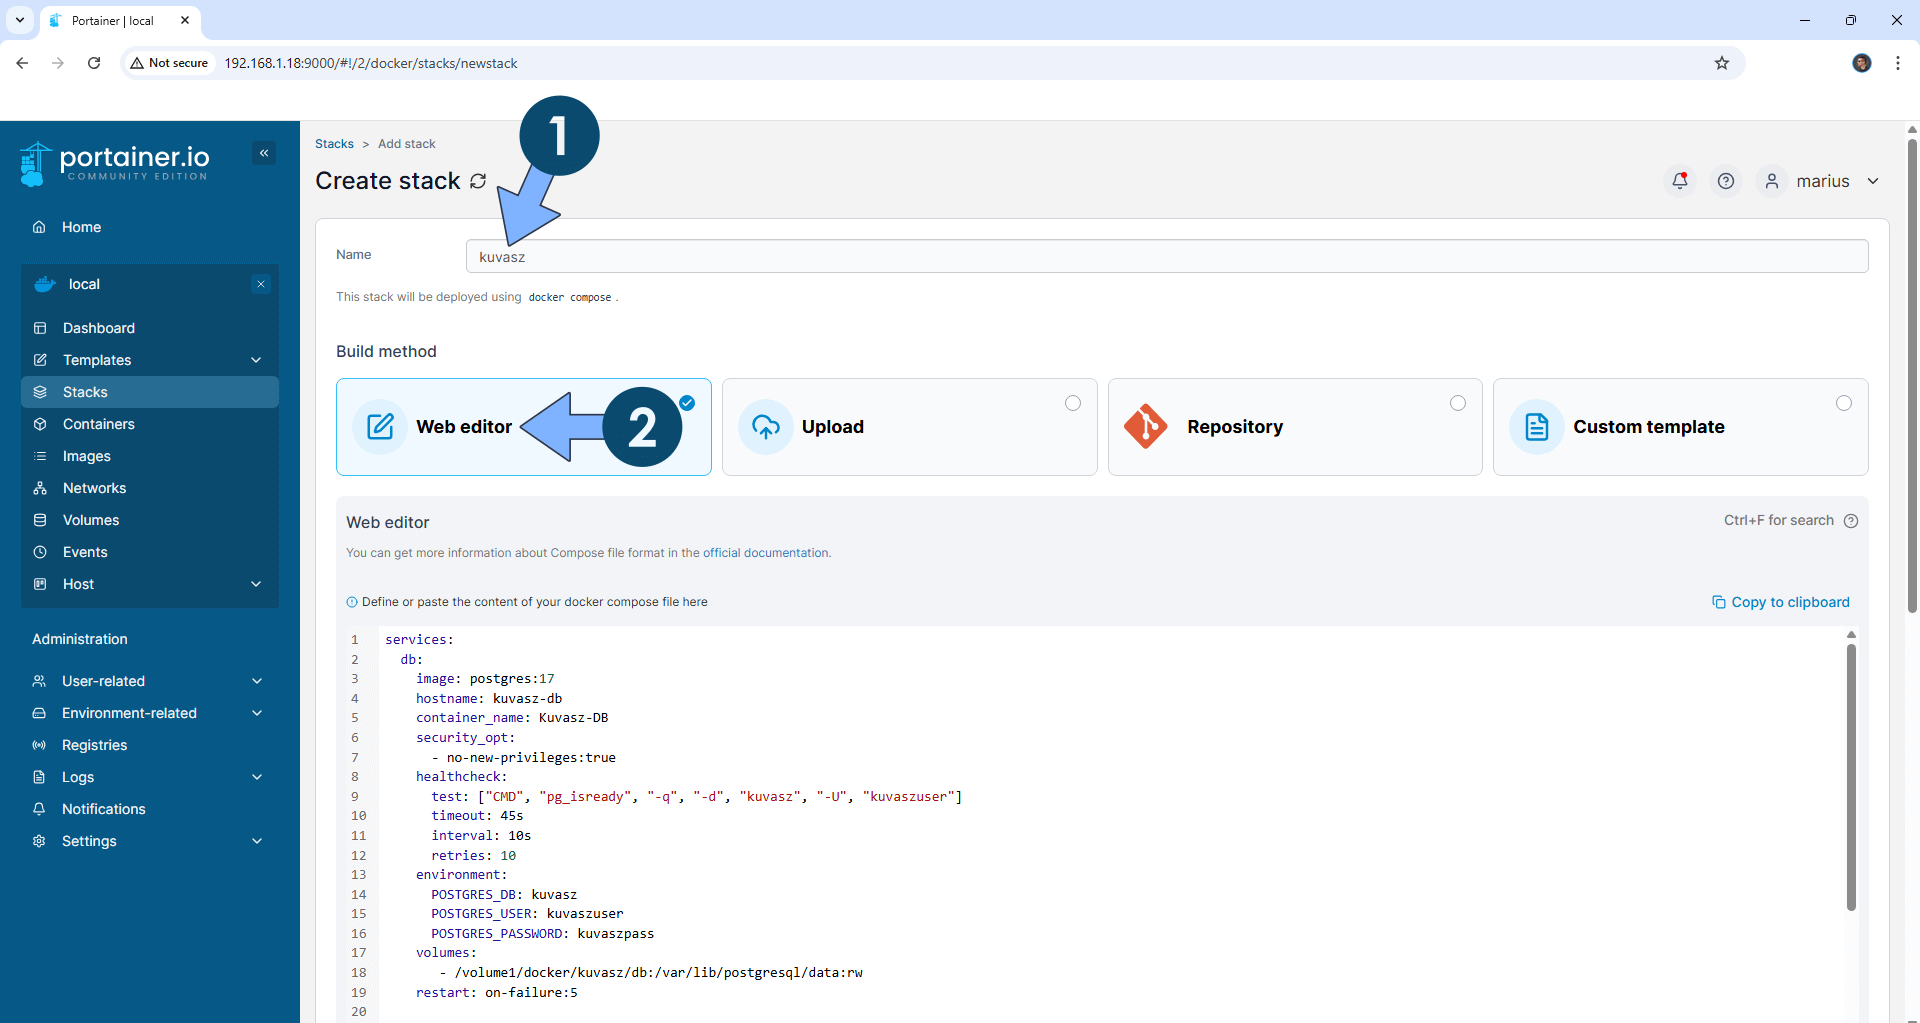
In the Name field type in kuvasz. Follow the instructions in the image below.
services:
  db:
    image: postgres:17
    hostname: kuvasz-db
    container_name: Kuvasz-DB
    security_opt:
      - no-new-privileges:true
    healthcheck:
      test: ["CMD", "pg_isready", "-q", "-d", "kuvasz", "-U", "kuvaszuser"]
      timeout: 45s
      interval: 10s
      retries: 10
    environment:
      POSTGRES_DB: kuvasz
      POSTGRES_USER: kuvaszuser
      POSTGRES_PASSWORD: kuvaszpass
    volumes:
       - /volume1/docker/kuvasz/db:/var/lib/postgresql/data:rw
    restart: on-failure:5

  kuvasz:
    image: kuvaszmonitoring/kuvasz:latest
    container_name: Kuvasz
    healthcheck:
      test: ["CMD-SHELL", "nc -z 127.0.0.1 8080 || exit 1"]
      interval: 10s
      timeout: 5s
      retries: 3
      start_period: 90s
    ports:
      - 6348:8080
    environment:
      TZ: Europe/Bucharest
      DATABASE_HOST: kuvasz-db
      DATABASE_USER: kuvaszuser
      DATABASE_PASSWORD: kuvaszpass
      ADMIN_USER: marius
      ADMIN_PASSWORD: mariushosting
      ADMIN_API_KEY: dOxZYTTZgXKMHkqLBIQVImayQXAVWdzGBPuFJKggzcgvgPJPXpWzqzKaUOIOGGIr
    volumes:
      - /volume1/docker/kuvasz/config/kuvasz.yml:/config/kuvasz.yml
    depends_on:
      - db
    restart: on-failure:5
Note: Before you paste the code above in the Web editor area below, change the value for TZ. (Select your current Time Zone from this list.)
Note: Before you paste the code above in the Web editor area below, change the value for ADMIN_USER. Type in your own username. marius is an example for a username.
Note: Before you paste the code above in the Web editor area below, change the value for ADMIN_PASSWORD. Type in your own password. mariushosting is an example for a password.
Note: Before you paste the code above in the Web editor area below, change the value for ADMIN_API_KEY. (Generate your own Random 64 length ADMIN_API_KEY.)
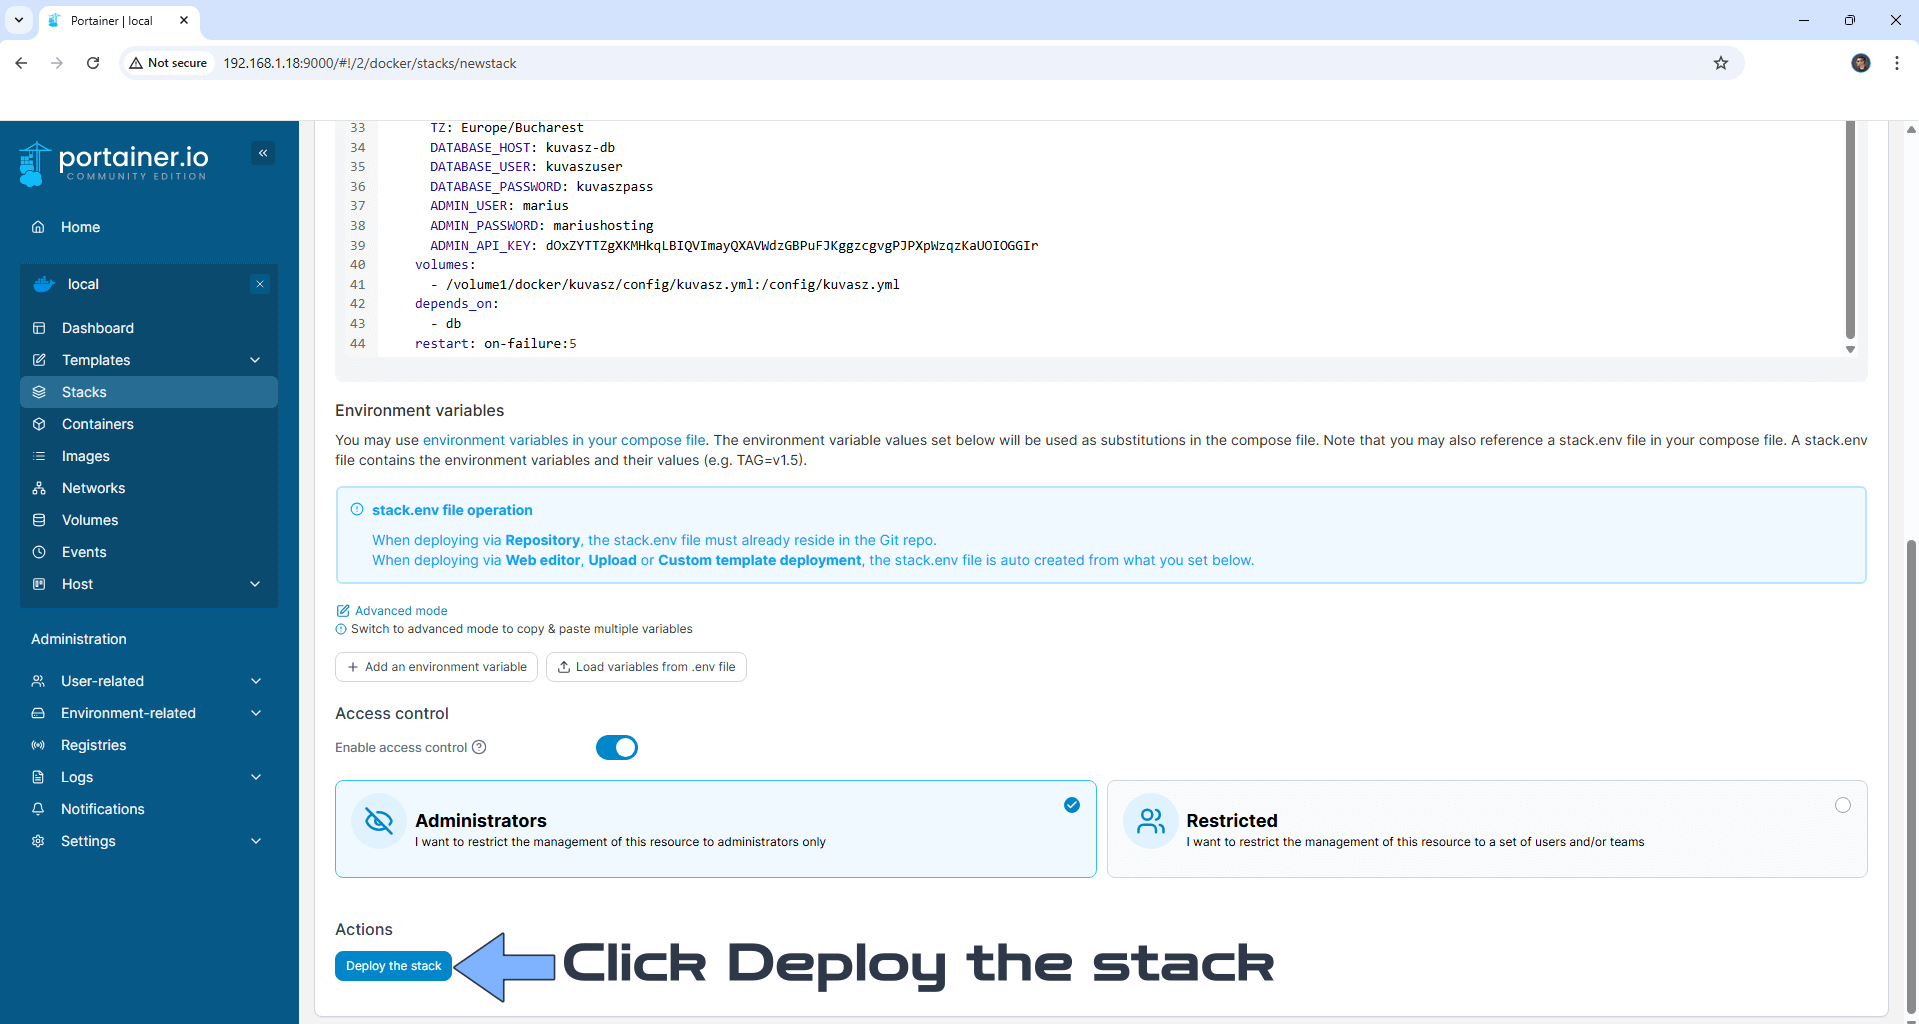
STEP 10
Scroll down on the page until you see a button named Deploy the stack. Click on it. Follow the instructions in the image below. The installation process can take up to a few minutes. It will depend on your Internet speed connection.
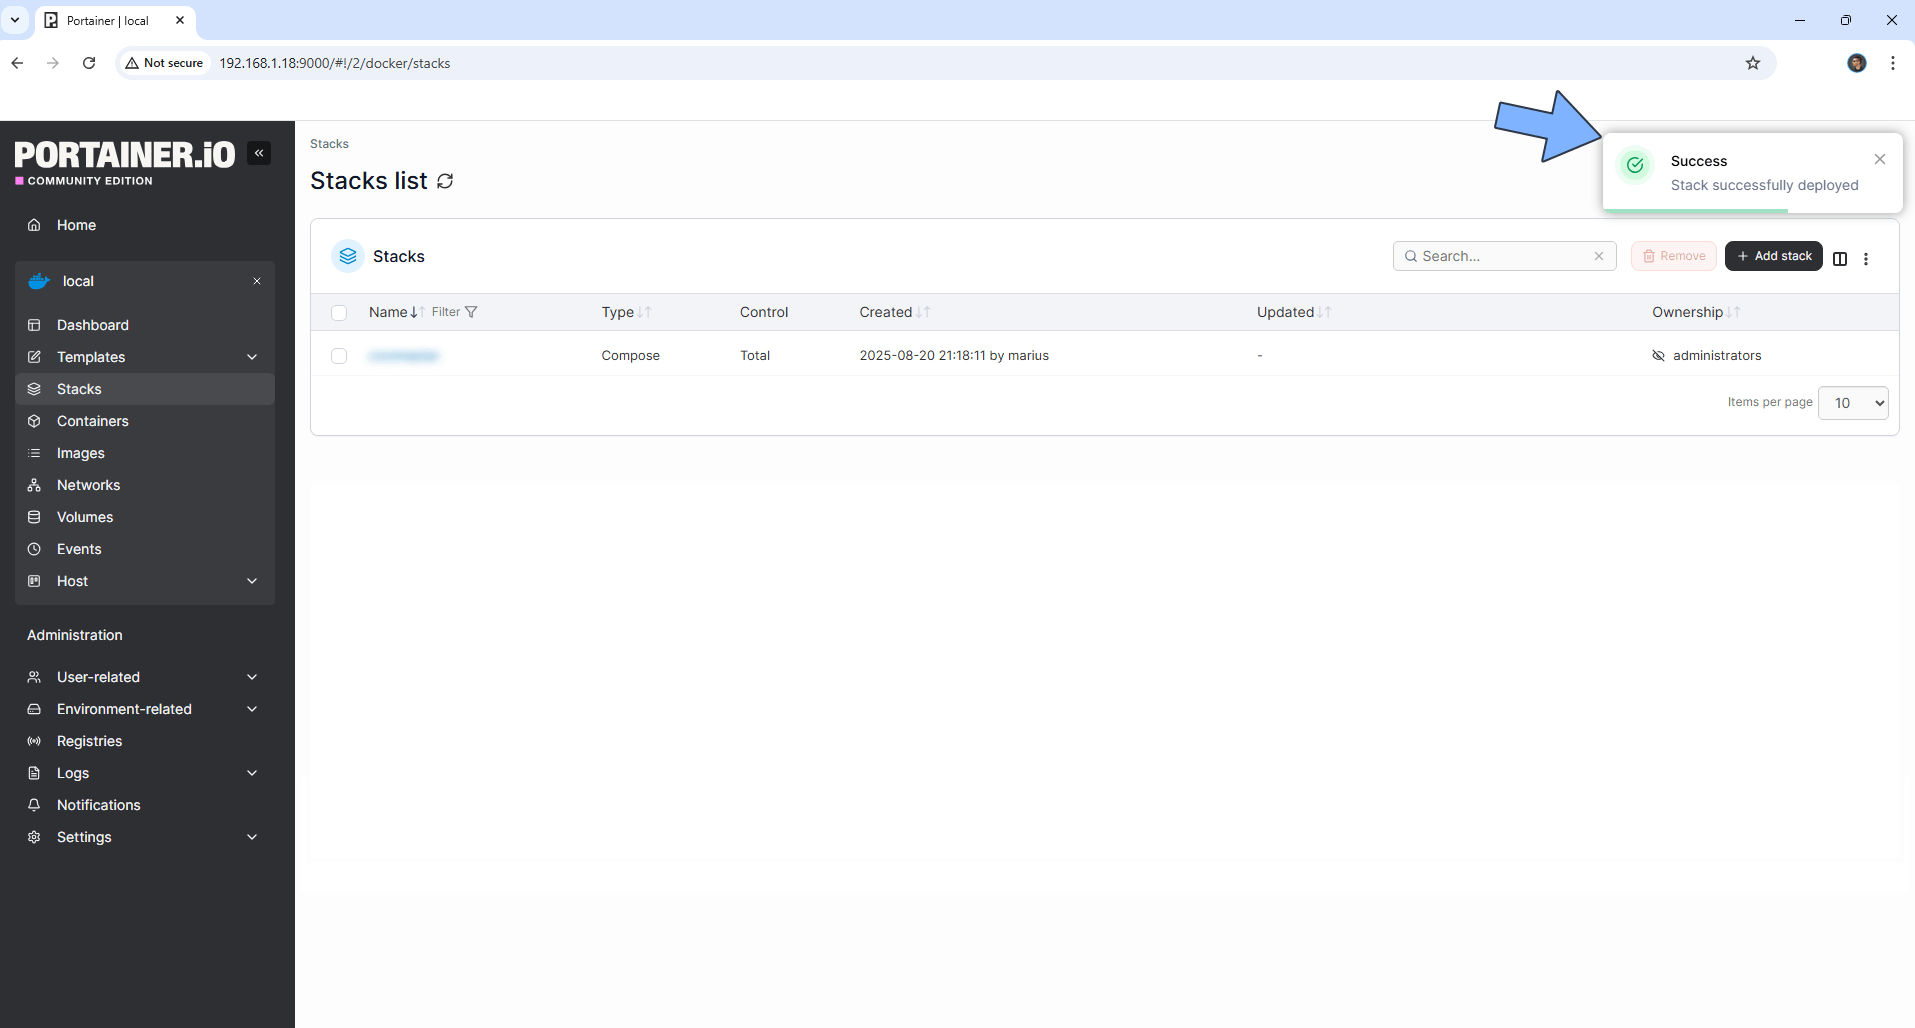
STEP 11
If everything goes right, you will see the following message at the top right of your screen: “Success Stack successfully deployed“.
STEP 12
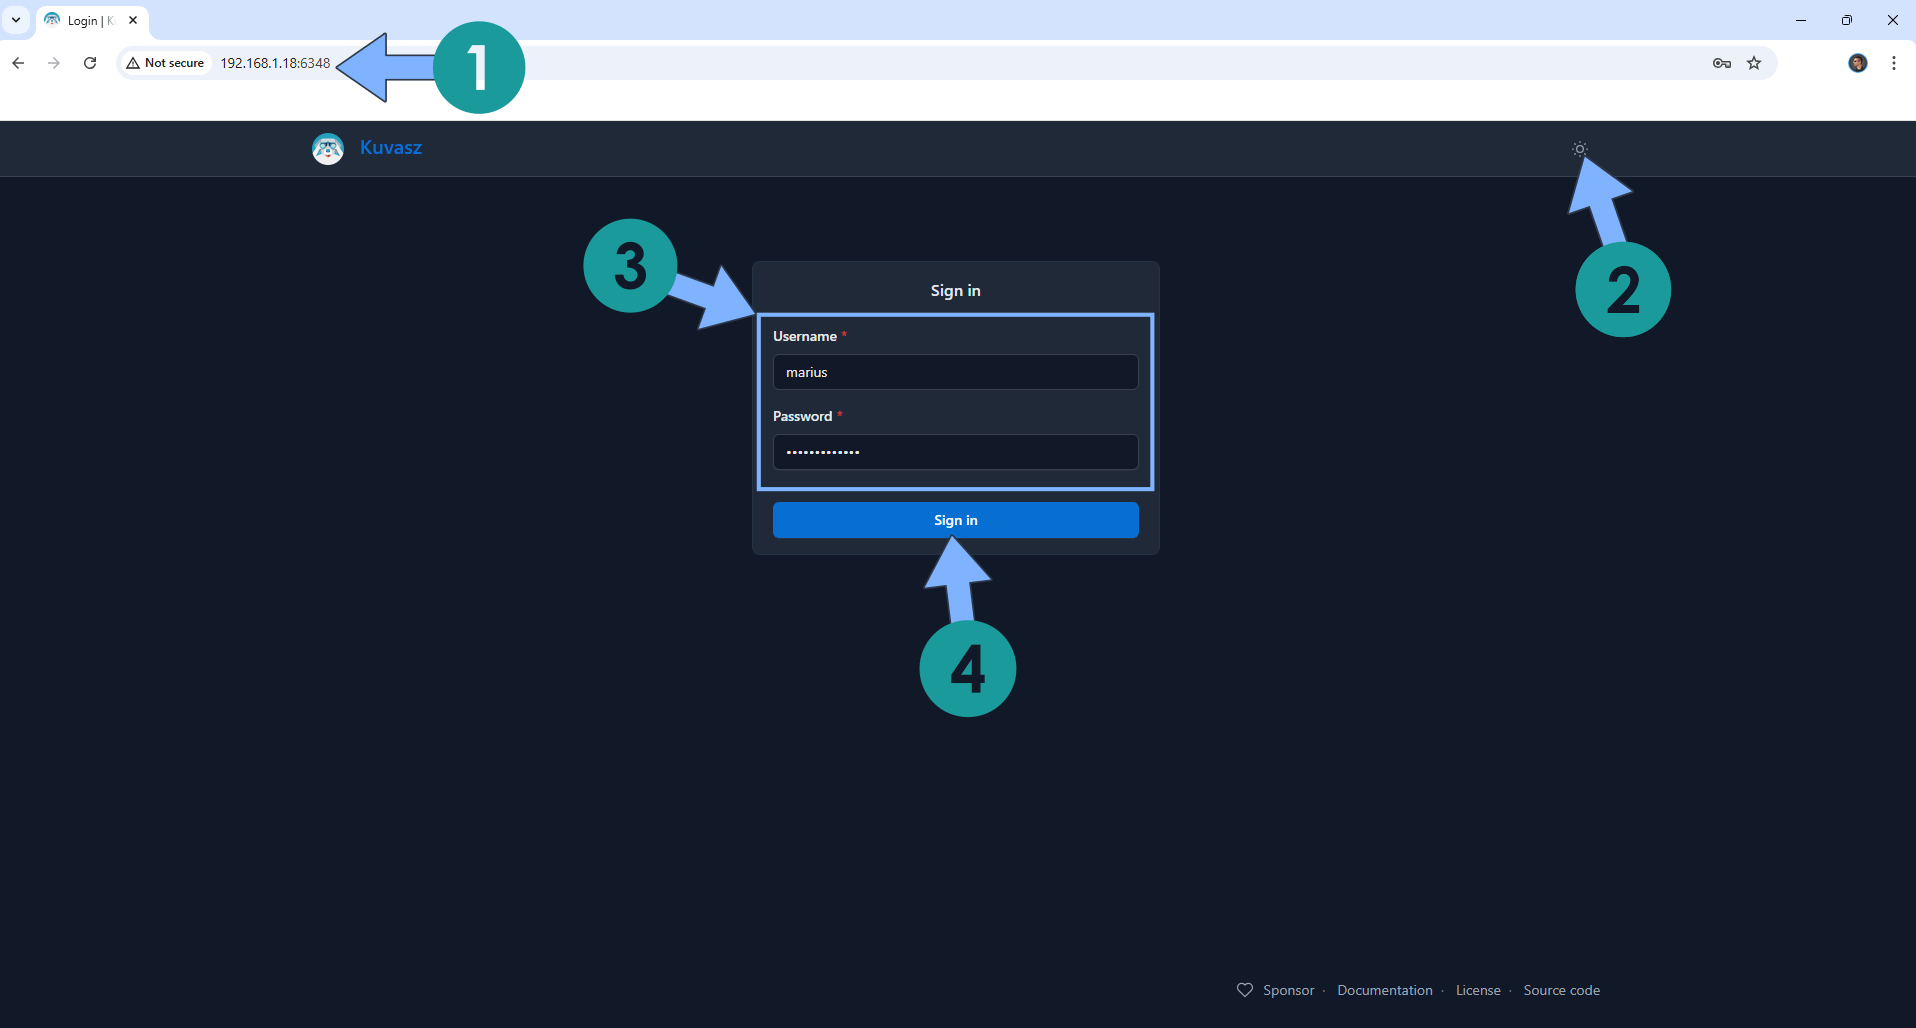
The installation process can take up to a few seconds/minutes. It will depend on your Internet speed connection. Now open your browser and type in http://Synology-ip-address:6348 If everything goes right, you will see the Kuvasz Login page. Type in your own Username (ADMIN_USER) and Password (ADMIN_PASSWORD) that you have previously added at STEP 9, then click Sign in. Follow the instructions in the image below.
STEP 13
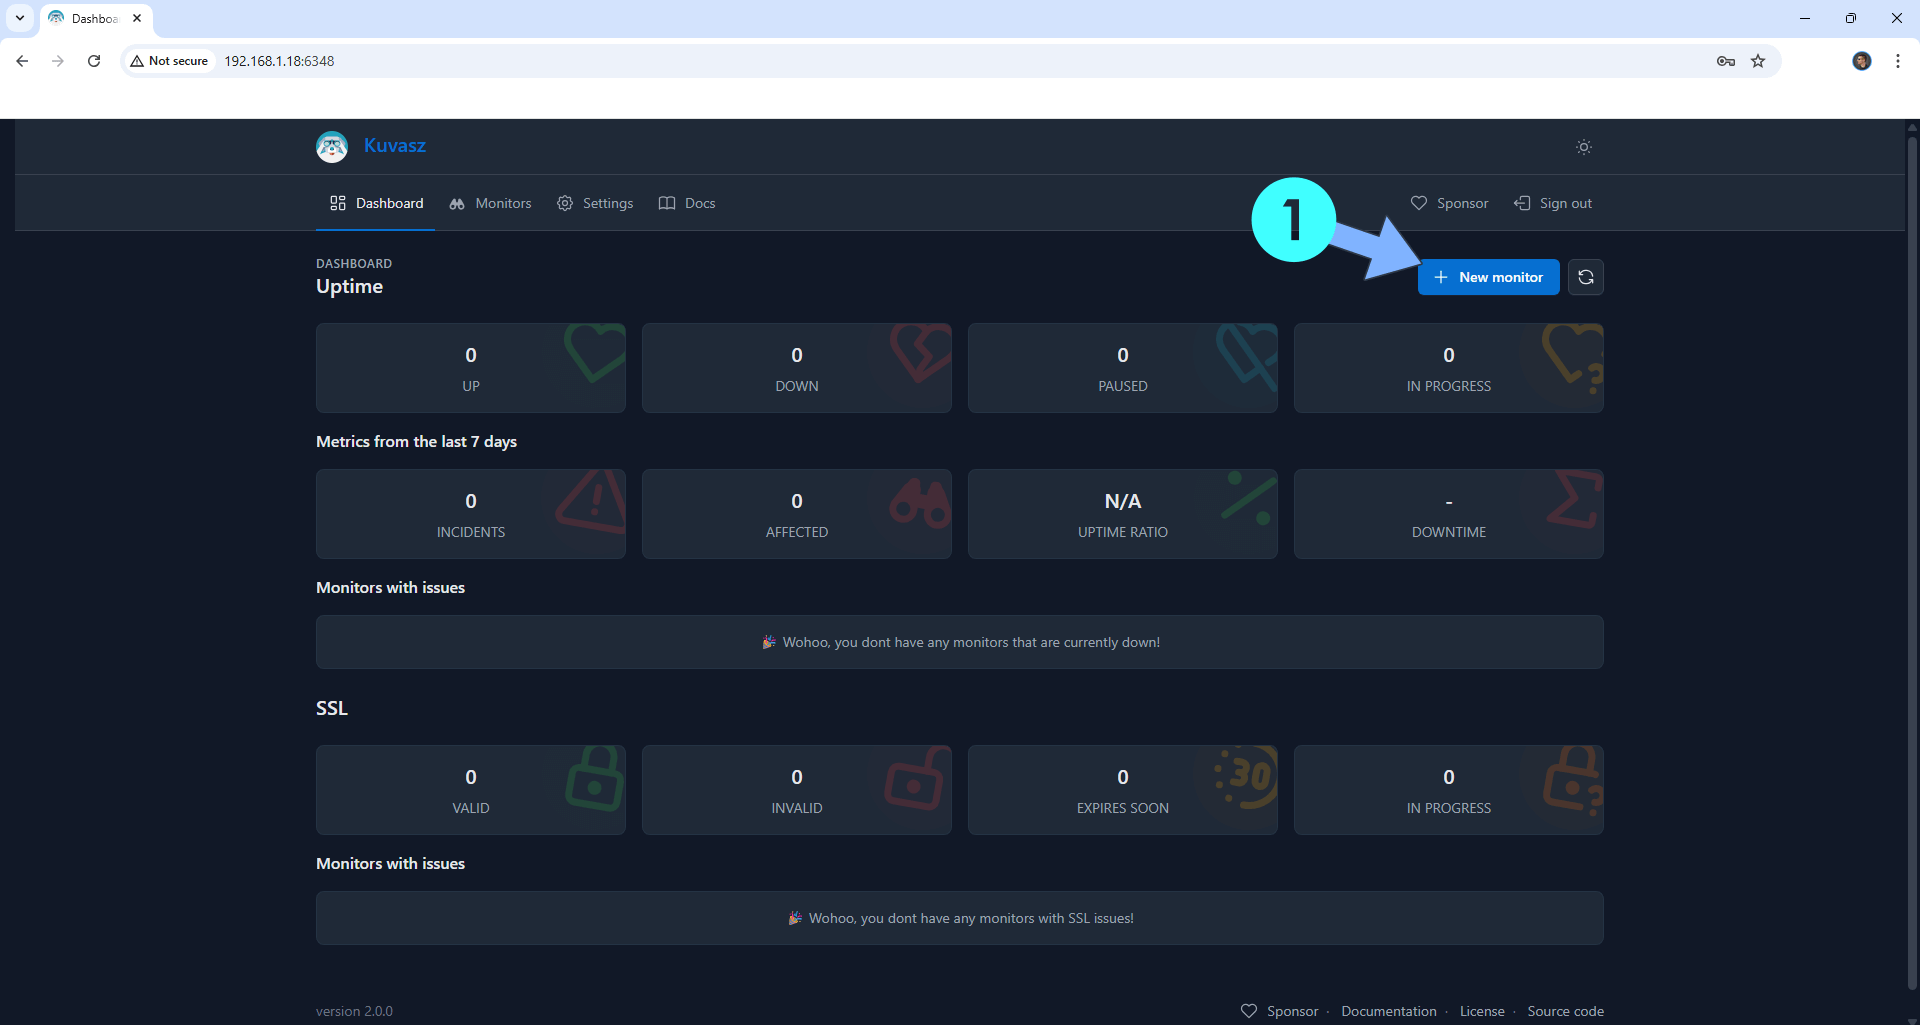
Click + New monitor. Follow the instructions in the image below.
STEP 14
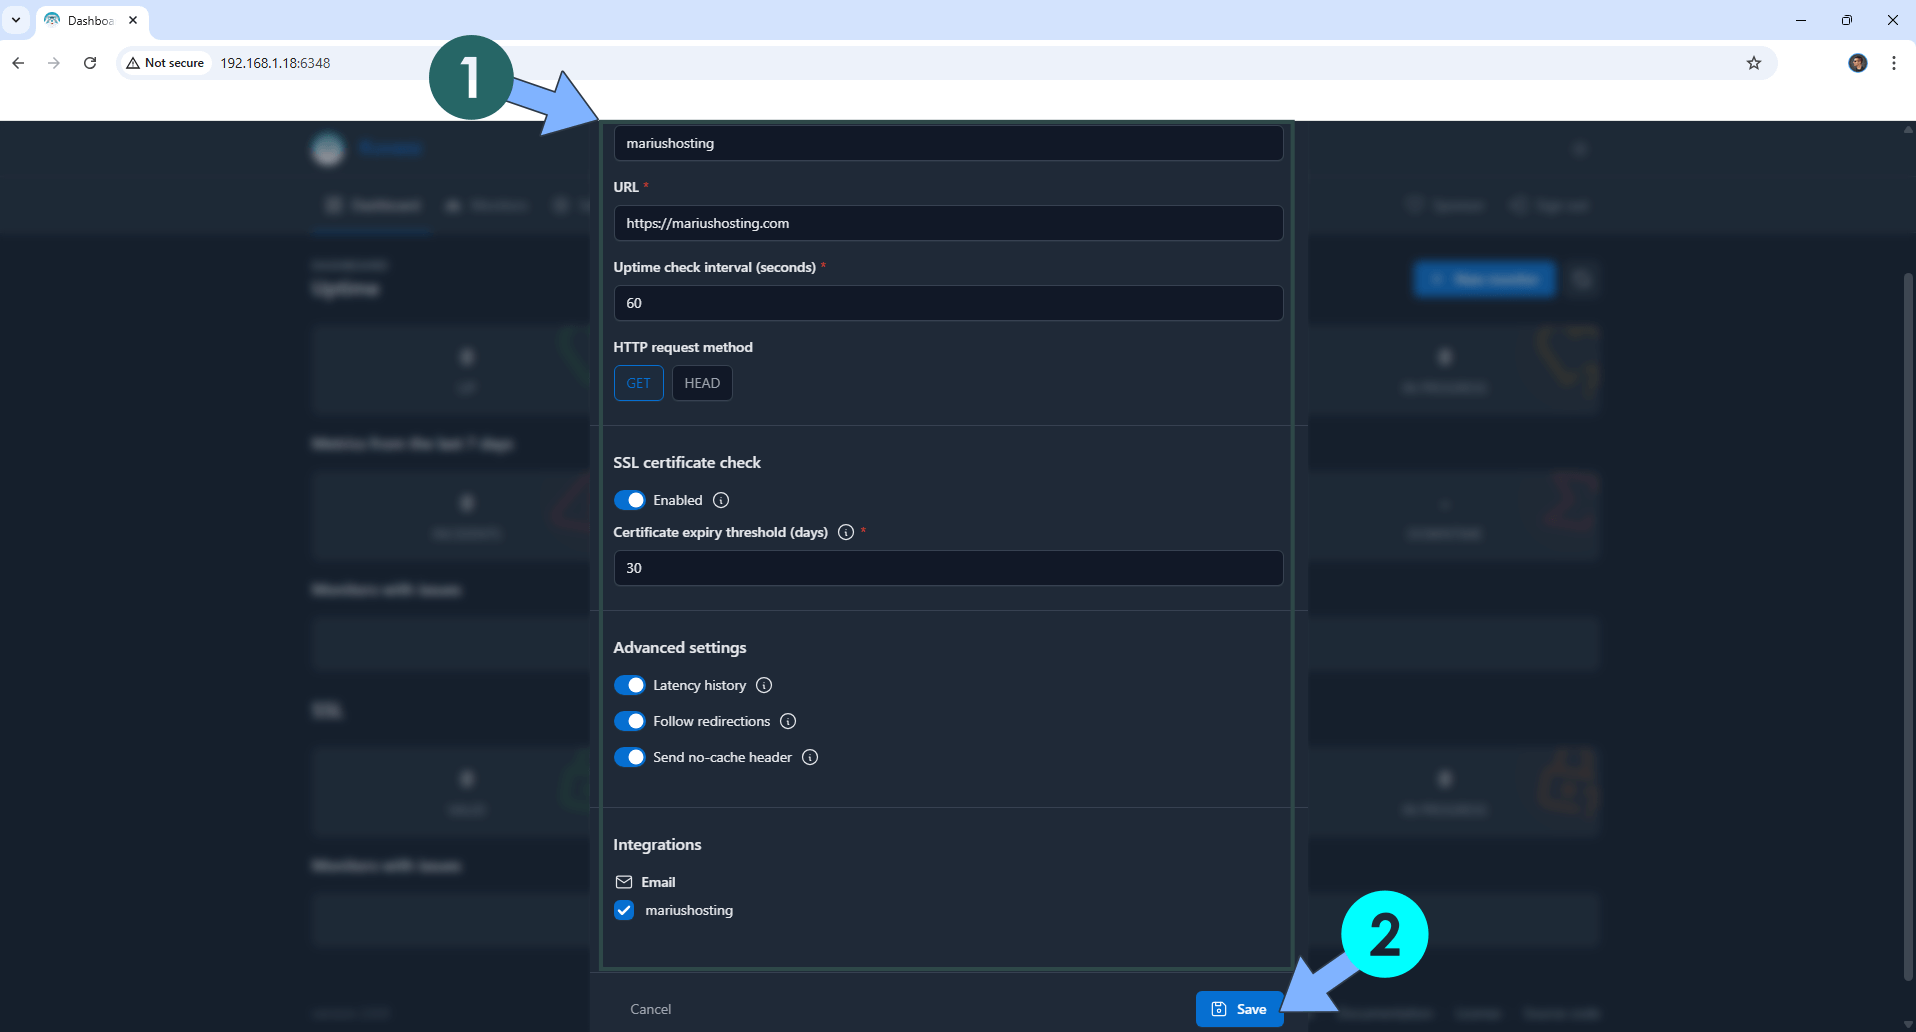
Add the website that you want to monitor. Select Email for the SMTP integration. Click Save. Follow the instructions in the image below.
STEP 15
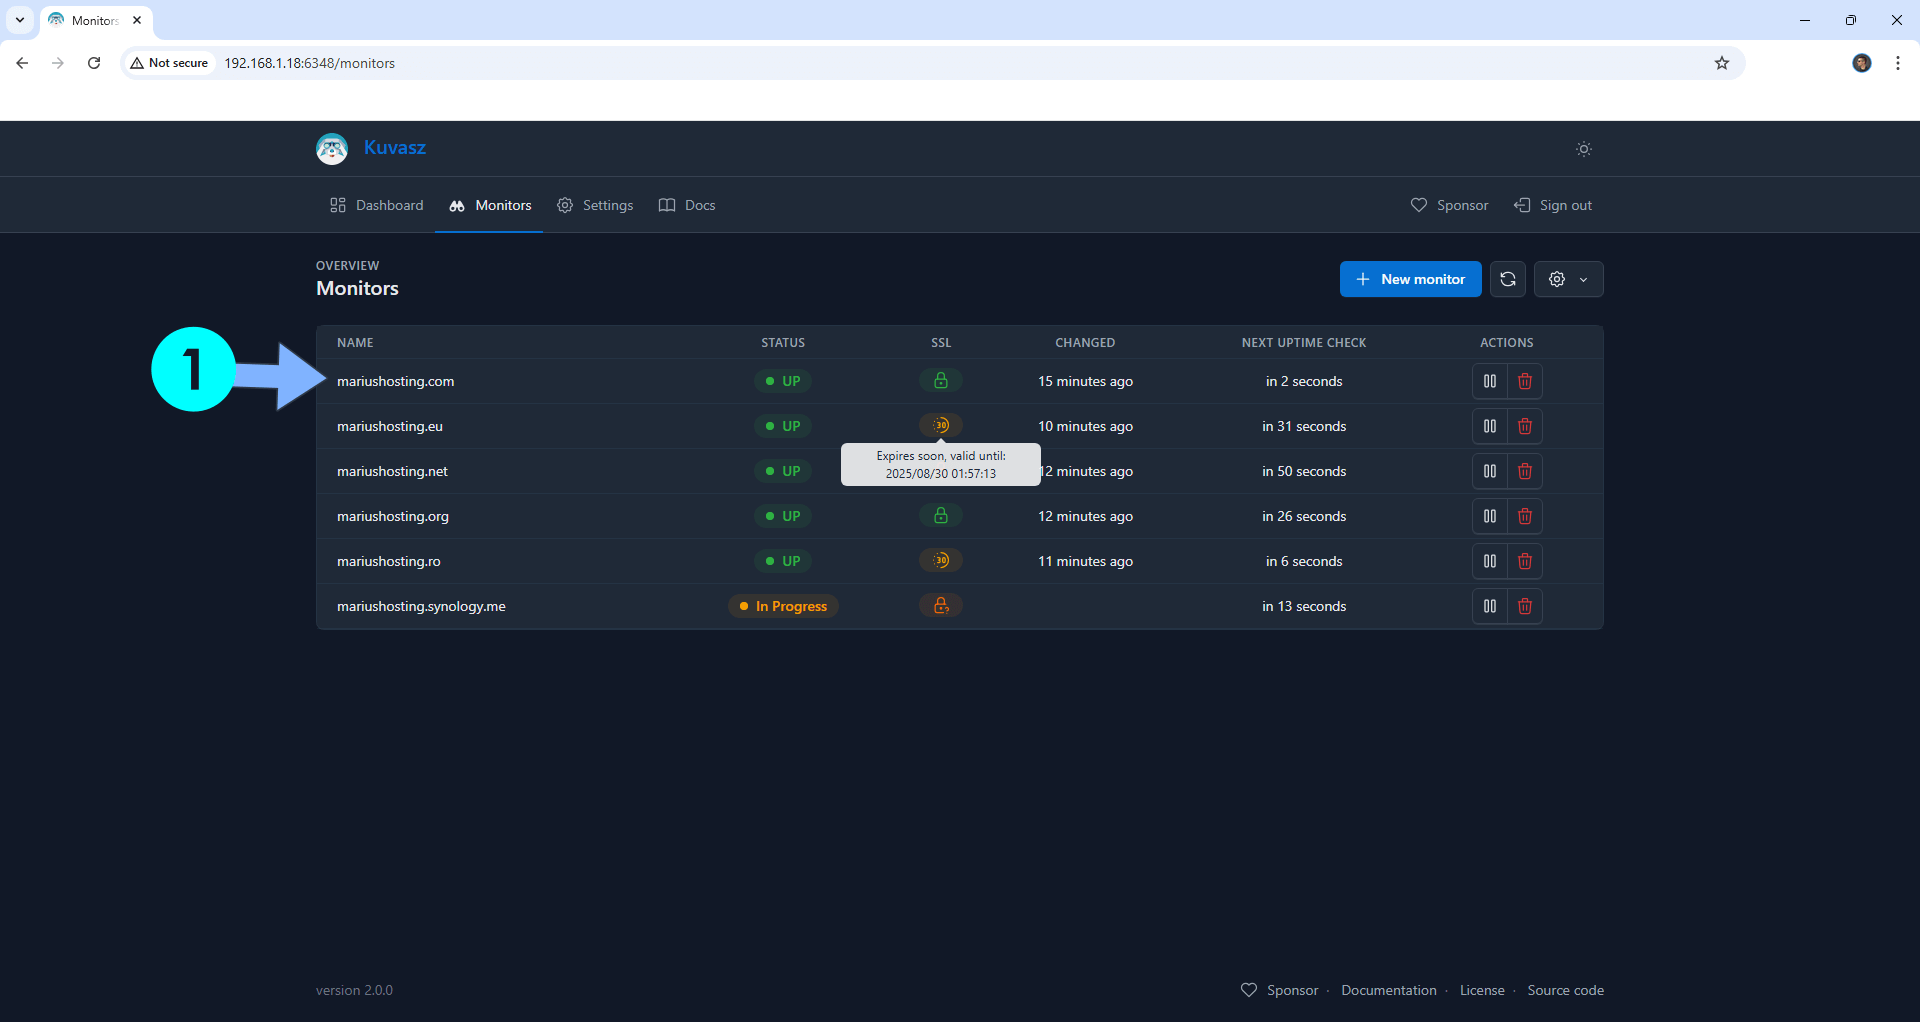
Click the Monitors tab to see your websites uptime at a glance! Click on a website name to get detailed information. Follow the instructions in the image below.
STEP 16
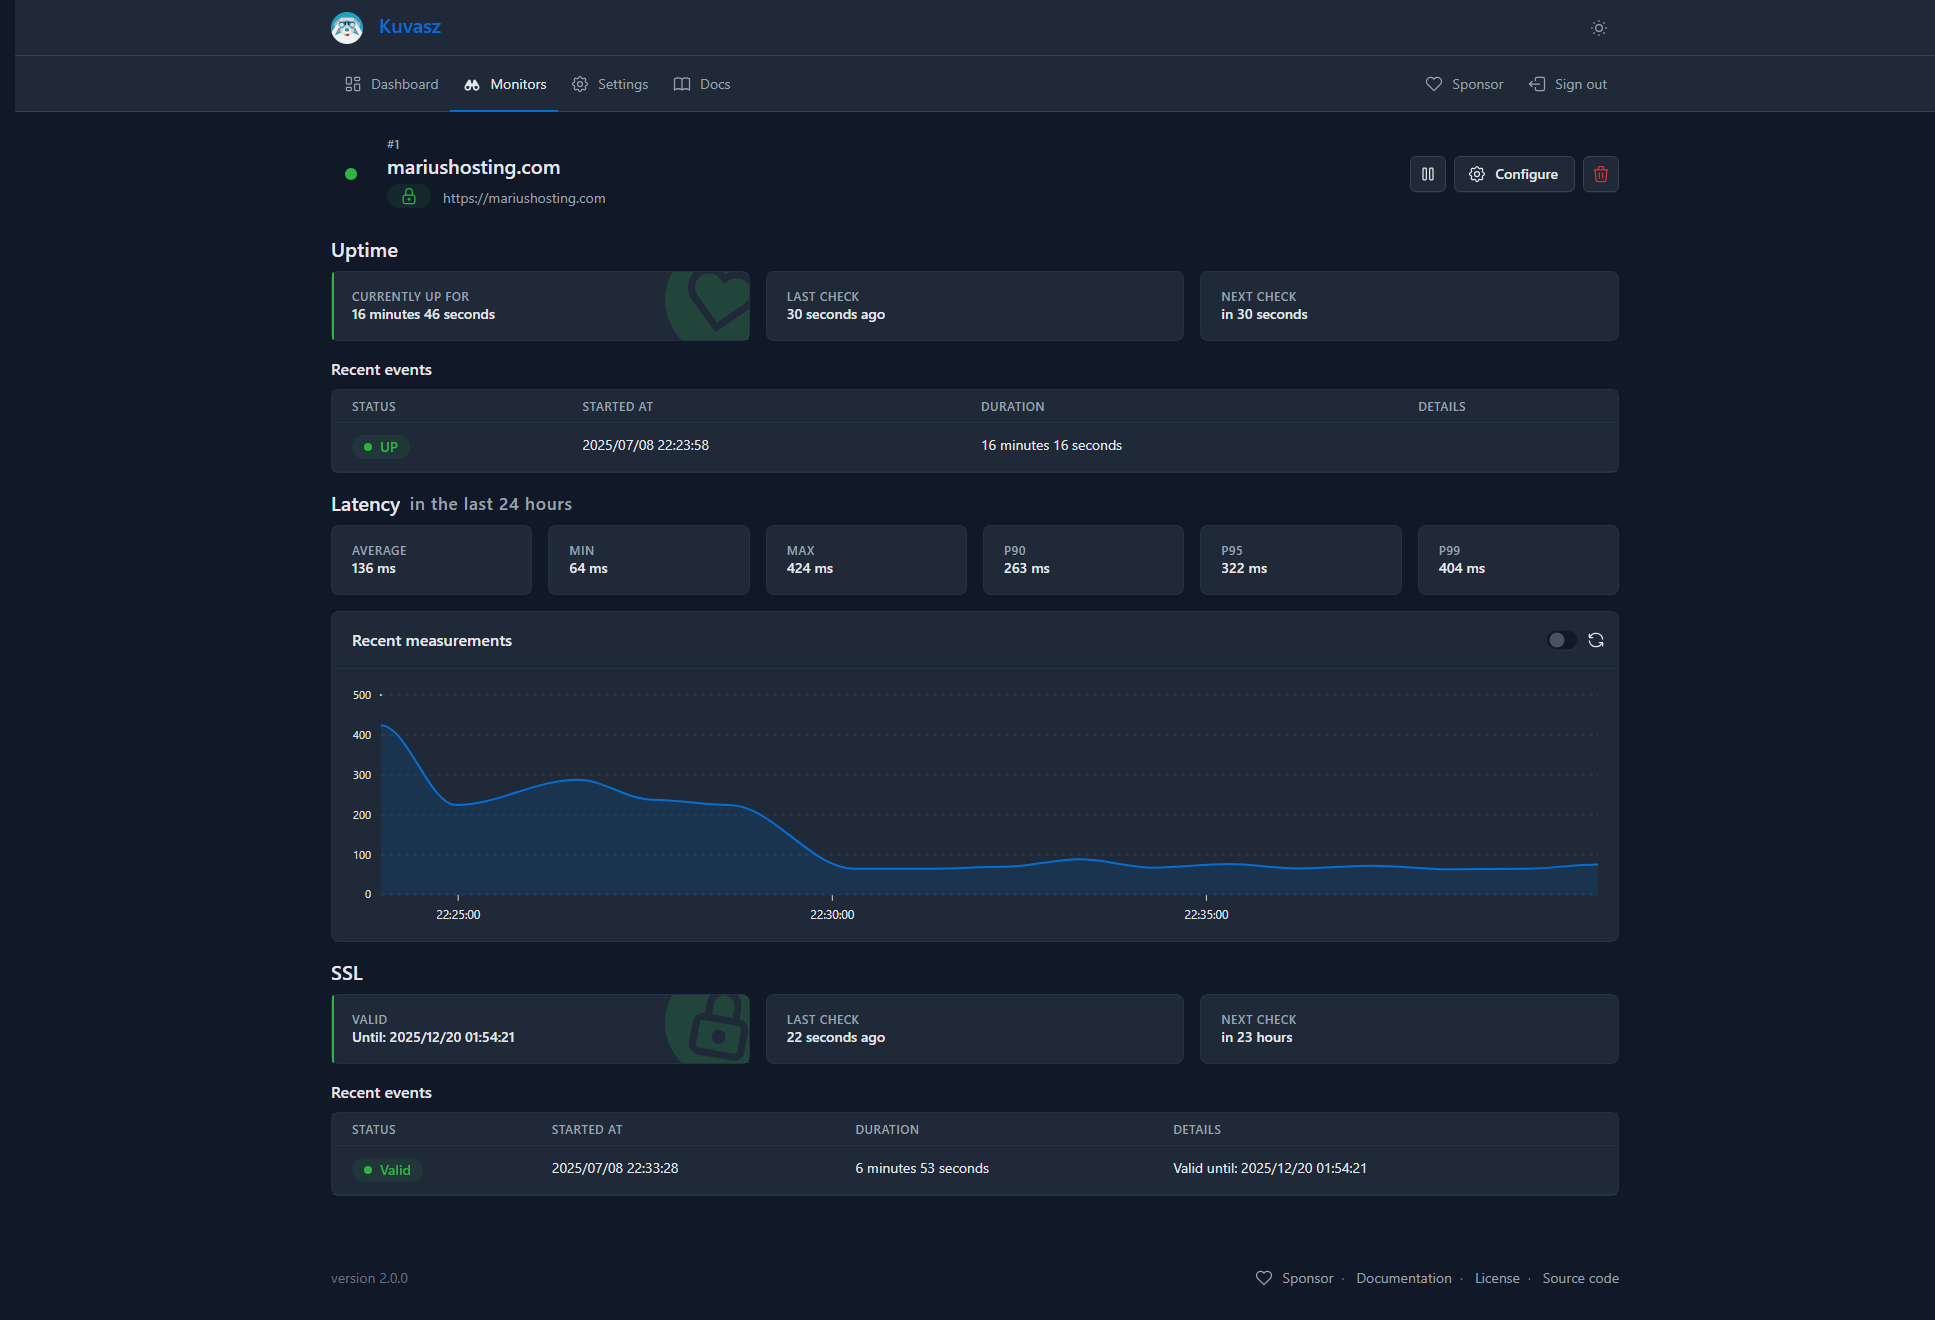
Your detailed website information at a glance!
STEP 17
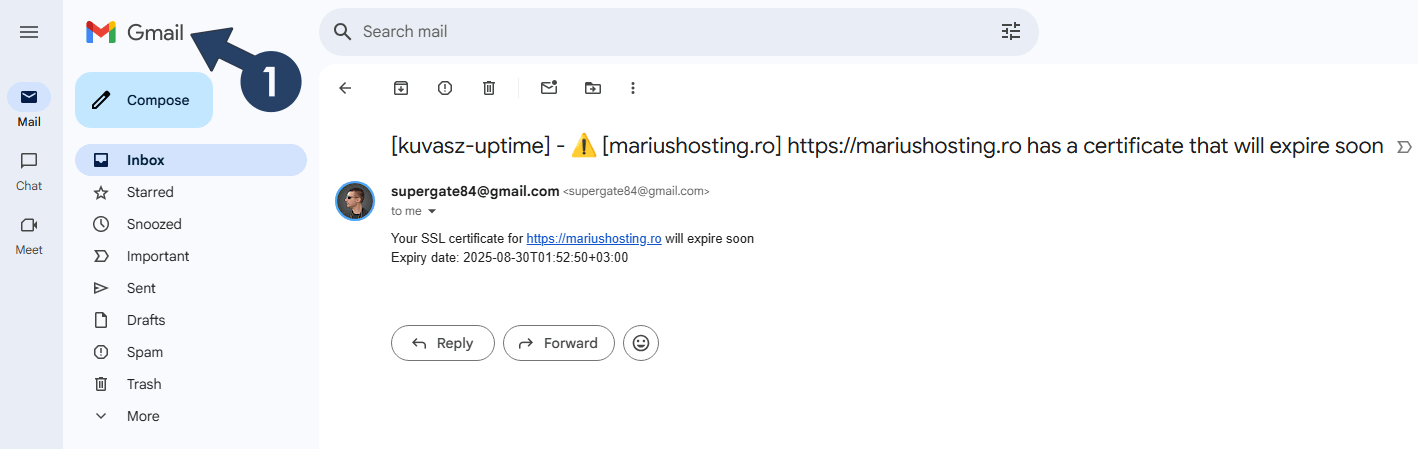
If you have correctly added your SMTP details at STEP 7 and selected the email integration at STEP 14, in case a website goes down or a certificate expires, you’re alerted via email when services go down or certificates near expiration.
Enjoy Kuvasz!
If you encounter issues by using this container, make sure to check out the Common Docker issues article.
Note: If you want to run the Kuvasz container over HTTPS, check How to Run Docker Containers Over HTTPS. In order to make Kuvasz work via HTTPS, it’s mandatory to activate WebSocket.
Note: Can I run Docker on my Synology NAS? See the supported models.
Note: How to Back Up Docker Containers on your Synology NAS.
Note: Find out how to update the Kuvasz container with the latest image.
Note: How to Free Disk Space on Your NAS if You Run Docker.
Note: How to Schedule Start & Stop For Docker Containers.
Note: How to Activate Email Notifications.
Note: How to Add Access Control Profile on Your NAS.
Note: How to Change Docker Containers Restart Policy.
Note: How to Use Docker Containers With VPN.
Note: Convert Docker Run Into Docker Compose.
Note: How to Clean Docker.
Note: How to Clean Docker Automatically.
Note: Best Practices When Using Docker and DDNS.
Note: Some Docker Containers Need WebSocket.
Note: Find out the Best NAS Models For Docker.
Note: Activate Gmail SMTP For Docker Containers.
This post was updated on Tuesday / April 7th, 2026 at 12:00 AM