

Endurain is a self-hosted fitness tracking service designed to give users full control over their data and hosting environment, similar to Strava but focused on privacy and customization. In this step by step guide I will show you how to install Endurain on your Synology NAS using Docker & Portainer.
This guide works perfectly with the latest Endurain v0.19.1 release.
STEP 1
Please Support My work by Making a Donation.
STEP 2
Install Portainer using my step by step guide. If you already have Portainer installed on your Synology NAS, skip this STEP. Attention: Make sure you have installed the latest Portainer version.
STEP 3
Make sure you have a synology.me Wildcard Certificate. Follow my guide to get a Wildcard Certificate. If you already have a synology.me Wildcard certificate, skip this STEP.
STEP 4
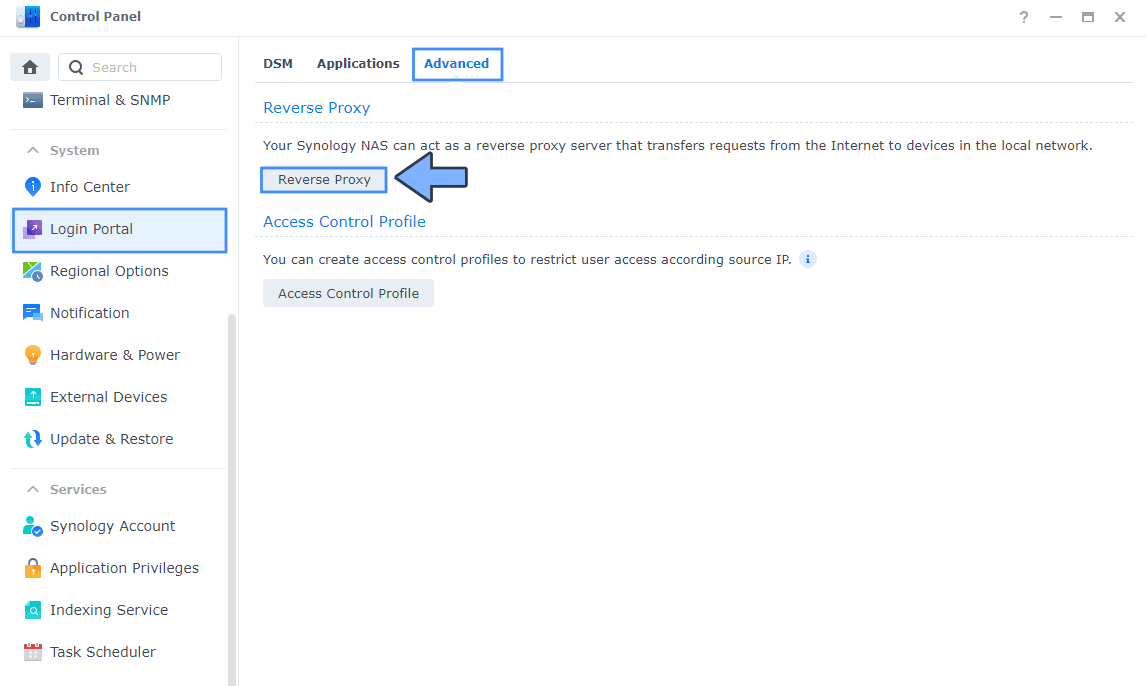
Go to Control Panel / Login Portal / Advanced Tab / click Reverse Proxy. Follow the instructions in the image below.
STEP 5
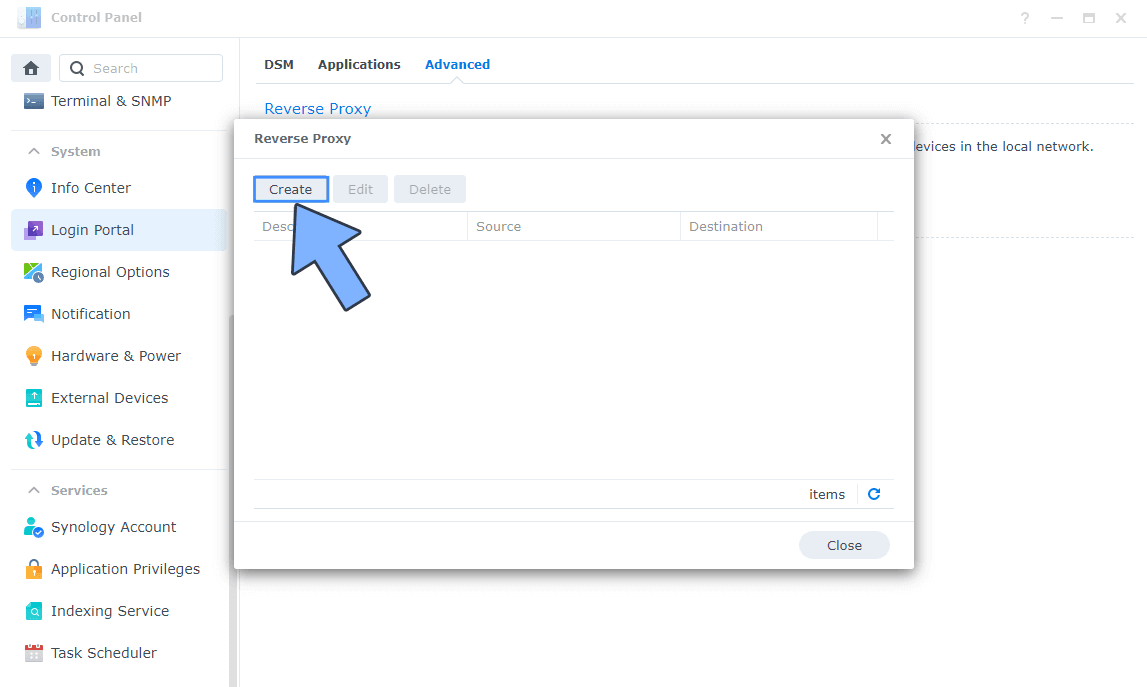
Now click the “Create” button. Follow the instructions in the image below.
STEP 6
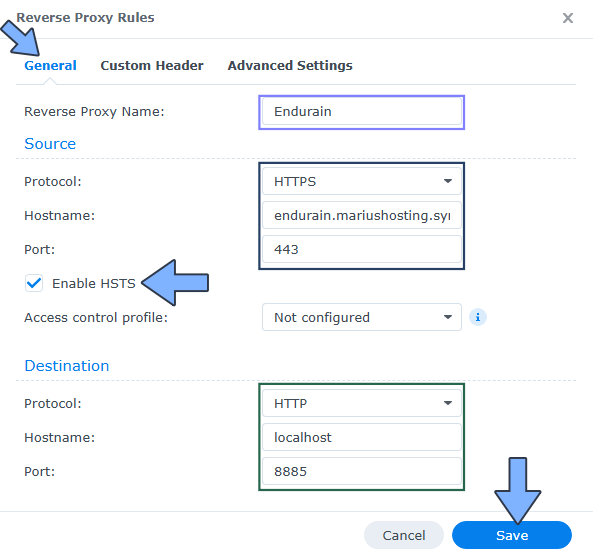
After you click the Create button, the window below will open. Follow the instructions in the image below.
On the General area, set the Reverse Proxy Name description: type in Endurain. After that, add the following instructions:
Source:
Protocol: HTTPS
Hostname: endurain.yourname.synology.me
Port: 443
Check Enable HSTS
Destination:
Protocol: HTTP
Hostname: localhost
Port: 8885
STEP 7
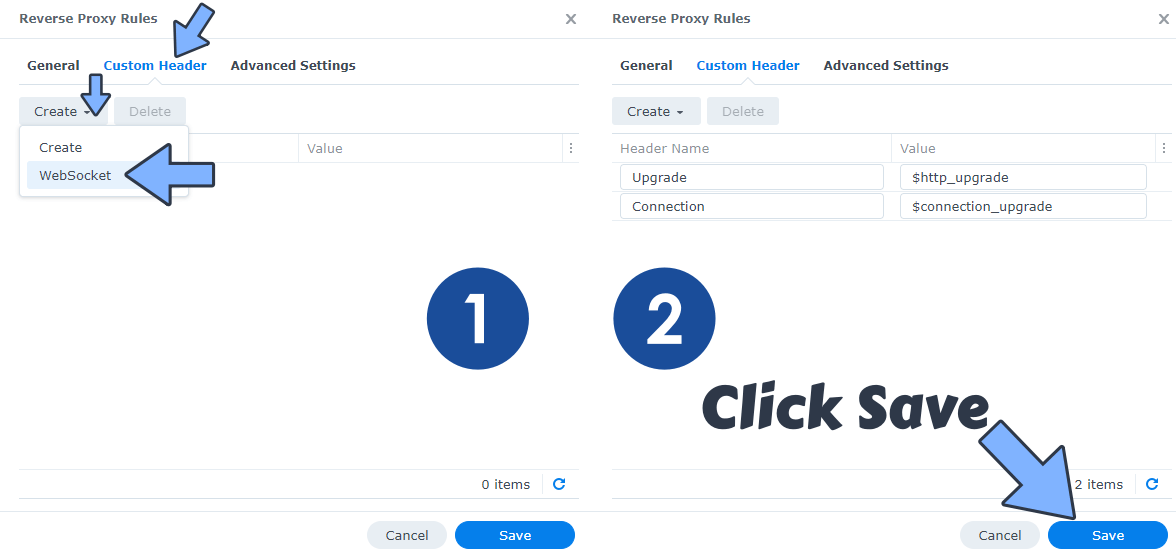
On the Reverse Proxy Rules click the Custom Header tab. Click Create and then, from the drop-down menu, click WebSocket. After you click on WebSocket, two Header Names and two Values will be automatically added. Click Save. Follow the instructions in the image below.
STEP 8
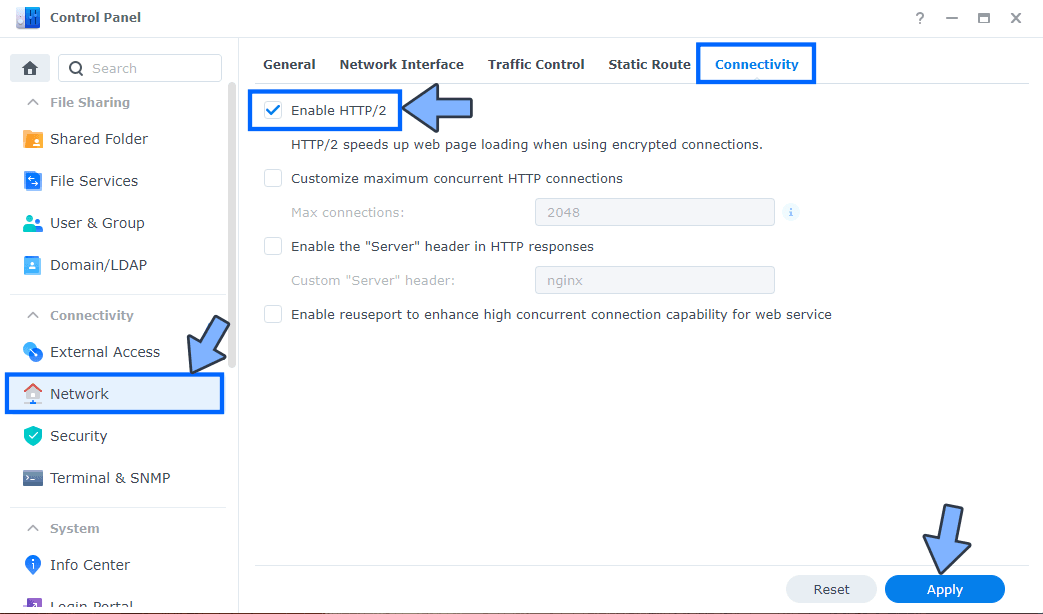
Go to Control Panel / Network / Connectivity tab/ Check Enable HTTP/2 then click Apply. Follow the instructions in the image below.
STEP 9
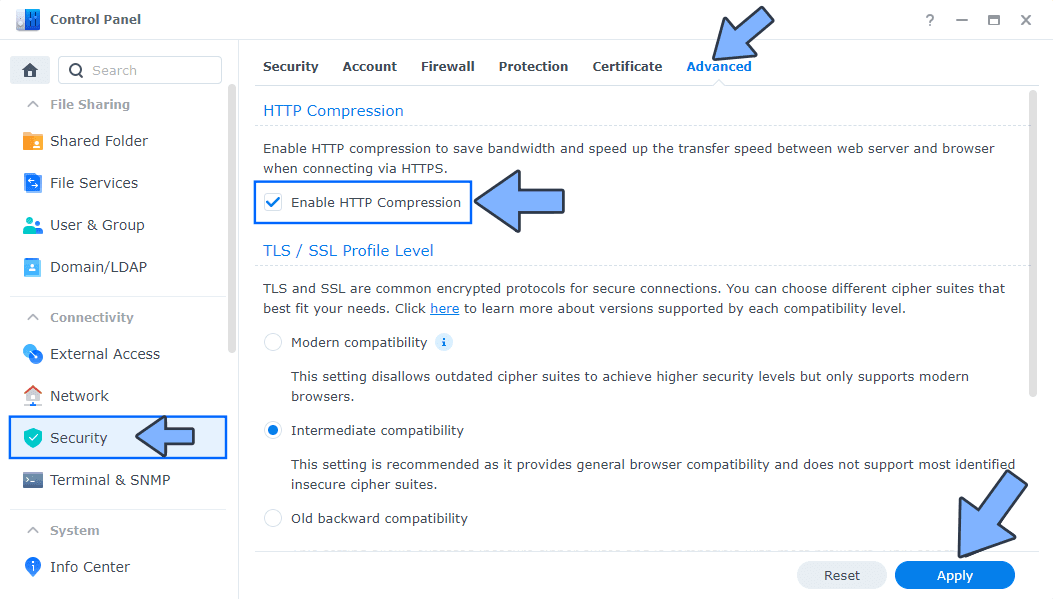
Go to Control Panel / Security / Advanced tab/ Check Enable HTTP Compression then click Apply. Follow the instructions in the image below.
STEP 10
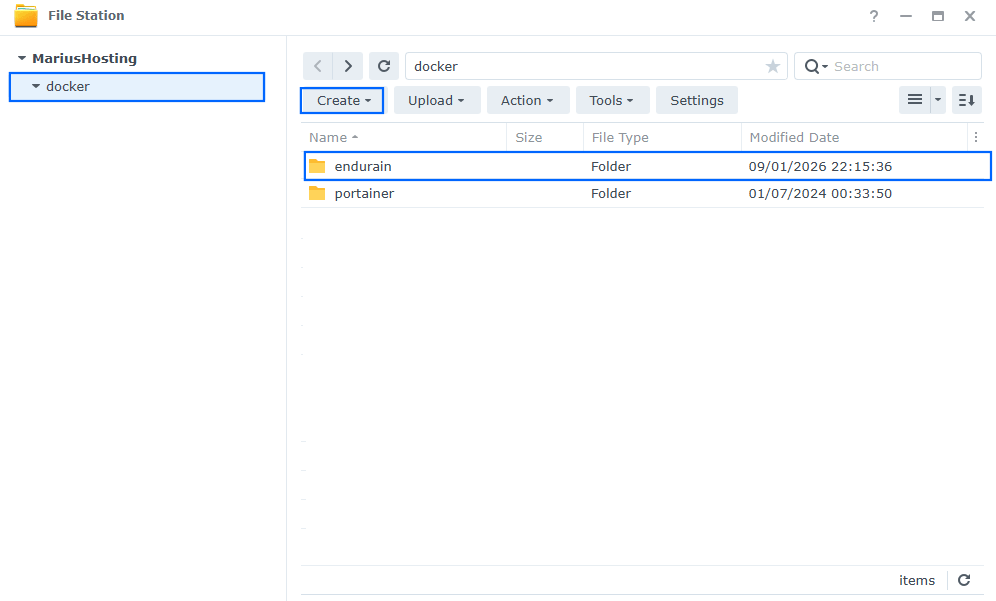
Go to File Station and open the docker folder. Inside the docker folder, create one new folder and name it endurain. Follow the instructions in the image below.
Note: Be careful to enter only lowercase, not uppercase letters.
STEP 11
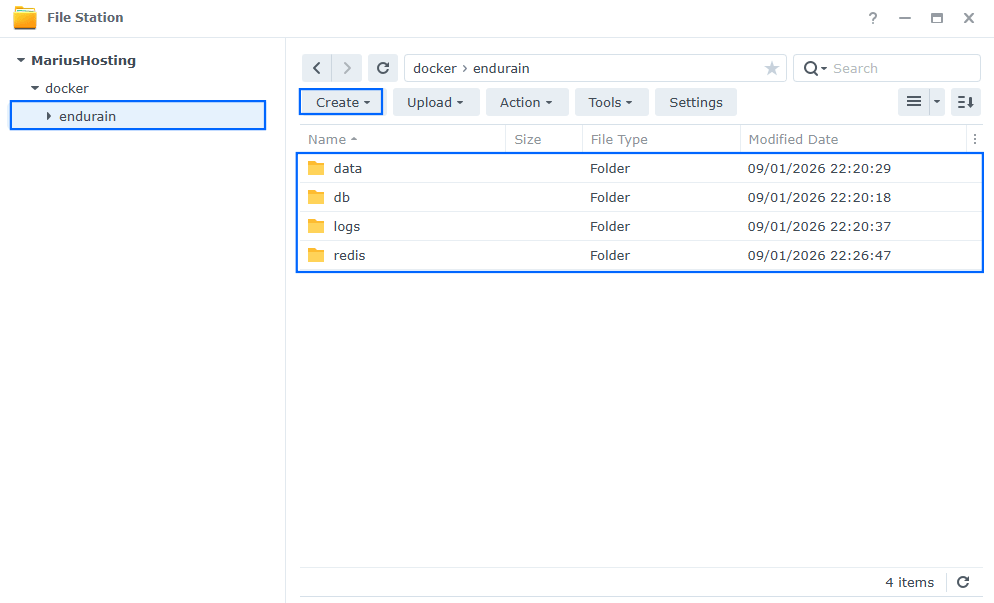
Now create four new folders inside the endurain folder that you have previously created at STEP 10. Name them data, db, logs, redis. Follow the instructions in the image below.
Note: Be careful to enter only lowercase, not uppercase letters.
STEP 12
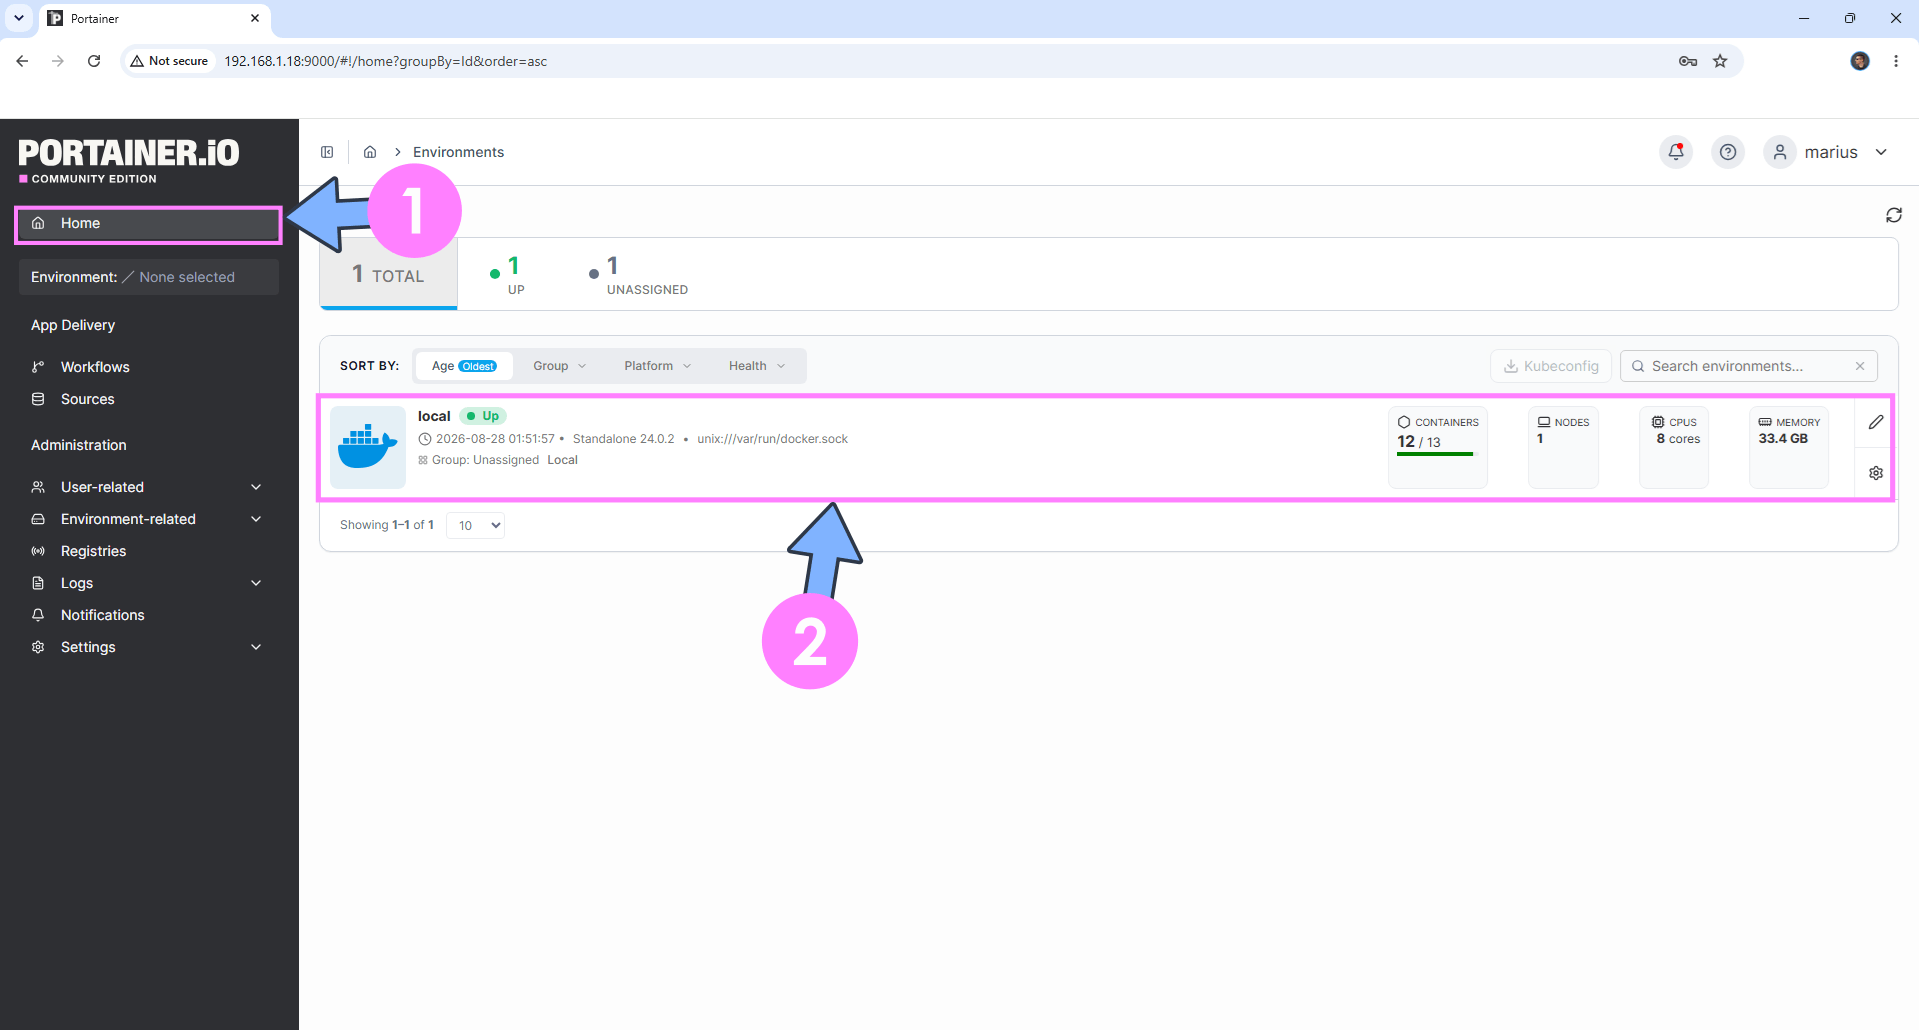
Log into Portainer using your username and password. On the left sidebar in Portainer, click on Home then click inside the local rectangle. Follow the instructions in the image below.
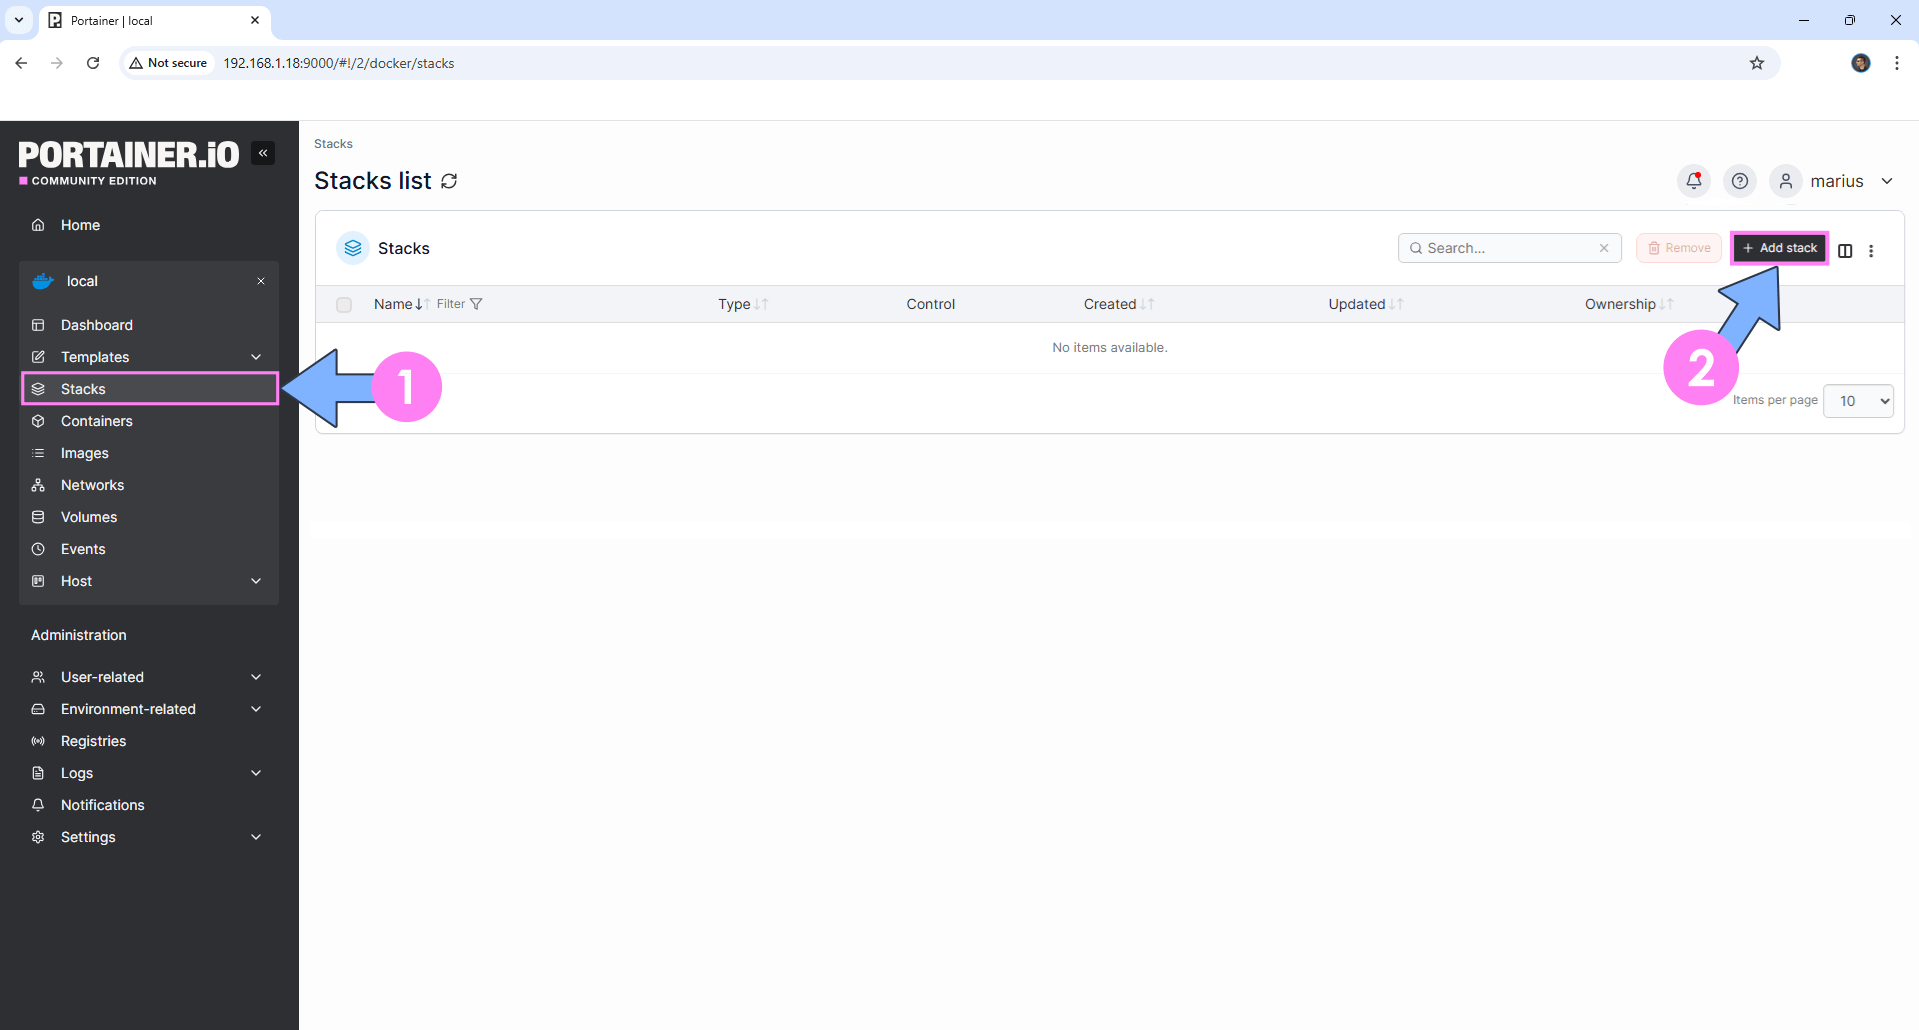
On the left sidebar in Portainer, click on Stacks then + Add stack. Follow the instructions in the image below.
STEP 13
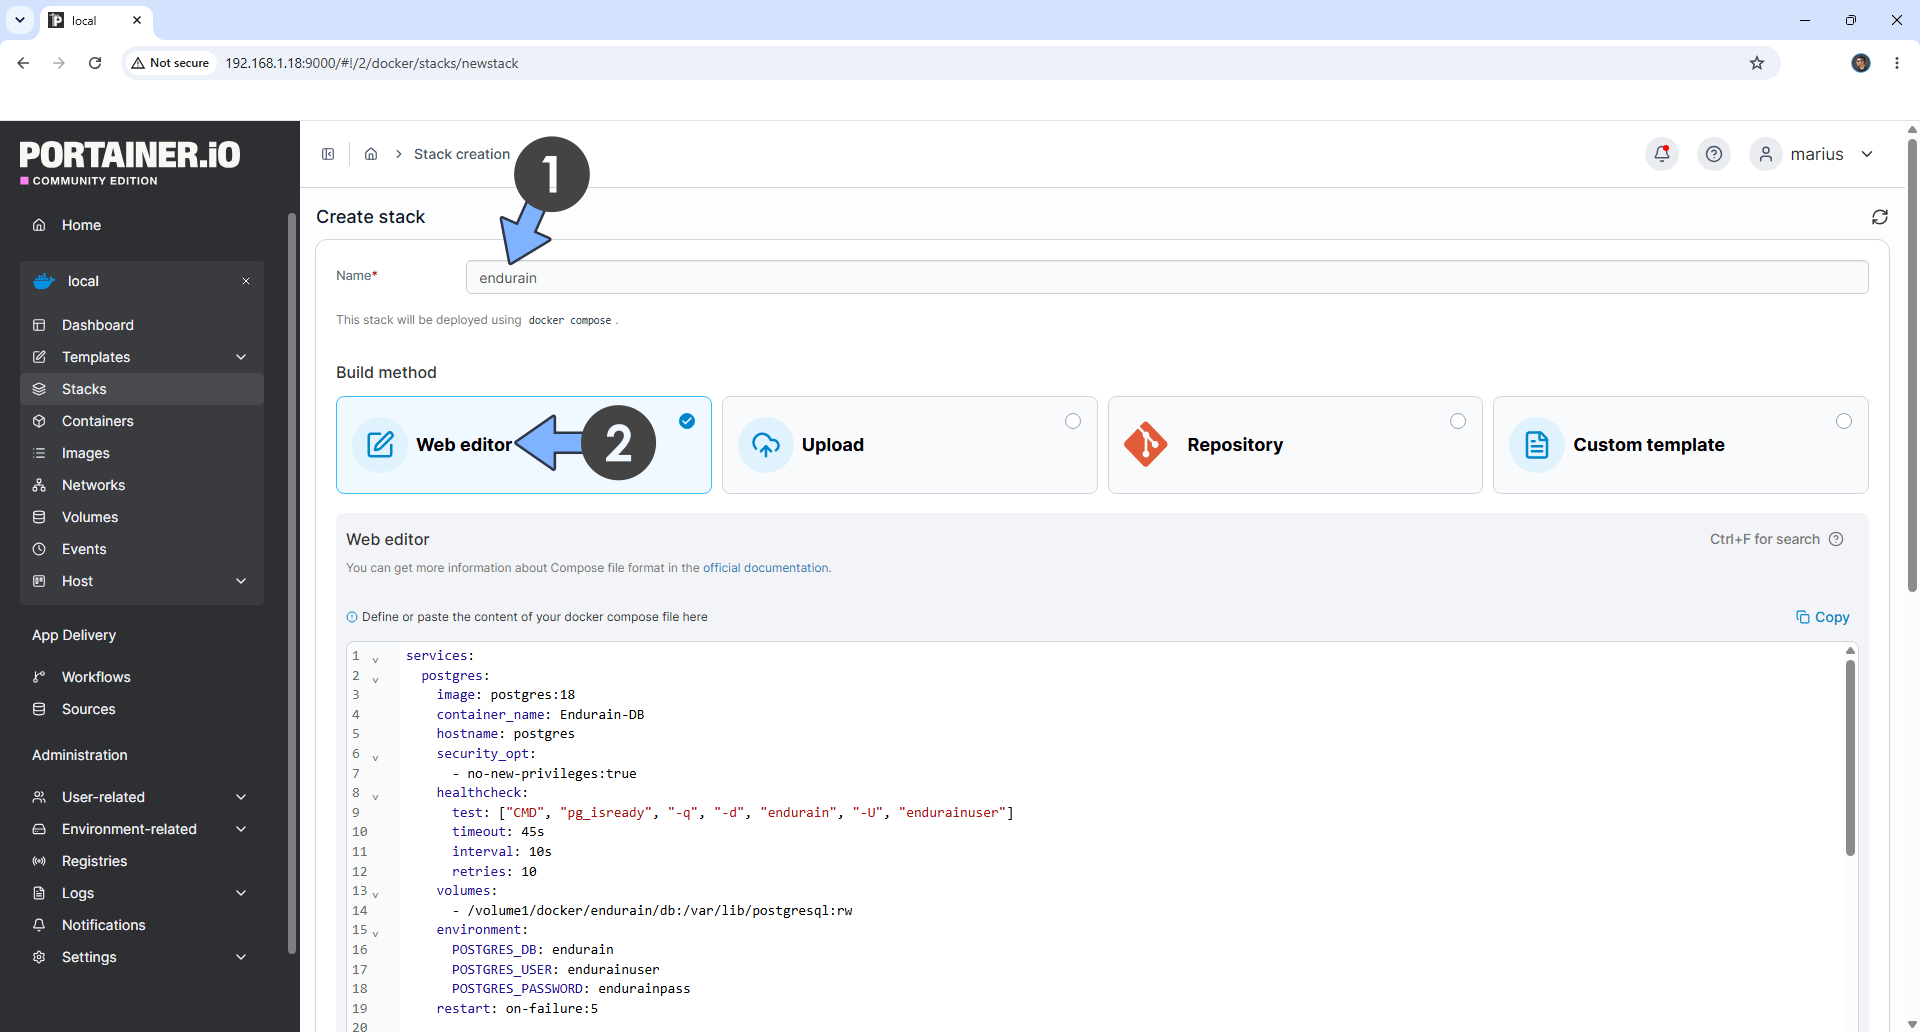
In the Name field type in endurain. Follow the instructions in the image below.
services:
  postgres:
    image: postgres:18
    container_name: Endurain-DB
    hostname: postgres
    security_opt:
      - no-new-privileges:true
    healthcheck:
      test: ["CMD", "pg_isready", "-q", "-d", "endurain", "-U", "endurainuser"]
      timeout: 45s
      interval: 10s
      retries: 10
    volumes:
      - /volume1/docker/endurain/db:/var/lib/postgresql:rw
    environment:
      POSTGRES_DB: endurain
      POSTGRES_USER: endurainuser
      POSTGRES_PASSWORD: endurainpass
    restart: on-failure:5

  endurain:
    image: codeberg.org/endurain-project/endurain:latest
    container_name: Endurain
    user: 1026:100
    environment:
      DB_DATABASE: endurain
      DB_USER: endurainuser
      DB_PASSWORD: endurainpass
      POSTGRES_PASSWORD: endurainpass
      SECRET_KEY: dOxZYTTZgXKMHkqLBIQVImayQXAVWdzGBPuFJKggzcgvgPJPXpWzqzKaUOIOGGIr
      FERNET_KEY: p6OLx4vZO0rAusETERDmhgr8crvbniZ1lvTYhU-PST0=
      TZ: Europe/Bucharest
      ENDURAIN_HOST: https://endurain.yourname.synology.me
      BEHIND_PROXY: true
      RATE_LIMIT_STORAGE_URI: redis://redis:6379/0
      AUTH_SECURITY_STORAGE_URI: redis://redis:6379/0
    volumes:
      - /volume1/docker/endurain/data:/app/backend/data:rw
      - /volume1/docker/endurain/logs:/app/backend/logs:rw
    ports:
      - 8885:8080
    depends_on:
      postgres:
        condition: service_healthy
      redis:
        condition: service_healthy
    restart: on-failure:5

  redis:
    image: redis:8-alpine
    container_name: Endurain-REDIS
    command: ["redis-server", "--appendonly", "yes"]
    healthcheck:
      test: ["CMD", "redis-cli", "ping"]
      interval: 5s
      timeout: 5s
      retries: 5
    volumes:
      - /volume1/docker/endurain/redis:/data:rw
    restart: on-failure:5
Note: Before you paste the code above in the Web editor area below, change the value for AUTHENTIK_SECRET_KEY. (Generate your own Random 64 length AUTHENTIK_SECRET_KEY.)
Note: Before you paste the code above in the Web editor area below, change the value for FERNET_KEY. (🟢Click this Link to Generate Your Own Free FERNET KEY.) 🖼️Check Example Screenshot and copy your FERNET_KEY.
Note: Before you paste the code above in the Web editor area below, change the value for TZ. (Select your current Time Zone from this list.)
Note: Before you paste the code above in the Web editor area below, change the value for ENDURAIN_HOST and type in your own synology.me DDNS with https:// at the beginning that you have previously created at STEP 6.
STEP 14
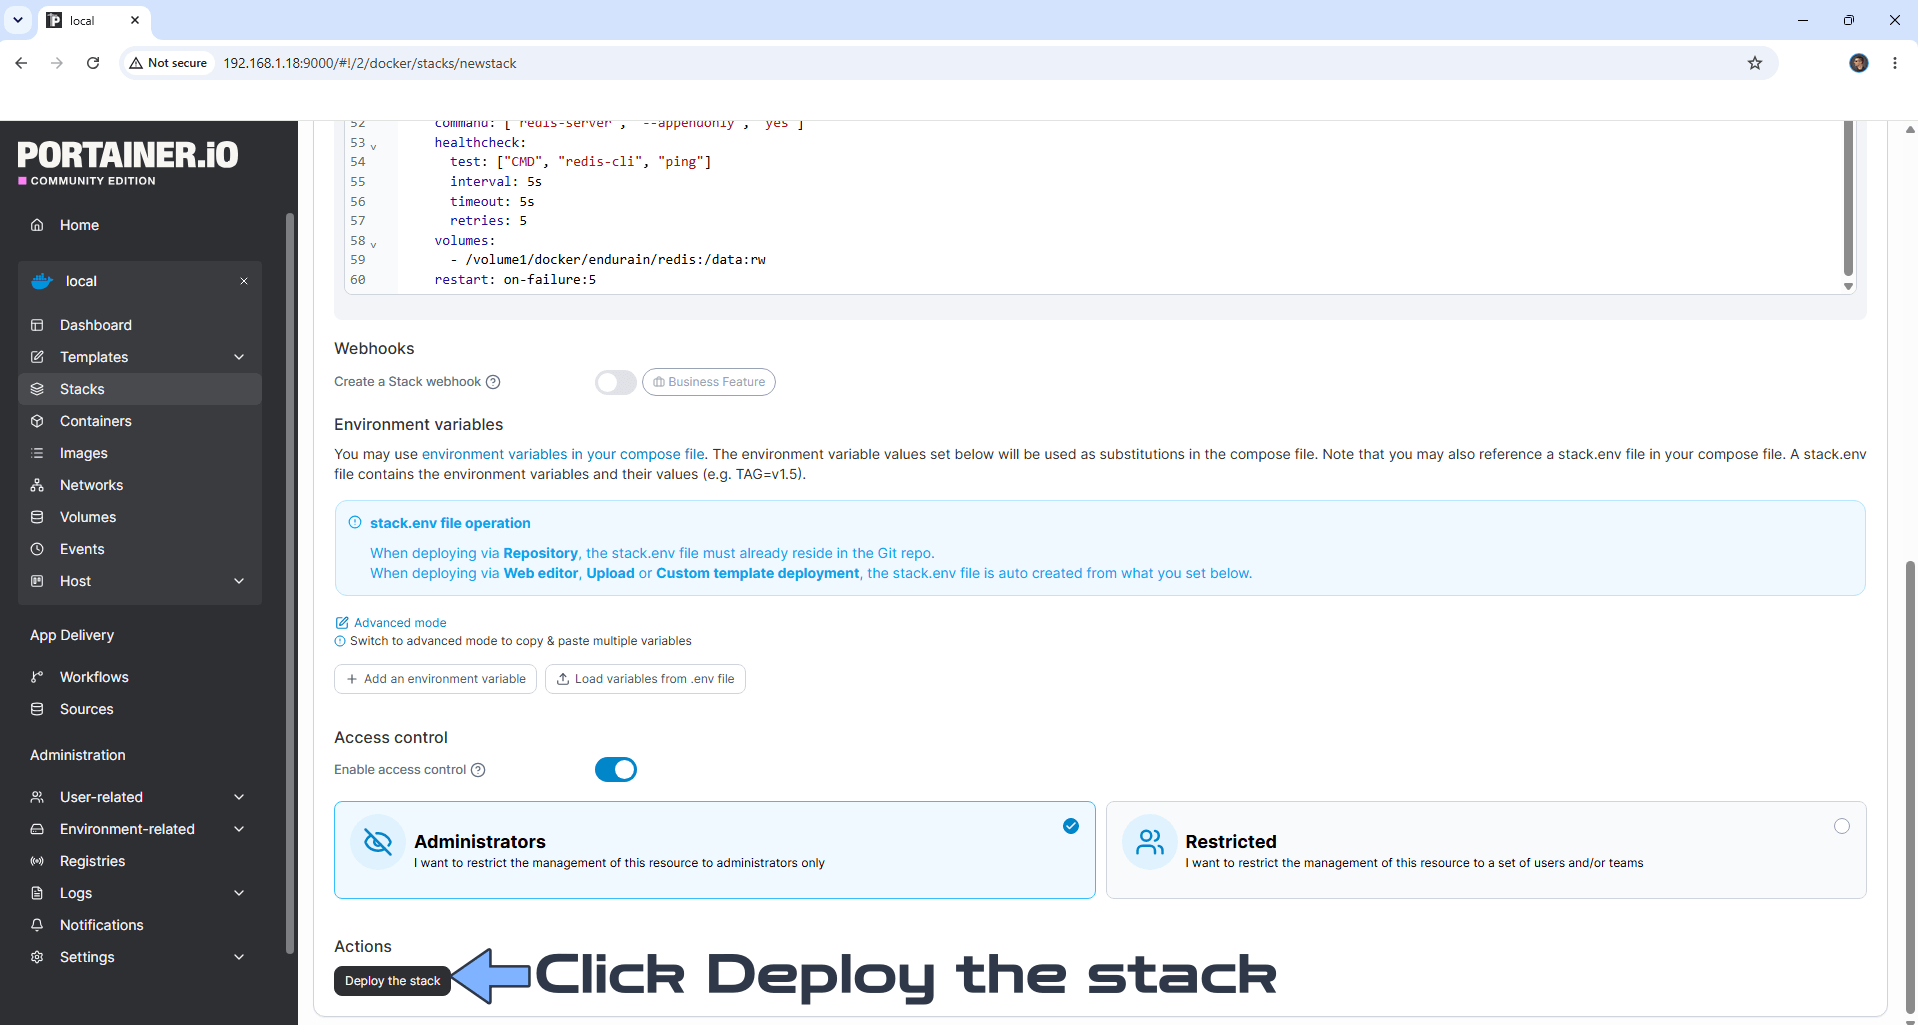
Scroll down on the page until you see a button called Deploy the stack. Click on it. Follow the instructions in the image below. The installation process can take up to a few minutes. It will depend on your Internet speed connection.
STEP 15
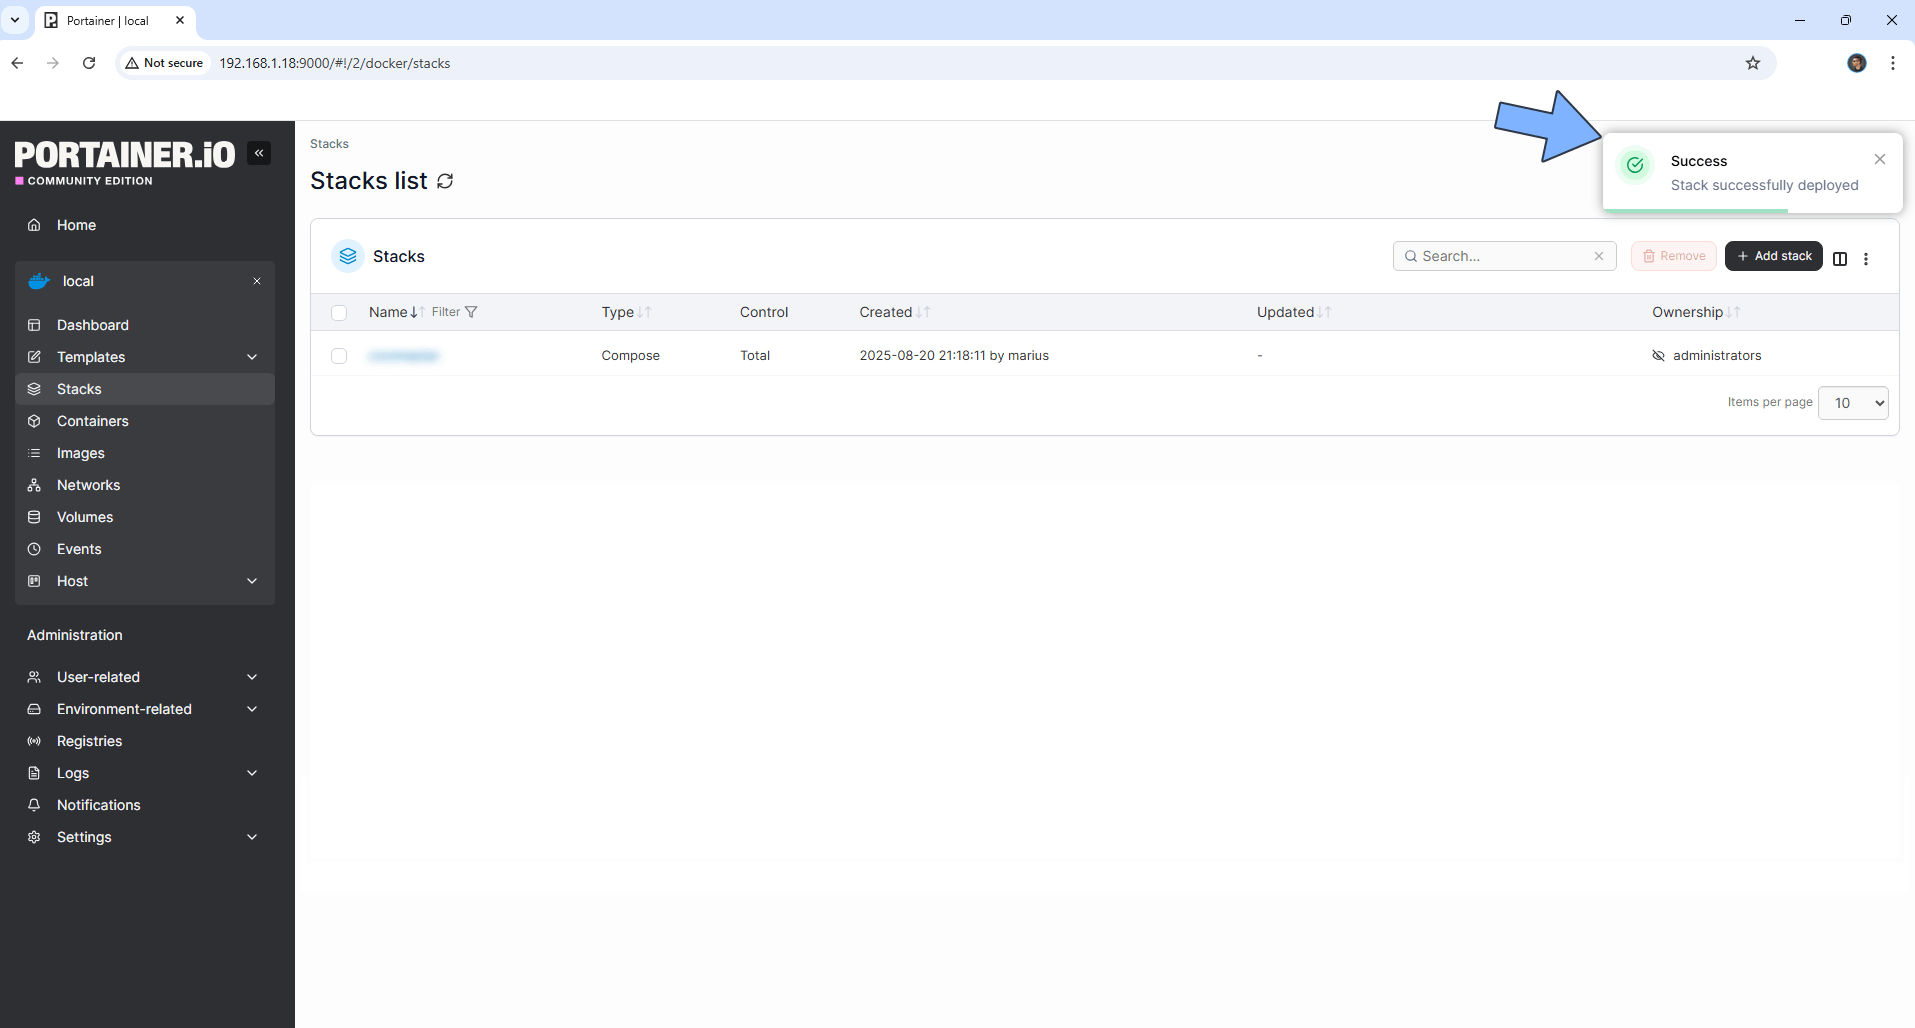
If everything goes right, you will see this message at the top right of your screen: “Success Stack successfully deployed“.
STEP 16
🟢Please Support My work by Making a Donation. You’ve just followed a detailed, ad-free guide that took real time and testing to create. I don’t run ads, I don’t sell subscriptions, I don’t track you, and I don’t use affiliate links. I simply create these guides because I love helping the community. But this work only continues if the community supports it back. If this guide saved you time, frustration or money, please take 30 seconds and make a donation.
STEP 17
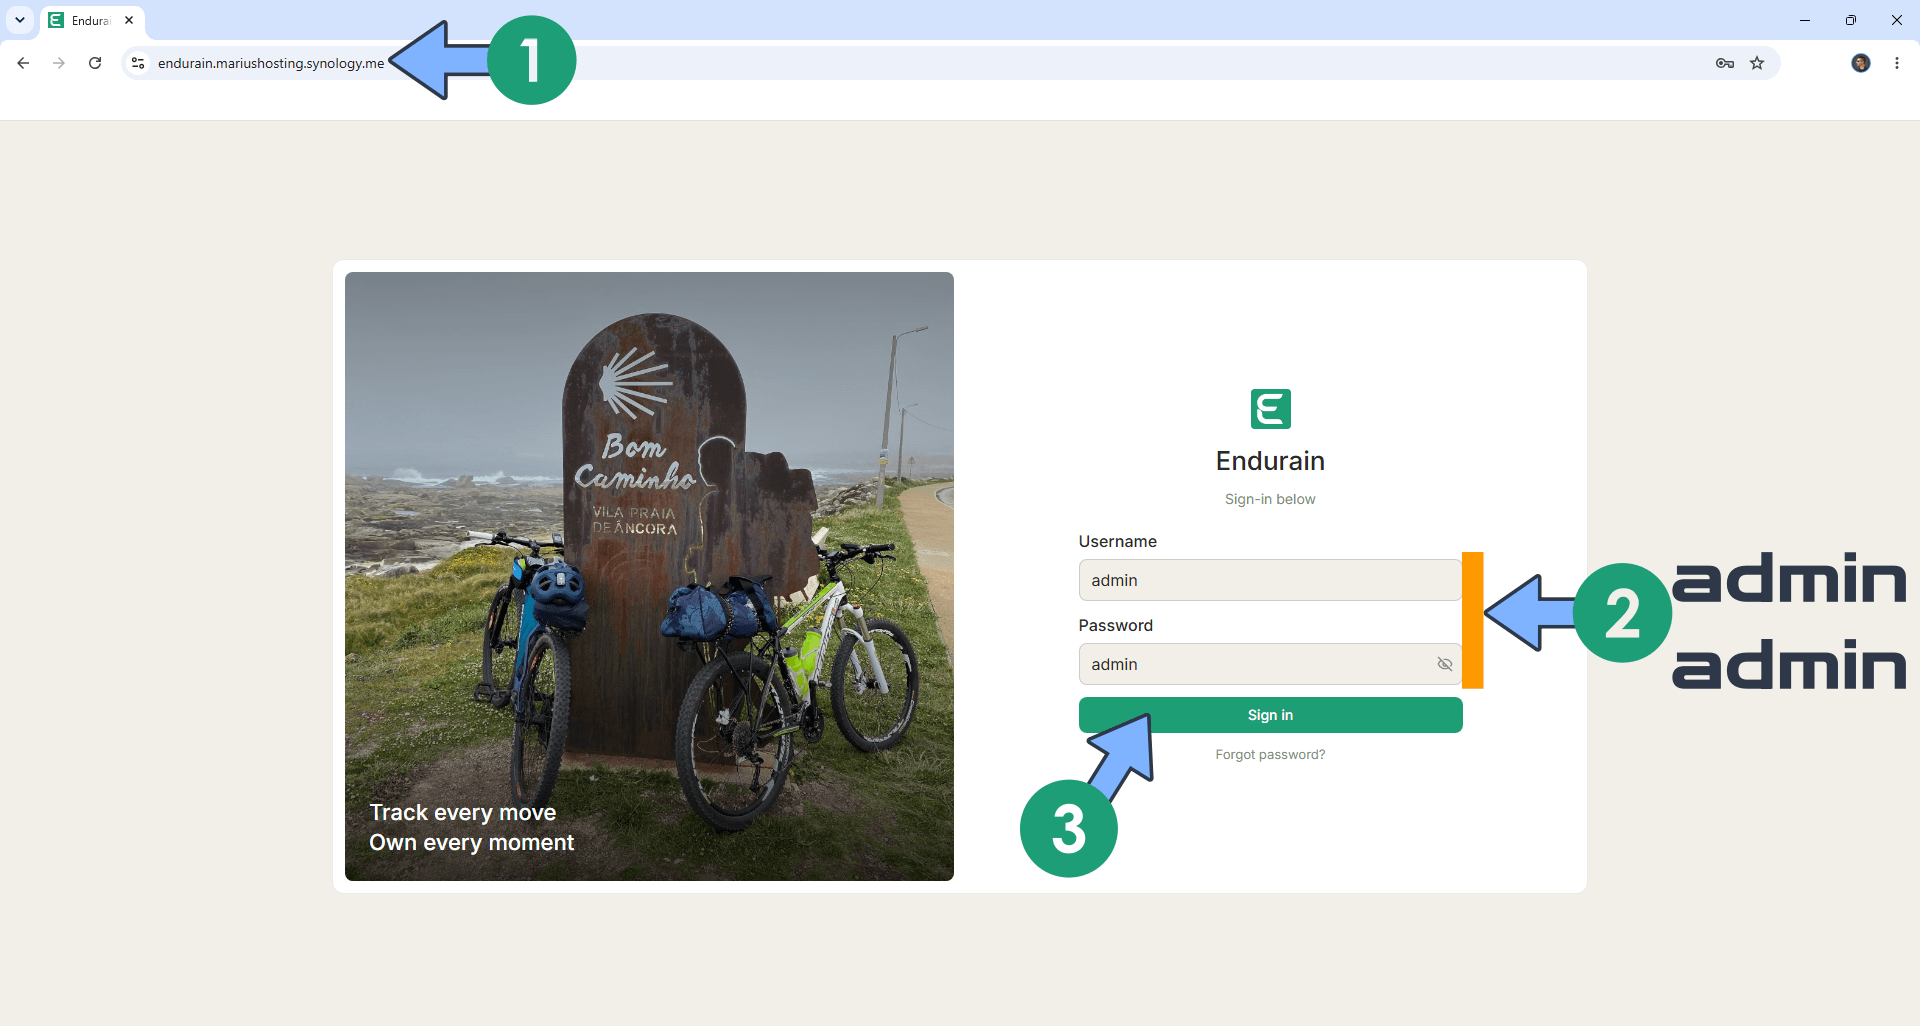
Now open your browser and type in your HTTPS/SSL certificate like this https://endurain.yourname.synology.me that you have previously created at STEP 6. In my case it’s https://endurain.mariushosting.synology.me If everything goes right, you will see the Endurain Login page. Type in admin as the default Username and admin as the default Password then click Sign in. Follow the instructions in the image below.
STEP 18
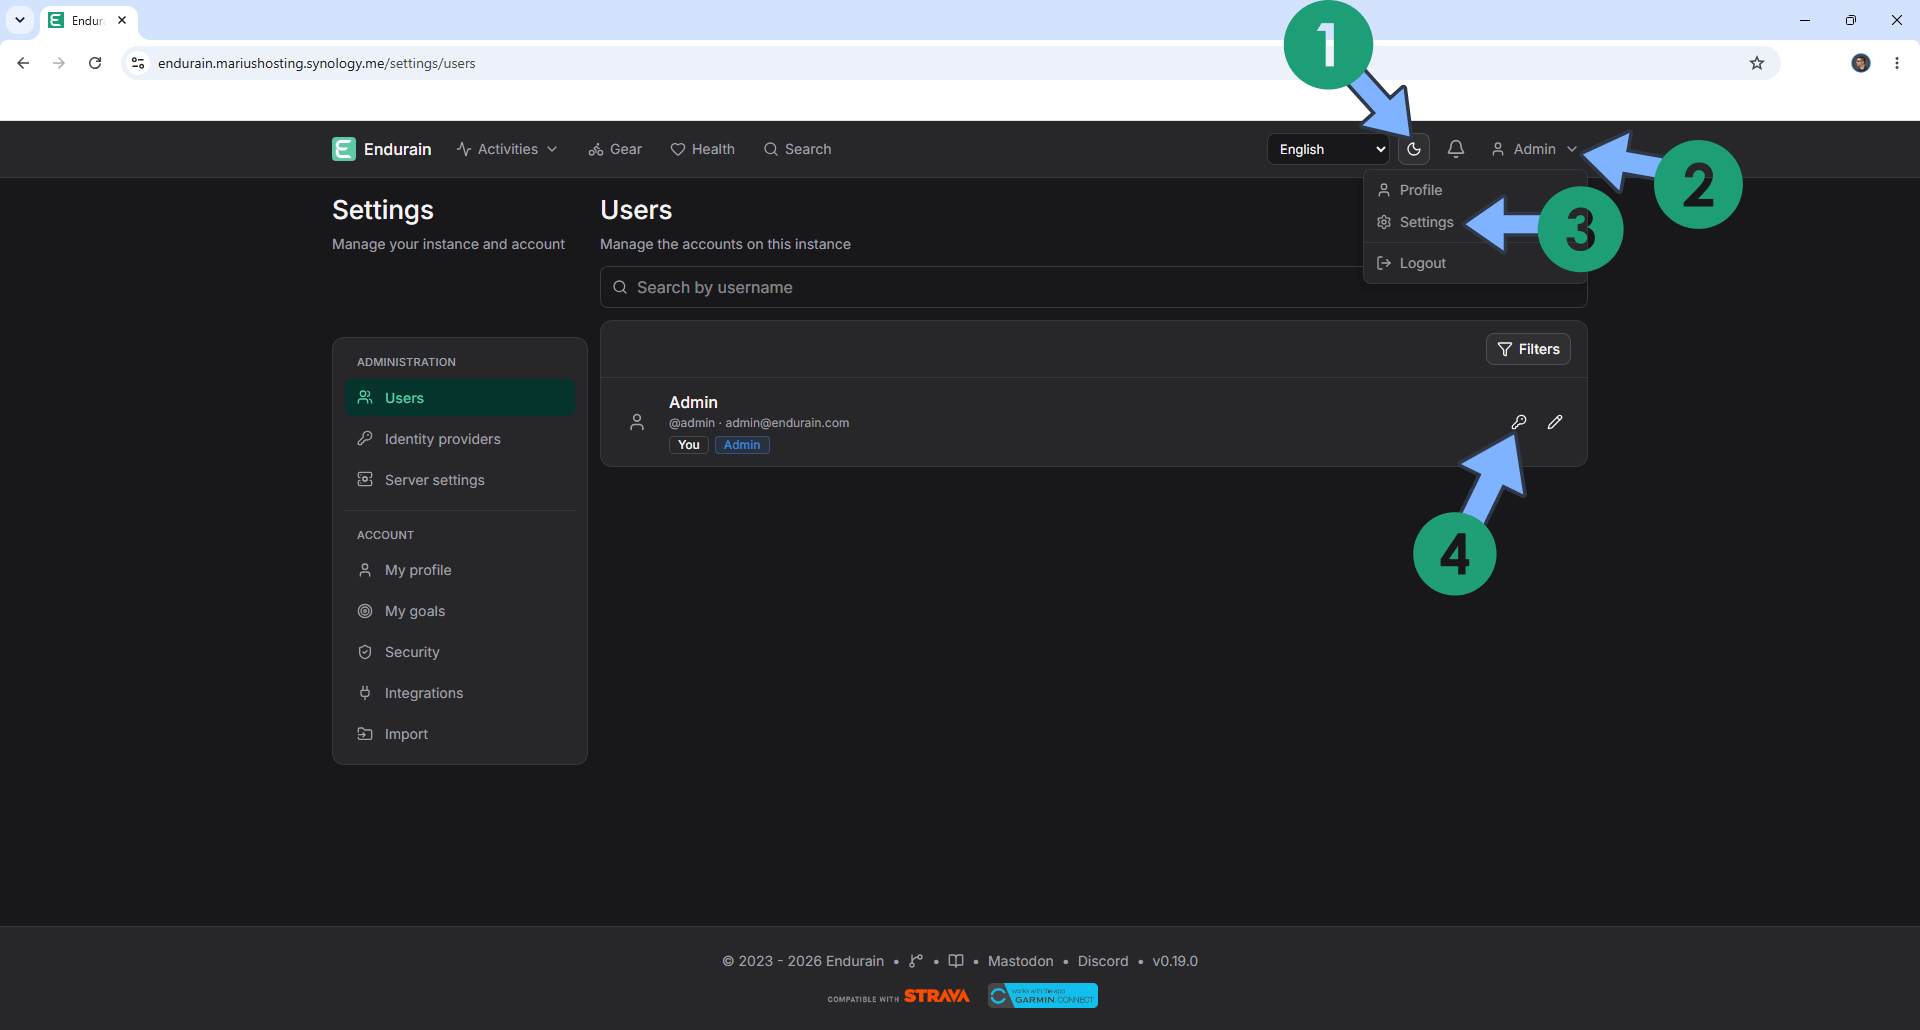
Switch the theme to Dark. At the top right of the page, under Admin, click Settings. Click the little key icon to change the default admin password. Follow the instructions in the image below.
STEP 19
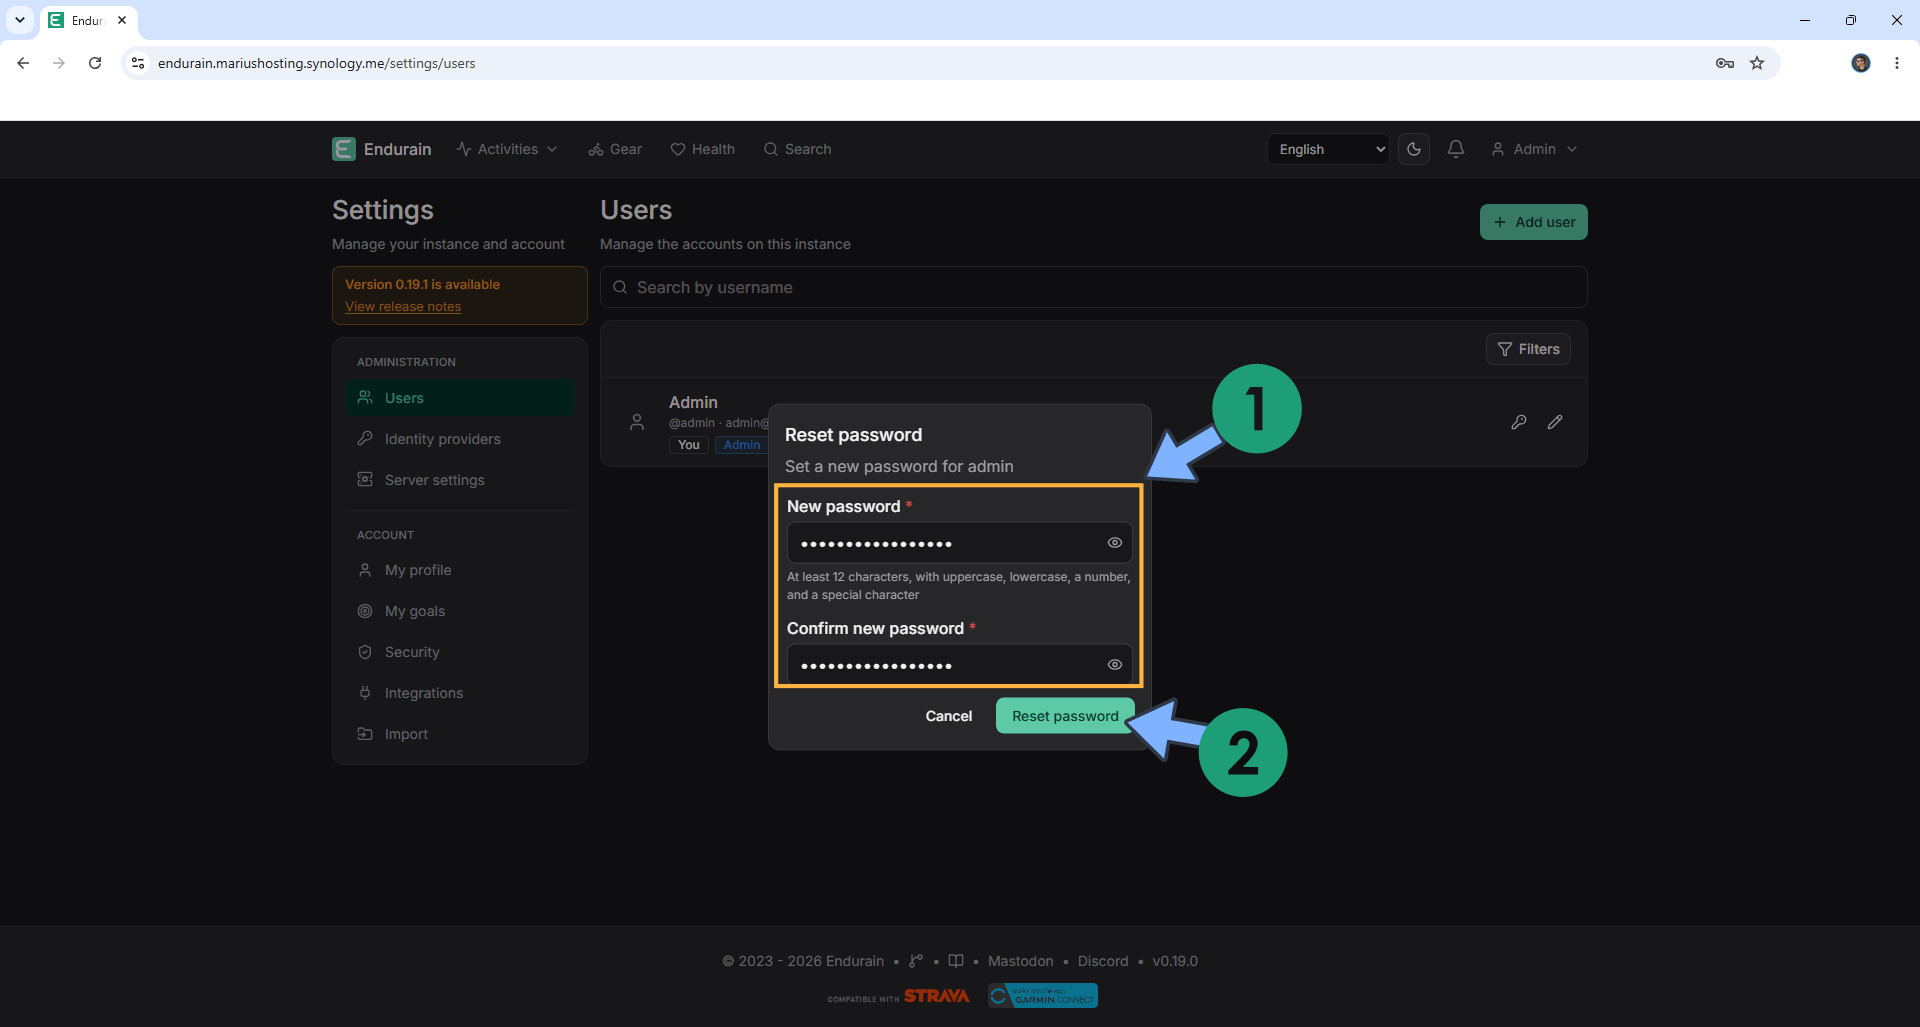
Set your new administrator password. Click Reset password. Follow the instructions in the image below.
STEP 20
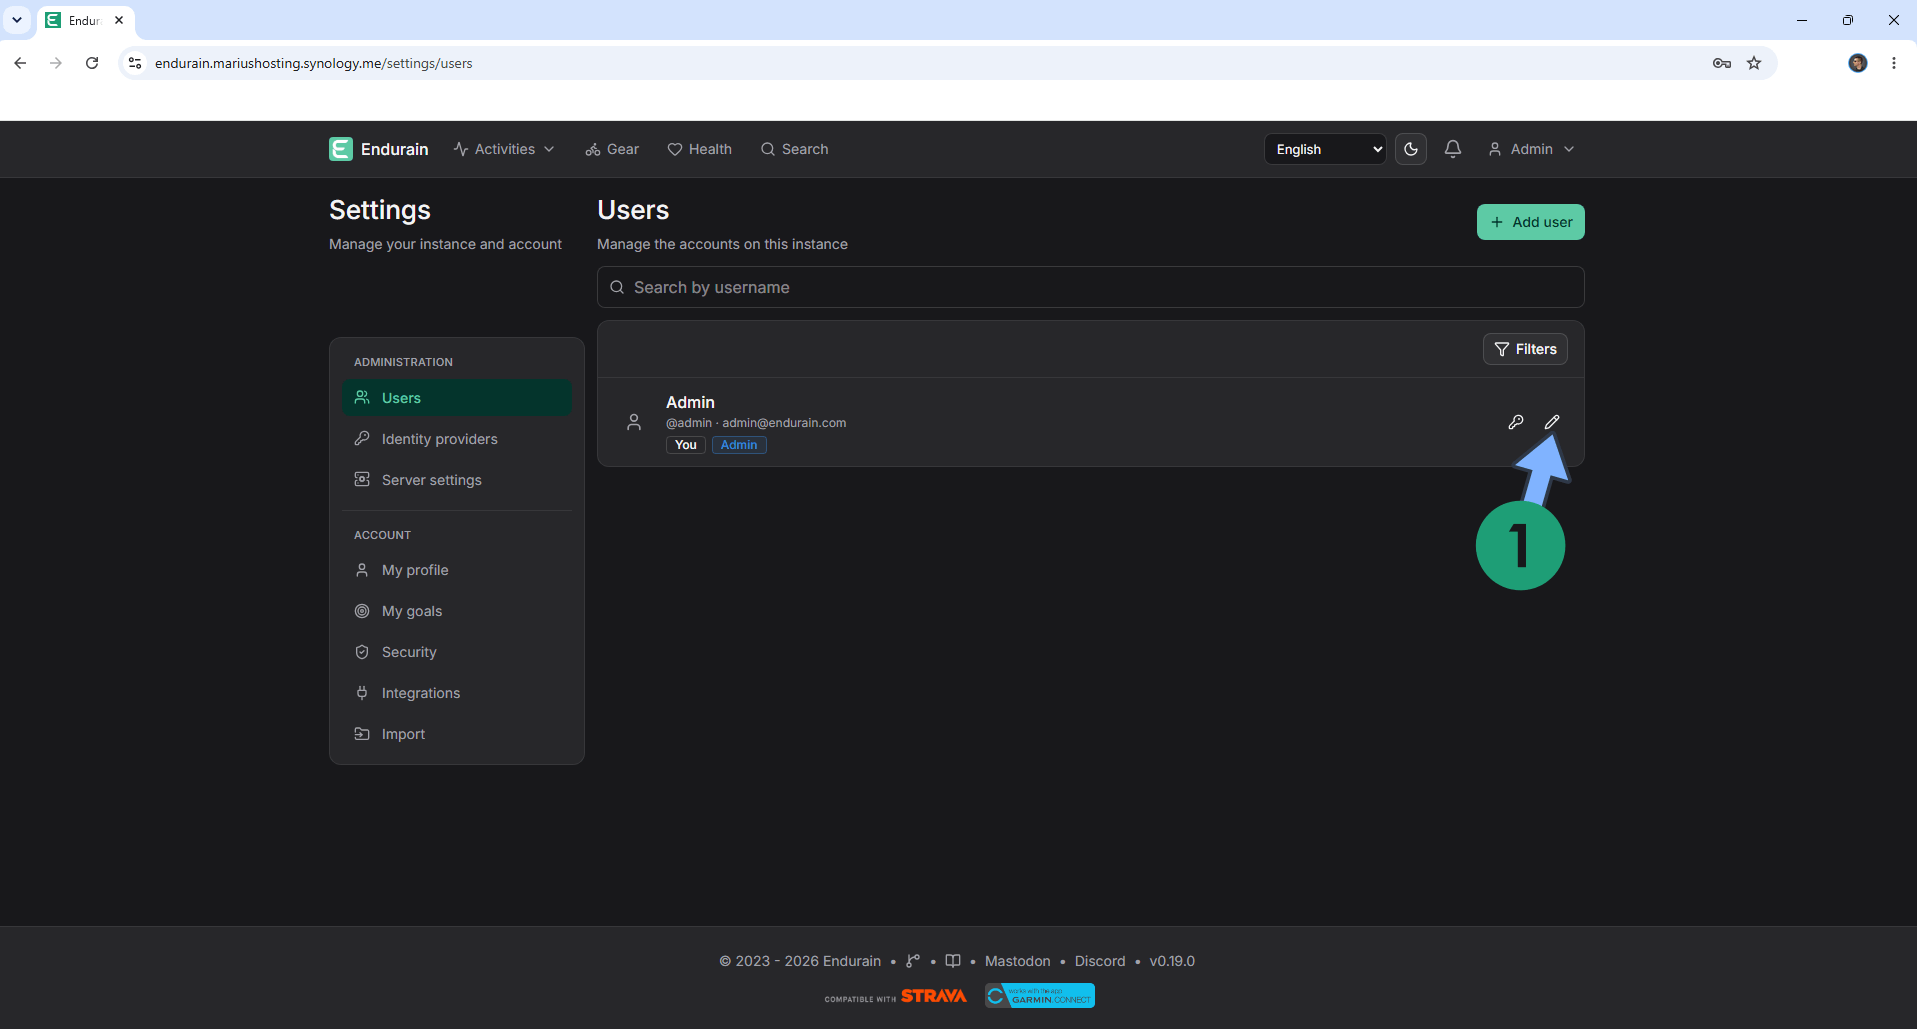
Click the little pencil icon. Follow the instructions in the image below.
STEP 21
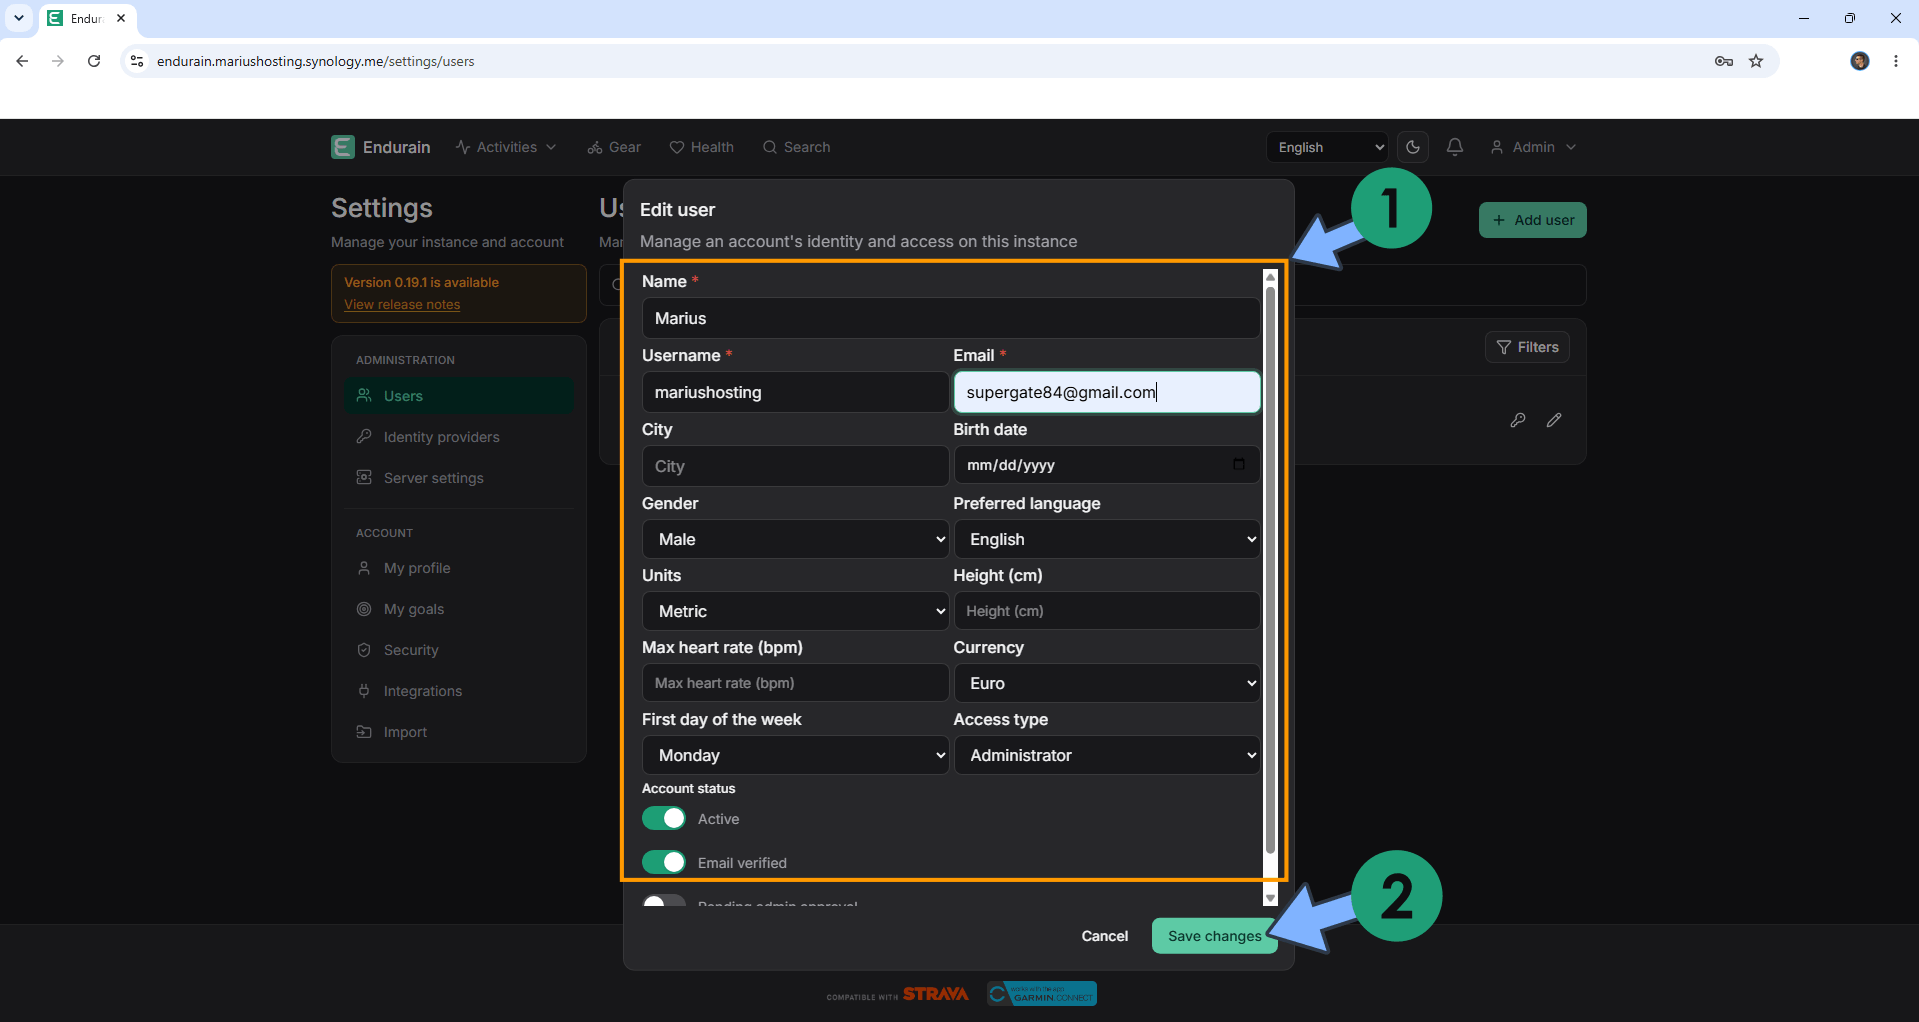
Edit your user. Click Save changes to save the changes. Follow the instructions in the image below.
STEP 22
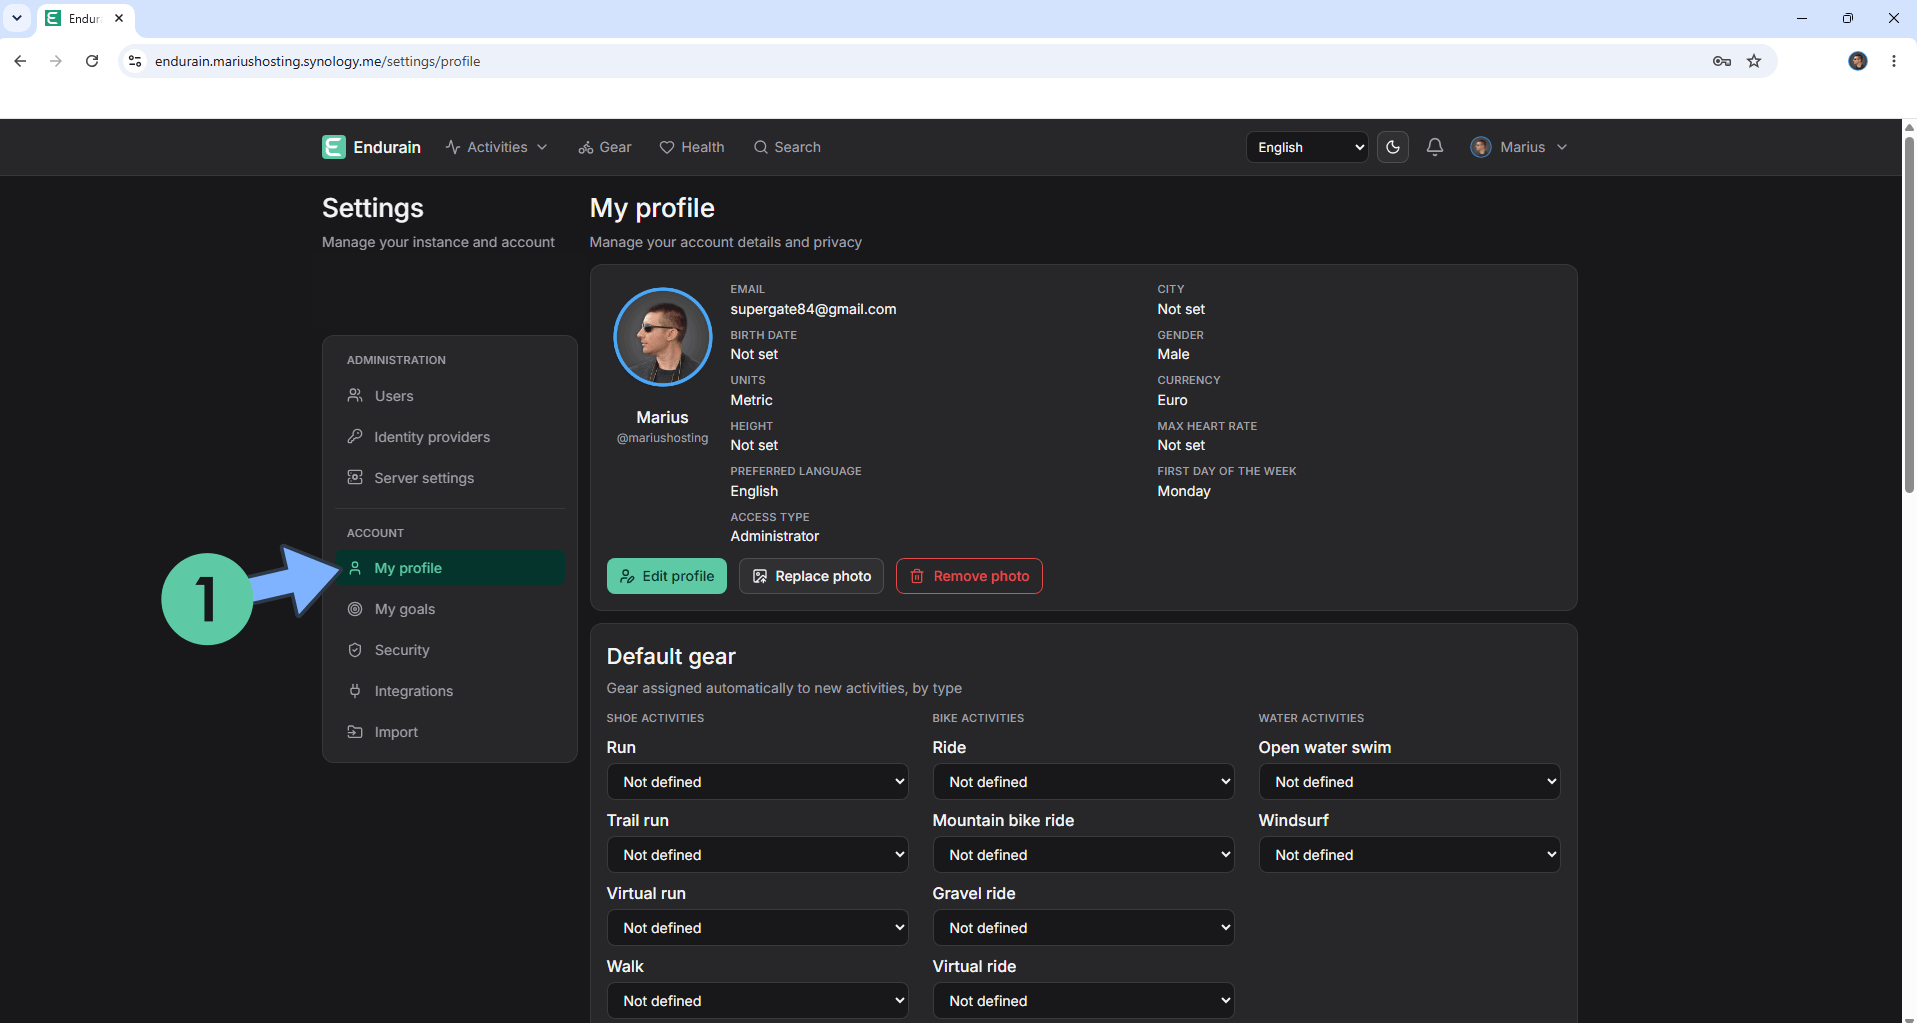
Your Profile at a glance!
STEP 23
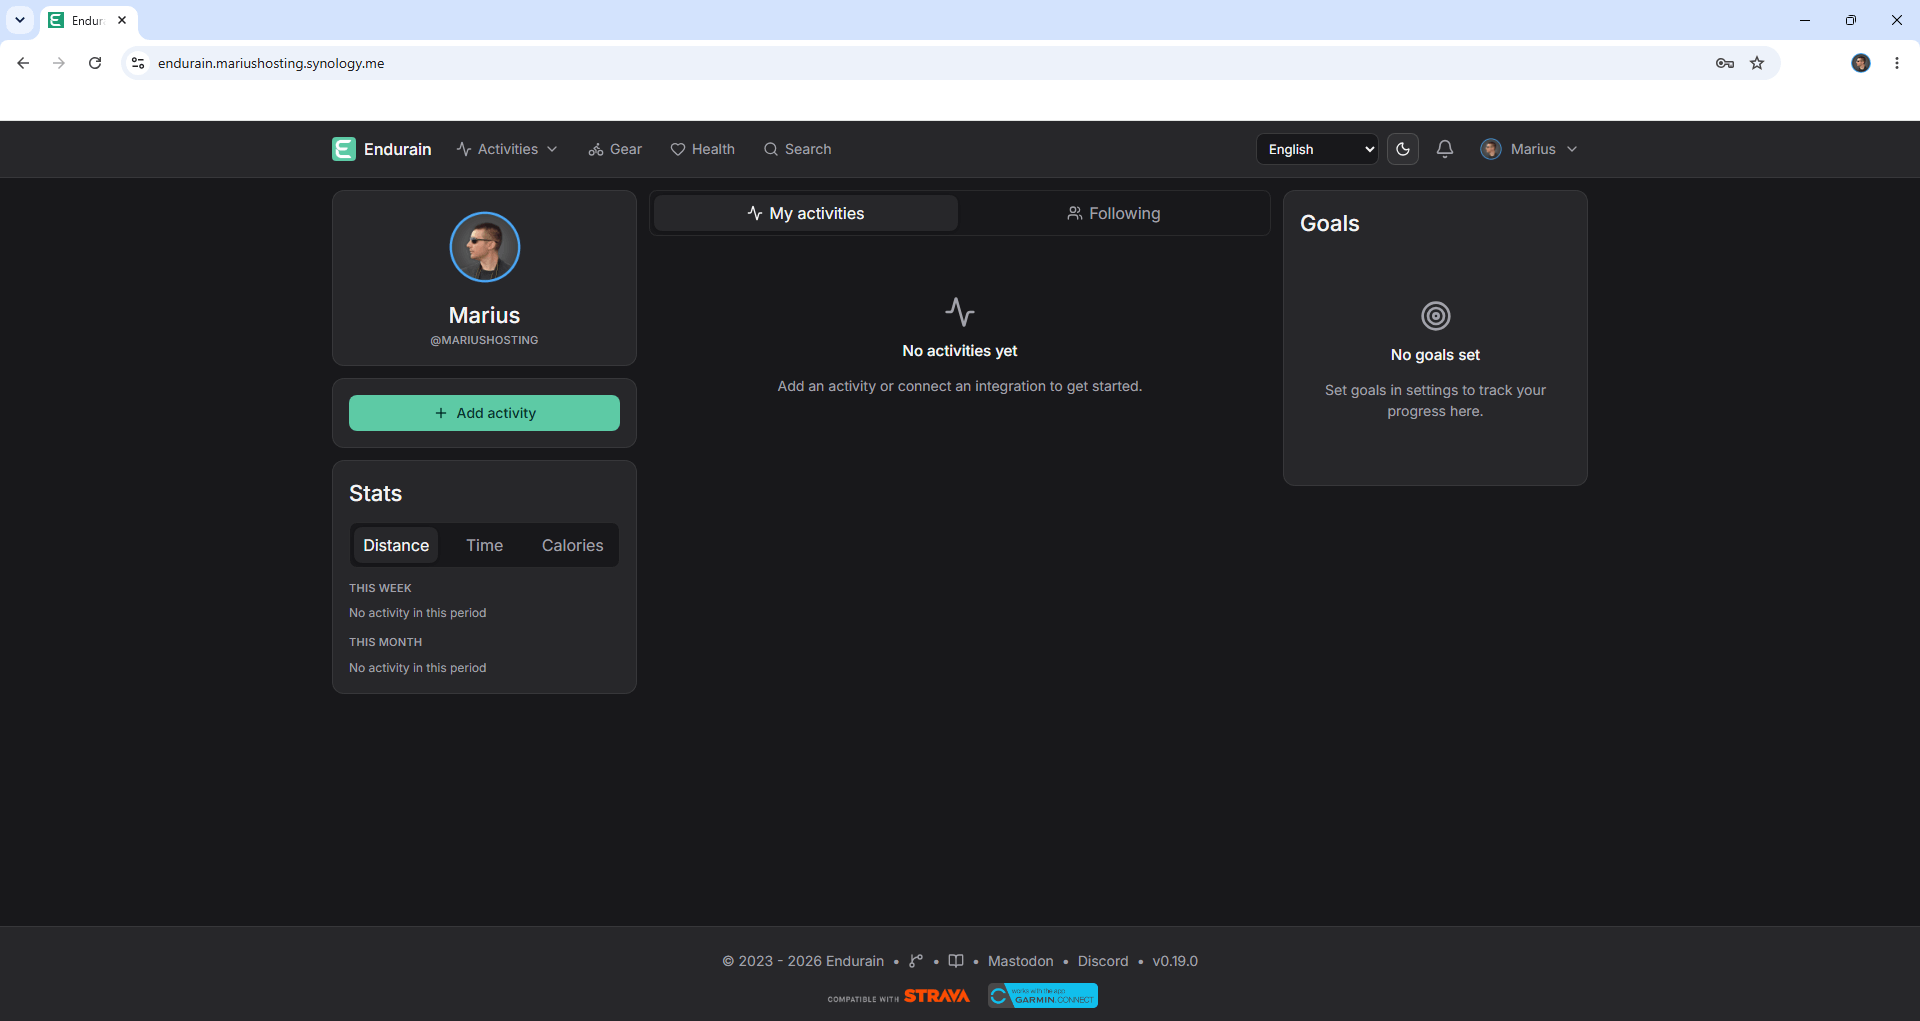
Start adding your Activity!
STEP 24
Your Endurain dashboard at a glance!
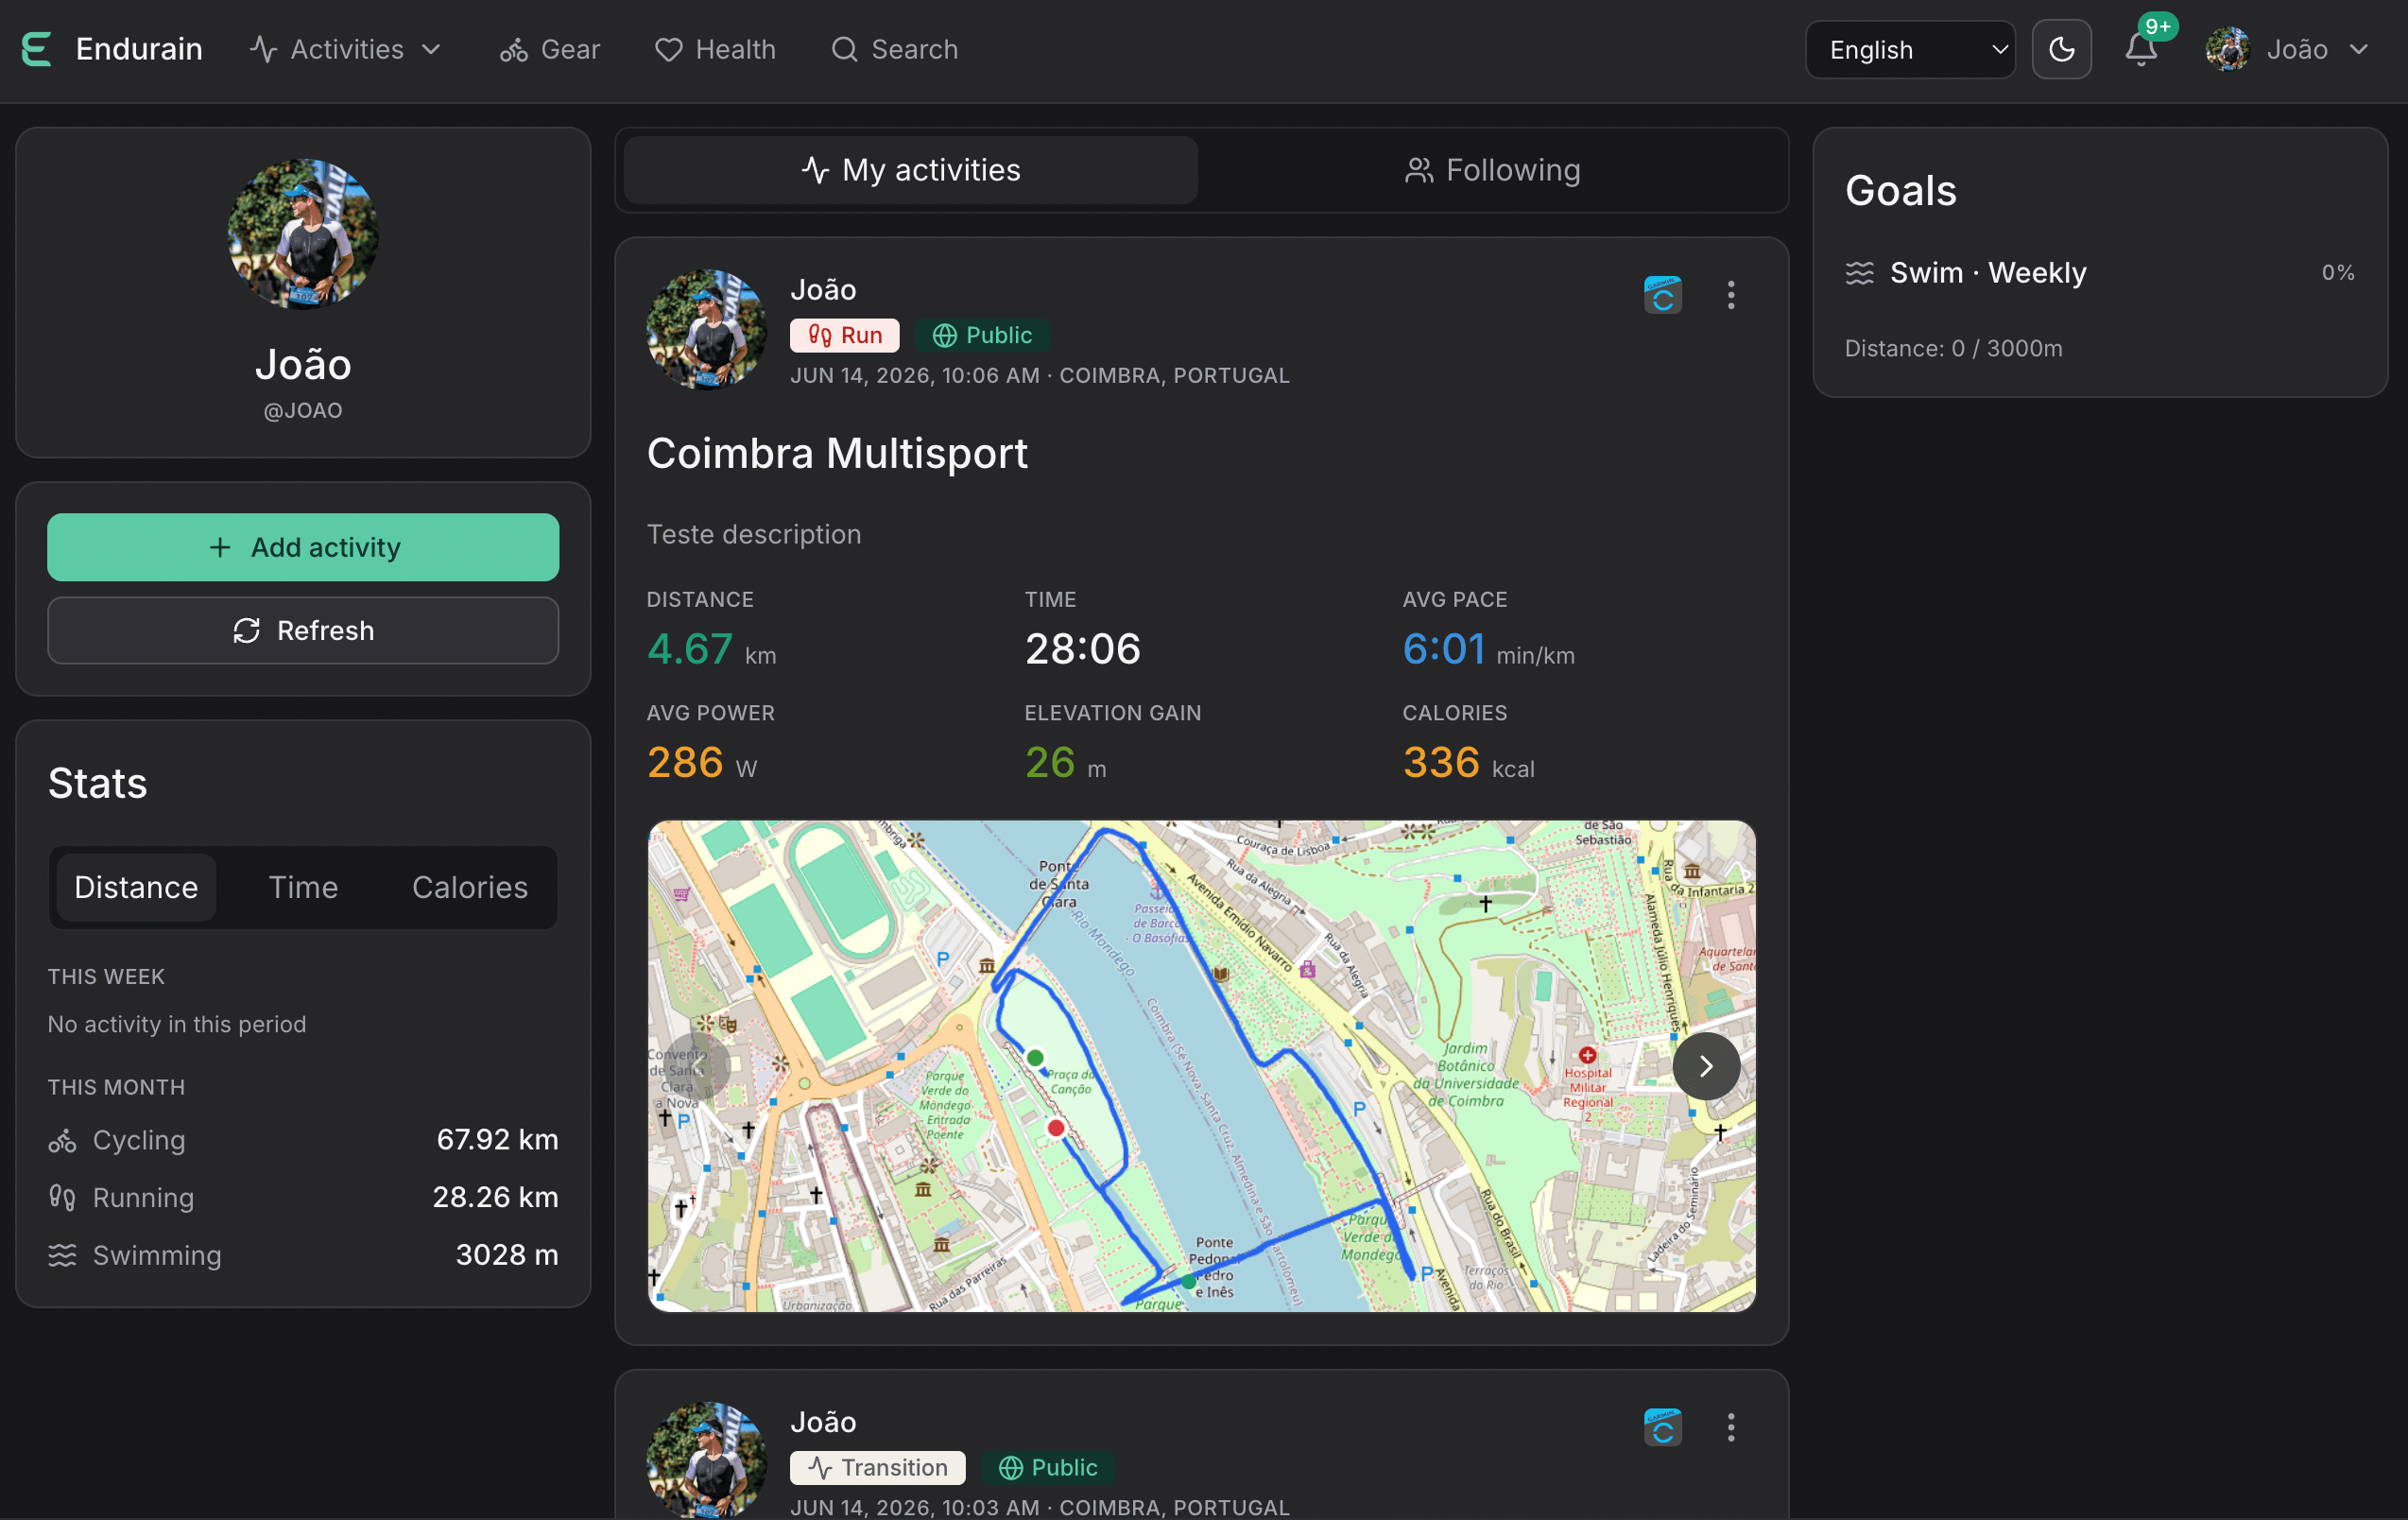
Enjoy Endurain!
If you encounter issues by using this container, make sure to check out the Common Docker issues article.
Note: Can I run Docker on my Synology NAS? See the supported models.
Note: How to Back Up Docker Containers on your Synology NAS.
Note: Find out how to update the Endurain container with the latest image.
Note: How to Free Disk Space on Your NAS if You Run Docker.
Note: How to Schedule Start & Stop For Docker Containers.
Note: How to Activate Email Notifications.
Note: How to Add Access Control Profile on Your NAS.
Note: How to Change Docker Containers Restart Policy.
Note: How to Use Docker Containers With VPN.
Note: Convert Docker Run Into Docker Compose.
Note: How to Clean Docker.
Note: How to Clean Docker Automatically.
Note: Best Practices When Using Docker and DDNS.
Note: Some Docker Containers Need WebSocket.
Note: Find out the Best NAS Models For Docker.
Note: Activate Gmail SMTP For Docker Containers.
This post was updated on Wednesday / September 2nd, 2026 at 3:53 AM