OnlyOffice Document Server is an online office suite comprising viewers and editors for texts, spreadsheets and presentations, fully compatible with Office Open XML formats: .docx, .xlsx, .pptx etc. In this step by step guide I will show you how to install OnlyOffice on your Synology NAS using Docker.
STEP 1
Please Support My work by Making a Donation.
STEP 2
Install Nextcloud using my Docker Guide. If you already have Nextcloud installed on your Synology NAS, skip this STEP.
STEP 3
Make sure you have a synology.me Wildcard Certificate. Follow my guide to get a Wildcard Certificate. If you already have a synology.me Wildcard certificate, skip this STEP.
STEP 4
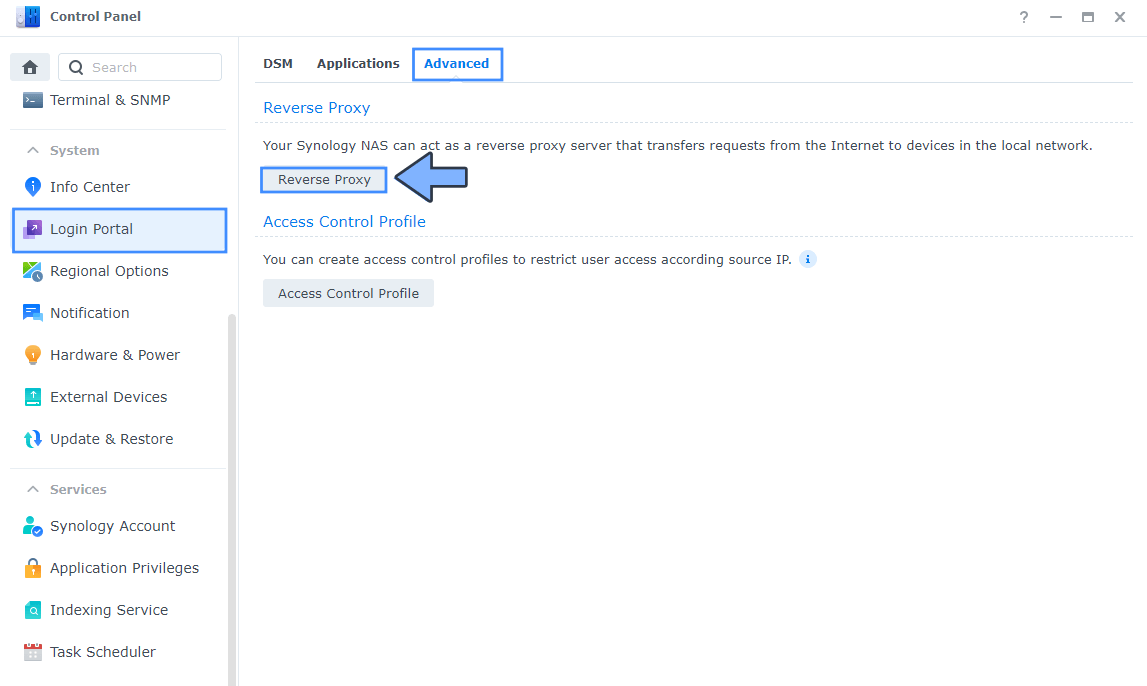
Go to Control Panel / Login Portal / Advanced Tab / click Reverse Proxy. Follow the instructions in the image below.
STEP 5
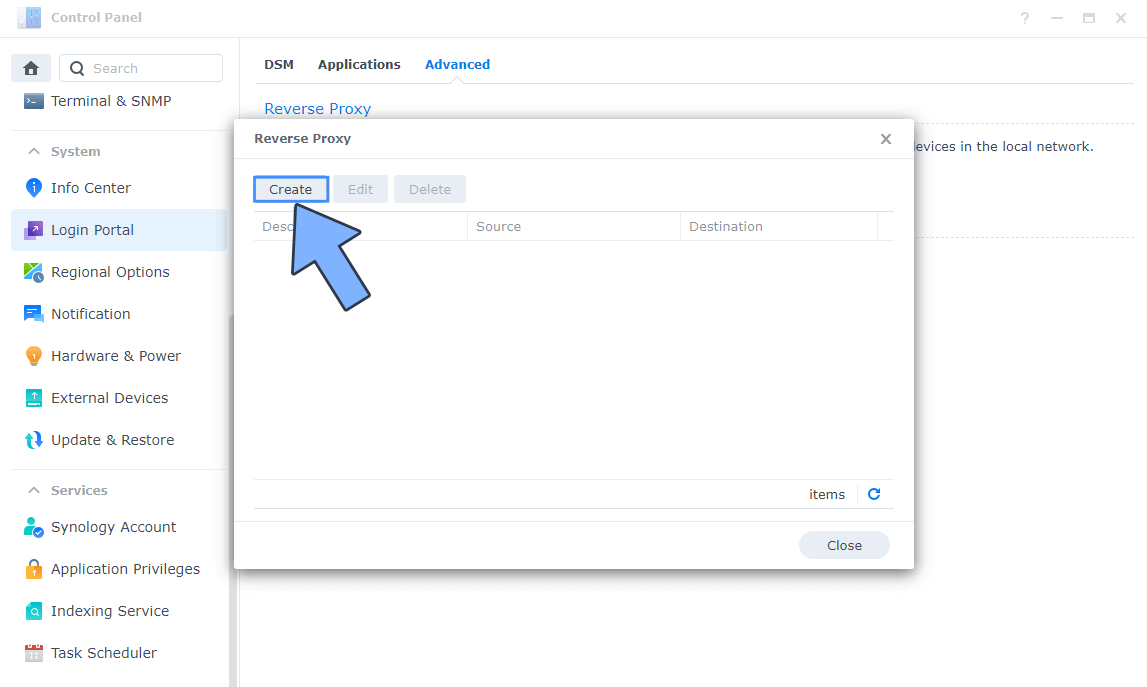
Now click the “Create” button. Follow the instructions in the image below.
STEP 6
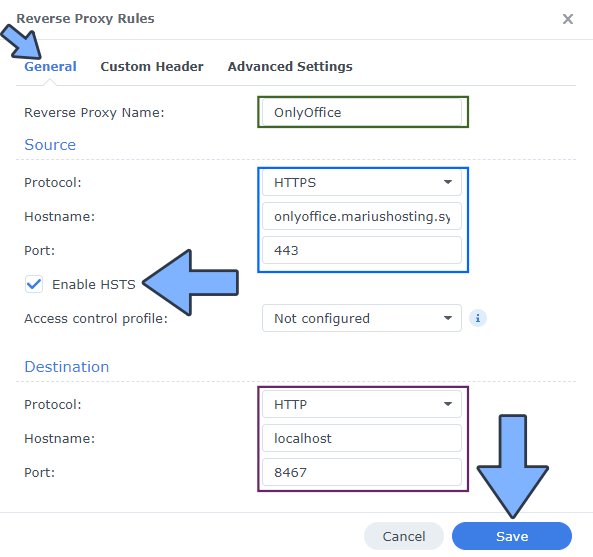
After you click the Create button, the window below will open. Follow the instructions in the image below.
On the General area, set the Reverse Proxy Name description: type in OnlyOffice. After that, add the following instructions:
Source:
Protocol: HTTPS
Hostname: onlyoffice.yourname.synology.me
Port: 443
Check Enable HSTS
Destination:
Protocol: HTTP
Hostname: localhost
Port: 8467
STEP 7
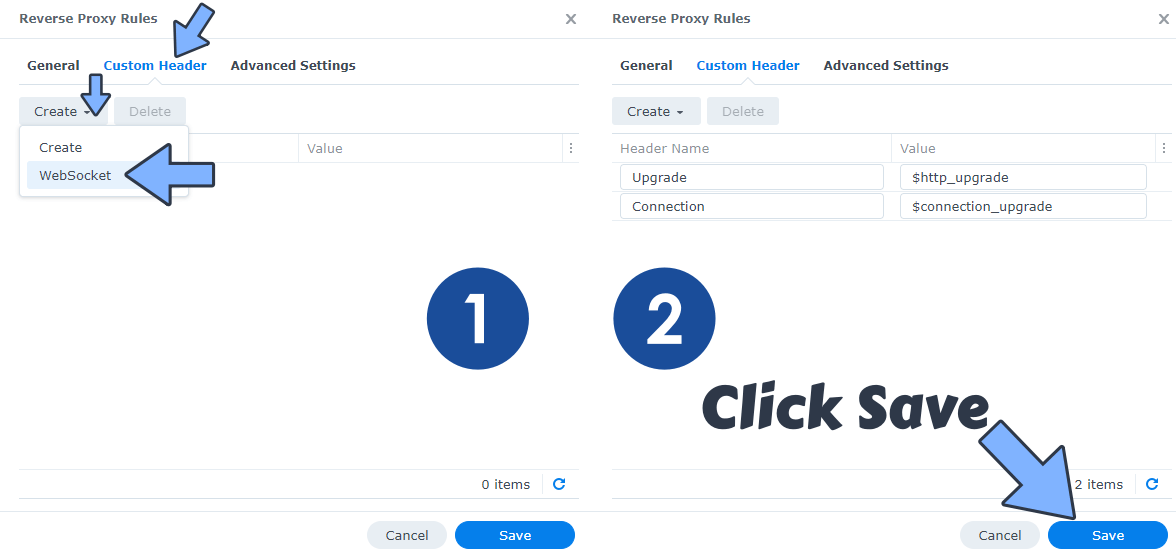
On the Reverse Proxy Rules click the Custom Header tab. Click Create and then, from the drop-down menu, click WebSocket. After you click on WebSocket, two Header Names and two Values will be automatically added. Click Save. Follow the instructions in the image below.
STEP 8
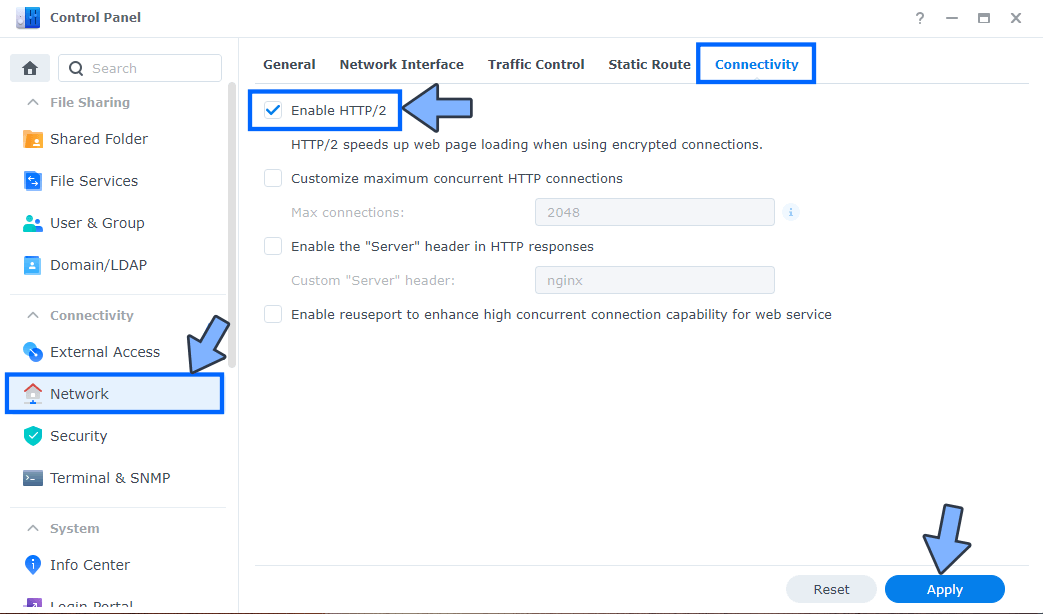
Go to Control Panel / Network / Connectivity tab/ Check Enable HTTP/2 then click Apply. Follow the instructions in the image below.
STEP 9
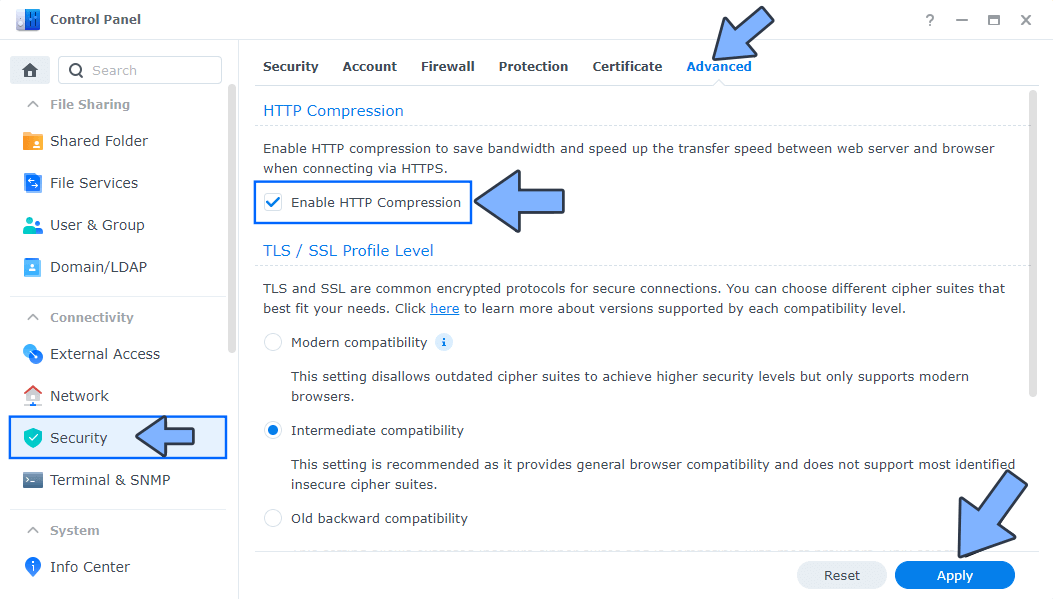
Go to Control Panel / Security / Advanced tab/ Check Enable HTTP Compression then click Apply. Follow the instructions in the image below.
STEP 10
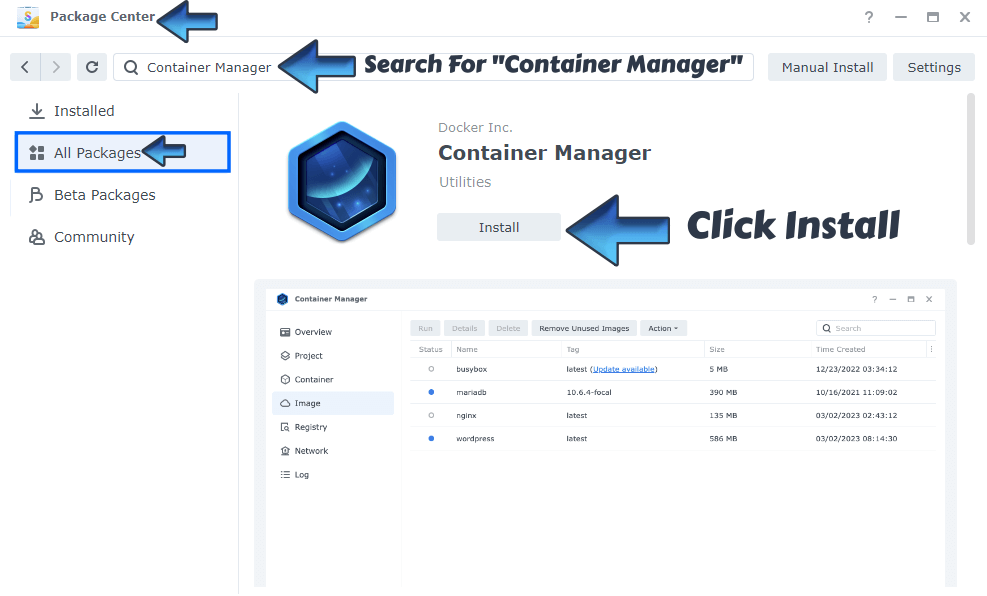
Install Container Manager via Synology “Package Center”. If you run an older DSM version (under 7.2), search for Docker instead of Container Manager.
STEP 11
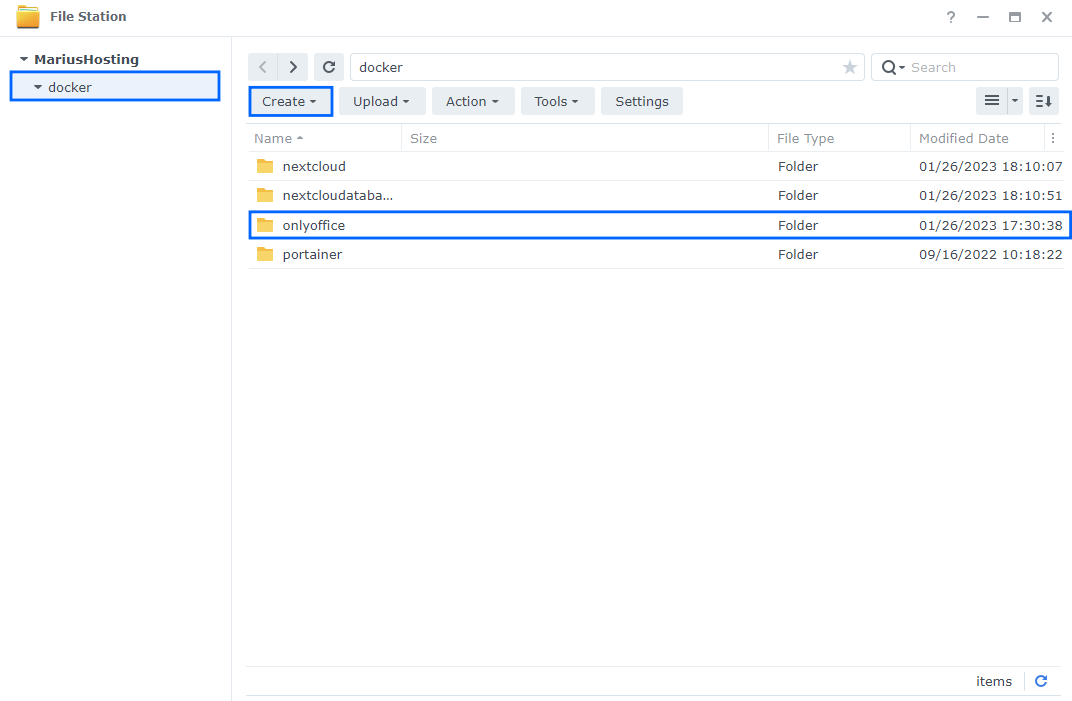
Go to File Station and open the docker folder. Inside the docker folder, create one new folder and name it onlyoffice. Follow the instructions in the image below.
Note: Be careful to enter only lowercase, not uppercase letters.
STEP 12
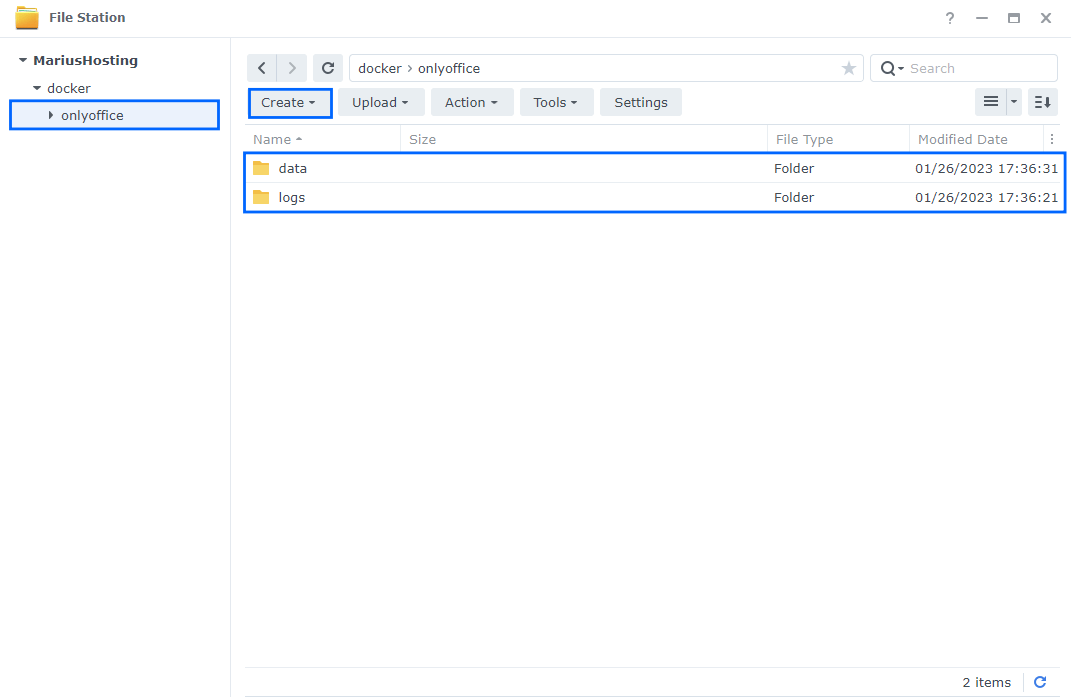
Now create two new folders inside the onlyoffice folder that you created at STEP 11. Name them data and logs. Follow the instructions in the image below.
Note: Be careful to enter only lowercase, not uppercase letters.
STEP 13
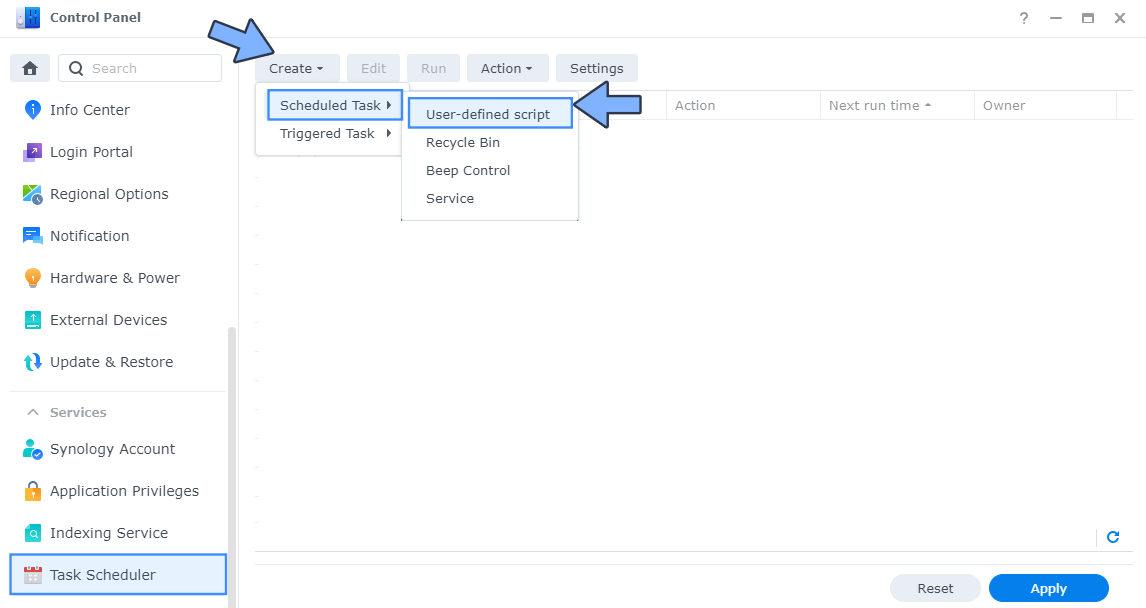
Go to Control Panel / Task Scheduler / Create / Scheduled Task / User-defined script. Follow the instructions in the image below.
STEP 14
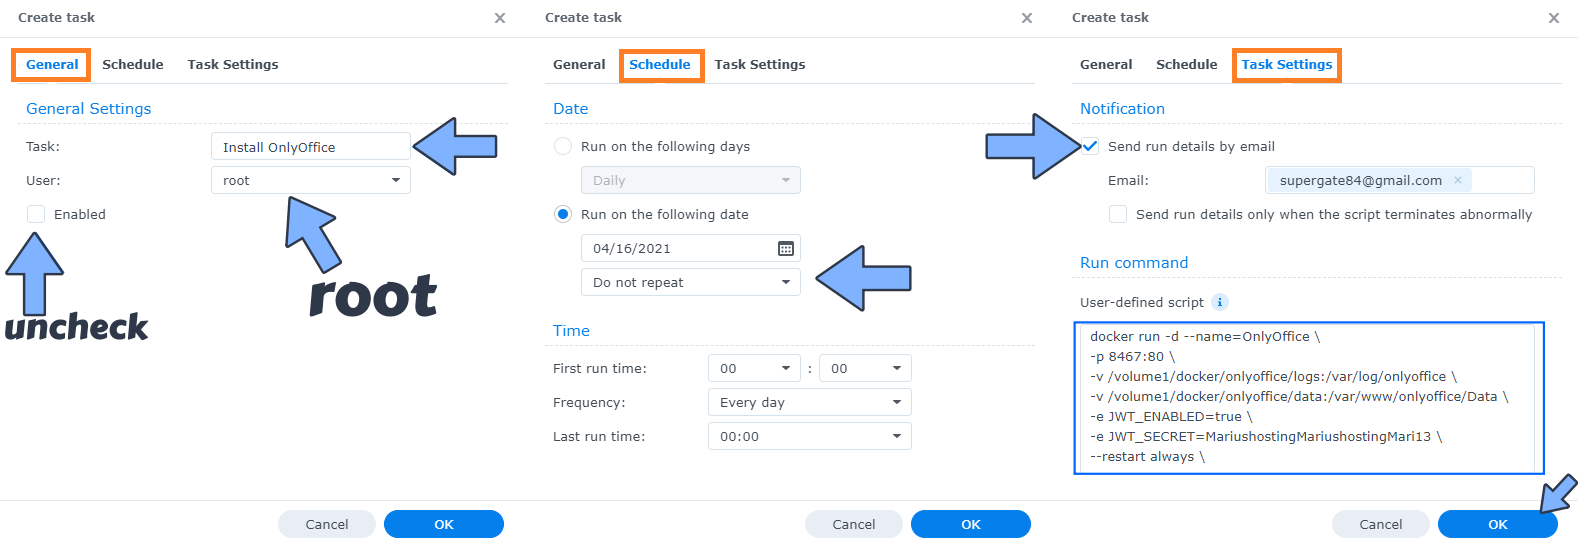
Once you click on User-defined script, a new window will open. Follow the instructions below:
- General: In the Task field type in “Install Onlyoffice“. Uncheck the “Enabled” option. Select root User.
- Schedule: Select Run on the following date then select “Do not repeat“.
- Task Settings: Check “Send run details by email“, add your email then copy paste the code below in the Run command area. After that, click OK.
docker run -d --name=OnlyOffice \
-p 8467:80 \
-v /volume1/docker/onlyoffice/logs:/var/log/onlyoffice \
-v /volume1/docker/onlyoffice/data:/var/www/onlyoffice/Data \
-e JWT_ENABLED=true \
-e JWT_SECRET=MariushostingMariushostingMari13 \
--restart always \
onlyoffice/documentserverNote: Before you paste the code above in the Run command area below, change the value for JWT_SECRET and add your own JWT SECRET. MariushostingMariushostingMari13 is an example for a JWT_SECRET. You should invent your own Value. Add 32 random characters, both letters and numbers.
STEP 15
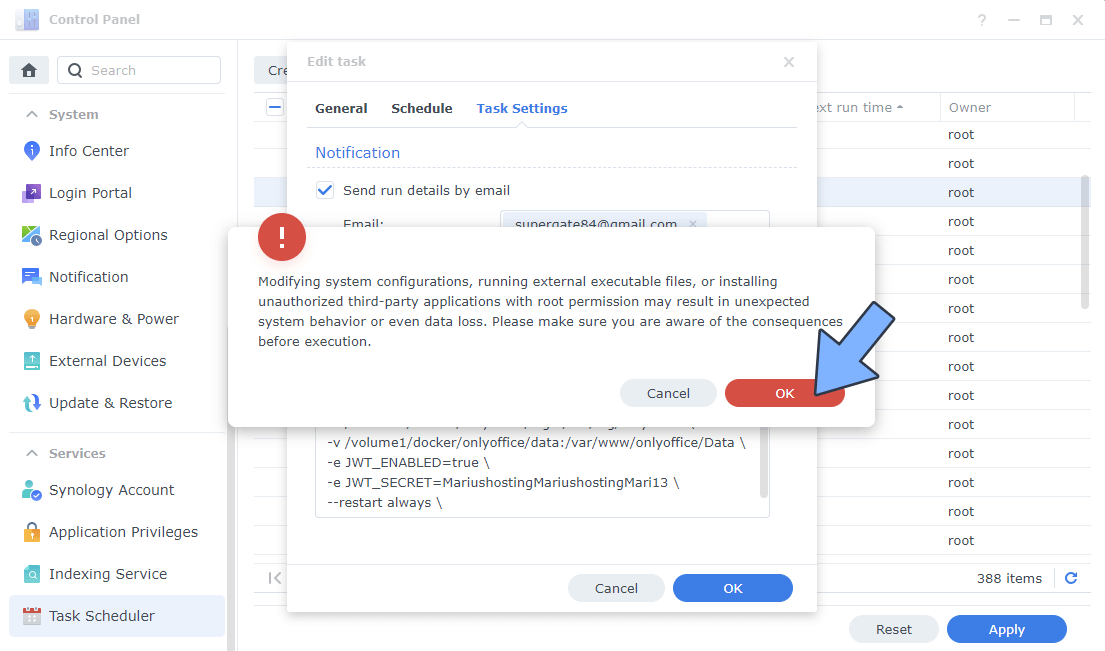
After you click OK on STEP 14 a new warning pop up window will open. Click OK.
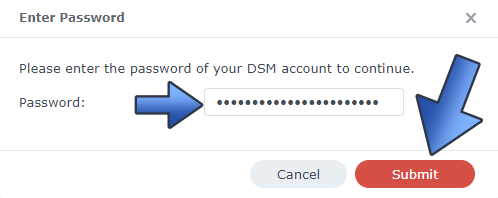
After you click OK, type in your DSM Password then click Submit. Follow the instructions in the image below.
STEP 16
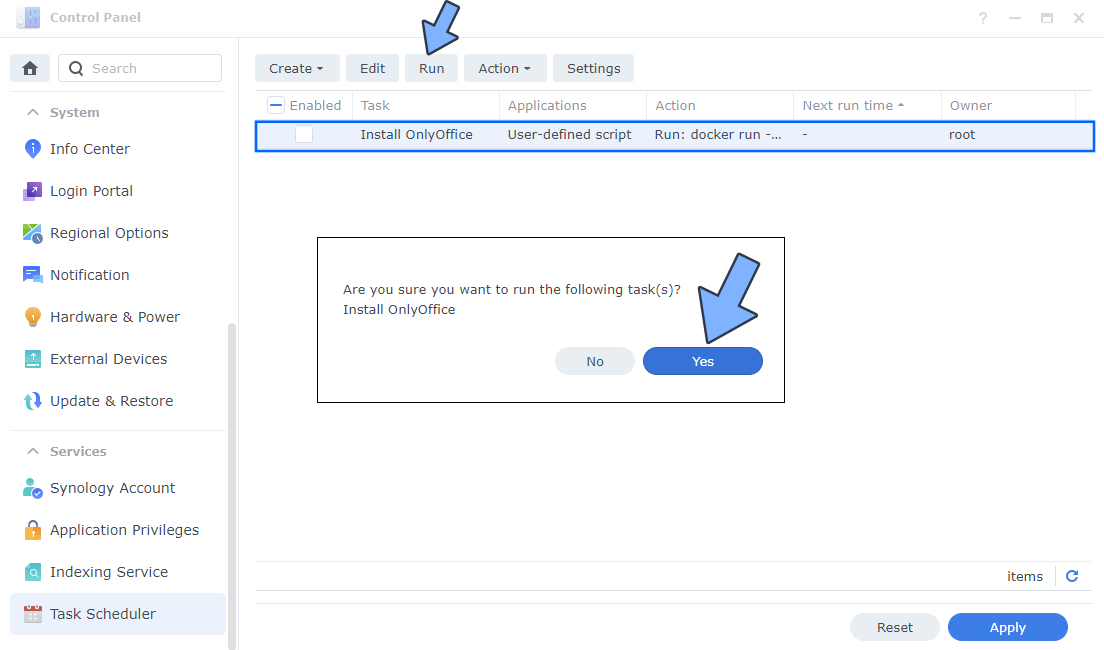
After you click Submit on STEP 15, select your “Install OnlyOffice” Task then click the “Run” tab. You will be asked to run Install OnlyOffice – click OK. Follow the instructions in the image below.
STEP 17
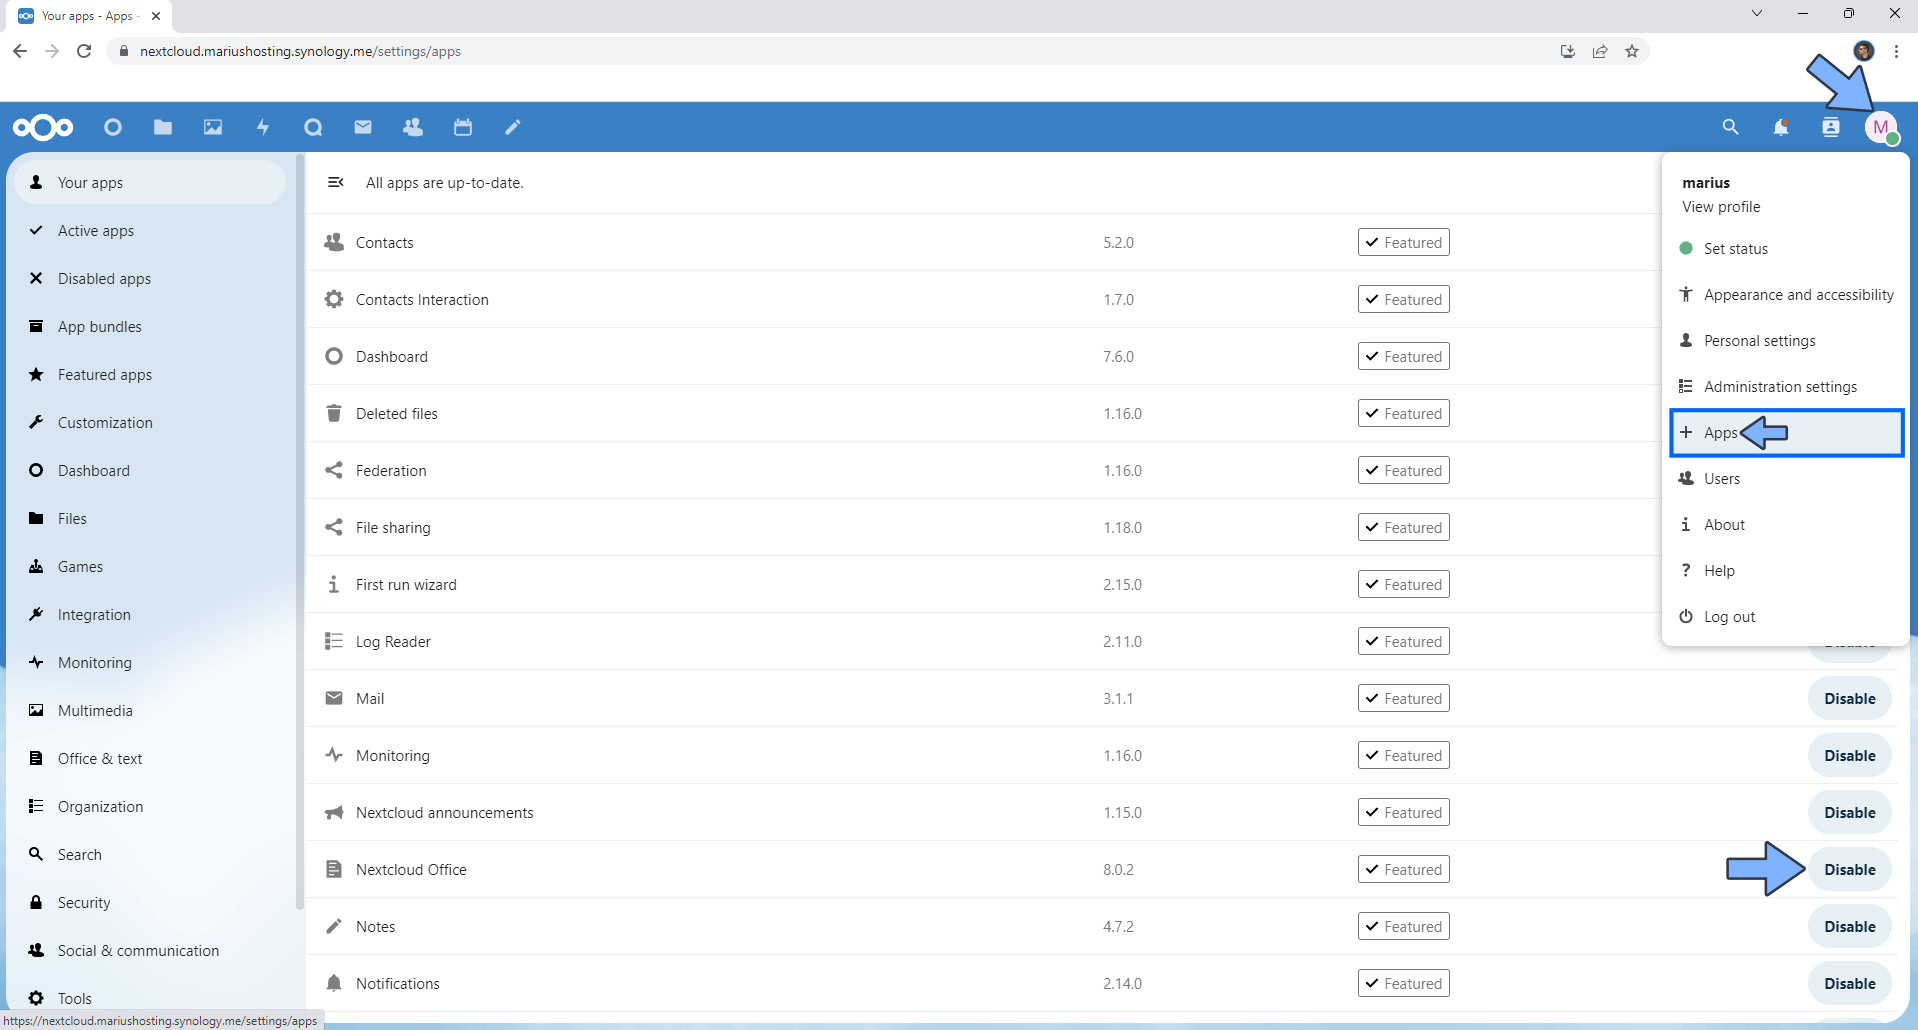
Log into your Nextcloud account. At the top right of the page click on your profile, then + Apps. Check to see if you have a Nextcloud Office App installed, then disable it. Follow the instructions in the image below.
STEP 18
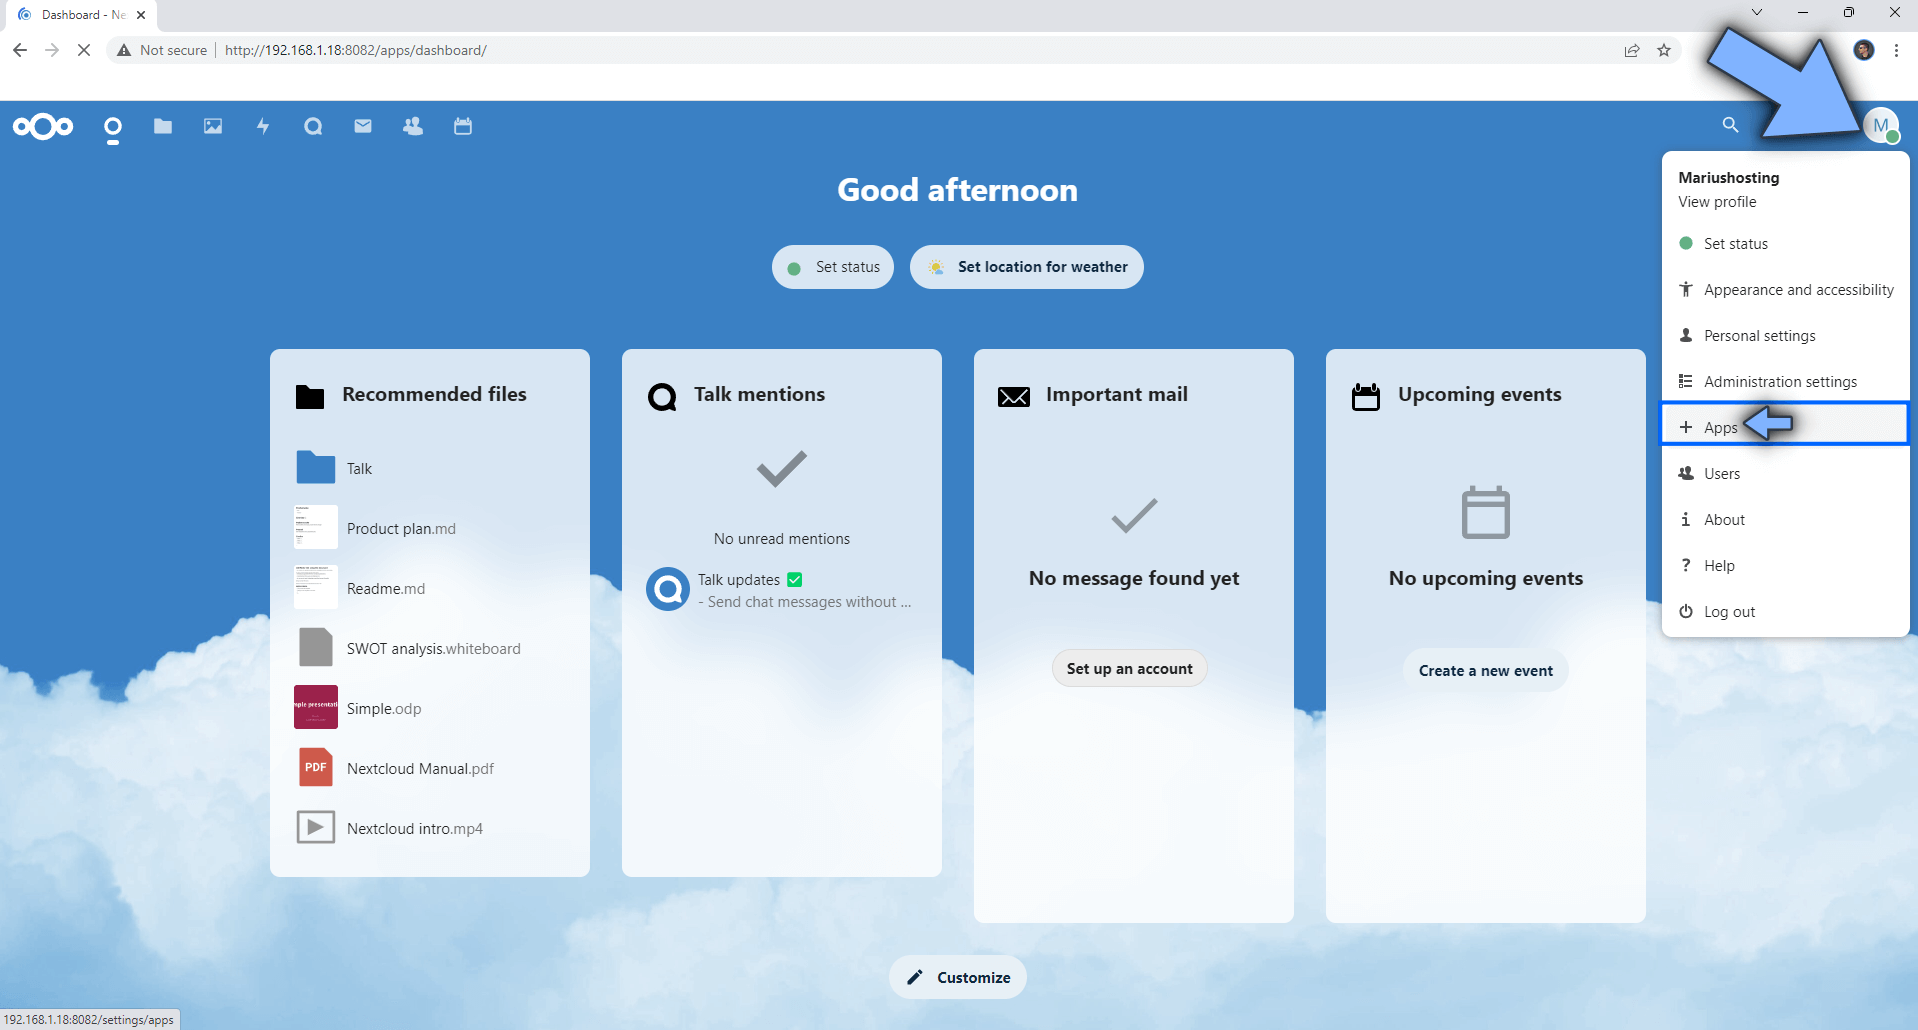
At the top right of the page click on your profile, then + Apps. Follow the instructions in the image below.
STEP 19
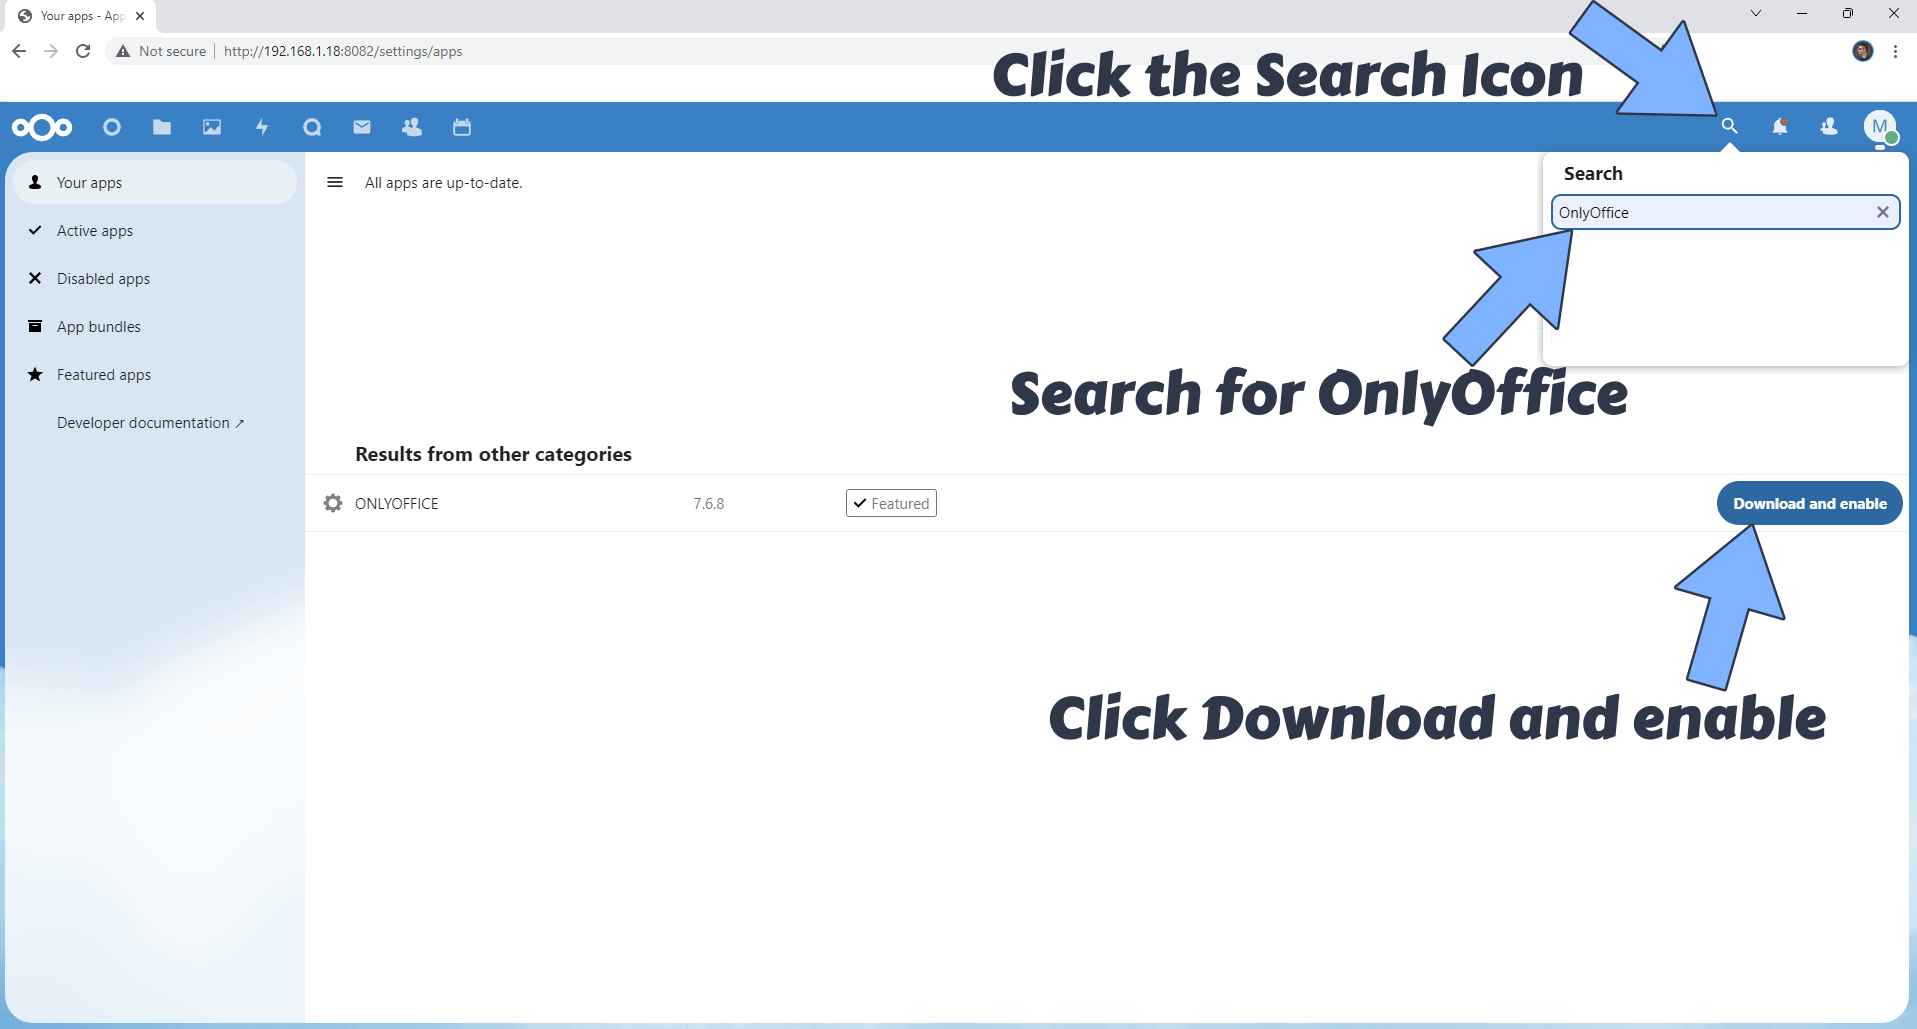
After you click on + Apps at STEP 18, click on the search icon and search for “OnlyOffice“. When OnlyOffice is found , click Download and enable. Follow the instructions in the image below.
STEP 20
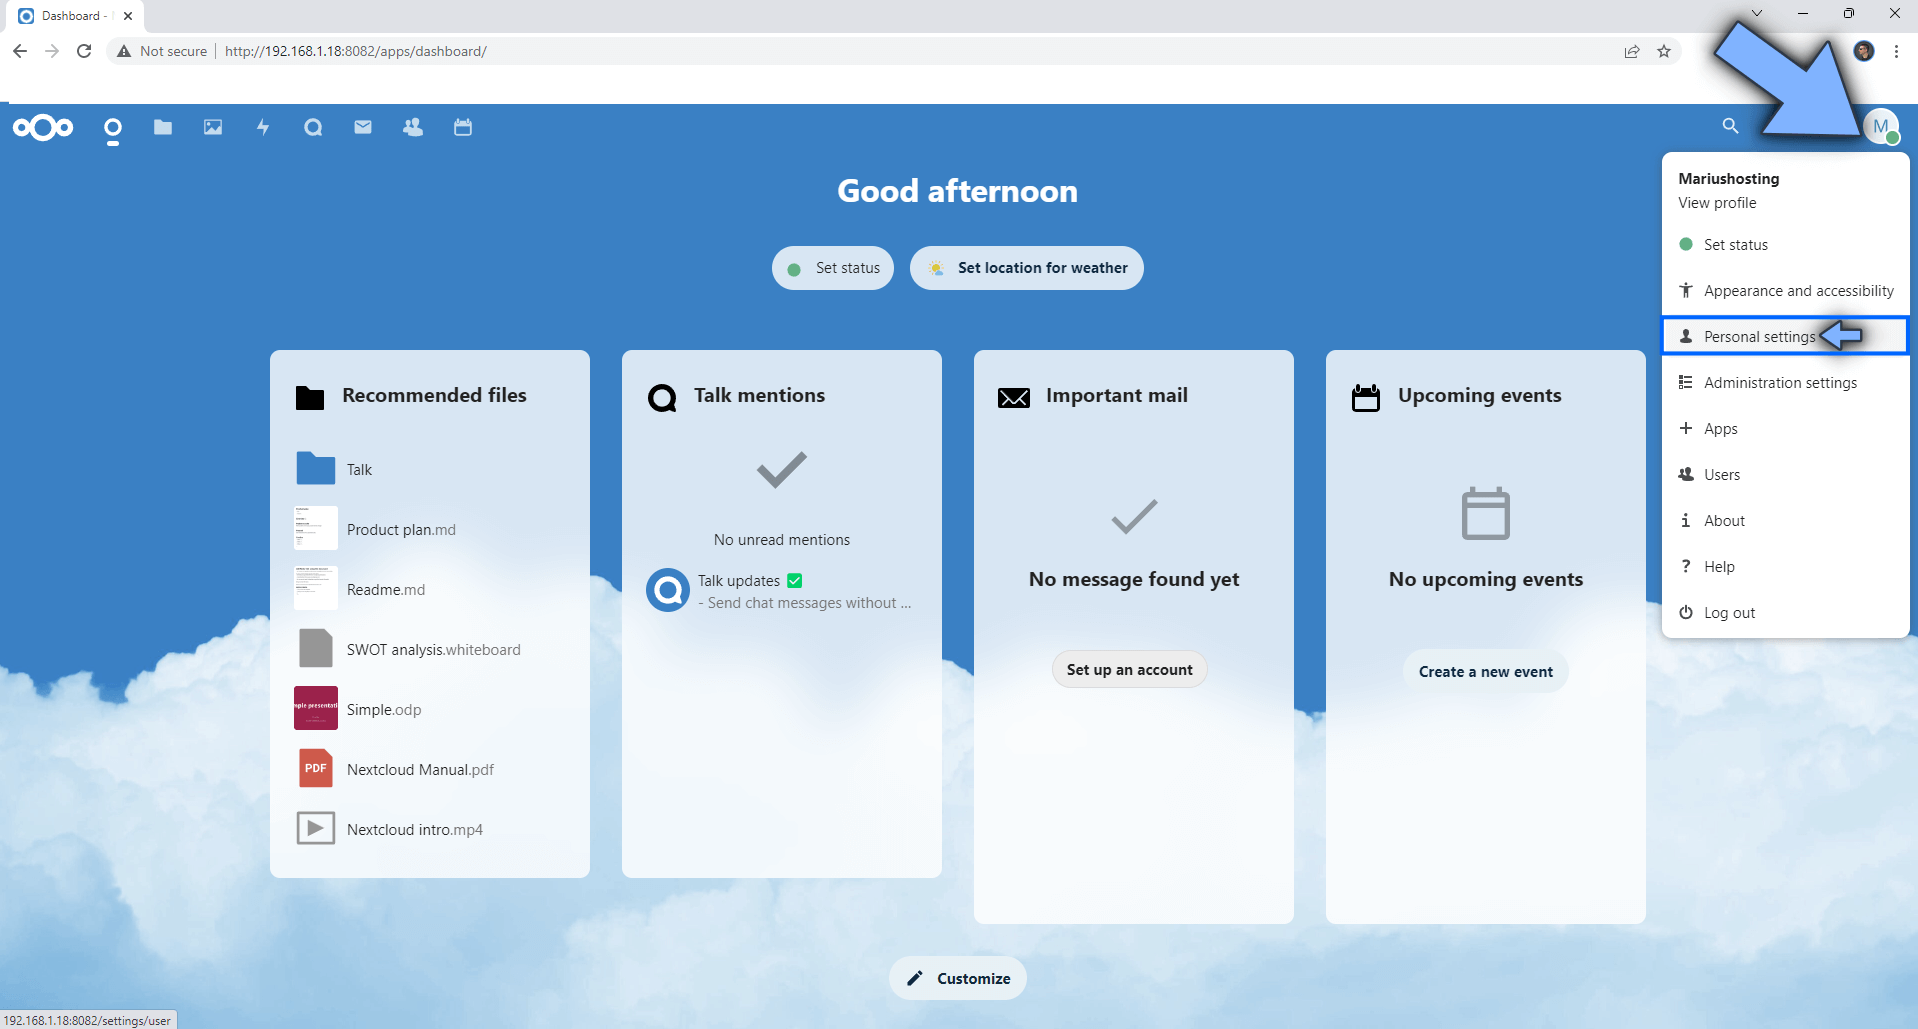
At the top right of the page click on your profile, then Personal Settings. Follow the instructions in the image below.
STEP 21
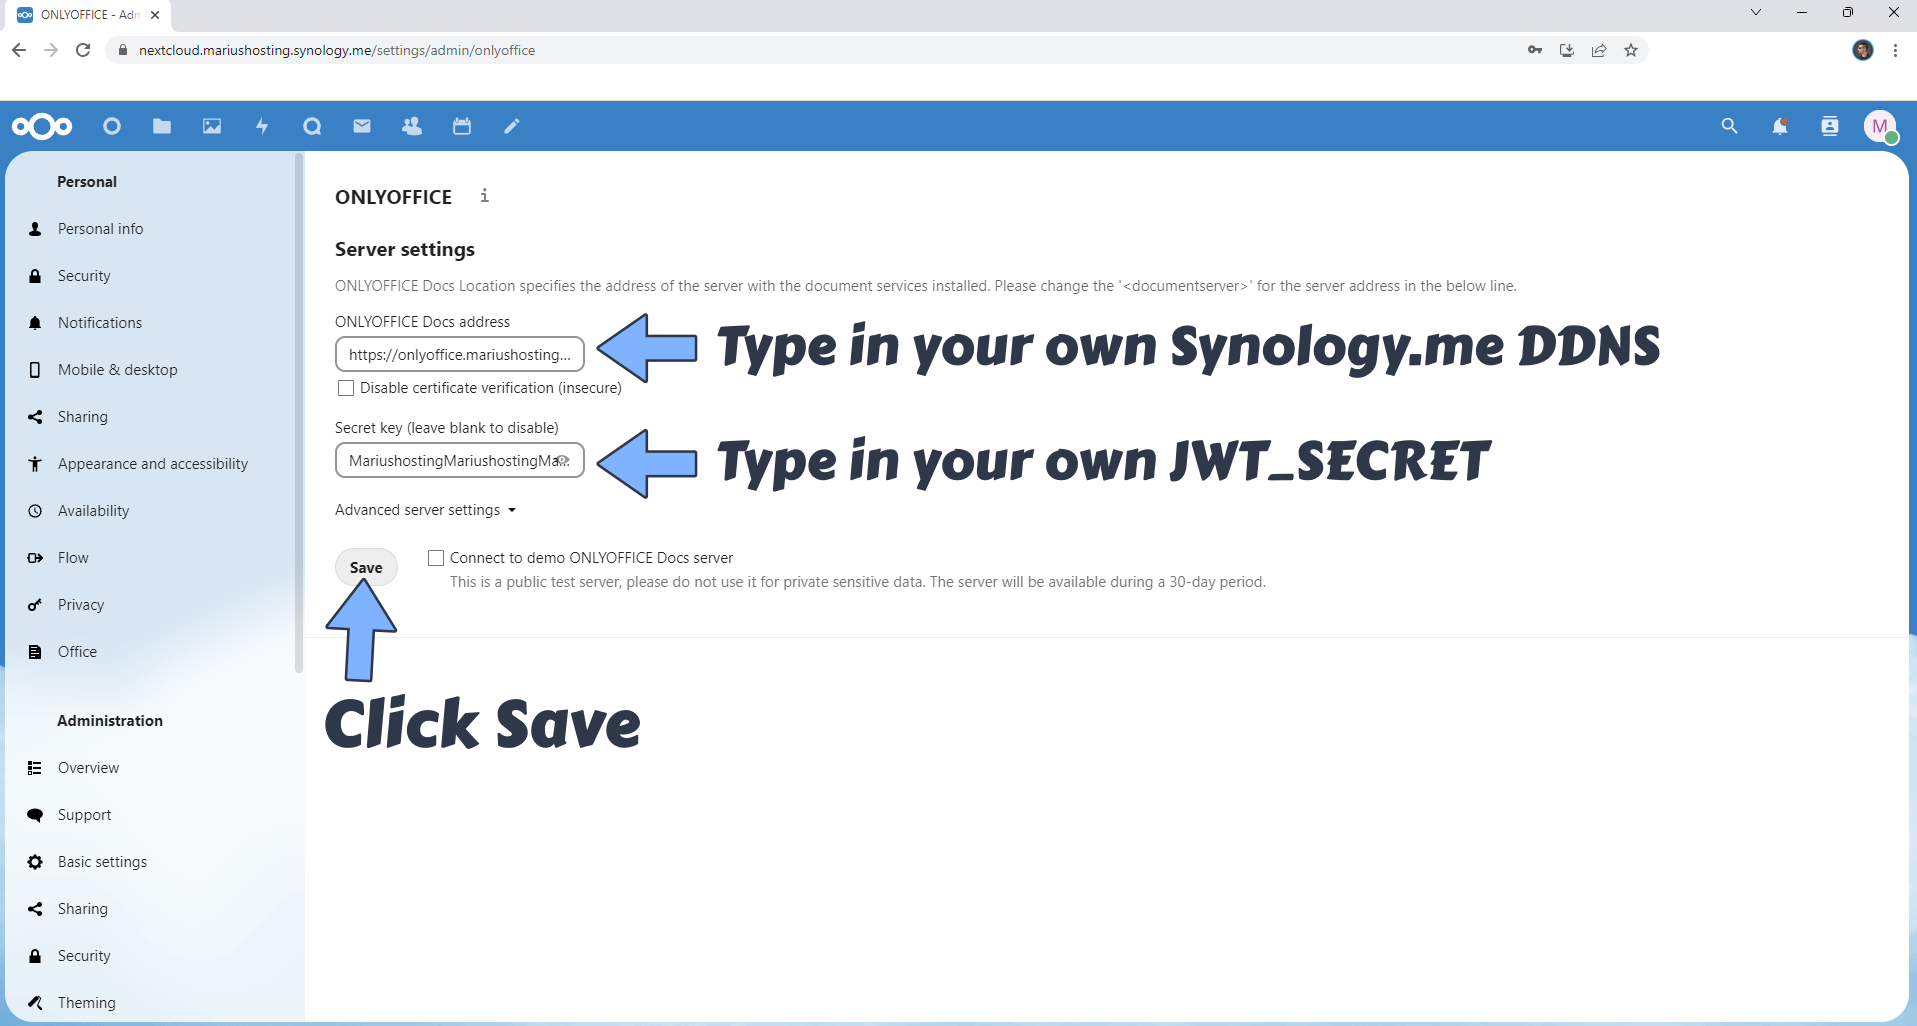
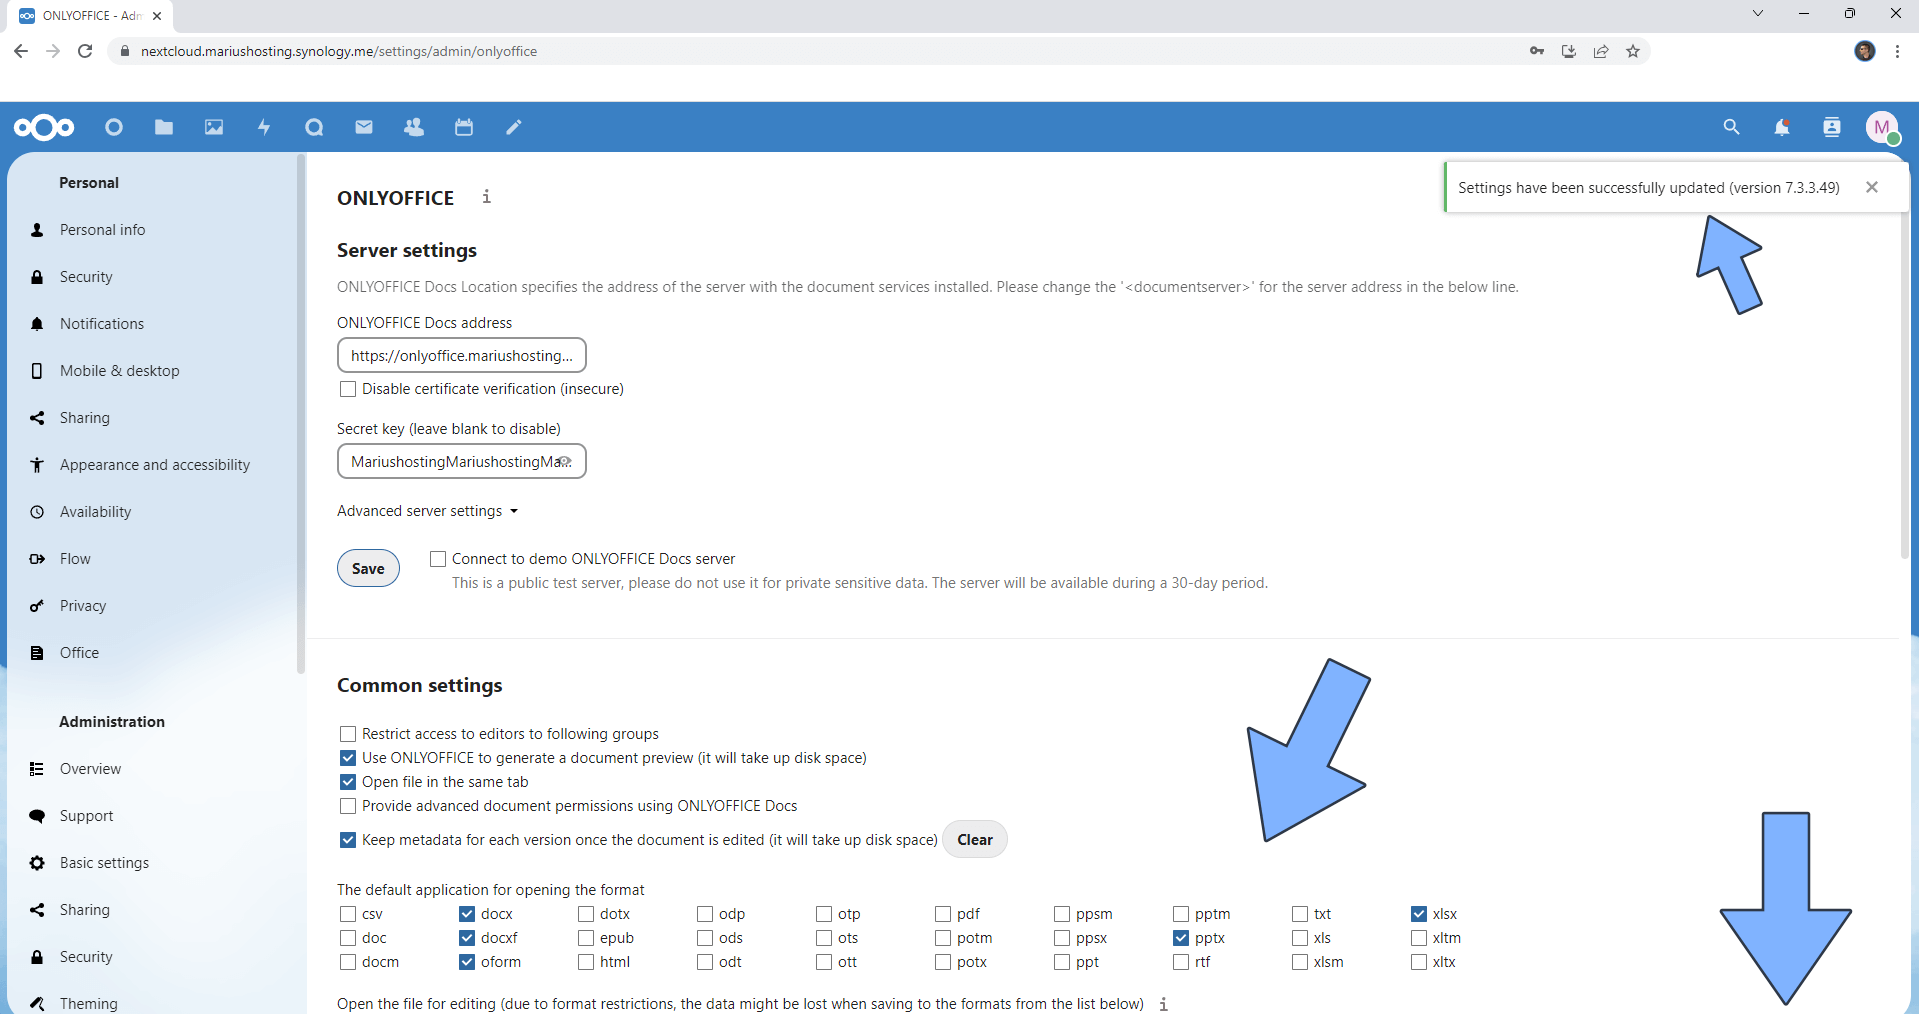
You will find the ONLYOFFICE app in the menu on the left sidebar, just under Administration; click on it. In the ONLYOFFICE Docs address field type in your own synology.me DDNS address with https at the beginning that you have previously created at STEP 6. In the Secret key field type in your own JWT_SECRET password that you have previously created at STEP 14. Click Save. Follow the instructions in the image below.
STEP 22
At this point you can select the formats for which you want OnlyOffice to be the default application. After you select the favorite formats, scroll down the page then click Save. Follow the instructions in the image below.
STEP 23
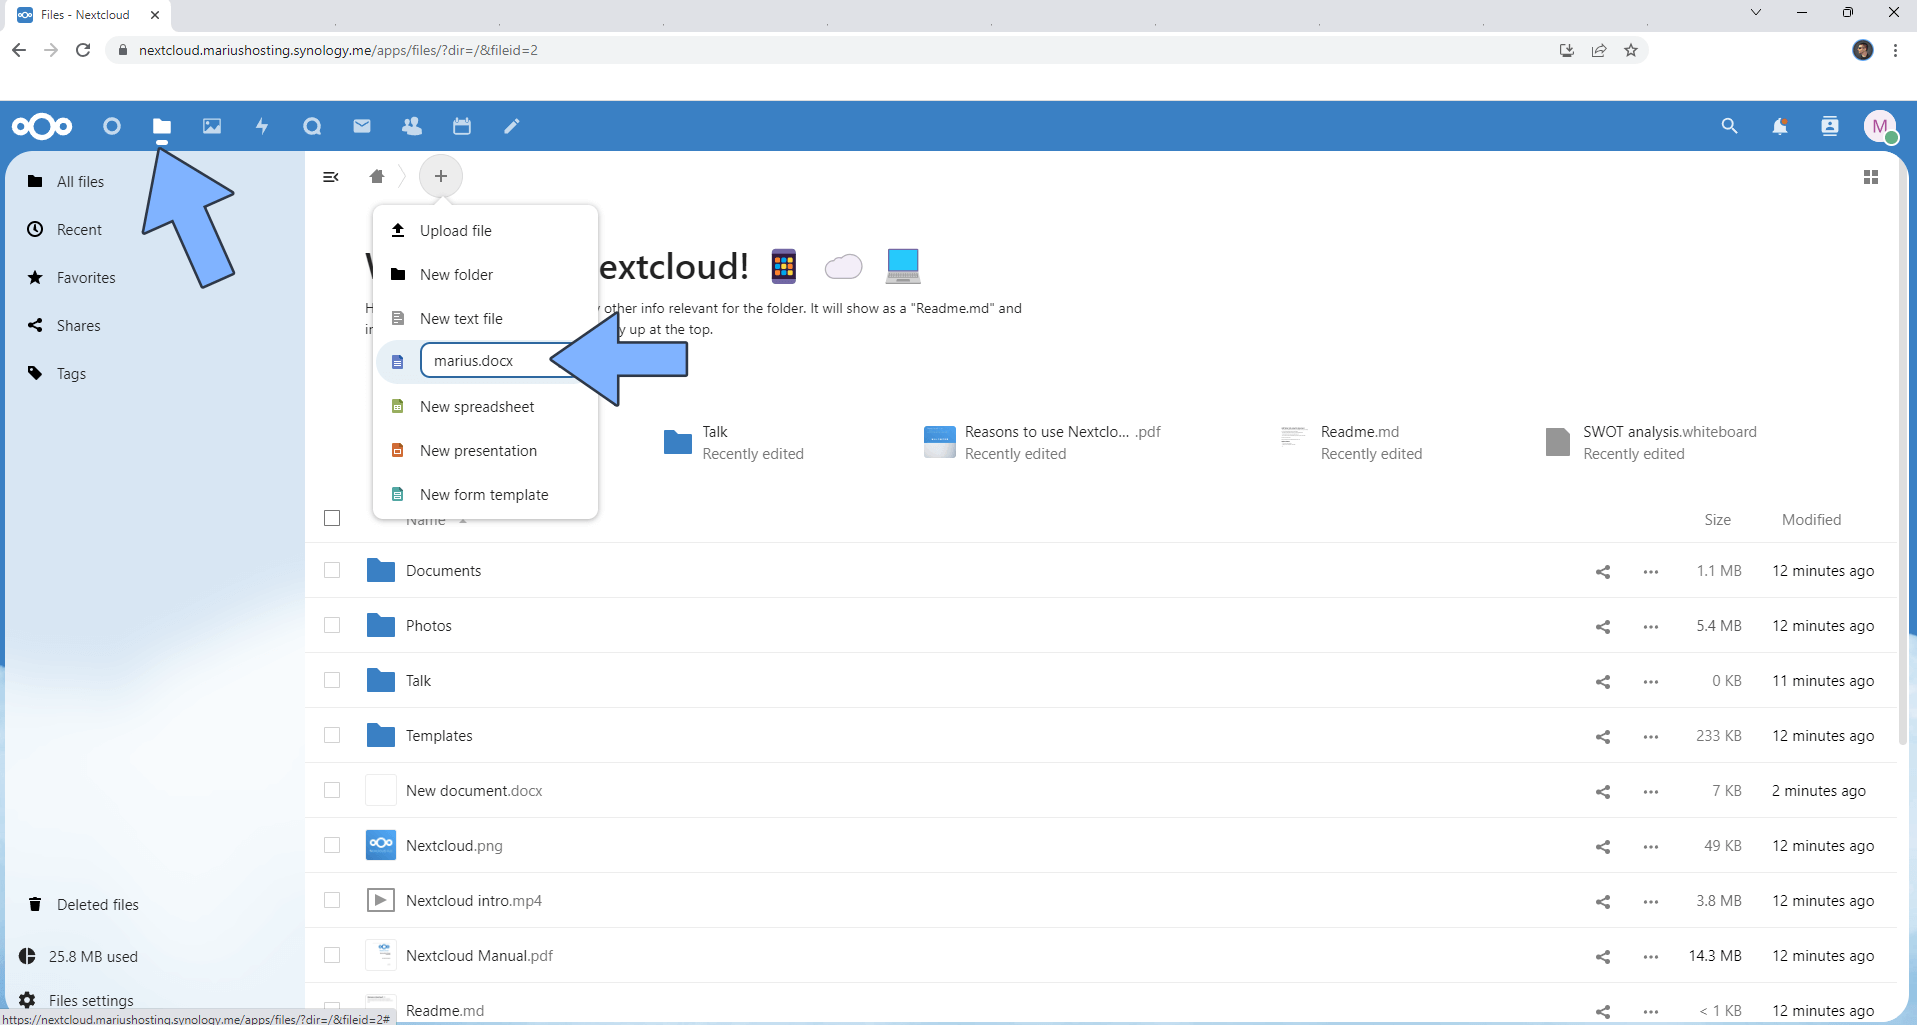
Now you can open all your files and edit them in real time using OnlyOffice. Click New Document. Follow the instructions in the image below.
STEP 24
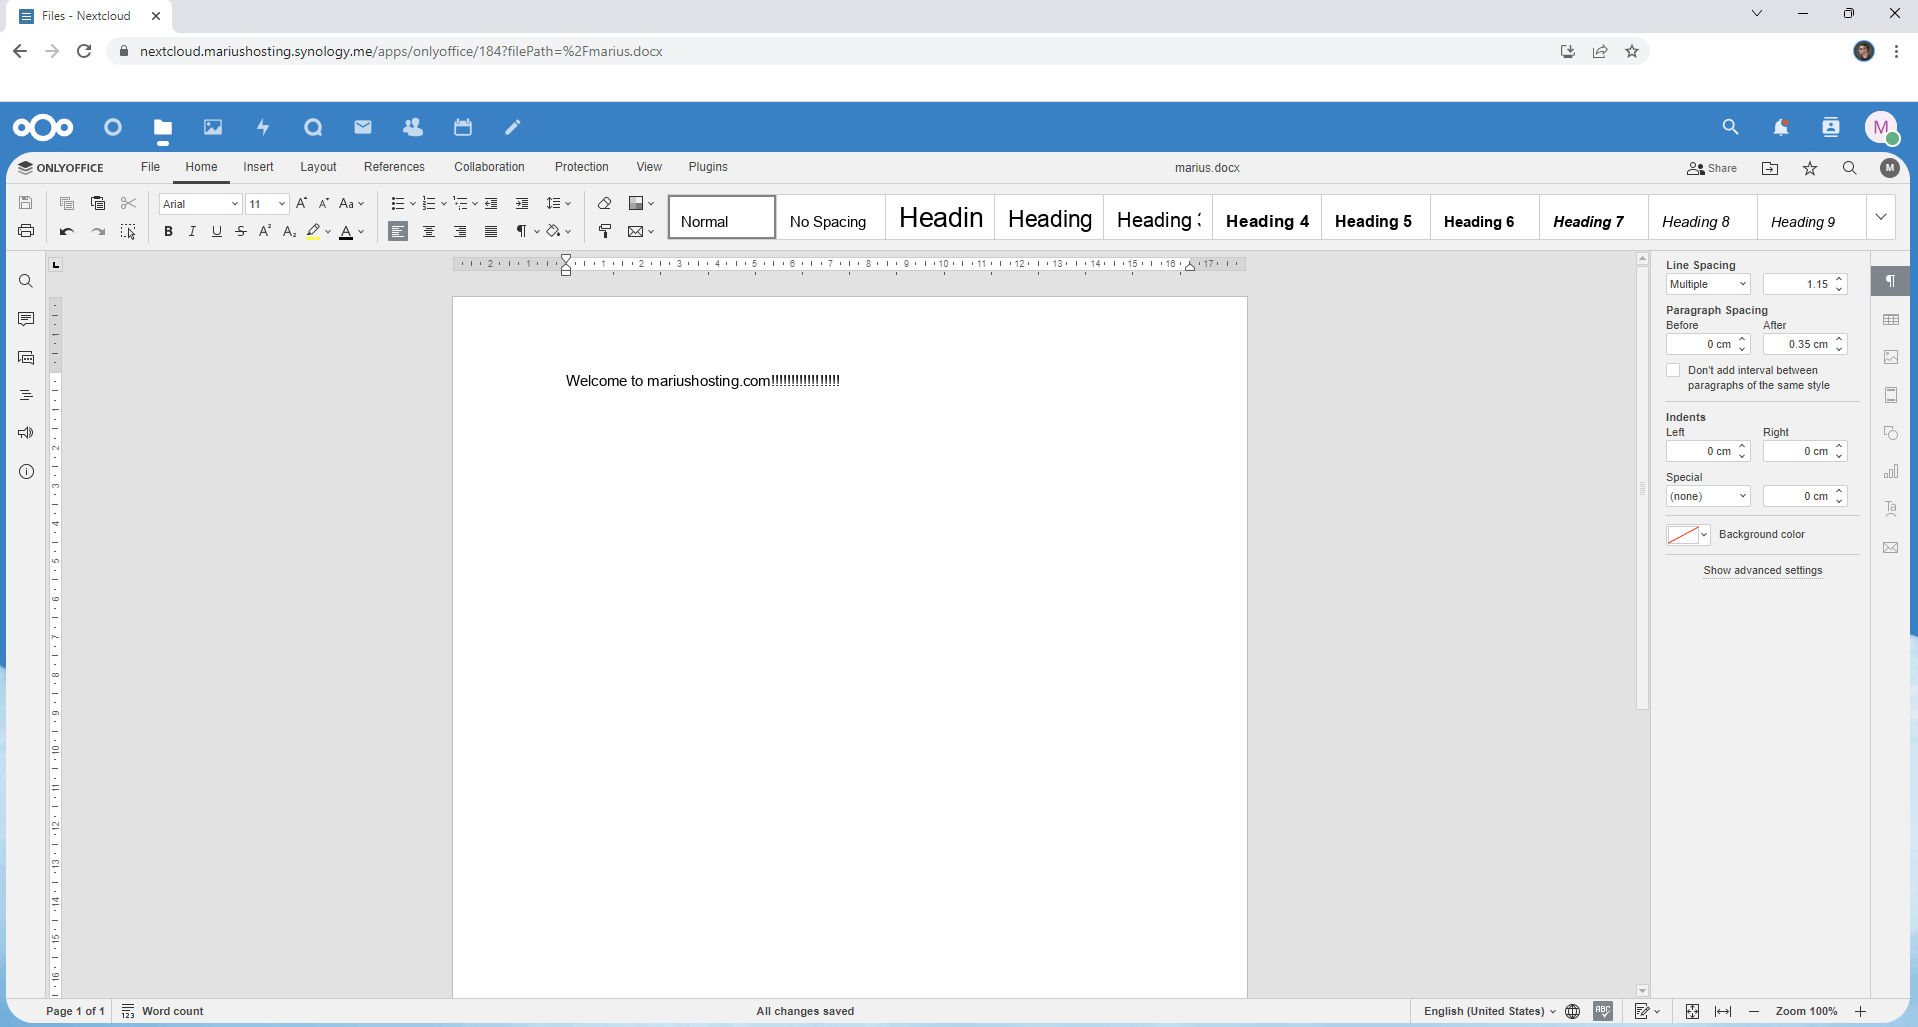
I wrote something in a new document using OnlyOffice.
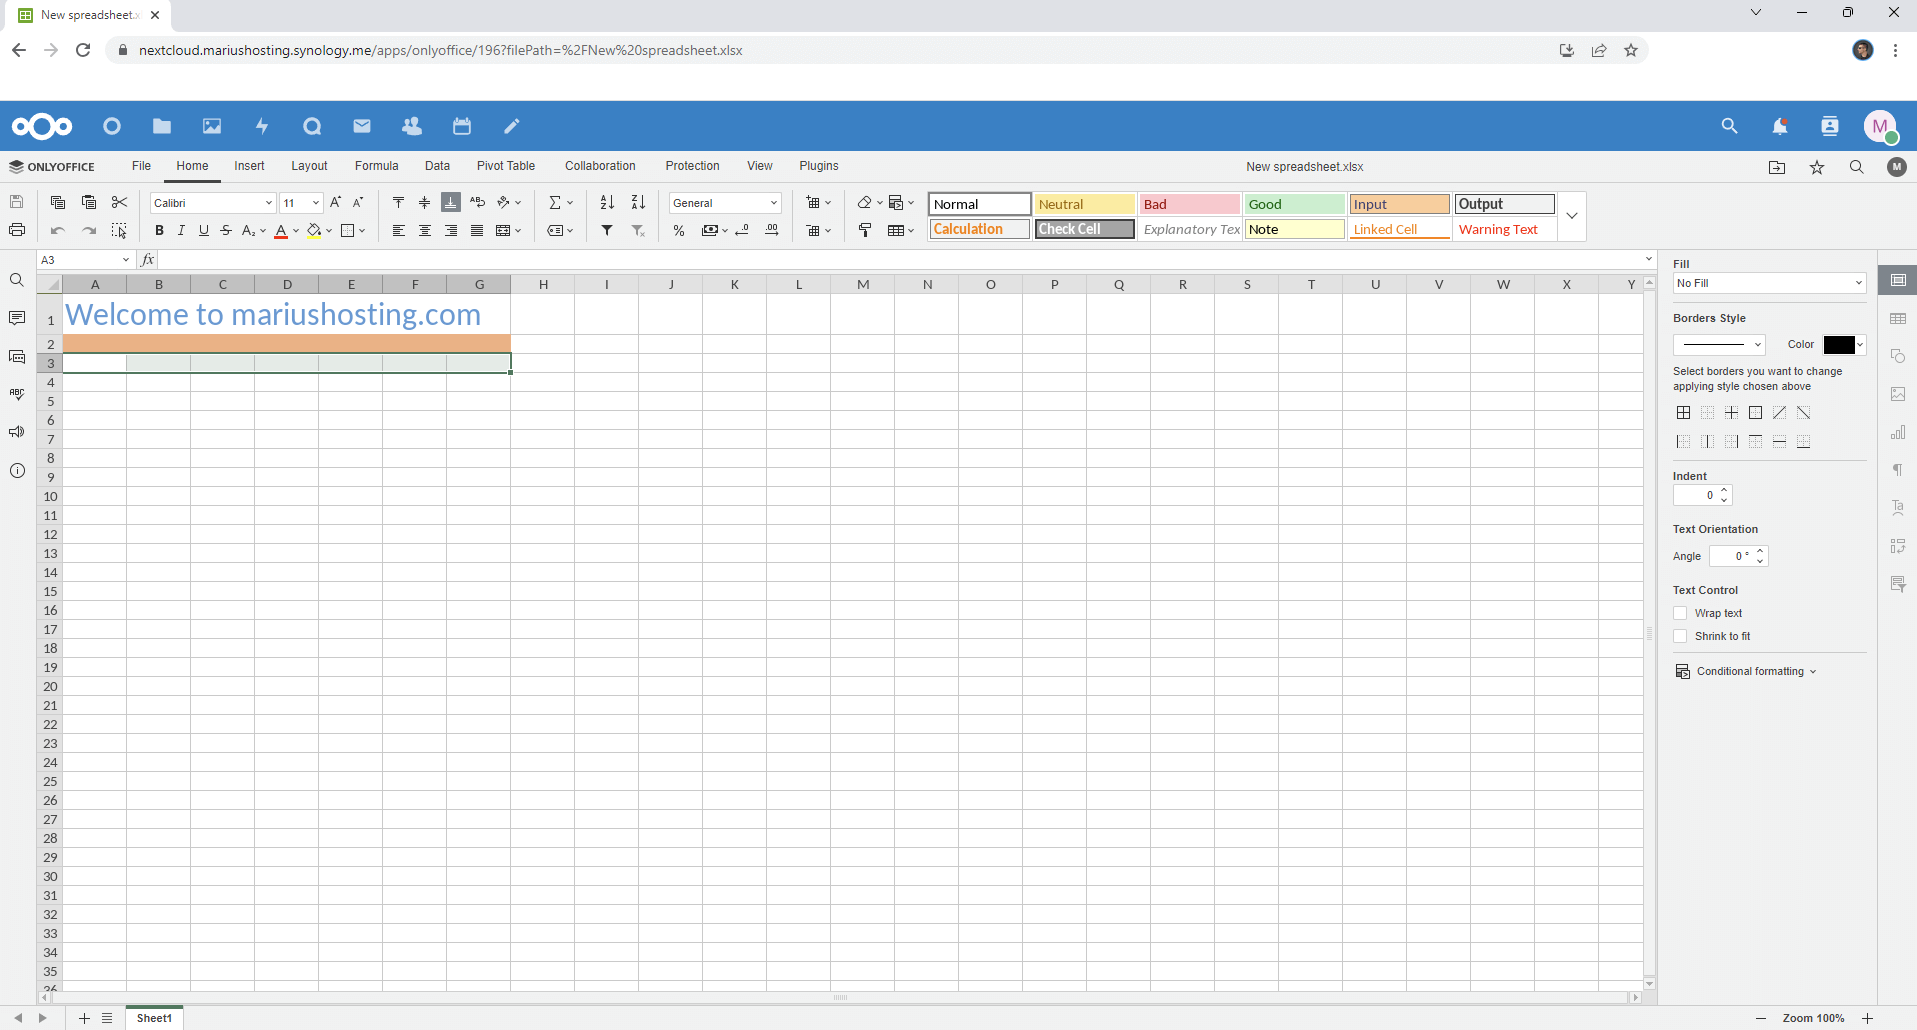
Same for .xlsx documents.
Enjoy your OnlyOffice integrated with Nextcloud!
If you encounter issues by using this container, make sure to check out the Common Docker issues article.
Note: This guide is compatible with Docker – Nextcloud – compatible Synology NAS devices and DSM 7.2
Note: Nextcloud together with the OnlyOffice document server present themselves as a very interesting alternative to Synology Office.
Note: Find out how to update the OnlyOffice container with the latest image.
Note: How to Back Up Docker Containers on your Synology NAS.
Note: How to Schedule Start & Stop For Docker Containers.
Note: How to Activate Email Notifications.
Note: How to Add Access Control Profile on Your NAS.
Note: How to Change Docker Containers Restart Policy.
Note: How to Use Docker Containers With VPN.
Note: Convert Docker Run Into Docker Compose.
Note: How to Clean Docker.
Note: How to Clean Docker Automatically.
Note: Best Practices When Using Docker and DDNS.
Note: Some Docker Containers Need WebSocket.
Note: Find out the Best NAS Models For Docker.
Note: Activate Gmail SMTP For Docker Containers.
This post was updated on Tuesday / December 3rd, 2024 at 11:46 PM
