
JellyGlance is a modern, self-hosted dashboard for Jellyfin media servers that unifies live sessions, user statistics, recently added media, libraries, download queues, release calendars, webhooks, backups, request management, and integrations with tools like the Arr suite, Seerr apps, and download clients into one clean, customizable command center. In this step by step guide I will show you how to install JellyGlance on your Synology NAS using Docker & Portainer.
This guide works perfectly with the latest JellyGlance v1.2.10 release.
STEP 1
Please Support My work by Making a Donation.
STEP 2
Install Portainer using my step by step guide. If you already have Portainer installed on your Synology NAS, skip this STEP. Attention: Make sure you have installed the latest Portainer version.
STEP 3
⚠️Mandatory: You should have Jellyfin installed on your NAS. Install Jellyfin on Your Synology NAS or Install Jellyfin on Your Synology NAS With Hardware Transcoding.
STEP 4
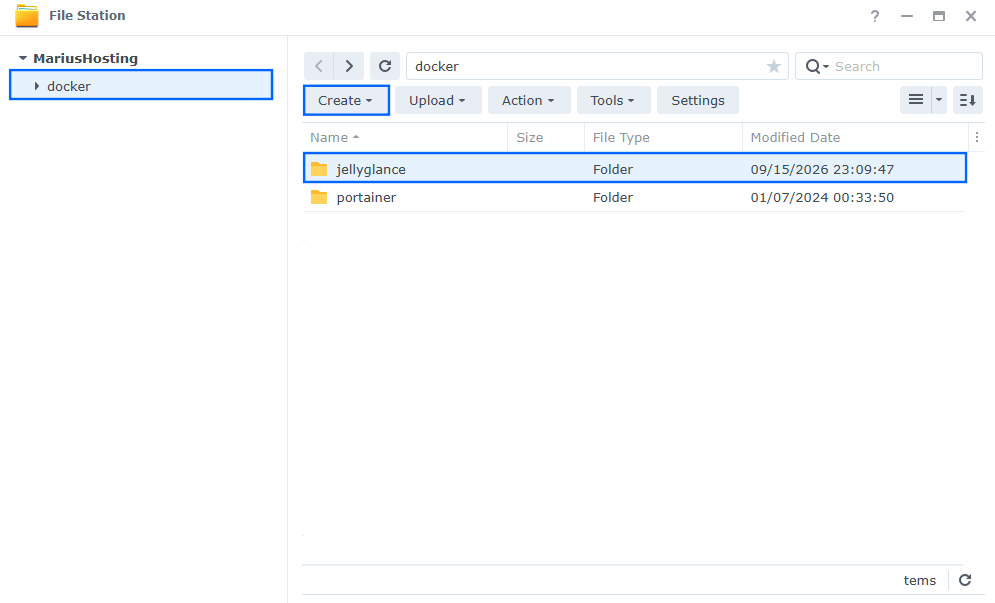
Go to File Station and open the docker folder. Inside the docker folder, create one new folder and name it jellyglance. Follow the instructions in the image below.
Note: Be careful to enter only lowercase, not uppercase letters.
STEP 5
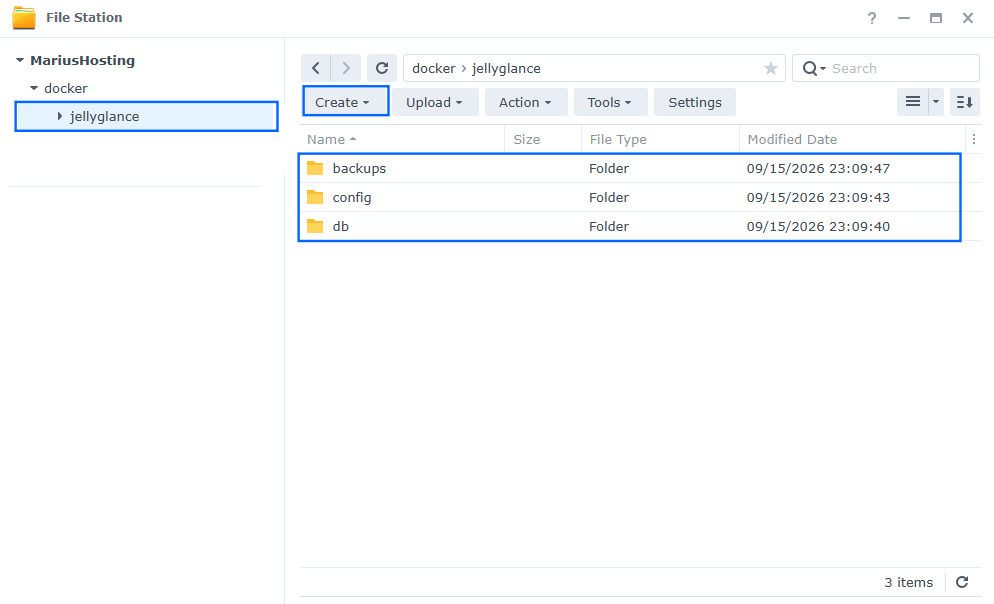
Now create three new folders inside the jellyglance folder that you have previously created at STEP 4 and name them backups, config, db. Follow the instructions in the image below.
Note: Be careful to enter only lowercase, not uppercase letters.
STEP 6
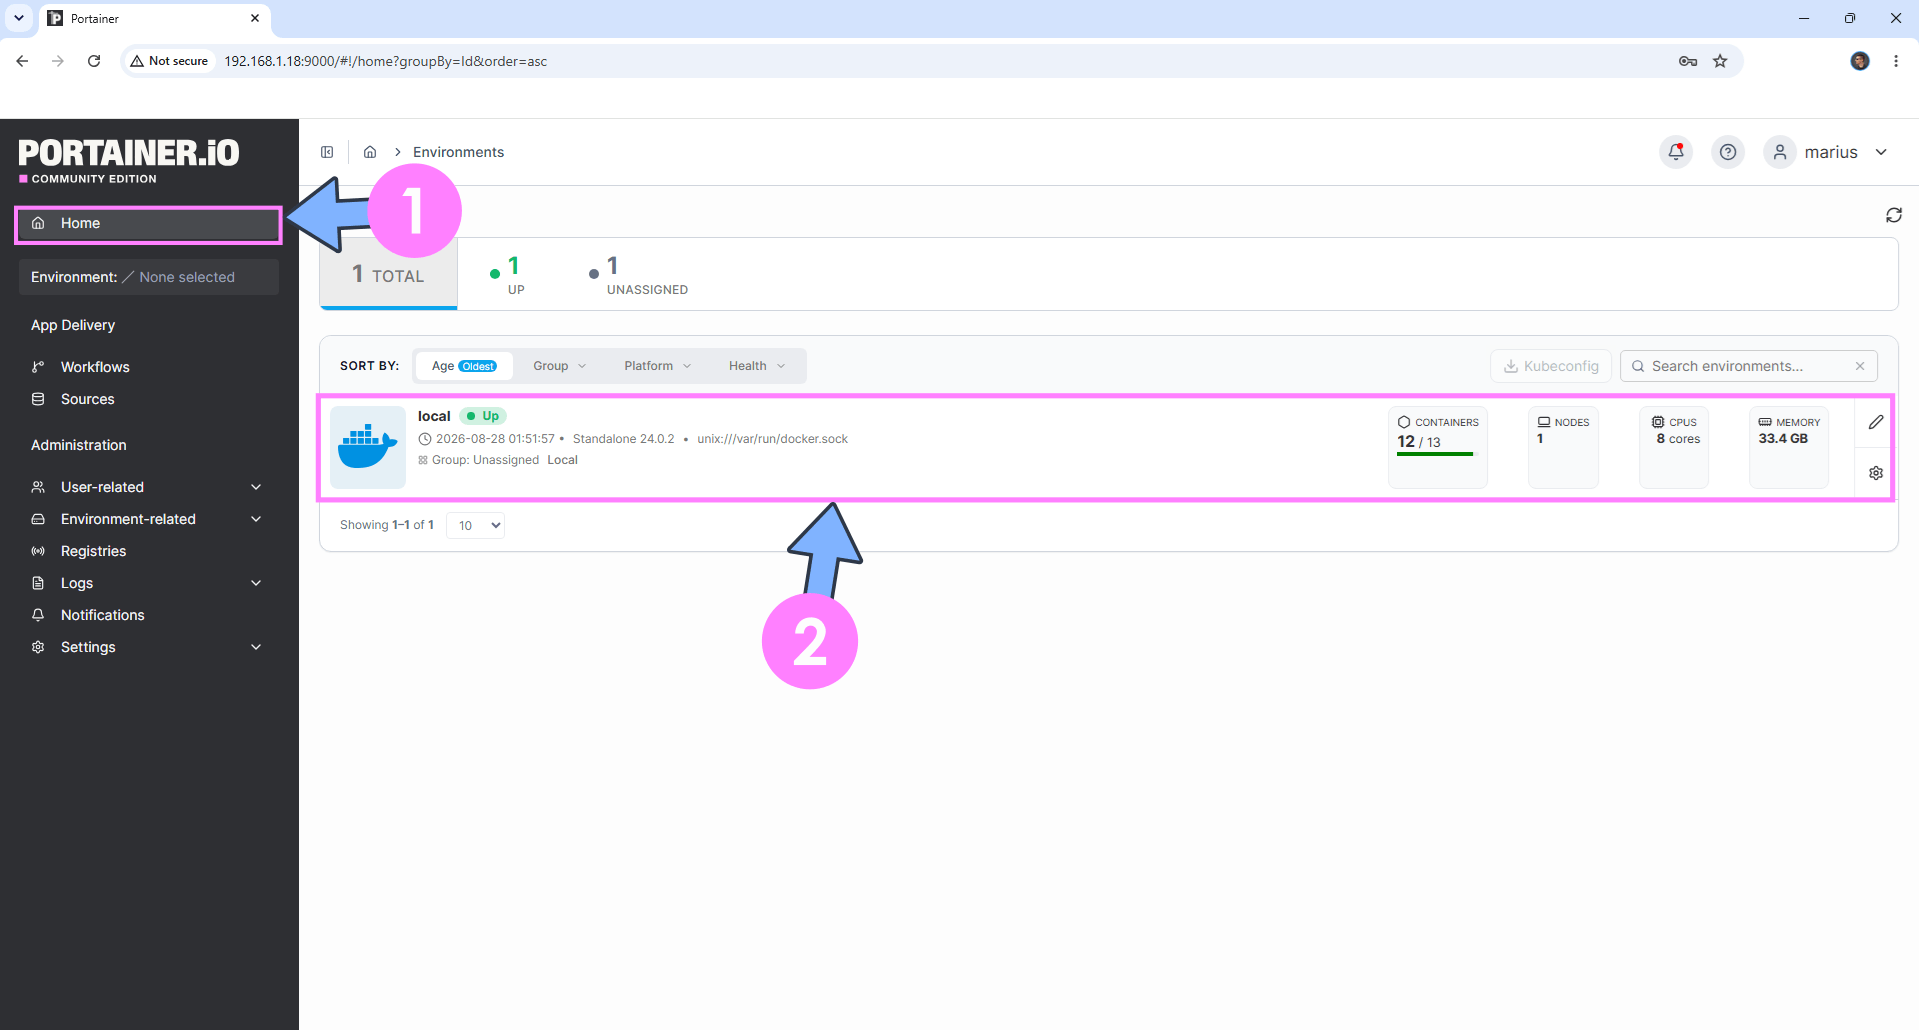
Log into Portainer using your username and password. On the left sidebar in Portainer, click on Home then click inside the local rectangle. Follow the instructions in the image below.
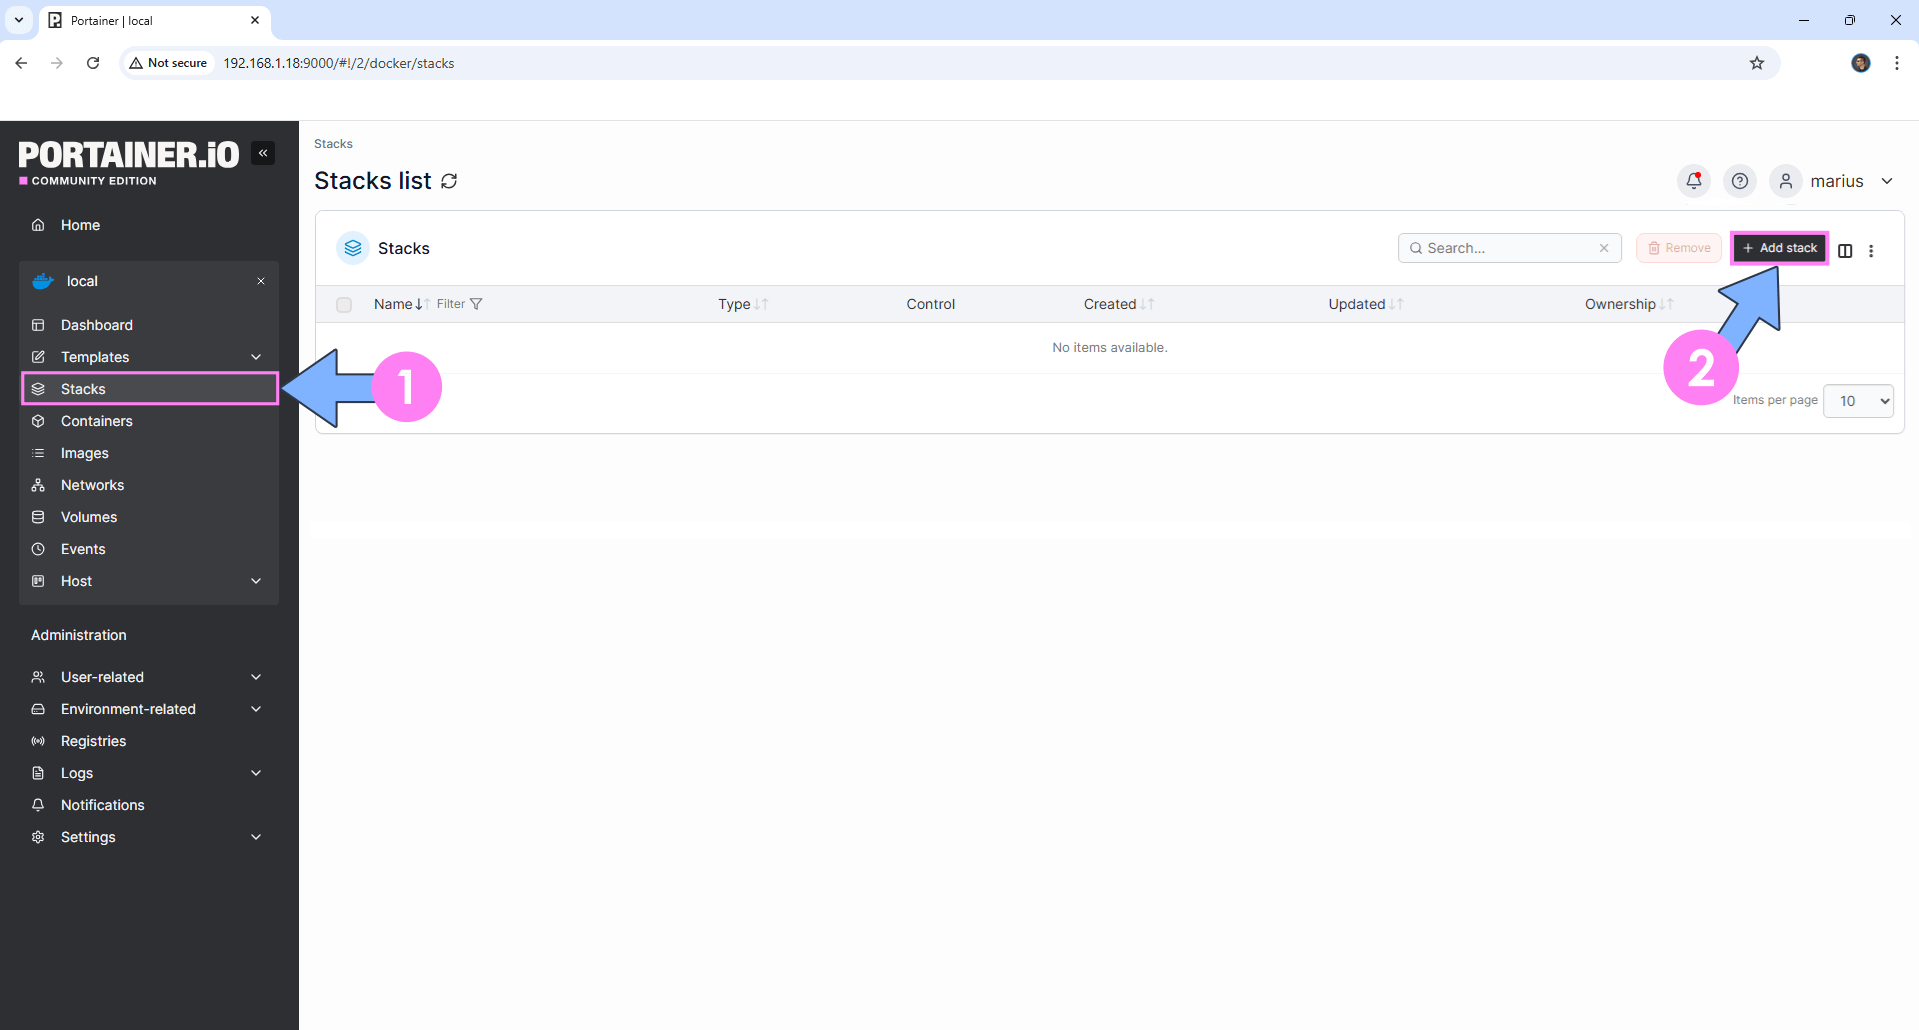
On the left sidebar in Portainer, click on Stacks then + Add stack. Follow the instructions in the image below.
STEP 7
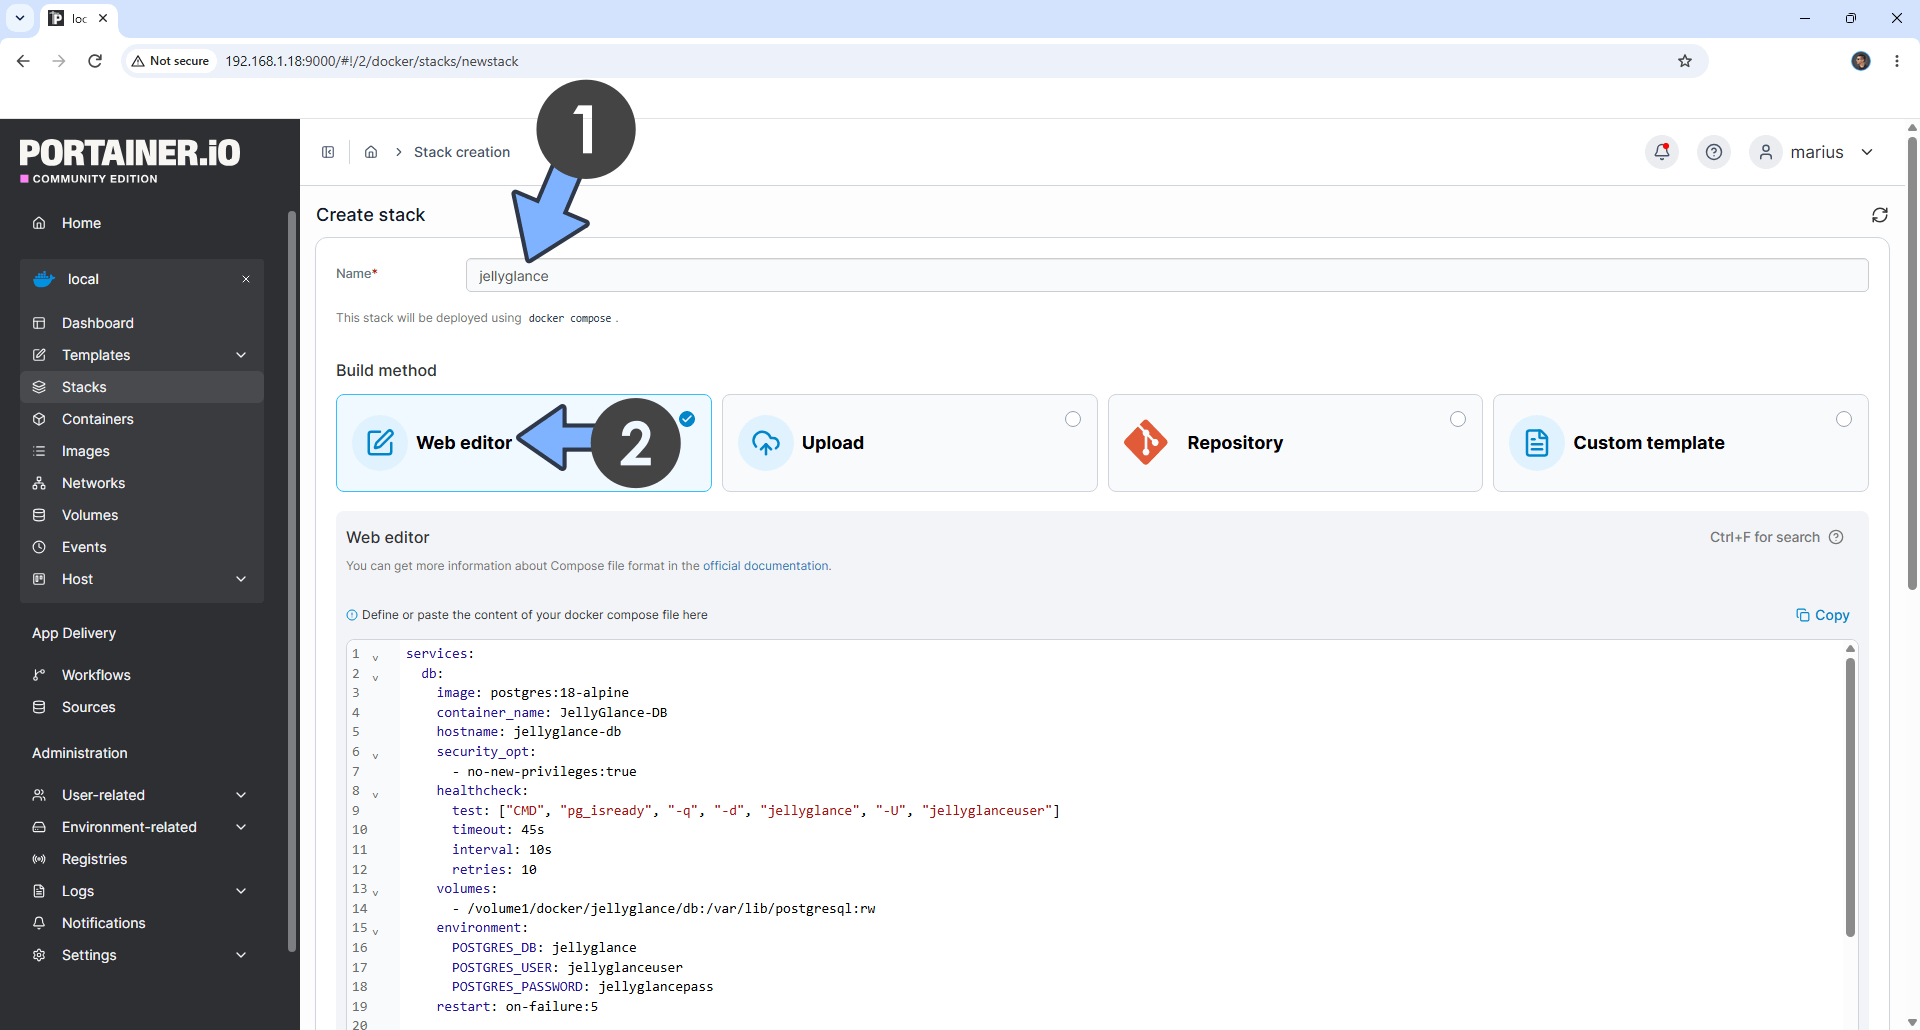
In the Name field type in jellyglance. Follow the instructions in the image below.
services:
  db:
    image: postgres:18-alpine
    container_name: JellyGlance-DB
    hostname: jellyglance-db
    security_opt:
      - no-new-privileges:true
    healthcheck:
      test: ["CMD", "pg_isready", "-q", "-d", "jellyglance", "-U", "jellyglanceuser"]
      timeout: 45s
      interval: 10s
      retries: 10
    volumes:
      - /volume1/docker/jellyglance/db:/var/lib/postgresql:rw
    environment:
      POSTGRES_DB: jellyglance
      POSTGRES_USER: jellyglanceuser
      POSTGRES_PASSWORD: jellyglancepass
    restart: on-failure:5

  jellyglance:
    image: ghcr.io/nerdy-technician/jellyglance:latest
    container_name: JellyGlance
    ports:
      - 3055:3000
    environment:
      POSTGRES_USER: jellyglanceuser
      POSTGRES_PASSWORD: jellyglancepass
      POSTGRES_IP: db
      POSTGRES_PORT: 5432
      POSTGRES_DB: jellyglance
      JWT_SECRET: dOxZYTTZgXKMHkqLBIQVImayQXAVWdzGBPuFJKggzcgvgPJPXpWzqzKaUOIOGGIr
      TZ: Europe/Bucharest
      CONFIG_DIR: /app/config
      BACKUP_DIR: /app/backups
    volumes:
      - /volume1/docker/jellyglance/config:/app/config:rw
      - /volume1/docker/jellyglance/backups:/app/backups:rw
    depends_on:
      db:
        condition: service_healthy
    restart: on-failure:5
Note: Before you paste the code above in the Web editor area below, change the value for JWT_SECRET. (Generate your own Random 64 length WEBUI_SECRET_KEY.)
Note: Before you paste the code above in the Web editor area below, change the value for TZ. (Select your current Time Zone from this list.)
STEP 8
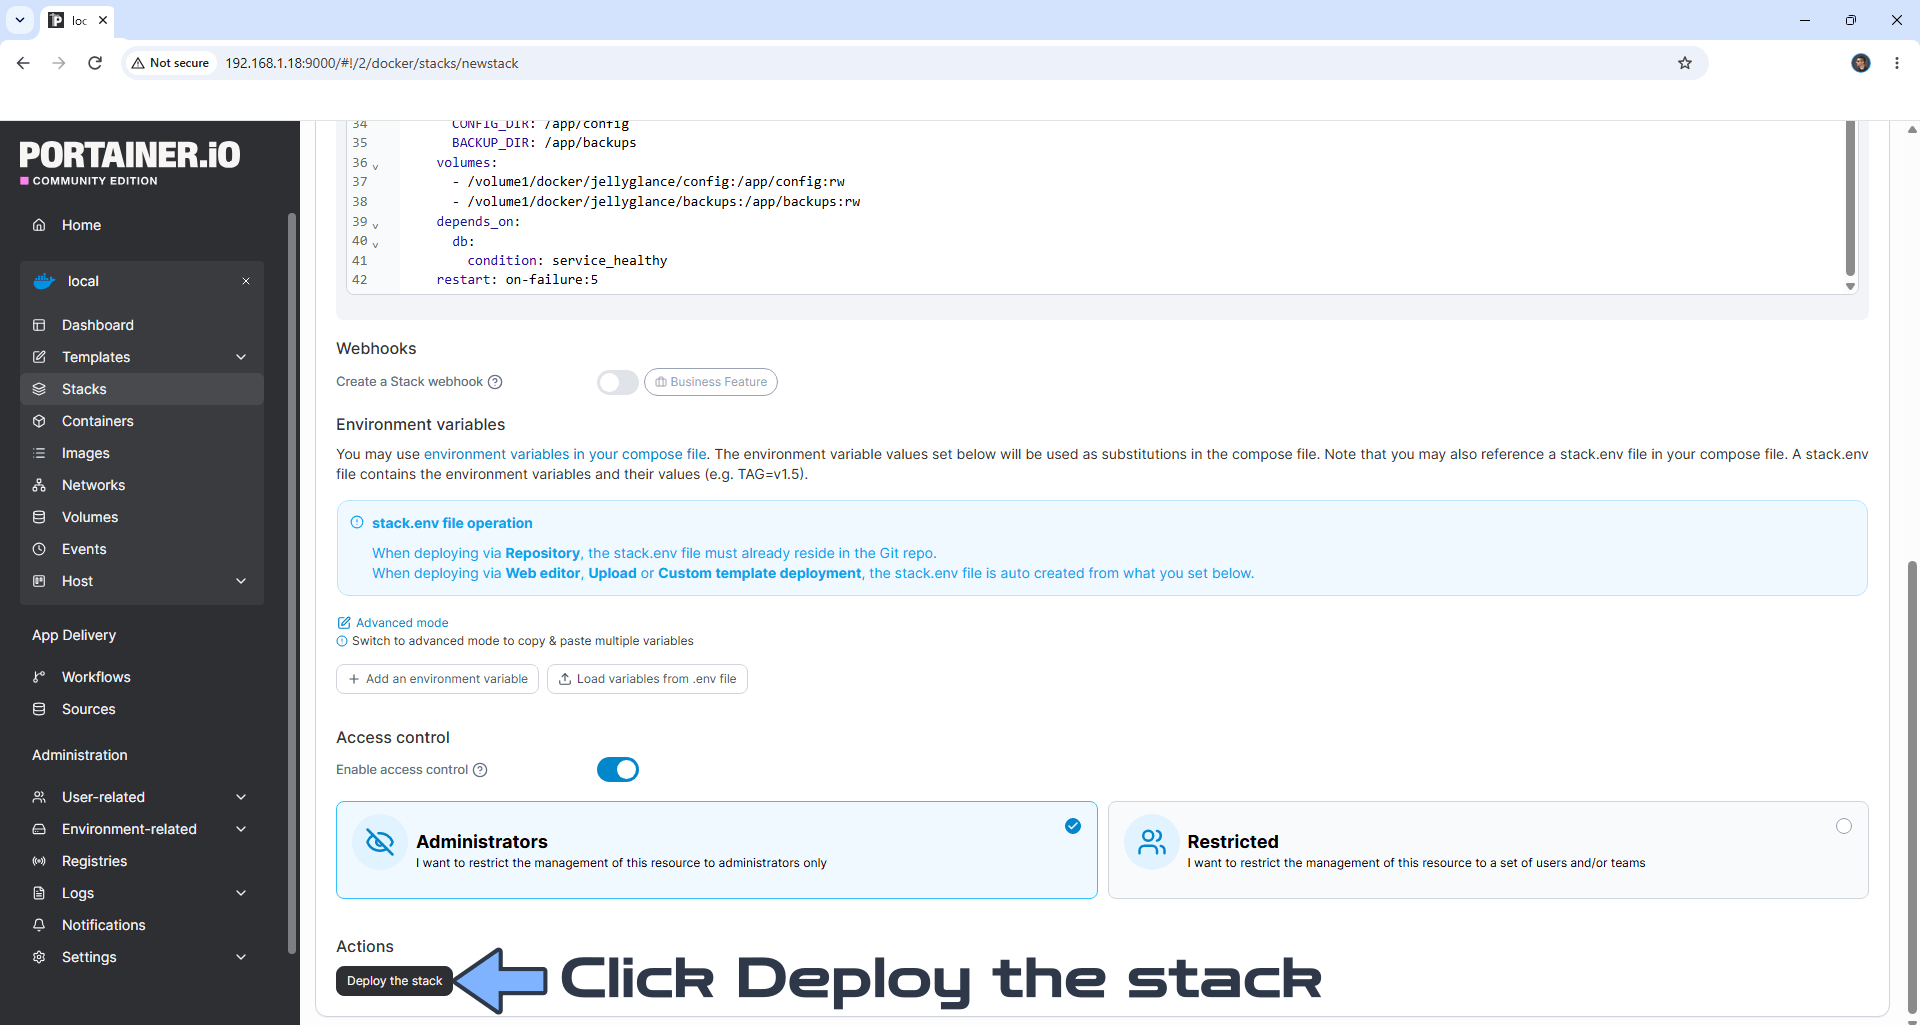
Scroll down on the page until you see a button named Deploy the stack. Click on it. Follow the instructions in the image below. The installation process can take up to a few minutes. It will depend on your Internet speed connection.
STEP 9
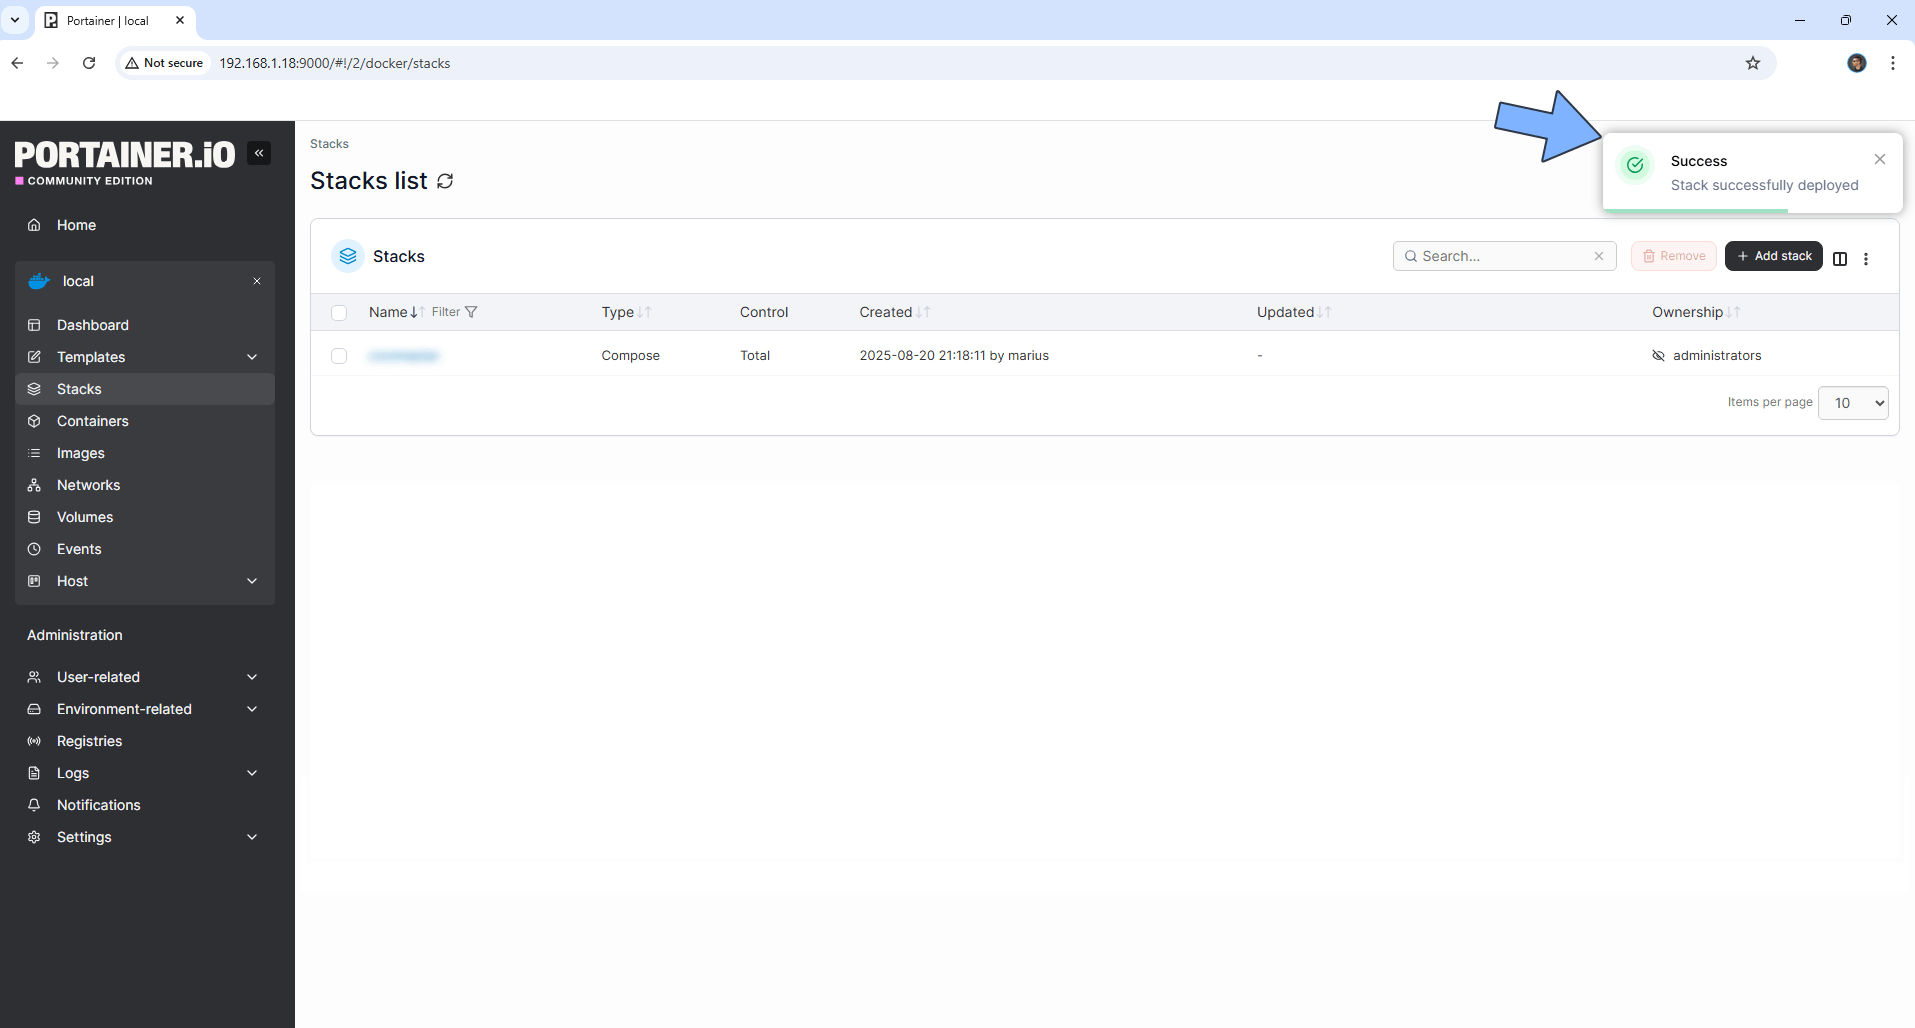
If everything goes right, you will see the following message at the top right of your screen: “Success Stack successfully deployed“.
STEP 10
🟢Please Support My work by Making a Donation. Almost 99,9% of the people that install something using my guides forget to support my work, or just ignore STEP 1. I’ve been very honest about this aspect of my work since the beginning: I don’t run any ADS, I don’t require subscriptions, paid or otherwise, I don’t collect IPs, emails, and I don’t have any referral links from Amazon or other merchants. I also don’t have any POP-UPs or COOKIES. I have repeatedly been told over the years how much I have contributed to the community. It’s something I love doing and have been honest about my passion since the beginning. But I also Need The Community to Support me Back to be able to continue doing this work.
STEP 11
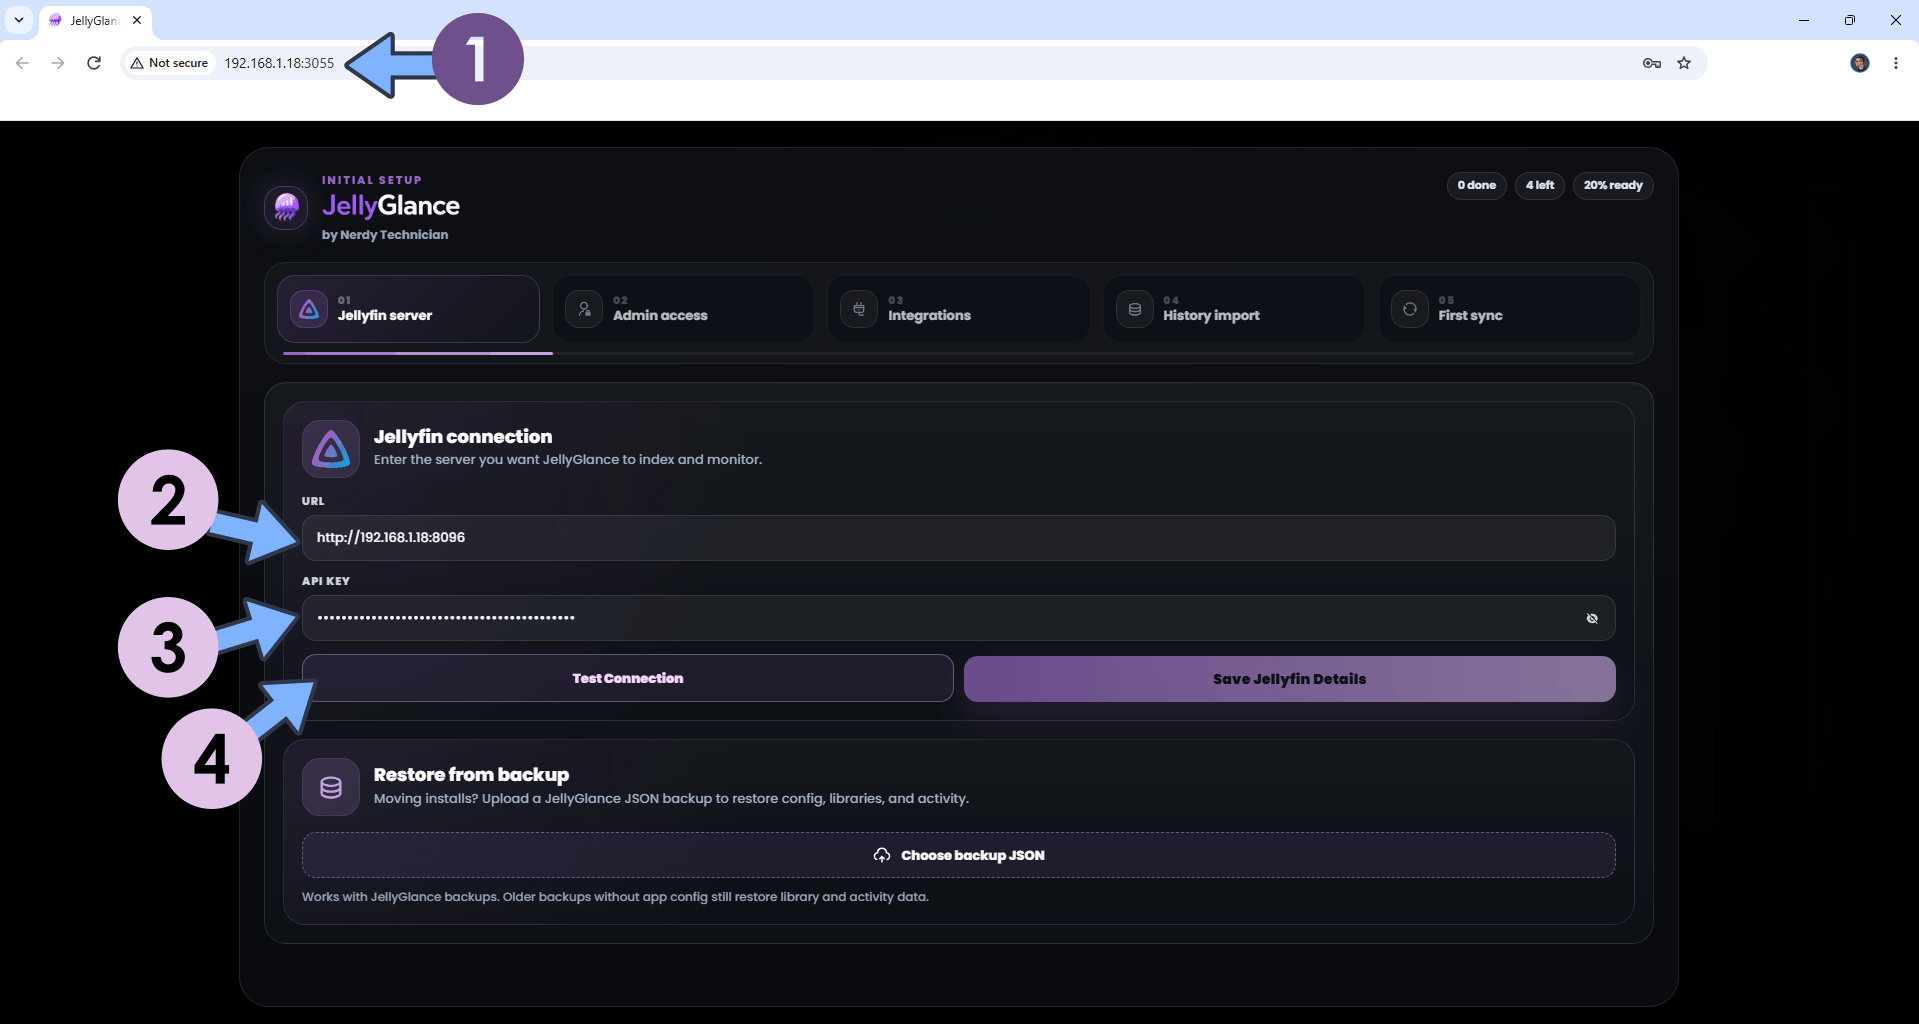
The installation process can take up to a few seconds/minutes. It will depend on your Internet speed connection. Now open your browser and type in http://Synology-ip-address:3055 In the apposite area, type in your own Jellyfin URL then add your Jellyfin API KEY then click Test Connection and save your details. Follow the instructions in the image below.
Enjoy JellyGlance!
Note: If you want to run the JellyGlance container over HTTPS, check How to Run Docker Containers Over HTTPS. In order to make JellyGlance work via HTTPS, it’s mandatory to activate WebSocket.
Note: Can I run Docker on my Synology NAS? See the supported models.
Note: How to Back Up Docker Containers on your Synology NAS.
Note: Find out how to update the JellyGlance container with the latest image.
Note: How to Free Disk Space on Your NAS if You Run Docker.
Note: How to Schedule Start & Stop For Docker Containers.
Note: How to Activate Email Notifications.
Note: How to Add Access Control Profile on Your NAS.
Note: How to Change Docker Containers Restart Policy.
Note: How to Use Docker Containers With VPN.
Note: Convert Docker Run Into Docker Compose.
Note: How to Clean Docker.
Note: How to Clean Docker Automatically.
Note: Best Practices When Using Docker and DDNS.
Note: Some Docker Containers Need WebSocket.
Note: Find out the Best NAS Models For Docker.
Note: Activate Gmail SMTP For Docker Containers.
This post was updated on Tuesday / September 15th, 2026 at 11:52 PM