
Recently I have been seeing quite a lot of self-hosted WordPress websites, hosted from home on a Synology NAS. The increase in self-hosted websites aside, what caught my attention was quite the unbelievable latency in opening pages and processing requests of said websites.
My website is extremely fast, with an impressive page speed, and has a 100% Google Page Speed score and 100% score on the Google Chrome Lighthouse extension. These results are perfectly attainable for anyone hosting their website on a Synology NAS, but the main rule is to have a Synology NAS that does only this, Web Hosting, and nothing else.
You can certainly use your NAS to upload photos and back up files, and do many other things, however, the golden rule if you want to achieve excellence is to use it for backup OR for video surveillance OR for web hosting.
If you want to use it for web hosting, but have other things you want or need to do on your NAS, you can always buy another 2-bay NAS that you will use for web hosting alone. This solution may seem very expensive at first, but I can assure you that, long-term, this is in fact the most economical solution, and also the best one overall resource and user experience-wise. Because a Synology NAS dedicated to web hosting simply does it well.
STEP 1
Please Support My work by Making a Donation.
First things first: before proceeding to self-hosting, you have to buy good hardware that supports your web hosting needs. Excellent Synology brand hardware paired with a well thought out configuration is the dream setup for home hosting.
HARDWARE CONFIGURATION:
- 1) Choose one of these three models from Synology: the DS218+ or the DS718+ or the DS720+, all models with 2 bays. Personally, I recommend the DS720+ Synology NAS model which is just the right option performance and price-wise.
- 2) Upgrade your RAM to 6GB if you decide to go for the DS218+ Synology NAS model, to 8GB if you go for the DS718+ model or to 10GB if you go for DS720+ model. The standard NAS models come with 2 GB of RAM. You can buy one 4GB block for the DS218+ and two 4GB blocks for the DS718+. Alternatively, you can buy one 8GB block for the DS720+. The RAM model is as follows: D3NS1866L-4G for DS718+.
Below you can find the guide on how to change the RAM on a Synology NAS. Read the full article on Synology DS218+ and DS718+ RAM Upgrade and the full article on DS720+ RAM upgrade.
- 3) Choose a good router. At the moment, the Synology brand router is the best one. After you buy the RT2600ac router make sure you turn the WiFi OFF. If you are hosting your website/s from home on your own Synology NAS, you need dedicated bandwidth (resources should not be shared with other devices such as mobile devices, laptops, tablets).
- 4) Link Aggregation or Multi LAN: While the DS218+ doesn’t have an option for link aggregation, the DS718+ model allows for two LAN which is good for speed optimization and communication.
- 5) HDD disks or SSD disks for self hosting? You want your hosting service to run smoothly? Just get SSDs and call it a day! You will definitely notice SSD discs will make you website much faster compared to HDDs and the overall hosting environment will benefit from the excellent speed they provide.
You can get two Crucial MX500 256 GB or two Synology SAT5200 SSDs, depending on your wants or needs. With SSDs, you will never hear any type of noise as the disks read and process files extremely fast when visitors access (aka visit) your website.
- 6) You will need a good UPS. I have bought an awesome UPS from CyberPower for my NAS devices – the CP1500EPFCLCD.
Why do you need an UPS? An uninterruptible power supply (UPS) is primarily used to provide a backup power source to your computer, NAS and other devices plugged into it. If a computer or another device such as a NAS is not receiving a consistent flow of electricity, damage such as database corruption can and often occurs. Read this important article about UPS.
SOFTWARE CONFIGURATION:
- 1) Choose the EXT4 File System for your Volume. Read the benefits and performance of EXT4 for running a fast website.
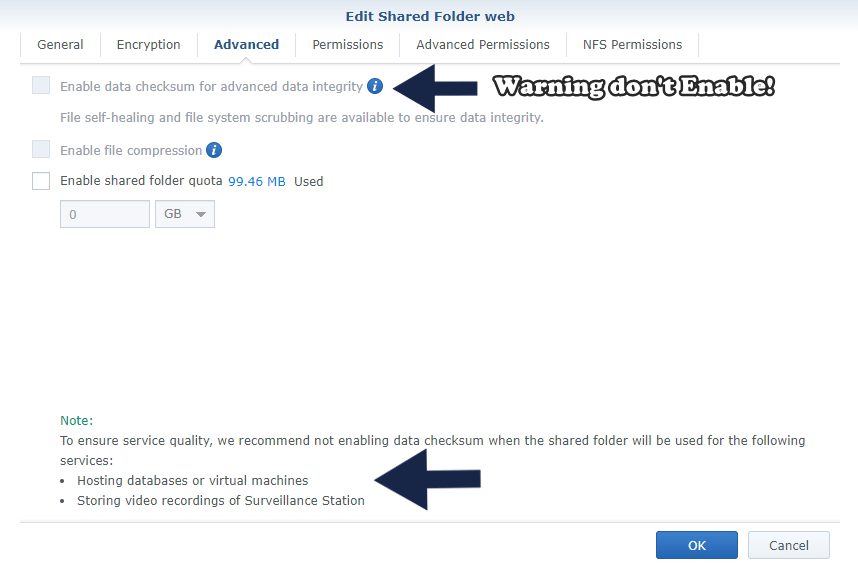
- 2) Don’t enable the Checksum option. Create a new Shared Folder in Control Panel / Shared Folder. Leave the ‘Checksum’ option blank (don’t enable it).
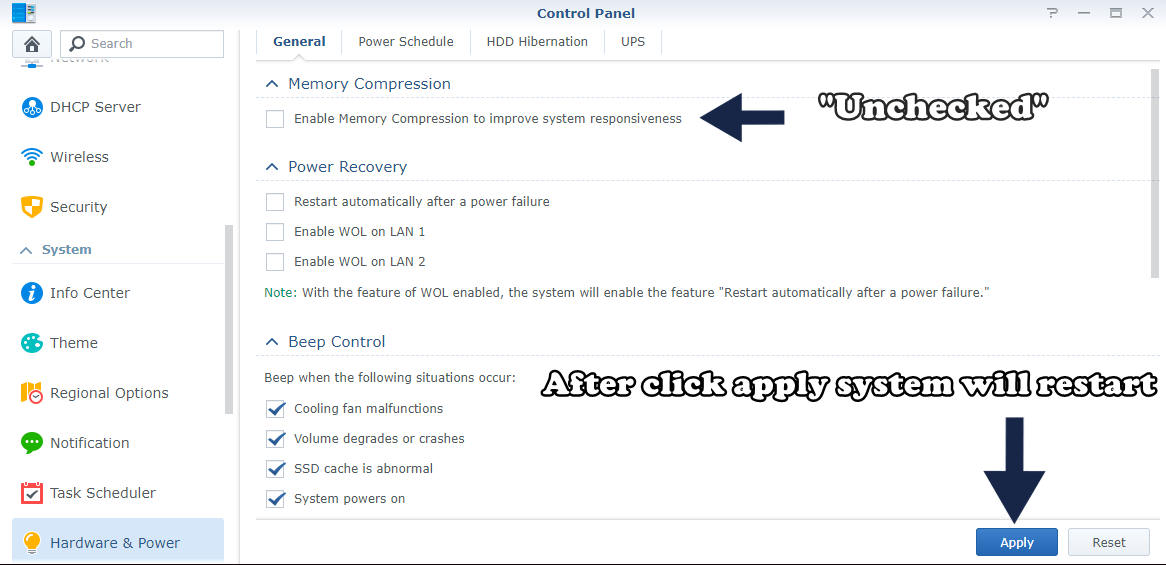
- 3) Don’t enable Memory Compression. Synology recommends activating Memory Compression on your NAS, but the fact is Memory Compression will make your system slower. I did some A/B tests and found it’s best to simply not enable this option if you are doing web hosting. If you leave it unchecked, you will notice a measurable increase in performance when the system restarts. Read more on the topic in my article Synology: Should I Use Memory Compression?
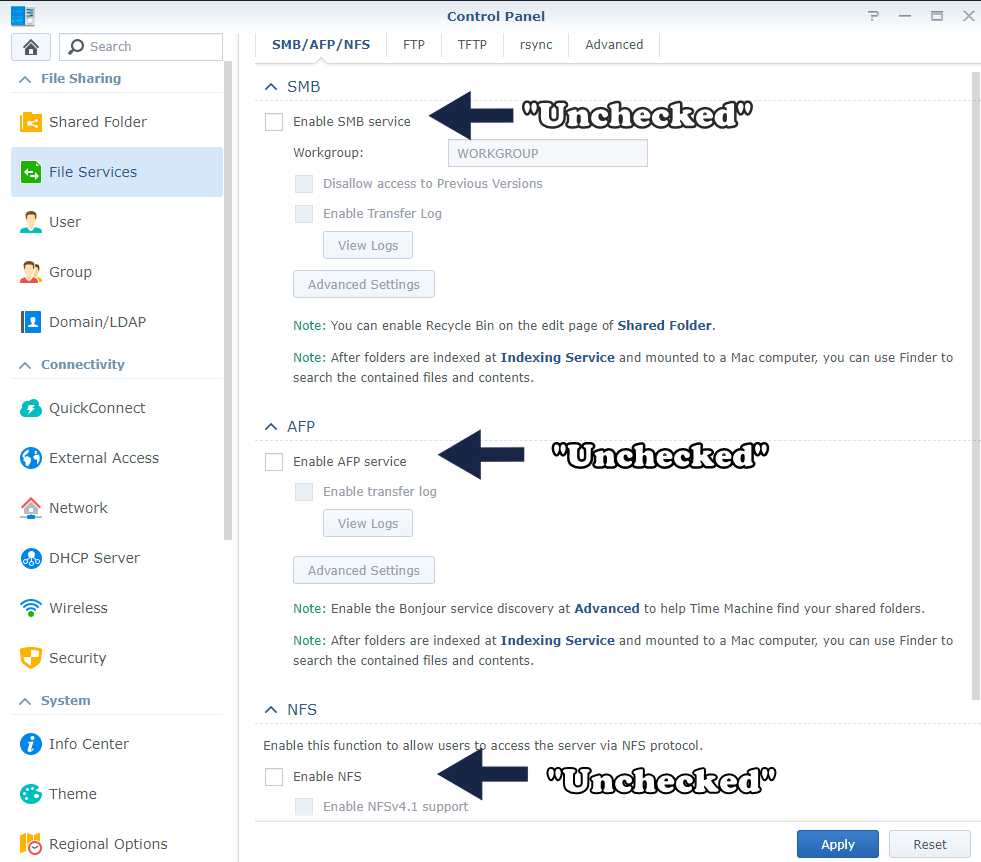
- 4) Disable CPU-hungry Services. You don’t need these types of services if you are doing web hosting. You only need SFTP on port 22 to upload files to your WordPress website through FileZilla or other FTP program or service. After you uncheck the services shown in the image below, you will notice your CPU will have more available resources and your system will run more smoothly. Follow the instructions in the image below.
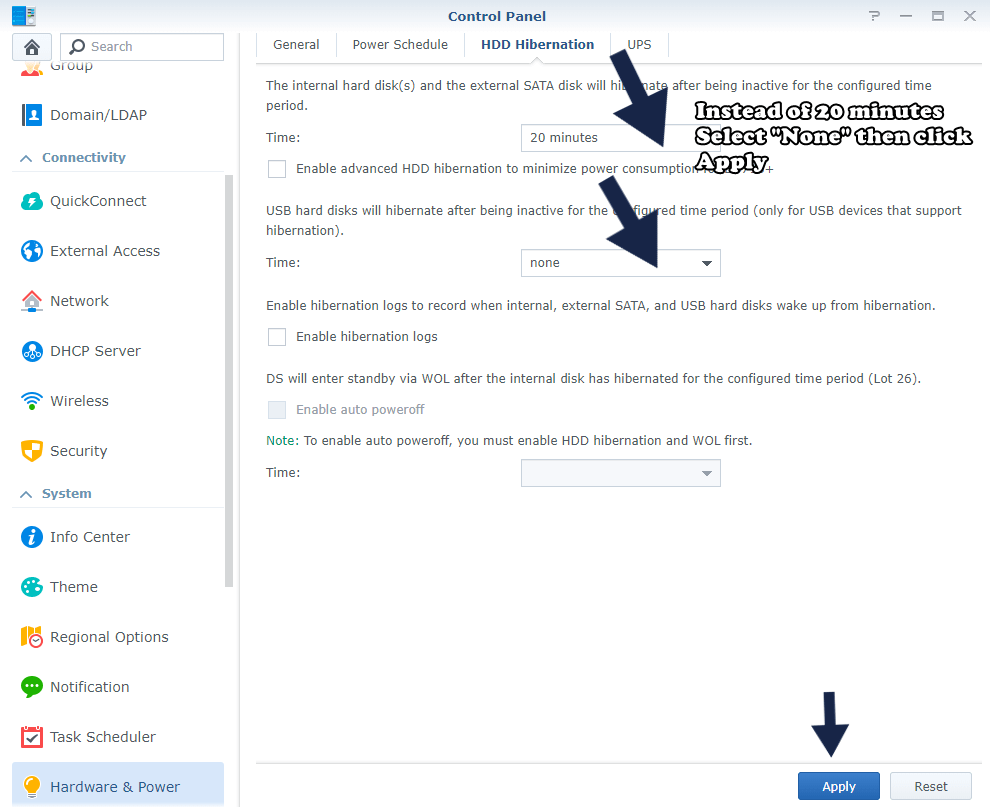
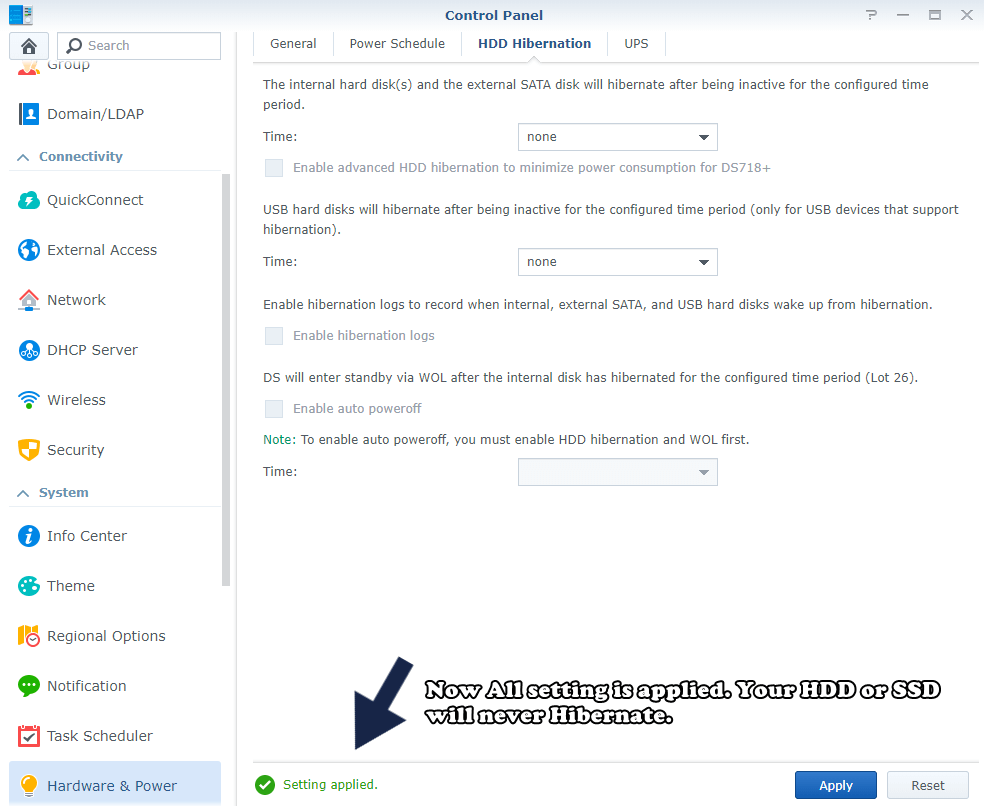
- 5) Disable HDD Hibernation. A website is meant to be online 24/7/365. Which means your disks can’t go to sleep or else your website will become unavailable. Find out more in my article on disk hibernation and HDD SSD lifespan.
- 6) Install PHP 7.3 and the latest Web Station Package (refer to this article).
- 7) Get an HTTPS / SSL Let’s Encrypt Certificate and activate the HTTP/2 option in Web Station / Virtual Host / Edit domain / Check HTTP/2.
Note: Read more on How To Enable HTTP/2 on a Synology NAS.
- 8) Download and install the latest WordPress Version.
- 9) Use a light theme like GeneratePress. You can download the GeneratePress theme for free.
- 10) Download the free plugin named “Autoptimize” and set it up.
That’s all! Now you know how you can run your own website from home on your Synology NAS! Following my recommendations will ensure your self-hosted website is safe, fast and reliable.
This post was updated on Monday / August 9th, 2021 at 9:38 AM
