Below I will explain how I reduced the number of direct attacks on my Synology NAS by correctly setting up the GeoIP Firewall on the powerful DSM 7 operating system. I blocked all geographical regions, except for my own, my static IP from my ISP and my subnet mask. Most Brute Force attempts came from outside my home country, Romania. With these detailed settings you will not only reduce the number of notifications received for attacks on port 22 like SSH login attempts, but also bring them down to almost 0. I thought I’d share how I implemented it for others wanting to reduce the surface area for attacks and make their Synology NAS device more secure.
You will have to follow the scheme below exactly as it is: allow, allow, allow, deny. And the order of insertion must be respected! I’ve been running these firewall settings on my Synology NAS with GeoIP deny rules for about two years now and everything seems to be working fine as I’ve had no unauthorized login attempts in my Log Center from any of the countries I’ve denied.
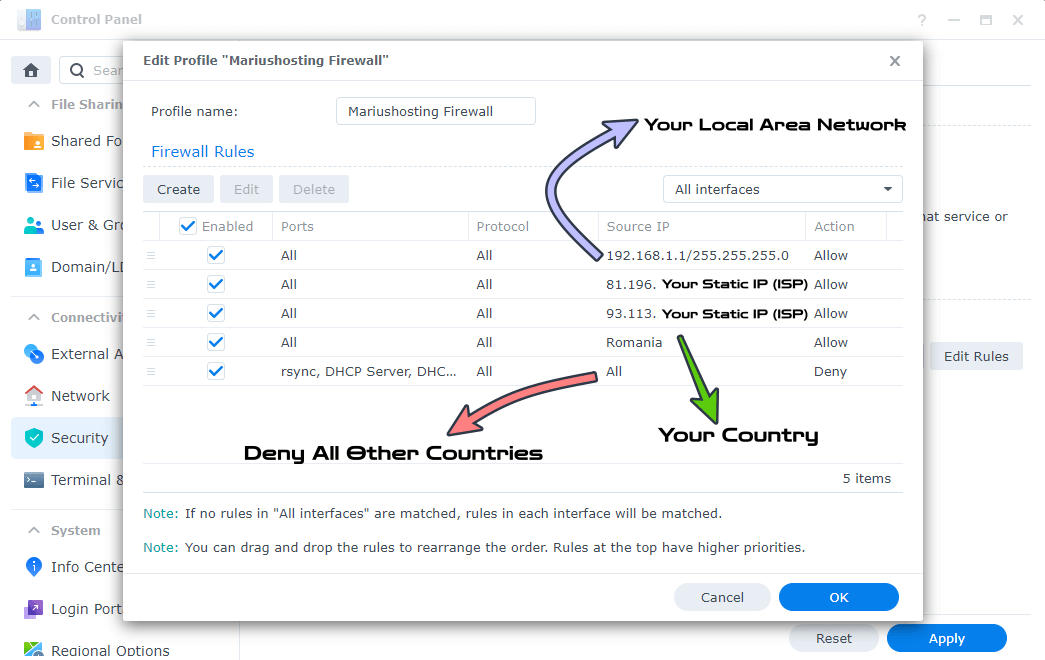
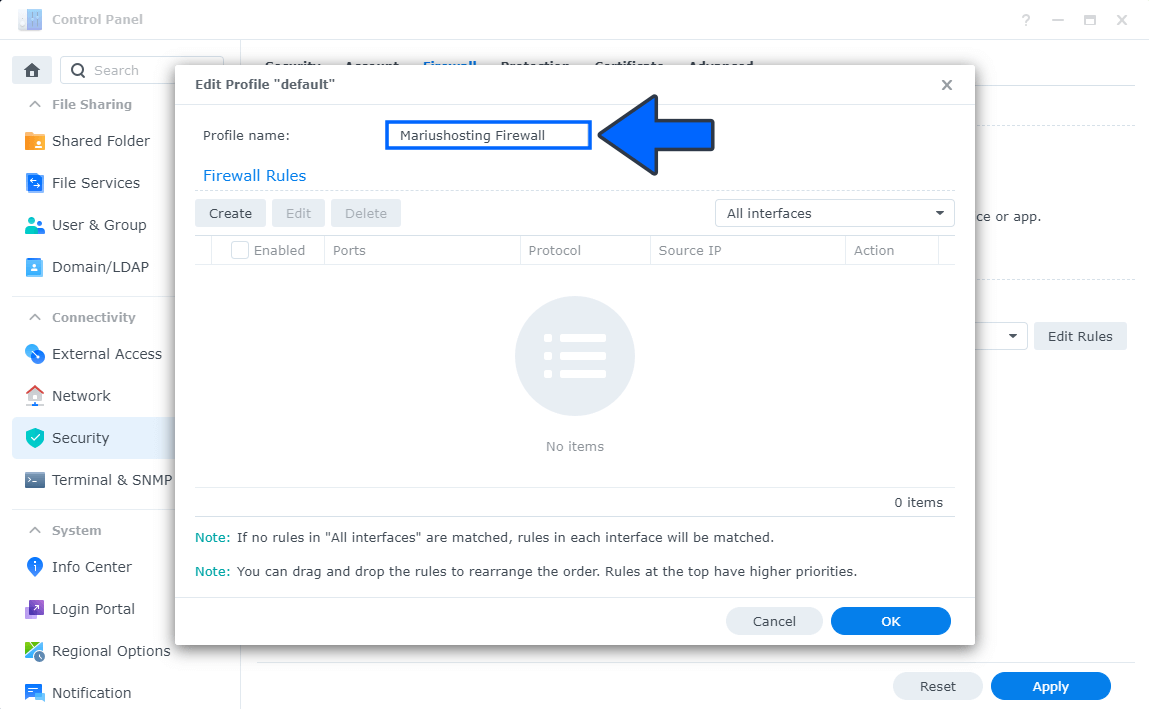
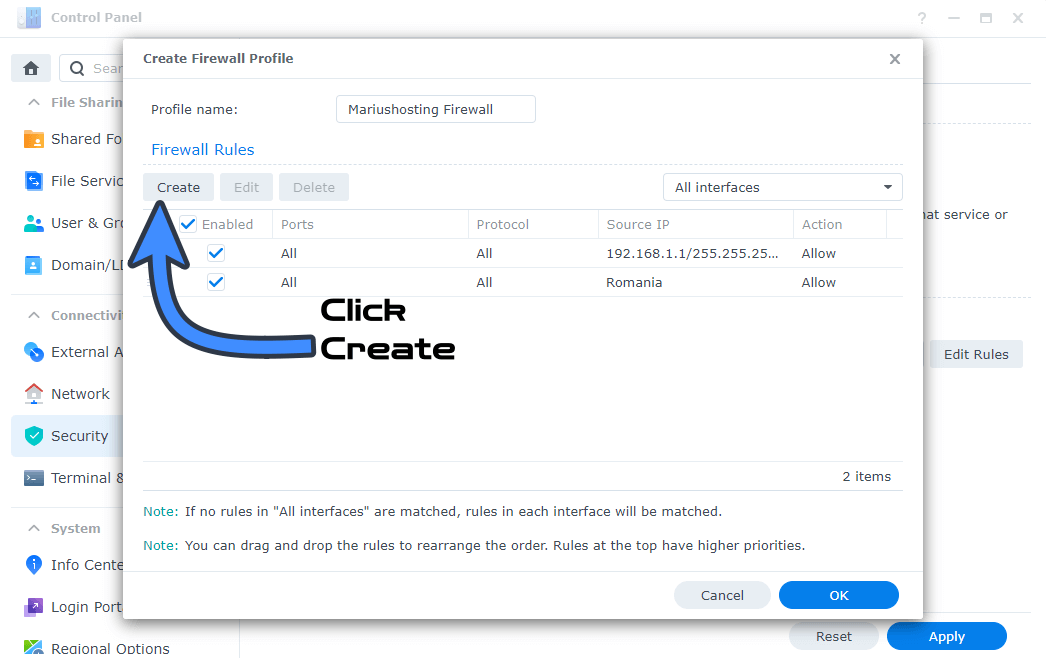
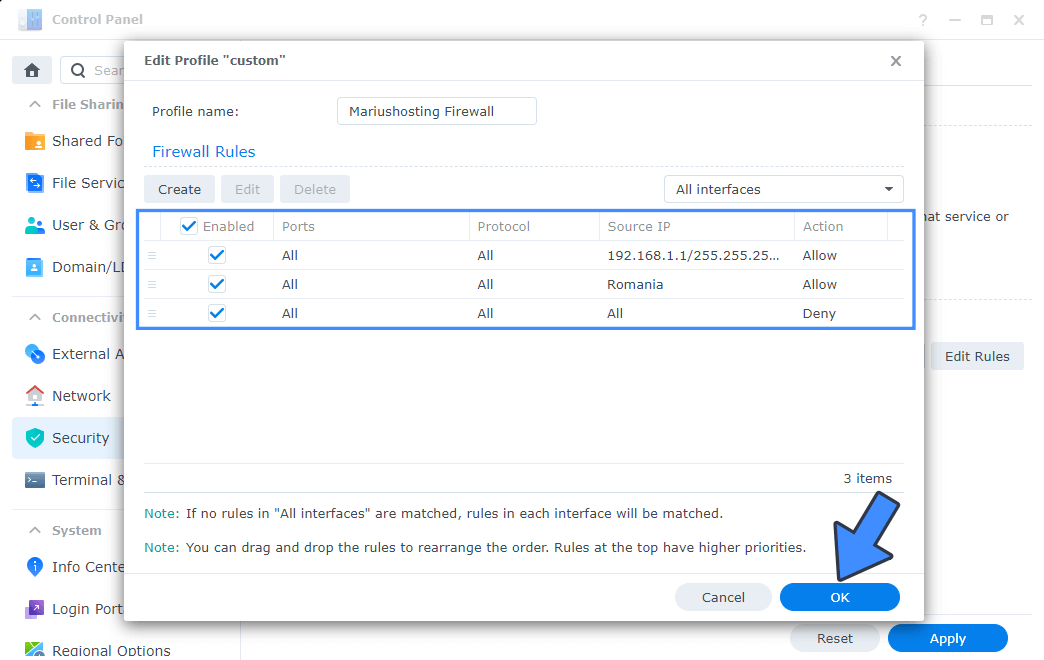
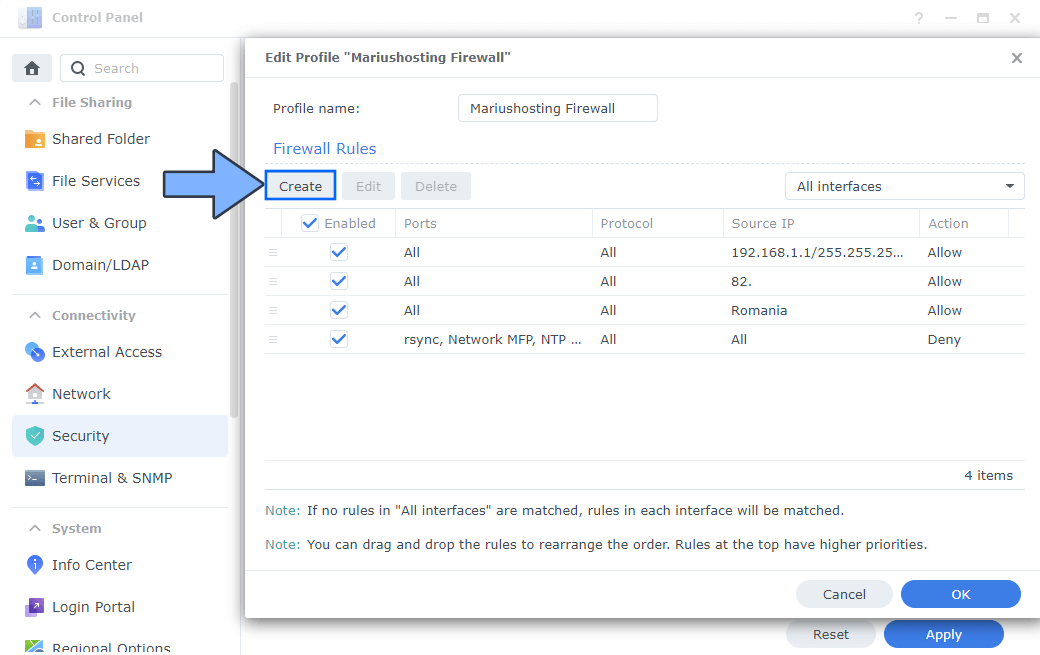
After you finish completing all the STEPS/RULES in this article, your Firewall profile should look like this:
1= Ports All – Protocol All – Source IP: “Your Subnet Mask – Default Gateway” (Local Area Network) 192.168.1.1/255.255.255.0 Action: Allow. In my case, my Default Gateway is 192.168.1.1 but you might have a different Default Gateway. Discover what is your Default Gateway in Control Panel / Network / General tab / Default Gateway. 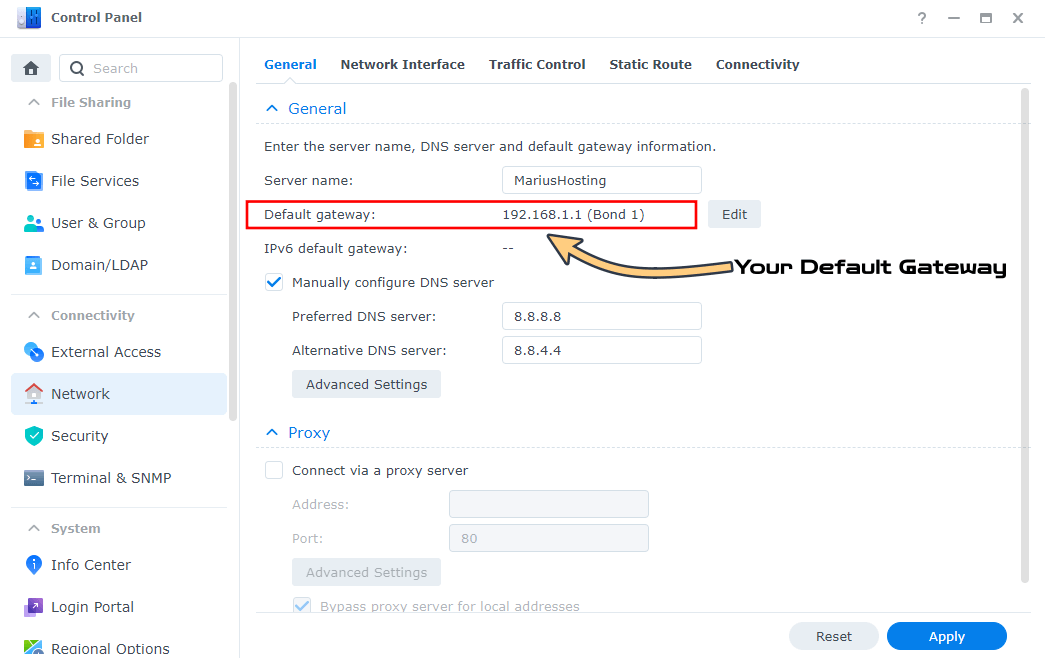
2= Ports All – Protocol All – Source IP: “Your Static IP” Action: Allow (Set your Static IP if you have one from your Provider.) I strictly recommend having a static IP if you use a Synology NAS. (Optional STEP)
3= Ports All – Protocol All – Source IP: “Your Alternative Static IP” (if you have more than one Static IP) Action: Allow. (Optional STEP).
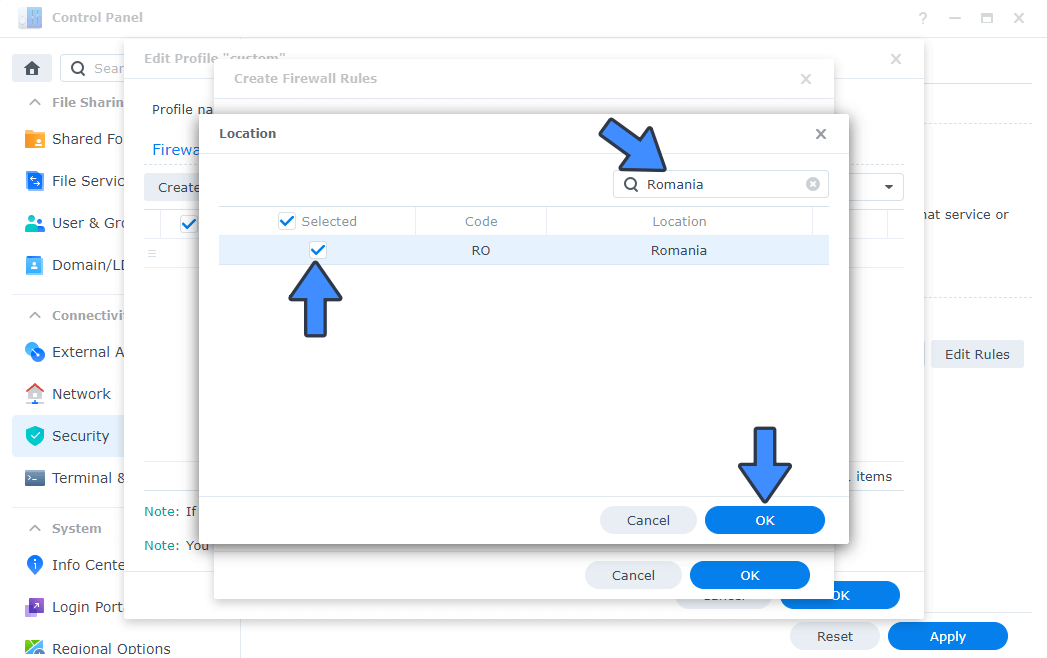
4= Ports All – Protocol All – Source IP: “Your Country” Action: Allow I set my country to Romania, but you have to set your own country. You can access your NAS from any IP in the country you have chosen, for example from an IP from school or from your office.
5= Port All – Protocol All – Source IP All – Action: Deny. You will block all IPs from all over the world from accessing your Synology NAS, except for the ones in your Country. In my case, I only allow ports 80 and 443 to be visible from any country, so this is why you can read mariushosting from anywhere.
Warning: The order of insertion of the rules must be respected. Rules are prioritized according to their positions in the list.
STEP 1
Please Support My work by Making a Donation.
STEP 2
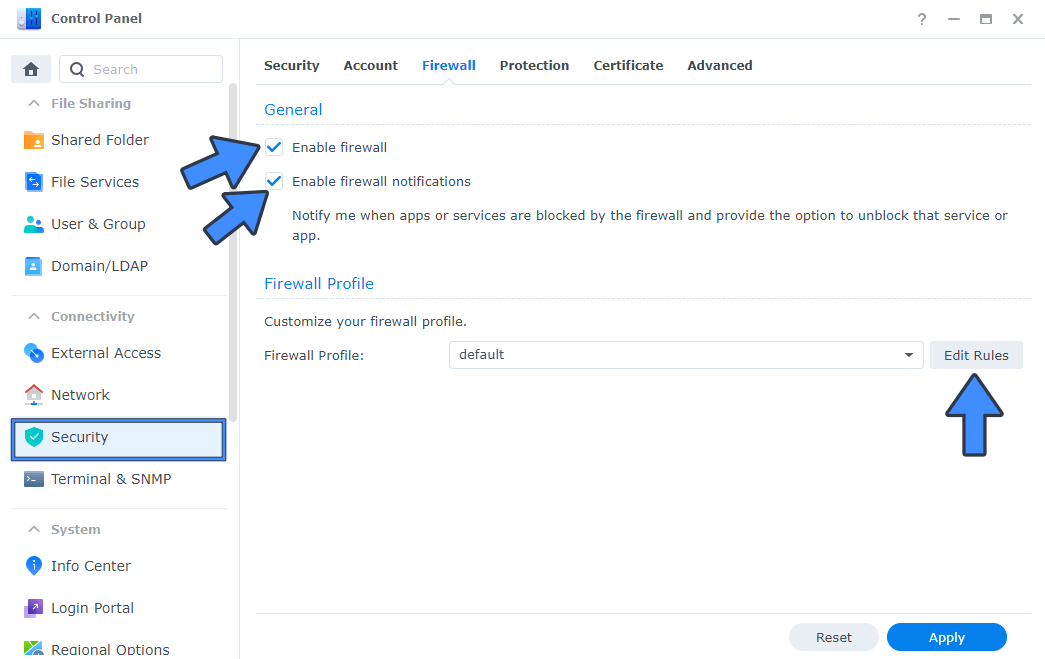
Go to Control Panel / Security / Firewall tab and follow the instructions in the image below.
- Check Enable Firewall.
- Check Enable Firewall Notifications.
- Select the Default Firewall Profile then click Edit Rules.
STEP 3
After you click Edit Rules on STEP 2 give a name to your new Firewall Profile. Follow the instructions in the image below.
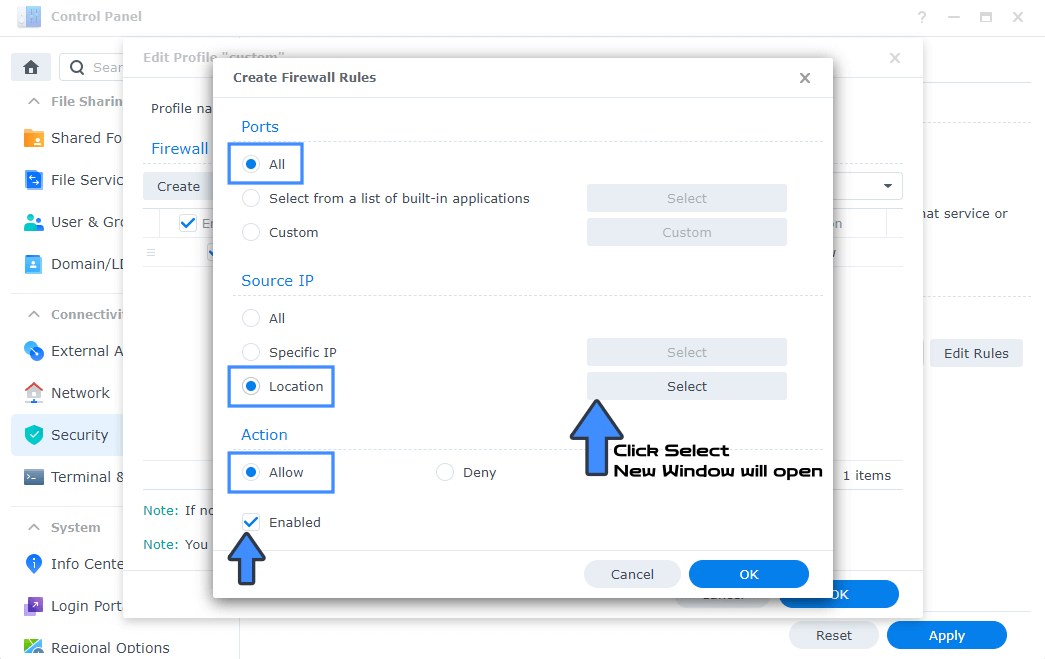
RULE 1 (Mandatory)
Create your first (mandatory) Firewall Rule to allow your internal/home network.
Click on the Create tab.
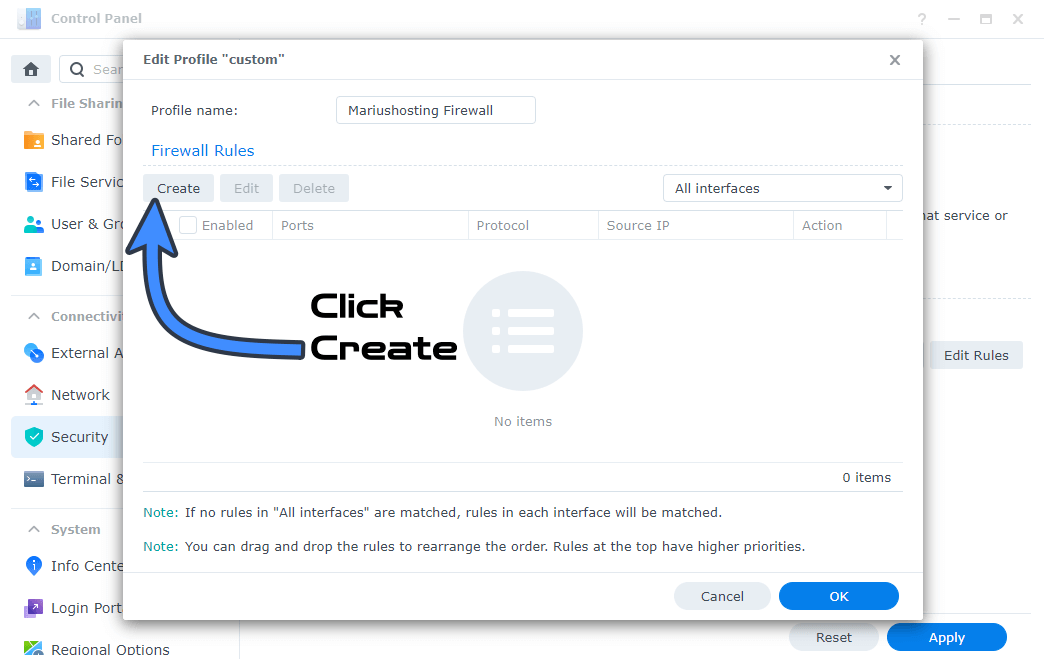
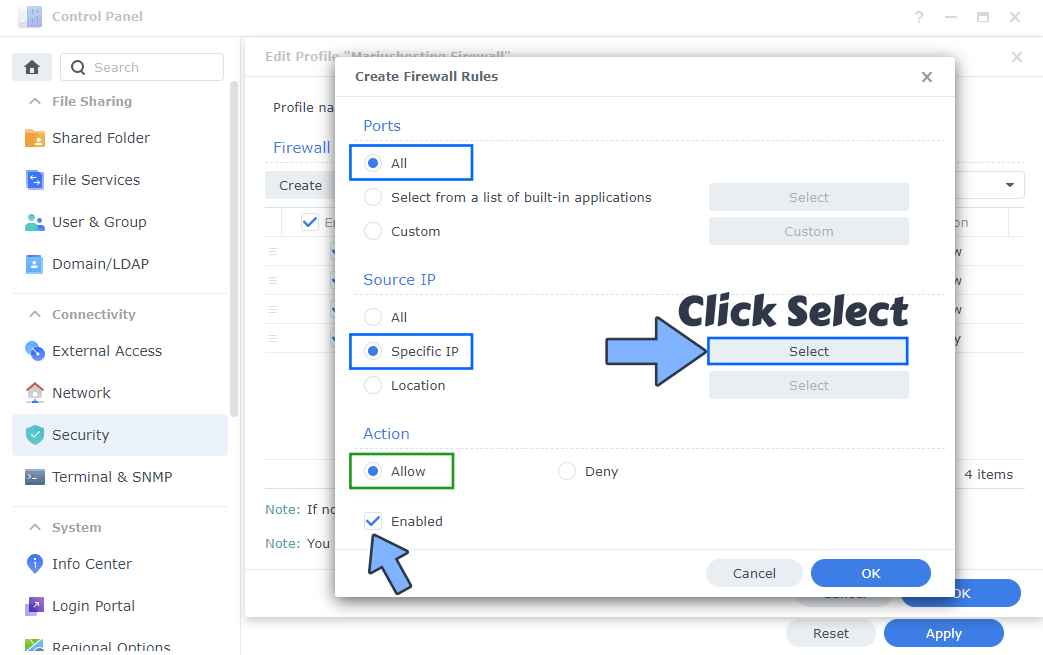
After you click Create, a new window will open.
Ports: Select All.
Source IP: Select Specific IP. Click the Select button and a new window will open.
Action: Select Allow and check Enabled.
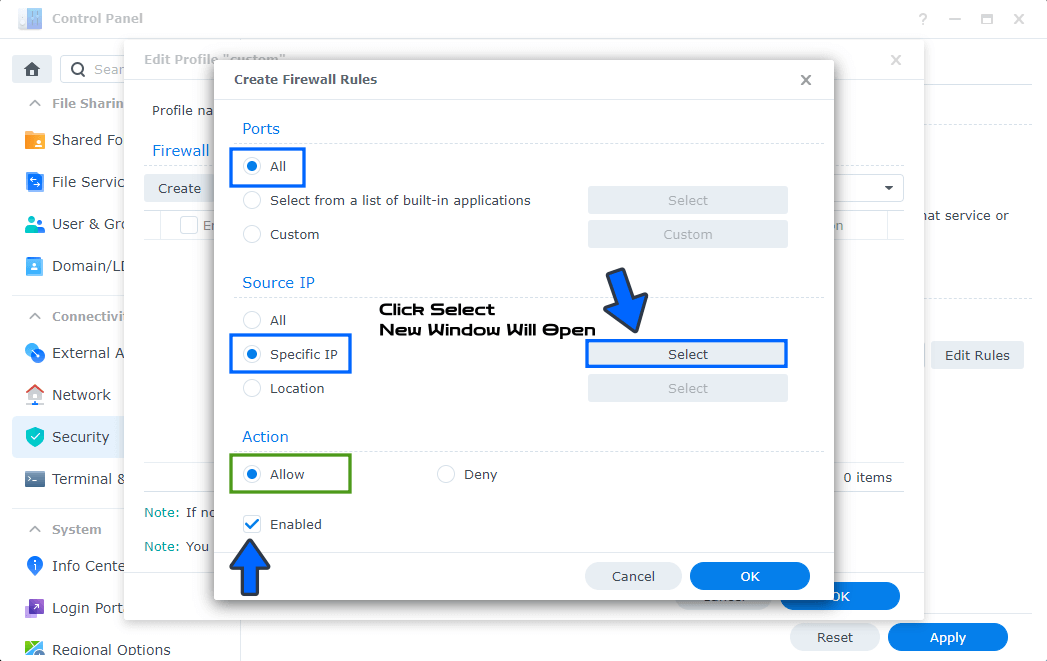
After you click Select, a new window will open. Check “Subnet“. In the IP address area add your Default Gateway. Warning: In my case, my Default Gateway is 192.168.1.1 but you might have a different Default Gateway. Discover what is your Default Gateway in Control Panel / Network / General / Default Gateway. Click OK.
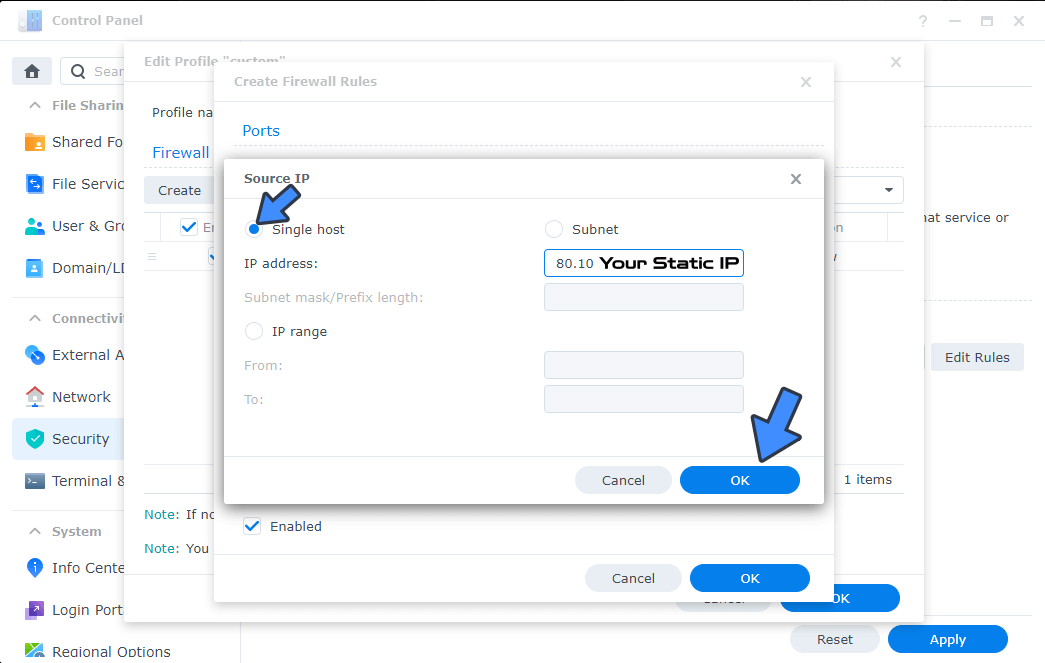
RULE 2 (Optional)
Create your second (optional) Firewall Rule to allow your Static IP provided by your ISP (Internet Service Provider), if you have one.
Click on the Create tab.

After you click Create, a new window will open.
Ports: Select All.
Source IP: Select Specific IP. Click the Select button and a new window will open.
Action: Select Allow and check Enabled.
After you click Select, a new window will open. Check “Single Host“. Add your Static IP, then click OK. If you have multiple Static IPs, create a new “Allow” rule for every Static IP you have.
RULE 3 (Mandatory)
Create your third (mandatory) Firewall Rule to Allow your own Country.
Click on the Create tab.
After you click Create, a new window will open.
Ports: Select All.
Source IP: Select Location. Click the Select button and a new window will open.
Action: Select Allow and check Enabled.
In the search box type in your own Country, select it then click OK. Follow the instructions in the image below.
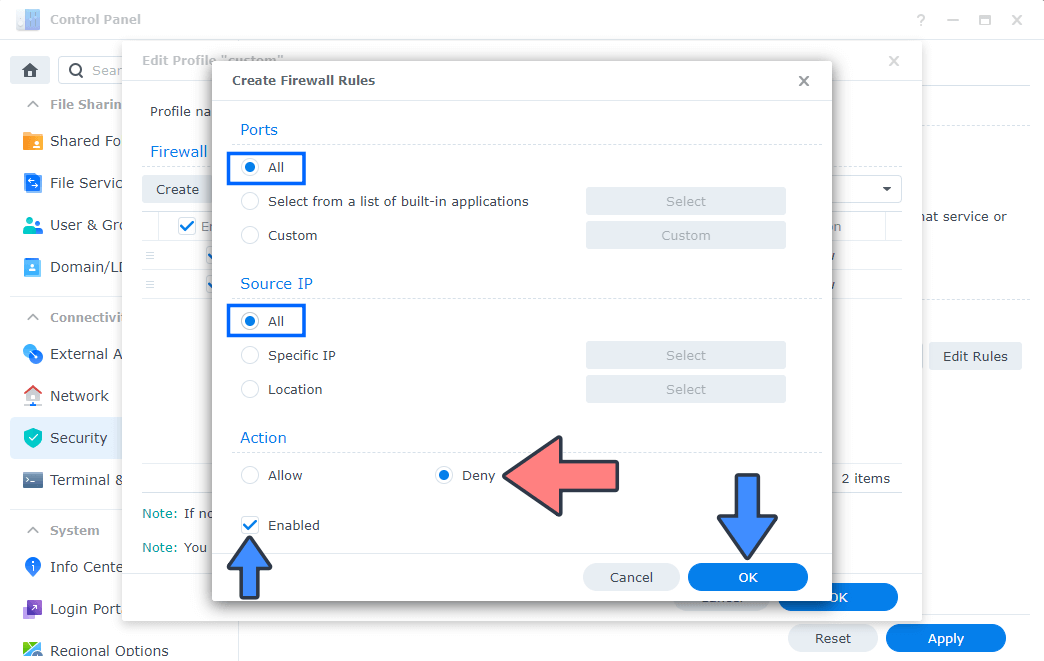
RULE 4 (Mandatory)
Create your fourth (mandatory) Firewall Rule to Deny all other Countries.
Click on the Create tab.
After you click Create, a new window will open.
Ports: Select All.
Source IP: Select All.
Action: Select Deny and check Enabled, then click OK.
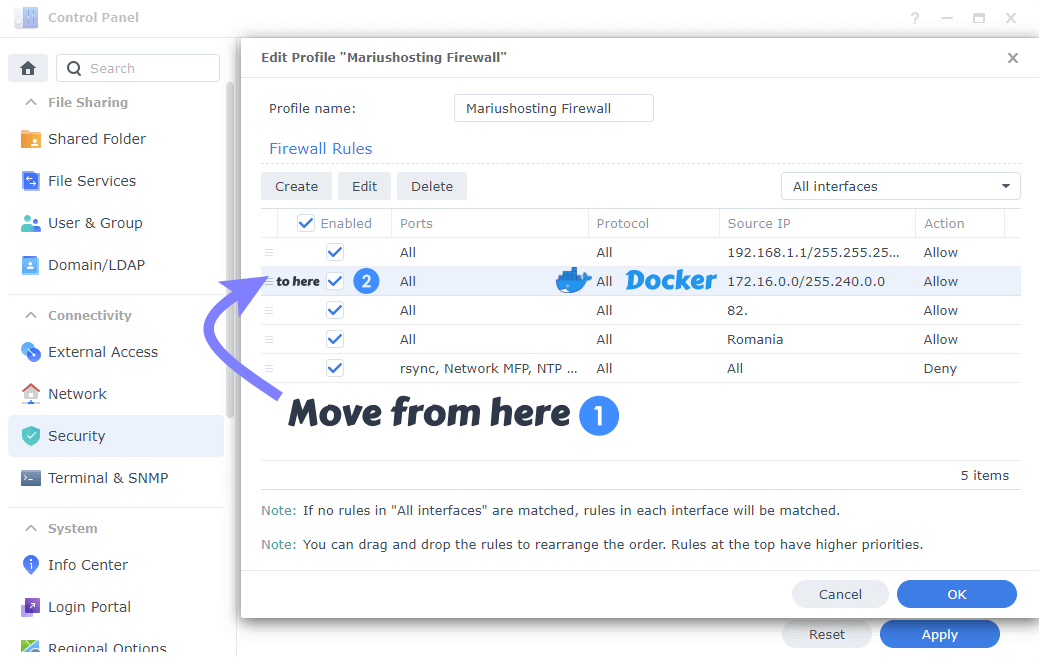
Your Firewall configuration will look like this (without the optional firewall rules):
RULE 5 (Mandatory if you use Reverse Proxy)
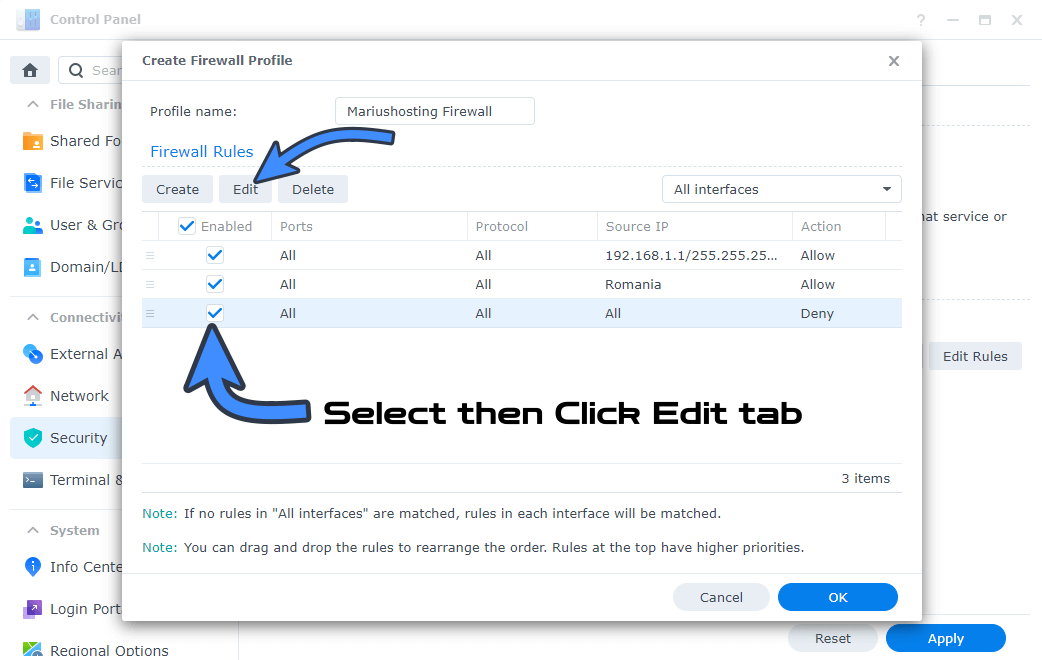
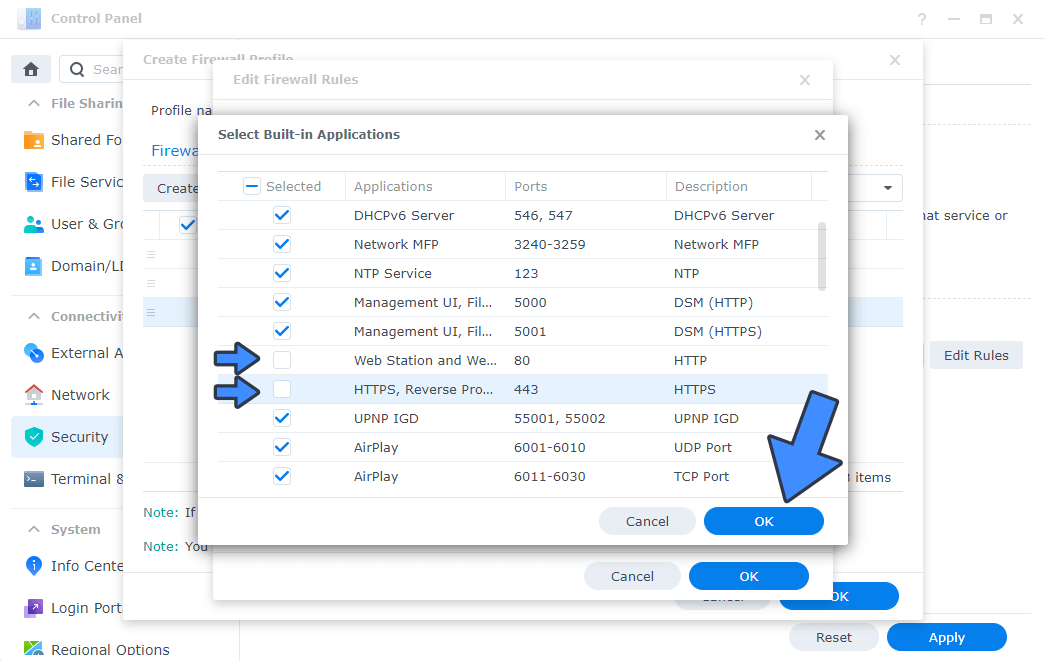
If you’re using your Synology NAS for web hosting, or if you have a service which must be accessible to all, follow the instructions in the images below. As mentioned above, if you are using your Synology NAS for web hosting, MailPlus server etc., you have to select from a list of built-in applications and exclude your service. In my case I excluded port 80 and port 443 from the Deny list to make my website MARIUSHOSTING accessible from all over the world. In the “Select from a list of built-in applications” you can choose which app/port/services can be accessible from all countries/locations.
Select your Deny Rule then click the Edit tab. Follow the instructions in the image below.
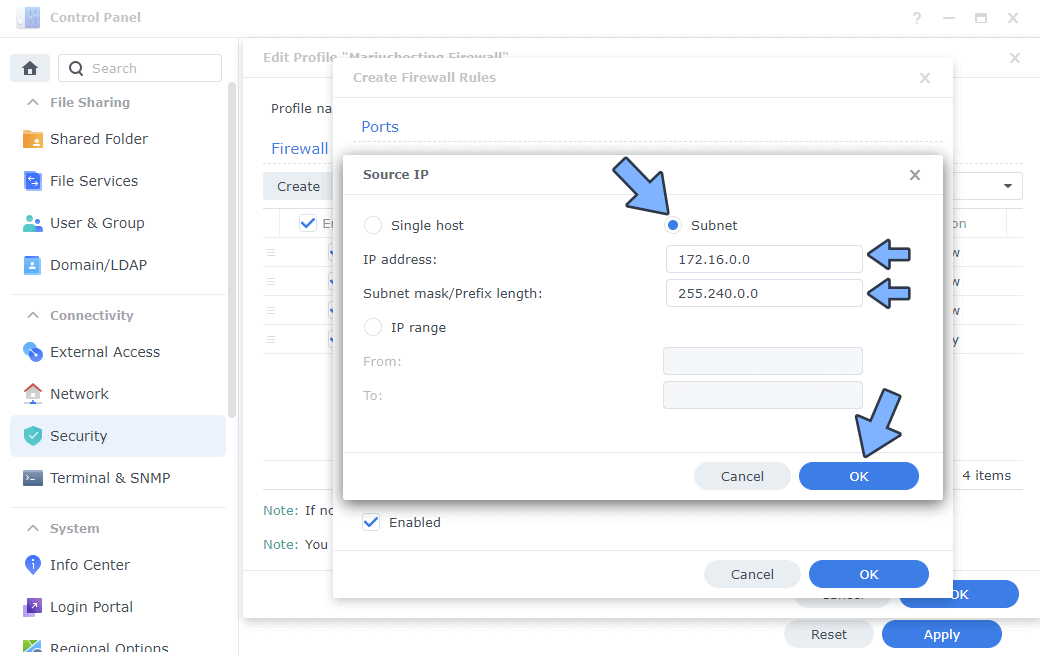
RULE 6 (Mandatory if you use Docker)
Click on the Create tab. Follow the instructions in the image below.
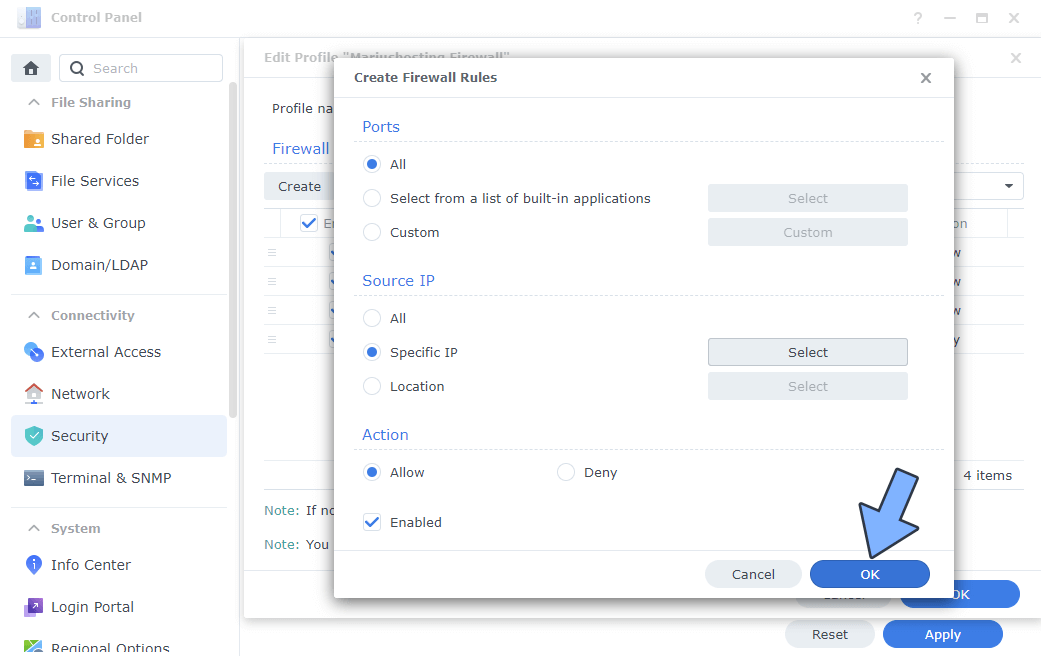
After you click Create, a new window will open.
Ports: Select All.
Source IP: Select Specific IP. Click the Select button and a new window will open.
Action: Select Allow and check Enabled.
After you click Select, a new window will open. Check “Subnet“. In the IP address area add 172.16.0.0 and in the Subnet mask/Prefix length add 255.240.0.0 – Click OK. Follow the instructions in the image below.
After you click OK, click OK again to save all the settings. Follow the instructions in the image below.
Your Docker Firewall rule will be ABOVE the deny rule. Move it from the last position to the second position. Click OK to save the Firewall Settings. Follow the instructions in the image below.
⚠️Warning: DSM 7.3 released on October 8, 2025 seems to have an issue with Firewall. If you experience issues after you have added RULE 1, RULE 5 and especially RULE 6, disable the Firewall, then restart the NAS. Install the container that you want with the Firewall still disabled, then enable the Firewall again in Control Panel / Security / Firewall.
Test-reach your Synology NAS on your internal network and from external networks in your country like your office, school or a free Wi-Fi area. You can also make sure (validate) if the firewall is working and blocking denied countries/locations by using a Tor browser or a VPN service to send traffic from a different country. Alternatively you can contact a friend from another part of the world by providing him with your Synology DDNS address. If he can’t connect, that means the firewall is working perfectly. These tests will help you see if your firewall rules are working properly. The Firewall configurations will not work with QuickConnect because your Firewall Configurations will be bypassed. You should always use DDNS and not QuickConnect. Remember to disable QuickConnect once you set up DDNS on your Synology NAS.
Note: Firewall rules are executed top to bottom. Meaning that all “Allow” rules must be at the top of the list, with a “Deny” rule at the bottom. When traffic enters the NAS, it will go through the list and, if it isn’t explicitly permitted, the “Deny” rule will block the traffic.
Note: If you don’t have a Static IP and you have a dynamic IP that changes every time you connect, set up only RULE 1, RULE 3 and RULE 4 described in this article.
Note: If you set up only RULE 1 and RULE 3 because you have a dynamic IP, you can connect to your NAS via VPN if you are planning to visit other countries, or you can allow your destination country on RULE 3 before leaving your own country.
Note: If you don’t allow your own Country on RULE 3, you will receive this message: Your computer has been blocked by the new firewall configuration. The firewall configuration has been reset to the previous state. Please make sure that no rule is blocking your computer and try again.
Note: As you add new packages to your NAS, new “Allow” rules will need to be created. Your NAS will generally inform you that you need to create a new rule when you finish installing/configuring a new package.
Note: Extra Protection IP Block List.
Contact me by leaving a message if you have any problems regarding Firewall Rules.
This post was updated on Friday / June 26th, 2026 at 12:01 AM