What is Nextcloud? Nextcloud is the most deployed self-hosted file share and collaboration platform on the web. Access and collaborate across your devices. The Nextcloud application is functionally similar to Dropbox or OneDrive. Unlike Dropbox and OneDrive, Nextcloud does not offer off-premises file storage hosting. Nextcloud Hub 26 is free and open-source which means that anyone is allowed to install and operate it on their own private server devices. Follow the instructions below to install Nextcloud on your Synology NAS device. You can also install Nextcloud on your Synology NAS with DSM version 6.2.4. If you are a more proficient user, I recommend the following installation for Nextcloud: How to Install Nextcloud Using Docker.
STEP 1
Please Support My work by Making a Donation.
STEP 2
Install the following packages through DSM Package Center.
- Web Station 4.3.0-0528
- Apache HTTP Server 2.4.63
- PHP 8.4.14
- phpMyAdmin 5.2.2
- MariaDB 10.11.11
Note: Once you install the MariaDB 10 package, you will have to set a root password. You will need this root password on STEP 14 of this article to access phpMyAdmin.
STEP 3
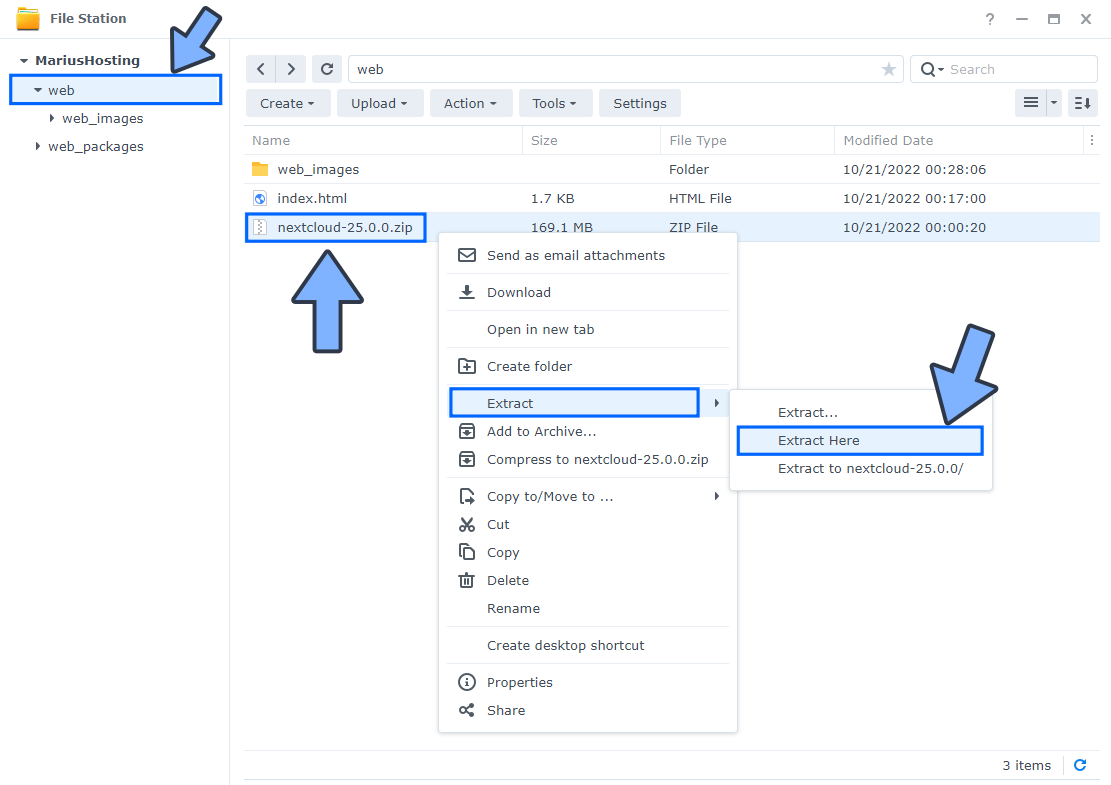
Download the latest Nextcloud Hub 26 version 34.0.1 from the official Nextcloud website nextcloud.com/install and place the nextcloud zip in the root of your web folder (/volume1/web/). Right click on the zip file and extract it in the web folder. Follow the instructions in the image below.
STEP 4
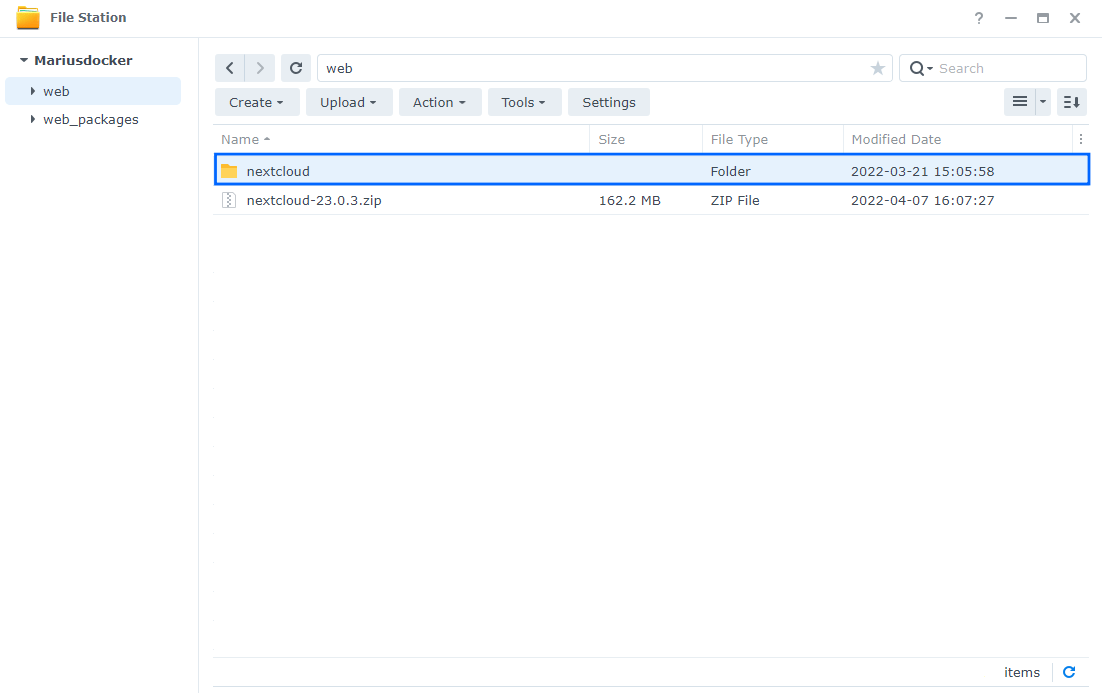
Your web folder should look like this.
STEP 5
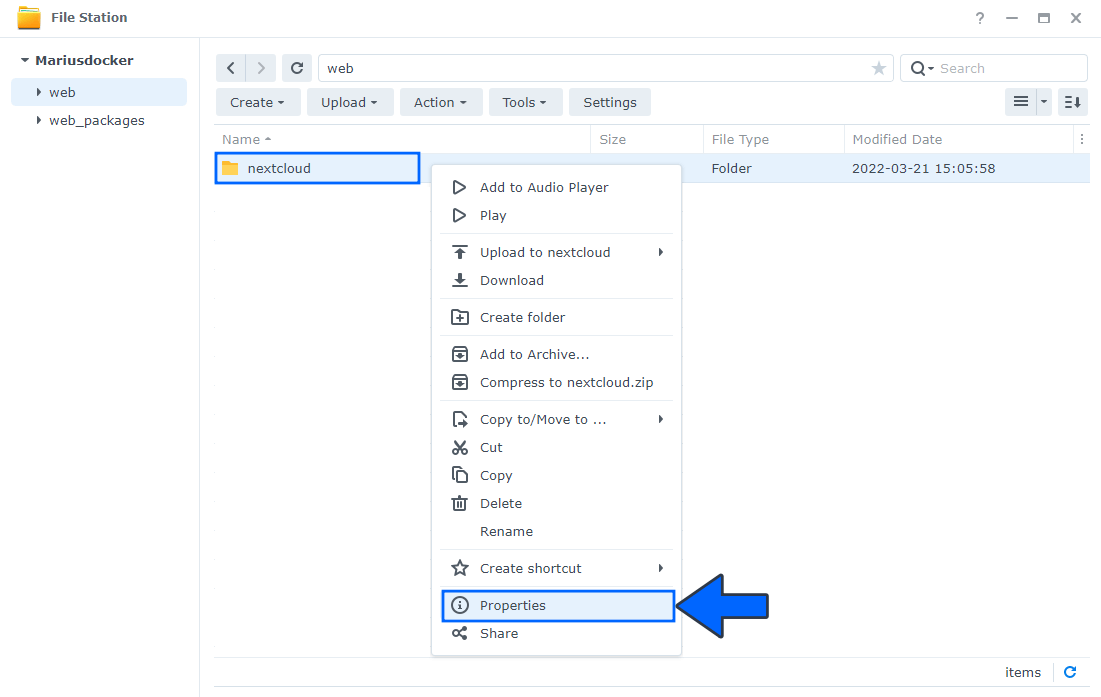
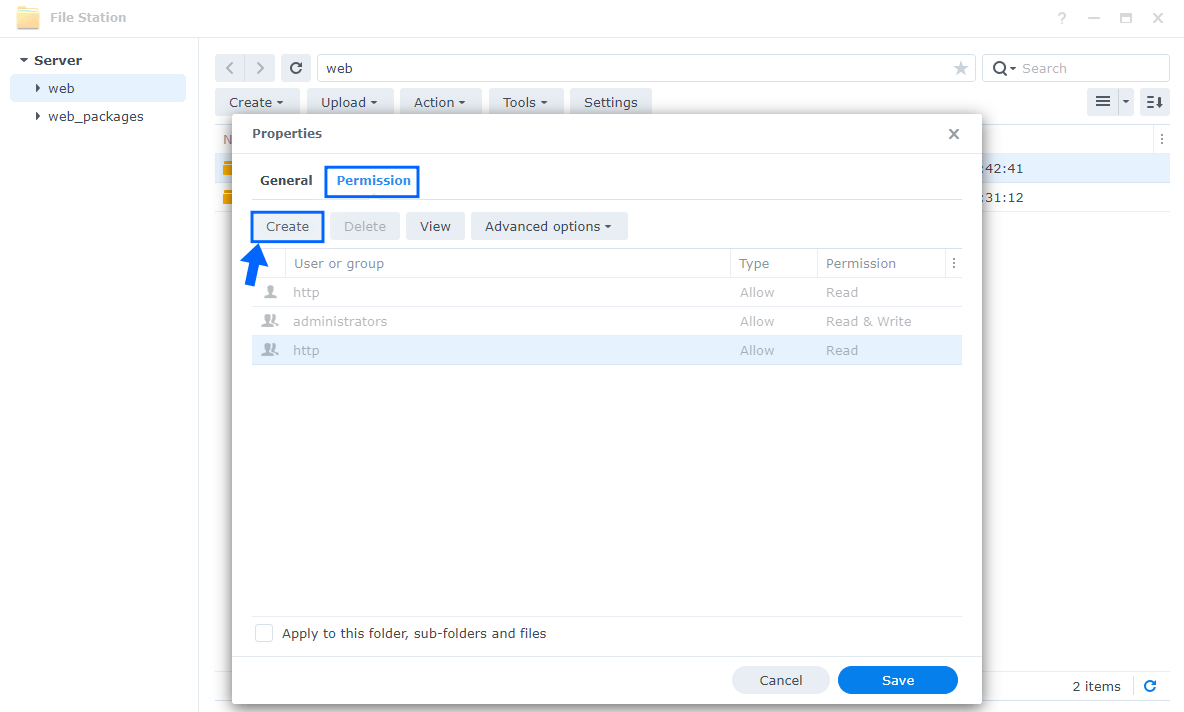
Right click on the nextcloud folder, then click Properties. Follow the instructions in the image below.
STEP 6
Go to the Permission tab, then click Create. Follow the instructions in the image below.
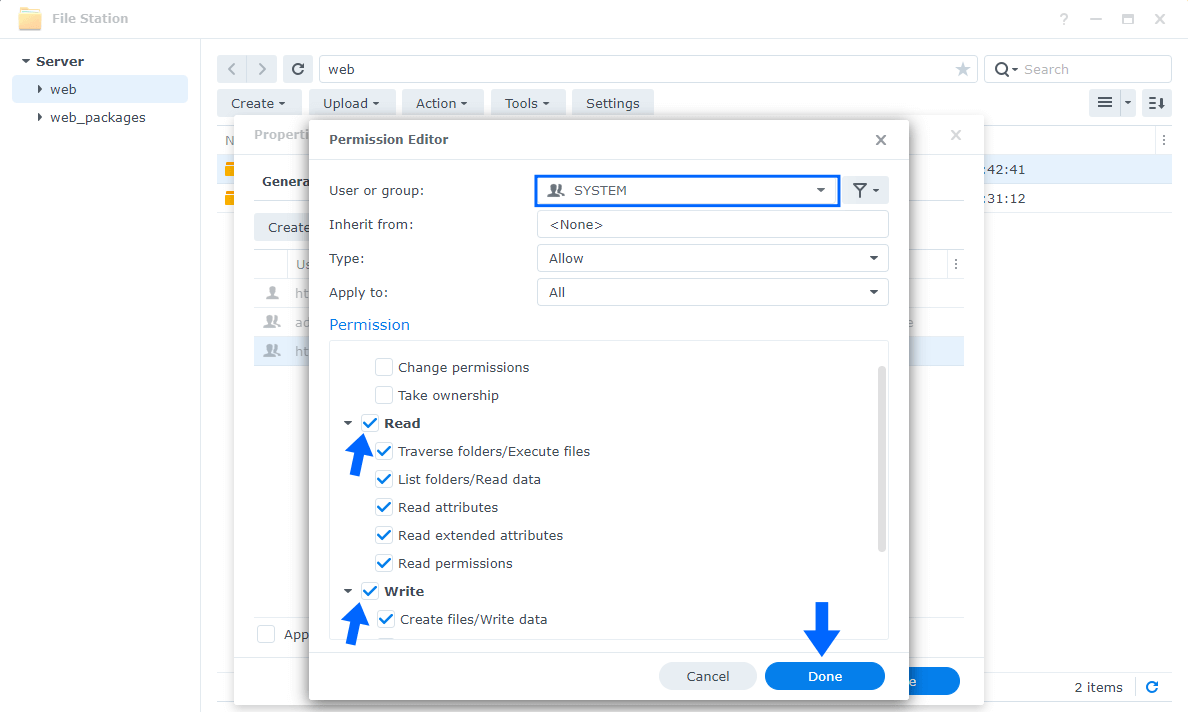
STEP 7
From the User or group dropdown menu, choose SYSTEM then check all Read and Write Permissions. Click Done. Follow the instructions in the image below.
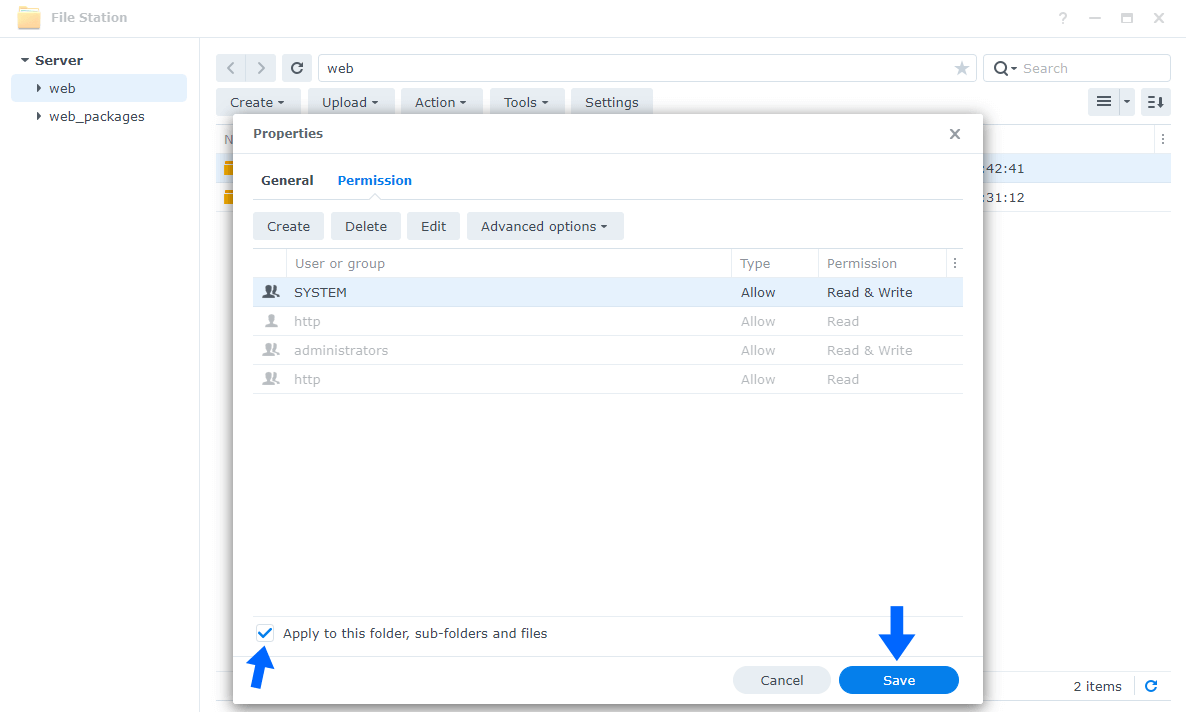
STEP 8
After you click Done on STEP 7, check “Apply to this folder, sub-folders and files“. Click Save. Follow the instructions in the image below.
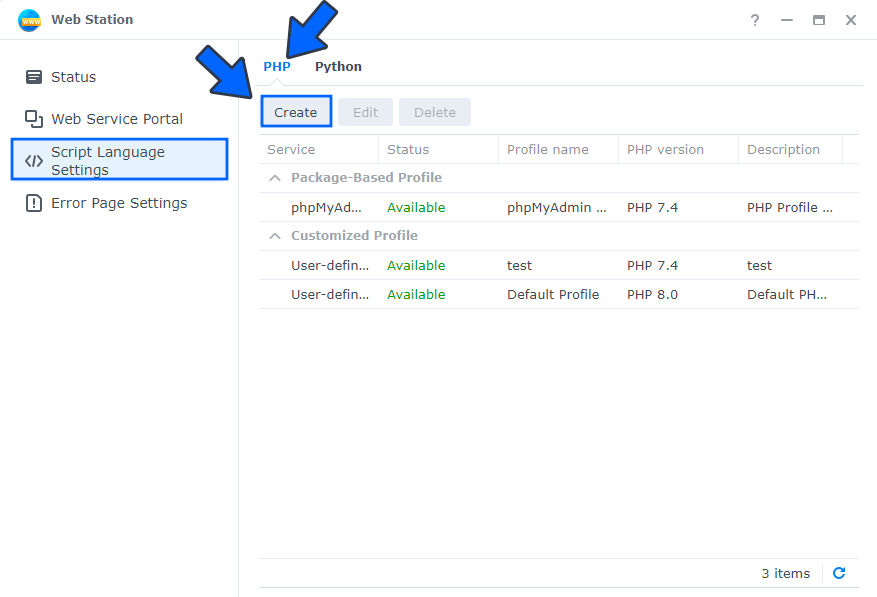
STEP 9
Configure PHP. Follow the instructions in the image below.
- Open the Web Station Package.
- In the left sidebar go to Script Language Settings and select the PHP tab, then click Create.
STEP 10
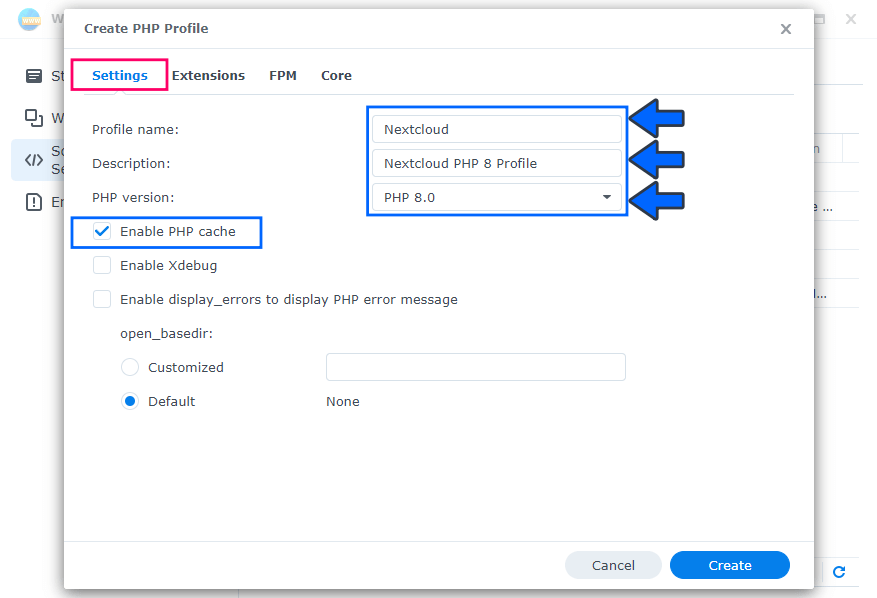
After you click Create on STEP 9, a new window will open. Go to the Settings tab and choose your Profile name, your Description and the PHP 8.4 version (Screenshot here is show PHP 8.0) you should select PHP 8.4, then check Enable PHP cache. Follow the instructions in the image below.
STEP 11
Next tab: “Extensions“.
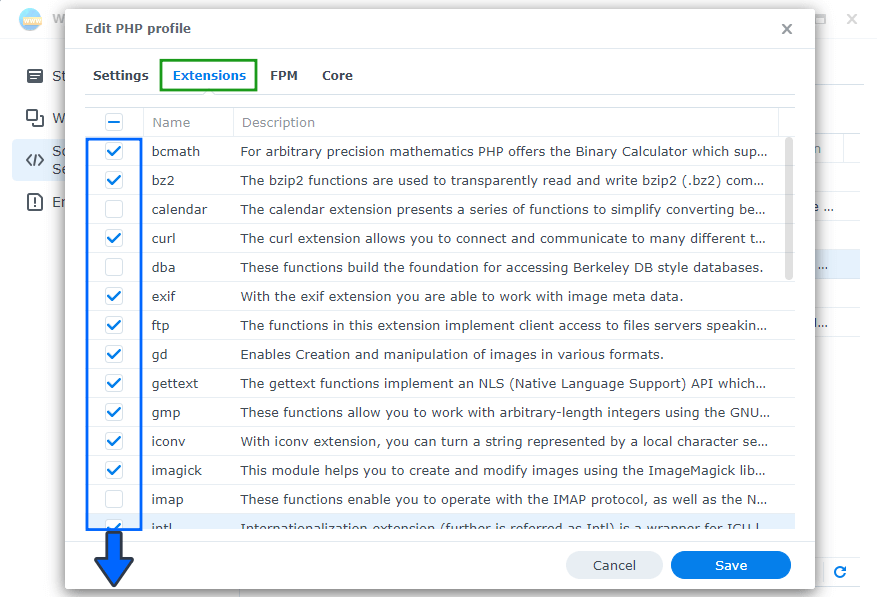
Check the following extensions. Follow the instructions in the image above.
- bcmath
- bz2
- curl
- exif
- ftp
- gd
- gettext
- iconv
- intl
- gmp
- imagick
- mailparse
- mysqli
- openssl
- pdo_mysql
- posix
- soap
- sodium
- sockets
- zip
- zlib
STEP 12
Next tab: “Core“. Search for the following values and change them accordingly:
memory_limit= 512M
upload_max_filesize= 128M (Allows uploading of maximum file size. If you need to upload bigger files, you can set 4000M = 4GB)
post_max_size= 128M
opcache.enable= 1
apc.enable_cli = 1
opcache.enable_cli= 1
opcache.interned_strings_buffer= 64
opcache.max_accelerated_files= 32531
opcache.memory_consumption= 512
opcache.save_comments= 1
opcache.revalidate_freq= 240
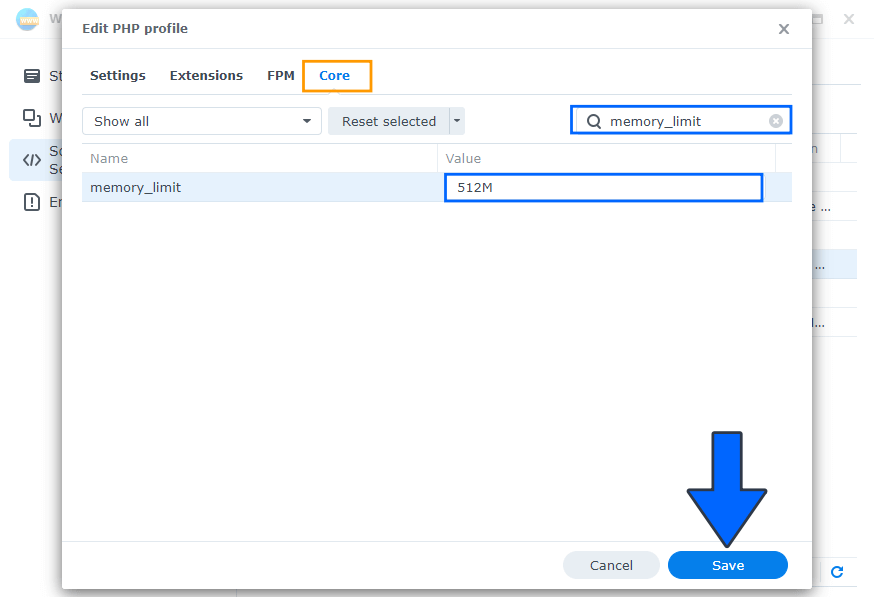
After you have changed all the values above, click the Save button.
STEP 13
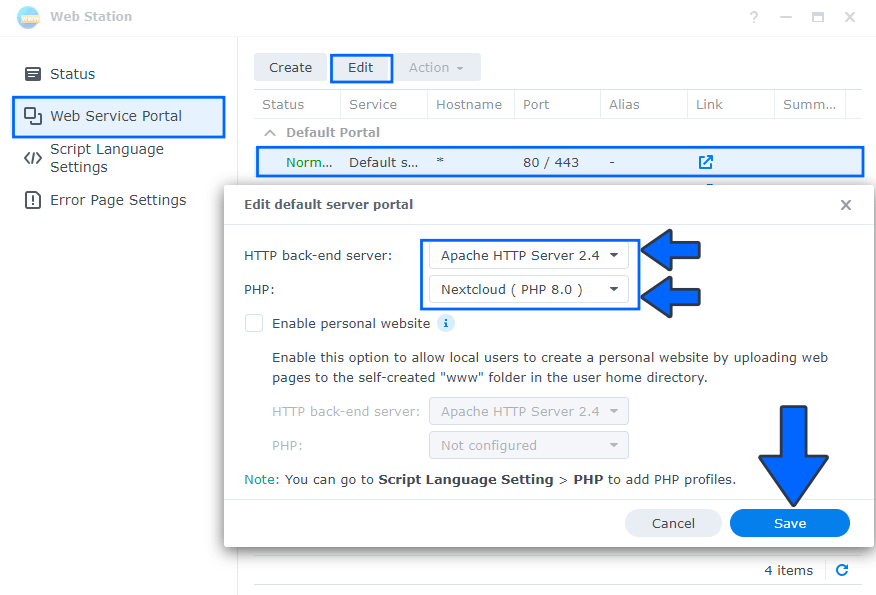
- Open the Web Station Package.
- Go to Web Service Portal.
- Select your Default server portal then click the Edit tab.
- Choose Apache 2.4 as HTTP back-end server.
- Choose the PHP 8.4 Nextcloud profile created at STEPS 9-12 then click Save.
Follow the instructions in the image below.
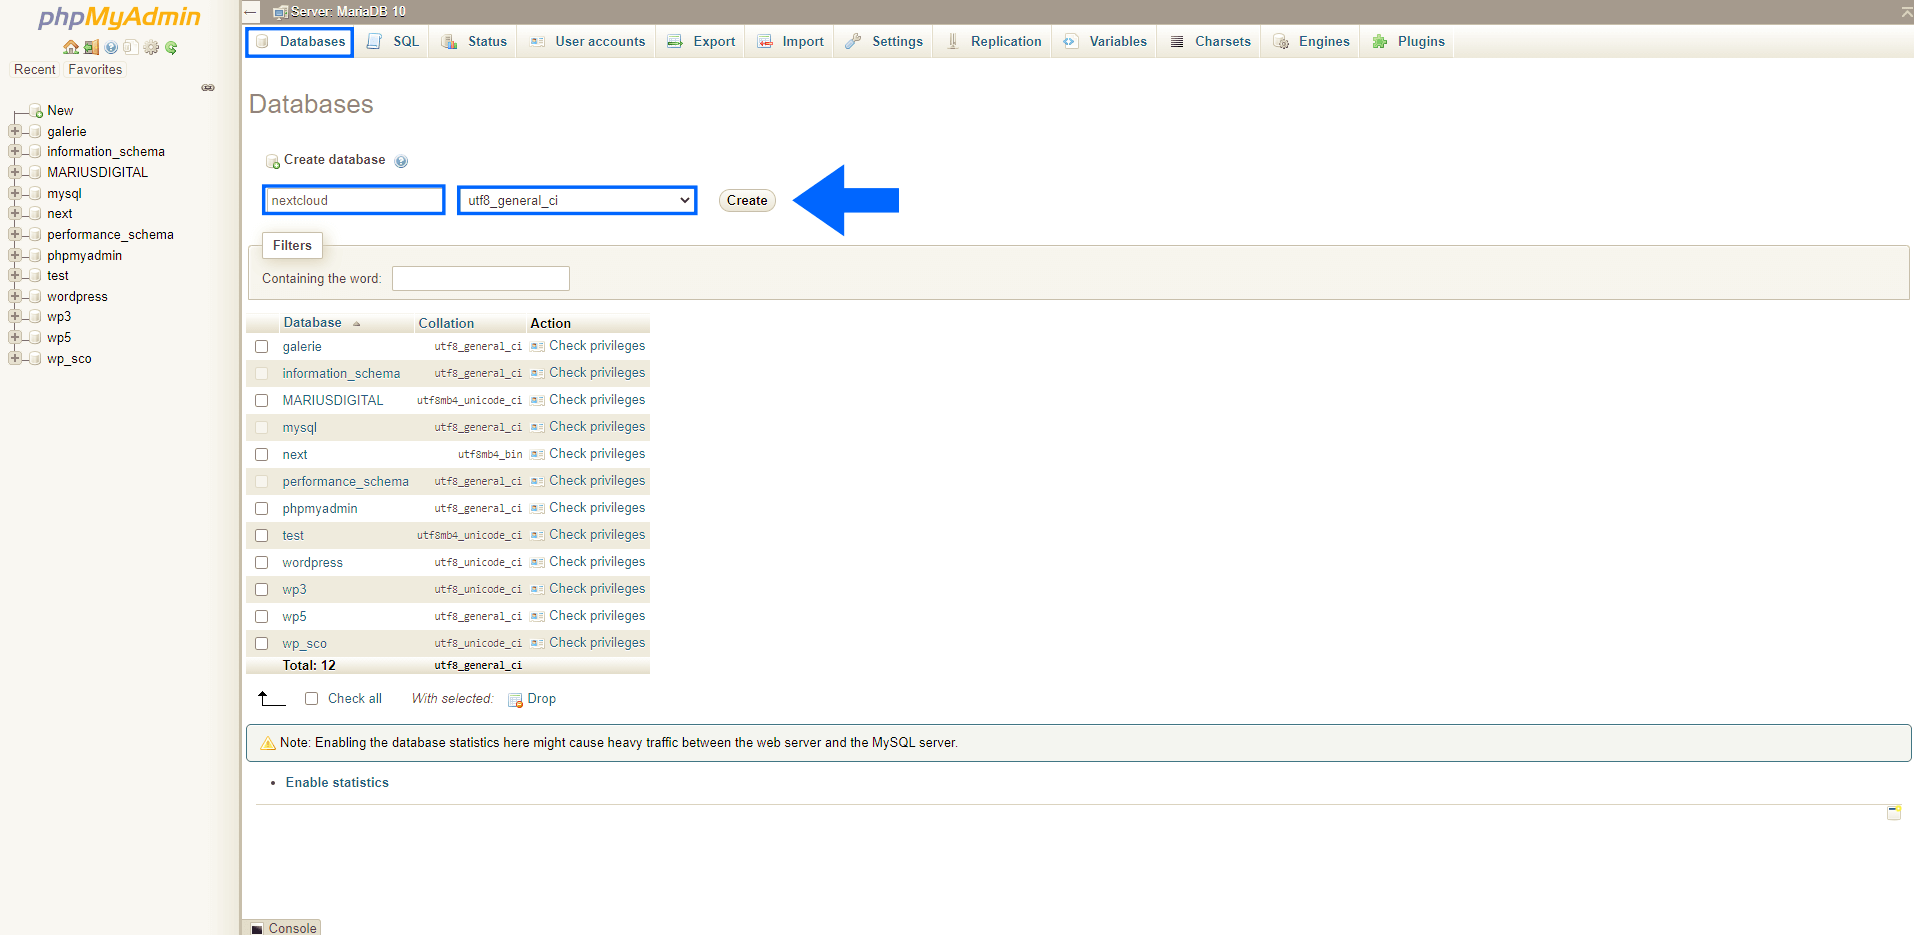
STEP 14
Open the phpMyAdmin package you have previously downloaded from Package Center at STEP 2 of this article. Log in with your own MariaDB 10 root credentials. Create the nextcloud database. Follow the instructions in the image below. Go to the phpMyAdmin Databases tab. In the Create database field, type in nextcloud then click the Create button. Follow the instructions in the image below. Note: To log in via phpMyAdmin: the username for phpMyAdmin is root and the password is the one for MariaDB 10 you have previously set up at STEP 2.
STEP 15
After the nextcloud database is successfully created at STEP 14, select it from the left panel, then go to the phpMyadmin Privileges tab and click Add user account. Follow the instructions in the image below.

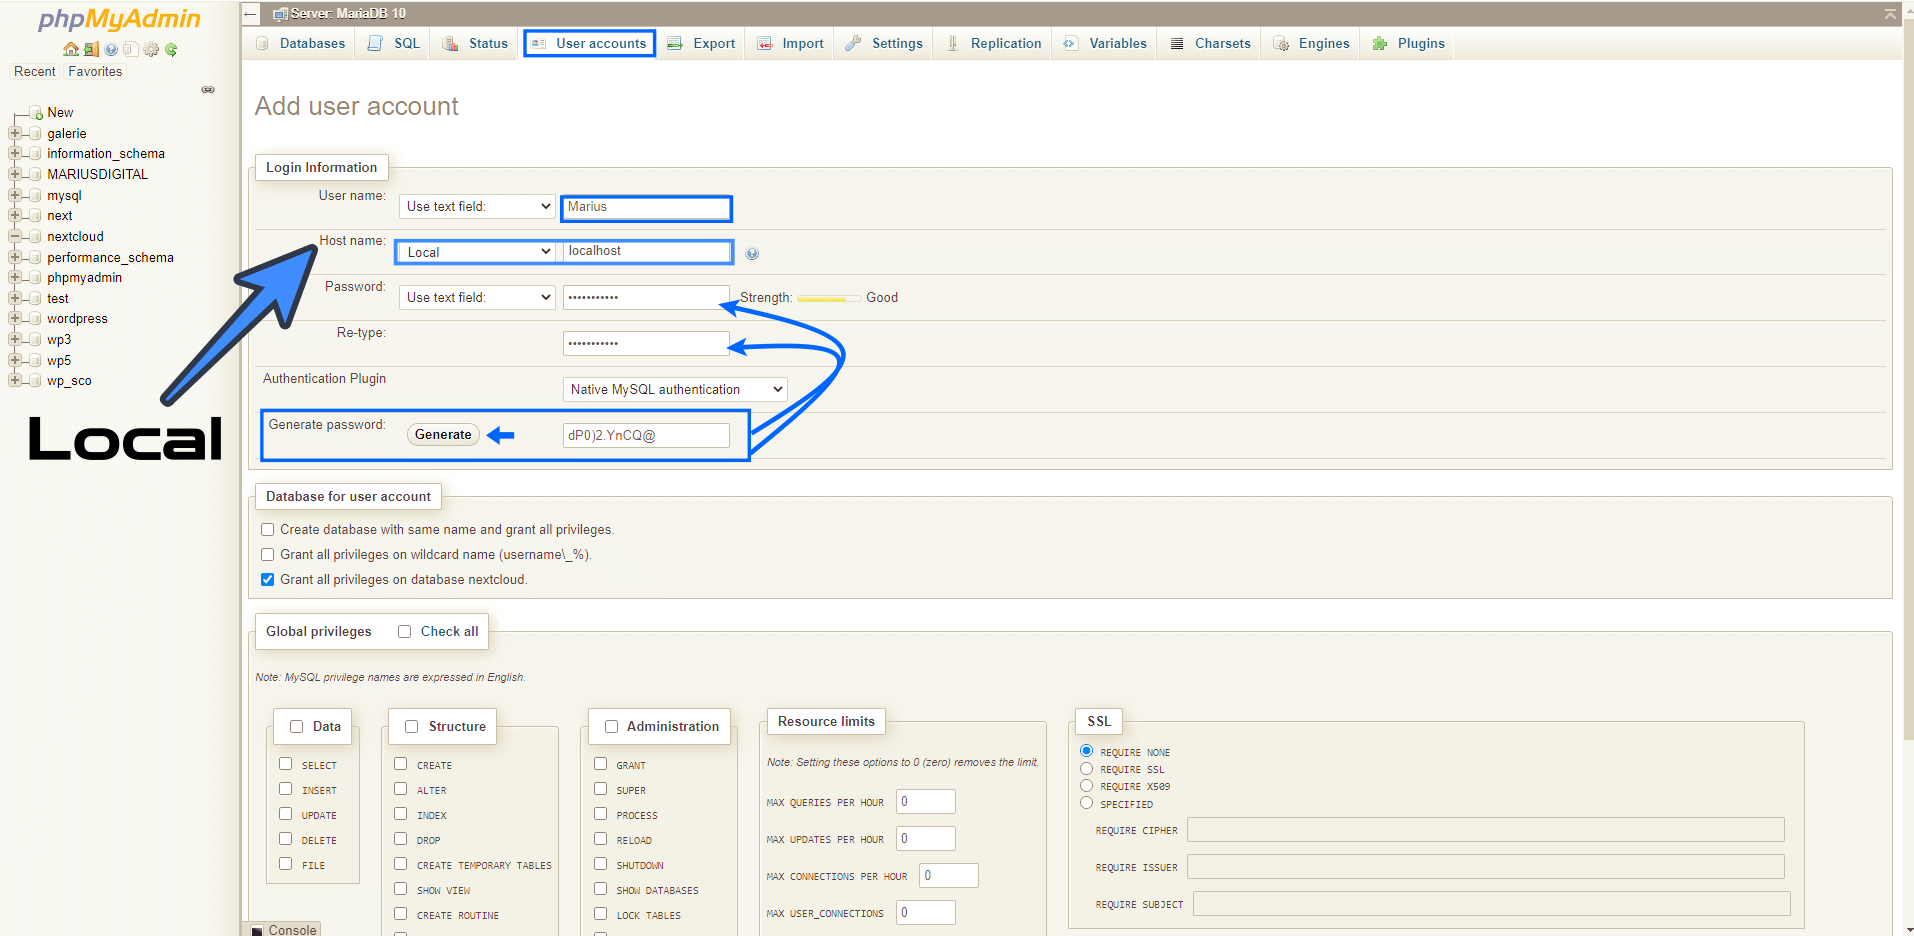
STEP 16
After you click Add user account on STEP 15, you will see the page below. Choose a User name, Select Local as Host name, then click the Generate button (Remember: you will need this Username and Password at STEP 19. This button will Generate a random password. Copy paste this password in the Password field and in the Re-type field. Follow the instructions in the image below.
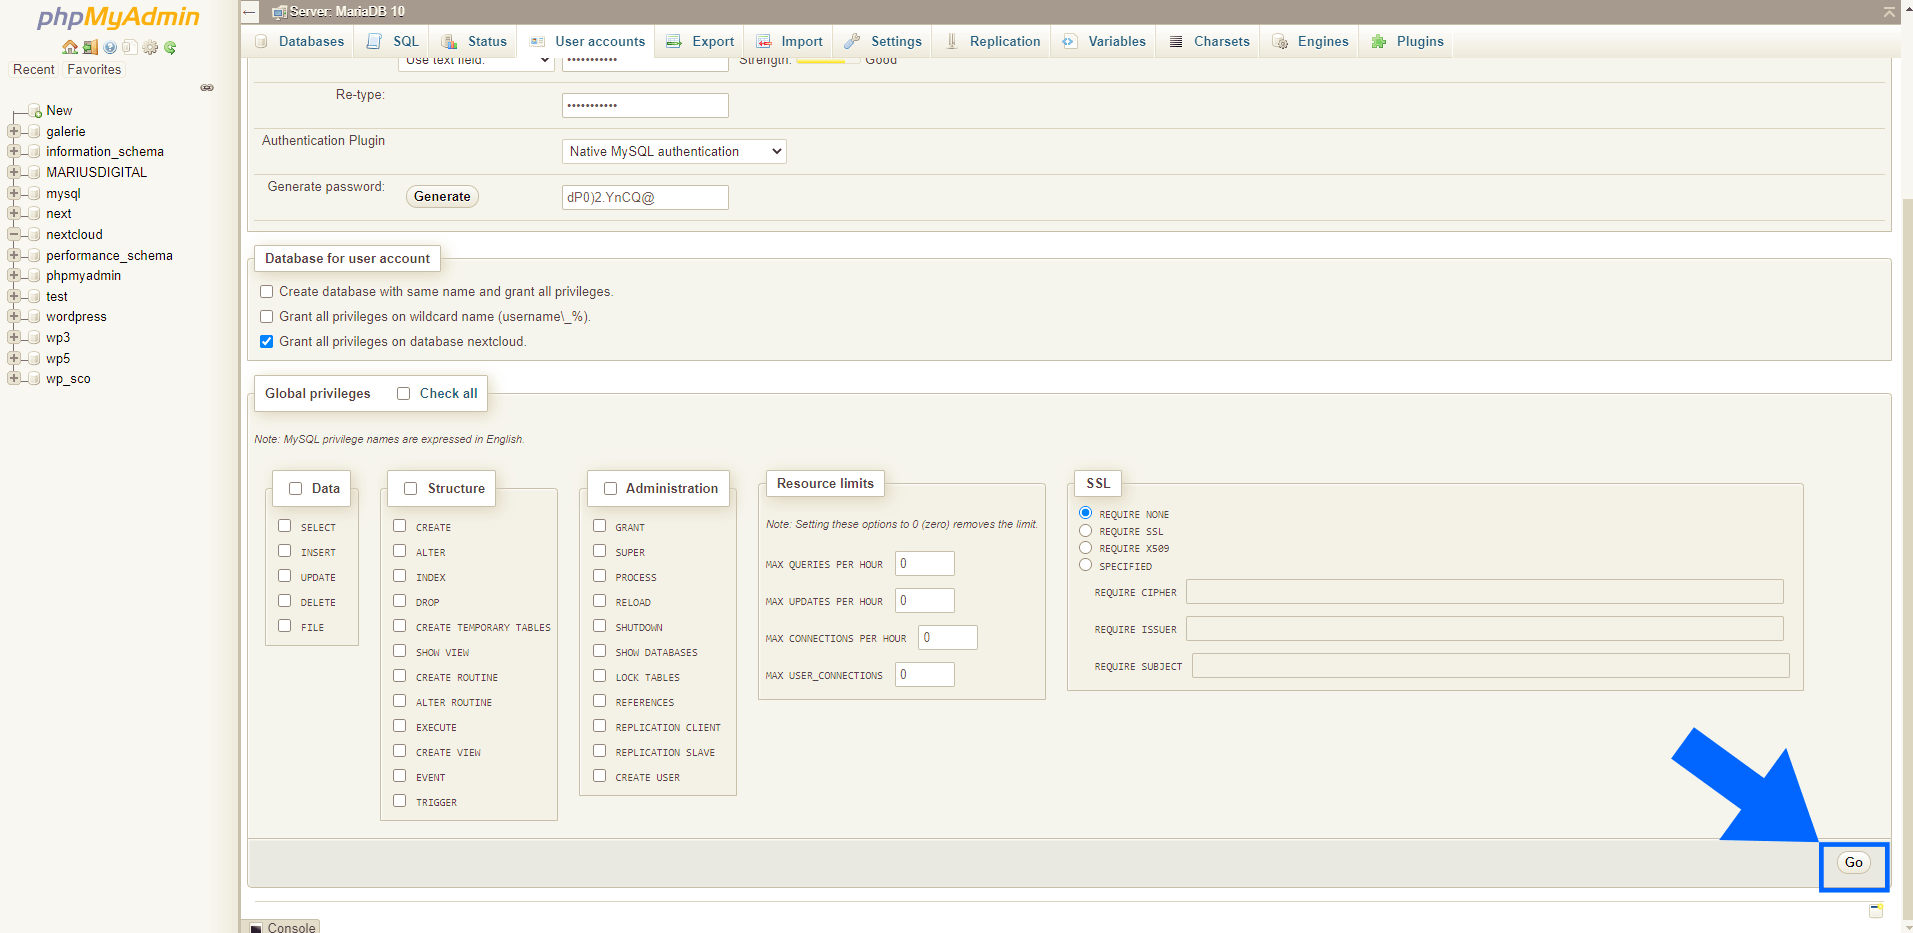
STEP 17
Scroll down the page a little bit and click the Go button. Follow the instructions in the image below.
STEP 18
🟢Please Support My work by Making a Donation. Almost 99,9% of the people that install something using my guides forget to support my work, or just ignore STEP 1. I’ve been very honest about this aspect of my work since the beginning: I don’t run any ADS, I don’t require subscriptions, paid or otherwise, I don’t collect IPs, emails, and I don’t have any referral links from Amazon or other merchants. I also don’t have any POP-UPs or COOKIES. I have repeatedly been told over the years how much I have contributed to the community. It’s something I love doing and have been honest about my passion since the beginning. But I also Need The Community to Support me Back to be able to continue doing this work.
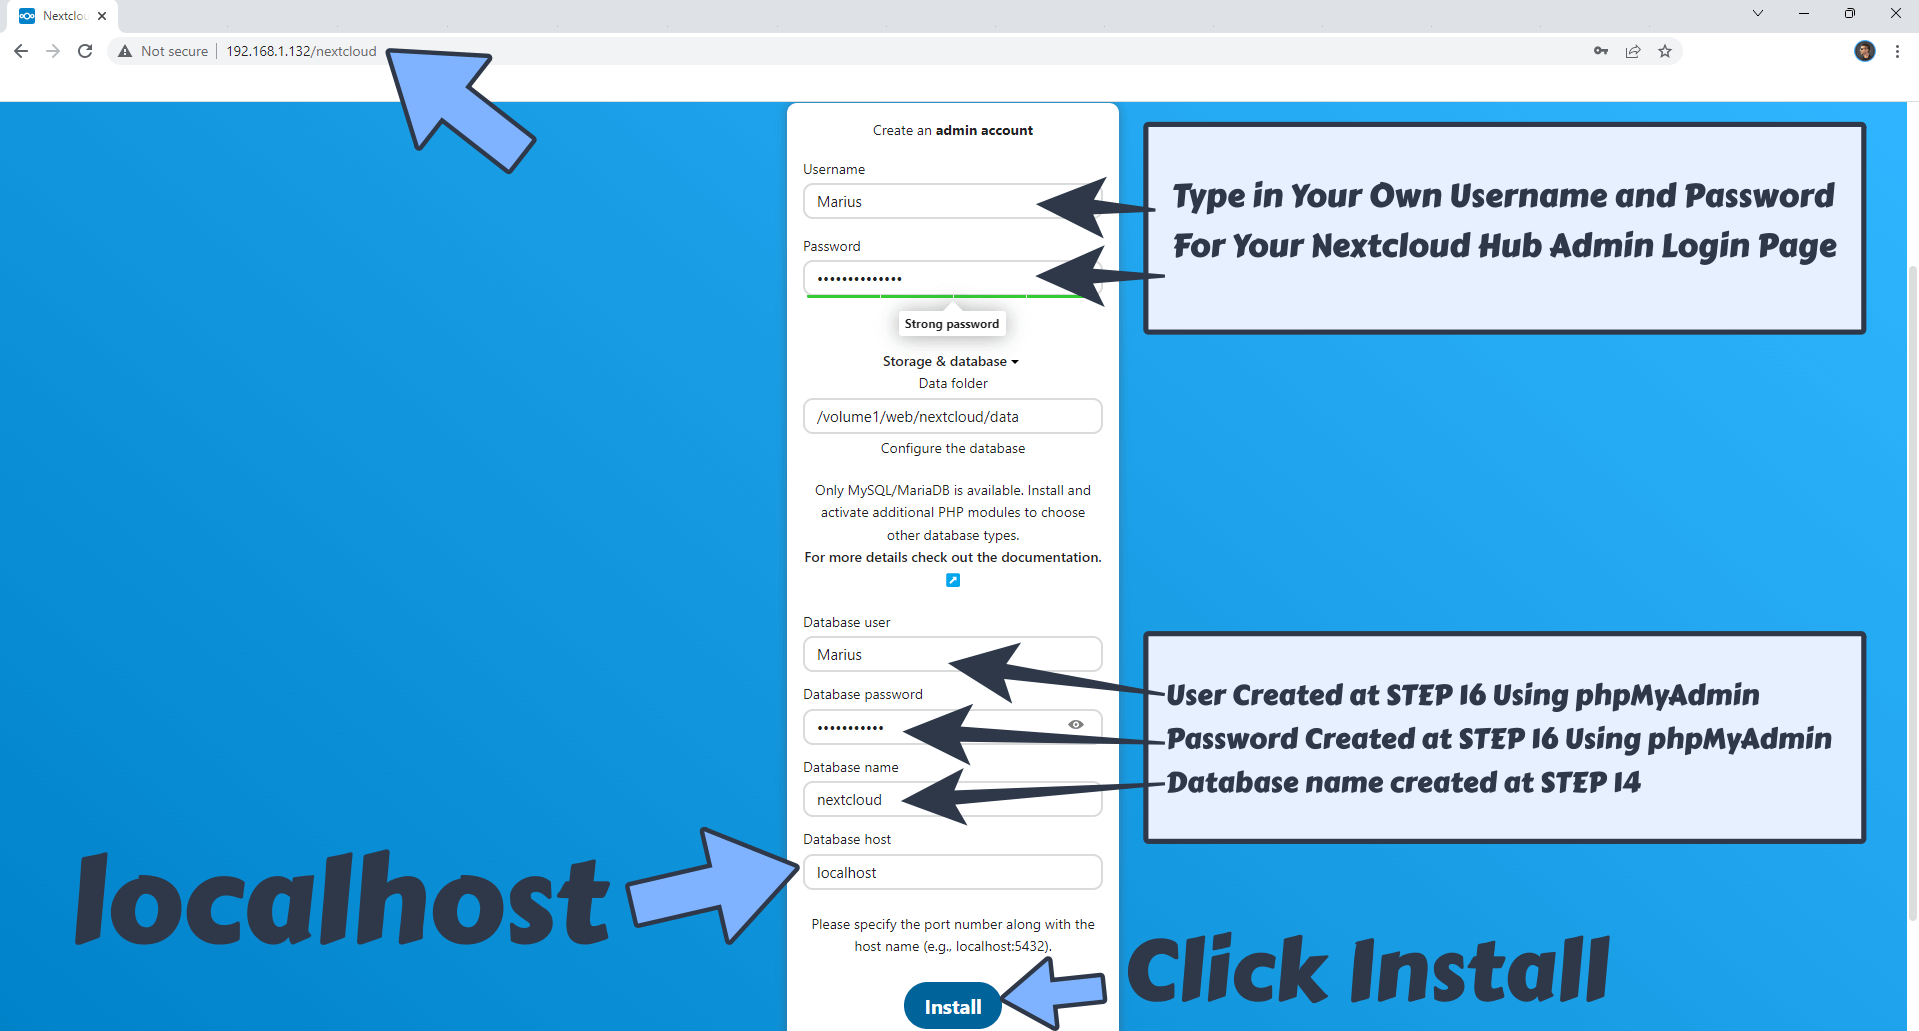
STEP 19
Now open your browser and type in http://Synology-ip-address/nextcloud
If all is good, you should find yourself at the installation page for Nextcloud. If your page is blank or you get an error, make sure Apache 2.4 and PHP 8.0 are correctly selected on STEP 13. Follow the instructions in the image below.
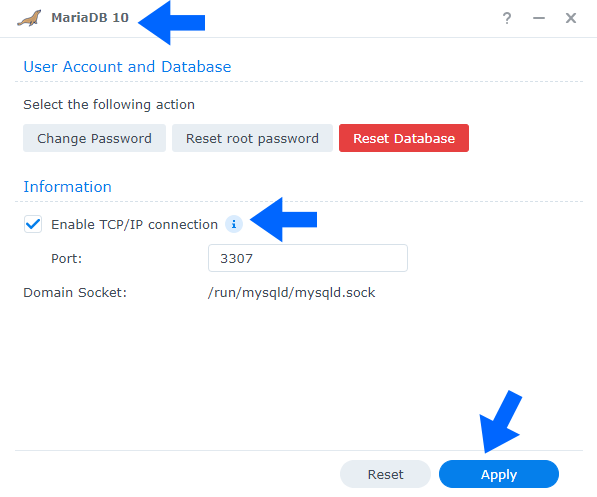
Note: If you experience trouble with the connection, open the MariaDB 10 package, then check “Enable TCP/IP connection“. Click Apply and try to connect to your Nextcloud again.
STEP 20
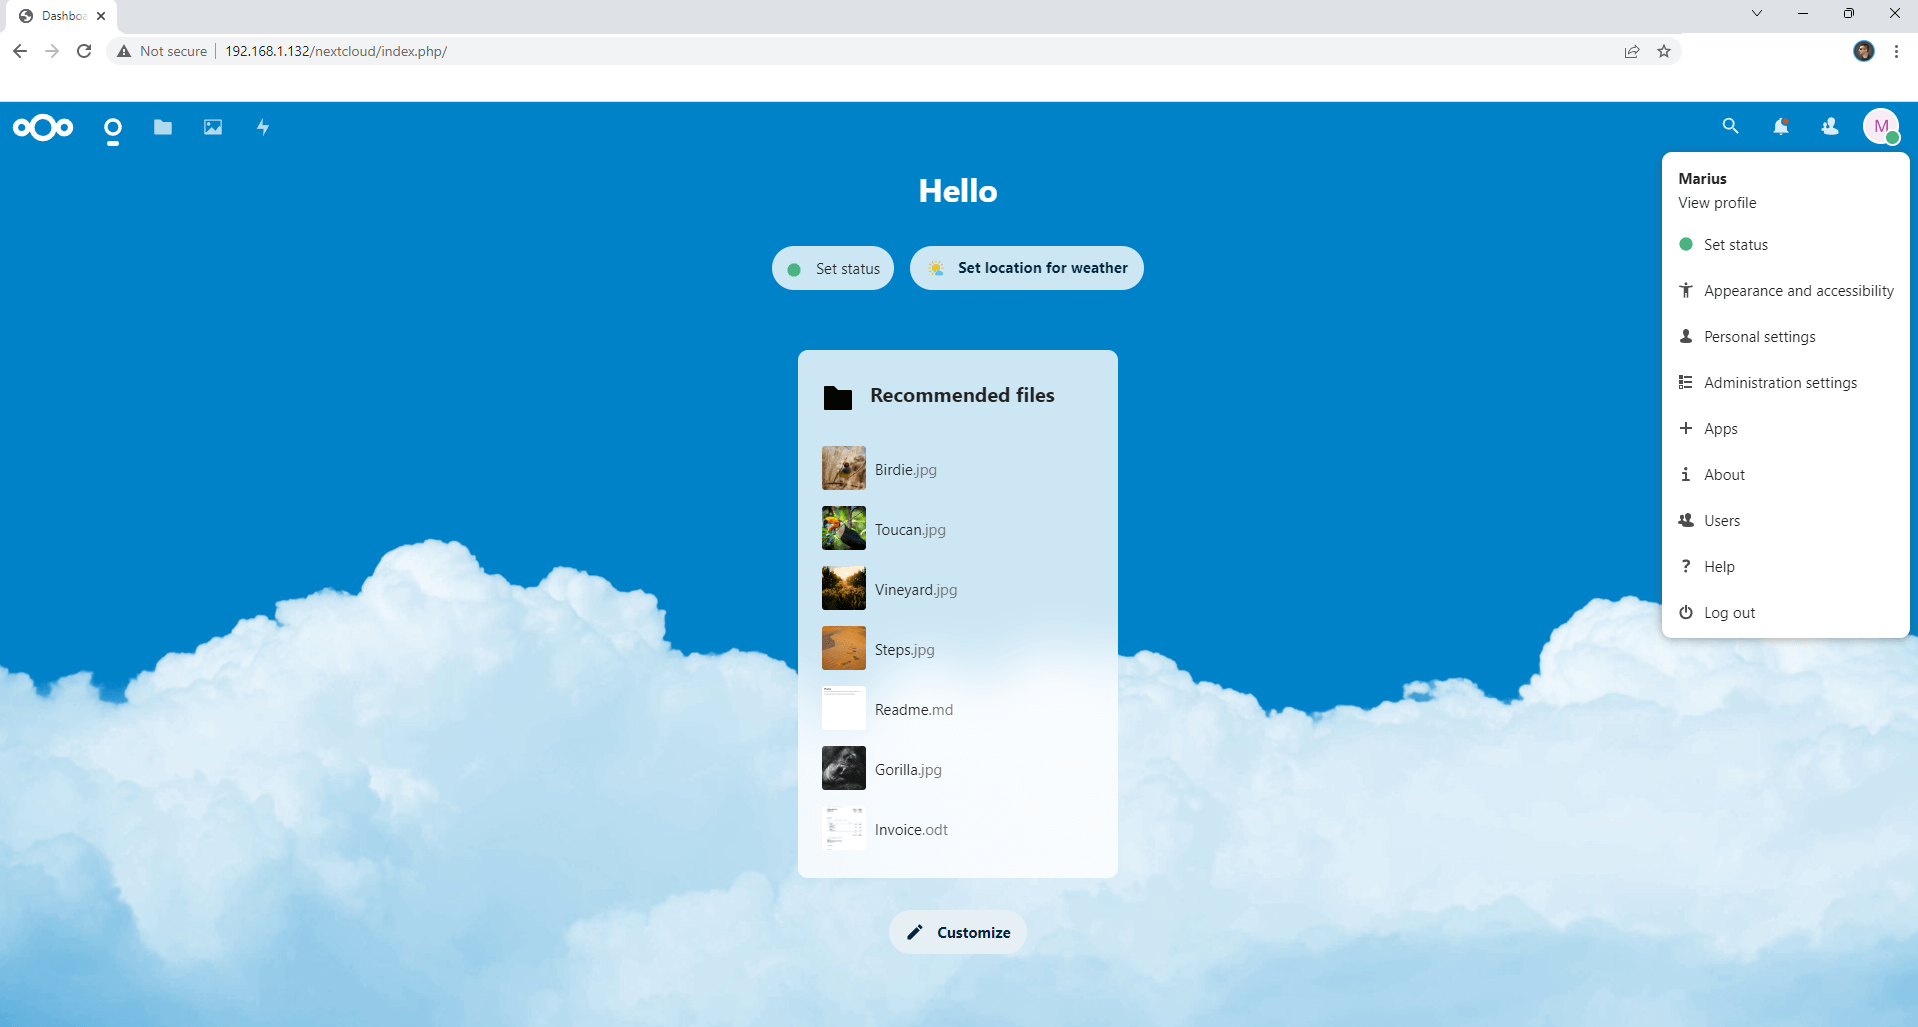
After you click Install at STEP 19, you will get a blank page. To solve this issue, open a new tab in your browser, then type in http://Synology-ip-address/nextcloud just like you did before at STEP 19. Enjoy Nextcloud Hub 3!
STEP 21
Set permissions! Go to Control Panel / Task Scheduler / Create / Scheduled Task / User-defined script. Follow the instructions in the image below.

STEP 22
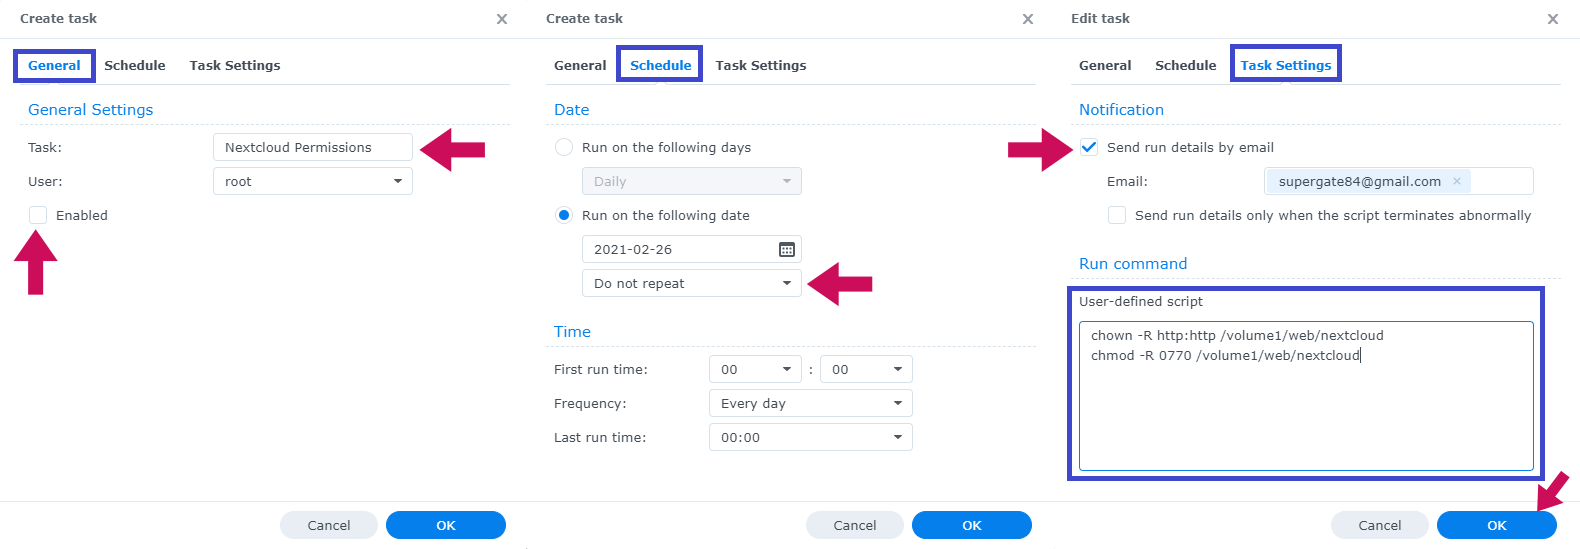
Once you click on User-defined script, a new window will open. Follow the instructions below:
- General: In the Task field type in “Nextcloud Permissions“. Uncheck the “Enabled” option. Select root user.
- Schedule: Select Run on the following date then select “Do not repeat“.
- Task Settings: Check “Send run details by email“, add your email then copy paste the code below in the Run command area. After that, click OK.
chown -R http:http /volume1/web/nextcloud
chmod -R 0770 /volume1/web/nextcloud
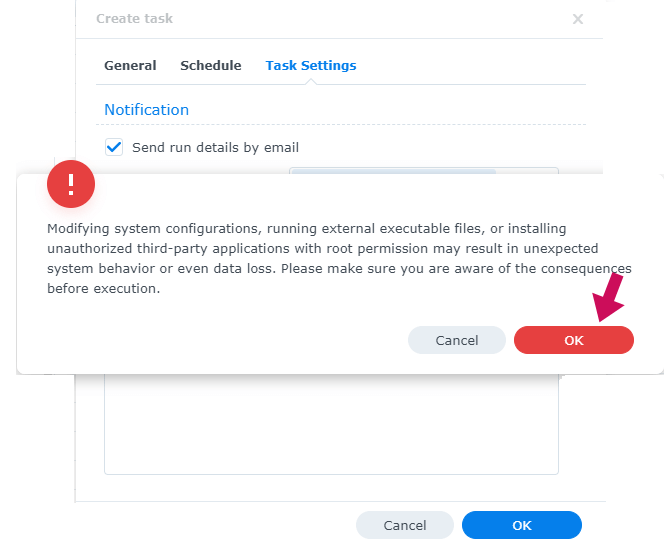
After you click OK above, you will see a warning pop-up message. Click OK.
Note: If you have your nextcloud folder in a different volume, then, in the code above, change /volume1/web/nextcloud according to your settings. For example: /volume2/web/nextcloud or /volume3/web/nextcloud etc.
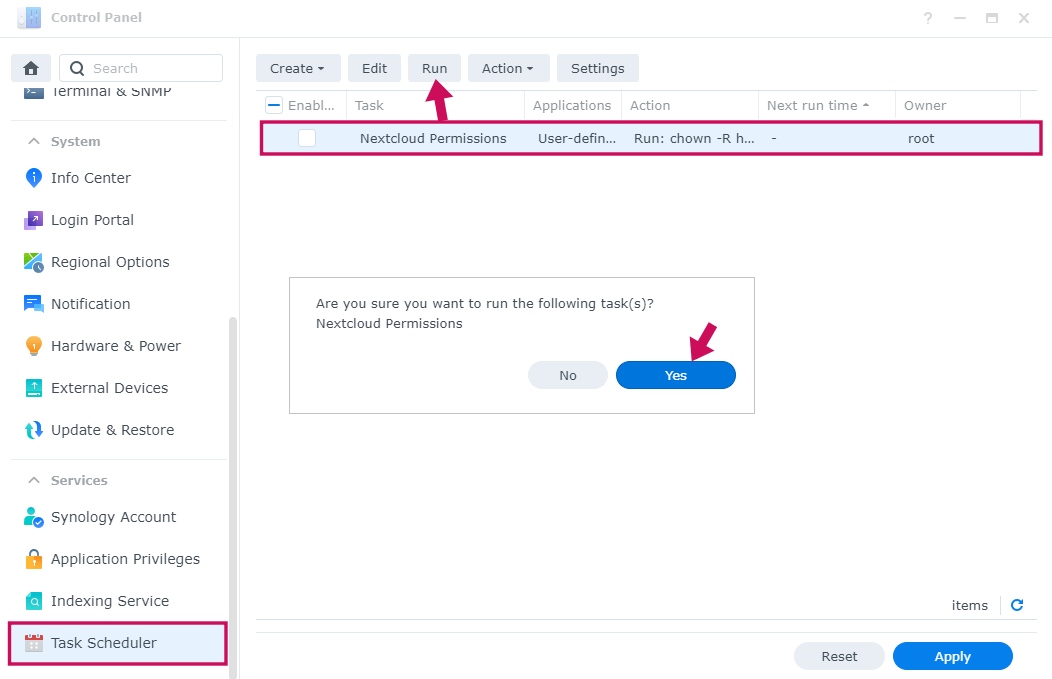
STEP 23
After you click OK on STEP 22, select your “Nextcloud Permissions” Task, then click the “Run” tab. You will be asked to run Nextcloud Permissions – click Yes. Follow the instructions in the image below.
STEP 24
🟢Please Support My work by Making a Donation. Almost 99,9% of the people that install something using my guides forget to support my work, or just ignore STEP 1. I’ve been very honest about this aspect of my work since the beginning: I don’t run any ADS, I don’t require subscriptions, paid or otherwise, I don’t collect IPs, emails, and I don’t have any referral links from Amazon or other merchants. I also don’t have any POP-UPs or COOKIES. I have repeatedly been told over the years how much I have contributed to the community. It’s something I love doing and have been honest about my passion since the beginning. But I also Need The Community to Support me Back to be able to continue doing this work.
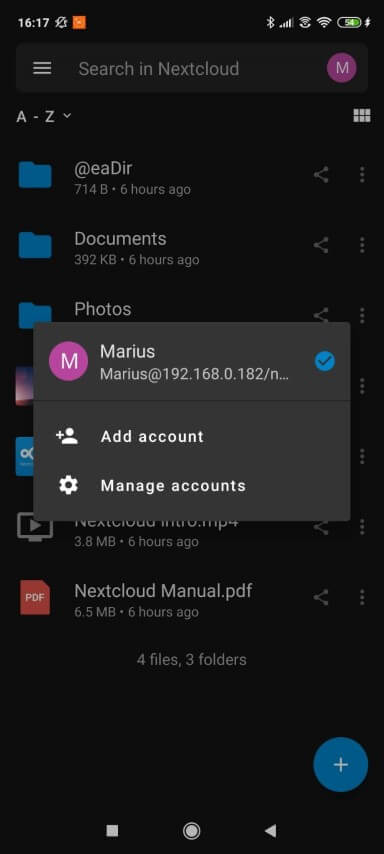
Works and synchronizes perfectly with multiple devices:
Virtual host or basic setup? The Synology “Web Station” package has the ability to create virtual hosts if you want to point a specific domain to your Nextcloud installation. In my case, I have my own domain name so I wanted to point it straight to my Nextcloud installation. I recommend you buy your own domain name if you want to use Nextcloud with a domain name.
(FOLLOW THIS STEP ONLY IF YOU HAVE A DOMAIN NAME)
STEP A
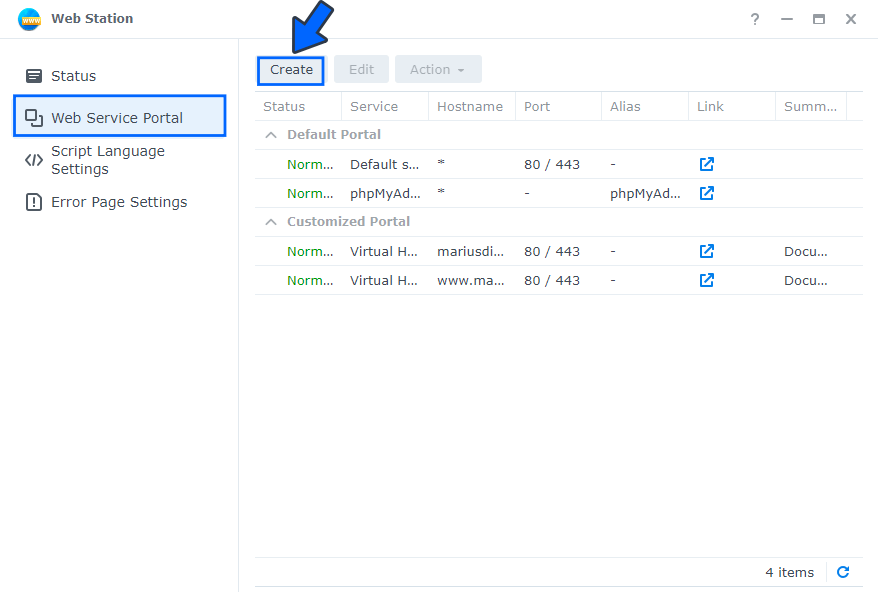
- Open the Web Station Package
- On the left sidebar go to Web Service Portal and click the “Create” tab.
STEP B
Select Virtual Host as portal.

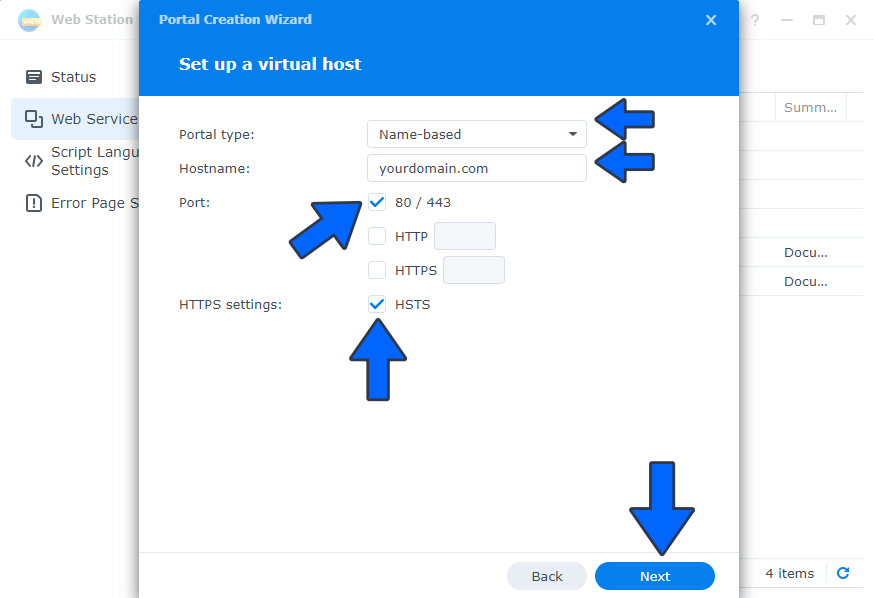
STEP C
- Portal type: choose Name-based.
- Enter your Hostname: yourdomain.com
- Choose Ports 80/443
- Check HSTS.
- Click Next.
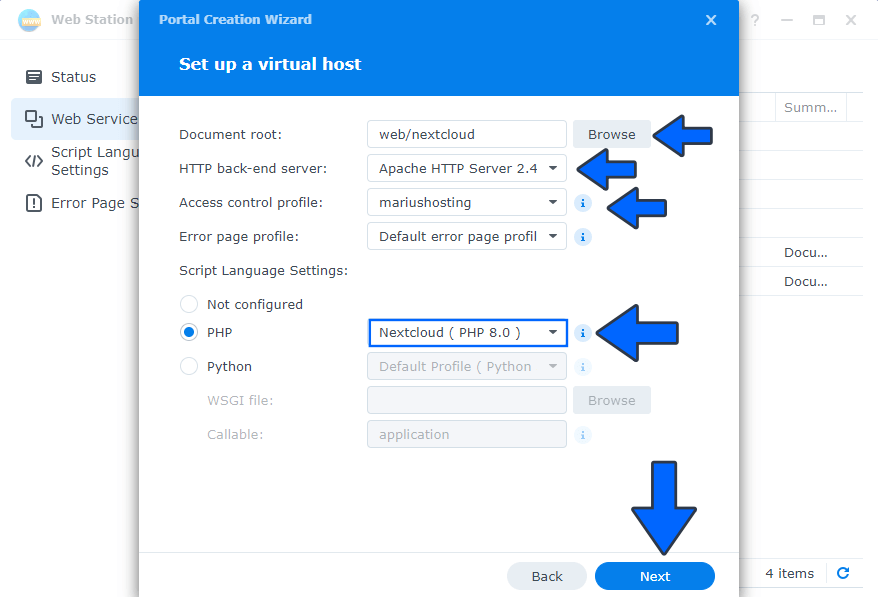
STEP D
- For Document root: click Browse and select your Nextcloud folder, the folder you have created at the beginning of this article at STEP 4. If you choose /web/nextcloud you will be able to access your Nextcloud installation through your virtual hostname.
- Choose Apache 2.4 as HTTP back-end server.
- Choose Access control profile if you have one.
- Choose PHP 8.4 as PHP
- Click Next.
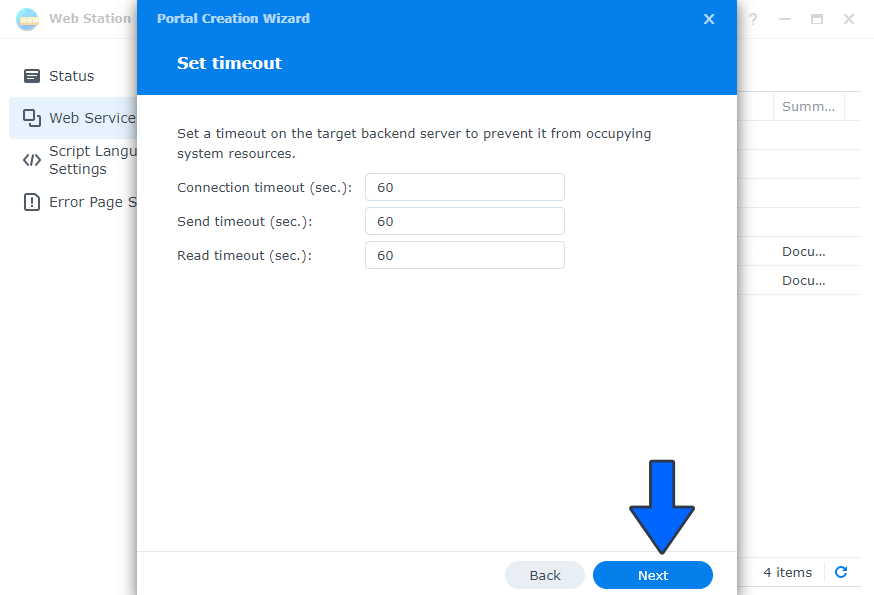
STEP E
Click Next. Follow the instructions in the image below.
STEP F
Click Create. Follow the instructions in the image below.

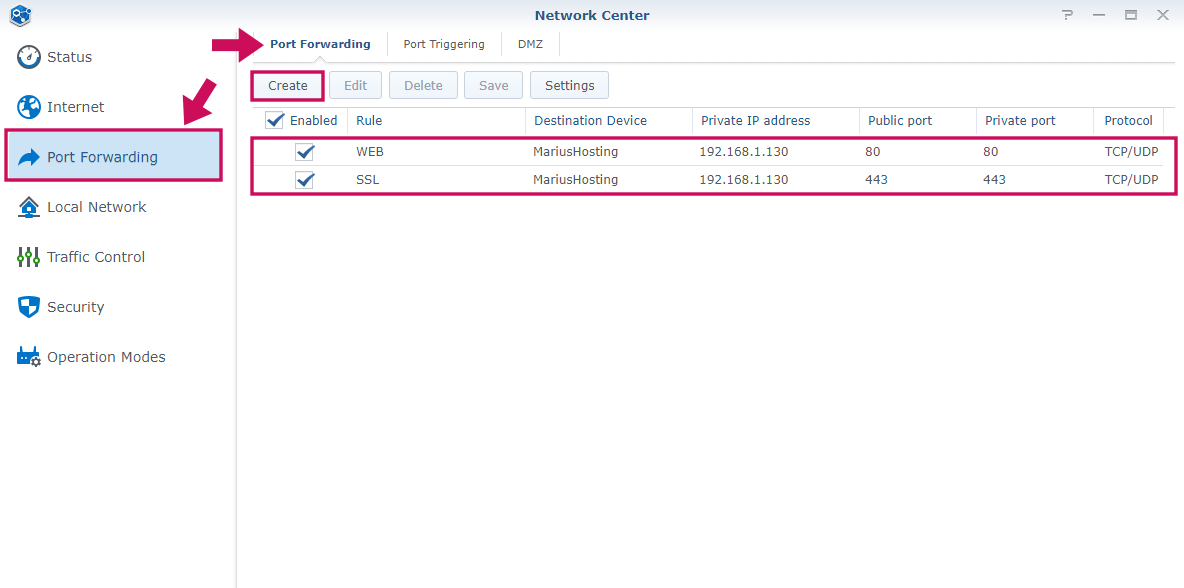
(FOLLOW THIS STEP ONLY IF YOU HAVE A DOMAIN NAME)
Log into your router and go to the Port Forwarding area. Select your NAS Local IP Address and port forward ports 80 and 443, both TCP/UDP. Remember that every router has its own interface design. At the moment I am using a Synology RT2600ac router. Follow the instructions in the image below.
- Log in to Godaddy and change your DNS A record and point it to your WAN IP.
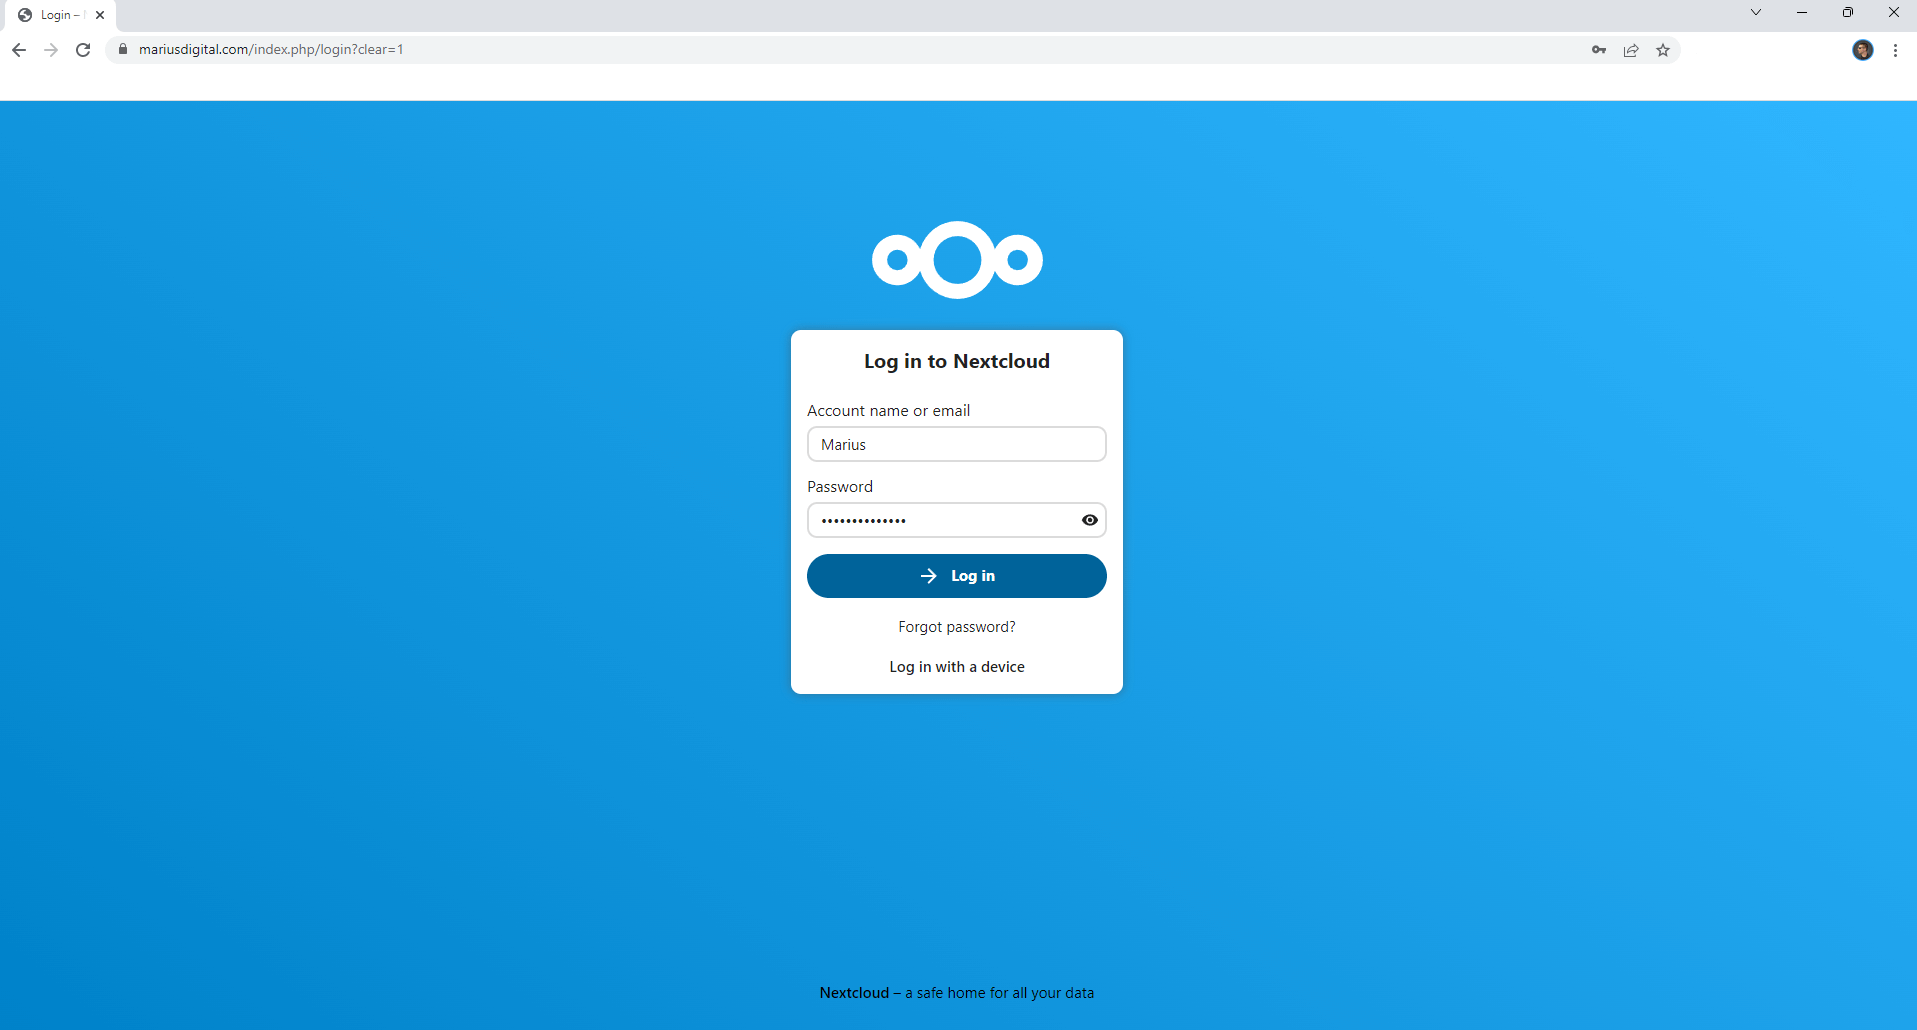
Below you can see my Nextcloud correctly working with my domain name.
Note: What if I get error 0770? Your data directory is readable by other users.
Please change the permissions to 0770 so that the directory cannot be listed by other users.
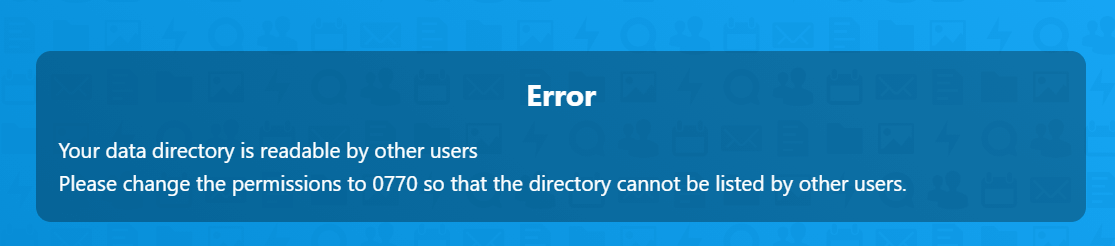
If you get this error, right click on the nextcloud folder in File Station, then click Properties. Click on the Permission tab, then go to Advanced options. Select Make inherited permissions explicit. Now Select User “Everyone” then Delete it using the Delete tab. Check “Apply to this folder, sub-folders and files”. Click Save.
Note: Synology: How to Automatically Redirect HTTP to HTTPS in Nextcloud
Note: Follow my Step by step guide on how to Set Up Email Notifications on Nextcloud.
Steps to consider after the Nextcloud installation:
HTTPS with Let’s Encrypt
A good practice is to use HTTPS (SSL) on any website, unless the access to your website is only on a local network. Synology has built-in Let’s Encrypt which supports great, and free, SSL certificates.
Create Let’s Encrypt certificate
Go to Control Panel / Security / Certificate and click “add”.
For the domain name you can use your own domain name – just make sure your domain is pointing to your NAS.
Unless you are using subdomains, just leave the “Subject Alternative Name:” blank.
Force HTTPS through .htaccess
Go to your Nextcloud installation folder and edit config.php in the config folder. Find the overwrite.cli.url value and change the http to https:
‘overwrite.cli.url’ => ‘https://yourdomain.com’
Note: Make Cron Job Work With Nextcloud.
Note: How to Install Nextcloud Using Docker.
Note: Nextcloud together with the OnlyOffice document server.
Note: Add Gmail Details to Nextcloud Mail.
This post was updated on Monday / June 29th, 2026 at 8:13 PM