

Dawarich is a self-hosted web app designed to replace Google Timeline (aka Google Location History). It enables you to: visualize your data on an interactive map, import your location history from Google Maps Timeline and Owntracks and explore statistics like the number of countries and cities visited, total distance traveled, and more. In this step by step guide I will show you how to install Dawarich on your UGREEN NAS using Docker & Dockhand.
STEP 1
Please Support My work by Making a Donation.
STEP 2
Install Dockhand using my step by step guide. If you already have Dockhand installed on your UGREEN NAS, skip this STEP. Attention: Make sure you have installed the latest Dockhand version.
STEP 3
⚠️Mandatory: Enable HTTPS on your UGREEN NAS.
STEP 4
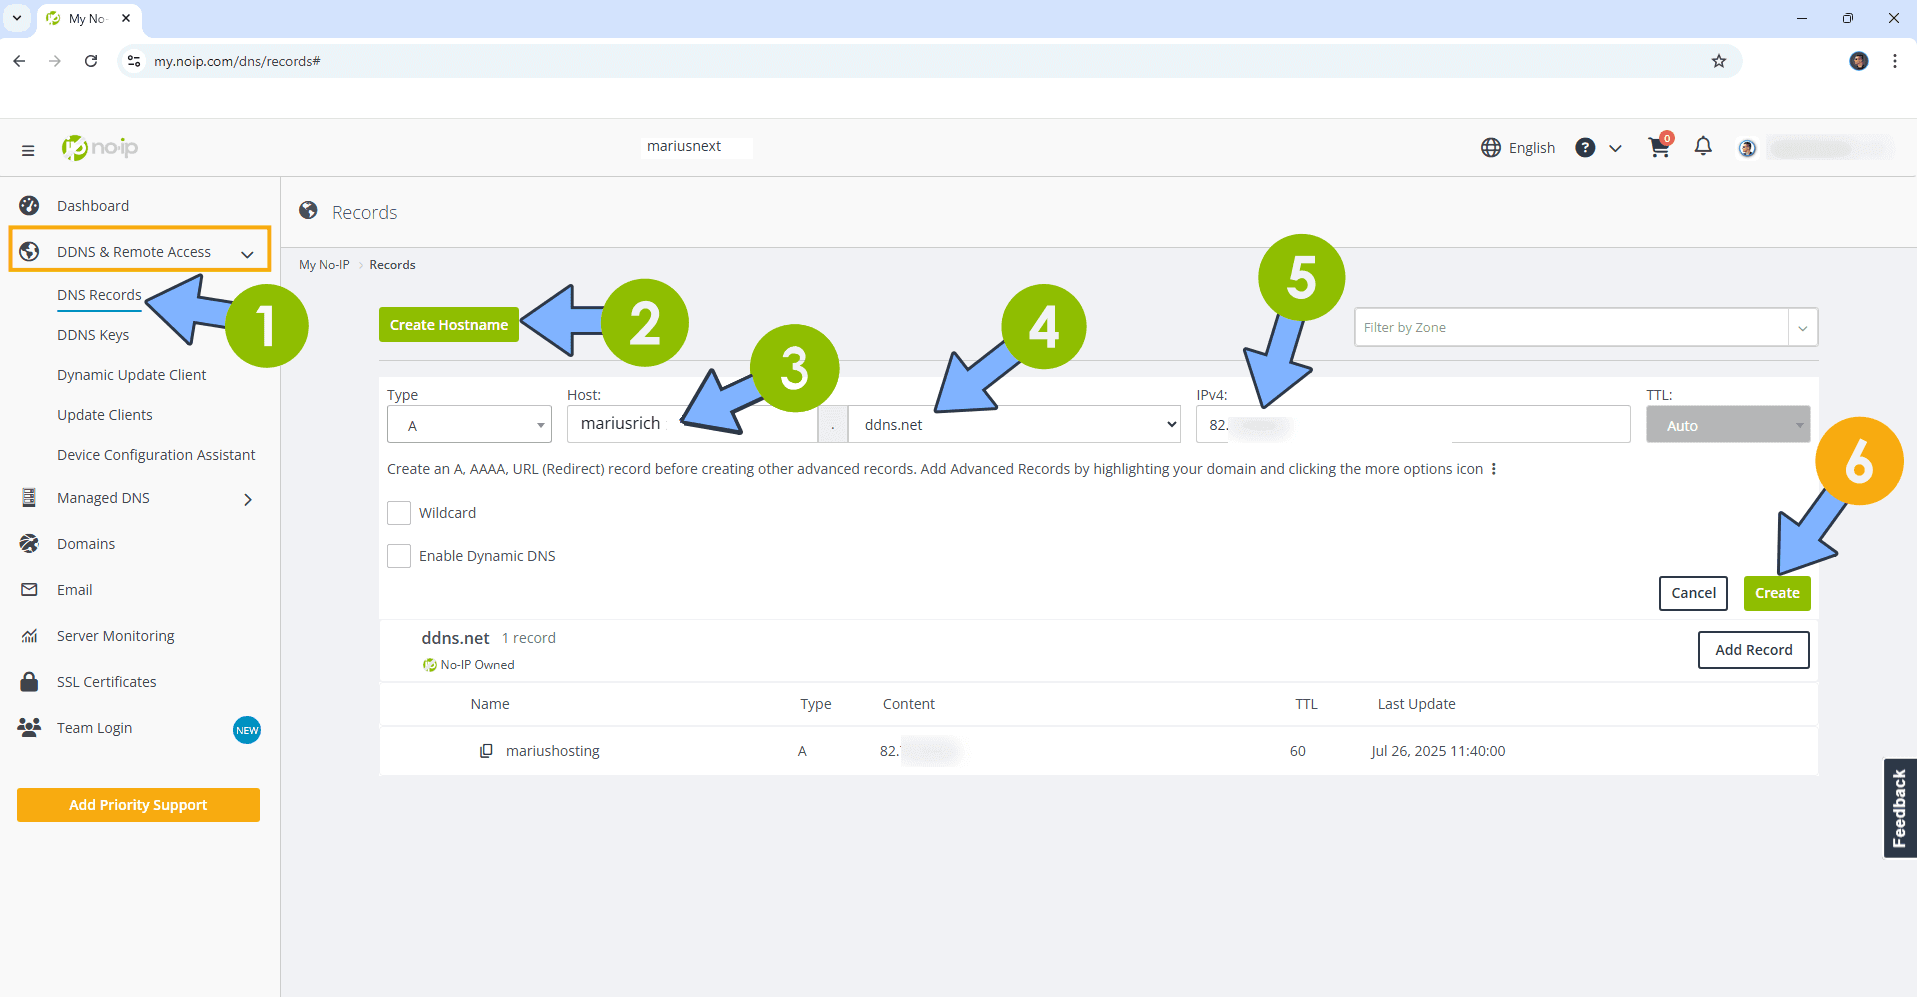
Create a new hostname on the noip website using your noip account. For example, I have created mariusrich as Host and I use the free ddns.net domain. In the IP Address area, type in your own IPV4 IP address from your ISP, then click Create. Follow the instructions in the image below.
STEP 5
⚠️Mandatory: Add Read & Write Permissions to the Docker Folder.
STEP 6
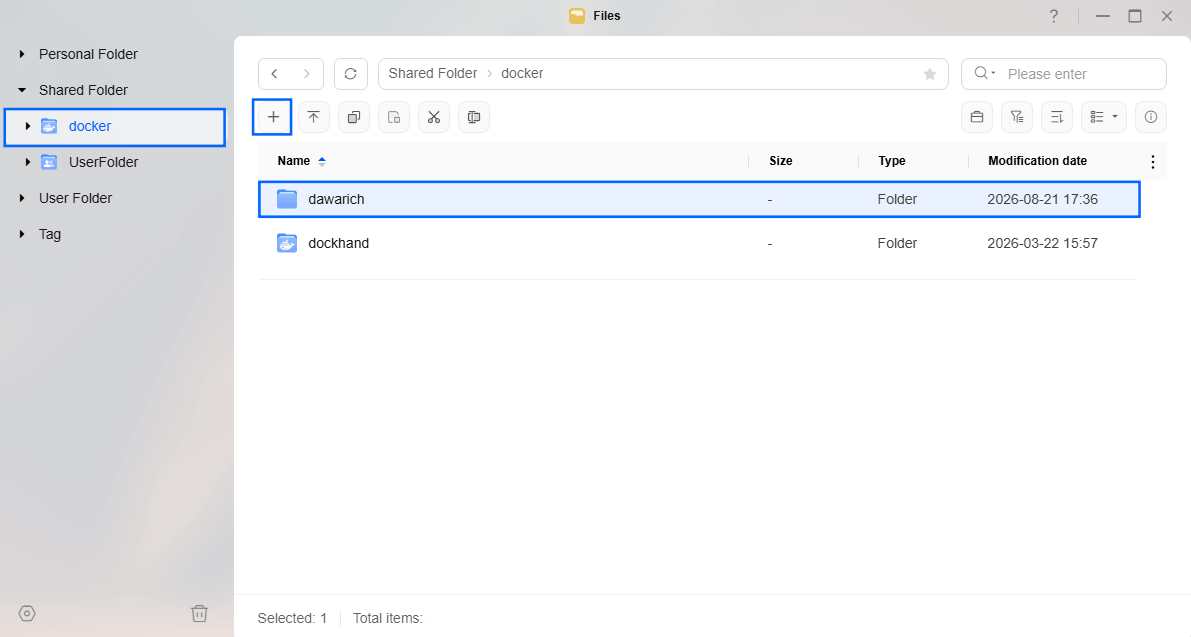
Go to Files and open the docker folder. Inside the docker folder, create one new folder and name it dawarich. Follow the instructions in the image below.
Note: Be careful to enter only lowercase, not uppercase letters.
STEP 7
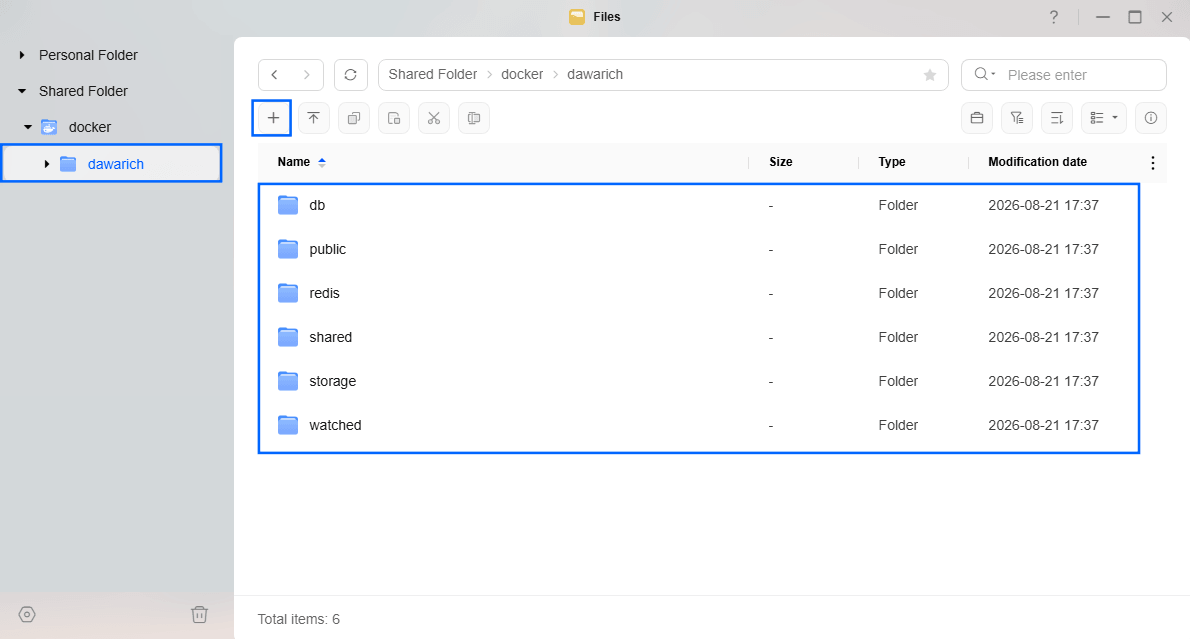
Now create six new folders inside the dawarich folder that you have previously created at STEP 6 and name them db, public, redis, shared, storage, watched. Follow the instructions in the image below.
Note: Be careful to enter only lowercase, not uppercase letters.
STEP 8
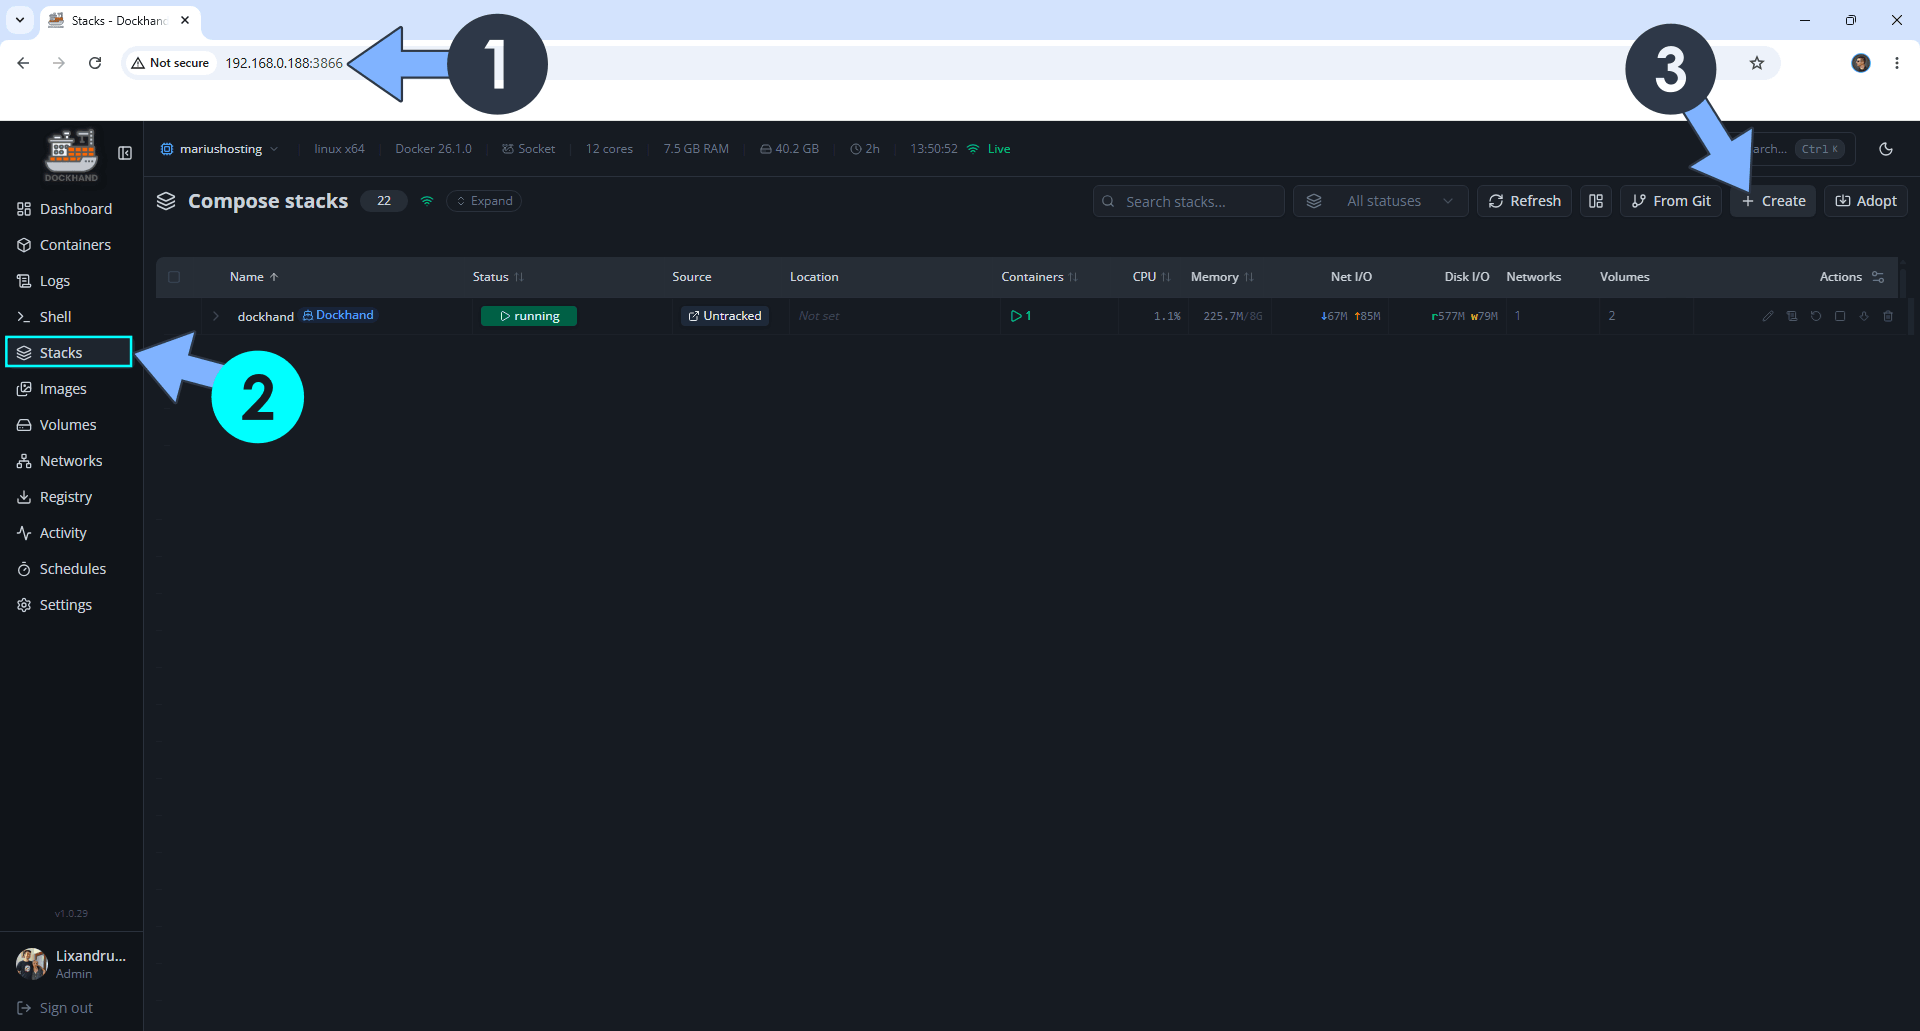
Open your browser and type in http://ugreen-ip-address:3866 to connect to your Dockhand container. On the left sidebar, click Stacks then + Create. Follow the instructions in the image below.
STEP 9
In the Stack name field, type in dawarich. ⚠️Warning: Type in the name in lowercase letters. The installation process can take up to a few seconds/minutes. It will depend on your Internet speed connection. Follow the instructions in the image below.
services:
  dawarich_db:
    image: postgis/postgis:17-3.5-alpine
    container_name: Dawarich-DB
    hostname: dawarich_db
    healthcheck:
      test: ["CMD-SHELL", "pg_isready -U postgres -d dawarich_development"]
      interval: 10s
      retries: 5
      start_period: 30s
      timeout: 10s
    volumes:
      - /volume1/docker/dawarich/db:/var/lib/postgresql/data:rw
      - /volume1/docker/dawarich/shared:/var/shared:rw
    environment:
      POSTGRES_USER: postgres
      POSTGRES_PASSWORD: password
      POSTGRES_DB: dawarich_development
    shm_size: 1G
    restart: on-failure:5

  dawarich_redis:
    image: redis:7.4-alpine
    command: redis-server
    container_name: Dawarich-REDIS
    user: 999:10
    healthcheck:
      test: ["CMD-SHELL", "redis-cli ping || exit 1"]
    volumes:
      - /volume1/docker/dawarich/redis:/data:rw
    environment:
      TZ: Europe/Bucharest
    restart: on-failure:5

  dawarich_app:
    image: freikin/dawarich:latest
    container_name: Dawarich
    volumes:
      - /volume1/docker/dawarich/public:/var/app/public:rw
      - /volume1/docker/dawarich/watched:/var/app/tmp/imports/watched:rw
      - /volume1/docker/dawarich/storage:/var/app/storage:rw
    ports:
      - 3639:3000
    stdin_open: true
    tty: true
    entrypoint: web-entrypoint.sh
    command: ['bin/rails', 'server', '-p', '3000', '-b', '::']
    environment:
      RAILS_ENV: development
      REDIS_URL: redis://dawarich_redis:6379
      DATABASE_HOST: dawarich_db
      DATABASE_USERNAME: postgres
      DATABASE_PASSWORD: password
      DATABASE_NAME: dawarich_development
      SELF_HOSTED: true
      STORE_GEODATA: true
      SECRET_KEY_BASE: dOxZYTTZgXKMHkqLBIQVImayQXAVWdzGBPuFJKggzcgvgPJPXpWzqzKaUOIOGGIr
      APPLICATION_HOSTS: mariusrich.ddns.net
      MIN_MINUTES_SPENT_IN_CITY: 60
      TIME_ZONE: Europe/Bucharest
      APPLICATION_PROTOCOL: http
      DISTANCE_UNIT: km
      PROMETHEUS_EXPORTER_ENABLED: false
      PROMETHEUS_EXPORTER_HOST: 0.0.0.0
      PROMETHEUS_EXPORTER_PORT: 9394
      ENABLE_TELEMETRY: false # More on telemetry: https://dawarich.app/docs/tutorials/telemetry
    logging:
      driver: "json-file"
      options:
        max-size: "100m"
        max-file: "5"
    healthcheck:
      test: ["CMD-SHELL", "wget -qO - http://127.0.0.1:3000/api/v1/health | grep -q '\"status\"\\s*:\\s*\"ok\"'"]
      interval: 10s
      retries: 30
      start_period: 30s
      timeout: 10s
    depends_on:
      dawarich_db:
        condition: service_healthy
      dawarich_redis:
        condition: service_healthy
    restart: on-failure:5

  dawarich_sidekiq:
    image: freikin/dawarich:latest
    container_name: Dawarich-SIDEKIQ
    healthcheck:
      test: ["CMD-SHELL", "pgrep -f sidekiq"]
      interval: 10s
      retries: 30
      start_period: 30s
      timeout: 10s
    volumes:
      - /volume1/docker/dawarich/public:/var/app/public:rw
      - /volume1/docker/dawarich/watched:/var/app/tmp/imports/watched:rw
      - /volume1/docker/dawarich/storage:/var/app/storage:rw
    stdin_open: true
    tty: true
    entrypoint: sidekiq-entrypoint.sh
    command: ['sidekiq']
    environment:
      RAILS_ENV: development
      REDIS_URL: redis://dawarich_redis:6379
      DATABASE_HOST: dawarich_db
      DATABASE_USERNAME: postgres
      DATABASE_PASSWORD: password
      DATABASE_NAME: dawarich_development
      TIME_ZONE: Europe/Bucharest
      SECRET_KEY_BASE: dOxZYTTZgXKMHkqLBIQVImayQXAVWdzGBPuFJKggzcgvgPJPXpWzqzKaUOIOGGIr
      APPLICATION_HOSTS: mariusrich.ddns.net
      BACKGROUND_PROCESSING_CONCURRENCY: 10
      APPLICATION_PROTOCOL: http
      PROMETHEUS_EXPORTER_ENABLED: false
      PROMETHEUS_EXPORTER_HOST: dawarich_app
      PROMETHEUS_EXPORTER_PORT: 9394
      SELF_HOSTED: true
      STORE_GEODATA: true
    logging:
      driver: "json-file"
      options:
        max-size: "100m"
        max-file: "5"
    depends_on:
      dawarich_db:
        condition: service_healthy
      dawarich_redis:
        condition: service_healthy
      dawarich_app:
        condition: service_healthy
    restart: on-failure:5
Note: Before you paste the code above in the Stack editor area below, change the value numbers for user with your own UID and GID values. (Follow my step by step guide on how to do this.) 999 is my personal UID value and 10 is my personal GID value. You have to type in your own values.
Note: Before you paste the code above in the Stack editor area below, change the value for TZ. (Select your current Time Zone from this list.)
Note: Before you paste the code above in the Stack editor area below, change the value for SECRET_KEY_BASE in both places. (Generate your own Random 64 length SECRET_KEY_BASE.)
Note: Before you paste the code above in the Stack editor area below, change the value for APPLICATION_HOSTS in both places and type in your own NO IP DDNS without https:// at the beginning that you have previously created at STEP 4.
Note: Before you paste the code above in the Stack editor area below, change the value for TIME_ZONE. (Select your current Time Zone from this list.)
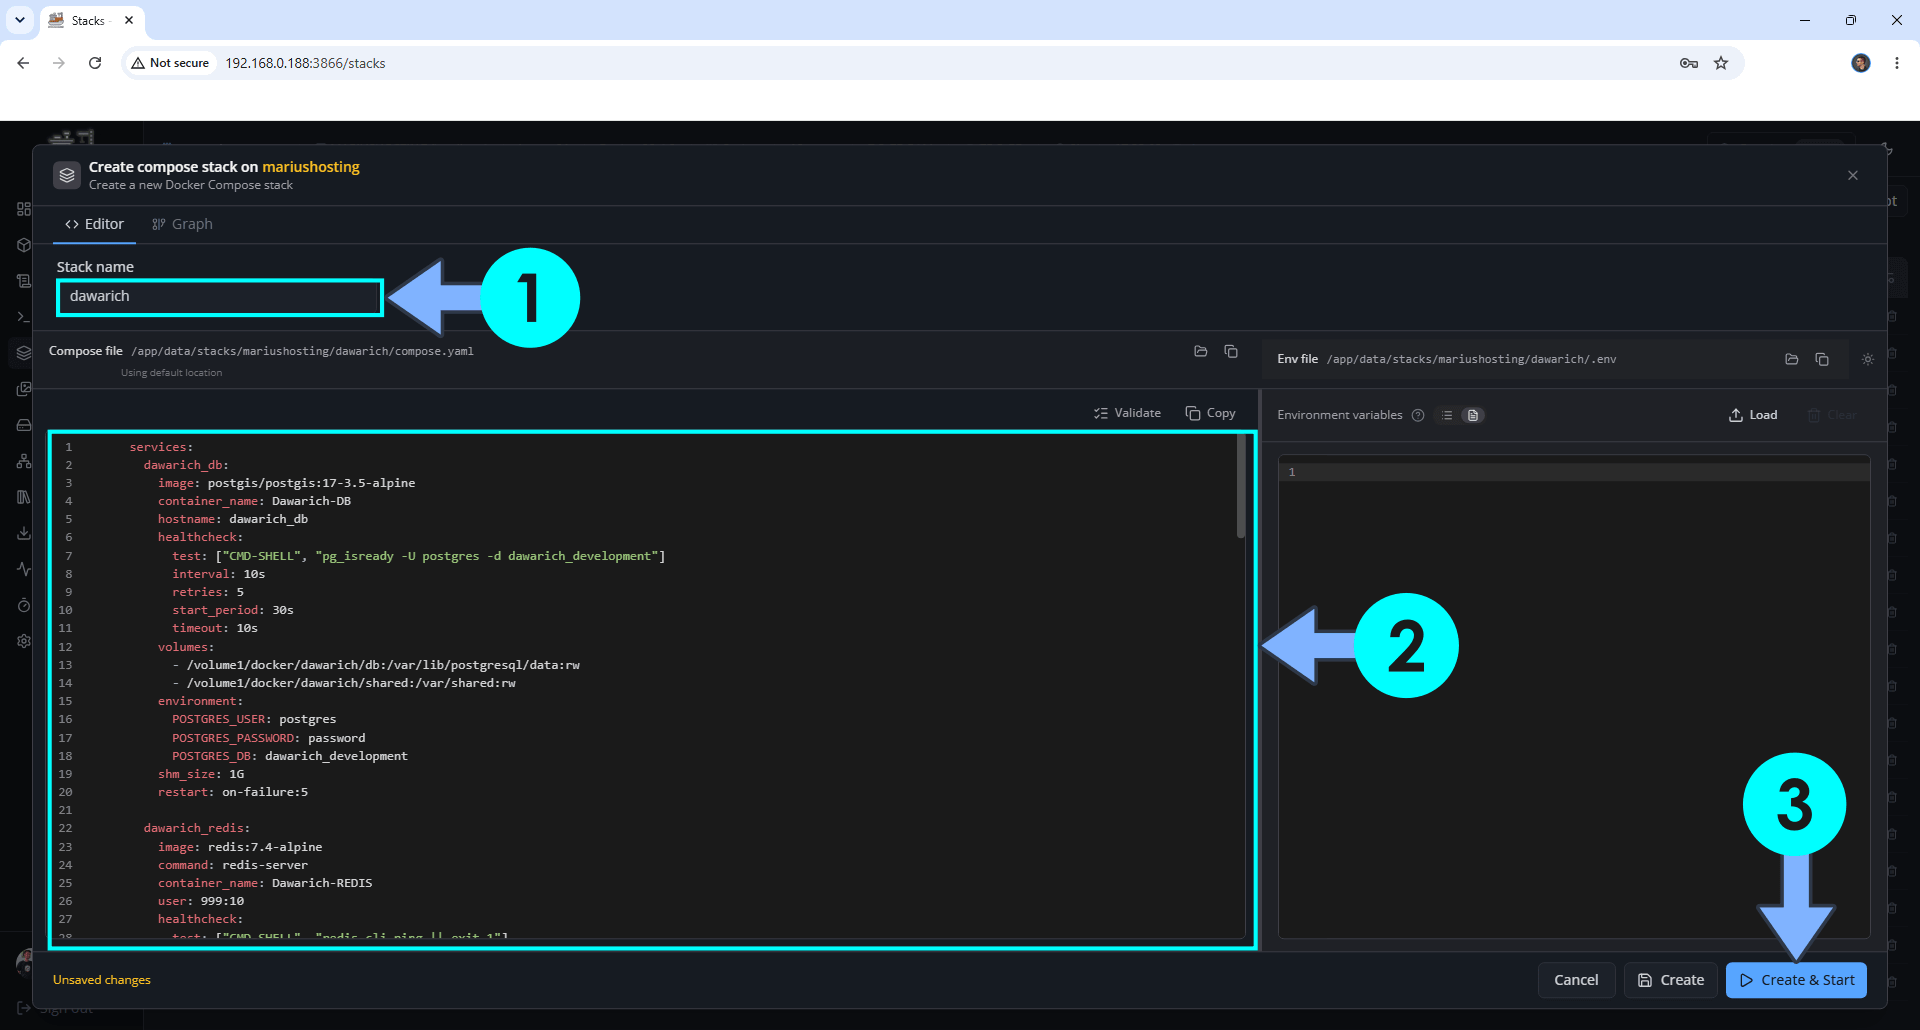
STEP 10
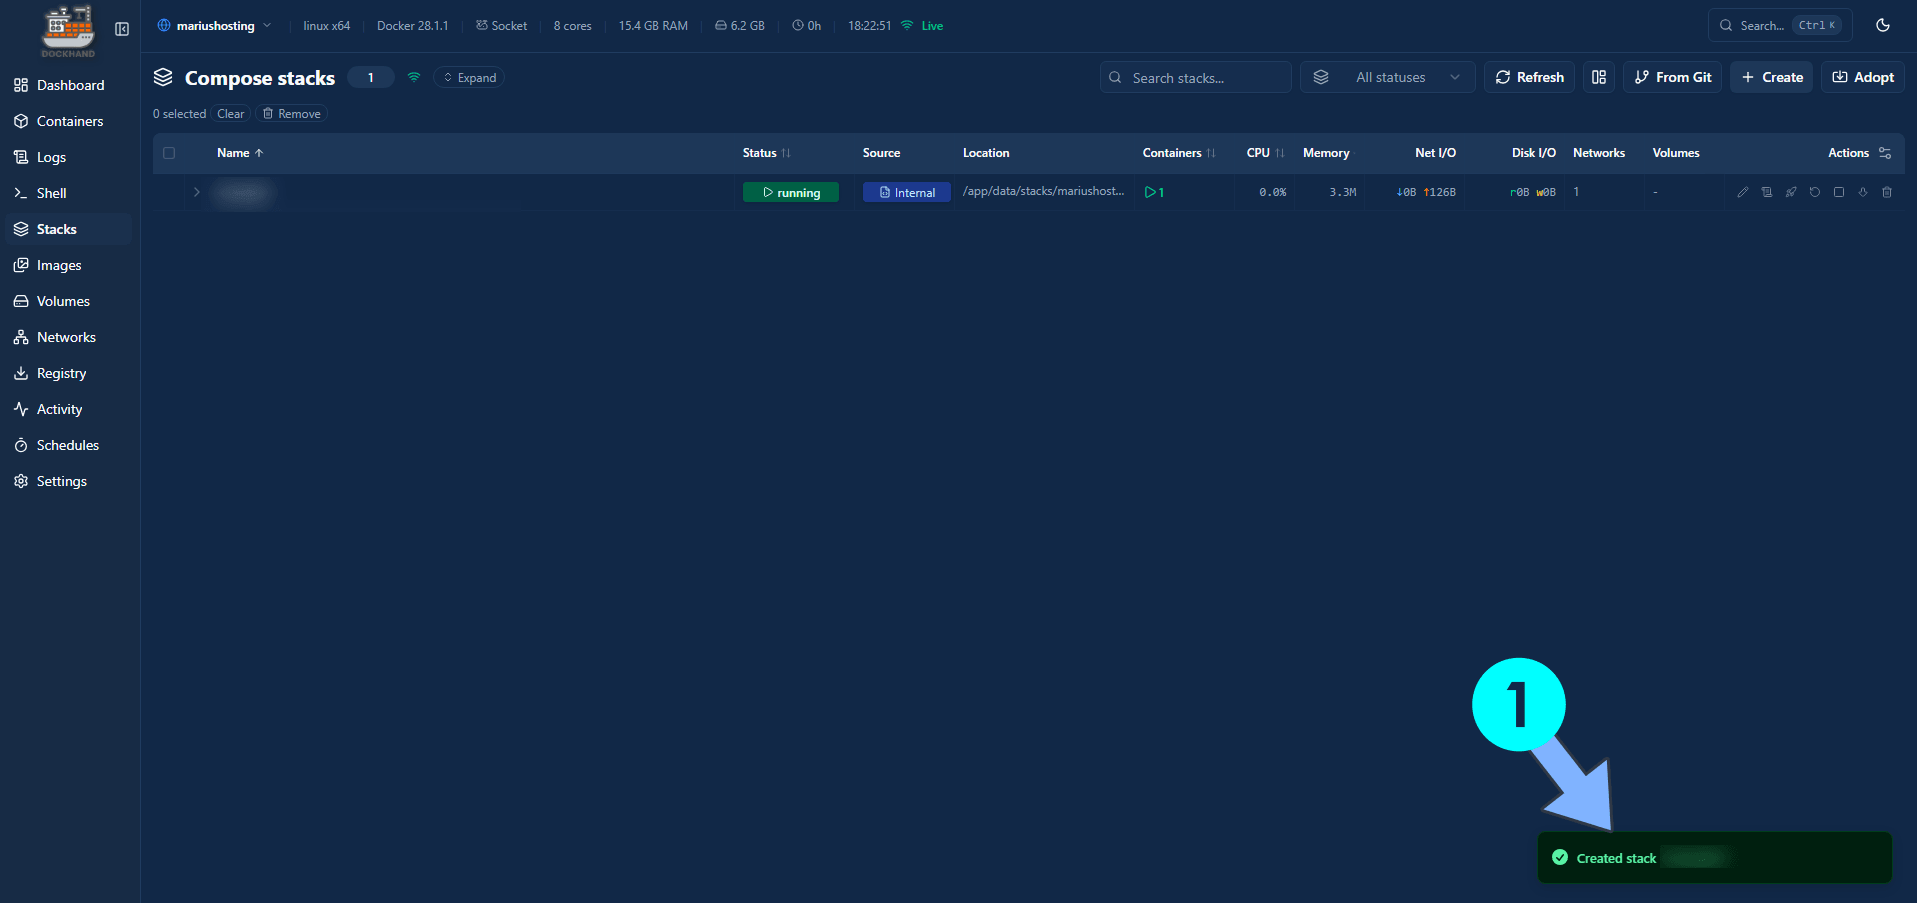
If everything goes right, you will see the following message at the bottom right of your screen: “Created stack “dawarich”“.
STEP 11
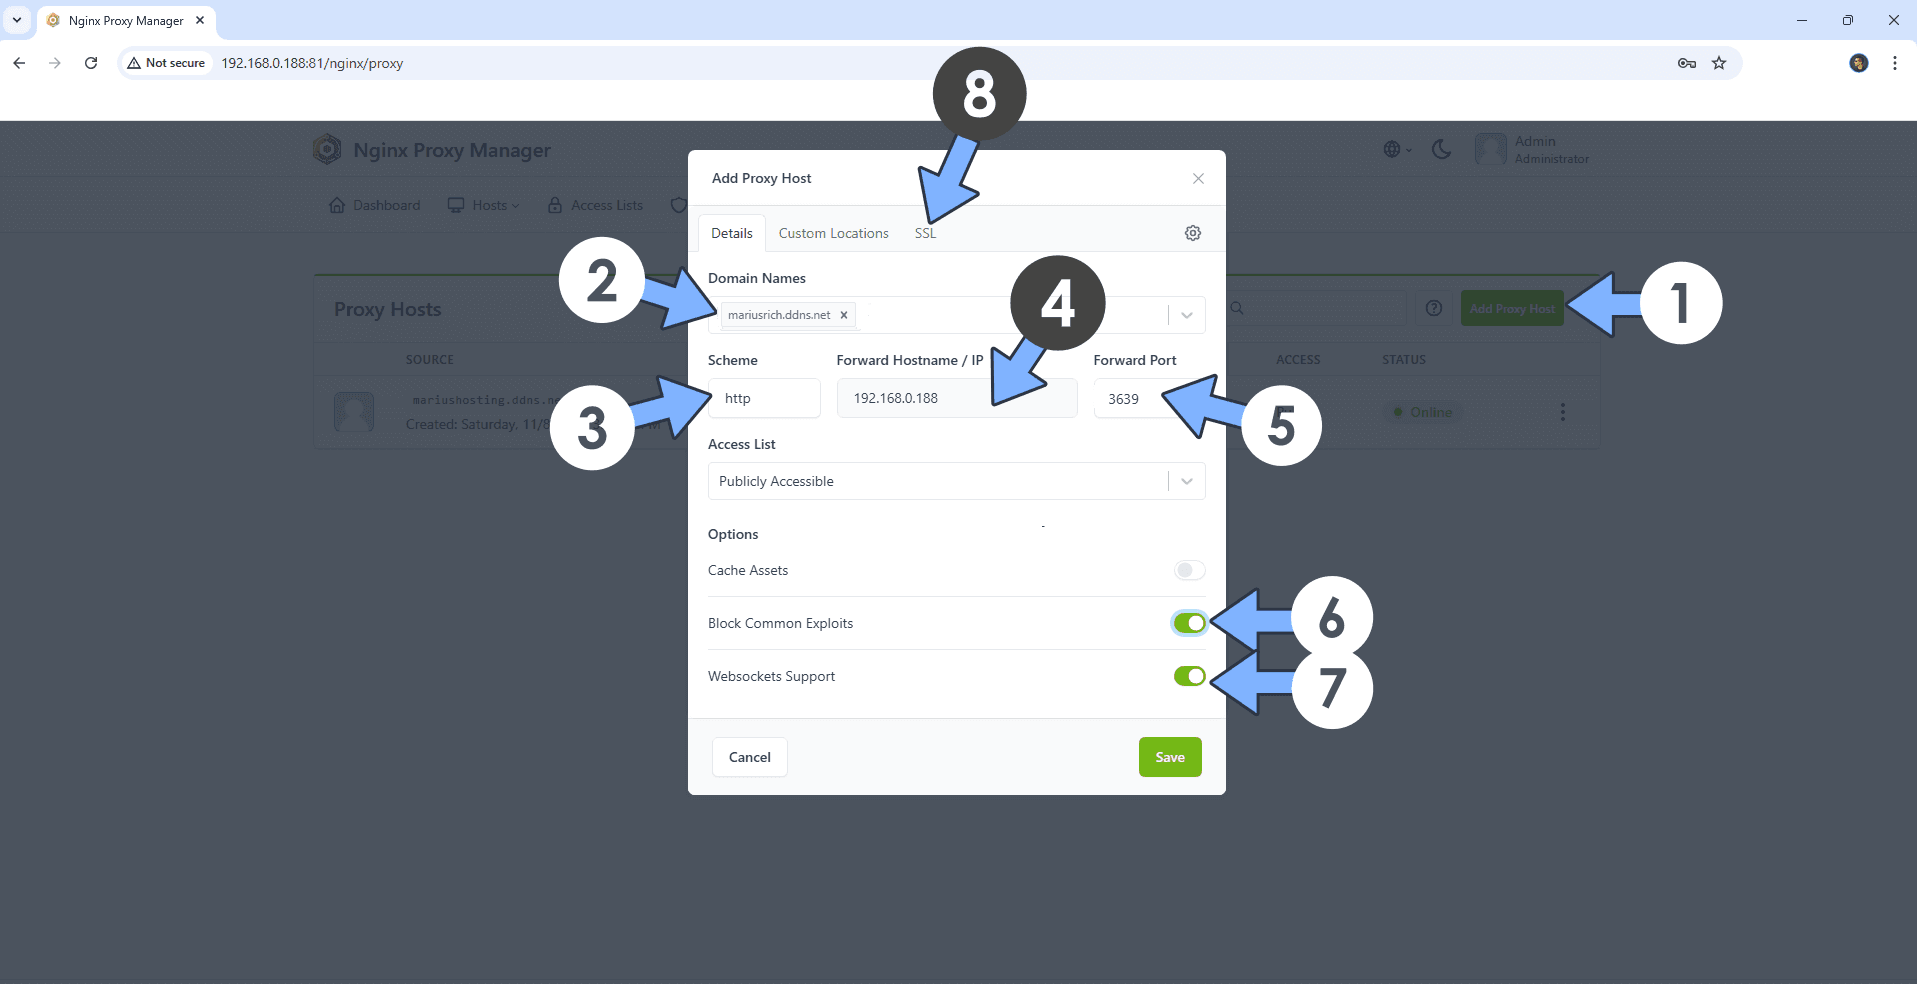
Open your Nginx Proxy Manager container that you have previously installed at STEP 3. Click Add Proxy Host. A new pop up window will open. Add the following details:
Domain Names: Type in your own noip domain name that you have previously created at STEP 4.
Scheme: http
Forward Hostname/IP: Type in the local NAS IP of your UGREEN NAS.
Forward Port: Type in the Dawarich local Port that is 3639
Check Block Common Exploits
Check Websockets Support
Click the SSL tab. Follow the instructions in the image below.
STEP 12
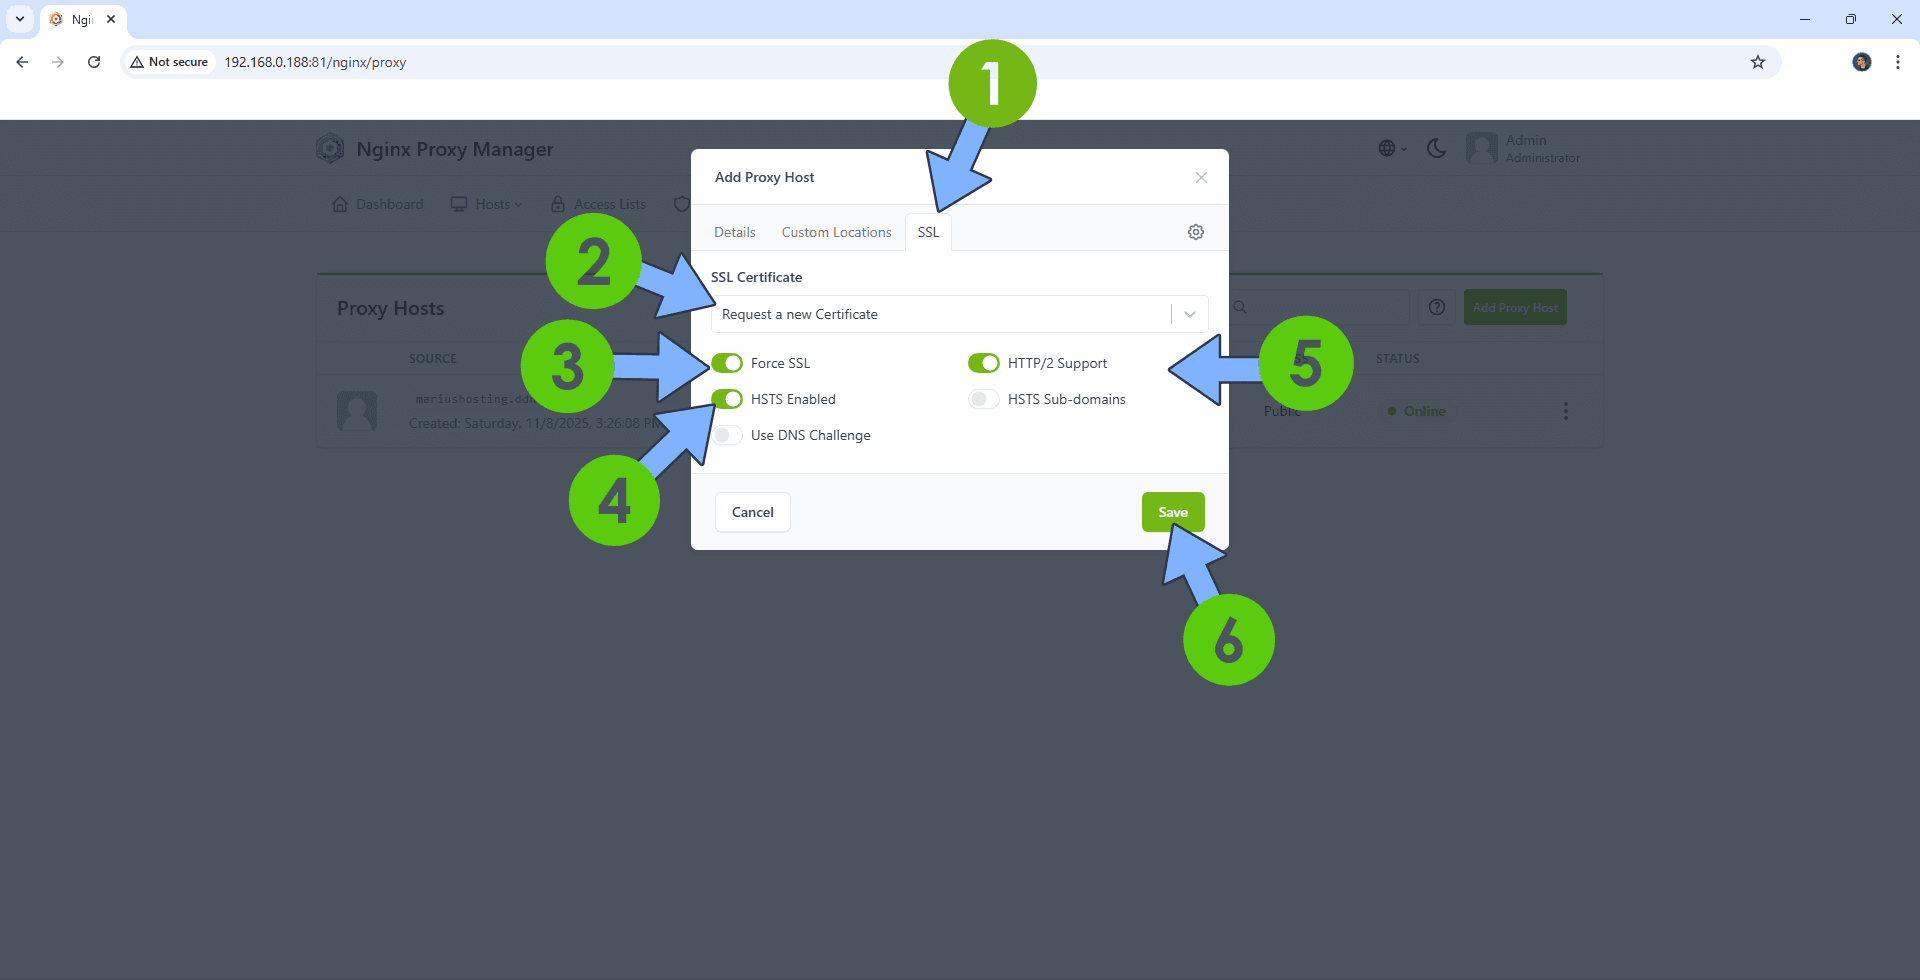
After you click the SSL tab, add the following details:
SSL Certificate: Request a new SSL Certificate
Check: Force SSL
Check: HSTS Enabled
Check: HTTP/2 Support
Click Save. Follow the instructions in the image below.
STEP 13
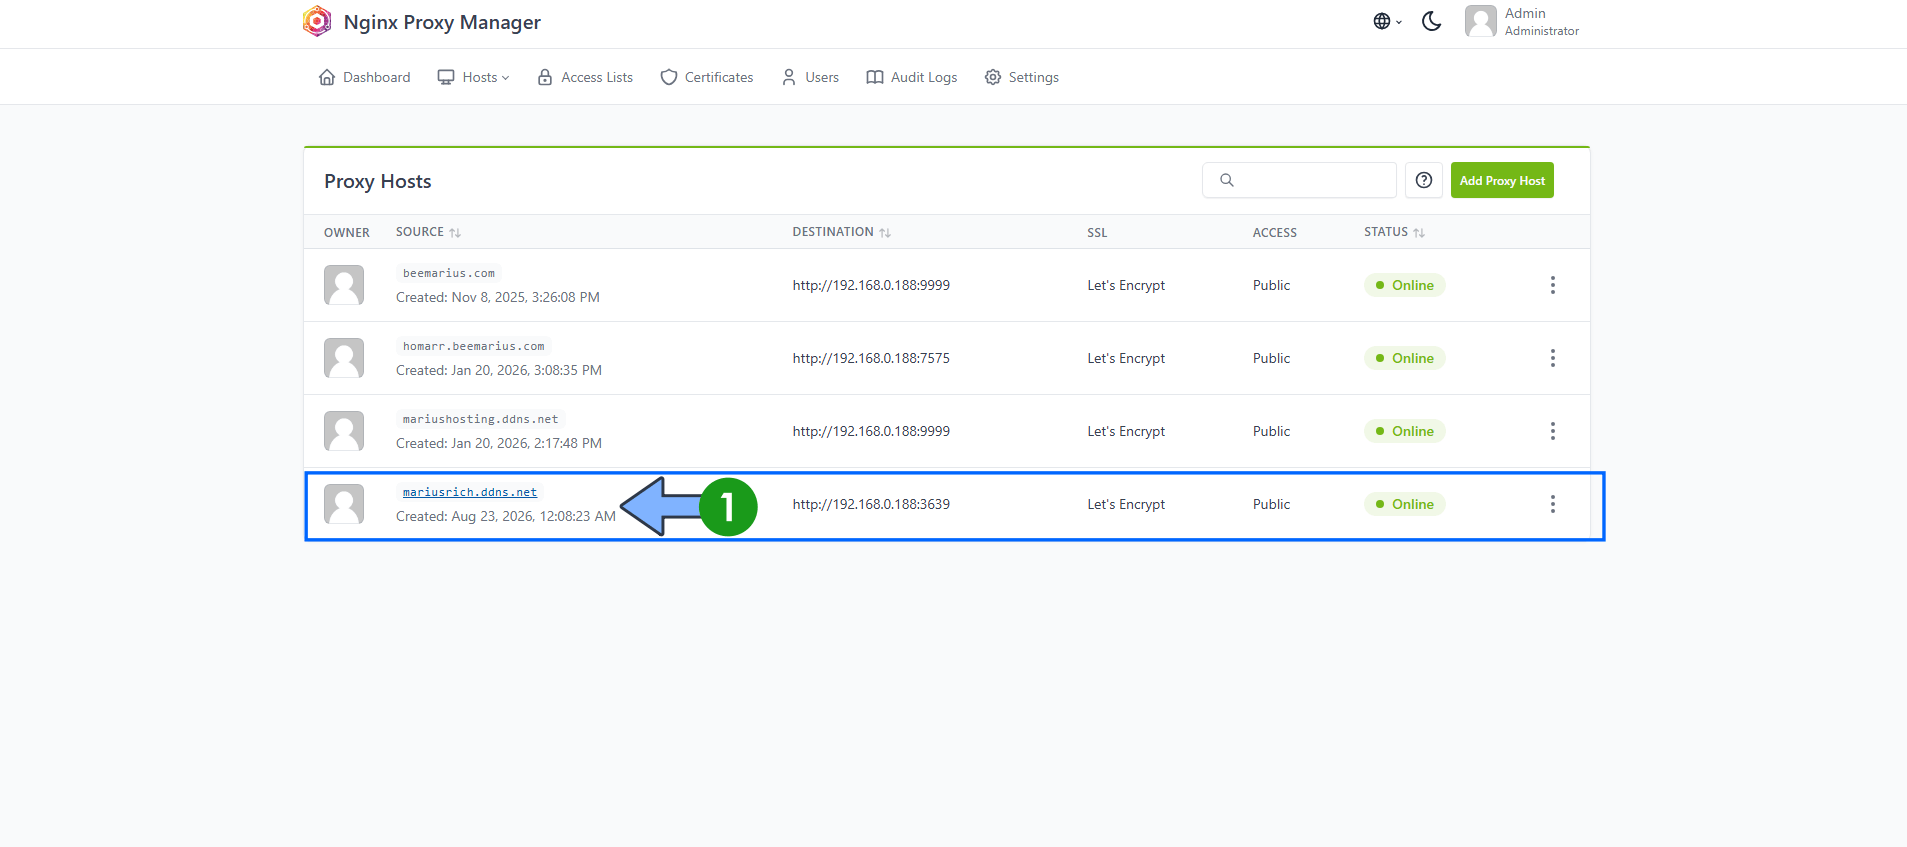
In the Proxy Hosts area, if everything goes right, you will see that your hostname has been generated. Click on it. Follow the instructions in the image below.
STEP 14
🟢Please Support My work by Making a Donation. Almost 99,9% of the people that install something using my guides forget to support my work, or just ignore STEP 1. I’ve been very honest about this aspect of my work since the beginning: I don’t run any ADS, I don’t require subscriptions, paid or otherwise, I don’t collect IPs, emails, and I don’t have any referral links from Amazon or other merchants. I also don’t have any POP-UPs or COOKIES. I have repeatedly been told over the years how much I have contributed to the community. It’s something I love doing and have been honest about my passion since the beginning. But I also Need The Community to Support me Back to be able to continue doing this work.
STEP 15
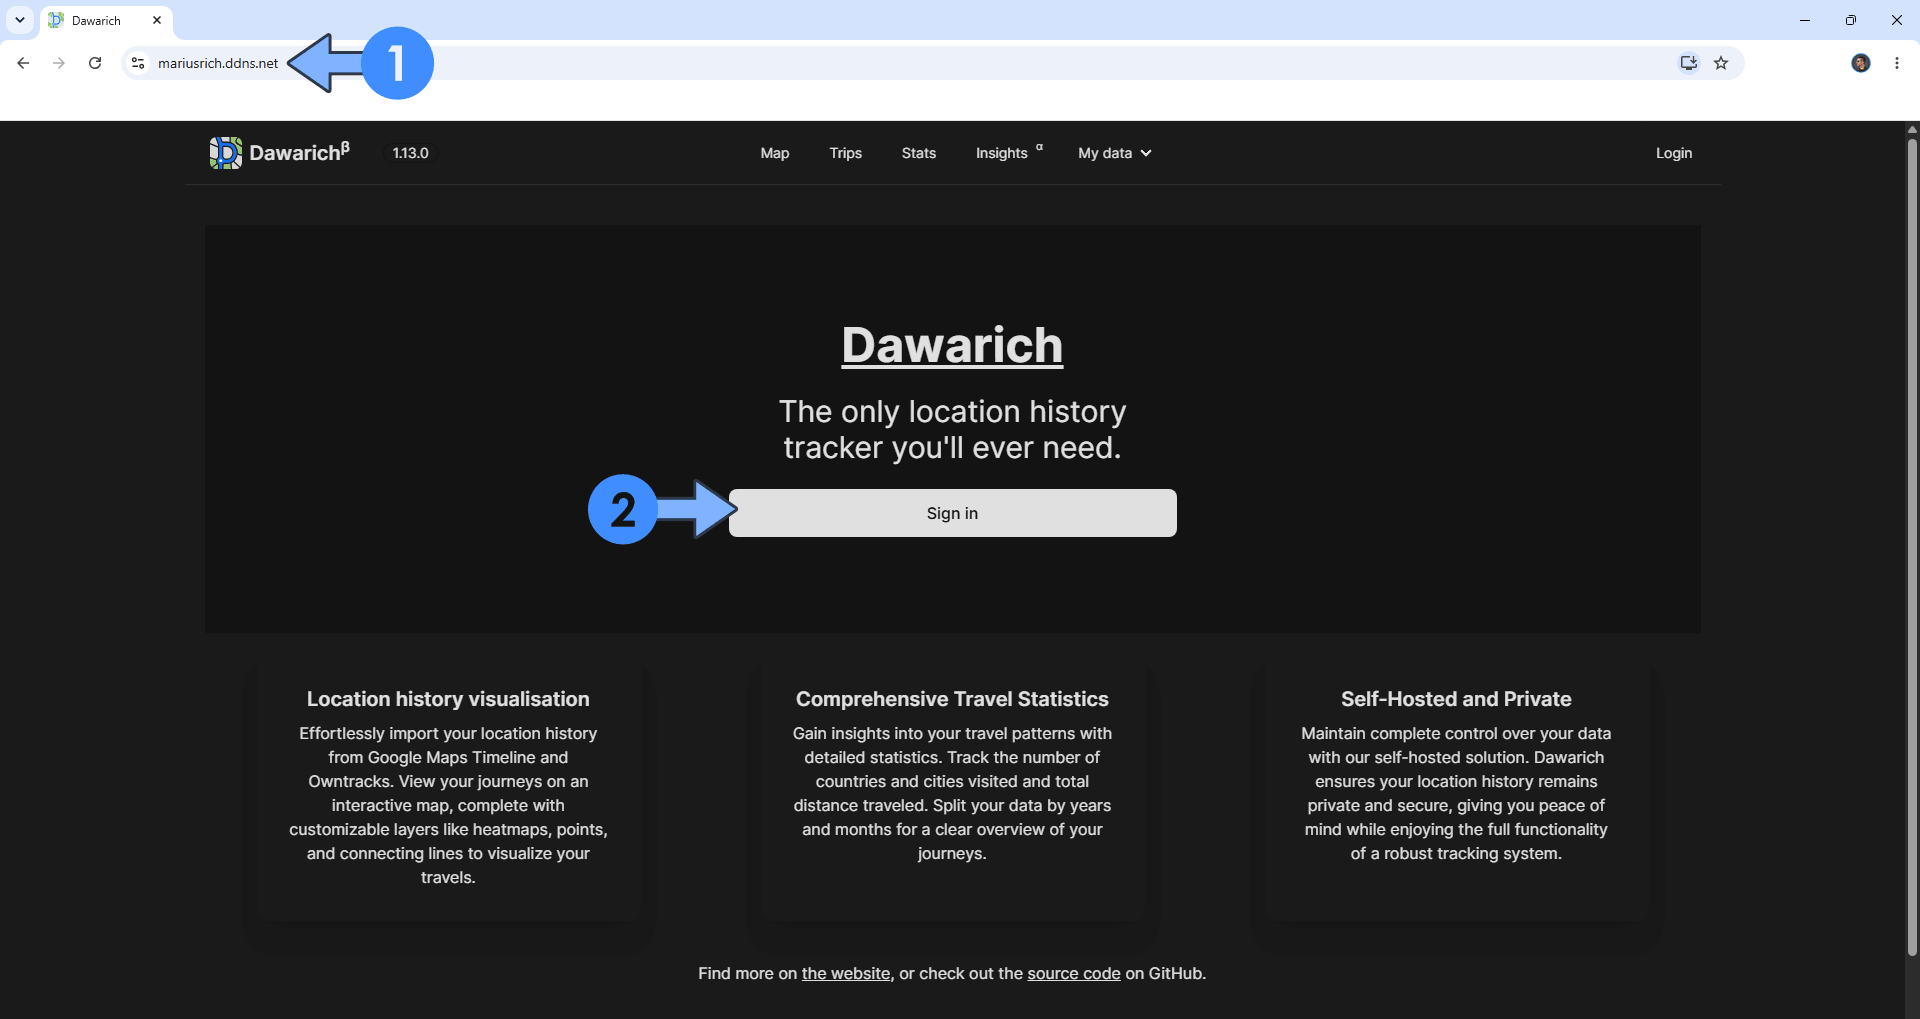
Now open your browser and type in your HTTPS/SSL certificate like this https://yourname.ddns.net that you have previously created at STEP 4. In my case it’s https://mariusrich.ddns.net If everything goes right, you will see the Dawarich Login page. Click Sign in. Follow the instructions in the image below.
STEP 16
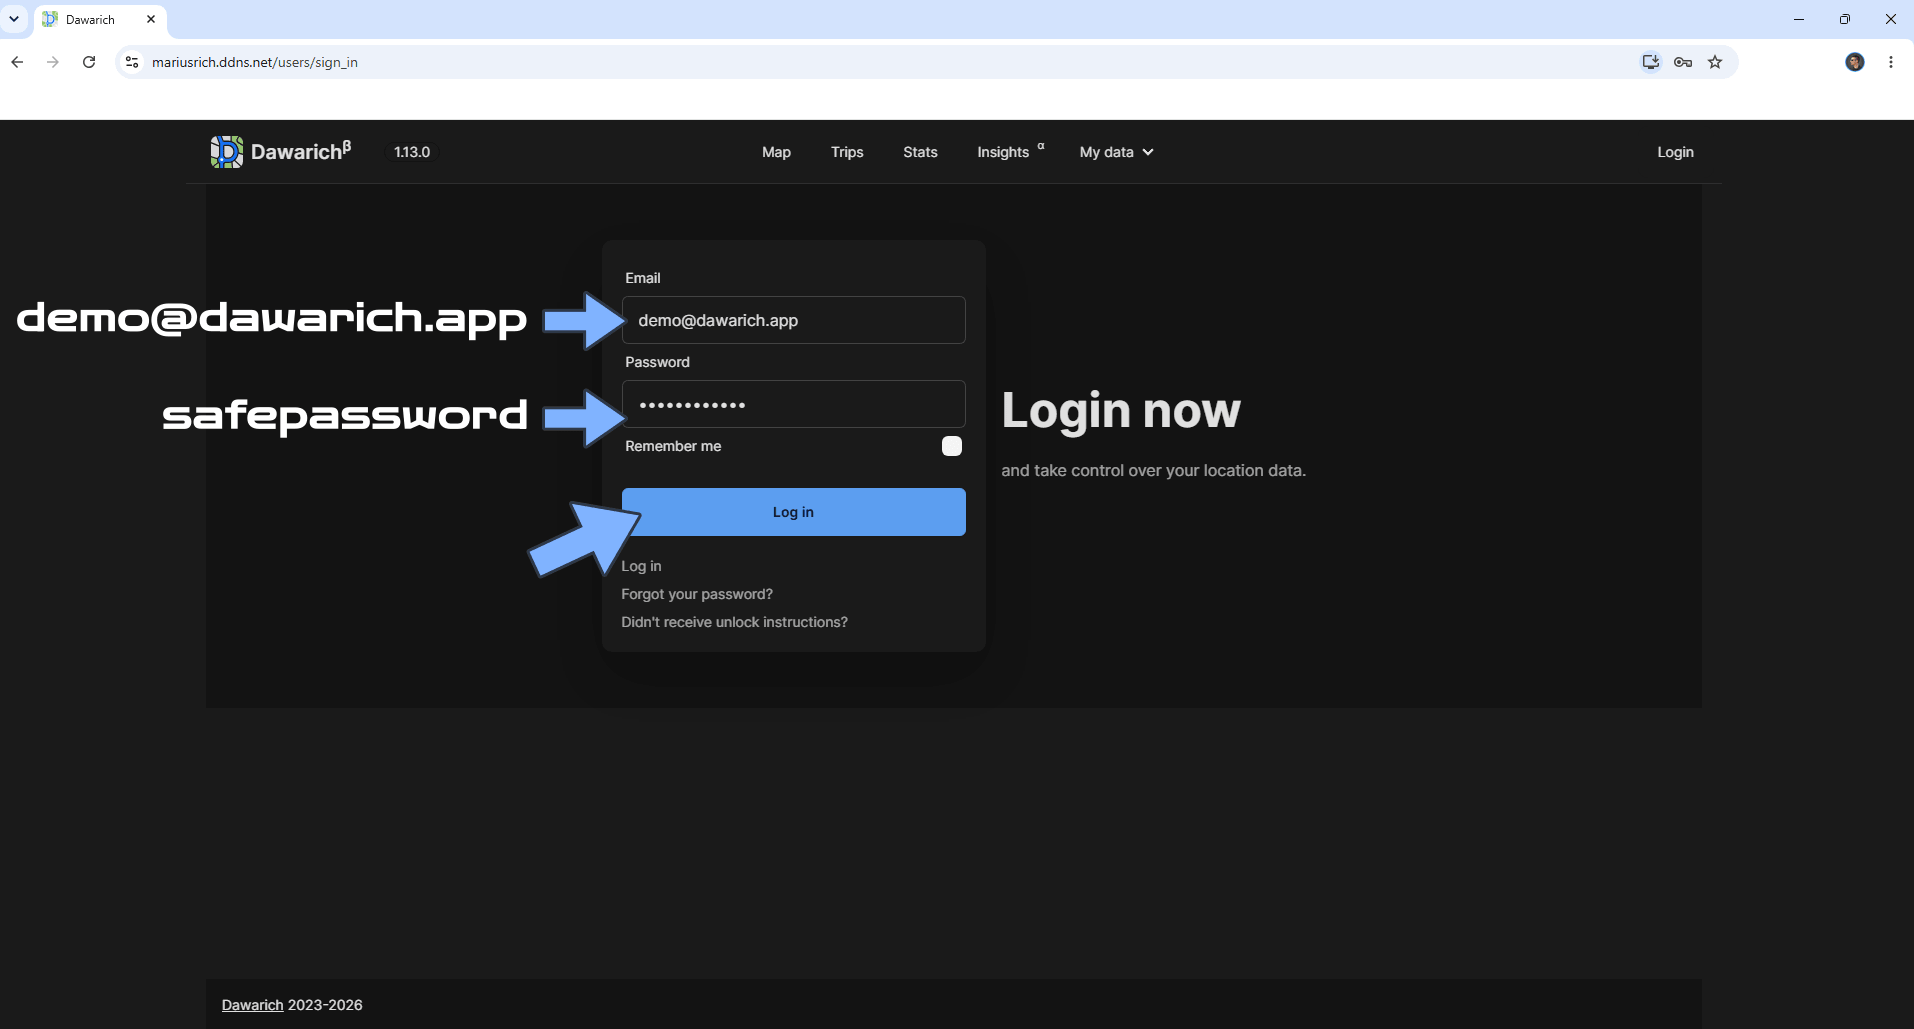
Type in the default Email address and Password, then click Log in. Follow the instructions in the image below.
STEP 17
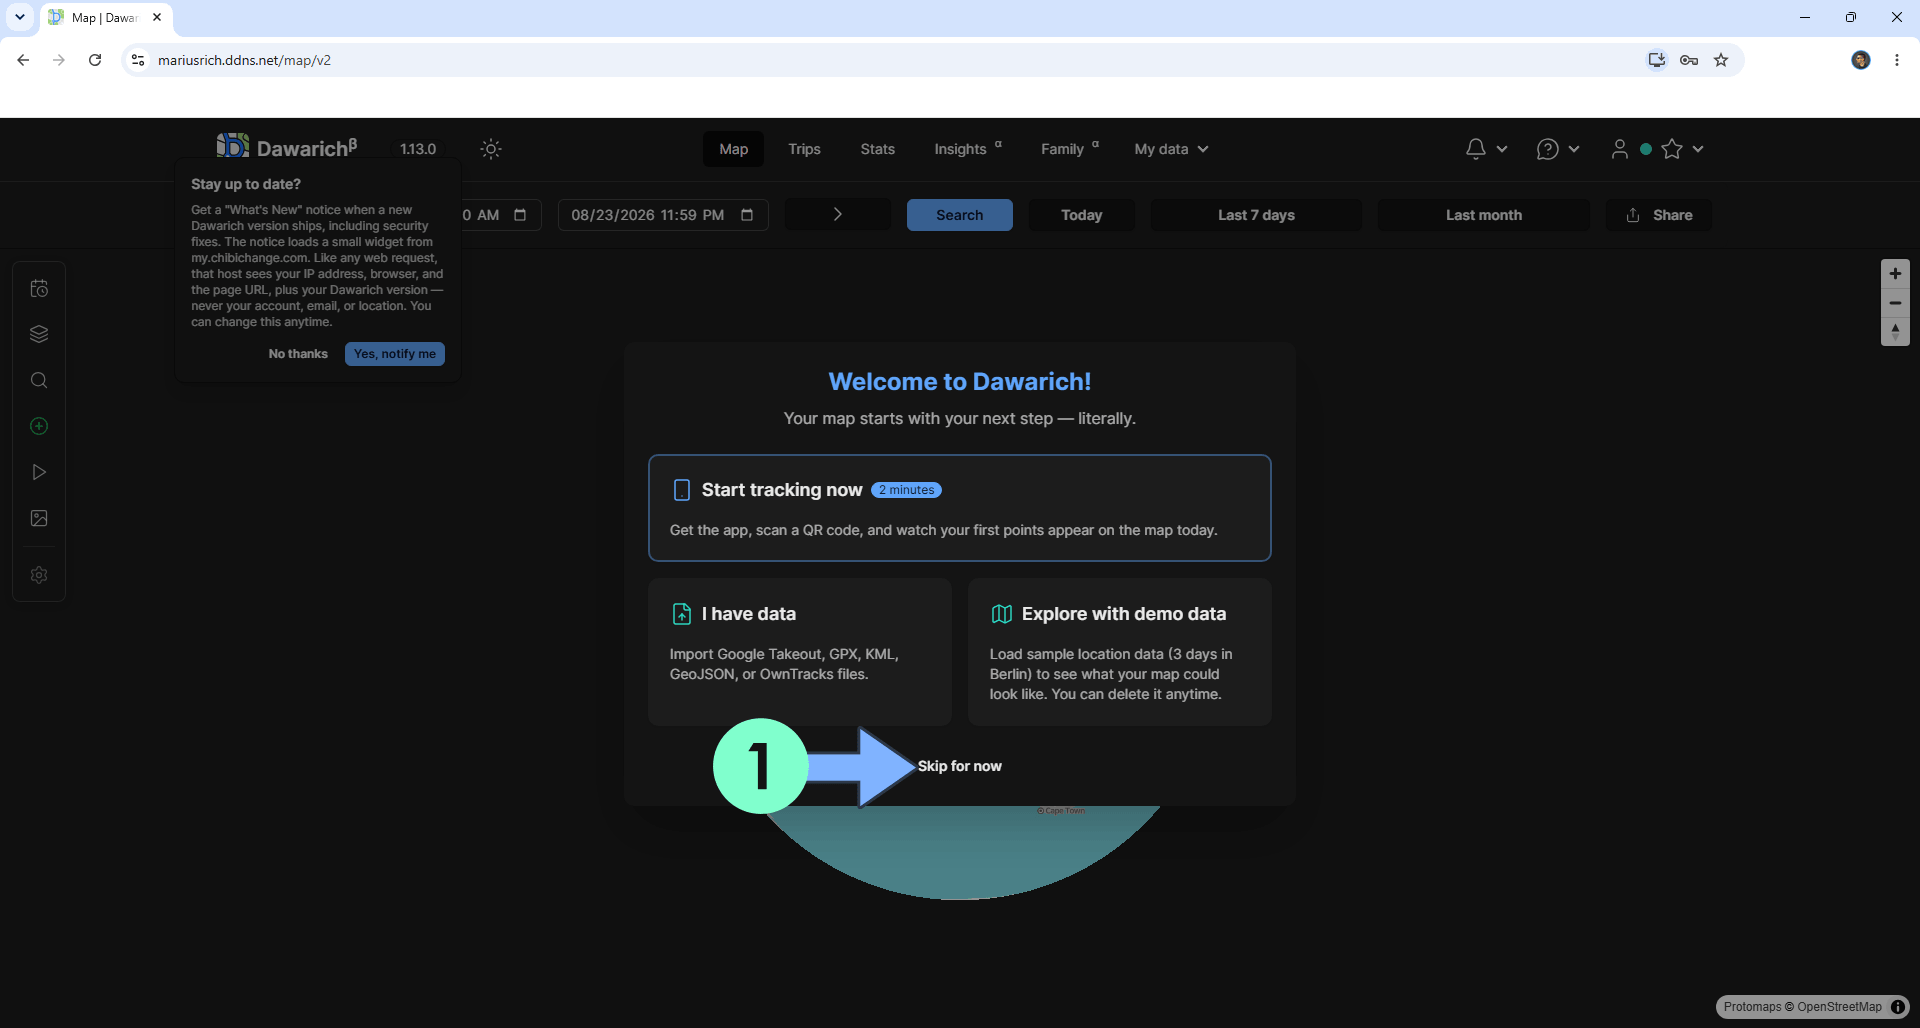
Click Skip for now. Follow the instructions in the image below.
STEP 18
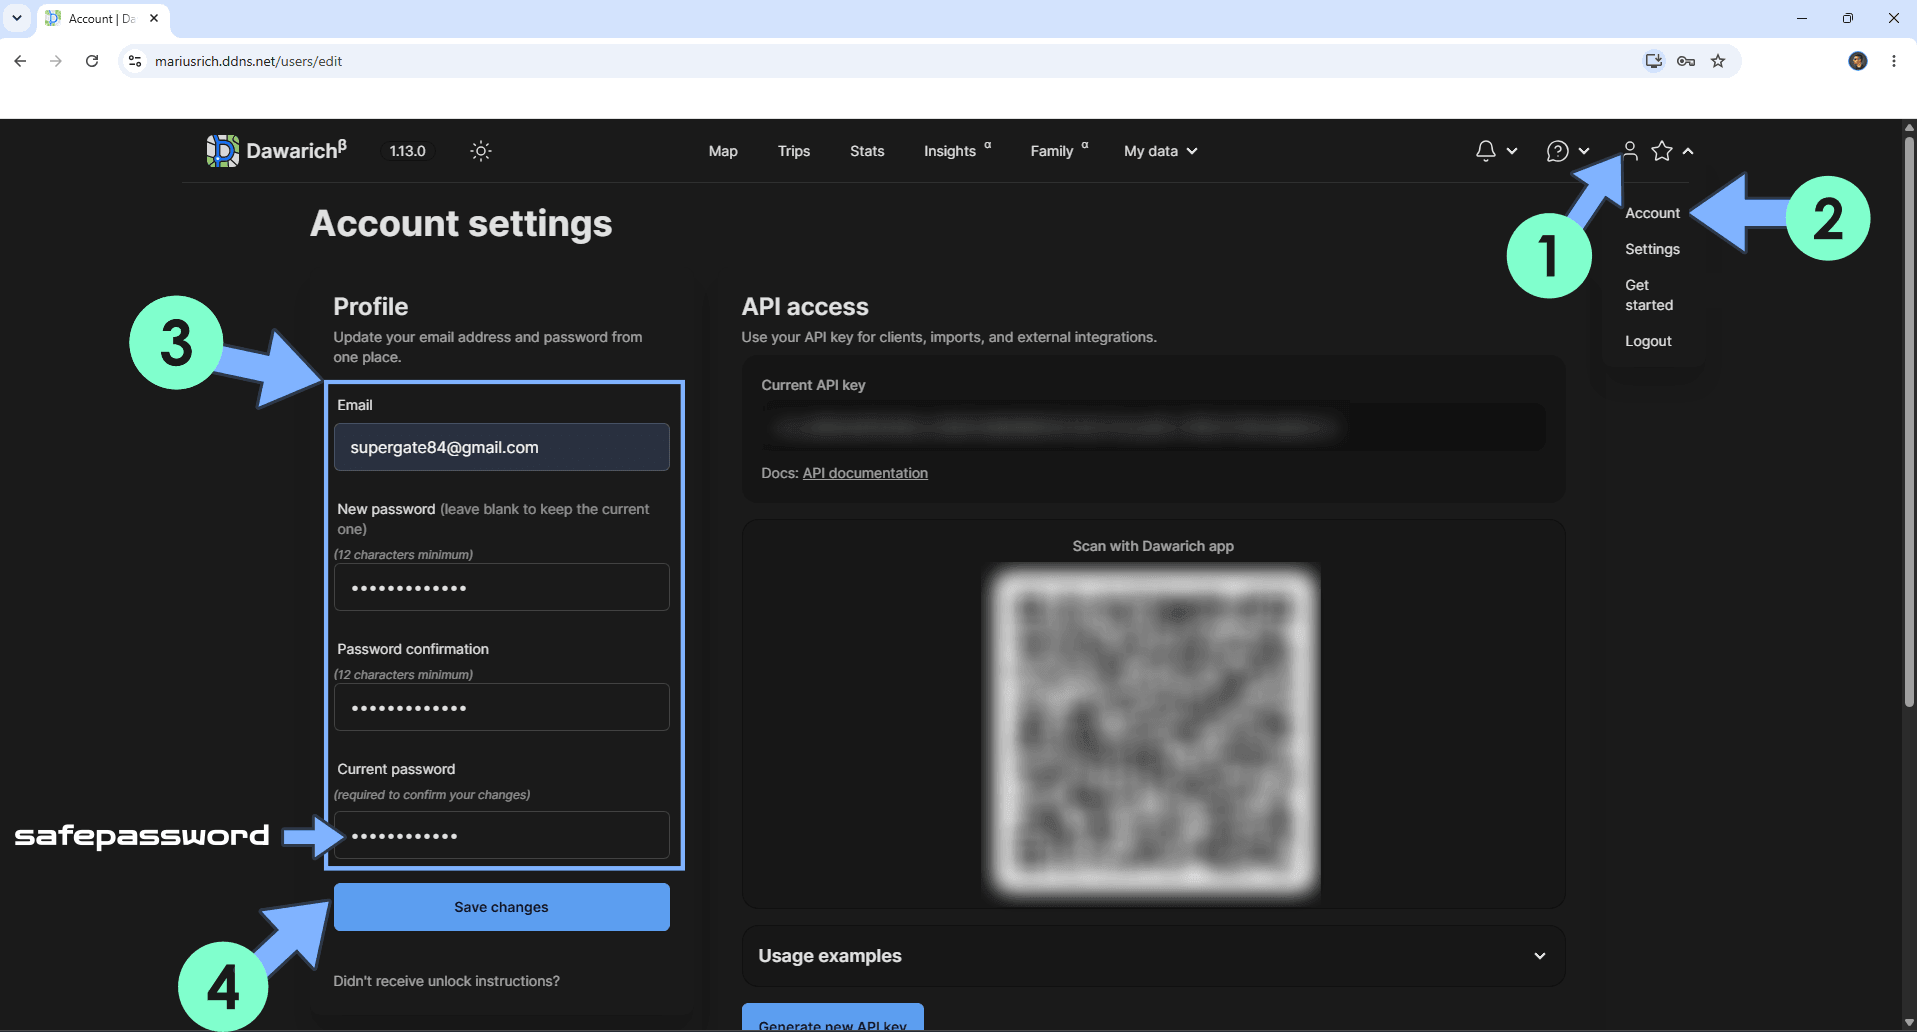
Change the default Email address and Password. At the top right of the page, click on the profile icon then Account. Change the default Email address and Password with your own credentials. Click Save changes. Follow the instructions in the image below.
STEP 19
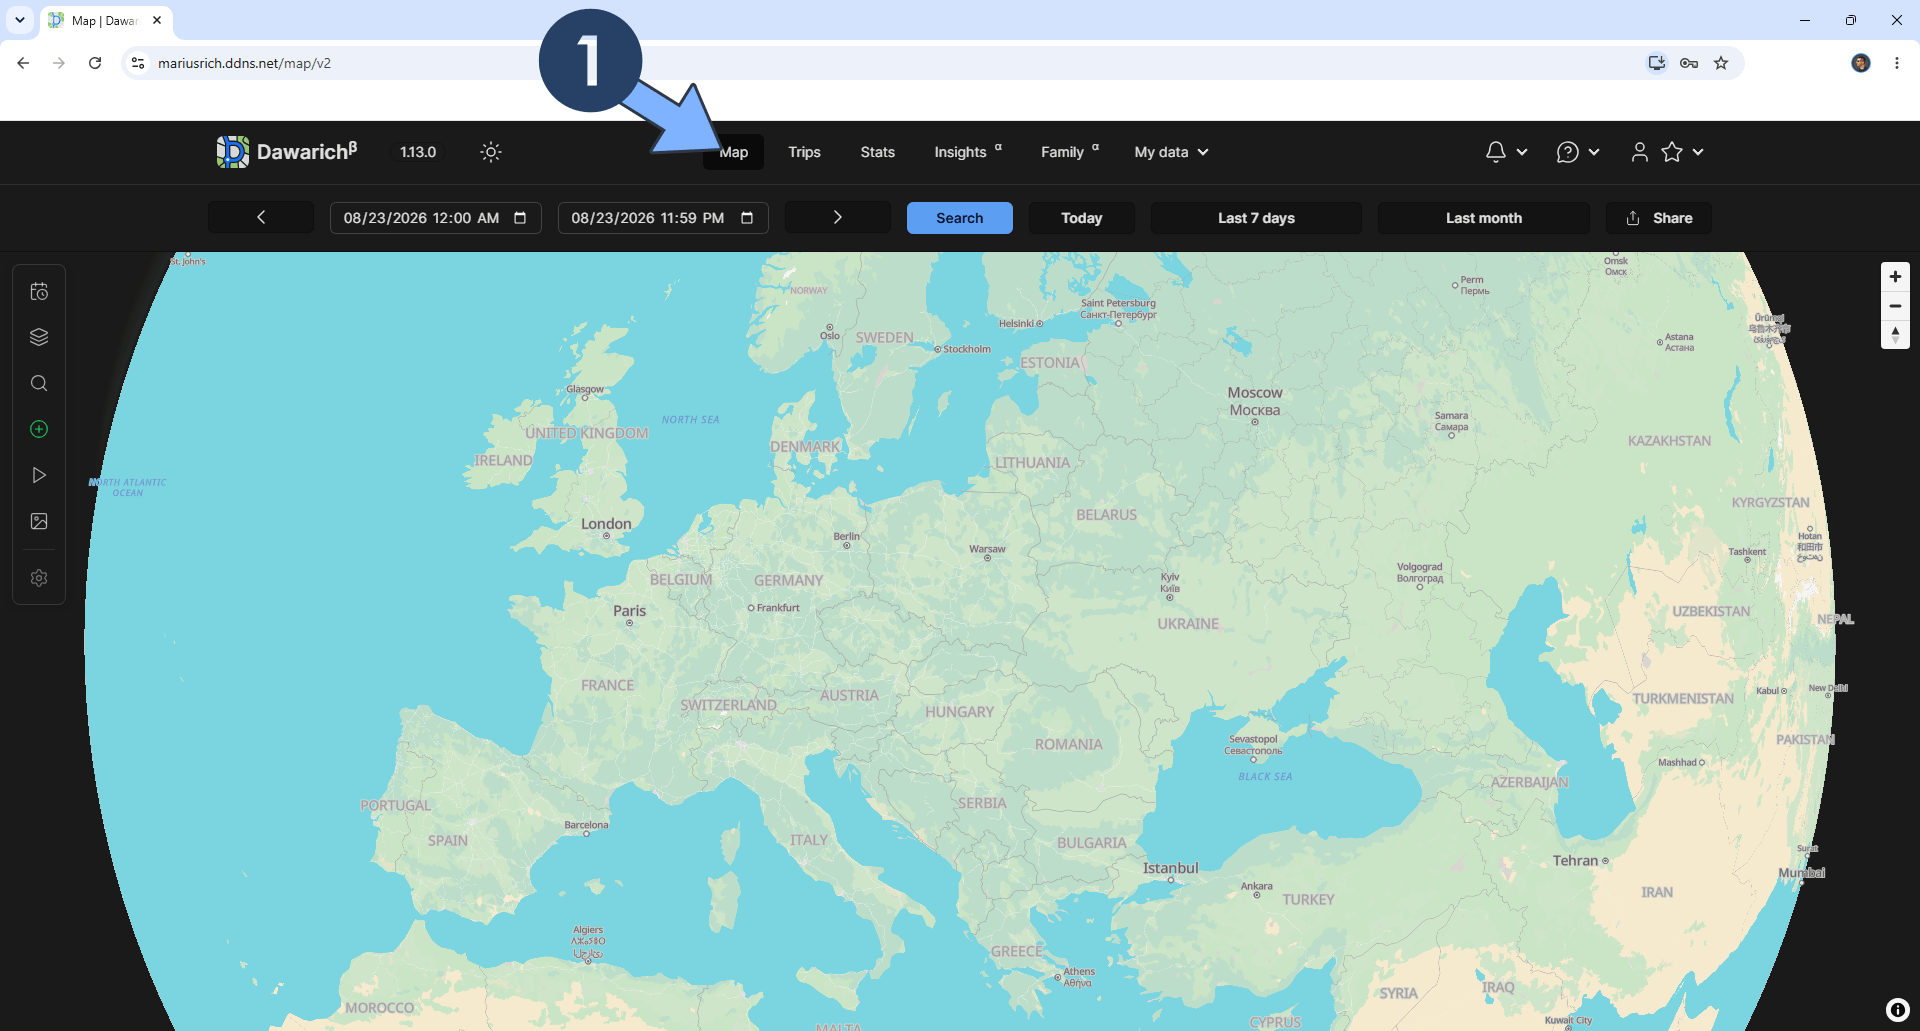
Your Dawarich Map at a glance!
STEP 20
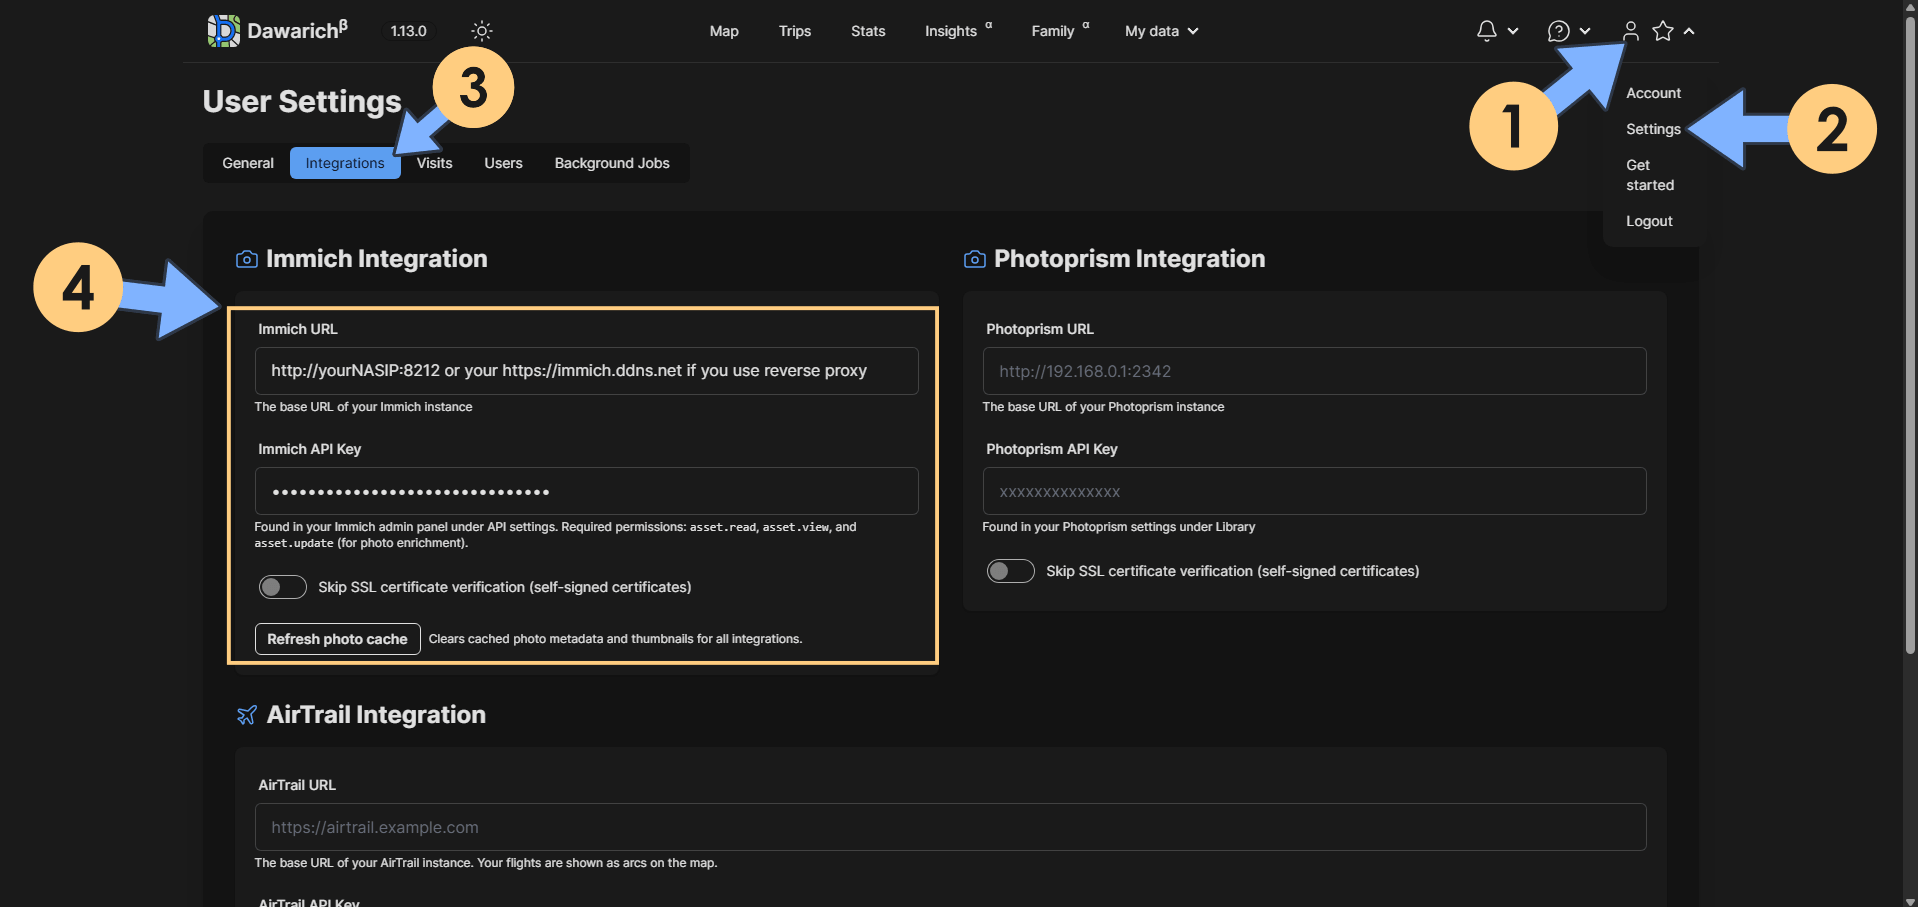
Add Immich, Photoprism or AirTrail integration. ⚠️Warning: You need to install Immich or Photoprism or AirTrail using my guides before you edit your integrations in Dawarich. At the top right of the page, click on your user icon, then Settings. Type in your own Immich URL address with the respective API KEY or your own Photoprism URL address with the respective API KEY, depending on your preference. Follow the instructions in the image below.
Enjoy Dawarich on your UGREEN NAS!
🆙Note/Update/Container: How to Update Your Docker Containers on UGREEN NAS Using Dockhand.
🐳Note: How to Create Docker Shortcuts on Desktop.
🆕Note: How to Update Dockhand to the latest version.
🆕Note: How to Clean Docker.
This post was updated on Friday / October 2nd, 2026 at 1:58 PM