
Dockhand is a modern, self-hosted Docker management platform with an intuitive web interface for homelabs, small businesses, and enterprises. It simplifies container operations, stack deployments, and observability through real-time management (start/stop/restart containers, web terminals, file transfers), a visual Compose editor, GitOps auto-sync, metrics, logs, OIDC/SSO, MFA, vulnerability scans, and multi-host support via the open-source Hawser agent. You can deploy it quickly as a Docker container with no cloud dependencies or telemetry. It’s forever free for personal use. I’ve been running Dockhand on my UGREEN iDX6011 Pro reliably for quite some time now. You’ve probably noticed my preference for installing container apps on my UGREEN NAS using Dockhand and that’s because I find it’s a professionally built tool with an intuitive dashboard that shows you everything you need to see when it comes to your NAS environment easily. My containers, stacks and logs are displayed clearly and the dashboard UI is friendly enough to make it easy for me to automate my tasks and keep a tidy workflow. In this step by step guide I will show you how to install Dockhand on your UGREEN NAS using Docker.
💡Note: This guide works perfectly with the latest Dockhand v1.0.54 release.
💡Note: How to Free Disk Space on Your NAS if You Run Docker and Dockhand
💡Note: Check out my guide on how to Install Dockhand on Your Synology NAS.
💡Note: Check out my guide on how to Install Dockhand on Your Asustor NAS.
🚀Farewell to 7 Docker Tools: Dockhand Just Killed Them All in One Go
STEP 1
Please Support My work by Making a Donation.
STEP 2
Add Read & Write Permissions to the Docker Folder. If you have already added the Read and Write Permissions to the Docker Folder, skip this STEP.
STEP 3
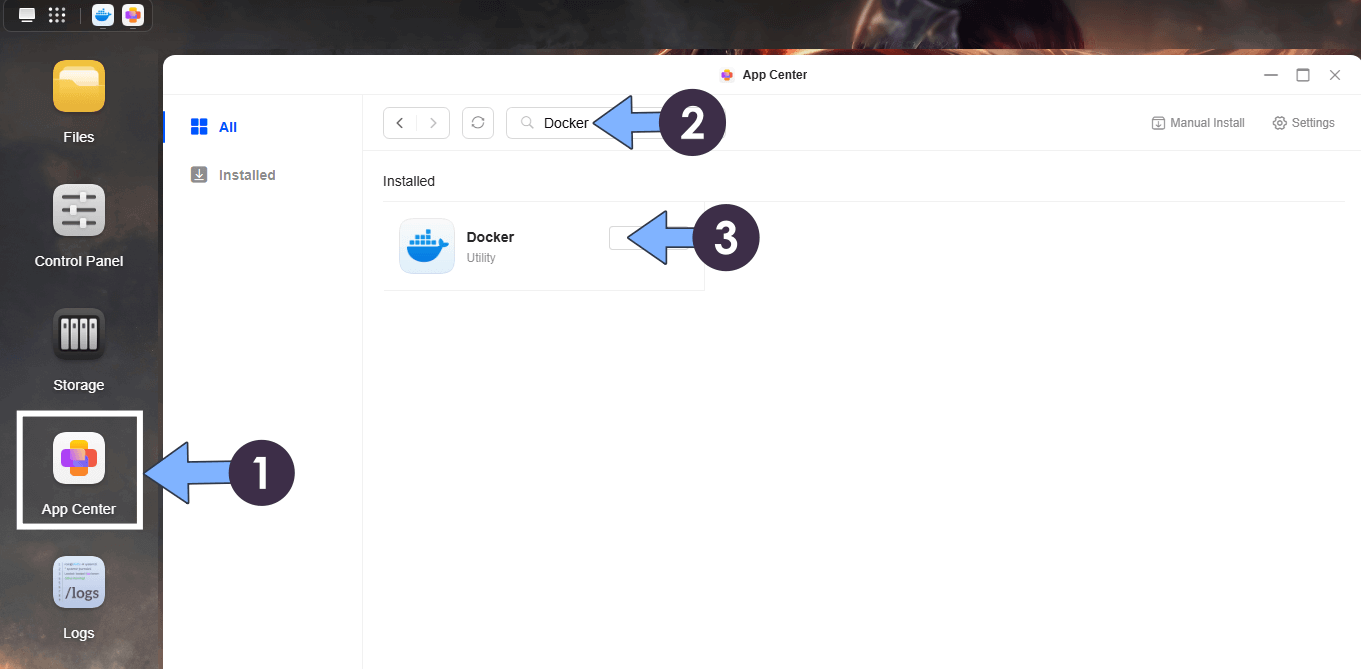
Install Docker via the UGREEN “App Center”. Search for Docker, then click Install App. Follow the instructions in the image below.
STEP 4
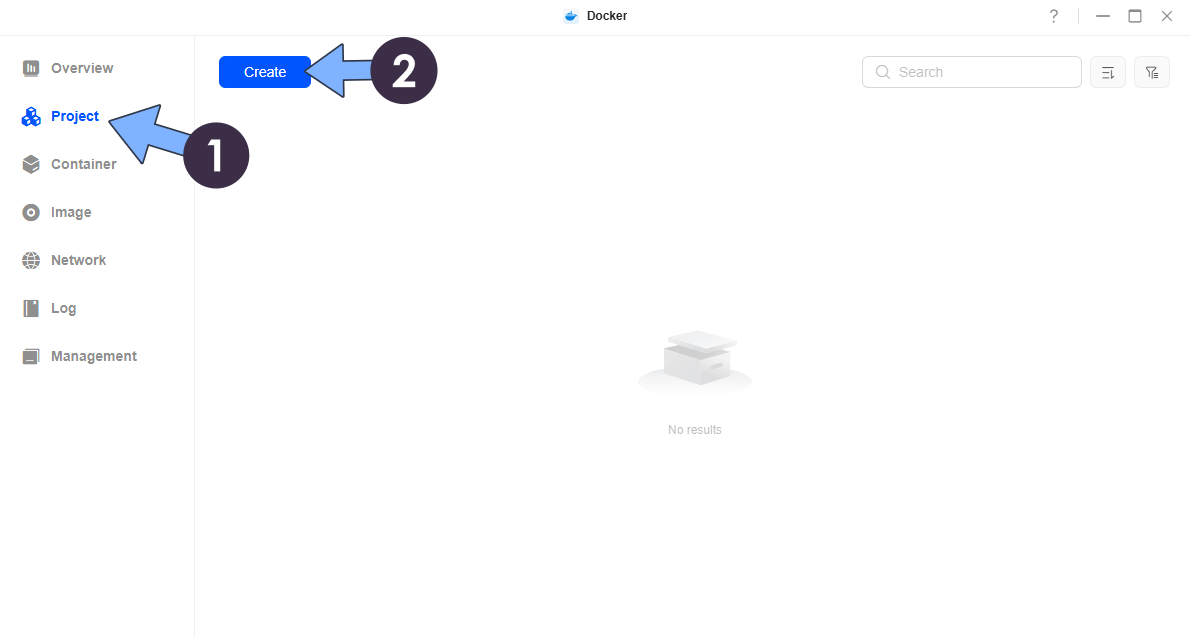
Open Docker. On the left sidebar, click Project then Create. Follow the instructions in the image below.
STEP 5
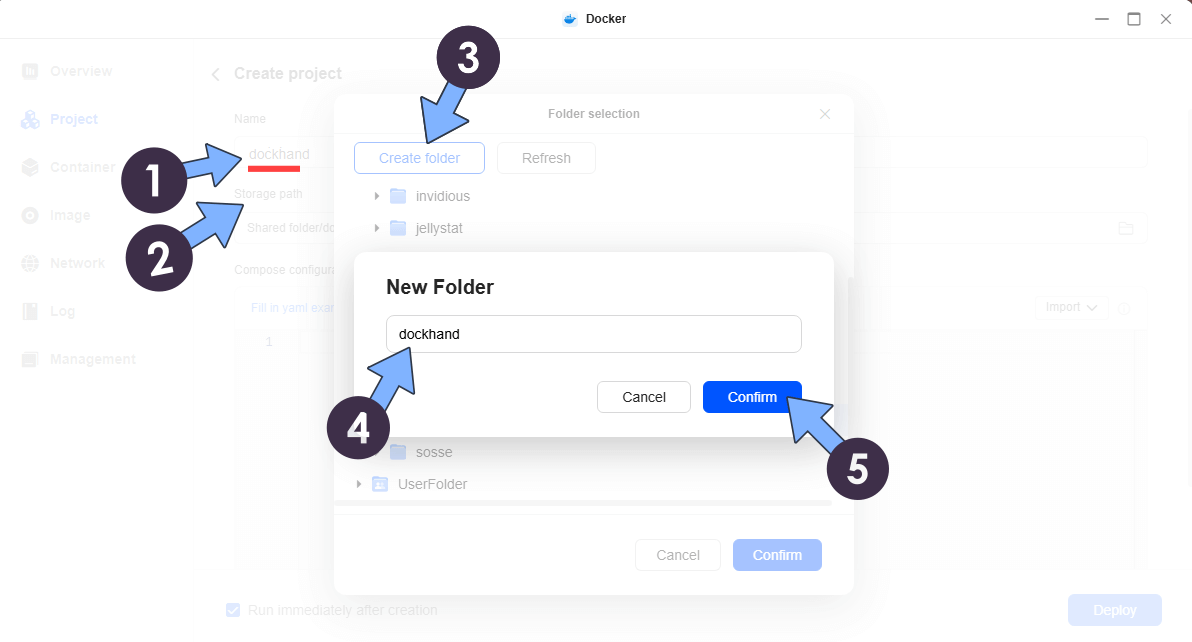
Type in the name of the project which is dockhand. Click Storage path. Click Create folder. Name the folder dockhand. Click Confirm. Follow the instructions in the image below.
STEP 6
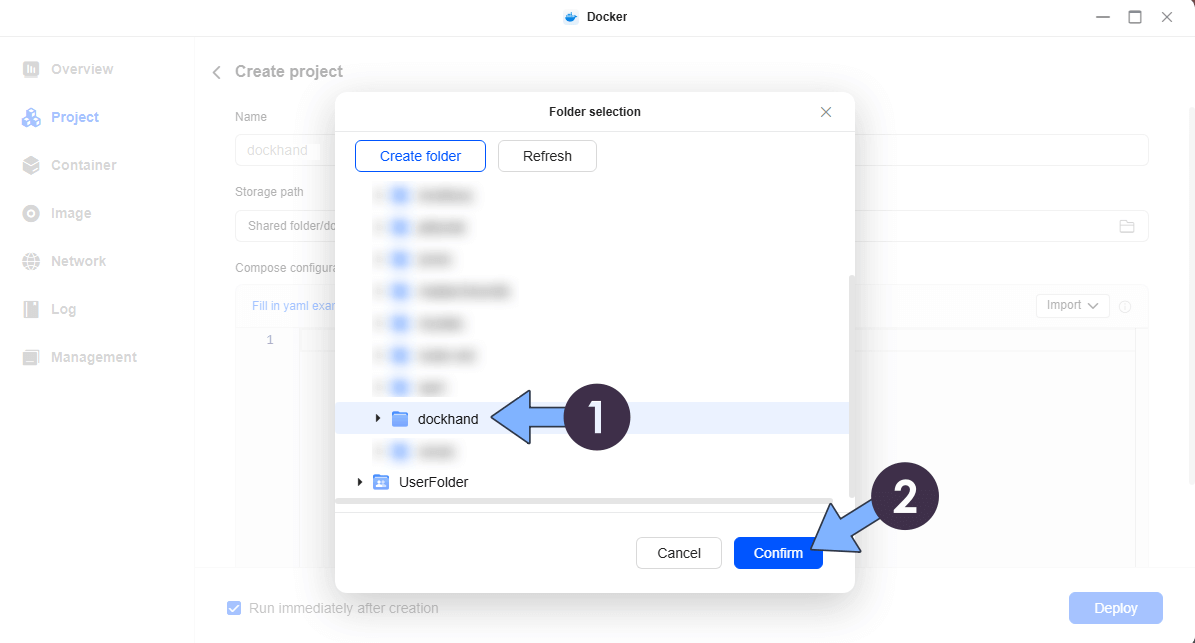
Select the dockhand folder, then click Confirm. Follow the instructions in the image below.
STEP 7
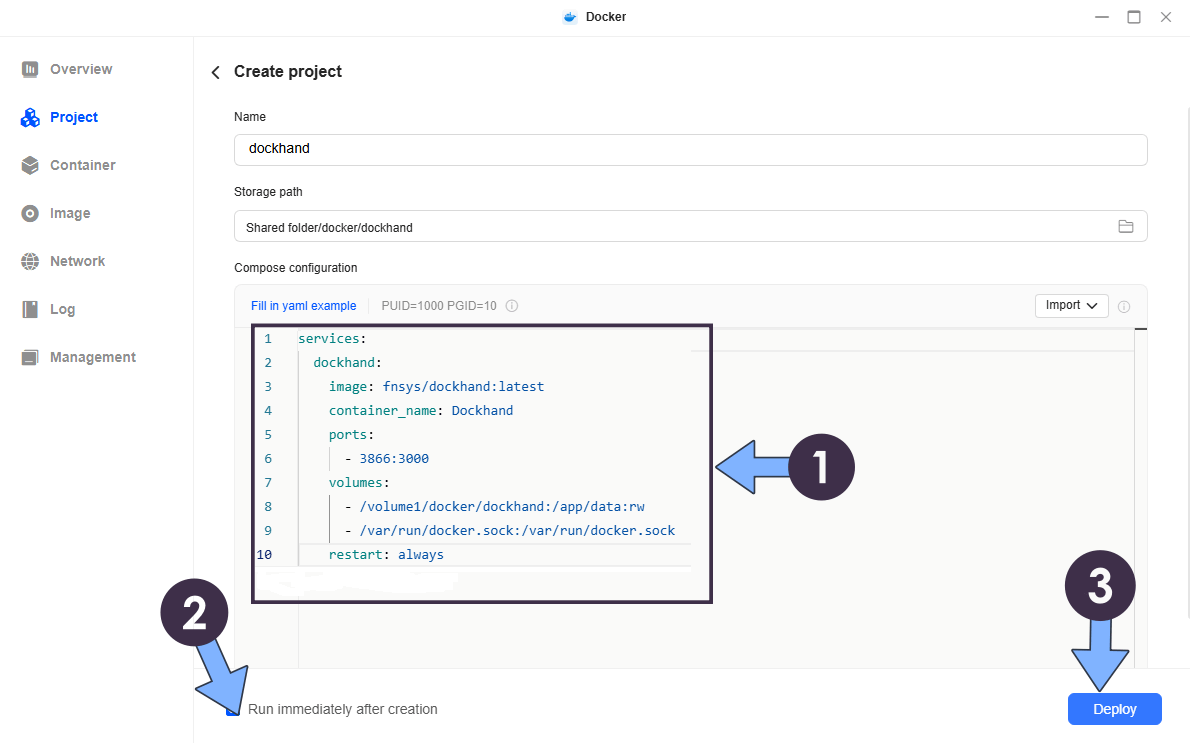
Note: Copy Paste the code below in the Compose configuration area.
Select the Run immediately after creation option, then click Deploy. Follow the instructions in the image below.
services:
  dockhand:
    image: fnsys/dockhand:latest
    container_name: Dockhand
    ports:
      - 3866:3000
    volumes:
      - /volume1/docker/dockhand:/app/data:rw
      - /var/run/docker.sock:/var/run/docker.sock
    restart: always
STEP 8
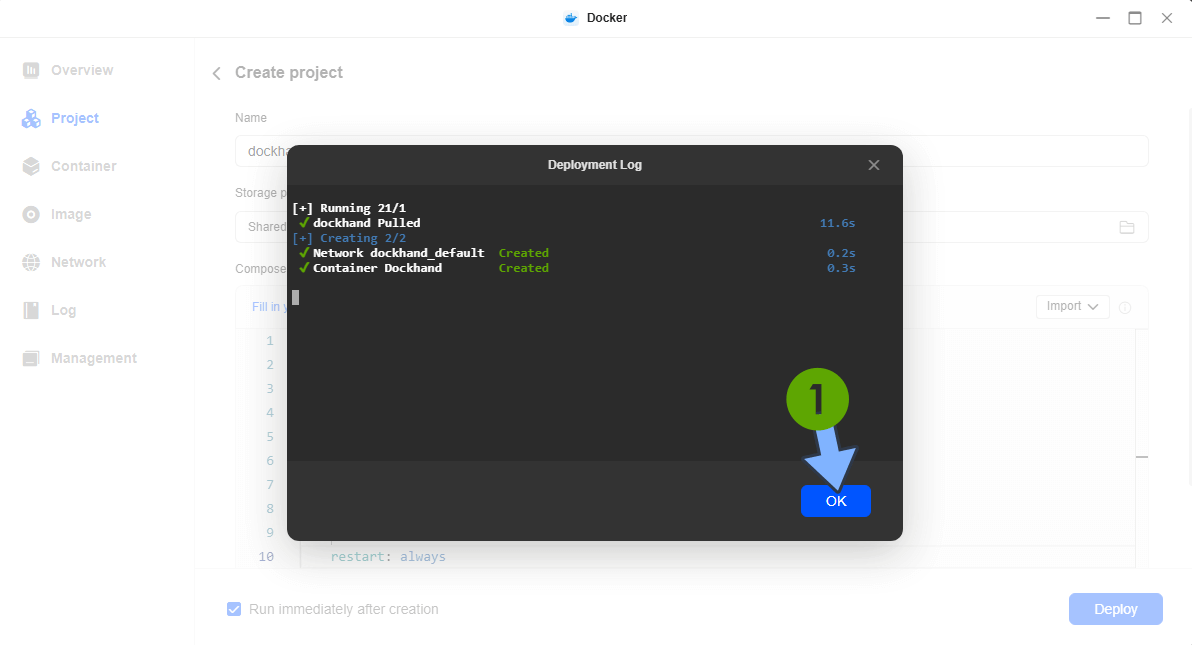
The Dockhand installation will automatically start. Click OK. Follow the instructions in the image below.
STEP 9
🟢Please Support My work by Making a Donation. Almost 99,9% of the people that install something using my guides forget to support my work, or just ignore STEP 1. I’ve been very honest about this aspect of my work since the beginning: I don’t run any ADS, I don’t require subscriptions, paid or otherwise, I don’t collect IPs, emails, and I don’t have any referral links from Amazon or other merchants. I also don’t have any POP-UPs or COOKIES. I have repeatedly been told over the years how much I have contributed to the community. It’s something I love doing and have been honest about my passion since the beginning. But I also Need The Community to Support me Back to be able to continue doing this work.
STEP 10
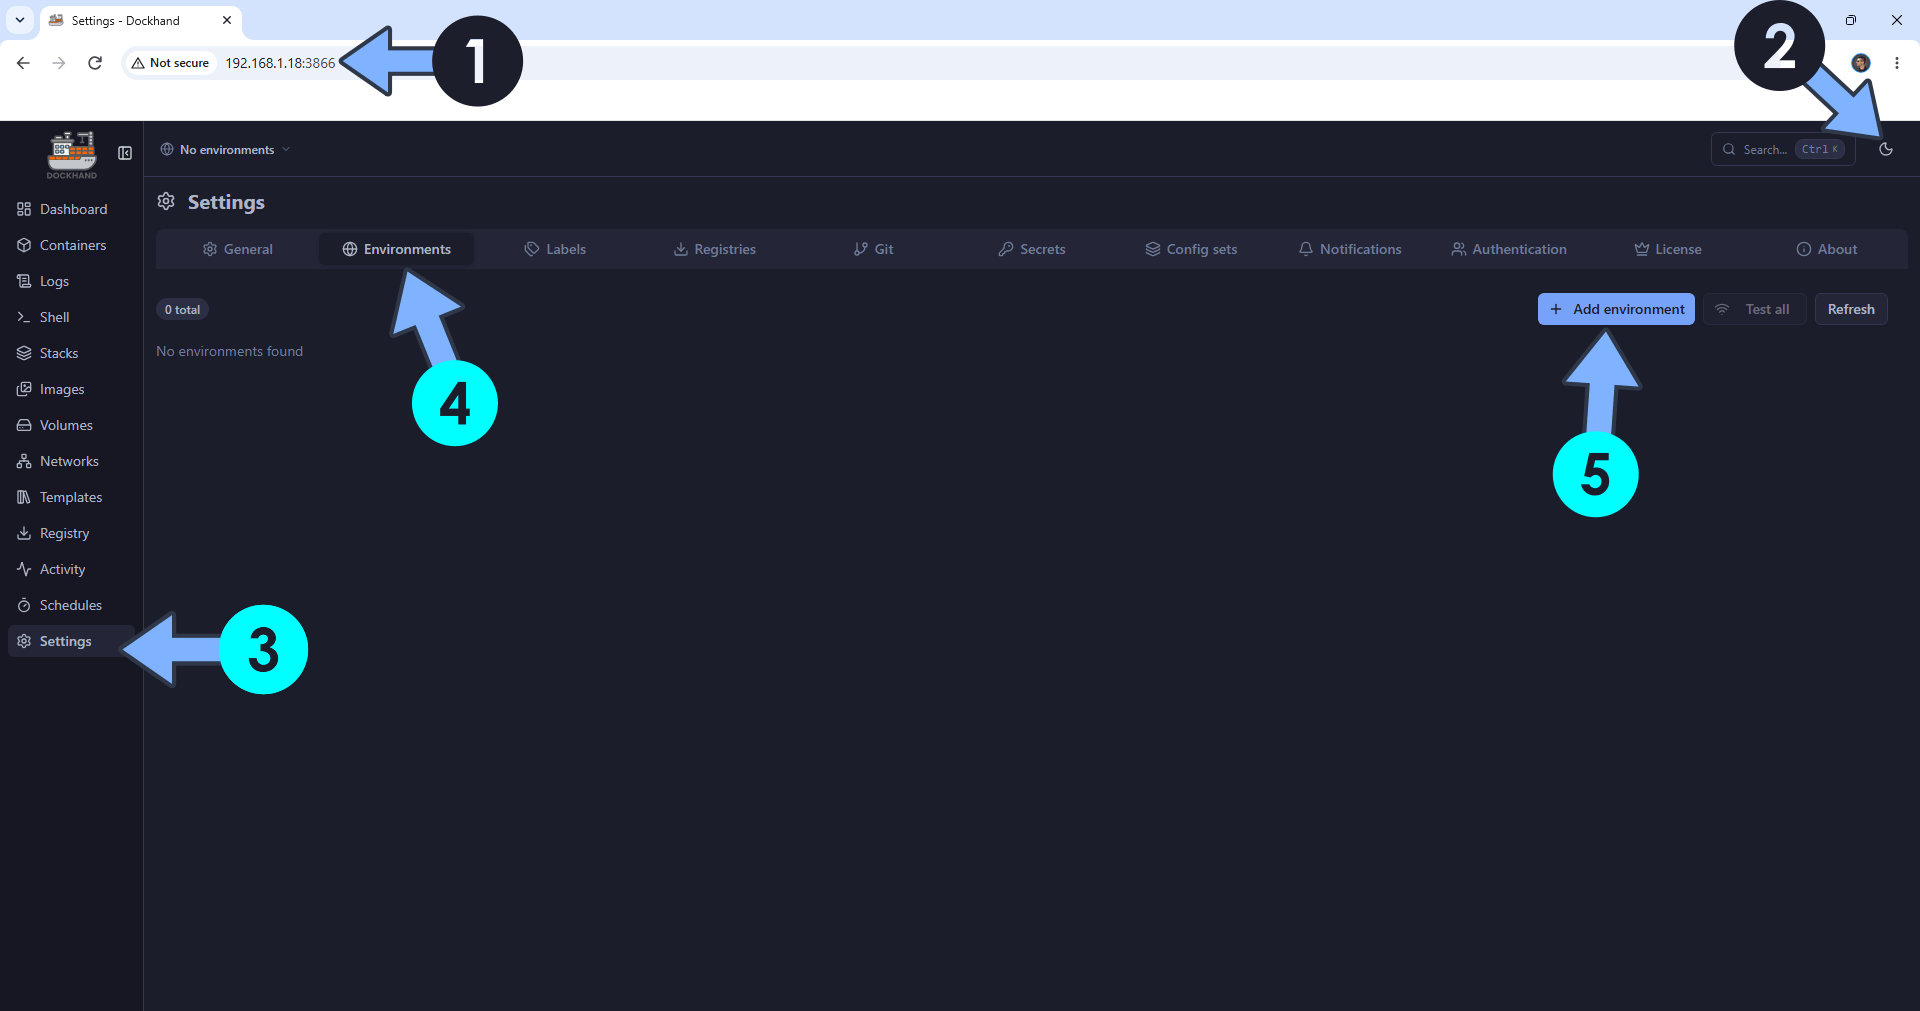
The installation process can take up to a few seconds/minutes. It will depend on your Internet speed connection. Open your browser and type in http://ugreen-ip-address:3866 At the top right of the page, switch the theme to Dark. On the left sidebar, click Settings. Select the Environments tab, then click +Add environment. Follow the instructions in the image below.
STEP 11
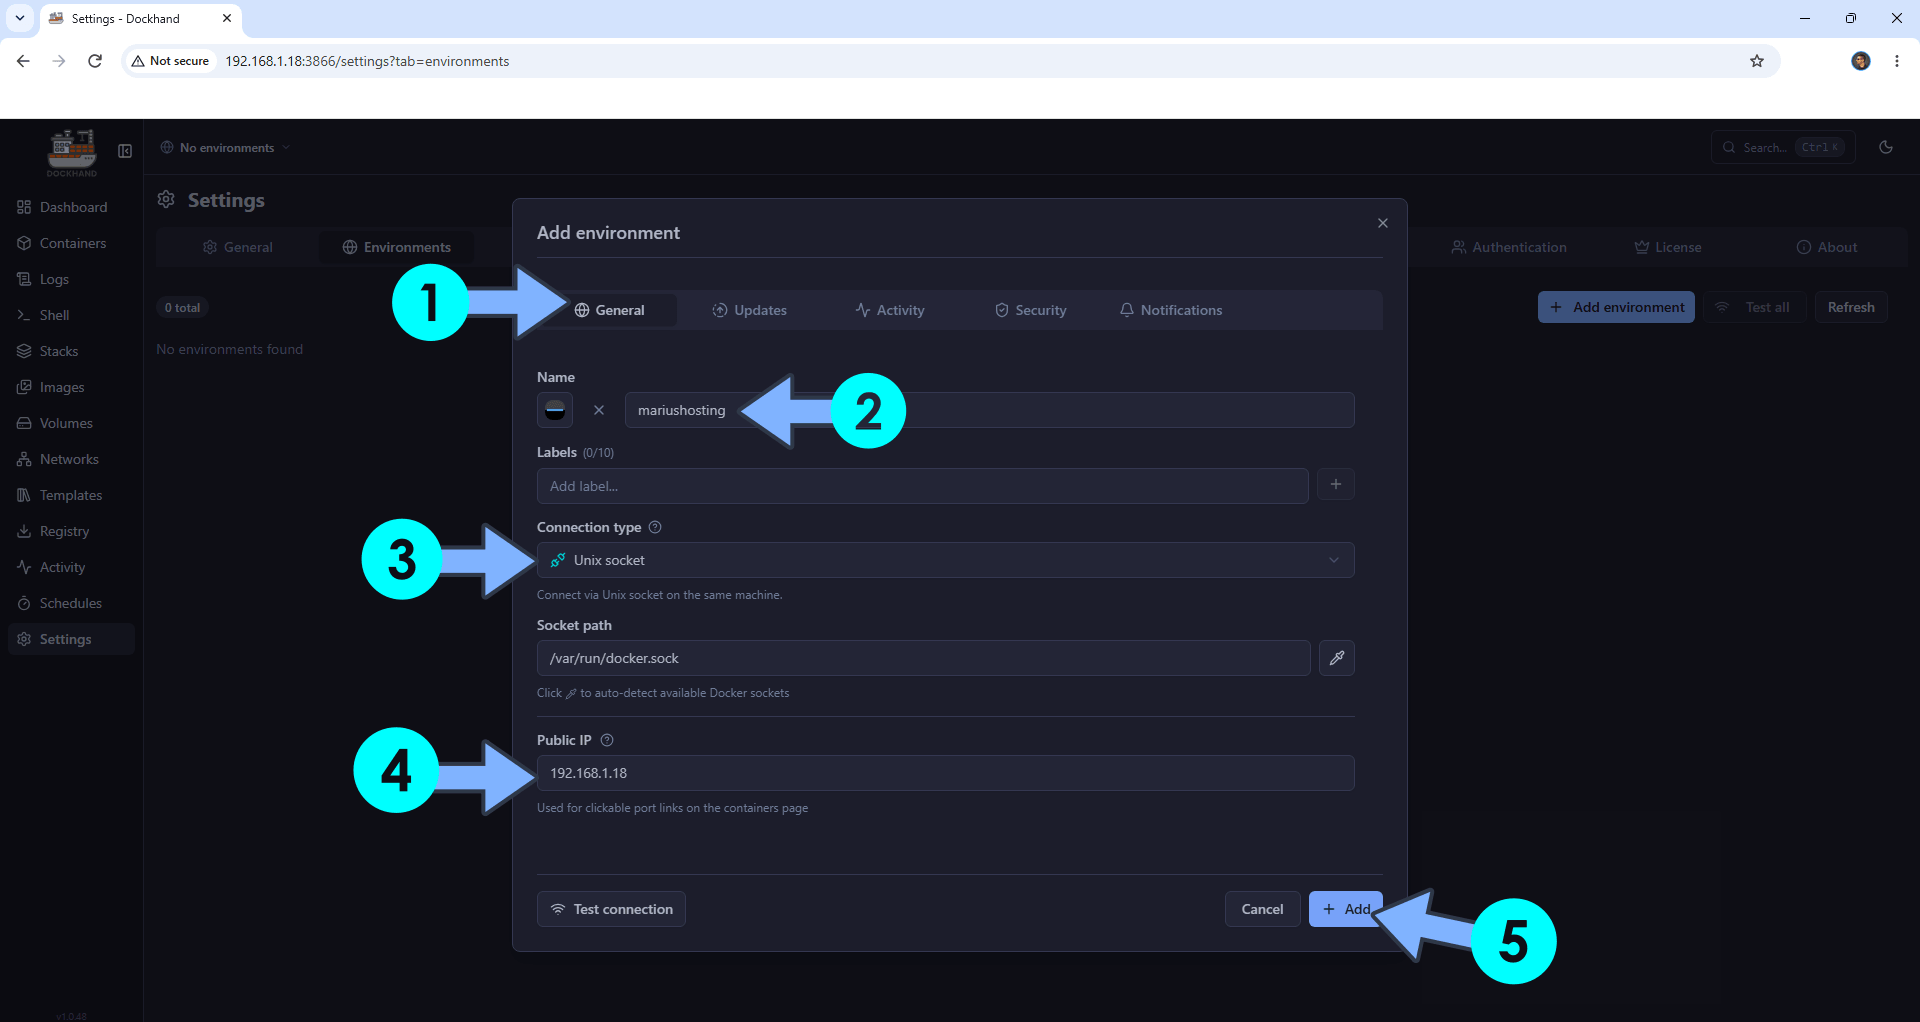
A new pop up window will open. Click the General tab. Type in the name of your server. From the dropdown menu, select Unix socket. Type in your local NAS IP in the Public IP field. Click + Add. Follow the instructions in the image below.
STEP 12
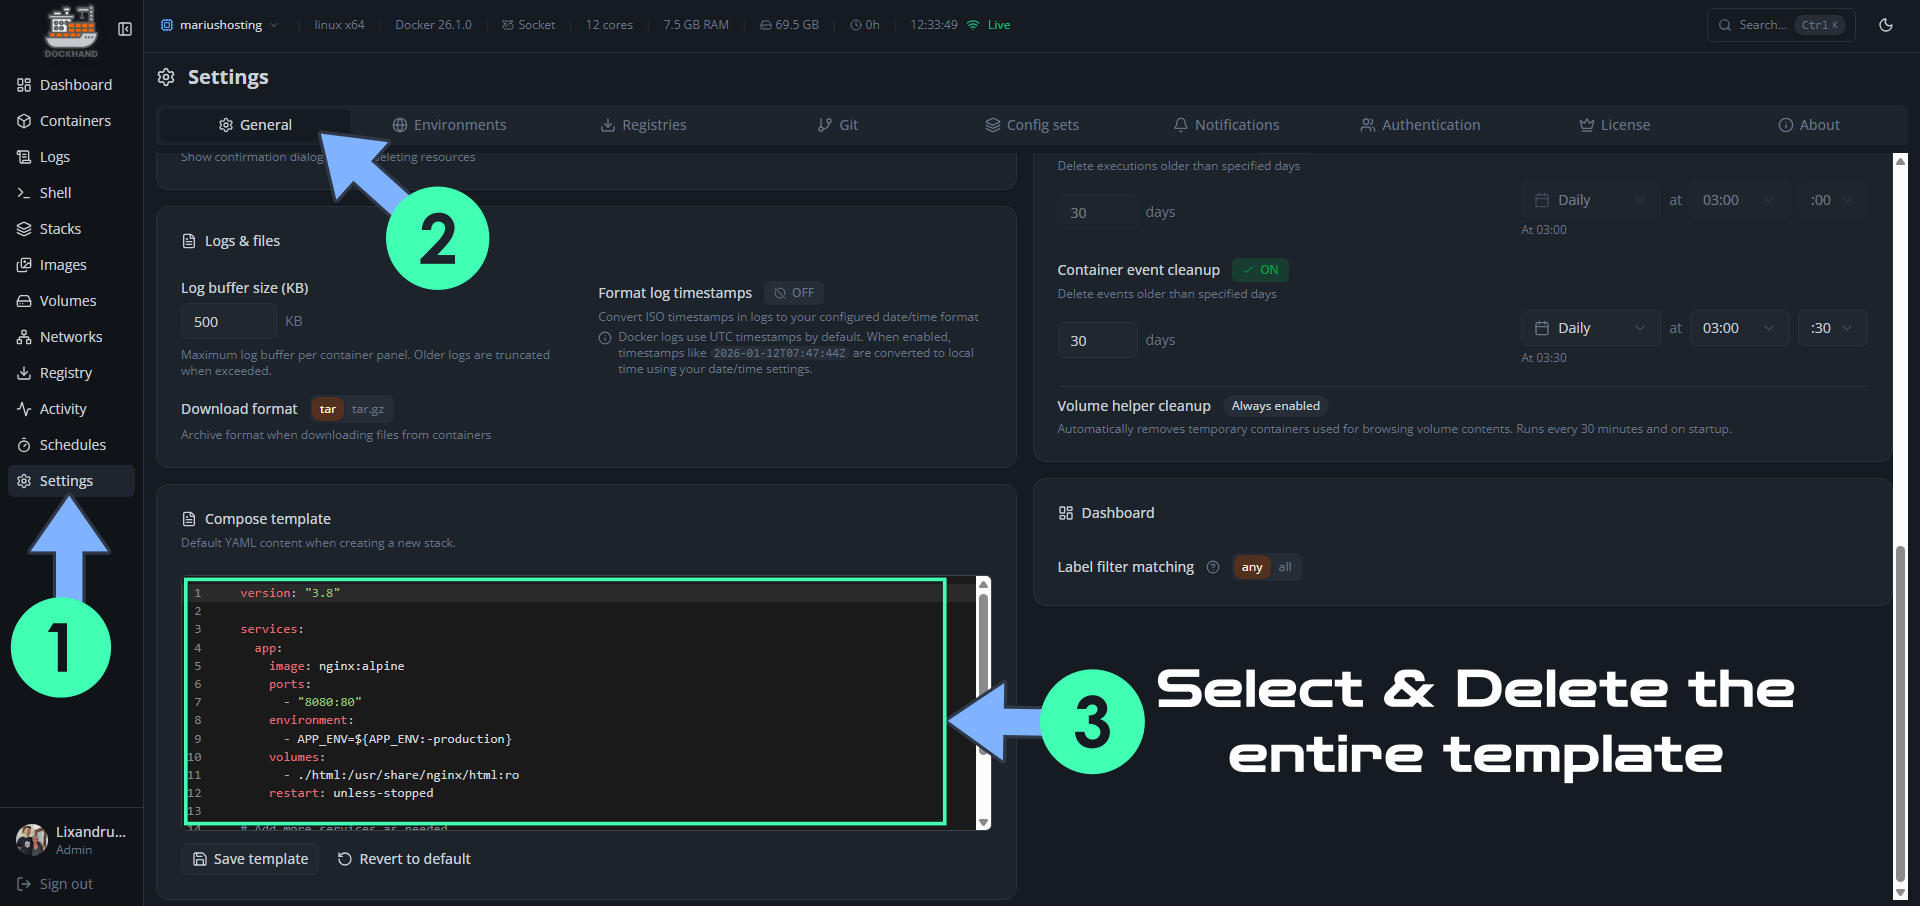
Remove the default nginx template for Stacks. On the left sidebar, click Settings. General Tab. Select & Delete the entire default template.
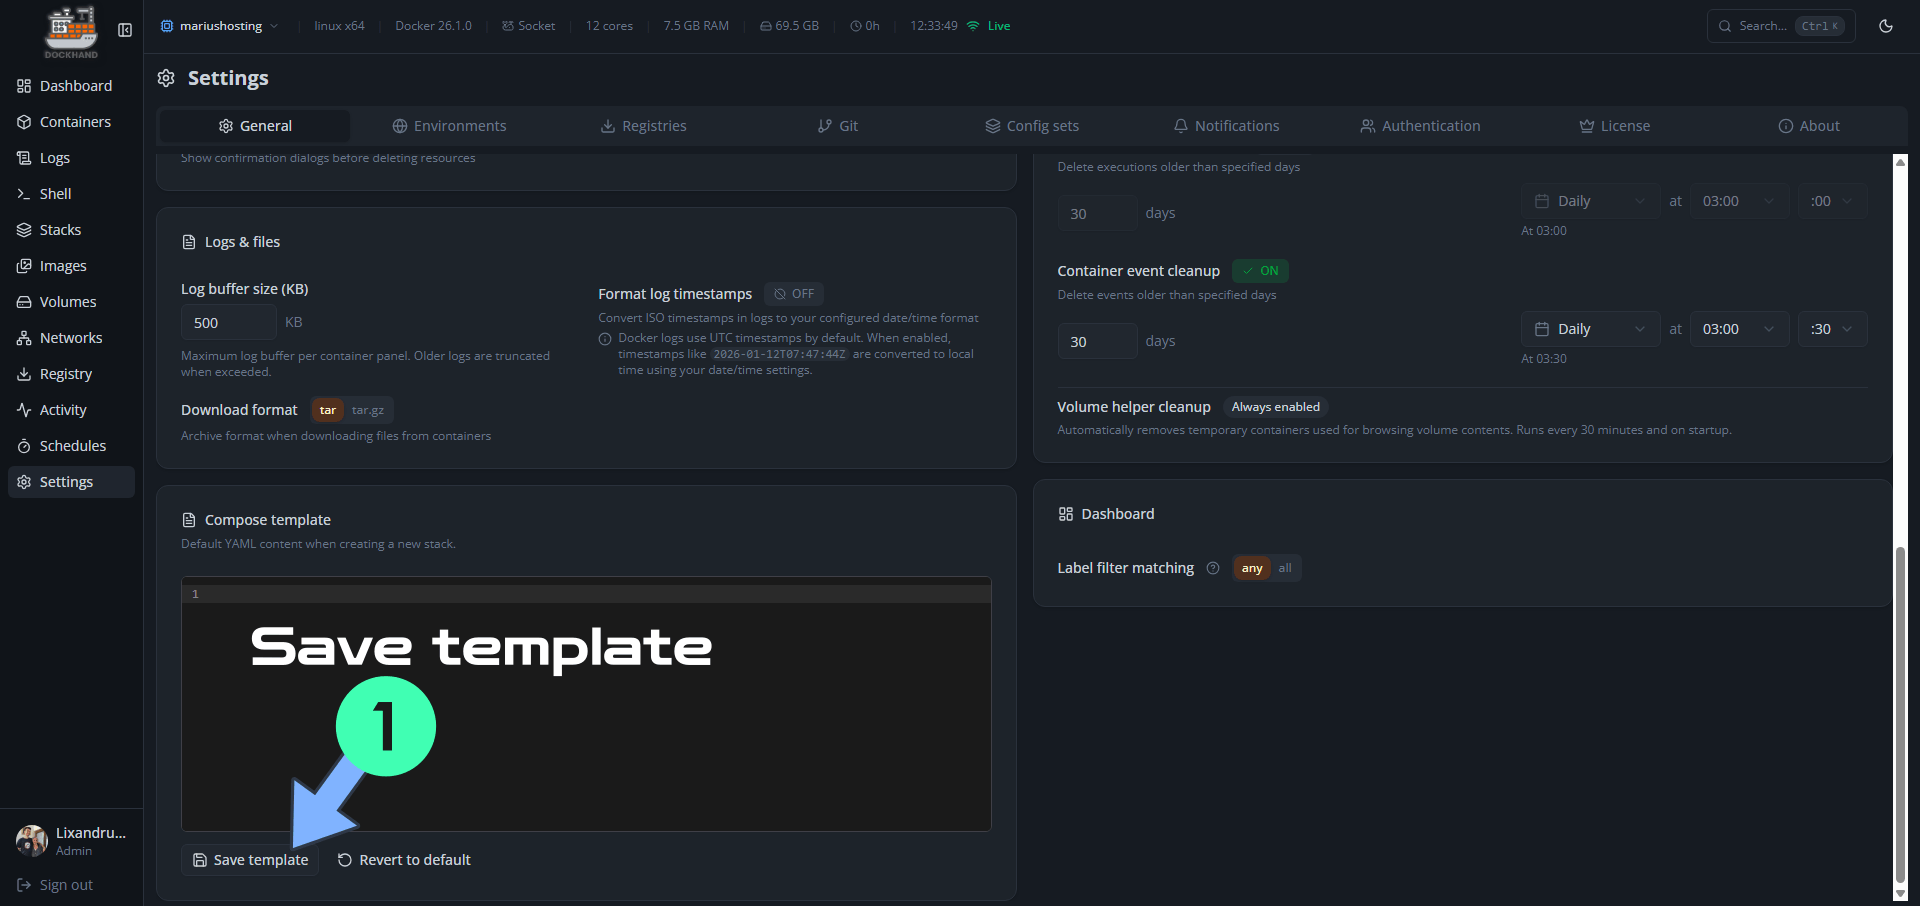
Click Save template. From now on, when you create a new stack, the default template will be empty, without distractions.
STEP 13
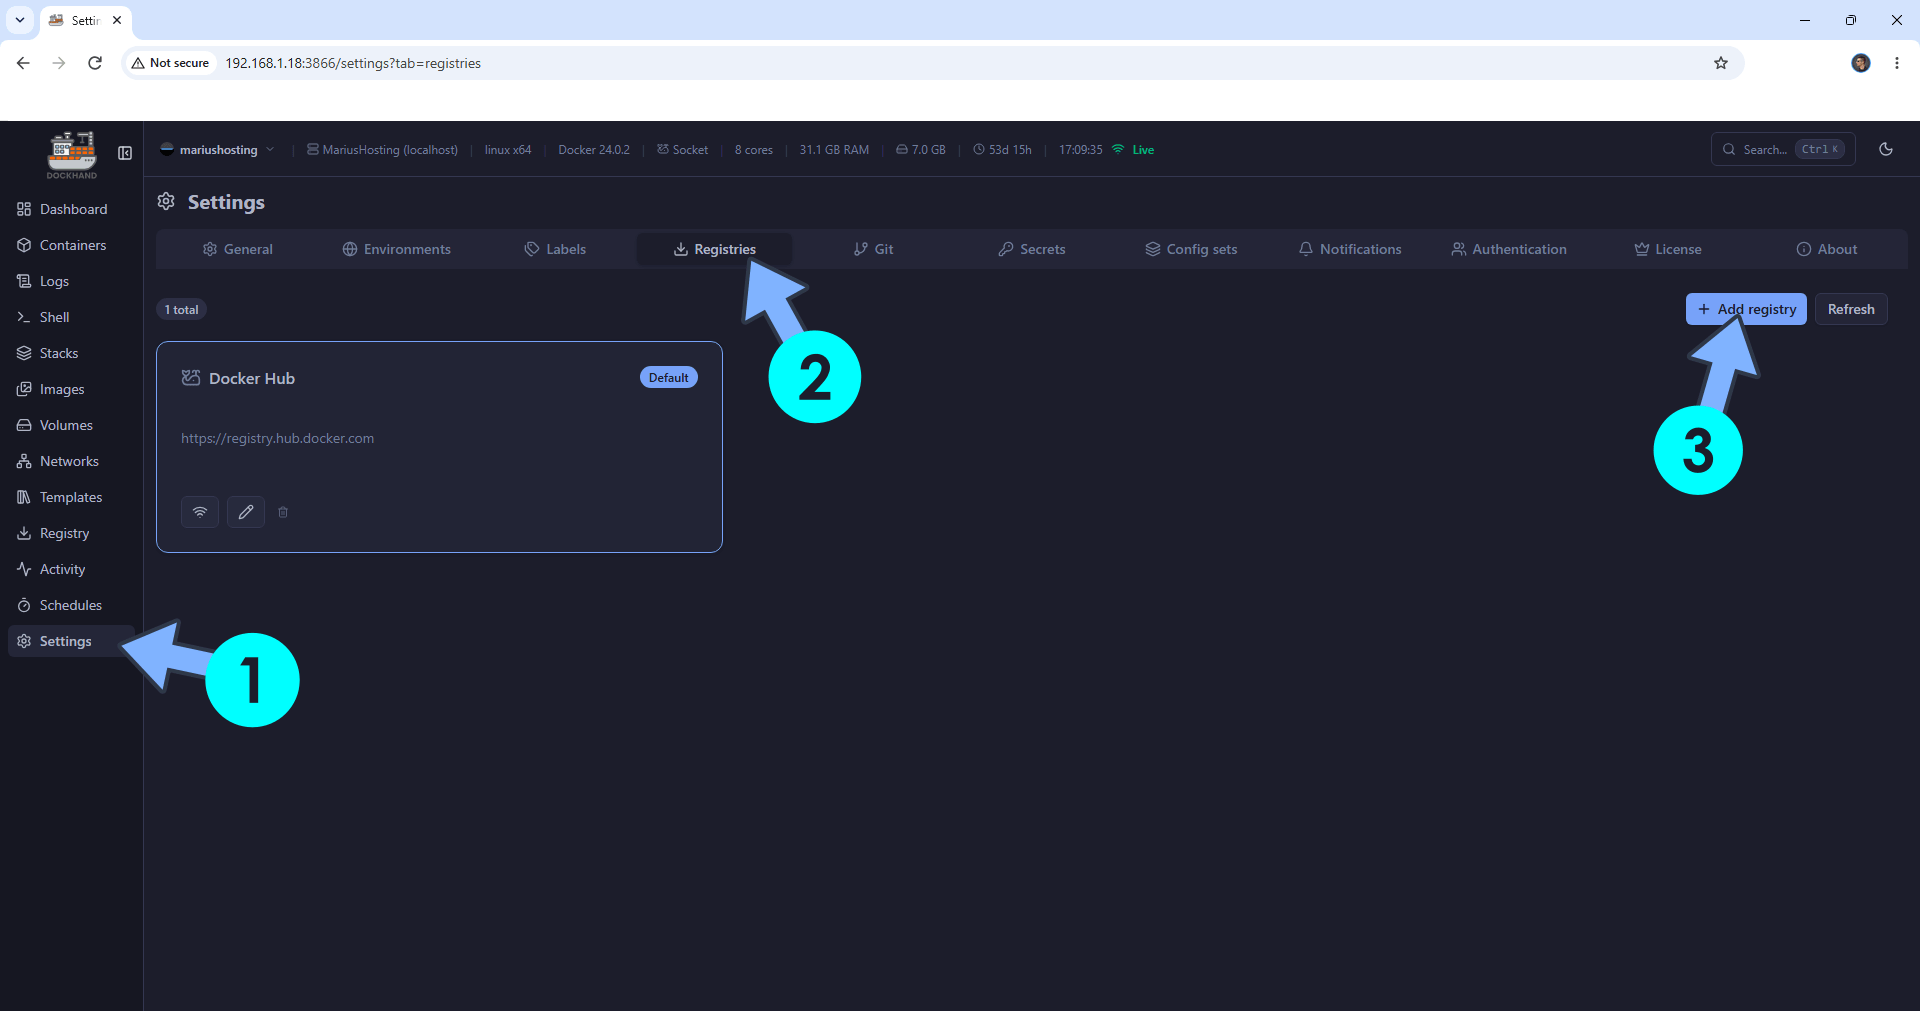
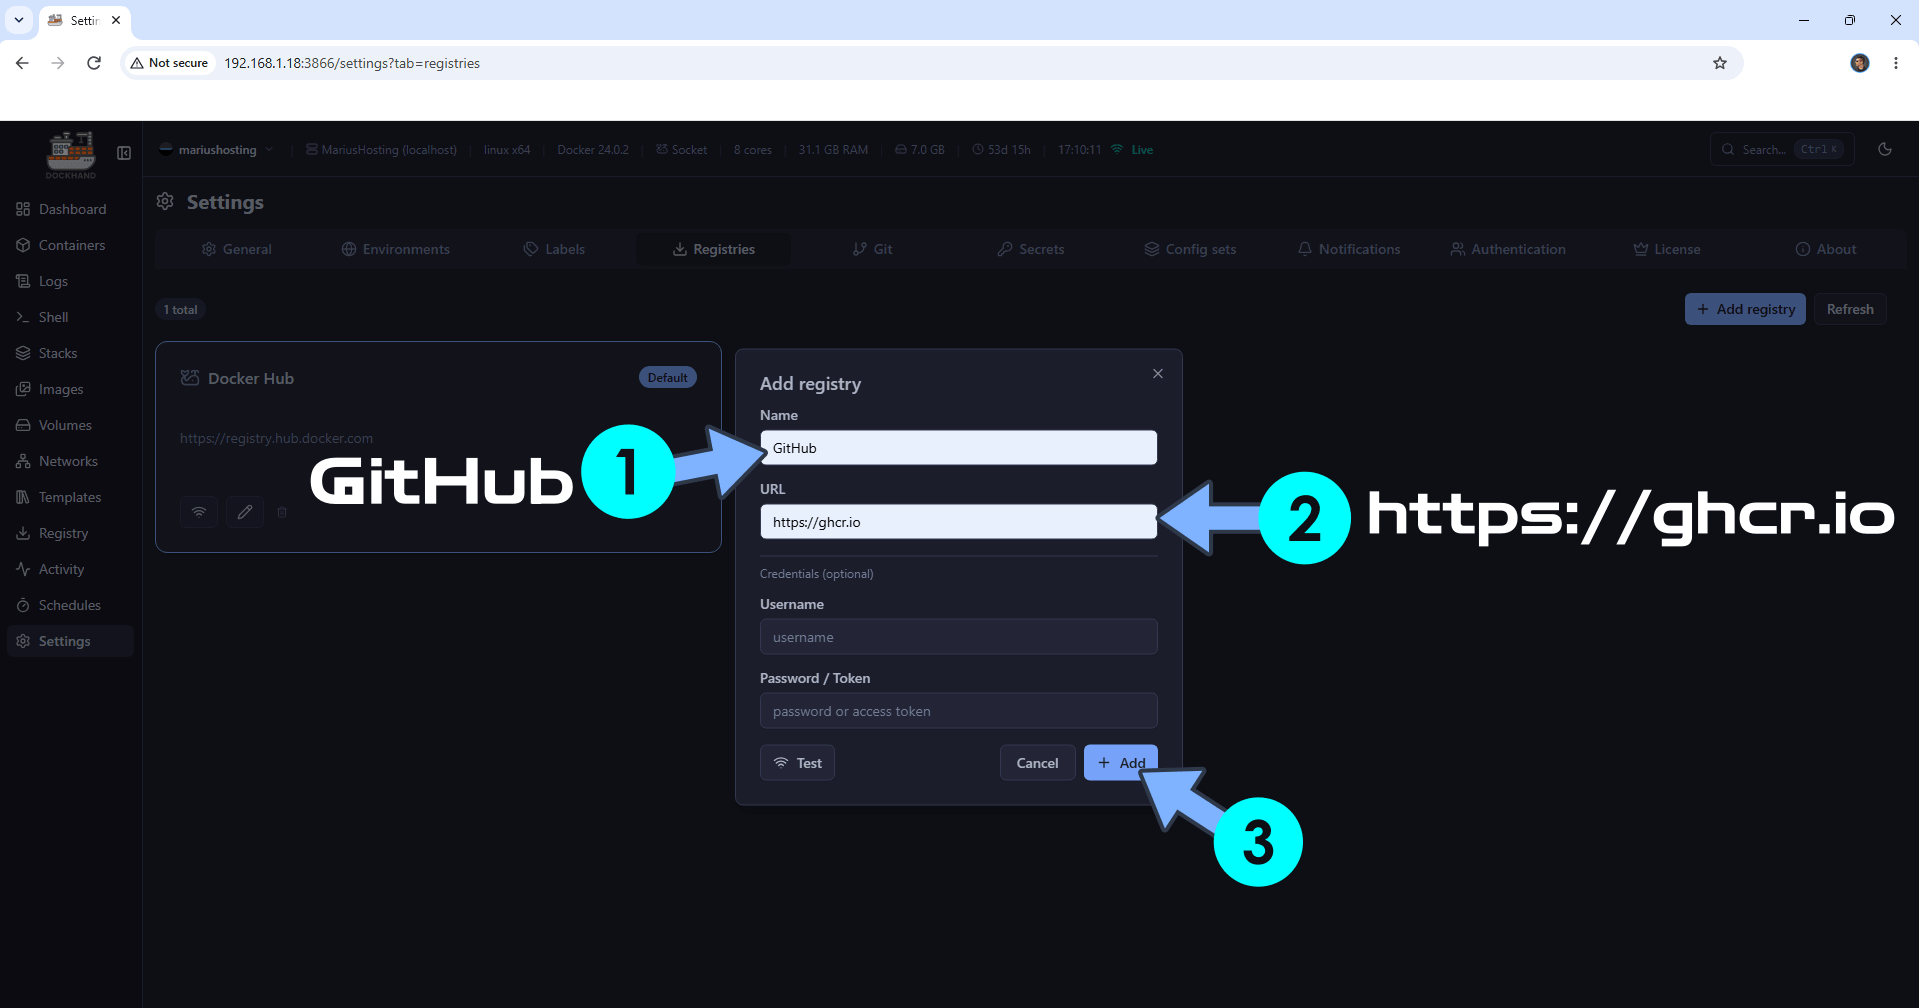
On the left sidebar, click Settings then the Registries tab. Click + Add registry. Follow the instructions in the image below.
STEP 14
Add the GitHub registry. In the Name field area, type in GitHub and, in the URL area, type in https://ghcr.io
Click + Add to save the settings. Follow the instructions in the image below.
Note: The ghcr.io registry is mandatory if you want to update Docker containers via Dockhand that are served via the GitHub registry.
STEP 15
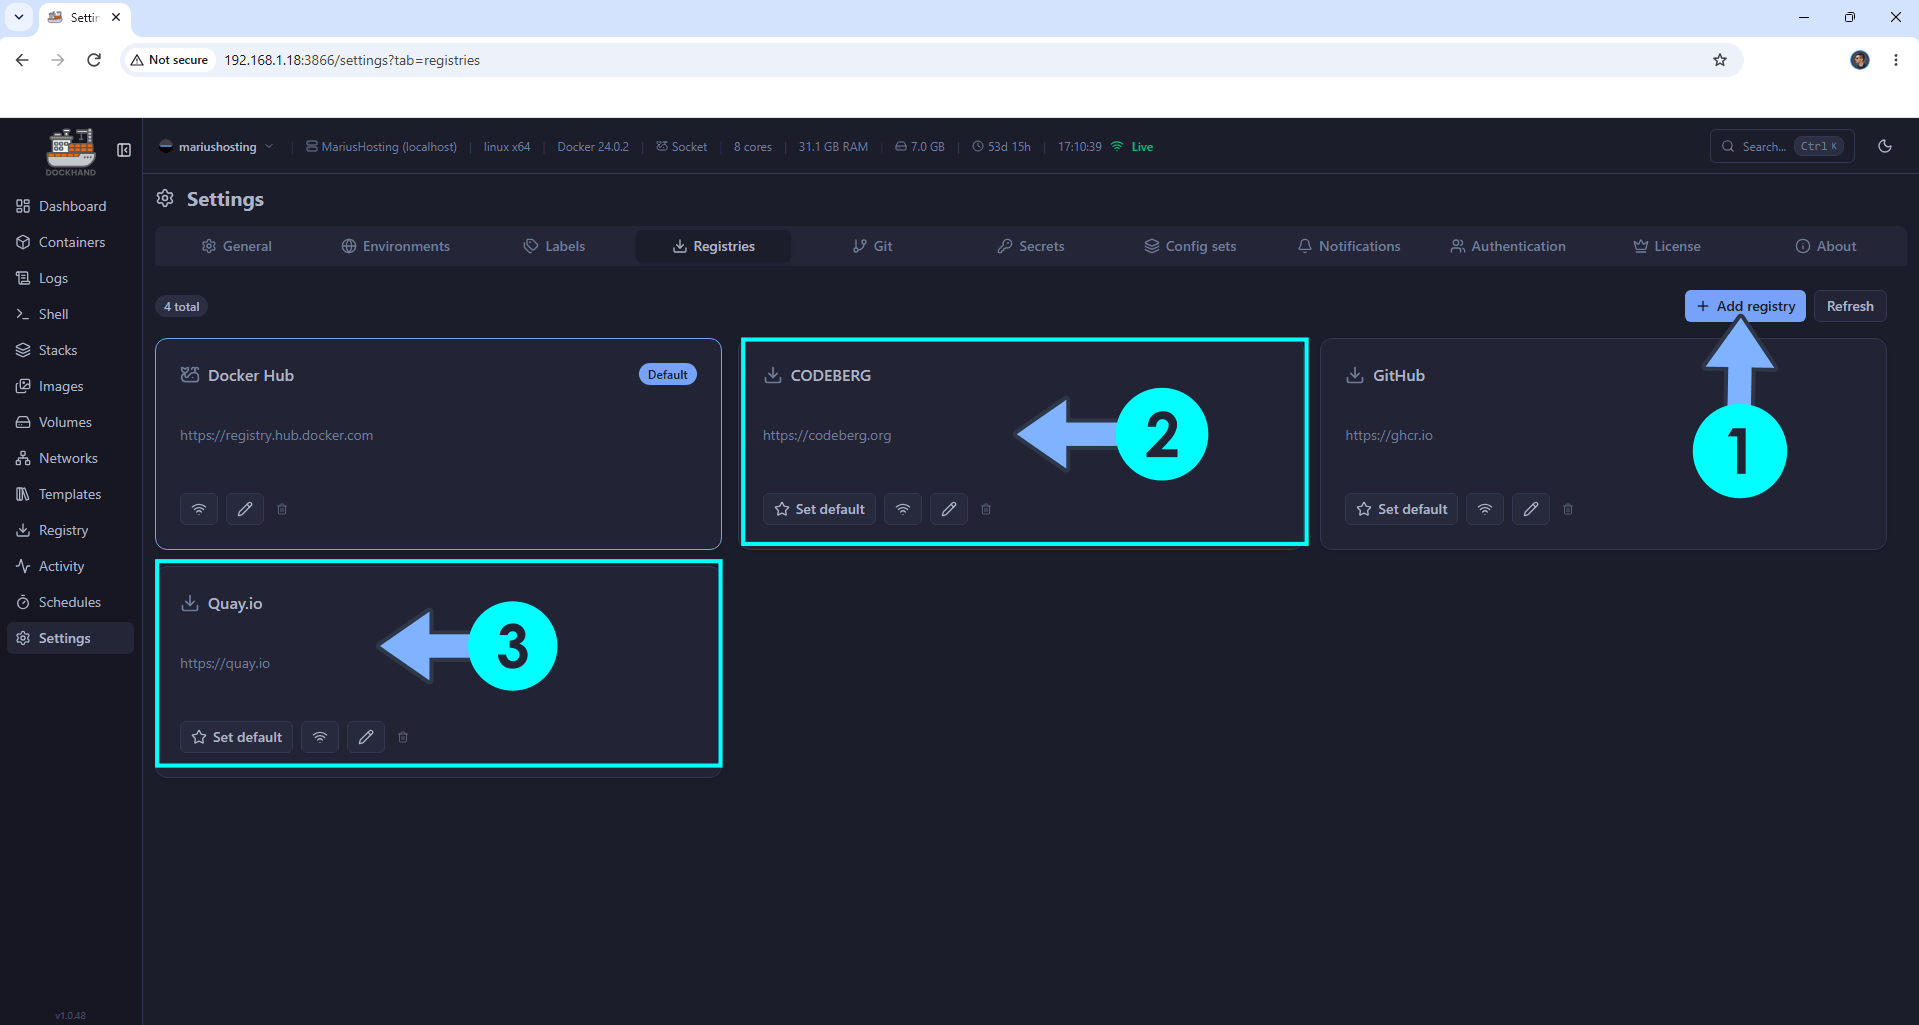
Do the same operation as per the instructions at STEP 14 for the CODEBERG and Quay.io registry.
Add the CODEBERG registry. In the Name field area, type in CODEBERG and, in the URL area, type in https://codeberg.org
Click + Add to save the settings. Follow the instructions in the image below.
Note: The codeberg.org registry is mandatory if you want to update Docker containers via Dockhand that are served via the codeberg registry.
Add the Quay.io registry. In the Name field area, type in Quay.io and, in the URL area, type in https://quay.io
Click + Add to save the settings. Follow the instructions in the image below.
Note: The Quay.io registry is mandatory if you want to update Docker containers via Dockhand that are served via the Quay.io registry.
STEP 16
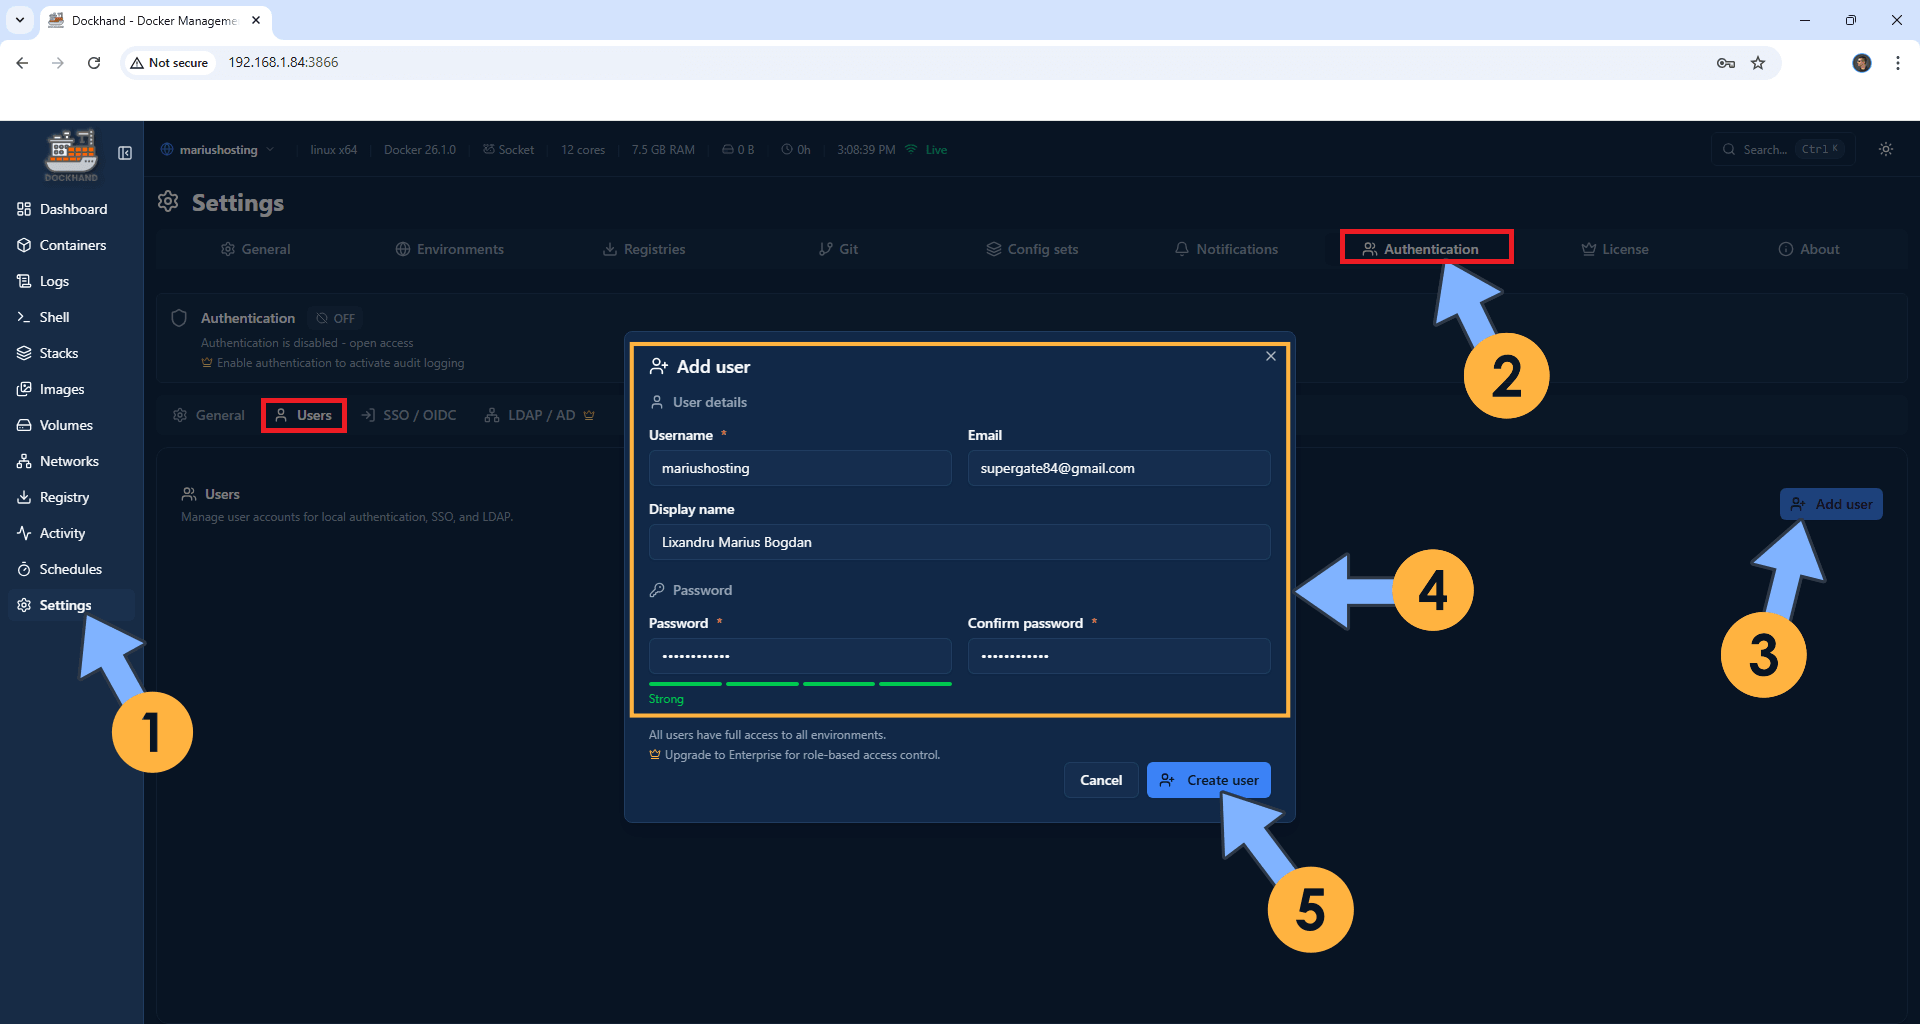
Add Authentication to your Dockhand container. On the left sidebar, click Settings. Click the Authentication tab. Click Users tab. Click the Add user button. Type in your own details which include Username and Password. Click Create user. Follow the instructions in the image below.
STEP 17
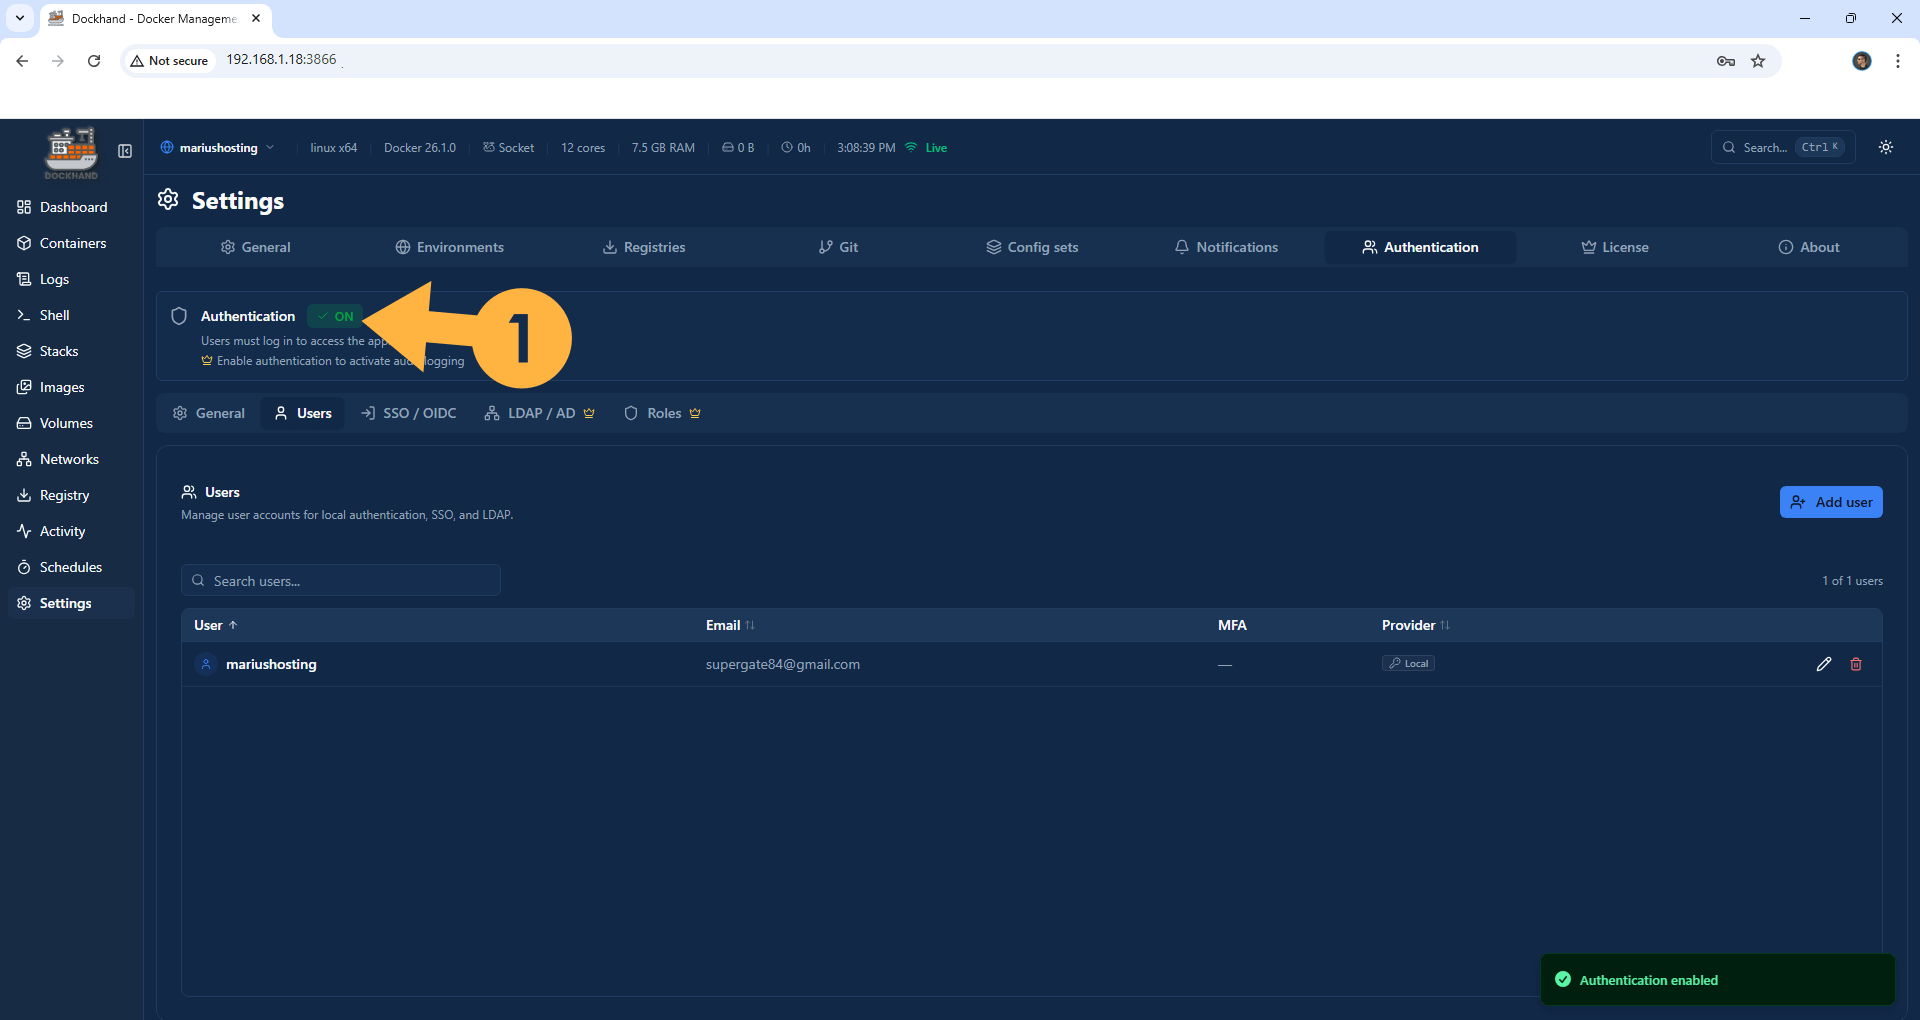
Switch the Authentication button from OFF to ON. Follow the instructions in the image below.
STEP 18
Type in your own Username and Password to access your Dockhand instance that you have previously created at STEP 16. Click Sign in. Follow the instructions in the image below.
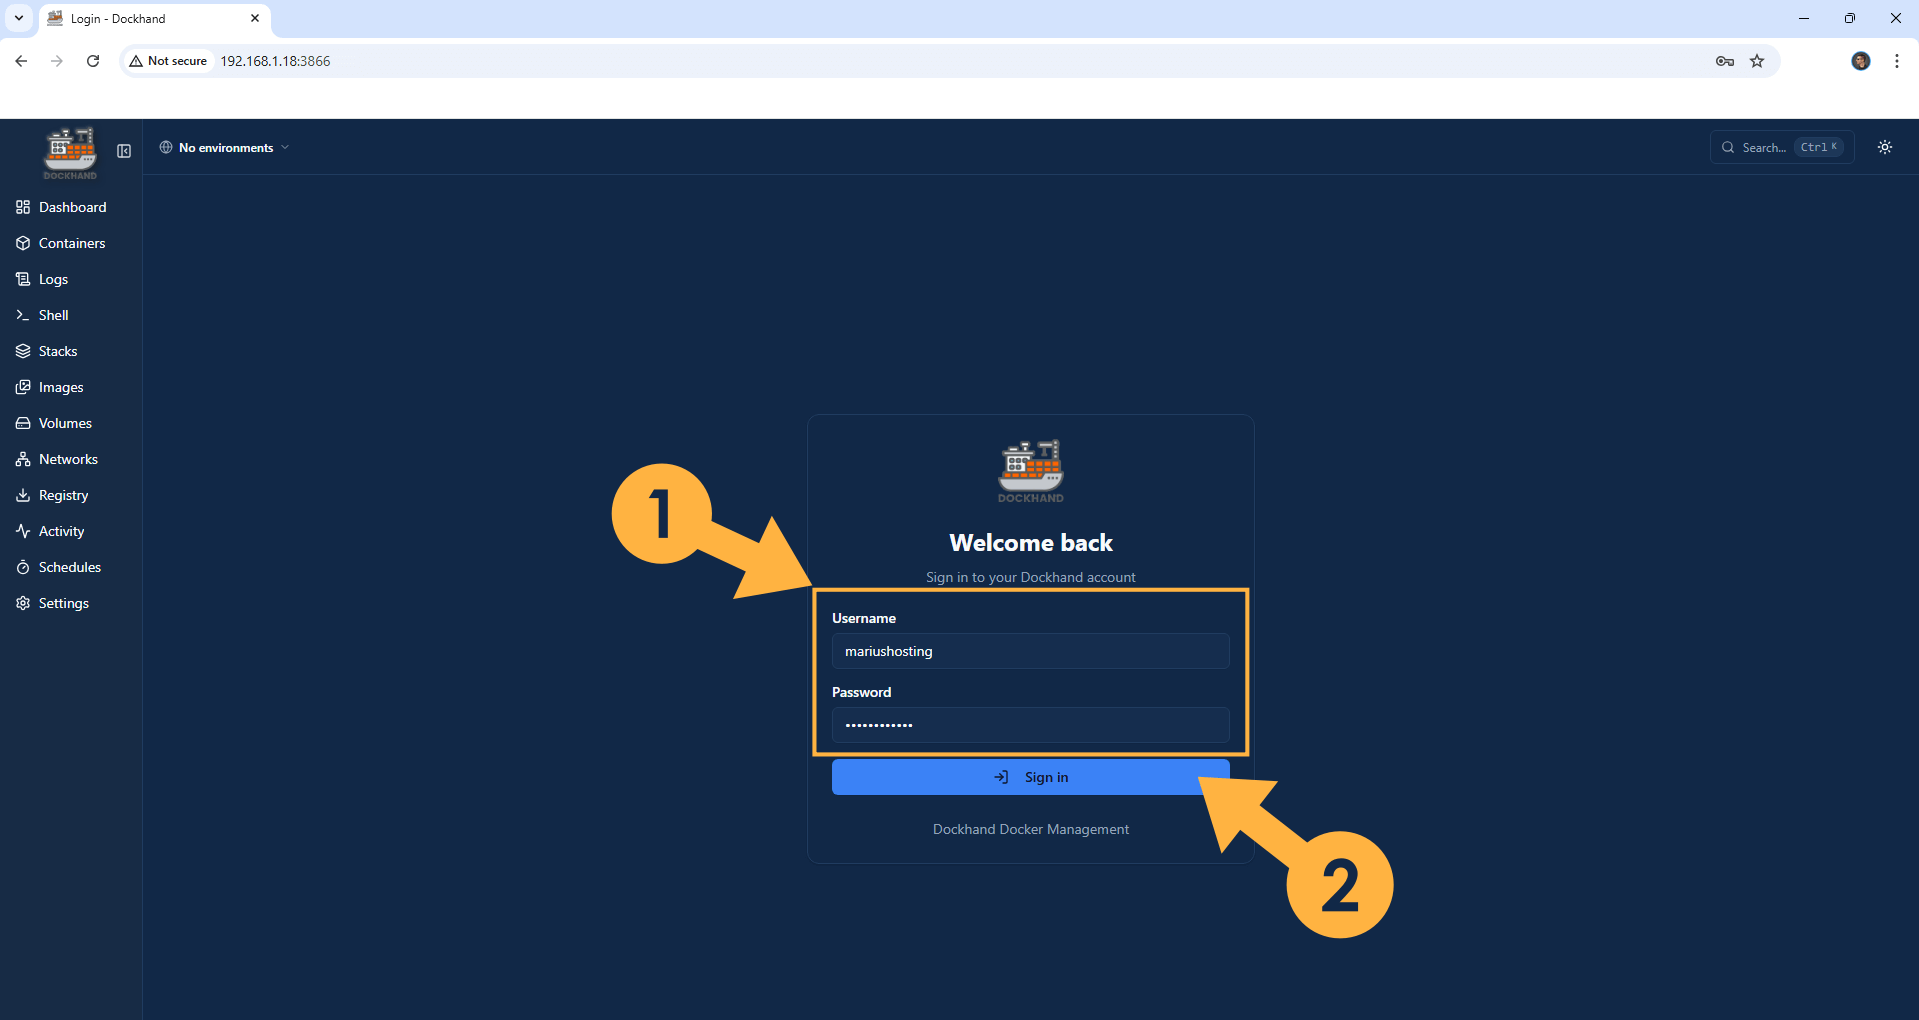
STEP 19
From now on, you can also upload your own Administrator avatar. Follow the instructions in the image below.
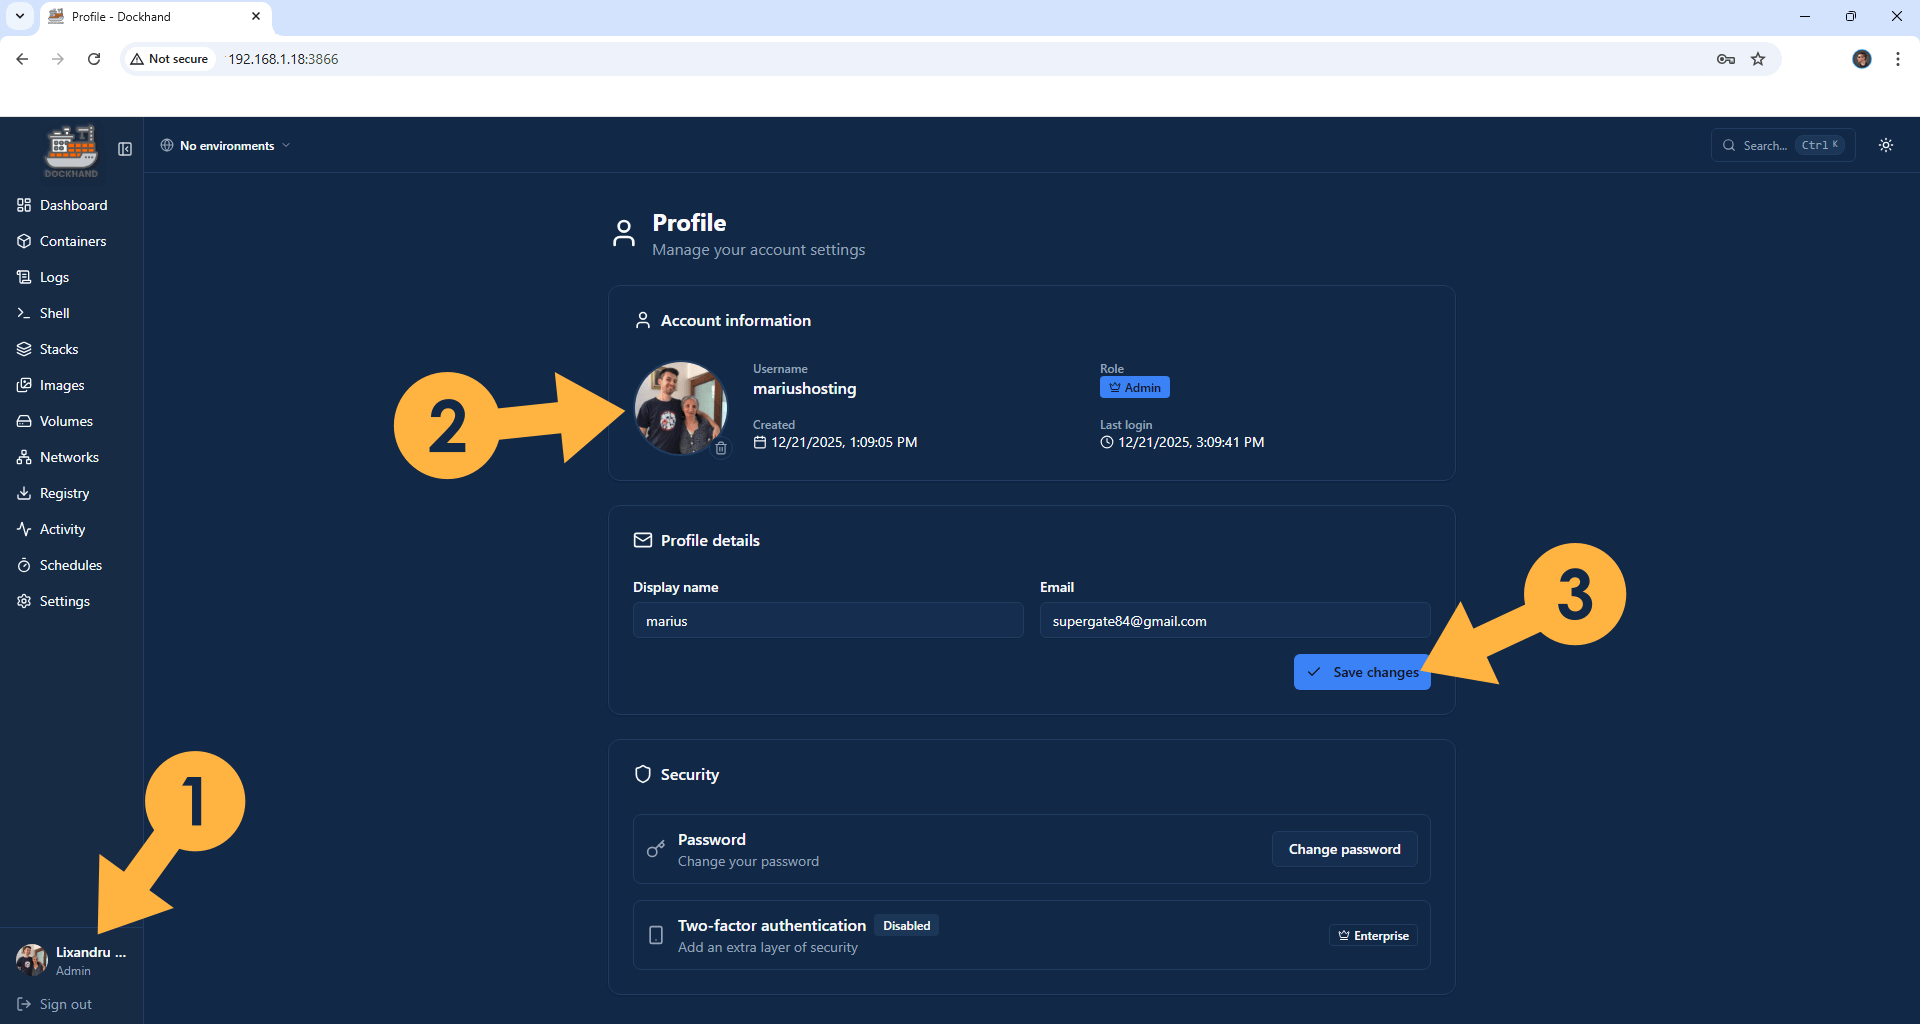
STEP 20
On the left sidebar, click Stacks then + Create. From now on you can add a Docker Compose. Follow the instructions in the image below.
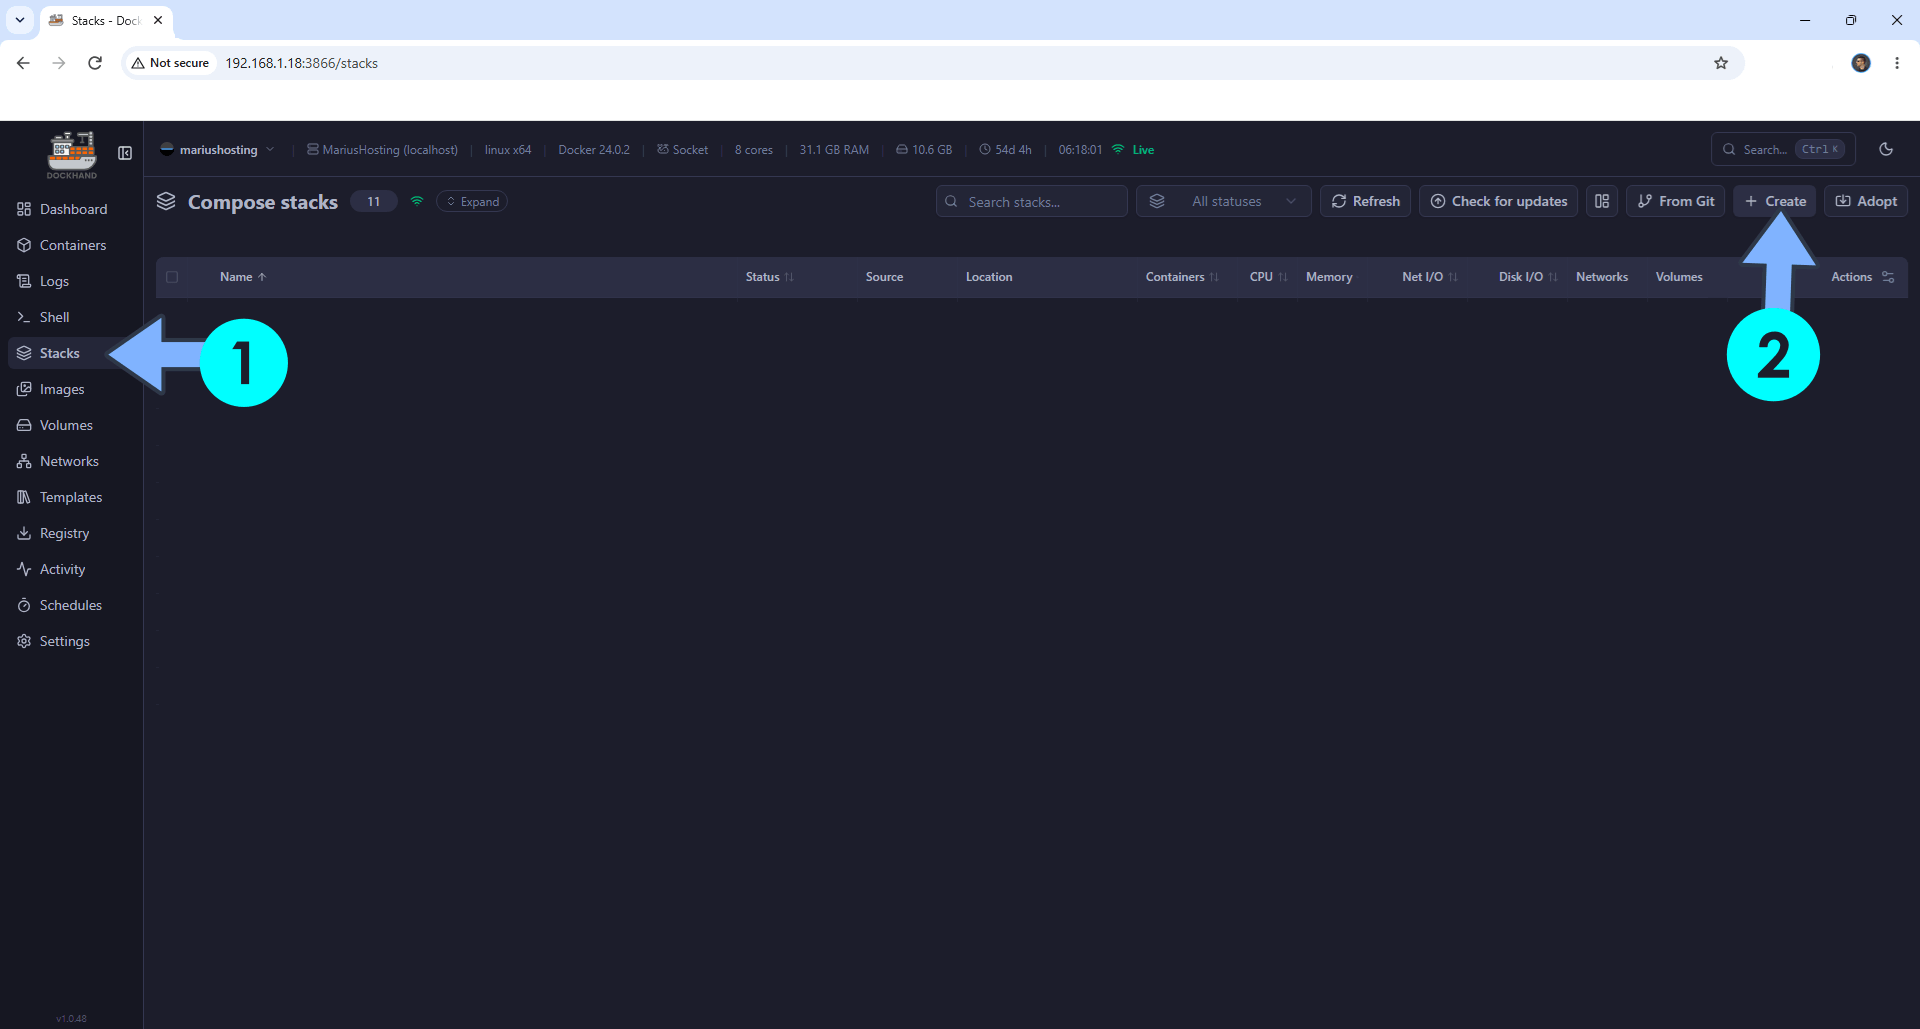
STEP 21
Step by step guide on how to Set up Email Notifications on Dockhand.
STEP 22
Follow the instructions on how to update your Dockhand instance to the latest version.
STEP 23
On the left sidebar, click Settings. Click the General Tab. Scroll down the page until you see the Scheduling option. Add your own Timezone. Follow the instructions in the image below.
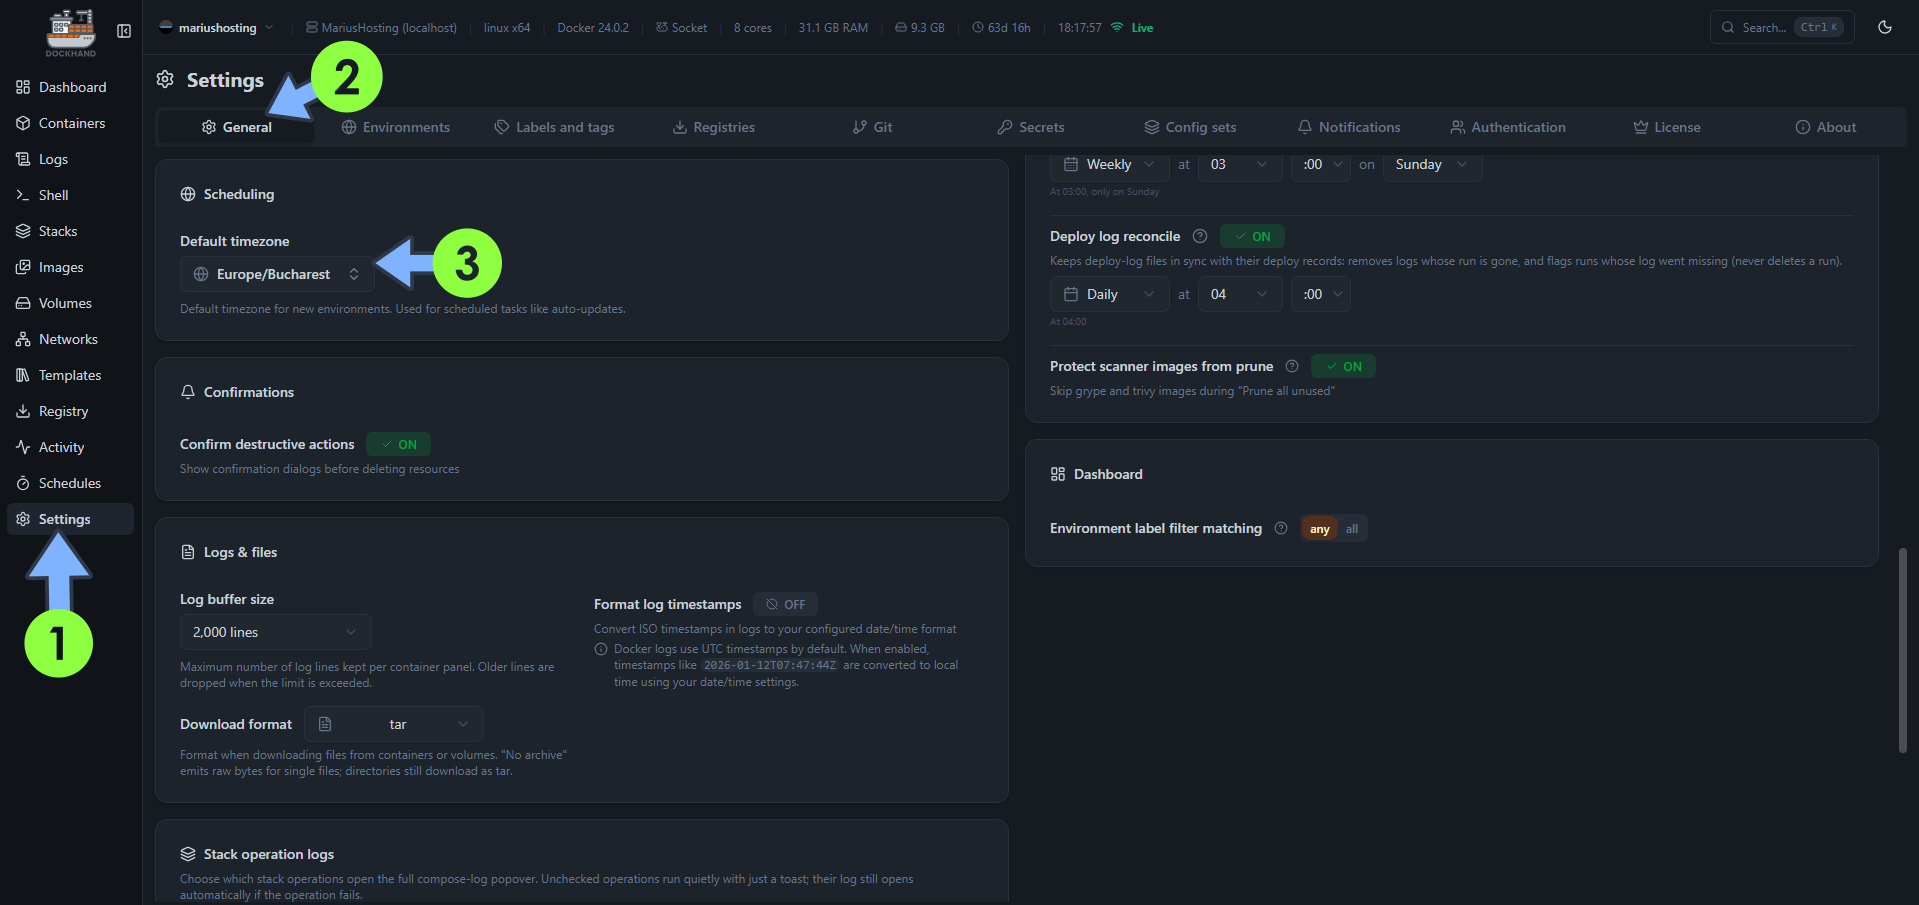
STEP 24
Follow the instructions on how to schedule automatic container updates in Dockhand.
STEP 25
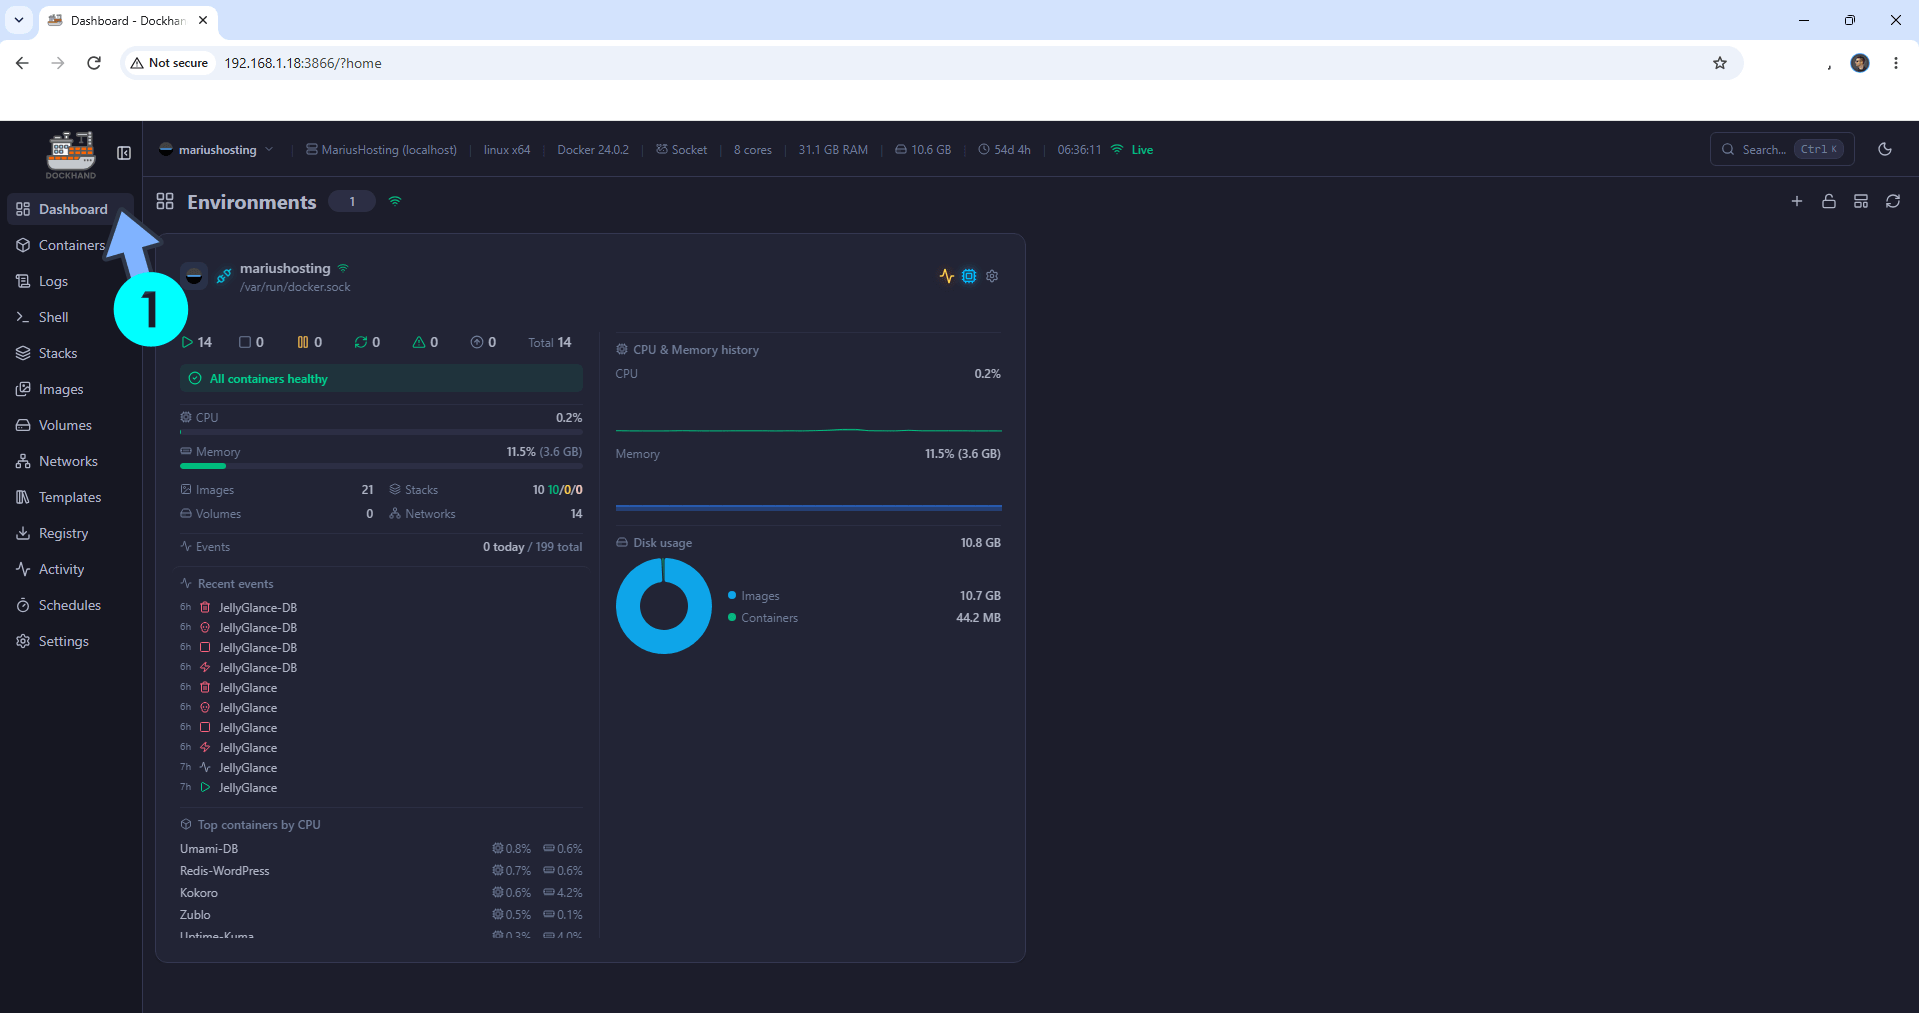
Your Dockhand Dashboard at a glance!
✏️Instructions to use Dockhand
STEP A
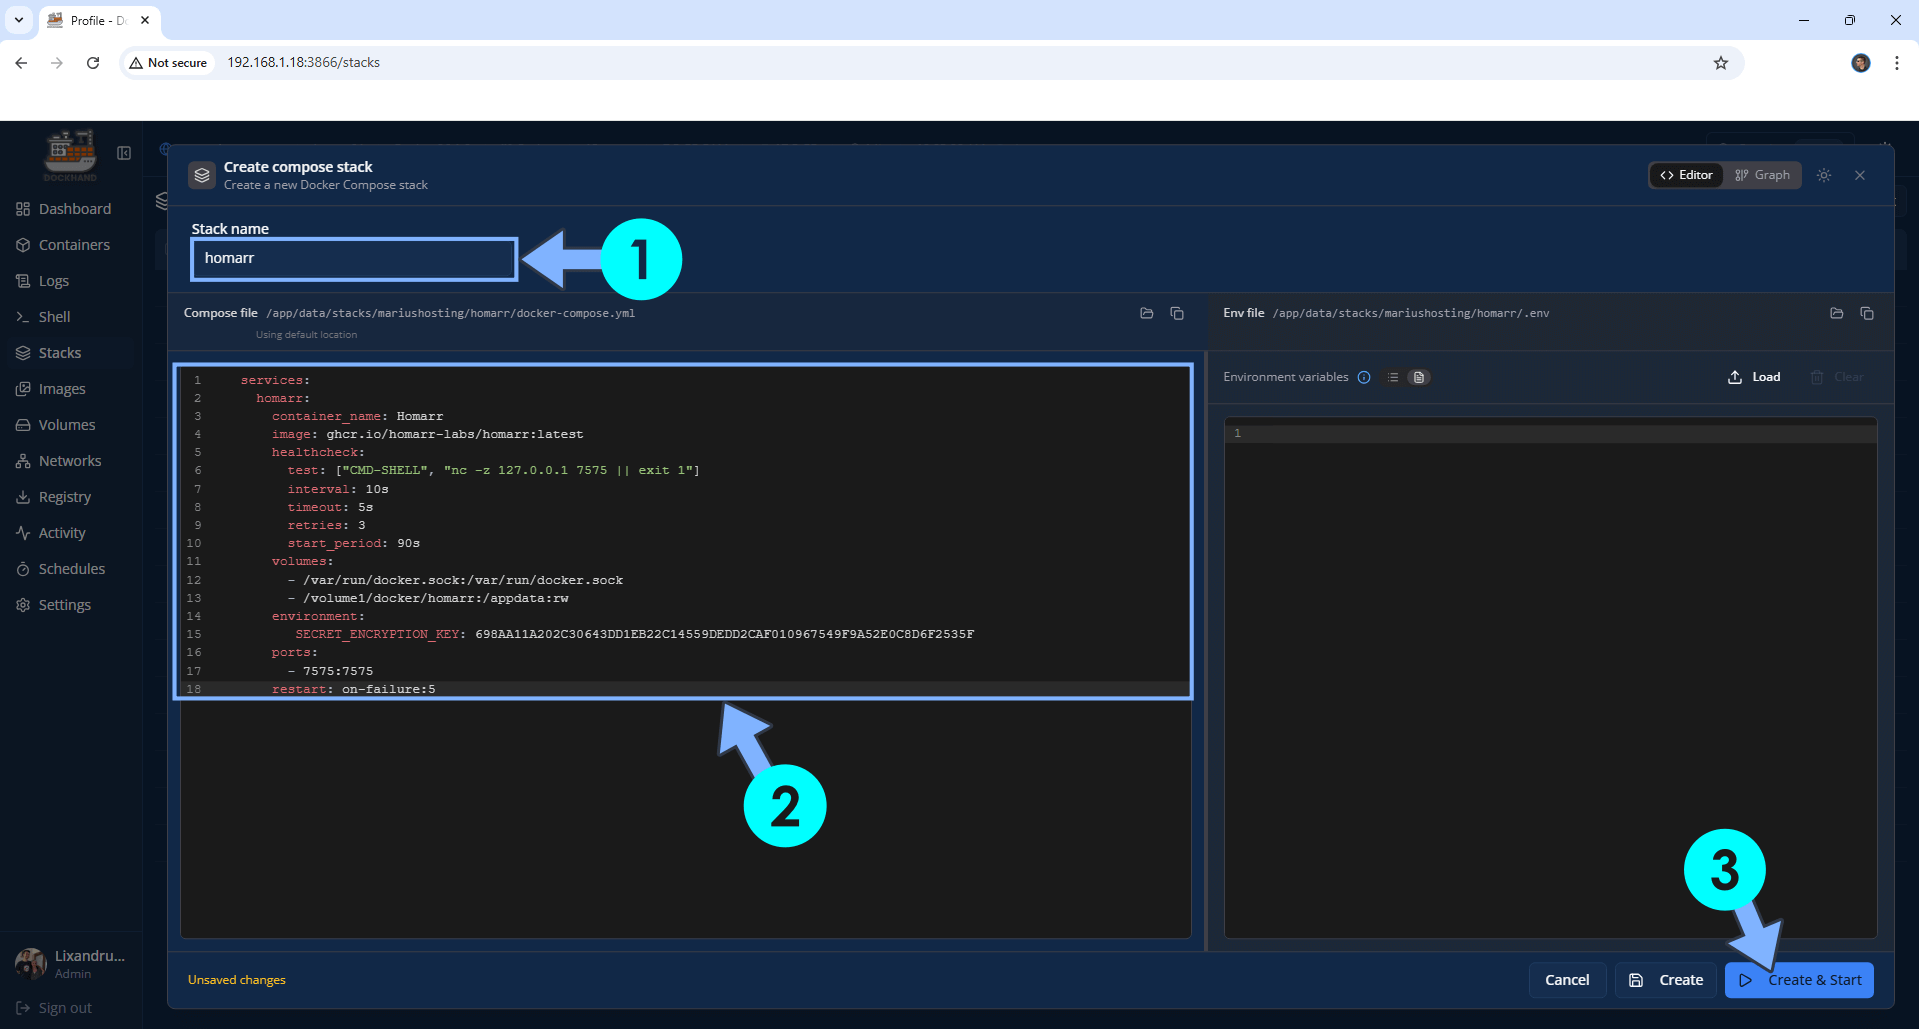
For example, I will copy and paste my docker compose stack for homarr from Portainer in the Compose file area. Follow the instructions in the image below. After creating the respective folder (STEP B) for your own Docker compose Stack, click the Create & Start button. Follow the instructions in the image below.
STEP B
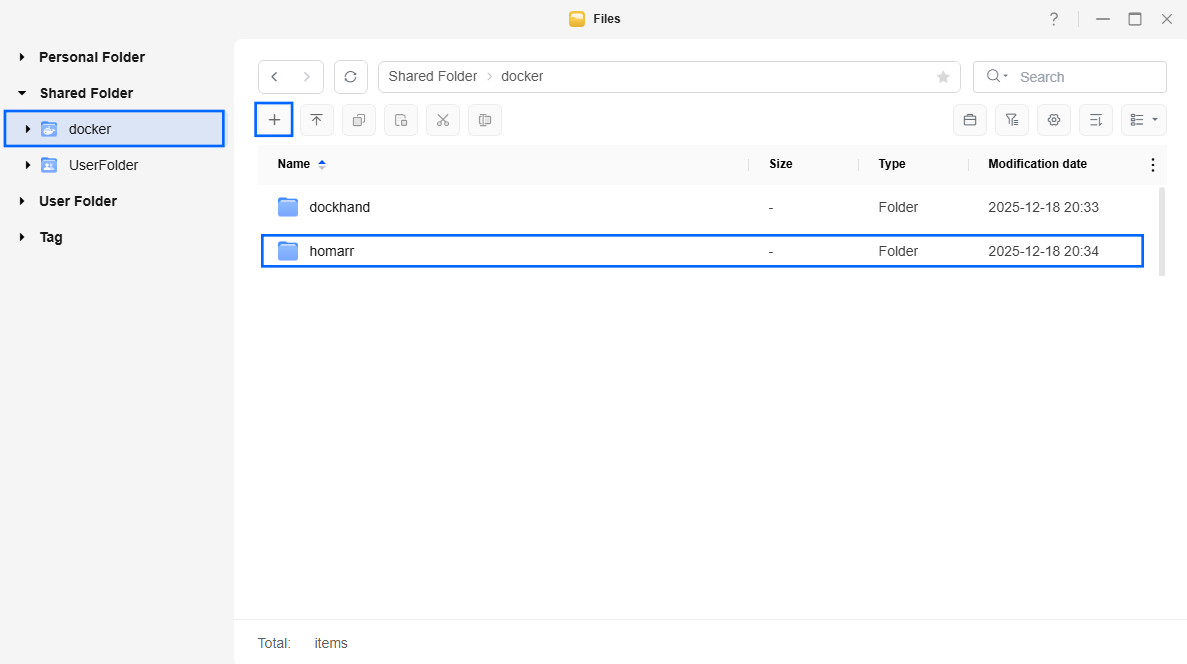
In my example, I create my homarr folder name in Files. Follow the instructions in the image below.
STEP C
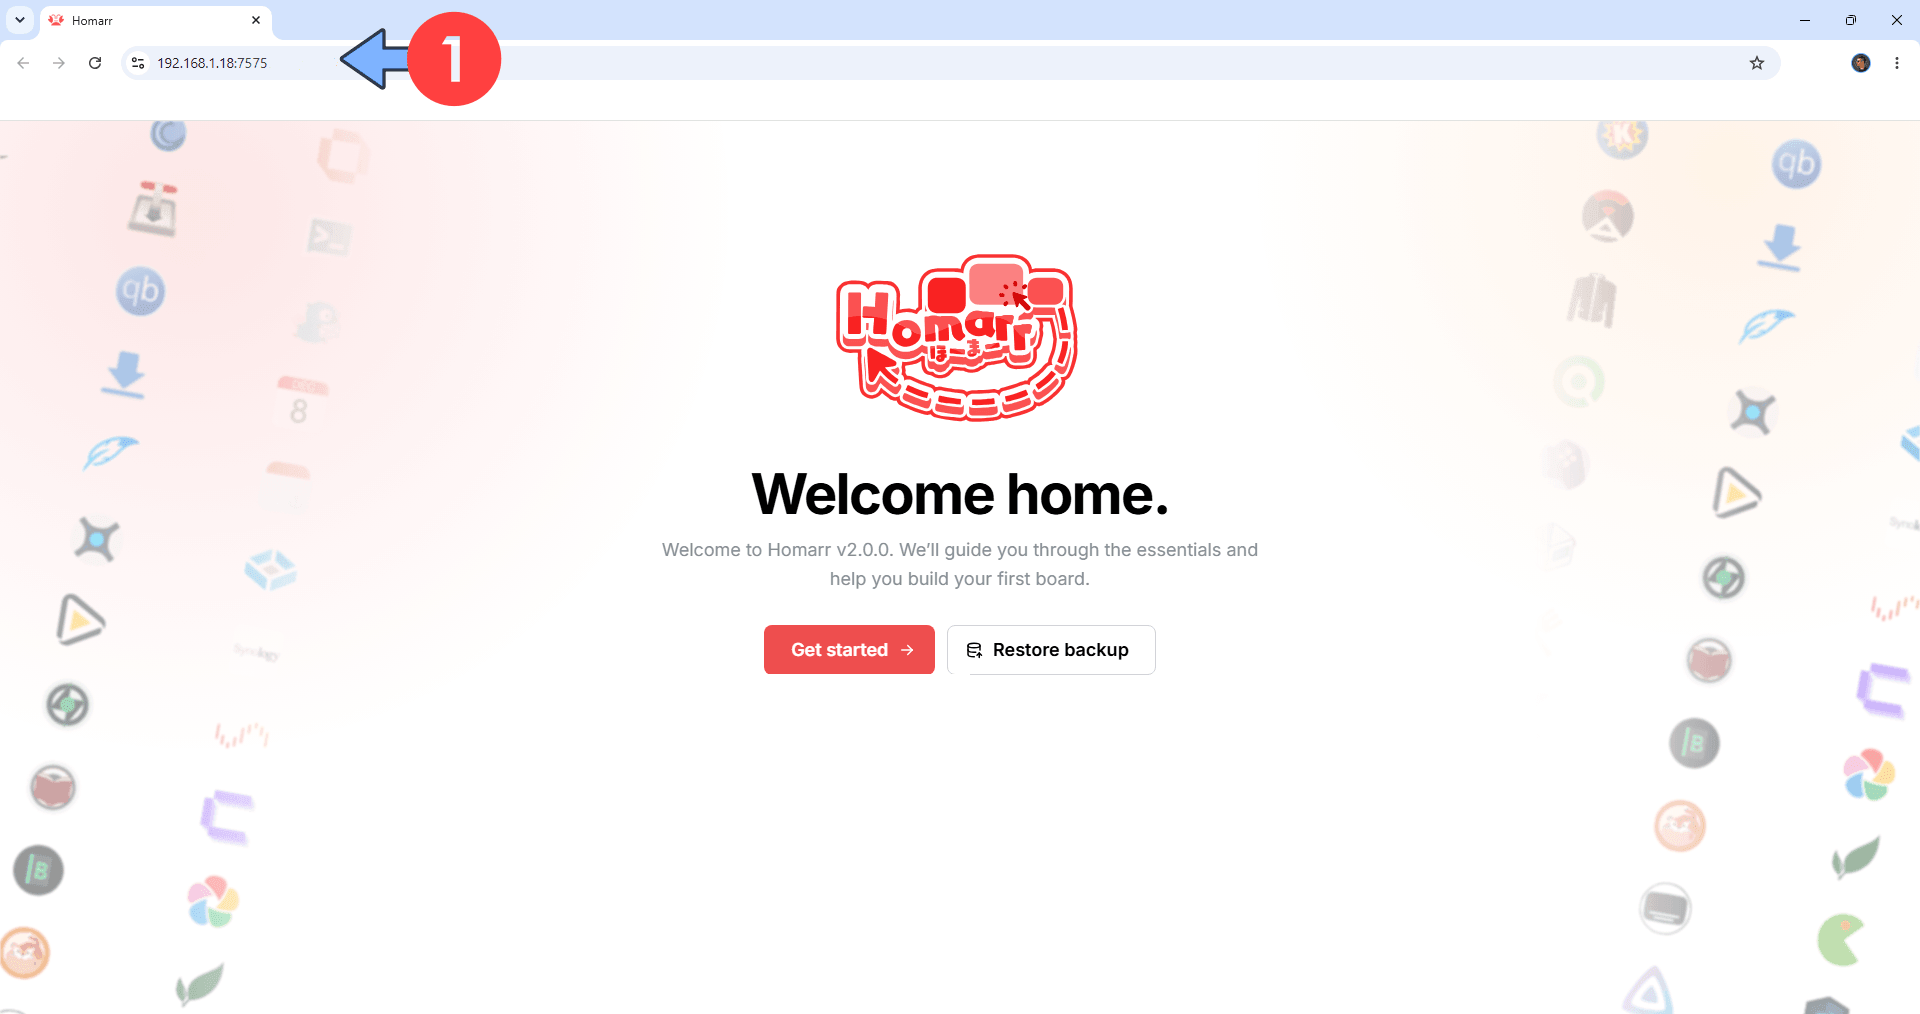
On the left sidebar, click Containers to see your installed container. In this area, you can see the Homarr container that has been successfully installed.
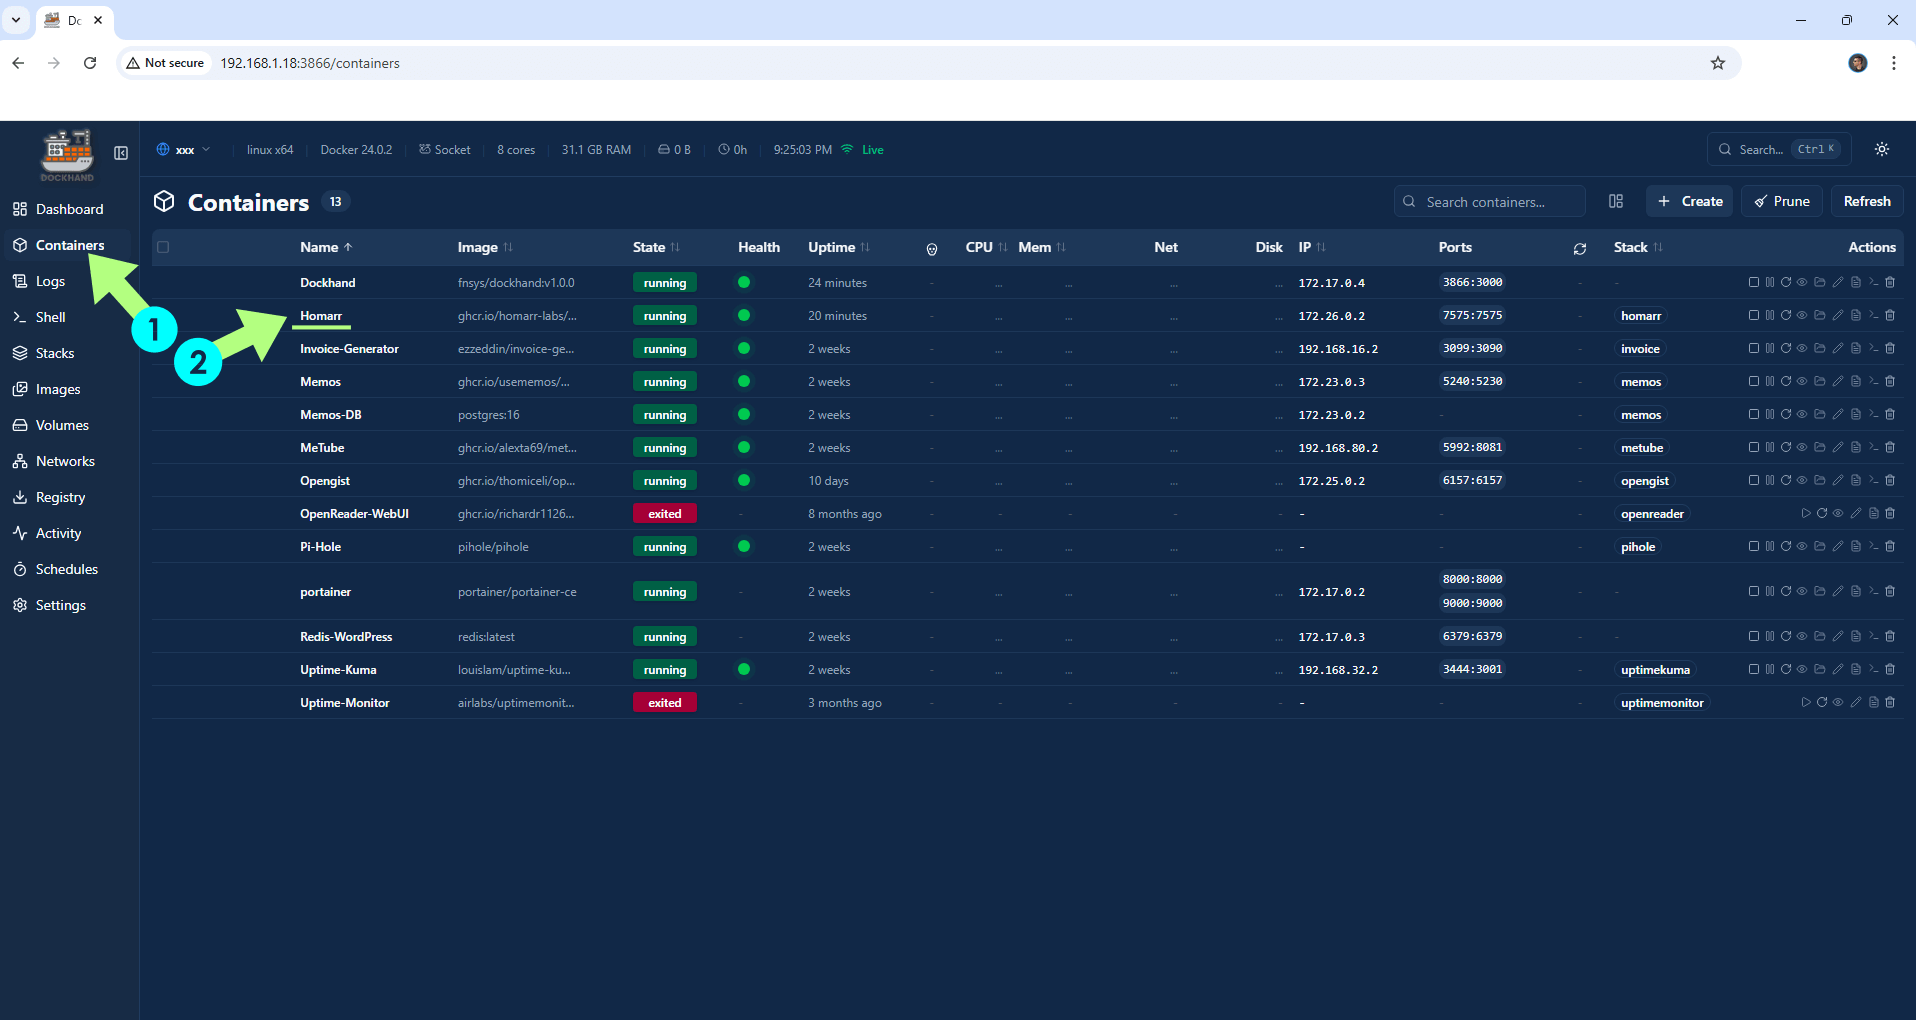
In my case, my Homarr container was successfully installed.
STEP D
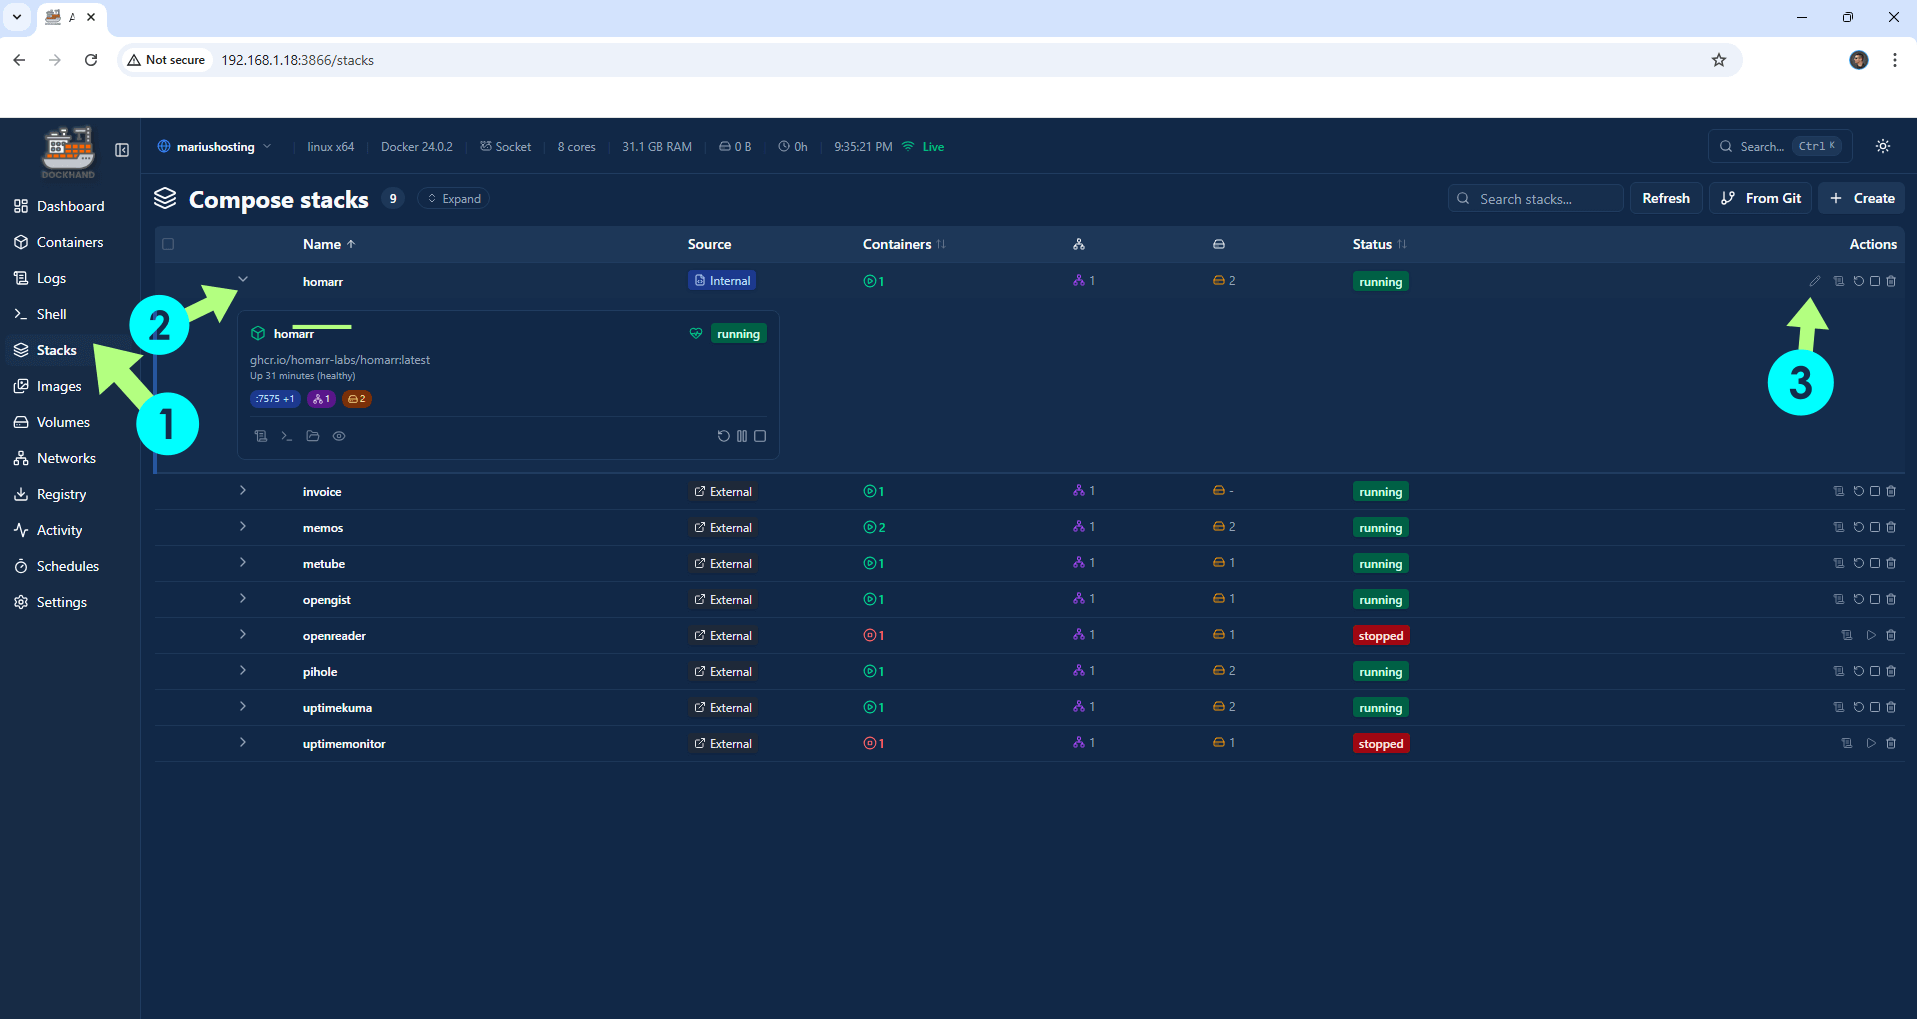
If you want to modify your current compose stack, click Stacks in the left sidebar. Expand your current stack, in my example “Homarr”, then click the little pencil icon. Follow the instructions in the image below.
STEP E
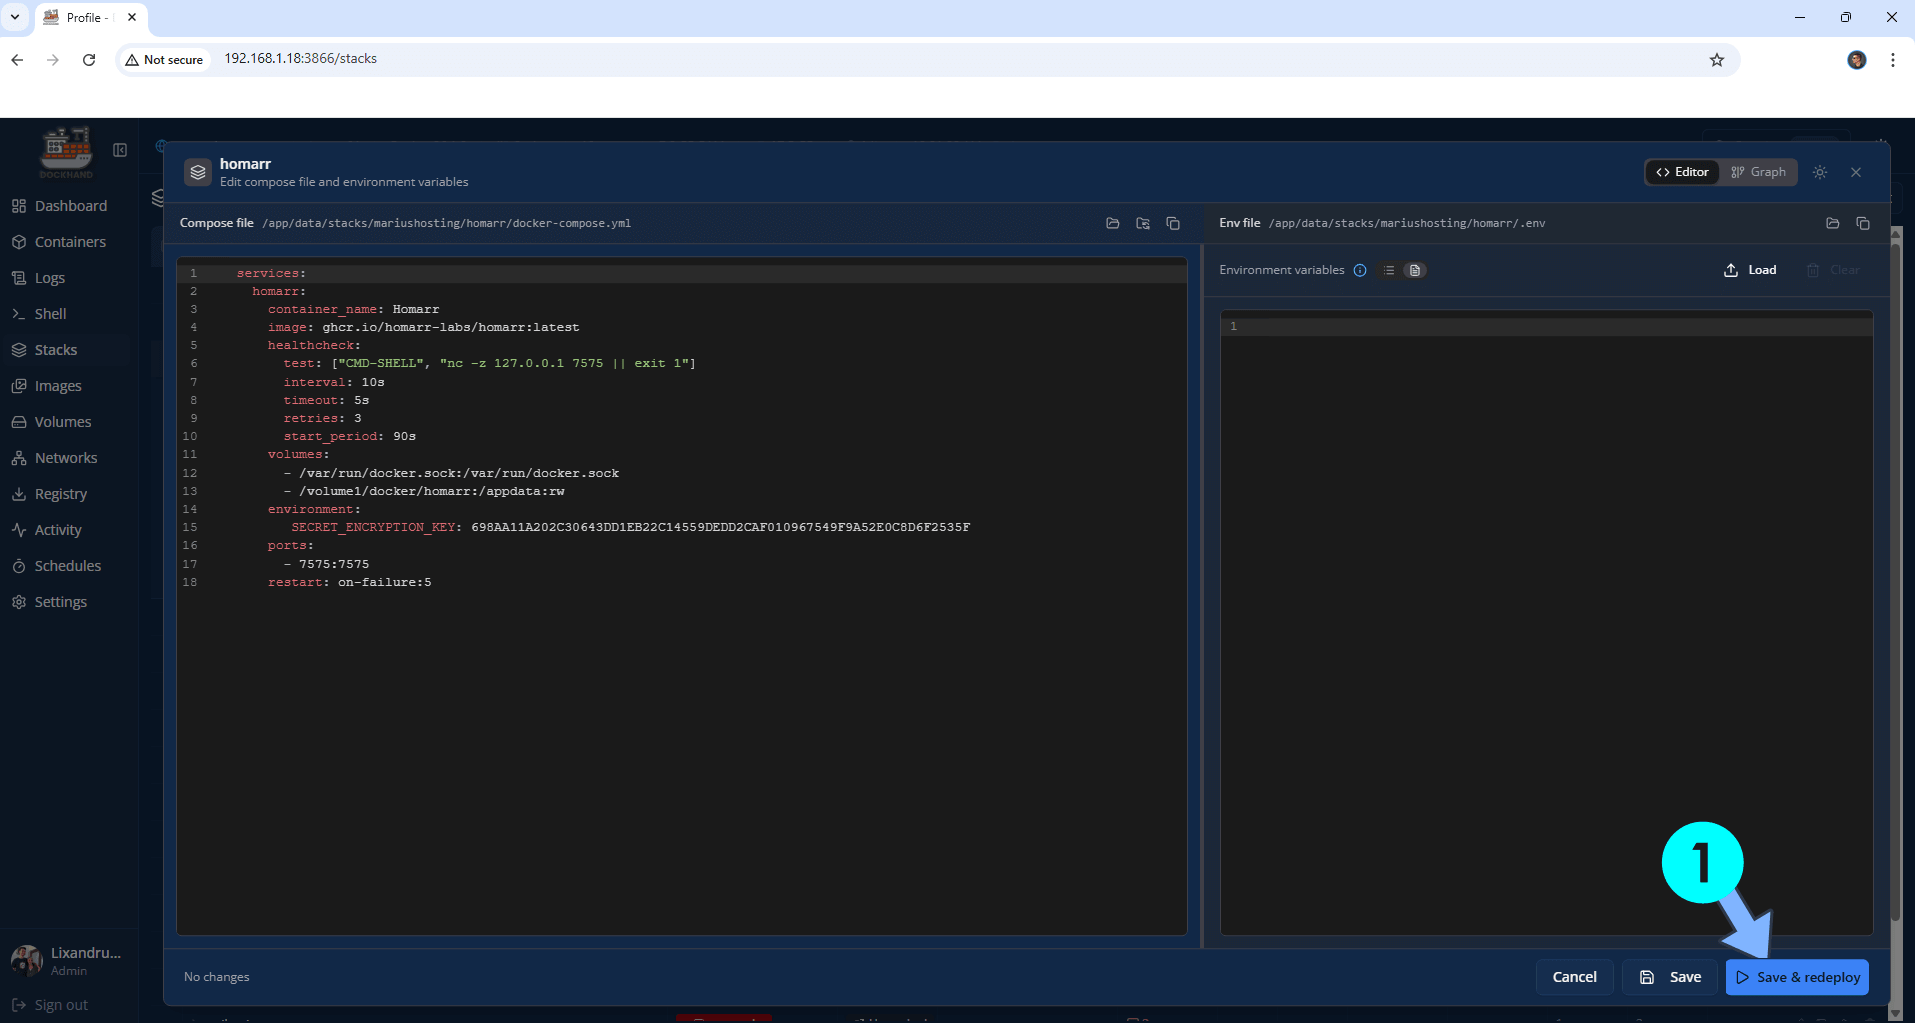
In this editor, you can easily modify your current compose stack. After you edit it, click Save & redeploy. Follow the instructions in the image below.
STEP F
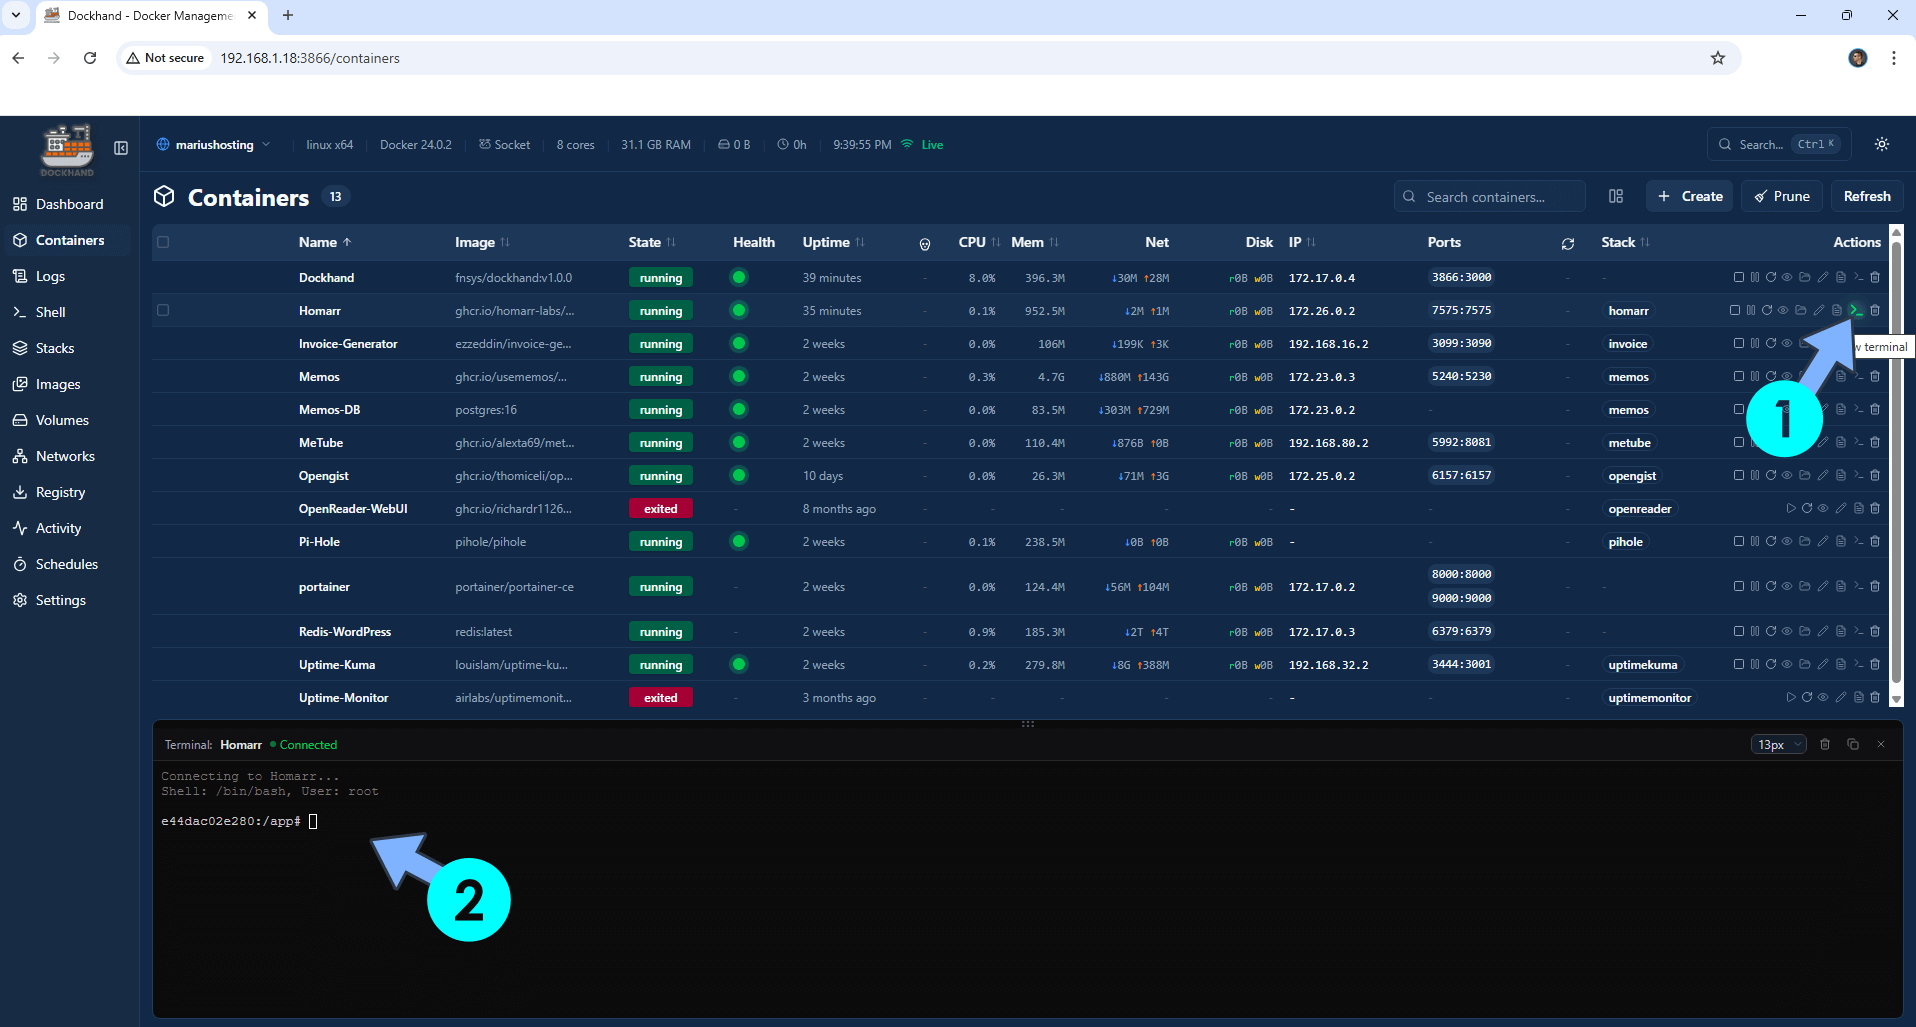
If you want, you can also access the container terminal. On the left sidebar, click Containers then select the container that you want to run the terminal. Click the little terminal icon. Click on the Shell that you want, in my example, Bash, then click Connect and the terminal will automatically show up. Follow the instructions in the image below.
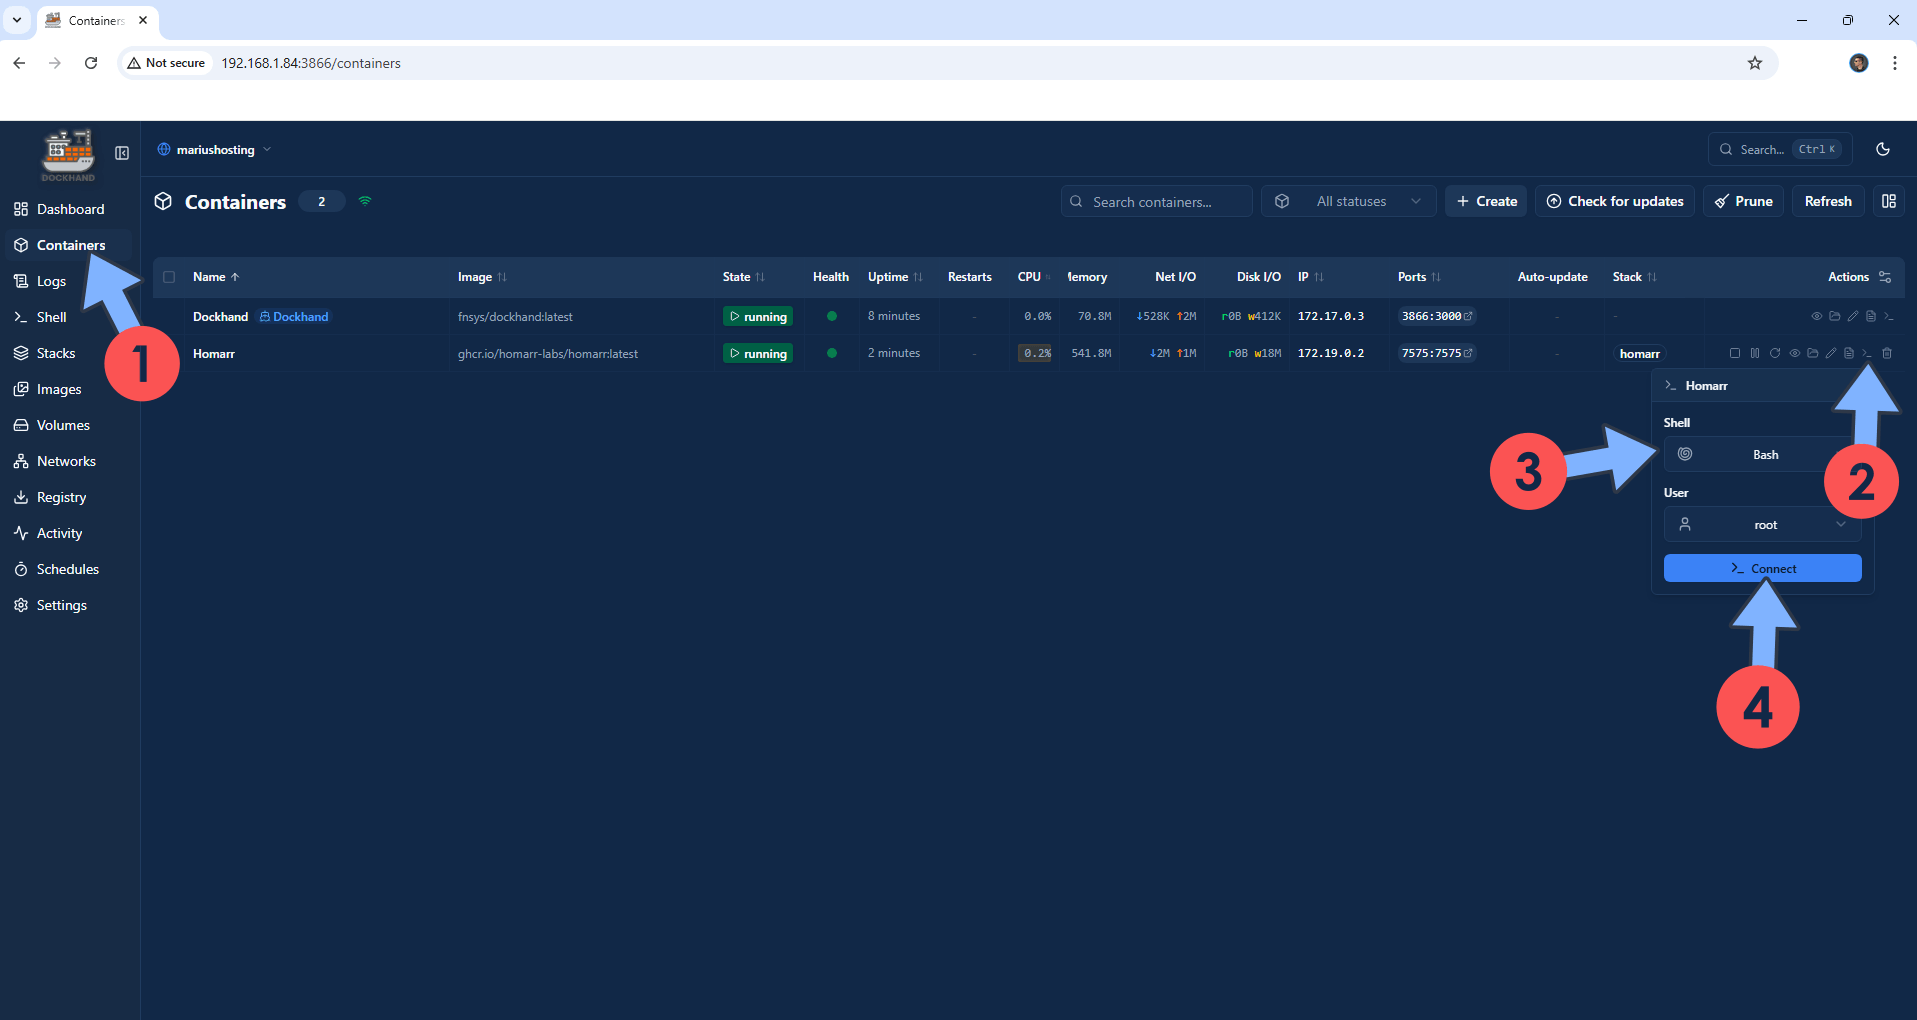
Your terminal at a glance!
STEP G
How to Move Your Docker Containers From Portainer to Dockhand.
Enjoy Dockhand!
🆘TROUBLESHOOTING
Note: If you want to run the Dockhand container over HTTPS, check out How to Run Docker Containers Over HTTPS on Your UGREEN NAS.
Note: If you use a different volume than volume1, for example volume2, you need to change the following line at STEP 7
services:
  dockhand:
    image: fnsys/dockhand:latest
    container_name: Dockhand
    ports:
      - 3866:3000
    volumes:
      - /volume1/docker/dockhand:/app/data:rw
      - /var/run/docker.sock:/var/run/docker.sock
    restart: always
with
services:
  dockhand:
    image: fnsys/dockhand:latest
    container_name: Dockhand
    ports:
      - 3866:3000
    volumes:
      - /volume2/docker/dockhand:/app/data:rw
      - /var/run/docker.sock:/var/run/docker.sock
    restart: always
🐳Note: How to Create Docker Shortcuts on Desktop.
🆕Note: How to Clean Docker.
🆕Note: How to Update Dockhand To The Latest Version.
This post was updated on Saturday / October 17th, 2026 at 11:01 AM