Did you know Reverse Proxy can hide the existence and characteristics of origin servers? Reverse Proxy can transform HTTPS requests into HTTP requests and more. According to Wikipedia.org: In computer networks, a reverse proxy is a type of proxy server that retrieves resources on behalf of a client from one or more servers. These resources are then returned to the client, appearing as if they originated from the proxy server itself. Unlike a forward proxy, which is an intermediary for its associated clients to contact any server, a reverse proxy is an intermediary for its associated servers to be contacted by any client. In other words, a proxy acts on behalf of the client(s), while a reverse proxy acts on behalf of the server(s).
This step by step guide below was updated for DSM 7.2 and will show you the steps you need to take to make your Synology NAS web apps and various services available via the Internet or your Local Access Network (LAN) through a domain name and a custom/default port. Why do it? For example, to conceal or avoid revealing your IP address or custom port. See below what you need to do:
STEP 1
Please Support My work by Making a Donation.
STEP 2
Find out how to set up web apps and services on your Synology NAS on a custom domain name and conceal your internal port number.
As a Synology NAS user, you host docker and web apps on your NAS. Say you want to access a web app in your Local Network (LAN). Said web app is hosted on a port, like 5005 for example. Should you want to access the web app in you Local Network (LAN), you would do it via your browser, like this:
http://192.168.0.108:5005If you look closely, you’ll notice that the web app is accessed in HTTP, not HTTPS, and it’s accessed through your local NAS IP address. Also, the port number for the web app is specified (in this case, for example, I will use port 5005, but in your case it can be a different one). But what happens if you want to access the same web app over the Internet?
For starters, to access a web app over the Internet, you have to open the port number for the app on your router (in this case, port 5005). It’s just one app, right? What’s the harm?
But what if you want or need to access more than just one web app over the Internet? Well, that would mean that you would have to open as many ports on your router as the number of web apps you are looking to access. The more ports you open on your router, the more exposed you are, right? Who wants so much of their Local Network (LAN) on display?
But with Reverse Proxy you won’t have to open too many ports on your router.
Isn’t it better to access all the web apps you want to access over the Internet using just one port number? Now you can do it with Reverse Proxy.
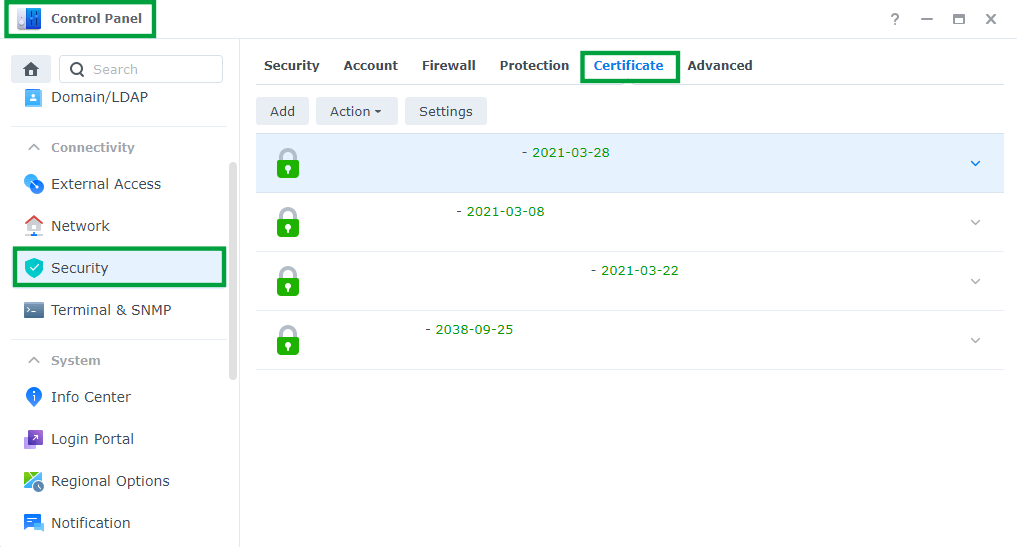
But how do you access a larger number of web apps on your Synology NAS over the Internet using just one port number instead of all the individual port numbers of each app? With Reverse Proxy of course, but there’s more to it. To be able to do it, you will need an SSL certificate (because security) and you will need all of your web apps to answer to a different domain name. You can buy your SSL certificate from an SSL certificate provider of your choice, or you can get a free SSL certificate from a Let’s Encrypt authority (I highly recommend Let’s Encrypt SSL certificates). The certificate will need to be configured in your Synology NAS in Control Panel / Security / Certificate.
The reason you will need a different domain name is because it will allow you to have individual sub-domain names for each one of the web apps you want to access over the Internet from just one port number using Reverse Proxy. For example, if your domain name is yourdomainame.com, that will mean your sub-domain names for each individual web app on your Synology NAS will be yourchoiceofappname1.domainname.com, yourchoiceofappname2.domainname.com and so on. For example: web1.yourdomainame.com, web2.yourdomainame.com, web3.yourdomainame.com and so on for every single app (you get the idea).
For Reverse Proxy, you will need:
- an SSL certificate (for security)
- a domain name (for example, yourdomainame.com) which will allow you to have sub-domain names for each individual web app on your Synology NAS
- port 443 forwarded on your router to your NAS local IP address.
STEP 3
Learn how to configure a web app via Reverse Proxy on DSM 7.
Go to Control Panel / Login Portal / Advanced / Reverse Proxy. Follow the instructions in the image below:
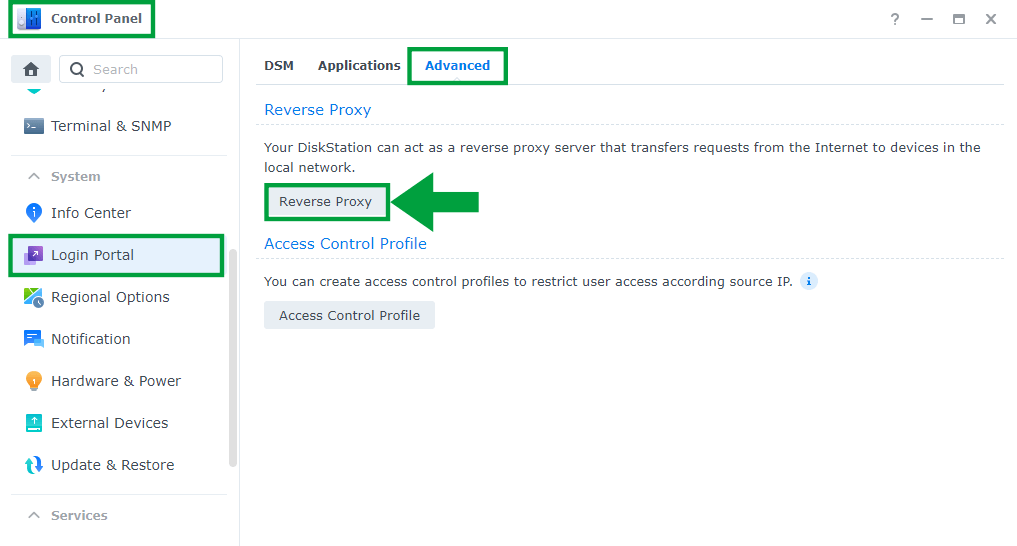
After you click on Reverse Proxy, the screen below will open. Click Create.
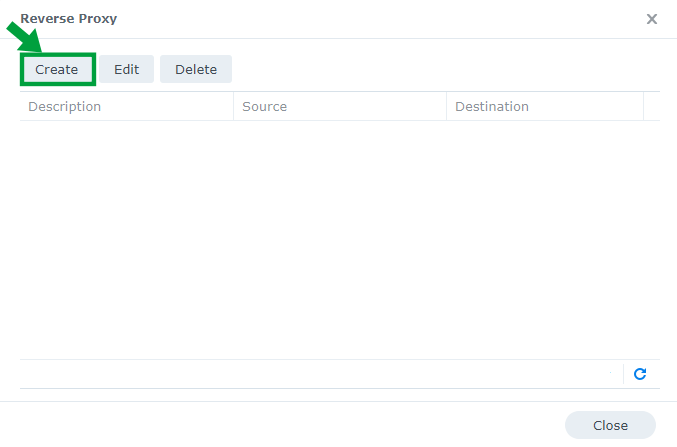
After you click Create, a new window titled Reverse Proxy Rules will appear. Click the General option. See the screenshot below:
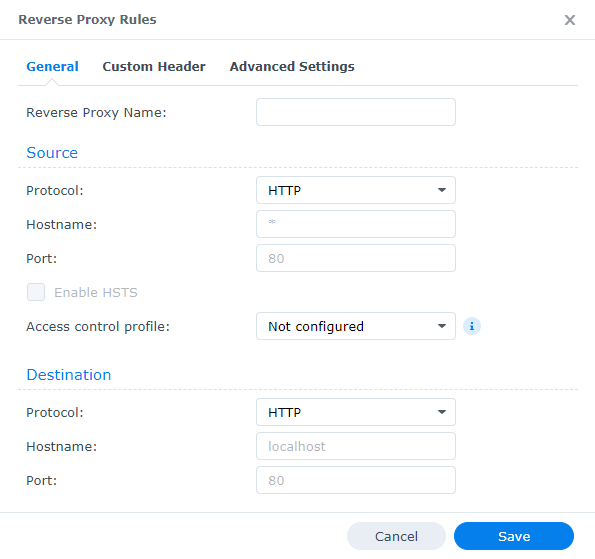
It’s here in the Reverse Proxy Rules window (screenshot above) on your Synology NAS that you start your setup that will allow you to use Reverse Proxy to access a large number of web apps via the same port and transfer protocol using their individual domain names.
Let’s begin to configure a web app on your Synology NAS on DSM 7 for the Reverse Proxy protocol. Let’s consider, for example, the web app on port 5005 that was using the HTTP transfer protocol. The aim right now is to make this web app accessible over the Internet via its individual domain name, on port 443, which is a default HTTPS/SSL port.
- Note 1: If the domain name is yourdomainame.com (the example considered earlier), the individual domain name for a web app you want to access over the Internet will be something along the lines of web1.yourdomainame.com
- Note 2: The web app you want to access over the Internet using the Reverse Proxy protocol will be accessed using its individual domain name (for example: web1.yourdomainame.com), not a local IP address and port
- Note 3: There will be no need to set up the port number because port number 443 is the default HTTPS port number
This is what it should look like when accessing the web app over the Internet using the Reverse Proxy protocol:
https://web1.yourdomainame.comHow to fill in Reverse Proxy Rules
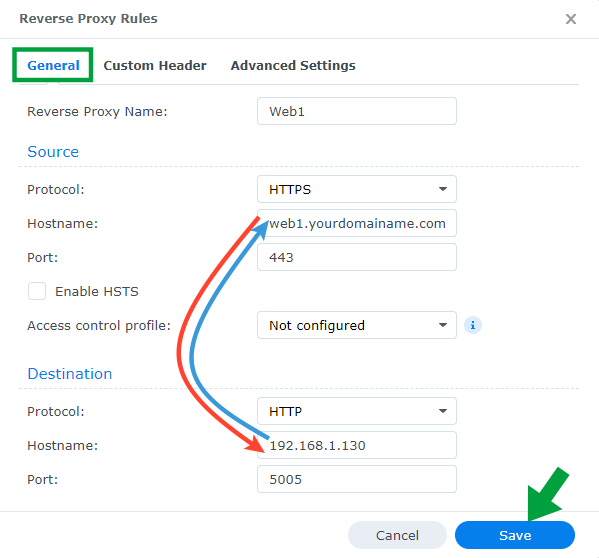
- Reverse Proxy Name: the name of the web app (in this case, Web1). See the screenshot below.
- Source
- Protocol: select HTTPS (which is the transfer protocol used to access the web app over the Internet using Reverse Proxy)
- Hostname: type in the individual unique domain name for your Synology NAS web app that you want to access over the Internet using the Reverse Proxy protocol (for example: web1.yourdomainame.com)
- Port: 443 (the default HTTPS port)
Note: Only fully qualified domain name (FQDN) “fully qualified domain name” formats may be introduced in the Hostname field. This means that a domain name format such as the one below is invalid:
https://yourdomainame.com/web1- Destination
- Protocol: select HTTP
- Hostname: type in your Local NAS IP address or type in localhost
- Port: type in port 5005
Follow the instructions in the screenshot below to learn how to fill in the Reverse Proxy Rules sections correctly:
STEP 4
Go to Control Panel / Security / Certificate / Settings and look for a new entry called Web1 (the name of the web app, the same as in the Description section in the Reverse Proxy Rules window – see screenshot above), then select yourdomainame.com certificate from the drop-down menu.
STEP 5
🟢Please Support My work by Making a Donation. Almost 99,9% of the people that install something using my guides forget to support my work, or just ignore STEP 1. I’ve been very honest about this aspect of my work since the beginning: I don’t run any ADS, I don’t require subscriptions, paid or otherwise, I don’t collect IPs, emails, and I don’t have any referral links from Amazon or other merchants. I also don’t have any POP-UPs or COOKIES. I have repeatedly been told over the years how much I have contributed to the community. It’s something I love doing and have been honest about my passion since the beginning. But I also Need The Community to Support me Back to be able to continue doing this work.
It’s done! Now you can use Reverse Proxy on your Synology NAS on DSM 7.2 to access web apps over the Internet via HTTPS.
Note: Reverse Proxy Example 1 – How To Reverse Proxy Your IP Camera.
Note: Reverse Proxy Example 2 – Access synology.me without Port :5001.
Note: Reverse Proxy Example 3 – How To Reverse Proxy Your Router.
Note: Reverse Proxy Example 4 – How To Reverse Proxy Multiple NAS.
Note: Port 5005 in the article above is my test port number. Remember that you can use a different port number.
Note: Find out how to use Reverse Proxy on DSM 6.2.4
This post was updated on Saturday / April 18th, 2026 at 8:56 PM