The Domain Name System (DNS) protocol is an important part of the web’s infrastructure, serving as the Internet’s phone book: every time you visit a website, your computer performs a DNS lookup. Complex pages often require multiple DNS lookups before they start loading, so your computer, mobile phone, Synology NAS may be performing hundreds of lookups a day.
Best known for its top-rated content delivery network, Cloudflare has extended its range to include a new public DNS service, the catchily-named 1.1.1.1. The product doesn’t have any of the extras you’ll often see elsewhere. There’s no anti-phishing, no ad-blocking, no content filtering or other attempts to monitor or control what you can access, and what you can’t, but it’s fast and has an impressive performance compared to Google DNS. Instead, Cloudflare has focused much more on the fundamentals. These start with performance and, at the moment, it’s the fastest public DNS service in the world.
Privacy is another major highlight. Cloudflare doesn’t just promise that it won’t use your browsing data to serve ads; it commits that it will never write the querying IP address (yours) to disk. Any logs that do exist will be deleted within 24 hours.
If you don’t set up specific DNS servers on your computer (or your router), default DNS servers from your ISP (Internet Service Provider) will be used. To avoid unwanted DNS errors on your Synology NAS device, switch to public DNS servers like the CloudFlare DNS. There are plenty of public DNS you can use, such as, OpenDNS, Quad9 or Google DNS, and that will likely never change.
The Cloudflare Public DNS IP addresses (IPv4) are the following:
1.1.1.1
1.0.0.1
STEP 1
Please Support My work by Making a Donation.
STEP 2
To Manually add Cloudflare DNS on your Synology NAS device, just go to Control Panel / Network / General. Check “Manually configure DNS server” and type in your Preferred DNS Server: 1.1.1.1 On Alternative DNS Server type in: 1.0.0.1 – Follow the instructions in the image below.
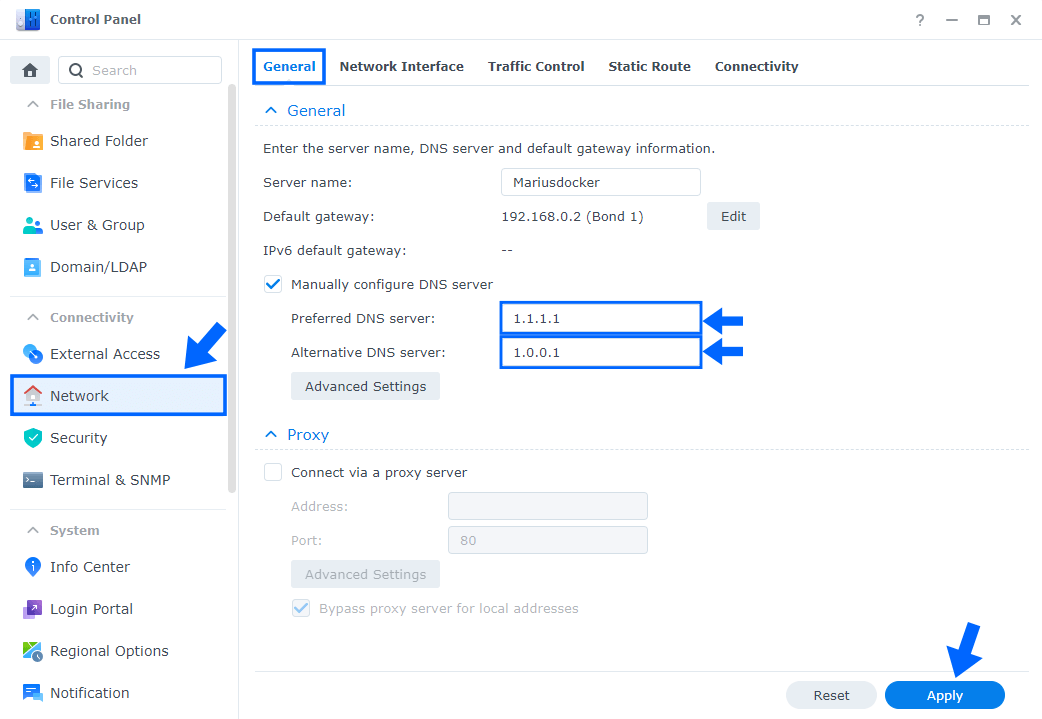
After you have manually inserted your DNS Server, click “Apply“. Now your Synology NAS device will use CloudFlare DNS for different services like Download Station and many other apps.
You can also change your router DNS and add your favorite DNS instead. At the moment I am using an RT6600ax Synology router. Remember that every router has its own interface design. If you, like me, own a Synology router, go to Network Center / Internet / Connection tab / under Manually configure DNS server type in your Preferred DNS Server: 1.1.1.1 and on Alternative DNS Server type in: 1.0.0.1 – Follow the instructions in the image below.

This post was updated on Thursday / January 8th, 2026 at 1:43 PM