WordPress is a free and open-source content management system (CMS). It’s the simplest and most popular solution to create your own website or blog. WordPress makes building a website accessible to anyone, even people who aren’t developers. With WordPress you can create any type of website such as blogs, eCommerce stores, portfolio websites, forums, resumes, business websites etc. In this step by step guide I will show you how to install WordPress on your UGREEN NAS using Docker & Portainer.
STEP 1
Please Support My work by Making a Donation.
STEP 2
Install Portainer using my step by step guide. If you already have Portainer installed on your UGREEN NAS, skip this STEP. Attention: Make sure you have installed the latest Portainer version.
STEP 3
⚠️Mandatory: Enable HTTPS on your UGREEN NAS.
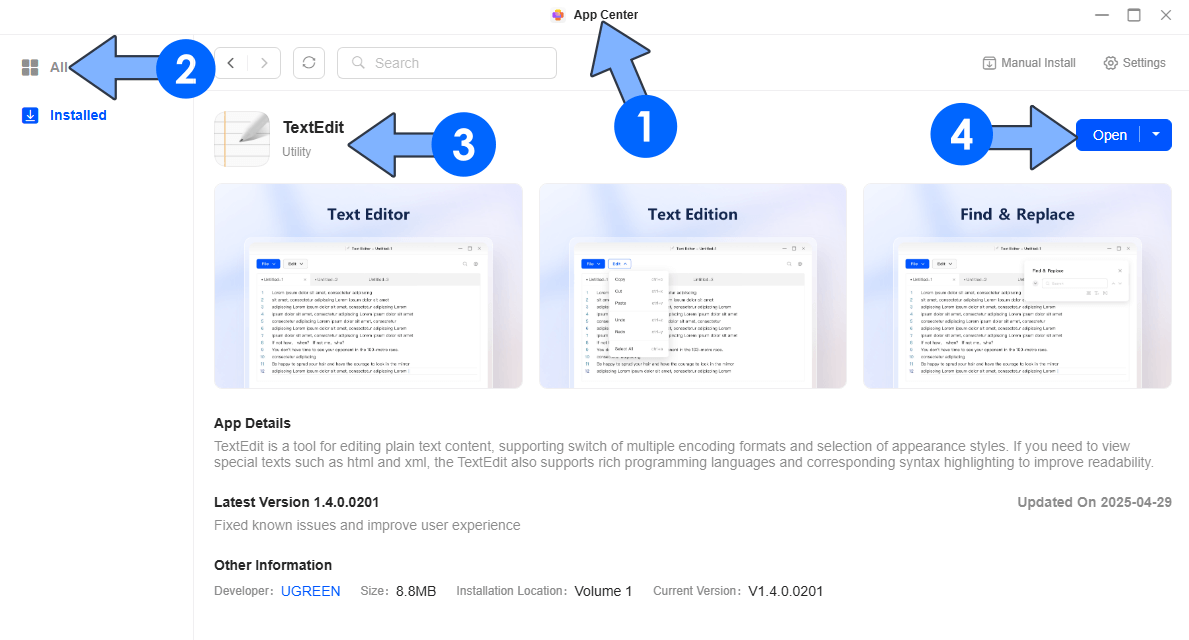
STEP 4
Install TextEdit via UGREEN “App Center”. (Mandatory STEP.) If you already have TextEdit installed on your UGREEN NAS, skip this STEP.
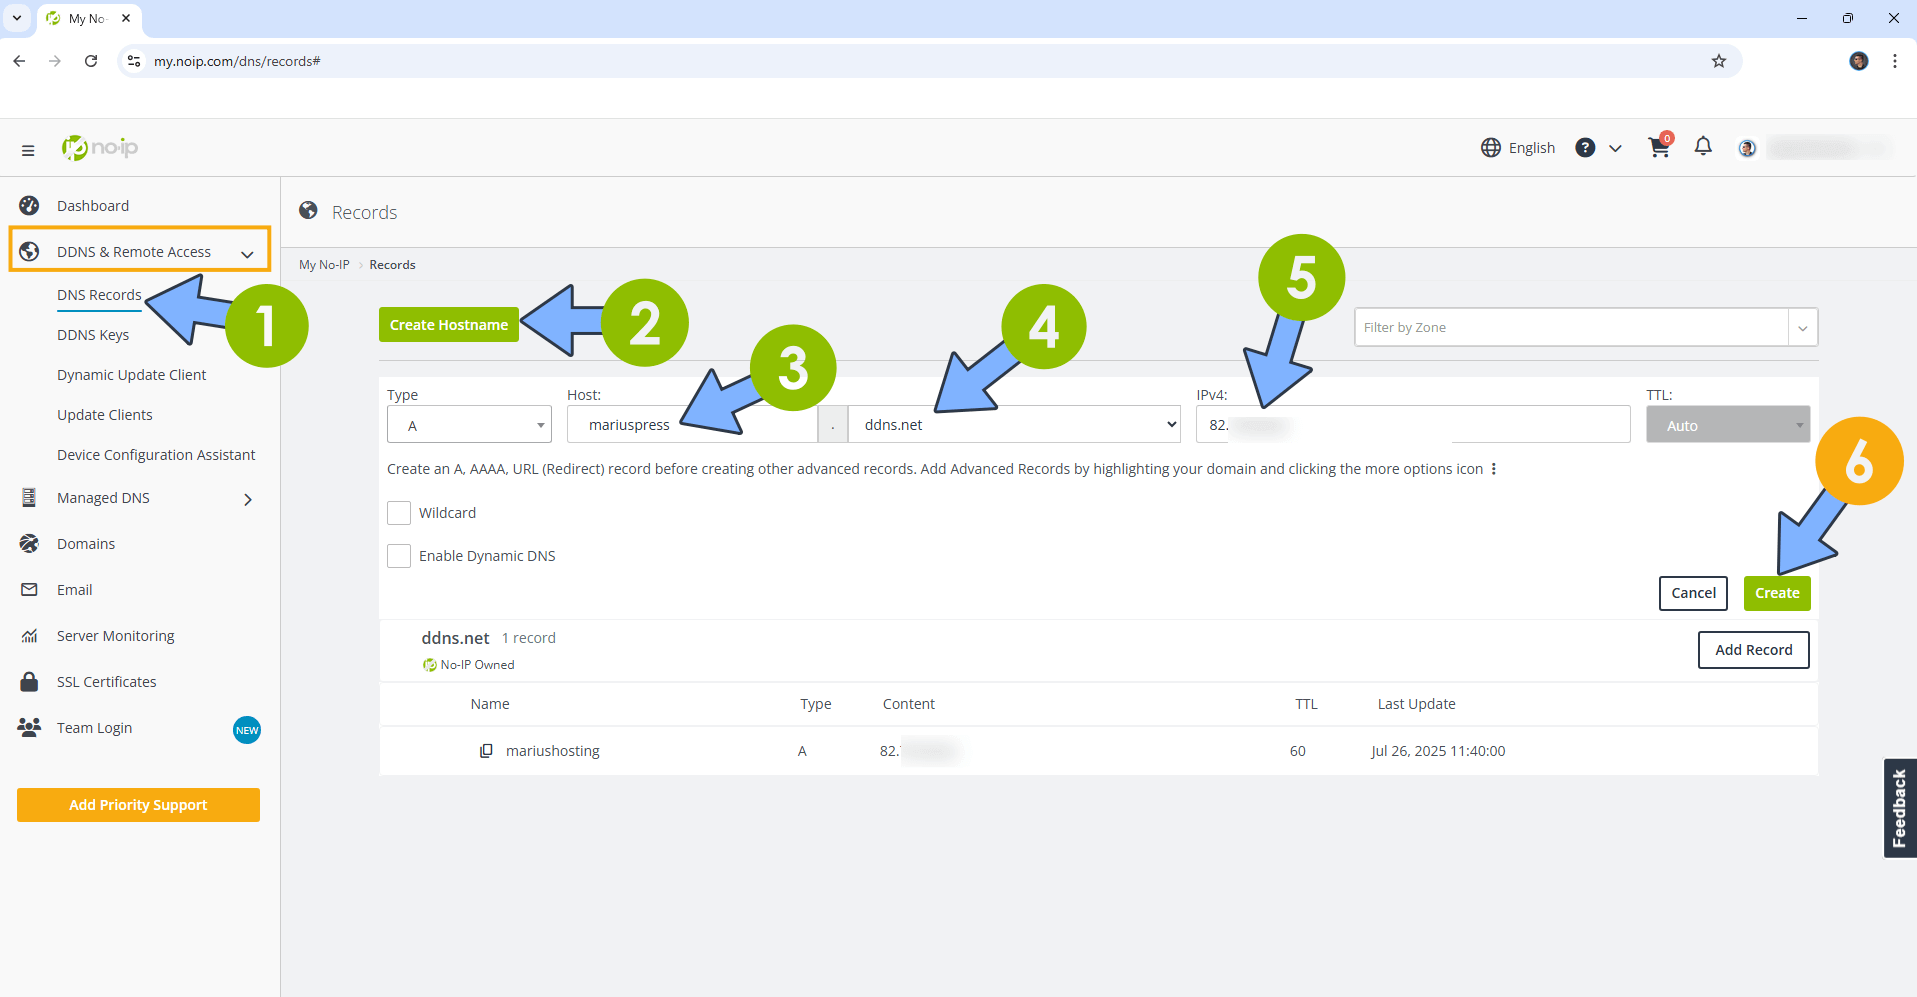
STEP 5
Create a new hostname on the noip website using your noip account. For example, I have created mariuspress as Host and I use the free ddns.net domain. In the IP Address area, type in your own IPV4 IP address from your ISP, then click Create. Follow the instructions in the image below.
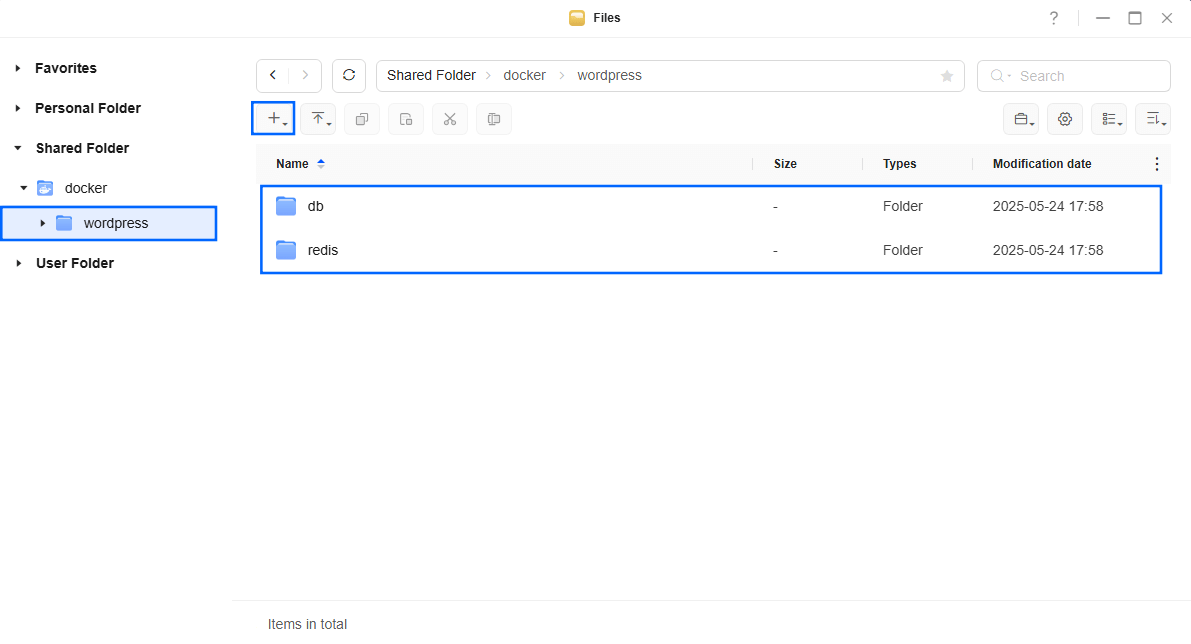
STEP 6
Go to Files and open the docker folder. Inside the docker folder, create one new folder and name it wordpress. Follow the instructions in the image below.
Note: Be careful to enter only lowercase, not uppercase letters.

STEP 7
Now create two new folders inside the wordpress folder that you have previously created at STEP 6 and name them db and redis. Follow the instructions in the image below.
Note: Be careful to enter only lowercase, not uppercase letters.
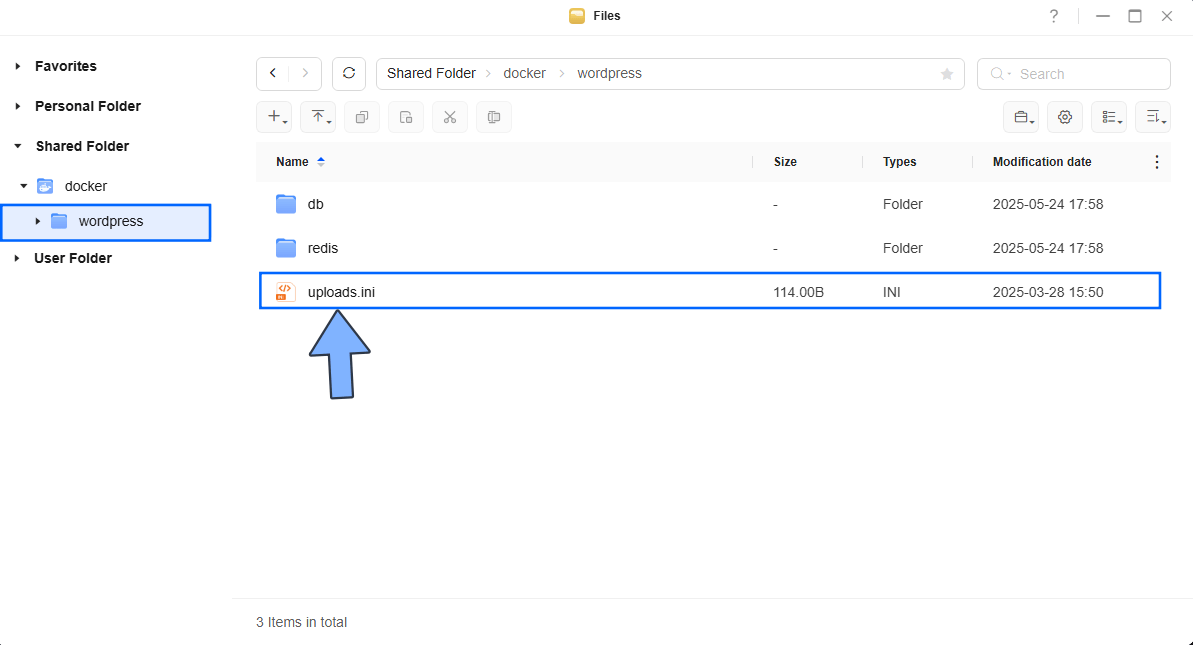
STEP 8
Download (click on the blue link below) then unzip and upload the uploads.ini file below in the wordpress folder that you have previously created at STEP 6. Follow the instructions in the image below. 🔒Note: Support my work to unlock the password. You can use this password to download any file on mariushosting forever!
STEP 9
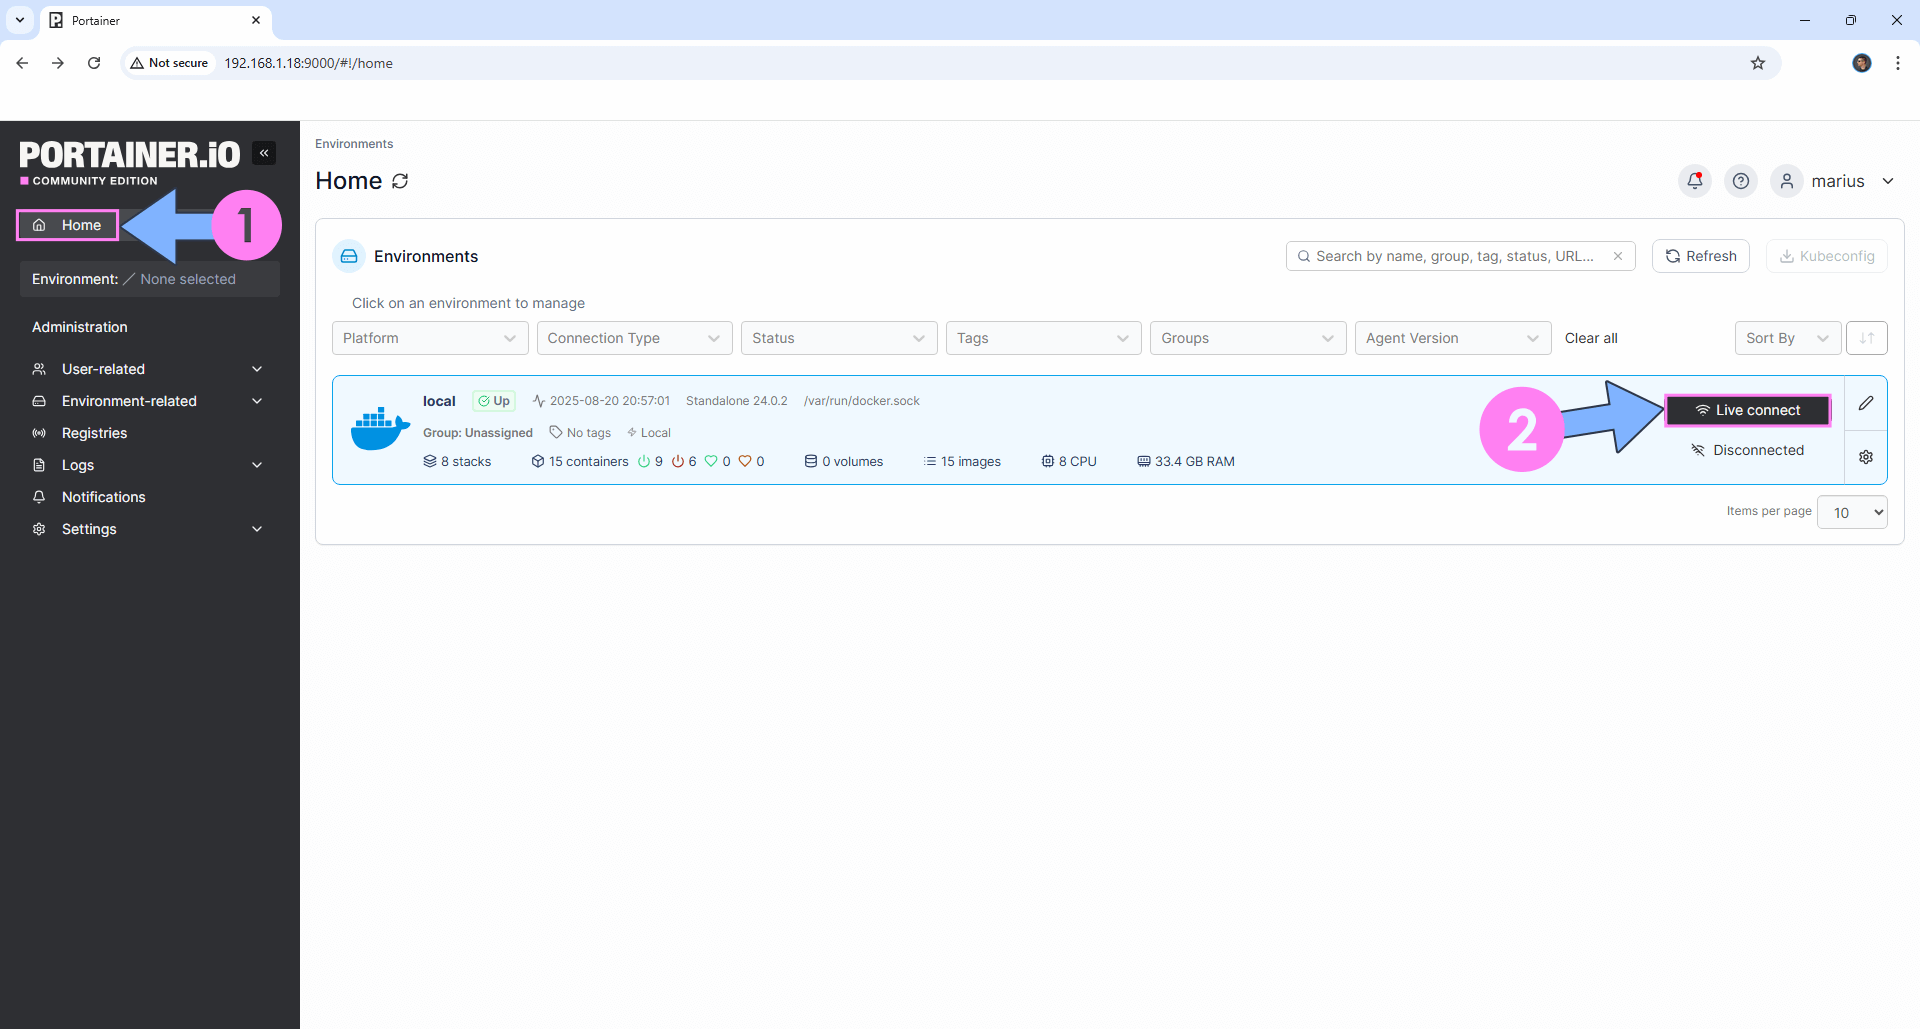
Log into Portainer using your username and password. On the left sidebar in Portainer, click on Home then Live connect. Follow the instructions in the image below.
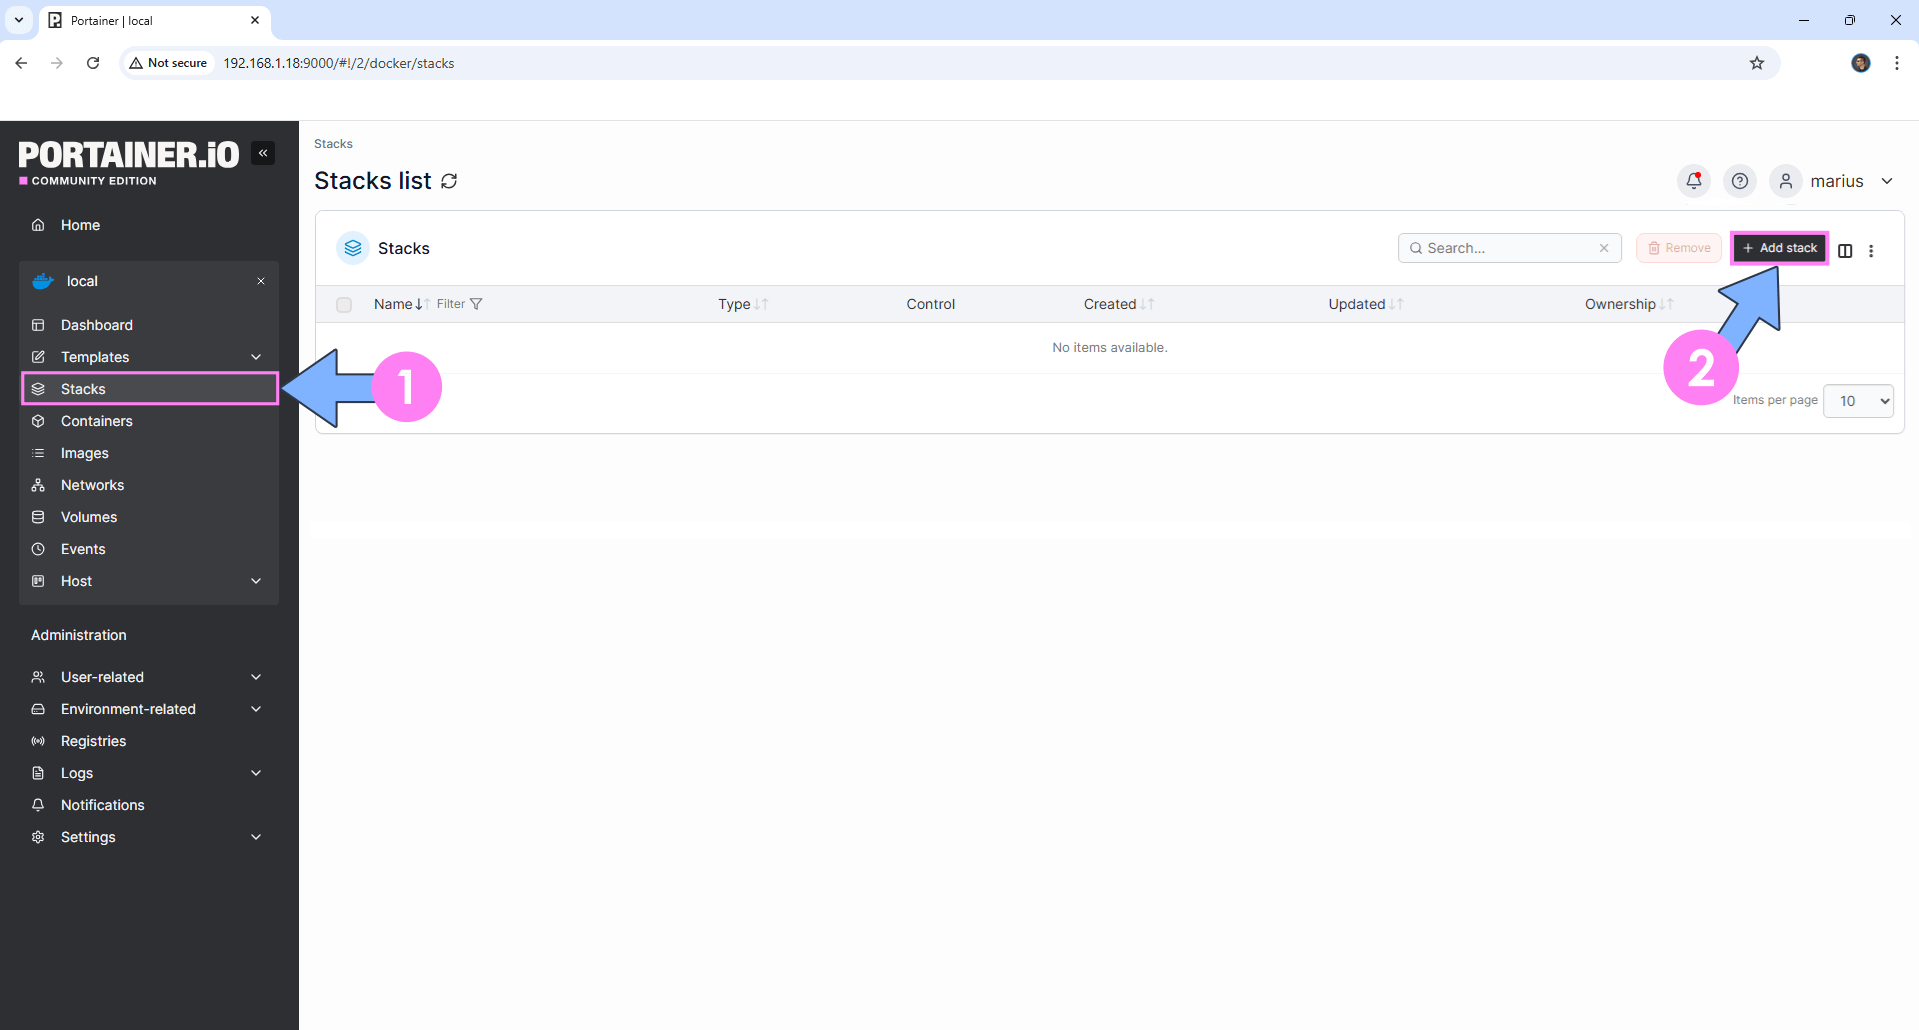
On the left sidebar in Portainer, click on Stacks then + Add stack. Follow the instructions in the image below.
STEP 10
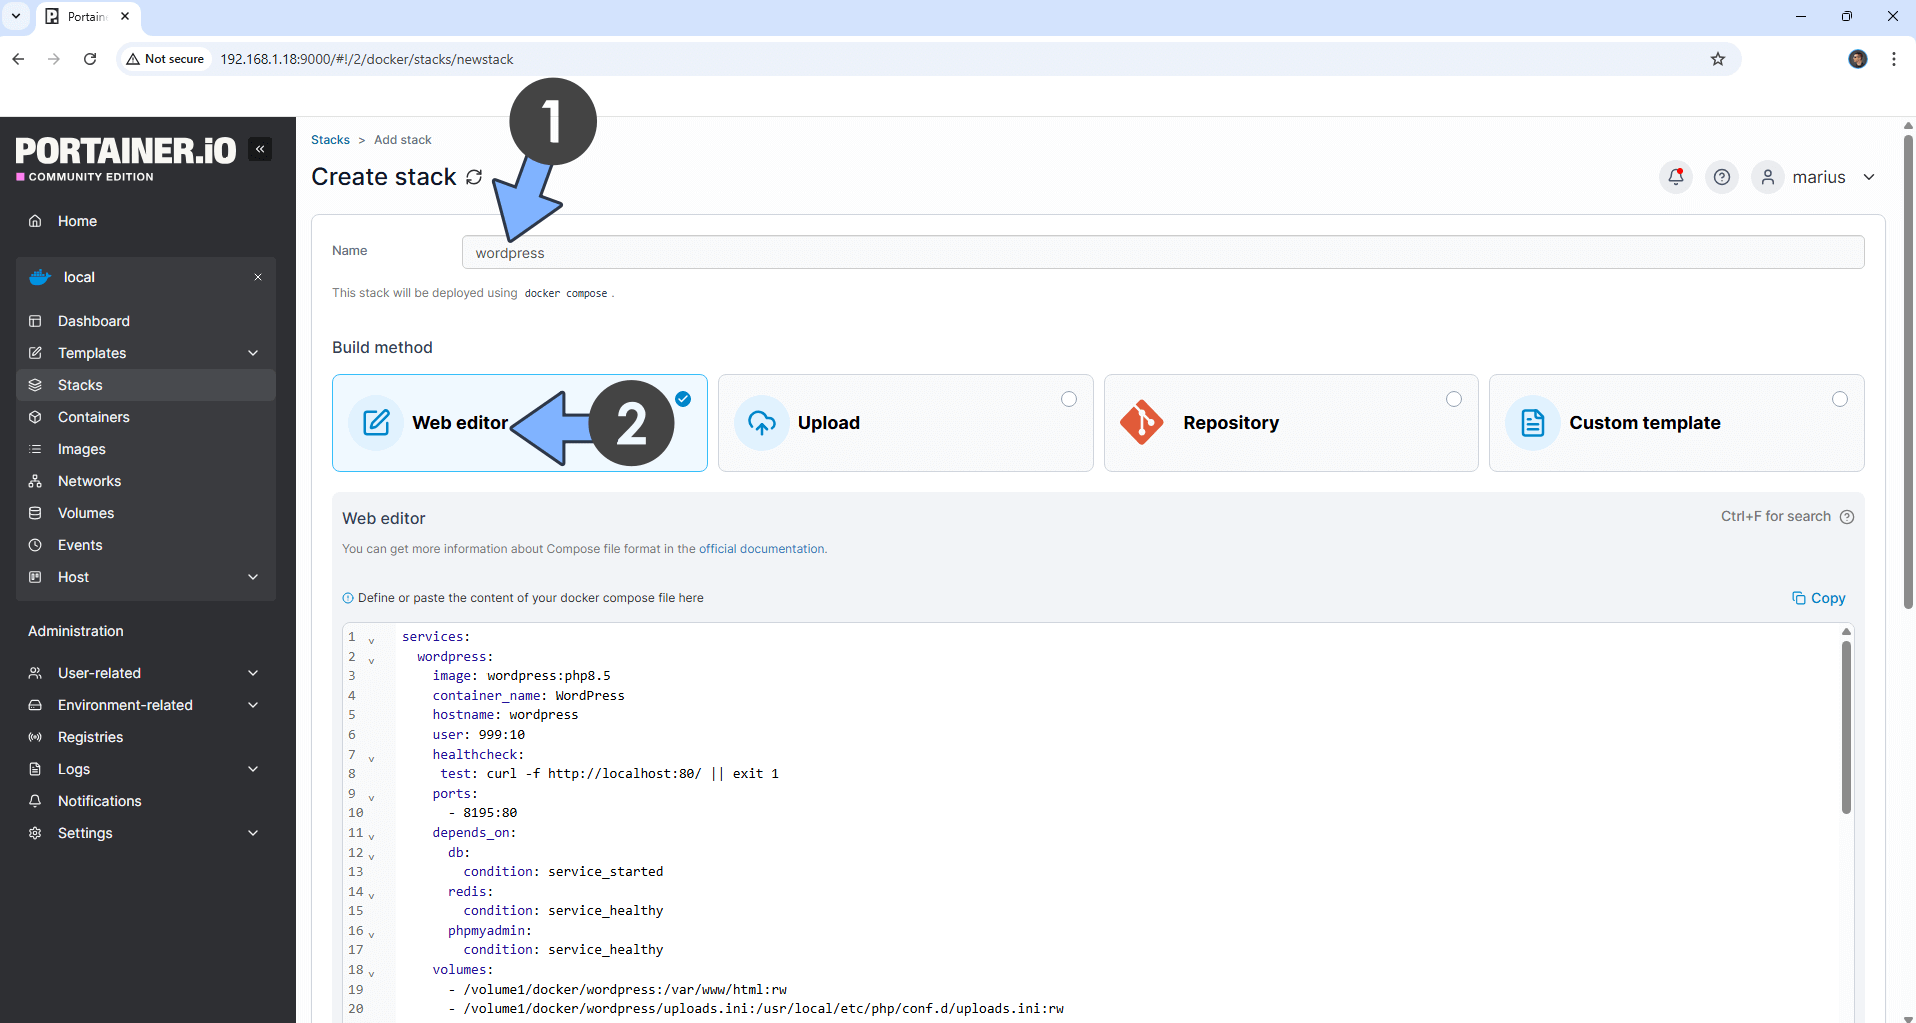
In the Name field type in wordpress. Follow the instructions in the image below.
services:
  wordpress:
    image: wordpress:php8.5
    container_name: WordPress
    hostname: wordpress
    user: 999:10
    healthcheck:
     test: curl -f http://localhost:80/ || exit 1
    ports:
      - 8195:80
    depends_on:
      db:
        condition: service_started
      redis:
        condition: service_healthy
      phpmyadmin:
        condition: service_healthy
    volumes:
      - /volume1/docker/wordpress:/var/www/html:rw
      - /volume1/docker/wordpress/uploads.ini:/usr/local/etc/php/conf.d/uploads.ini:rw
    environment:
      WORDPRESS_DB_HOST: db
      WORDPRESS_DB_USER: marius
      WORDPRESS_DB_PASSWORD: mariuspassword
      WORDPRESS_DB_NAME: mariushosting_db
    restart: on-failure:5

  db:
    image: mariadb:11.8-noble #LTS Long Time Support Until October 15, 2033.
    container_name: WordPress-DB
    security_opt:
      - no-new-privileges:true
    hostname: wordpress-db
    user: 999:10
    environment:
      MYSQL_DATABASE: mariushosting_db
      MYSQL_USER: marius
      MYSQL_PASSWORD: mariuspassword
      MYSQL_ROOT_PASSWORD: rootpass
      TZ: Europe/Bucharest
    volumes:
      - /volume1/docker/wordpress/db:/var/lib/mysql:rw
    restart: on-failure:5

  redis:
    image: redis
    hostname: wordpress-redis
    container_name: WordPress-REDIS
    user: 999:10
    healthcheck:
     test: ["CMD-SHELL", "redis-cli ping || exit 1"]
    volumes:
      - /volume1/docker/wordpress/redis:/data:rw
    environment:
      TZ: Europe/Bucharest
    restart: on-failure:5

  phpmyadmin:
    image: phpmyadmin
    hostname: wordpress-phpmyadmin
    healthcheck:
     test: curl -f http://localhost:80/ || exit 1
    container_name: WordPress-phpMyAdmin
    ports:
      - 2500:80
    environment:
     PMA_HOST: wordpress-db
     PMA_PORT: 3306
restart: on-failure:5Note: Before you paste the code above in the Web editor area below, change the value numbers for user with your own UID and GID values. (Follow my step by step guide on how to do this.) 999 is my personal UID value and 10 is my personal GID value. You have to type in your own values.
Note: Before you paste the code above in the Web editor area below, change the values for WORDPRESS_DB_USER and MYSQL_USER. Type in your own username for both values; they have to be identical. marius is an example for a user.
Note: Before you paste the code above in the Web editor area below, change the value for WORDPRESS_DB_PASSWORD and MYSQL_PASSWORD. Type in your own password for both values; they have to be identical. mariuspassword is an example for a password. ⚠️Warning: Do NOT use a password with special characters that include the dollar symbol $.
Note: Before you paste the code above in the Web editor area below, change the value for WORDPRESS_DB_NAME and MYSQL_DATABASE. Type in your own database name for both values; they have to be identical. mariushosting_db is an example for a database name.
Note: Before you paste the code above in the Web editor area below, change the value for TZ. (Select your current Time Zone from this list.)
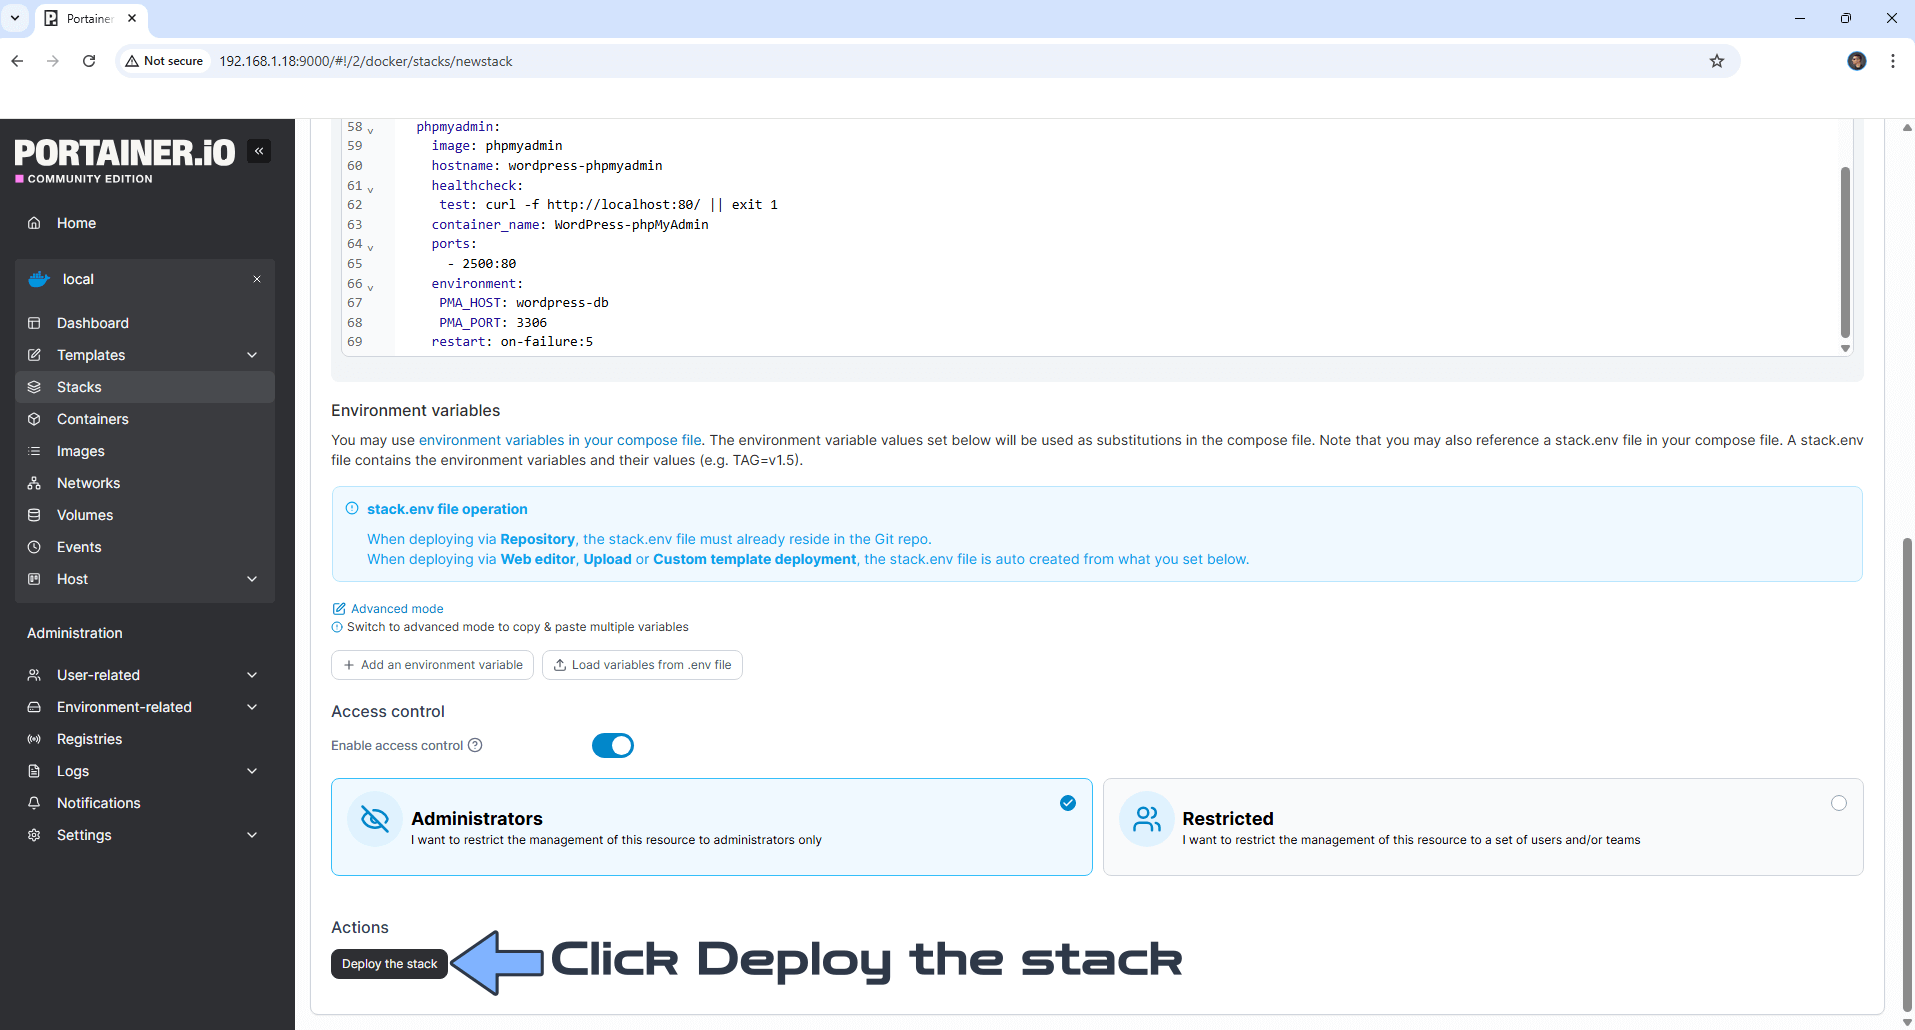
STEP 11
Scroll down on the page until you see a button named Deploy the stack. Click on it. Follow the instructions in the image below. The installation process can take up to a few minutes. It will depend on your Internet speed connection.
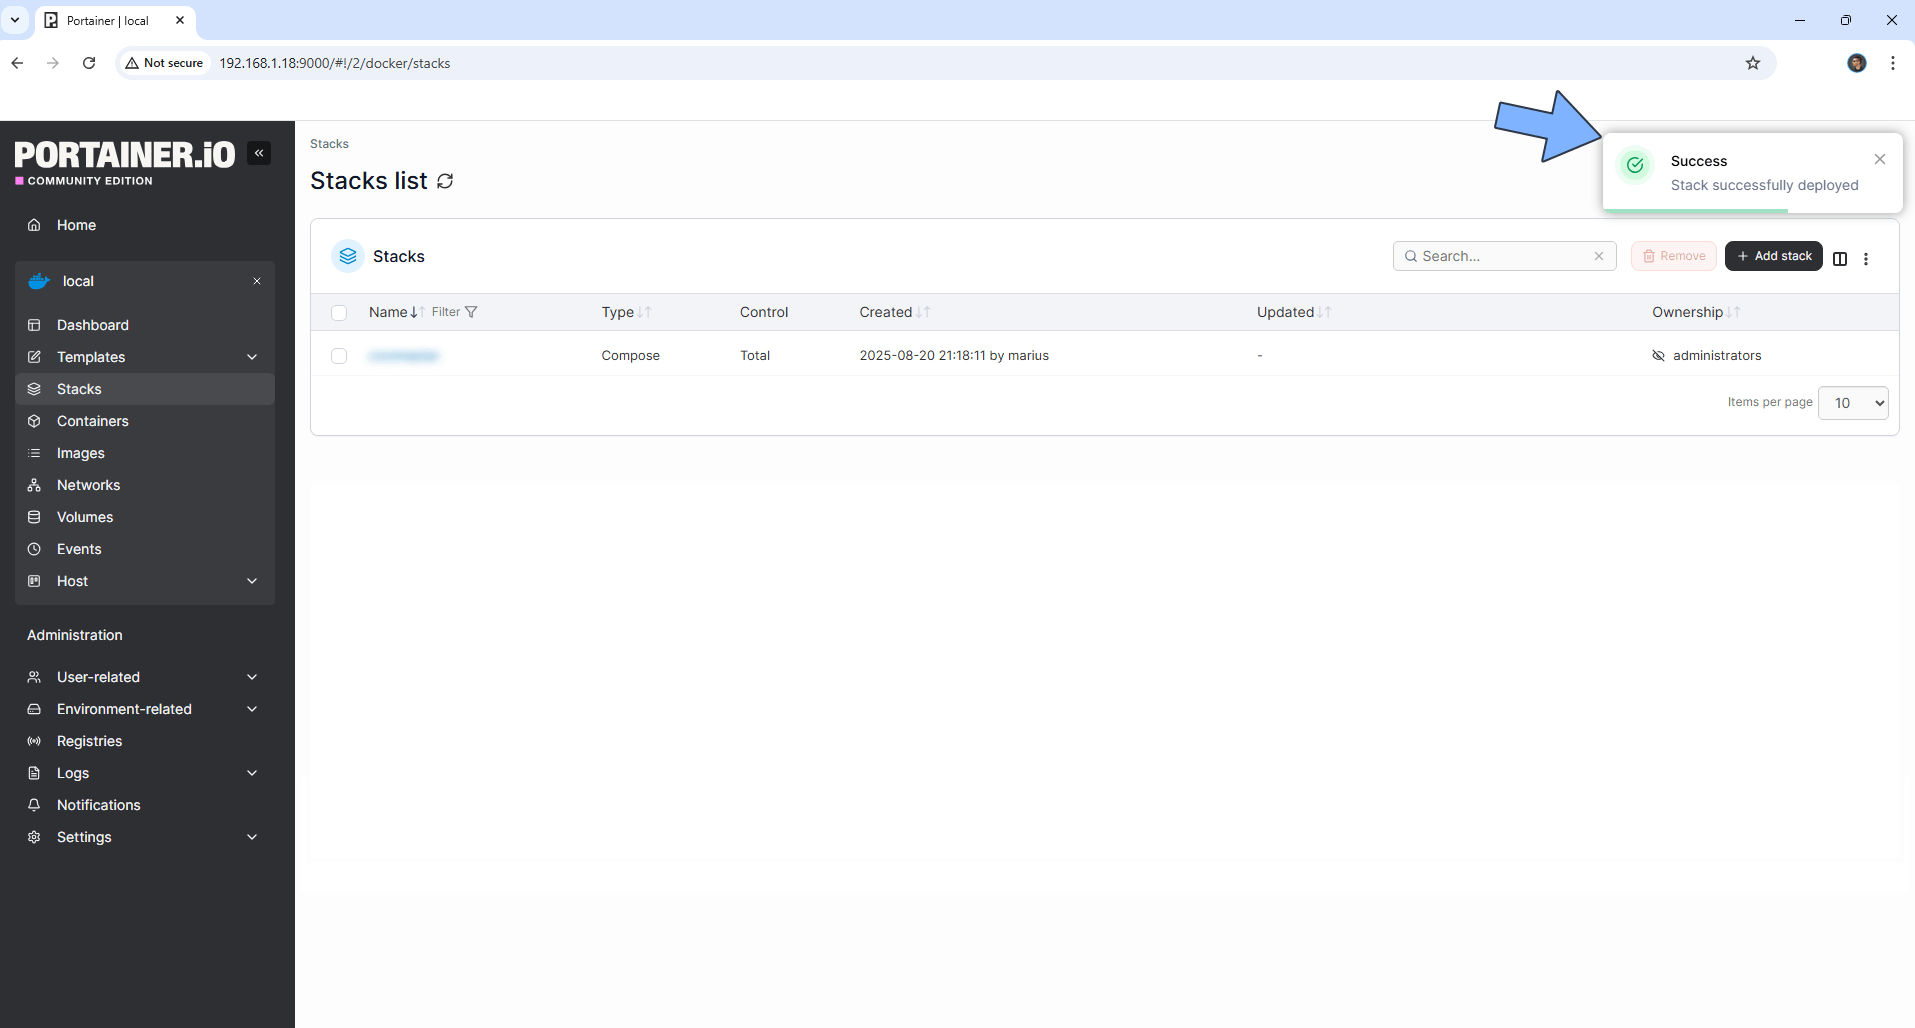
STEP 12
If everything goes right, you will see the following message at the top right of your screen: “Success Stack successfully deployed“.
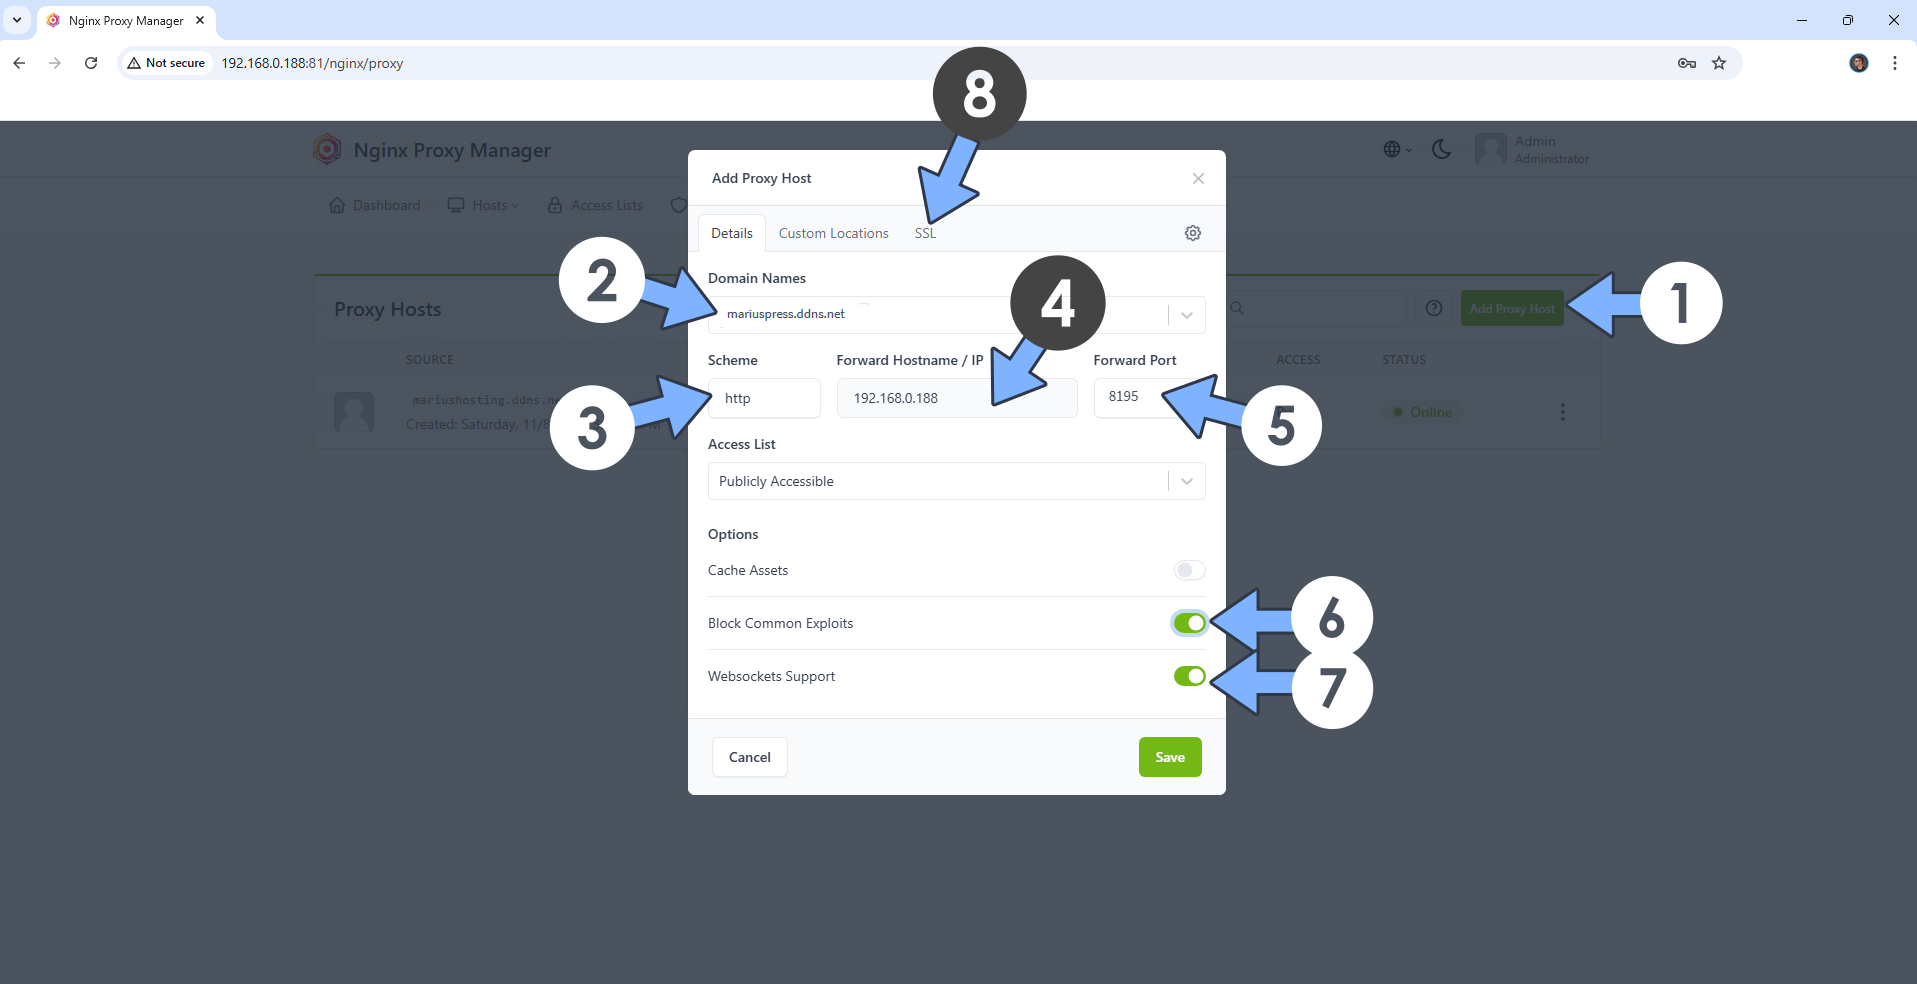
STEP 13
Open your Nginx Proxy Manager container that you have previously installed at STEP 3. Click Add Proxy Host. A new pop up window will open. Add the following details:
Domain Names: Type in your own noip domain name that you have previously created at STEP 5.
Scheme: http
Forward Hostname/IP: Type in the local NAS IP of your UGREEN NAS.
Forward Port: Type in the WordPress local Port that is 8195
Check Block Common Exploits
Check Websockets Support
Click the SSL tab. Follow the instructions in the image below.
STEP 14
After you click the SSL tab, add the following details:
SSL Certificate: Request a new SSL Certificate
Check: Force SSL
Check: HSTS Enabled
Check: HTTP/2 Support
Click Save. Follow the instructions in the image below.

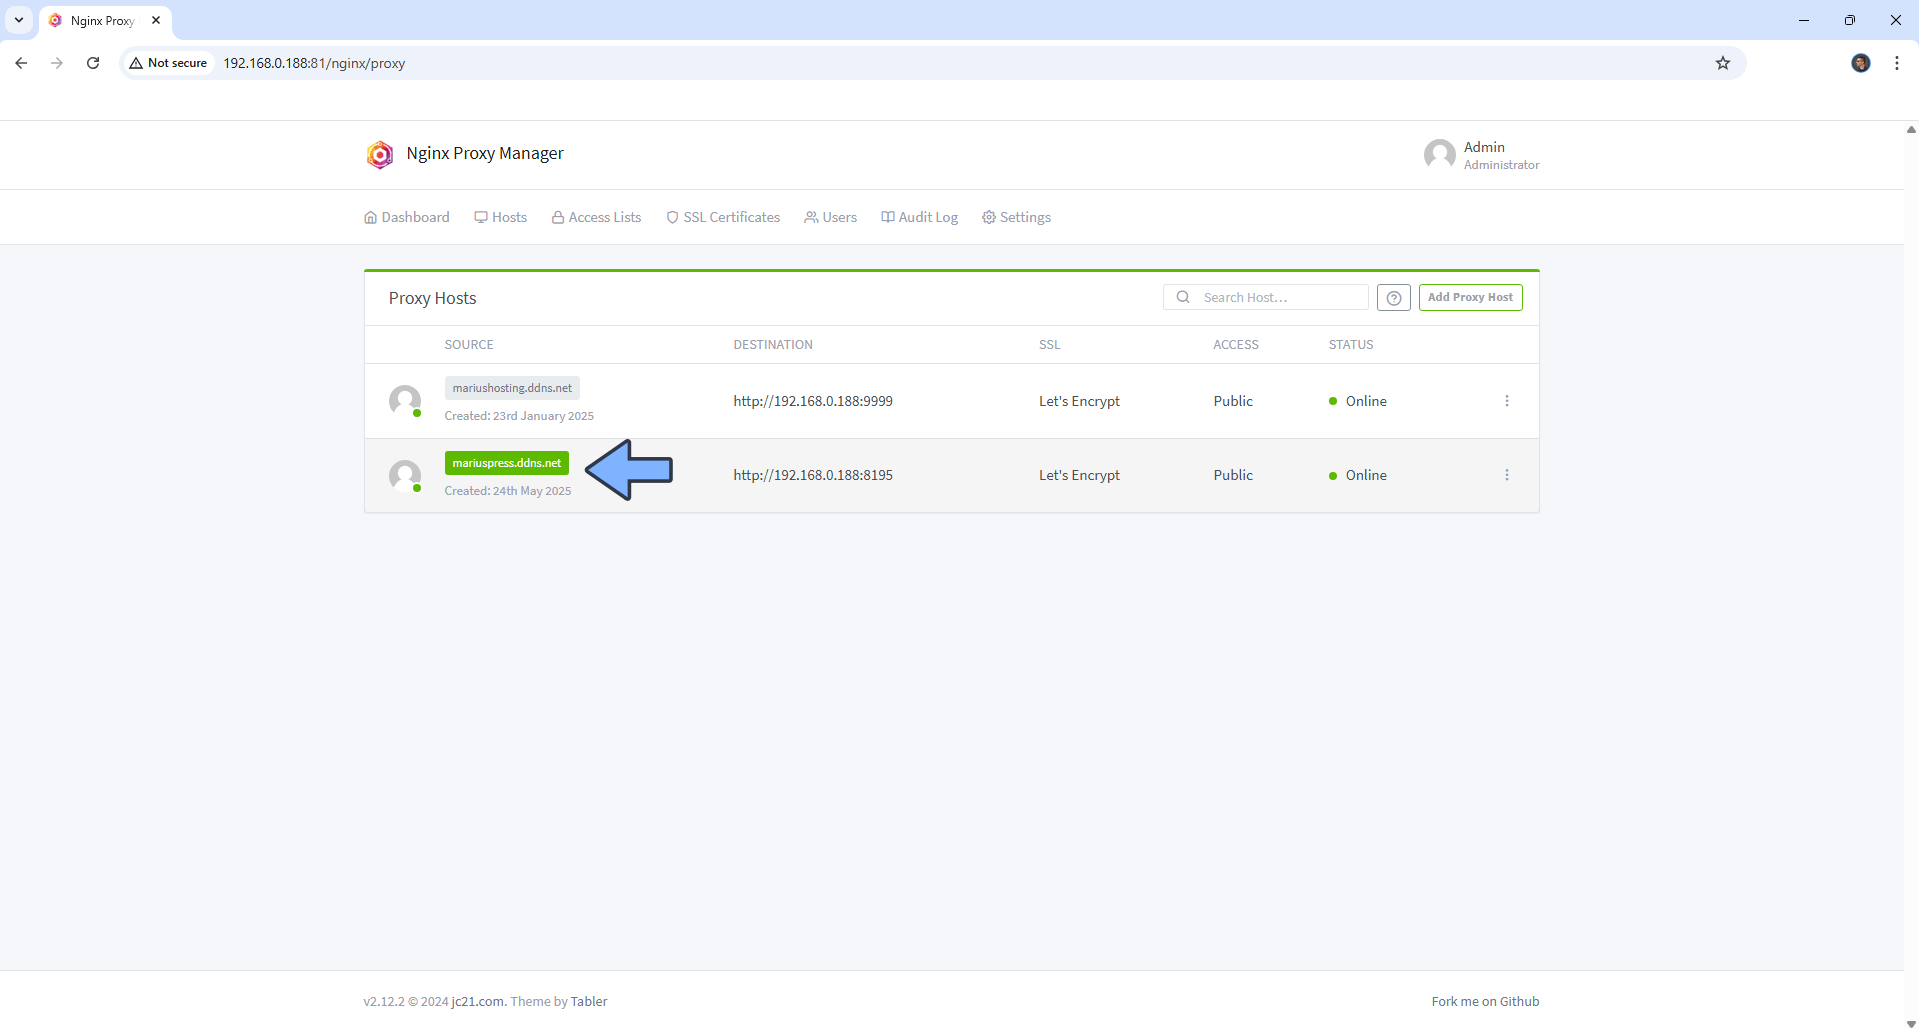
STEP 15
In the Proxy Hosts area, if everything goes right, you will see that your hostname has been generated. Click on it. Follow the instructions in the image below.
STEP 16
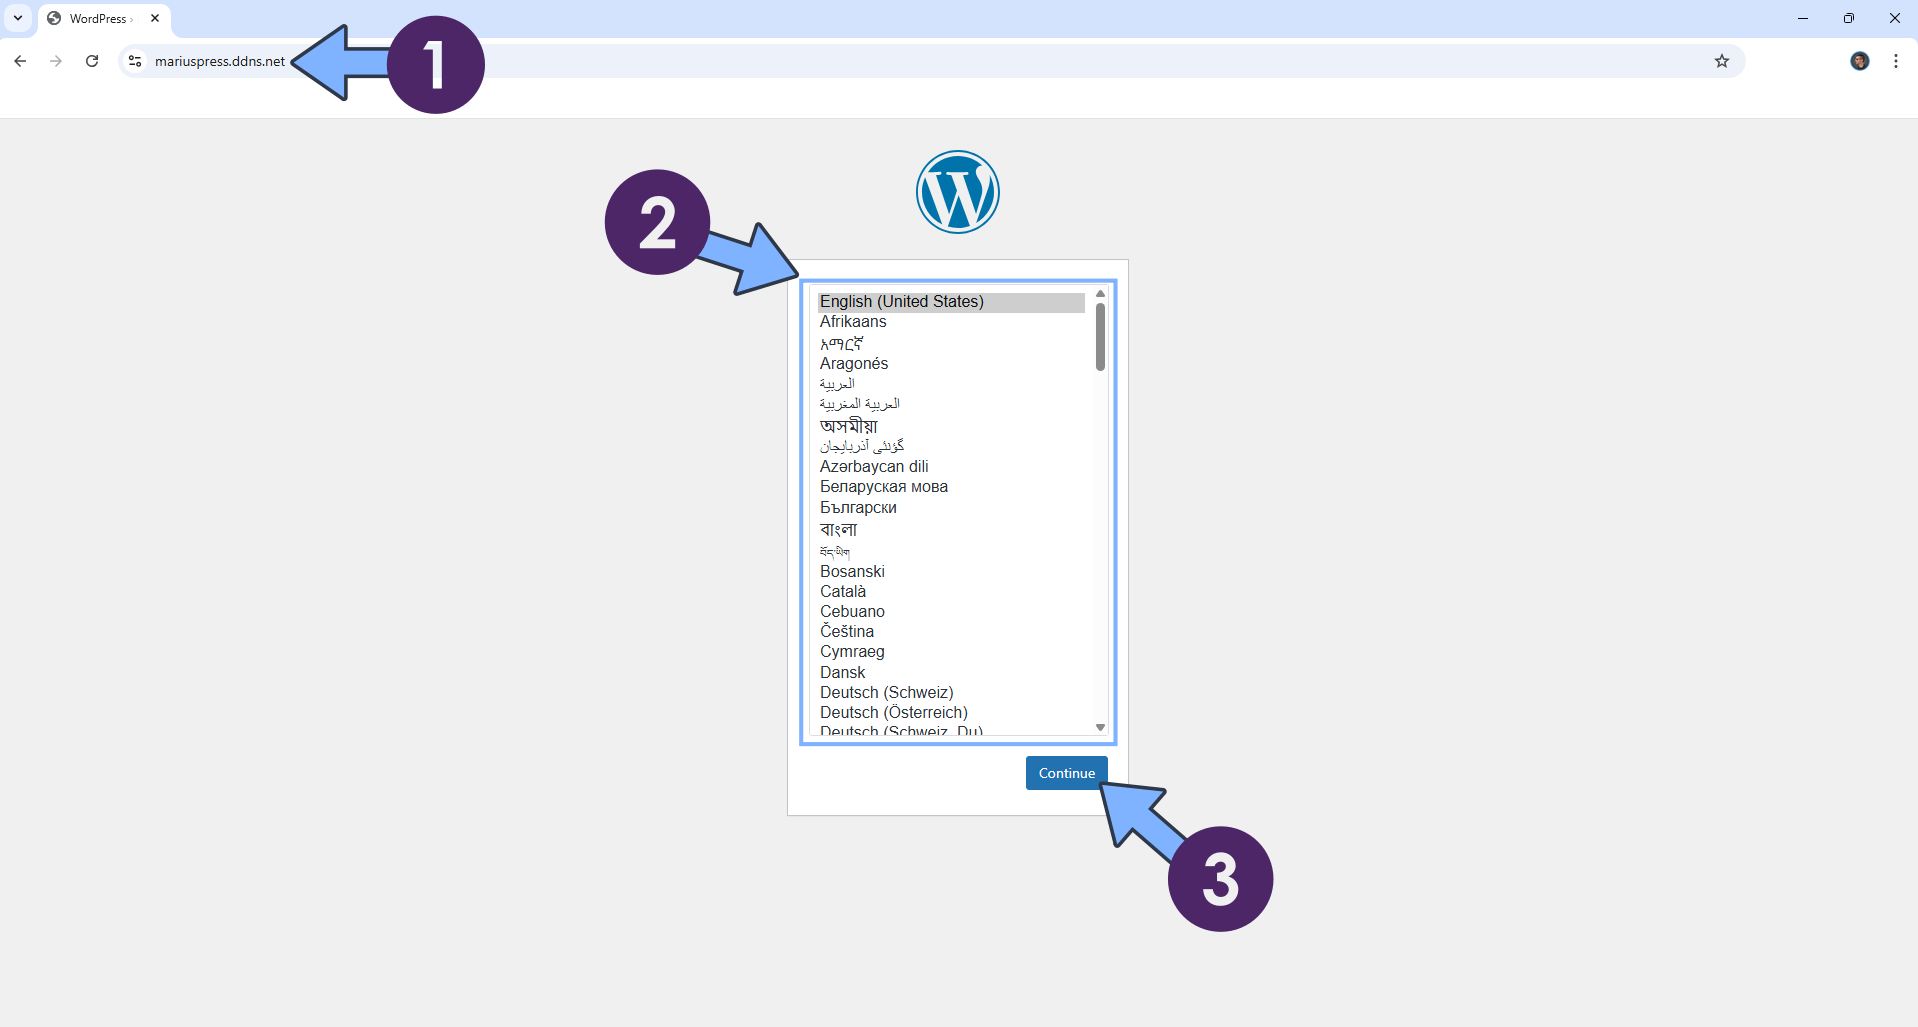
Now open your browser and type in your HTTPS/SSL certificate like this https://yourownhostname.ddns.net In my case it’s https://mariuspress.ddns.net If everything goes right, you will see the WordPress installation page. Choose your favorite language, then click Continue. Follow the instructions in the image below.
STEP 17
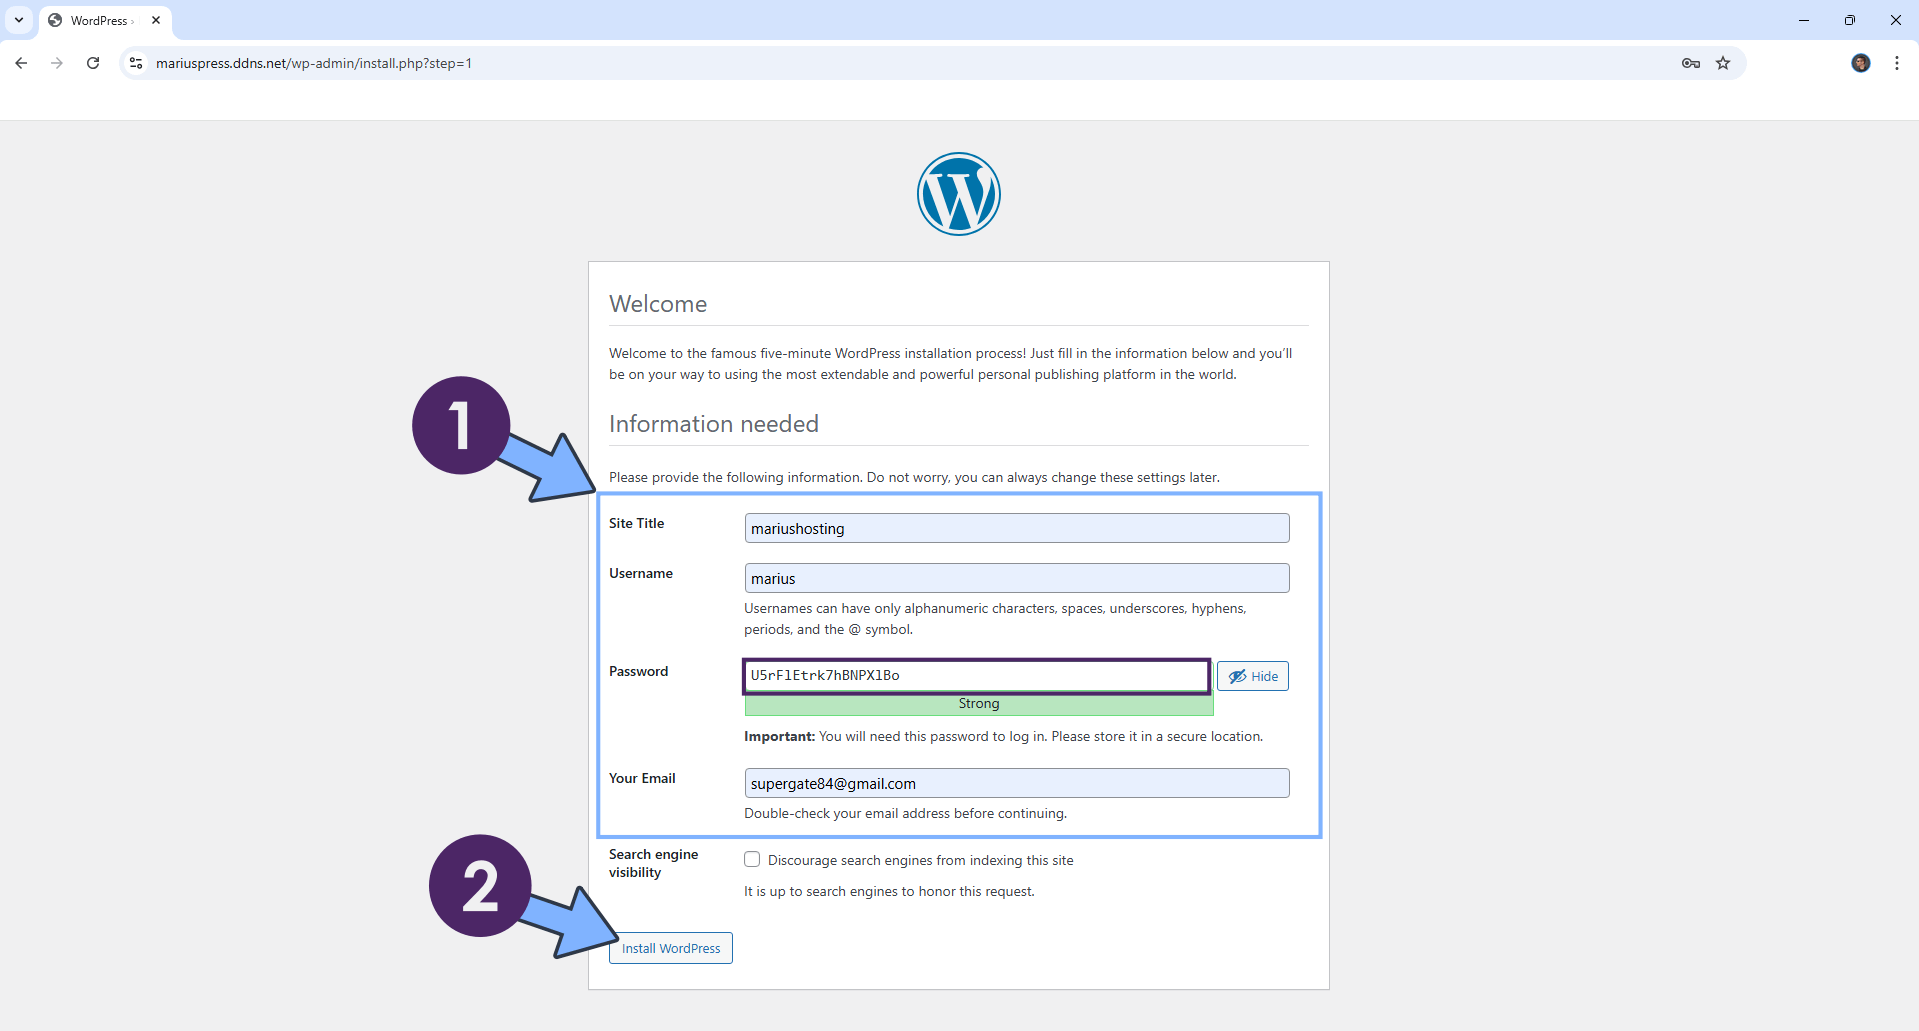
Type in your Site title, your own Username, your own Password and your own Email then click Install WordPress. Follow the instructions in the image below. ⚠️Warning: Username and Password in this area should be created now. ⚠️Do not confuse this Username and Password with the ones created at STEP 10.
STEP 18
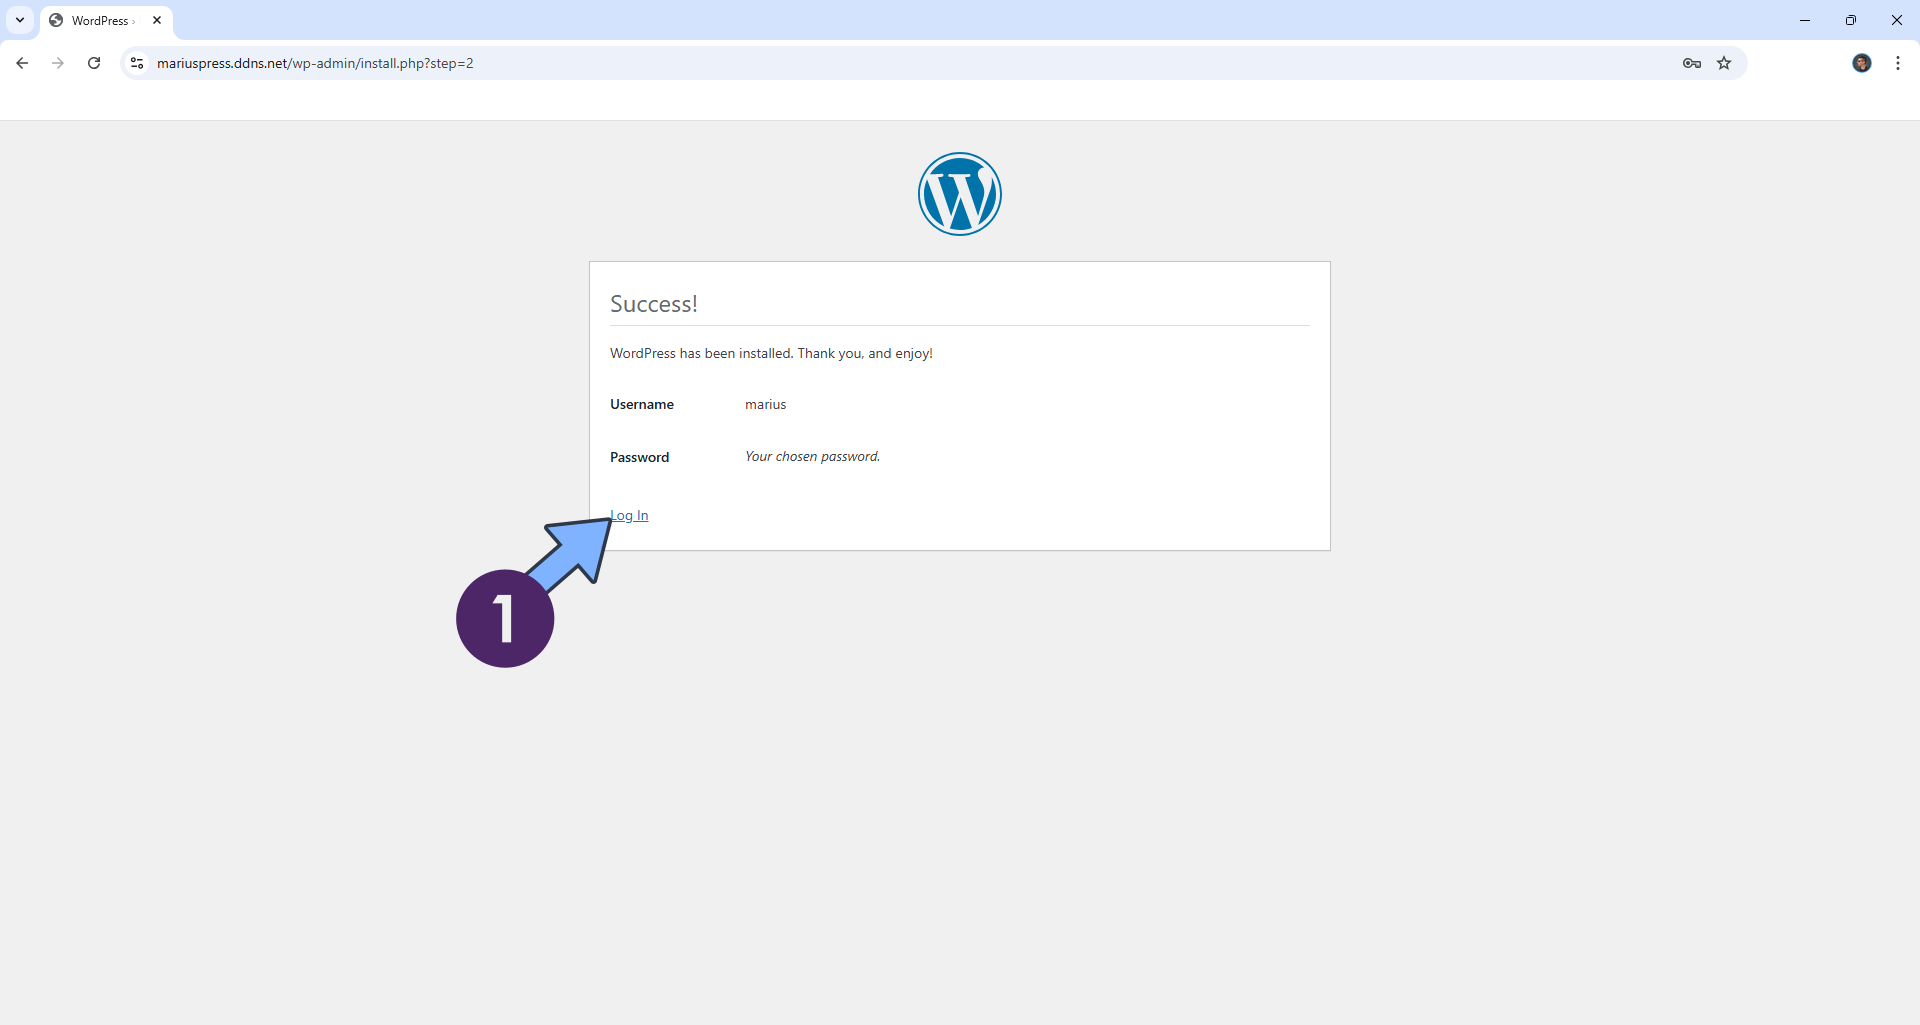
Wait approximately 1 minute for the installation to be completed. Click Log in. Follow the instructions in the image below.
STEP 19
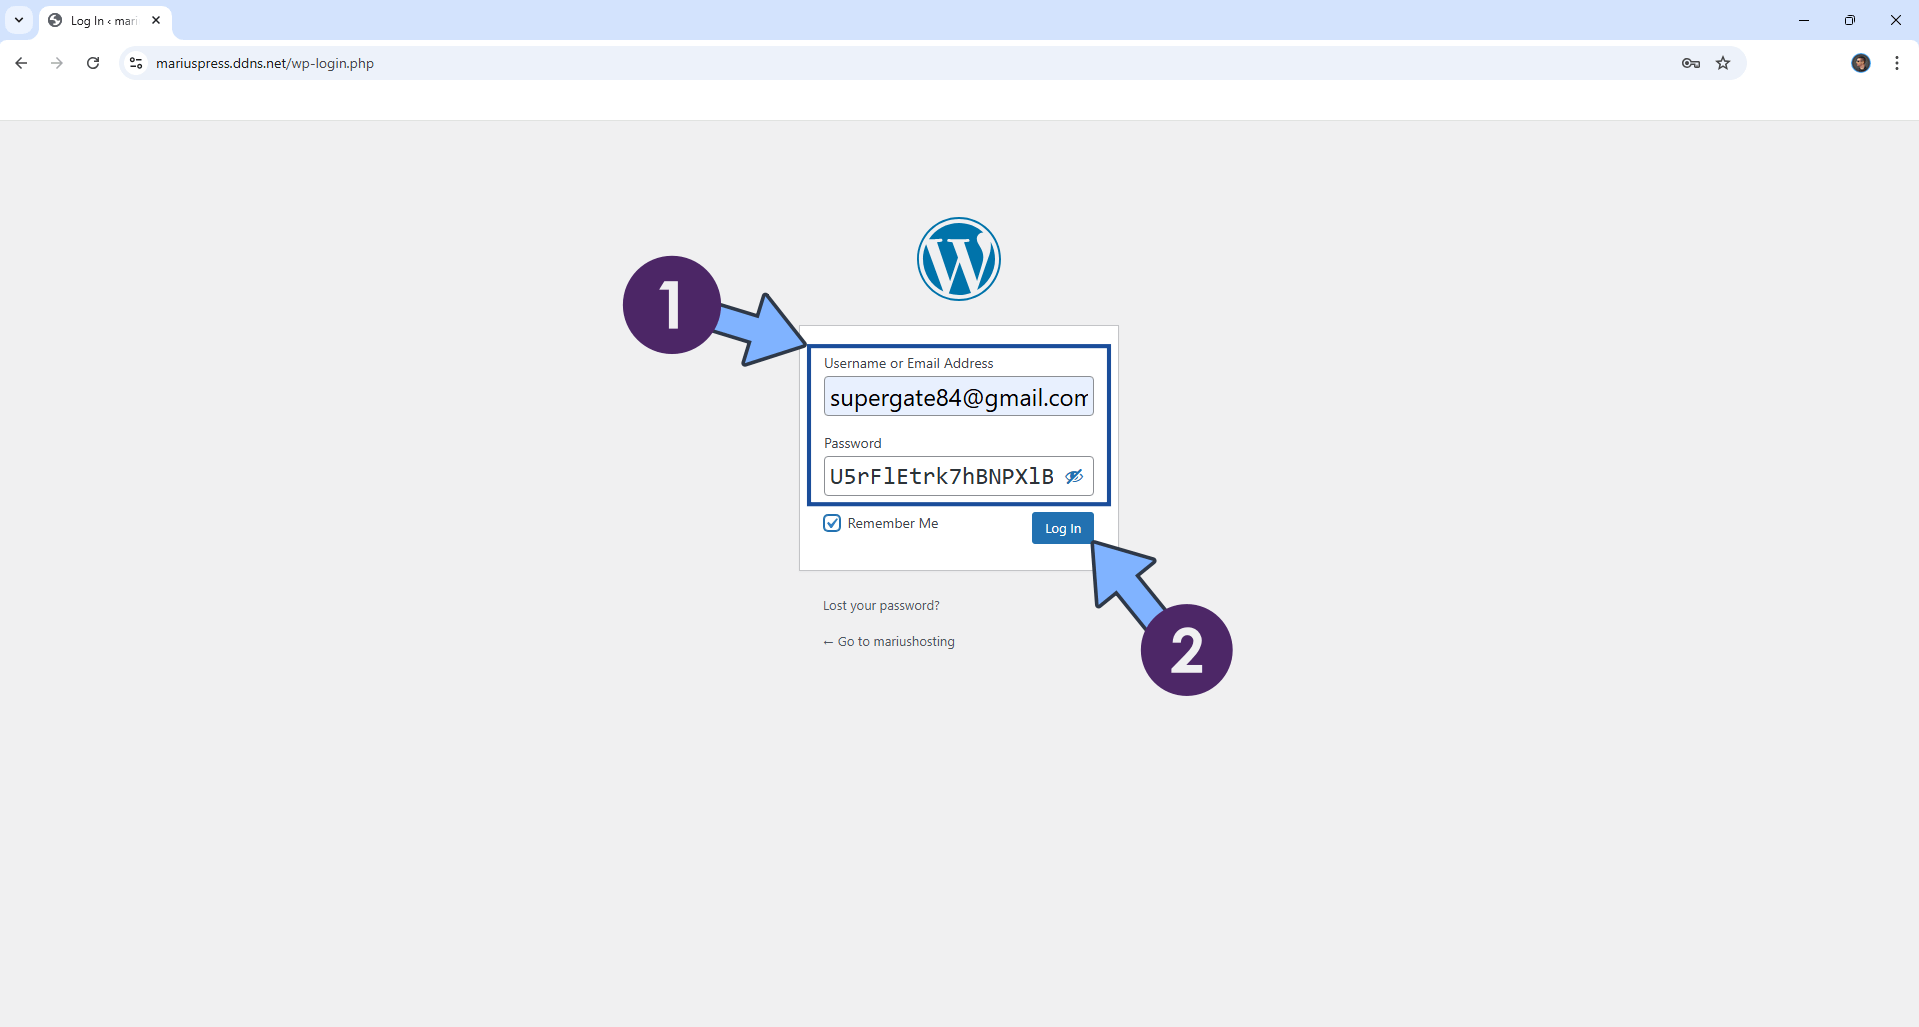
Type in your own Username and Password that you have previously created at STEP 17, then click Log in. Follow the instructions in the image below.
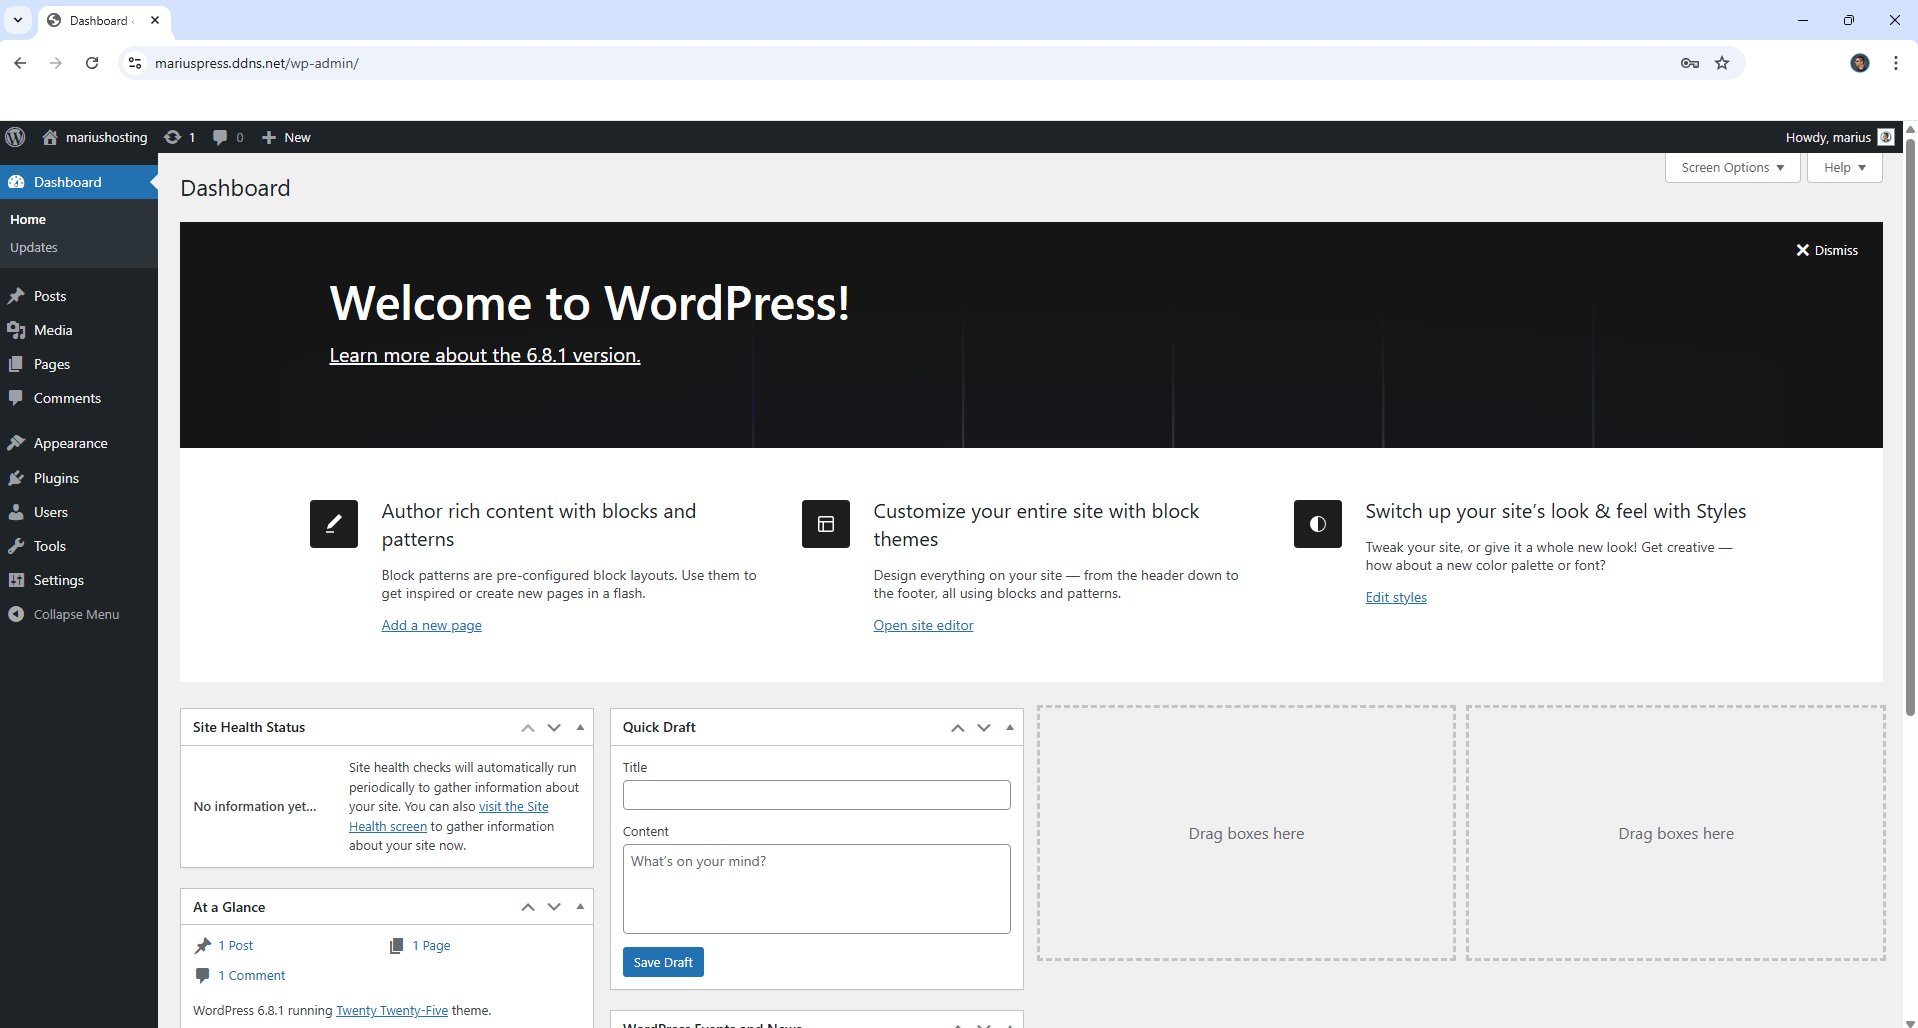
STEP 20
Your WordPress instance should look like this.
STEP 21
Go to Files then open the wordpress folder. Make sure you have installed the TextEdit app as per the instructions at STEP 4. Double click on the wp-config.php file to open it. Follow the instructions in the image below.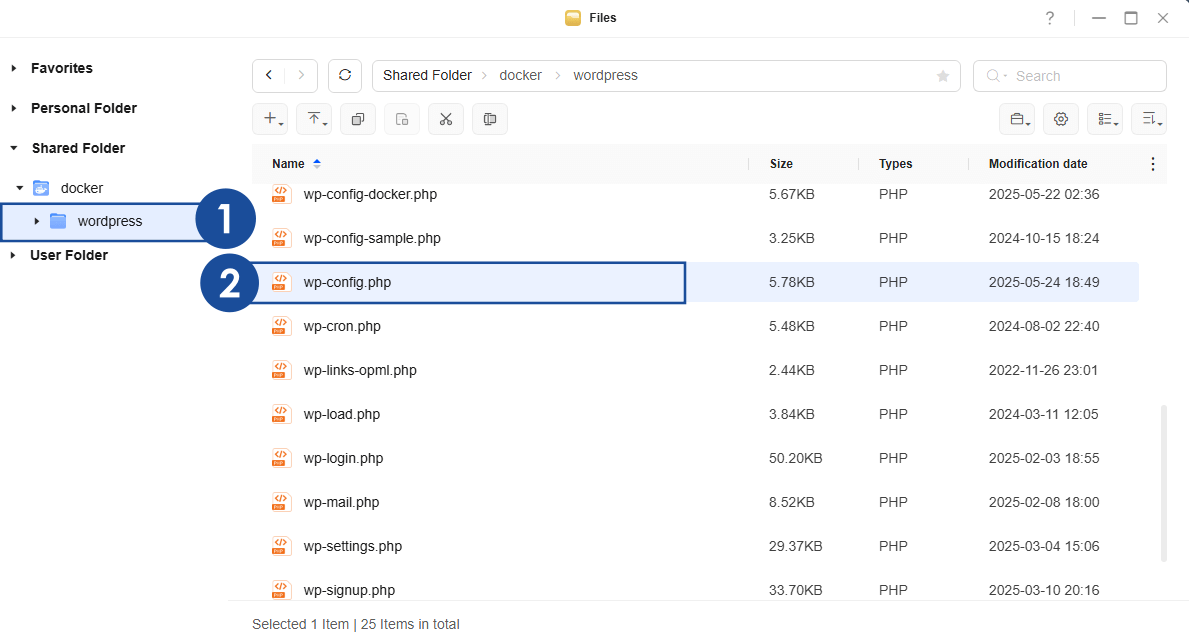
STEP 22
Under the WORDPRESS_DEBUG line, copy and paste these two supplementary lines below.
define('WP_REDIS_HOST', 'wordpress-redis');
define('WP_REDIS_PORT', '6379');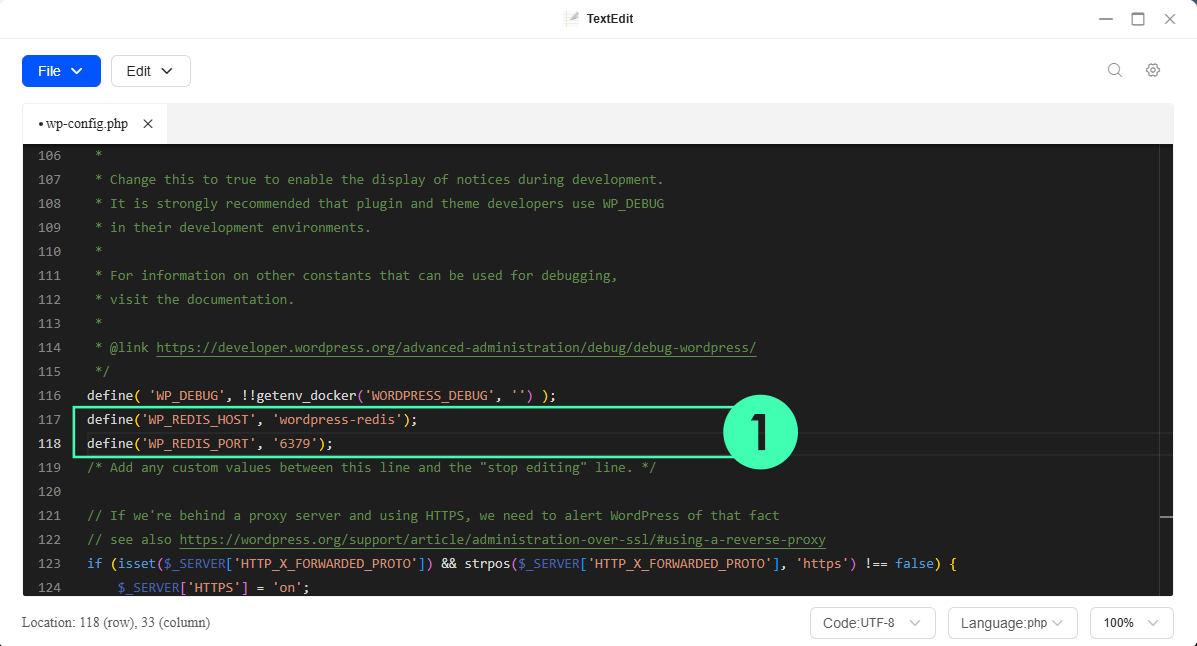
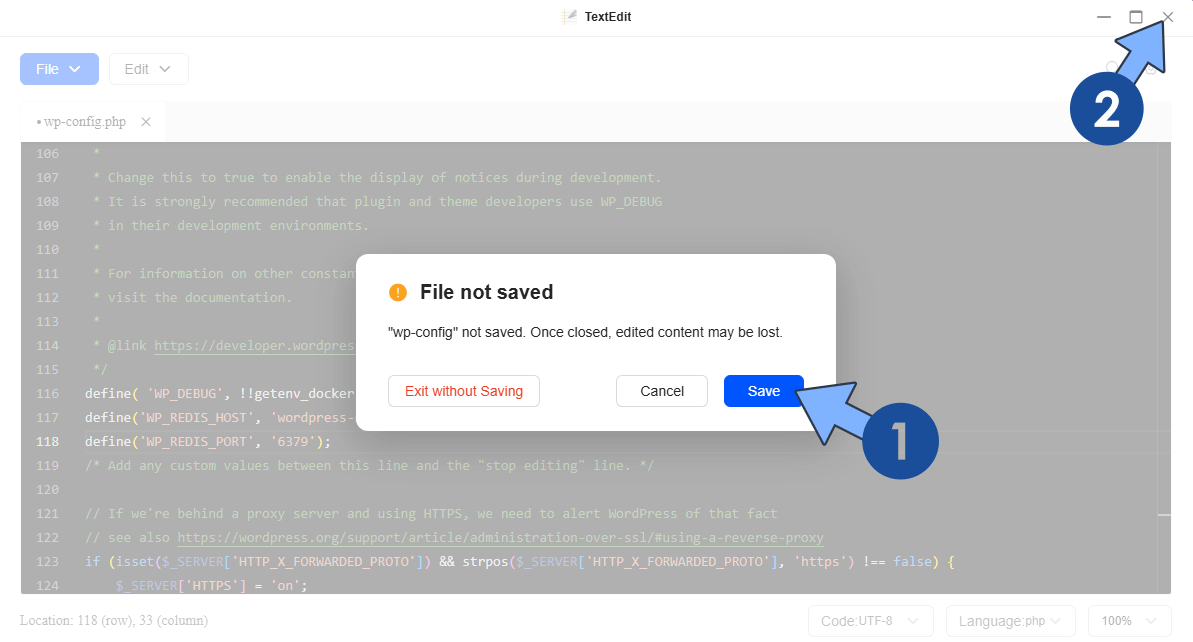
STEP 23
Click X to save the file. Follow the instructions in the image below.
STEP 24
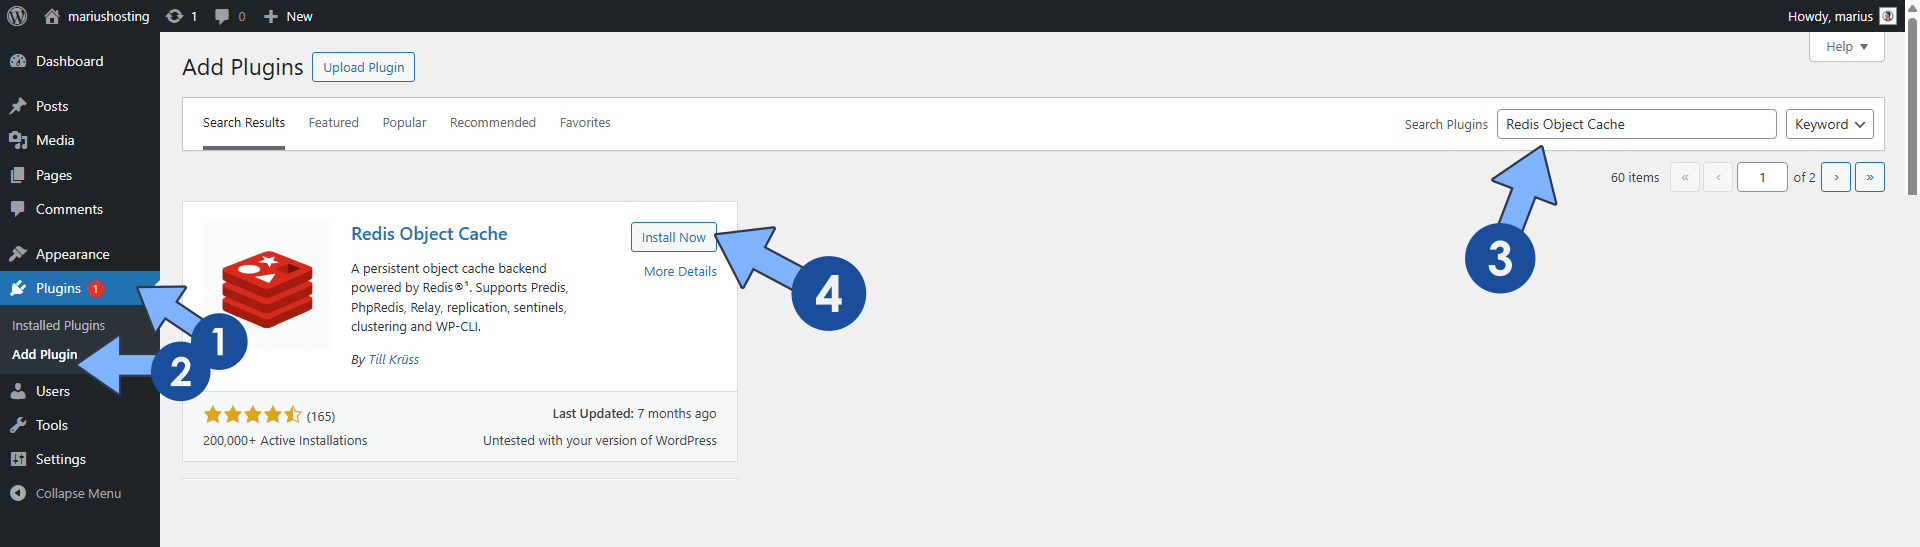
On the WordPress left sidebar, click on Plugins, then Add Plugin. Search for Redis Object Cache. When you find the plugin named Redis Object Cache, click Install Now. Follow the instructions in the image below.
STEP 25
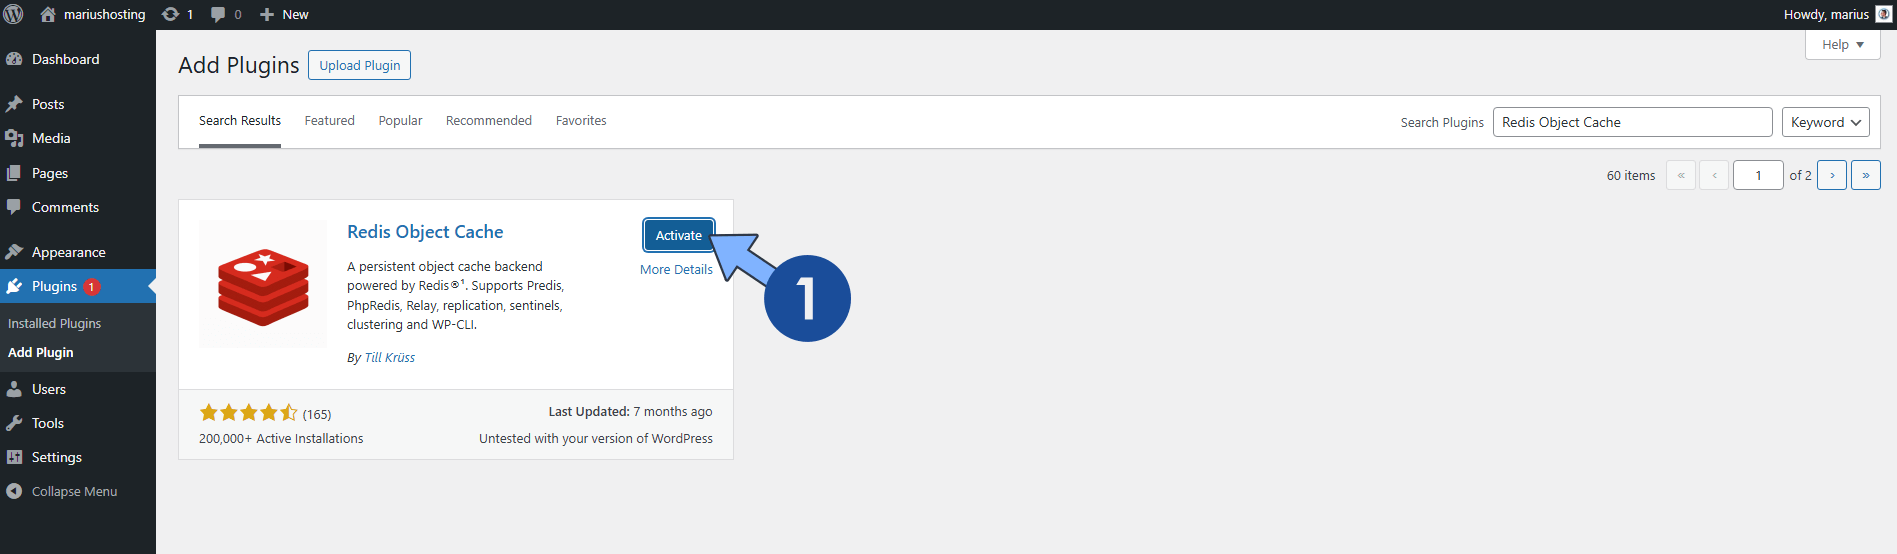
Click Activate. Follow the instructions in the image below.
📝Note: WordPress uses the MySQL/MariaDB database to cache internal application objects like breadcrumbs, menu items etc. which are very heavy to generate. A database handles queries for page requests, and causes increased load-times when your website is loaded intensively. Redis provides a caching mechanism that acts as an alternative to your MySQL/MariaDB database. If someone is visiting your WordPress website, the MySQL/MariaDB queries required to generate the entire page are served via Redis which caches the results. This results in blazing fast load times, comparable to static pages without Redis. When a user requests a WordPress page for the first time, a MySQL/MariaDB database query is performed on your UGREEN NAS server. Redis will cache this query, so when another user requests the same identical WordPress page, the results are provided from Redis, without the need to query the MySQL/MariaDB database again. So, in a few words, if the query is not cached in Redis, the results are provided by your MySQL/MariaDB database, which are then added to the Redis cache. Redis stores data in memory rather than on an HDD or SSD cache; its response time is faster than others when performing read and write operations.
STEP 26
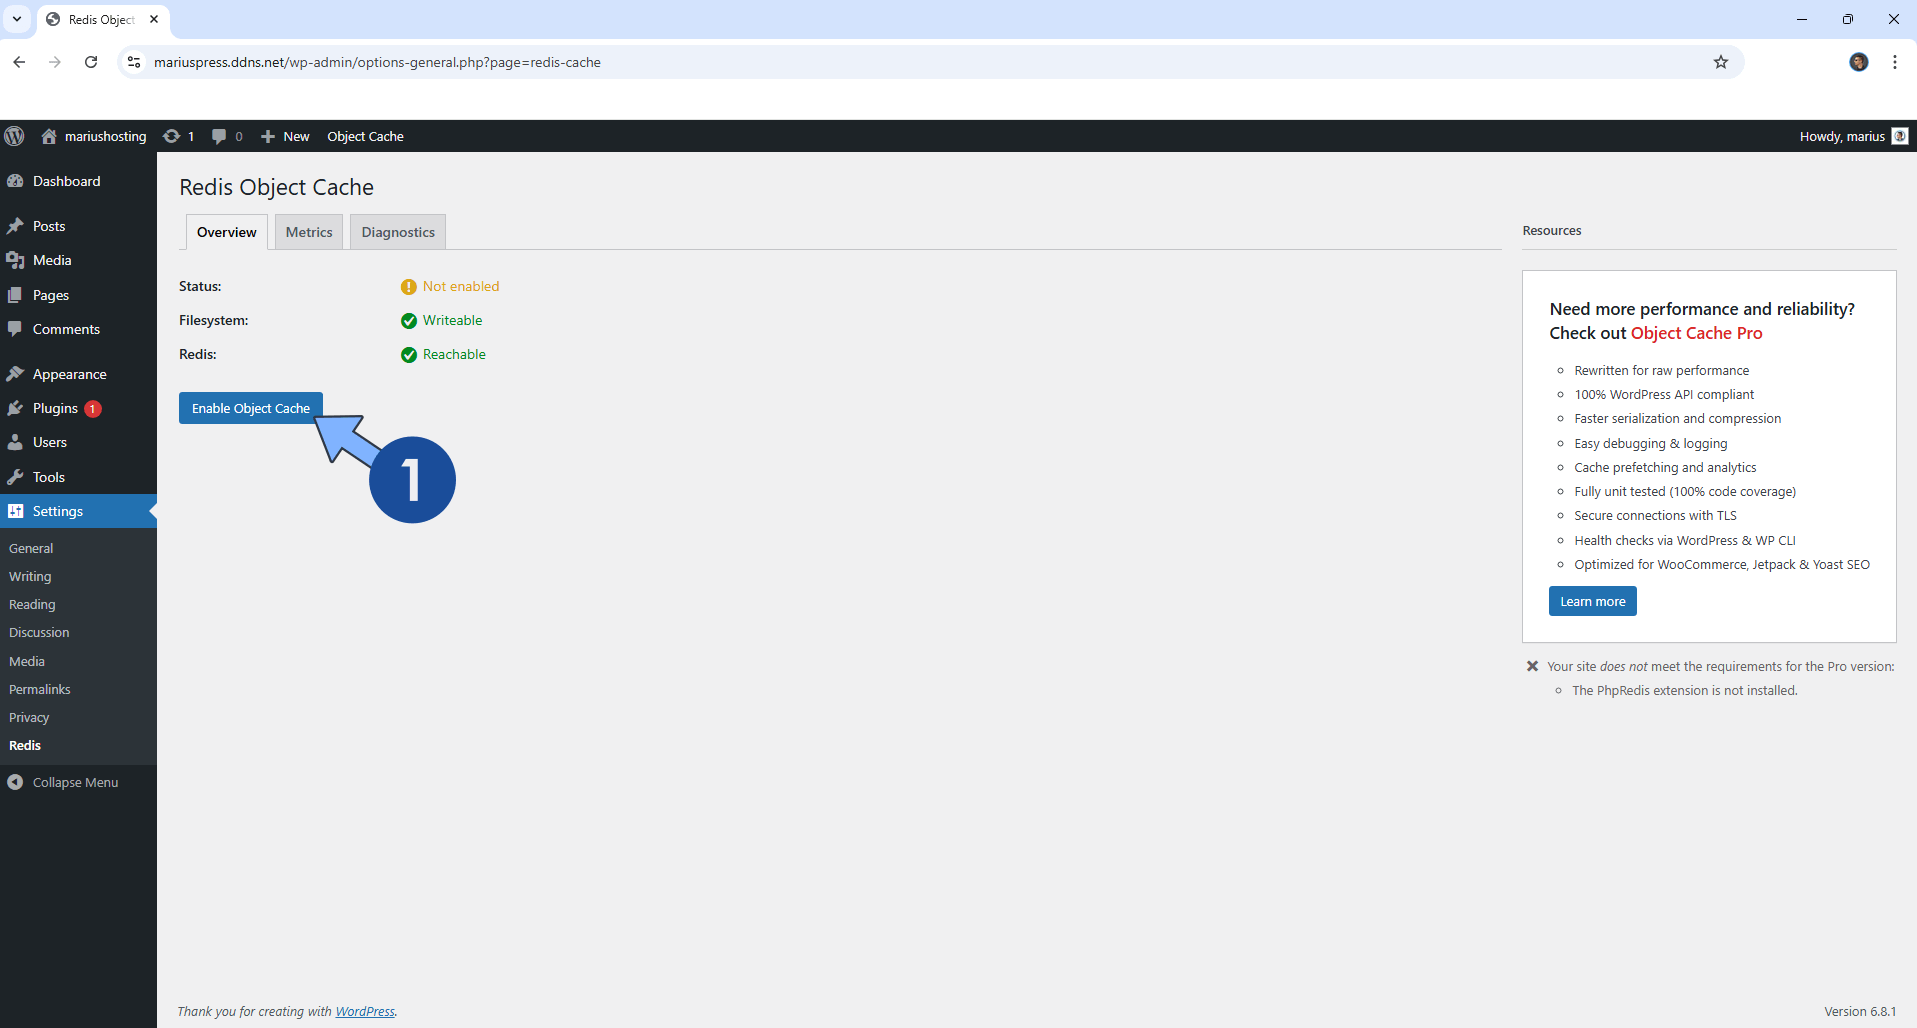
After the Redis Object Cache plugin is installed, you will find it under the Settings menu. Click on Redis. Click Enable Object Cache. Follow the instructions in the image below.
STEP 27
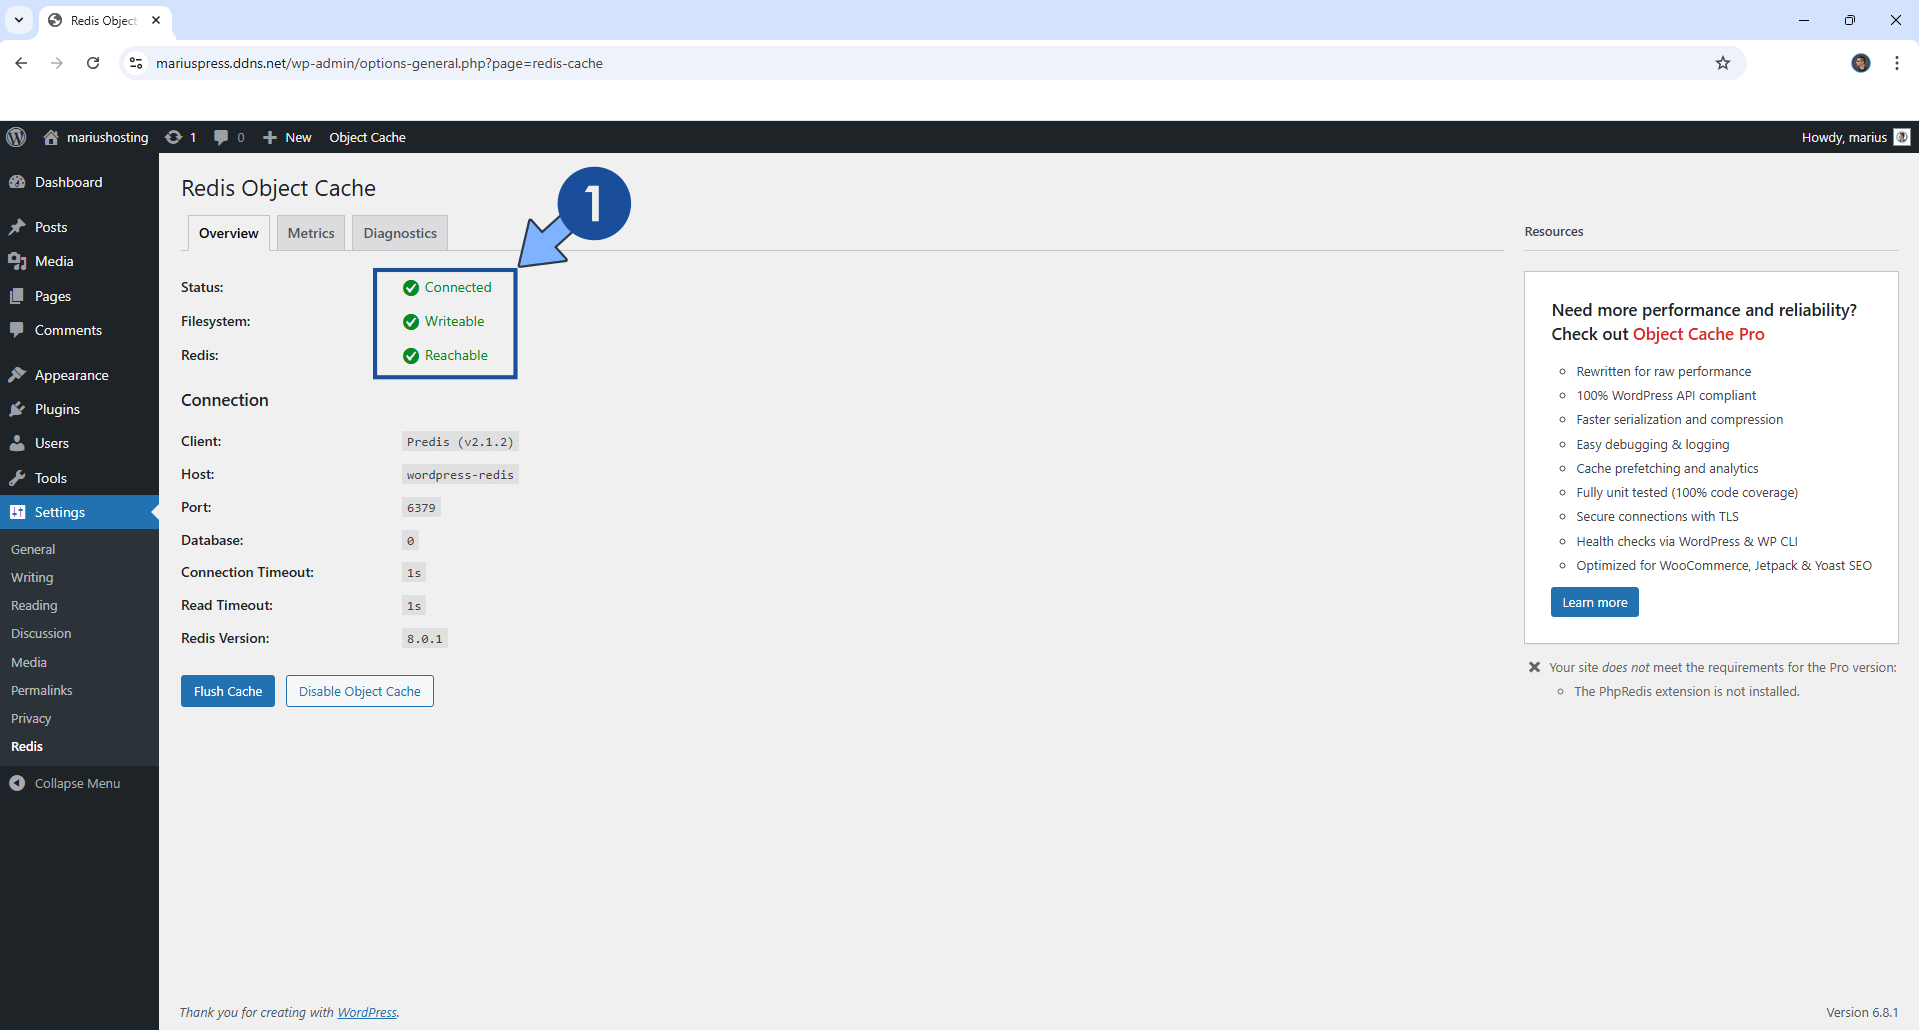
After you click Enable Object Cache, the Status will say Connected. Follow the instructions in the image below. ⚠️Warning: If you accidentally click Flush Cache, your Redis host will be disconnected. To solve this issue, just restart the WordPress-REDIS container via Portainer.
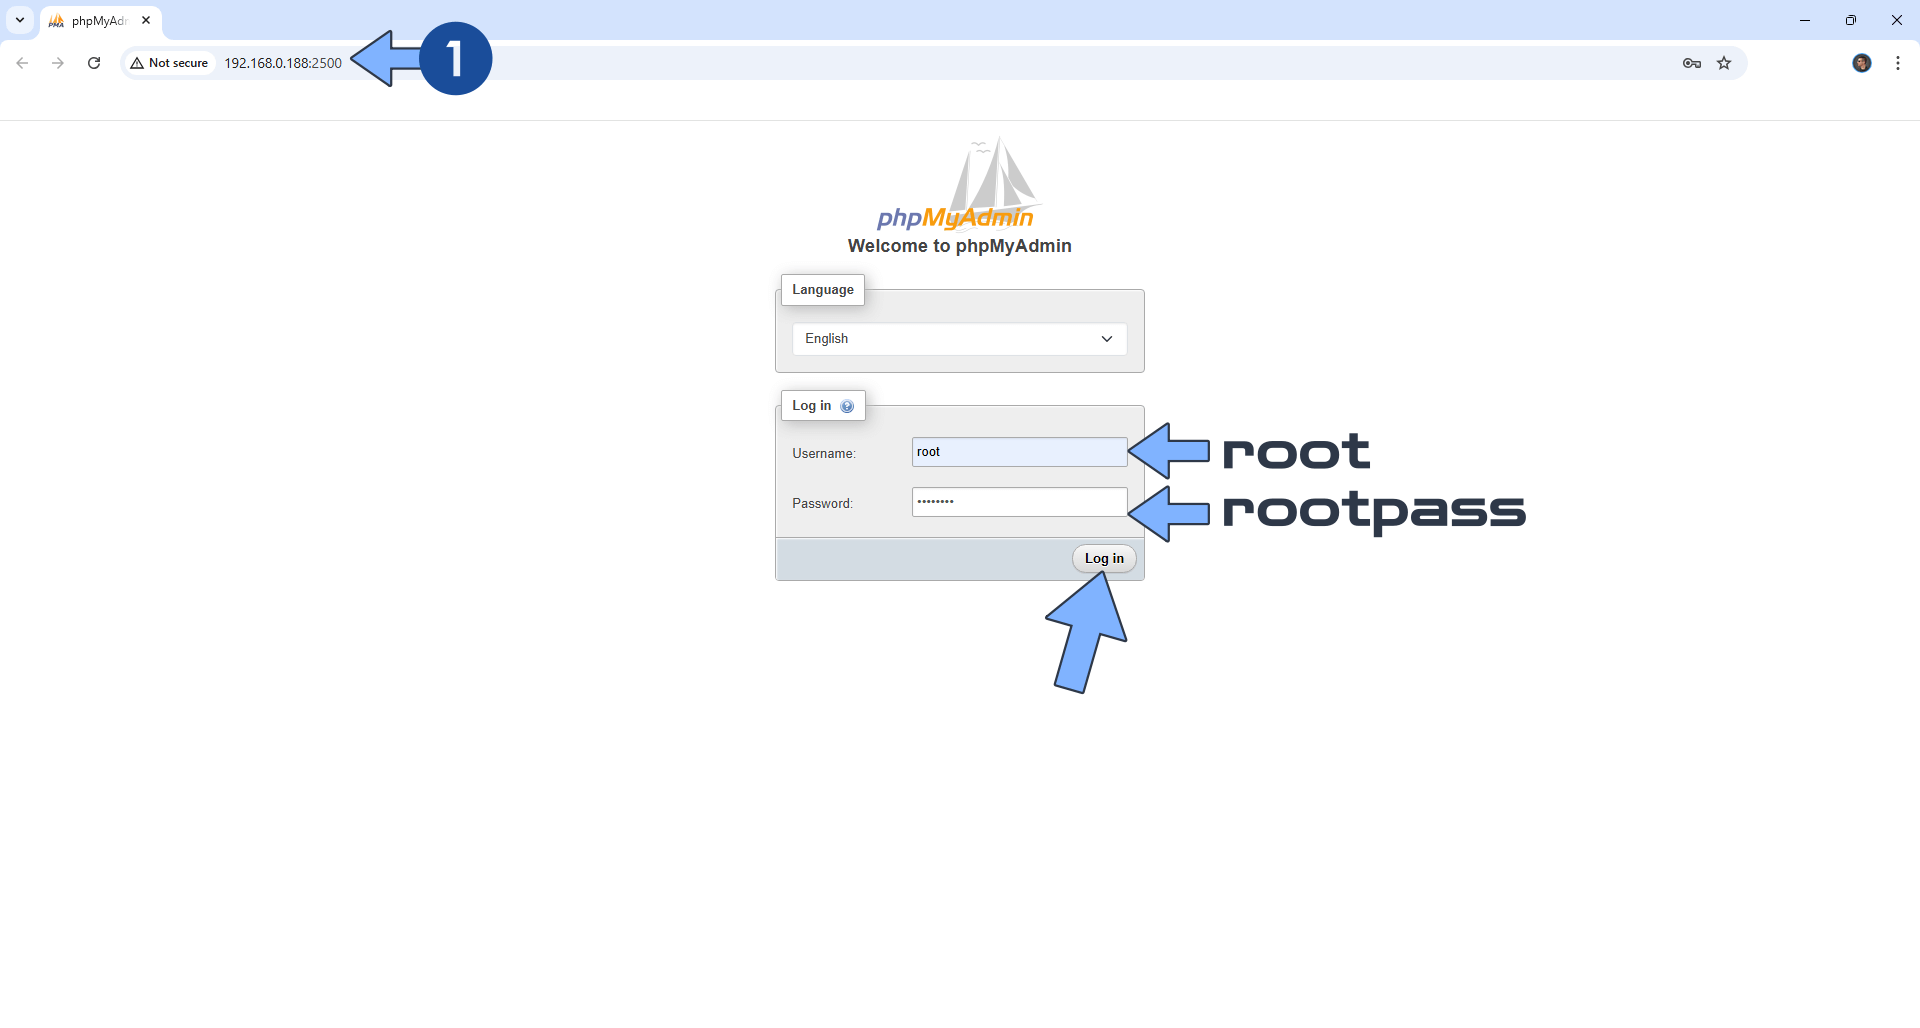
STEP 28
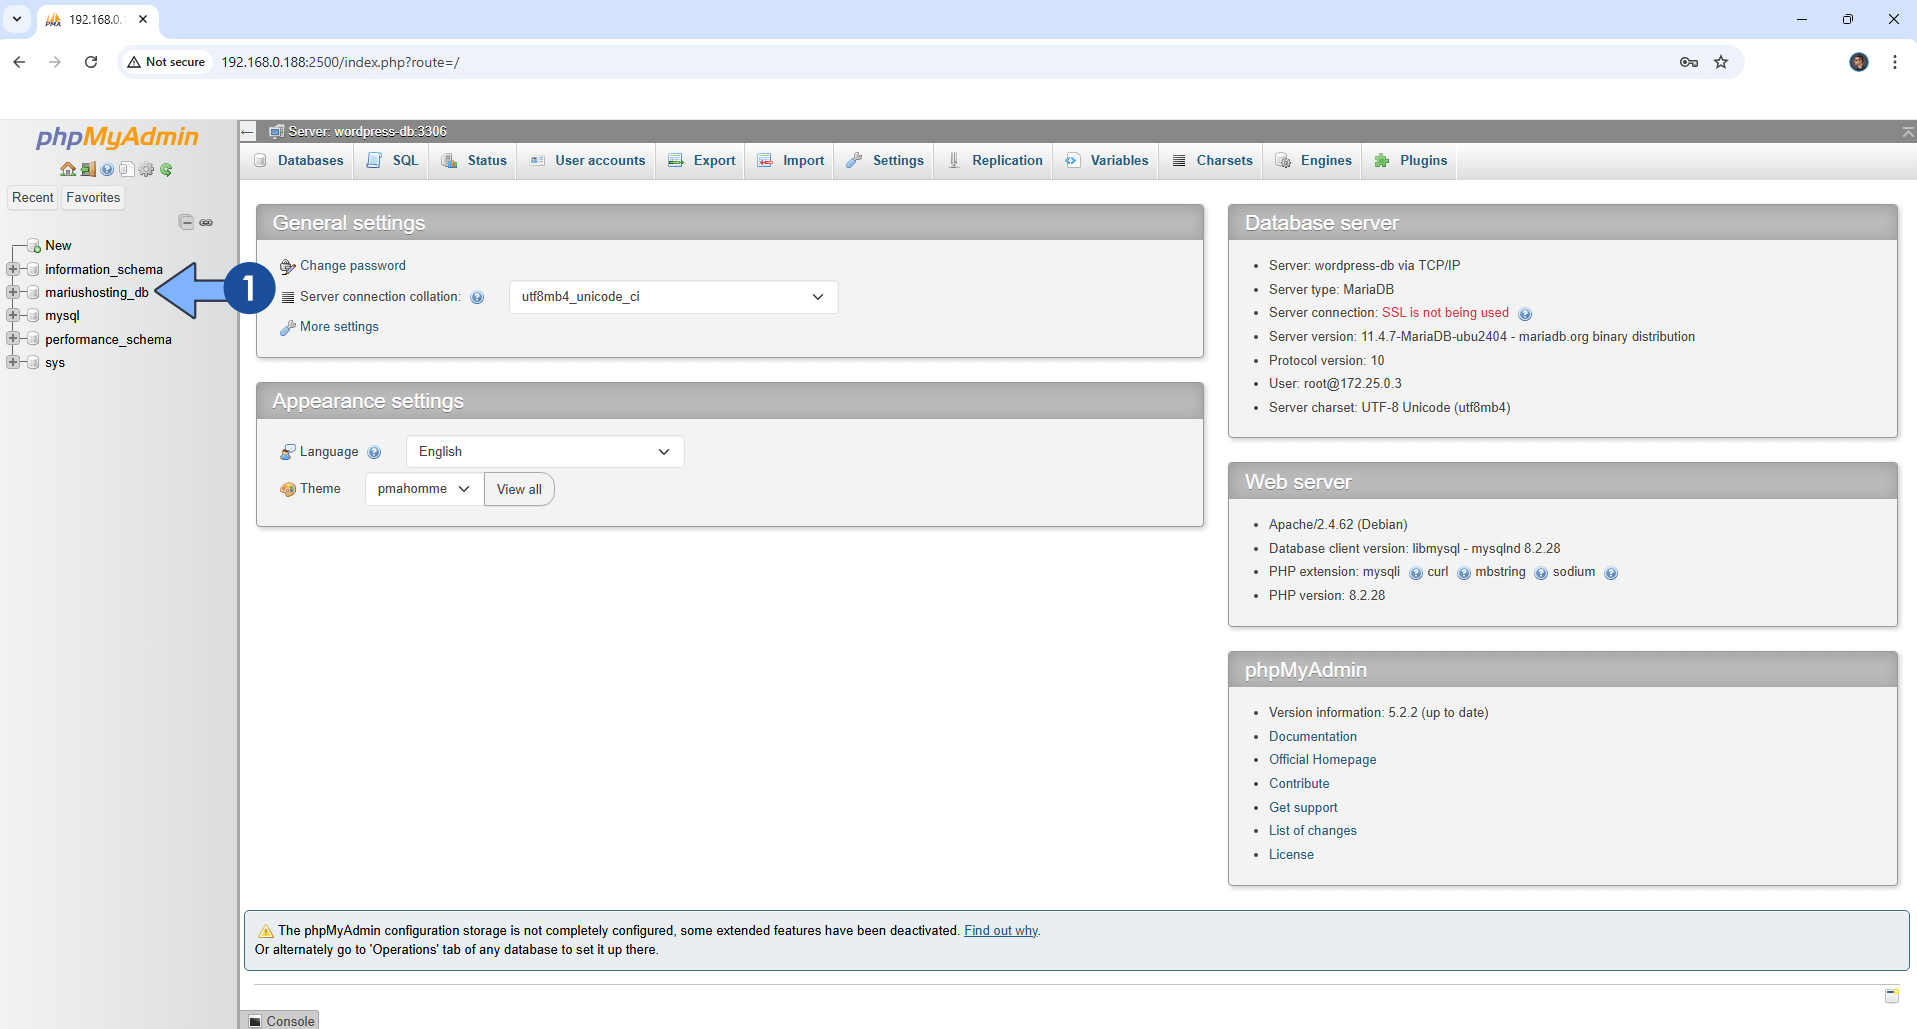
phpMyAdmin is the graphical interface for the MariaDB database. It will help you connect to your database. Open your browser and type in http://ugreen-ip-address:2500 Connect to your MariaDB using root as Username and rootpass as Password. Click Log in. Follow the instructions in the image below.
STEP 29
You can now download and back up your WordPress database without needing to install any backup plugin on your WordPress website. ⚠️Warning: Do not expose the phpMyadmin instance to the Internet via Nginx Proxy Manager. You can do it by using a strong password, but it’s not recommended to expose it. Keep it local.
Note: Find out how to backup your WordPress database using phpMyAdmin. This Synology instruction also works with UGREEN.
Note: Fix the error message: The phpMyAdmin configuration storage is not completely configured. This Synology instruction also works with UGREEN.
Enjoy WordPress on your UGREEN NAS!
🆙Note/Update/Container: How to Update Your Docker Containers on UGREEN NAS Using Portainer.
🐳Note: How to Create Docker Shortcuts on Desktop.
🆕Note: How to Update Portainer to the latest version.
🆕Note: How to Clean Docker.
This post was updated on Wednesday / March 11th, 2026 at 9:18 PM