RustDesk is a free, open-source remote desktop application designed for secure and efficient remote access and control. It serves as a robust alternative to commercial tools like TeamViewer, AnyDesk, Splashtop, offering users the ability to self-host their own servers for complete data control and enhanced security. Available on Windows, macOS, Linux, Android, and iOS, RustDesk provides cross-platform compatibility with minimal configuration. Key features include fast and reliable connections, end-to-end encryption, and a user-friendly interface. RustDesk is ideal for IT professionals, businesses, and individuals seeking a cost-effective, secure solution for remote desktop management. In this step by step guide I will show you how to install RustDesk on your UGREEN NAS using Docker and Portainer.
This guide works perfectly with the latest RustDesk Client 1.4.6 and RustDesk Server 1.1.15 release.
STEP 1
Please Support My work by Making a Donation.
STEP 2
Install Portainer using my step by step guide. If you already have Portainer installed on your UGREEN NAS, skip this STEP. Attention: Make sure you have installed the latest Portainer version.
STEP 3
Enable your NO IP DDNS address by Following the instructions in this article from STEP 1 to STEP 16. If you already have your NO IP DDNS, skip this STEP.
STEP 4
Log in to your router. Find the Port Forwarding area. At the moment, I am using an RT6600ax Synology router. Remember that every router has its own interface design. Be sure to open the necessary ports through your router settings, both TCP/UDP. If the ports that point to your UGREEN NAS device are not opened, all the services you have activated on those specific ports will not work. All you need to do is give your UGREEN NAS device permissions on ports 21115, 21116, 21117, 21118, 21119, both TCP and UDP, then apply the settings. Follow the instructions in the image below. Note: ports 21115, 21116, 21117, 21118, 21119 are mandatory ports to make RustDesk work on your UGREEN NAS.

STEP 5
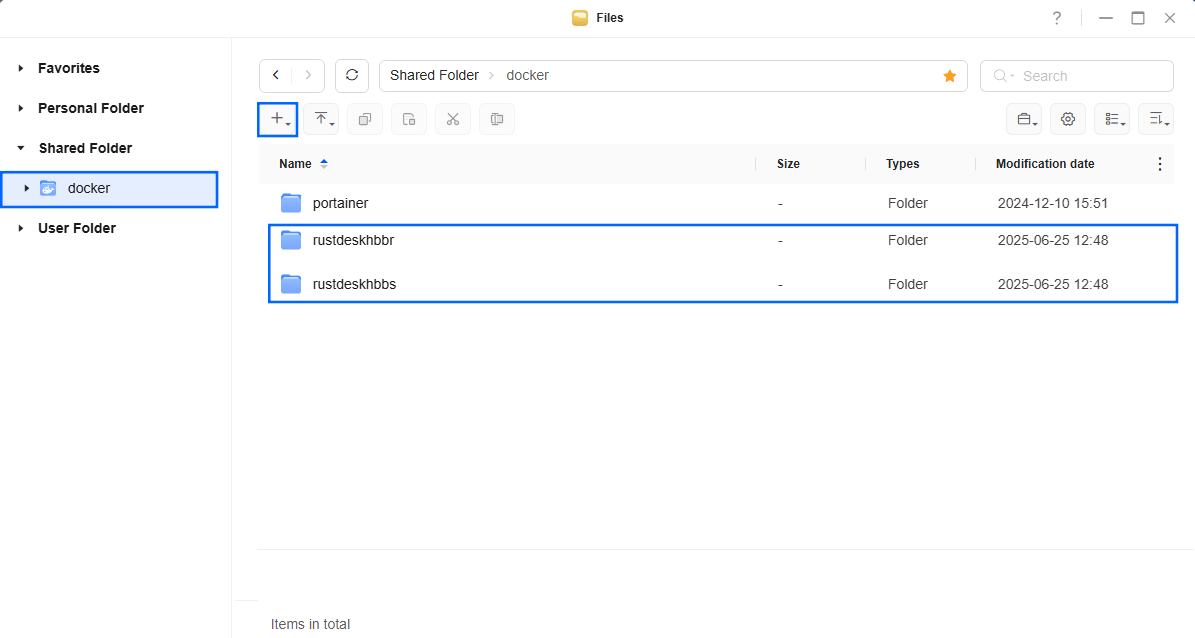
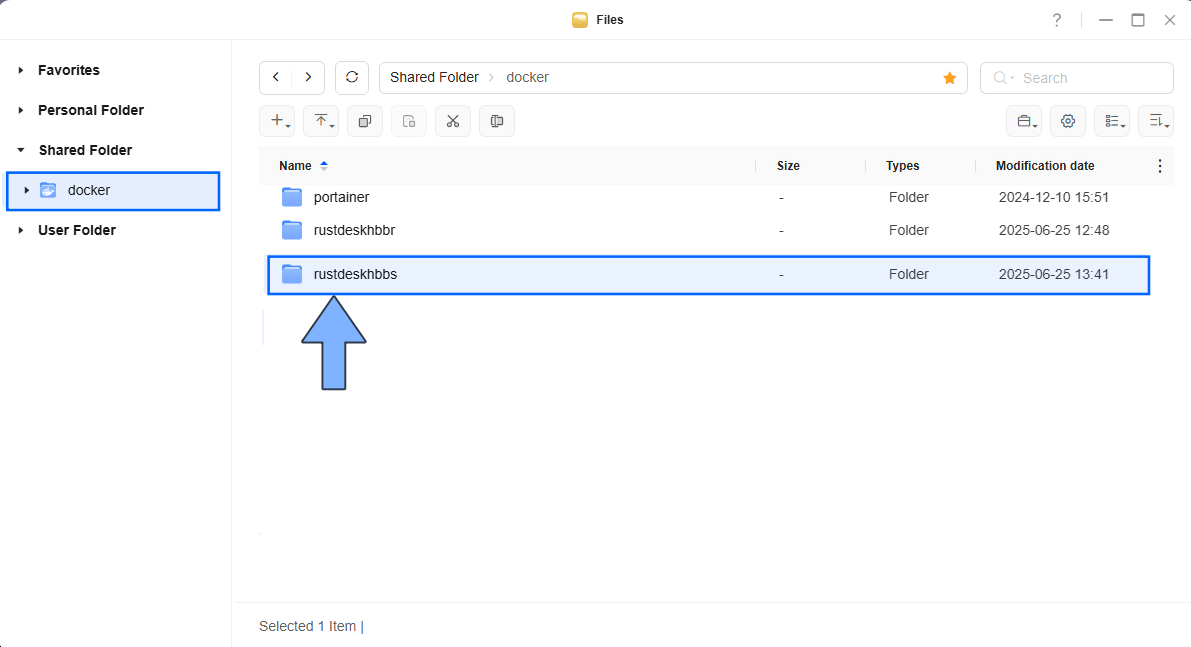
Go to Files and open the docker folder. Inside the docker folder, create two new folders and name them rustdeskhbbr and rustdeskhbbs. Follow the instructions in the image below.
Note: Be careful to enter only lowercase, not uppercase letters.
STEP 6
⚠️Mandatory Add Read & Write Permissions to the Docker Folder. If you have already added the Read and Write Permissions to the Docker Folder, skip this STEP.
STEP 7
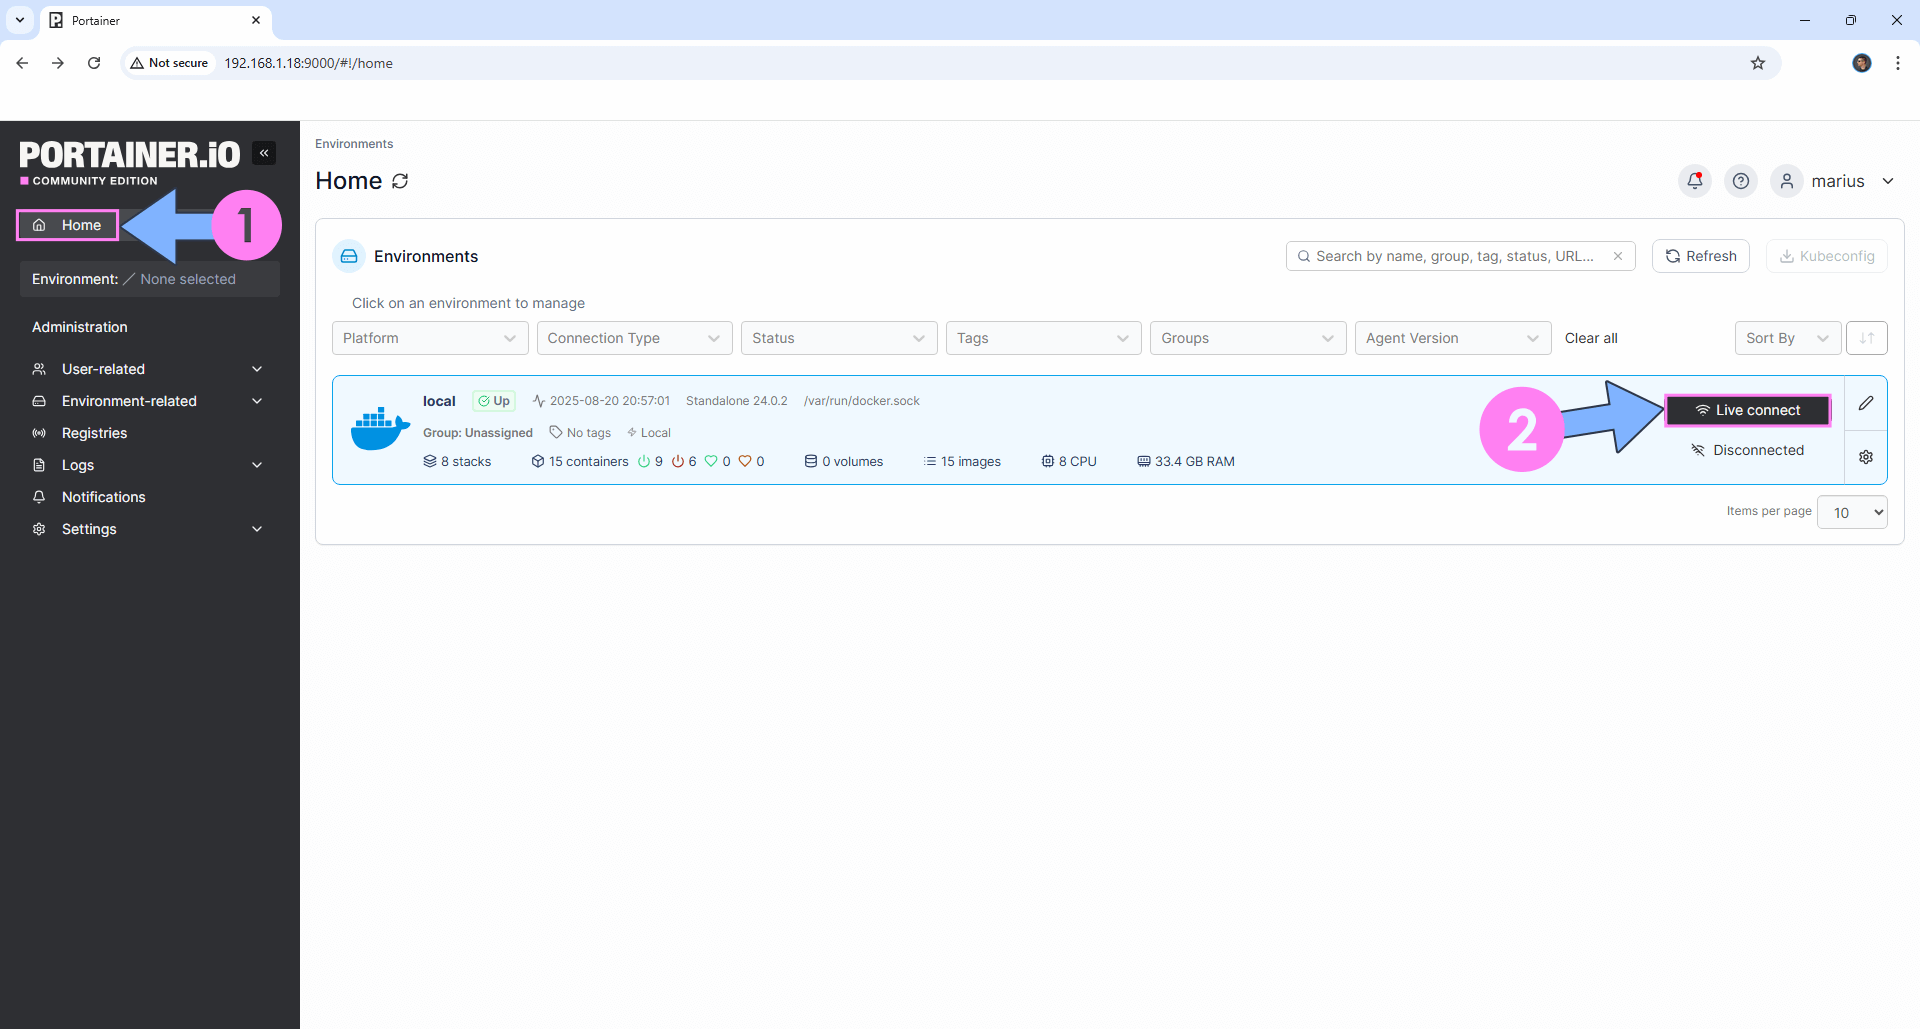
Log into Portainer using your username and password. On the left sidebar in Portainer, click on Home then Live connect. Follow the instructions in the image below.
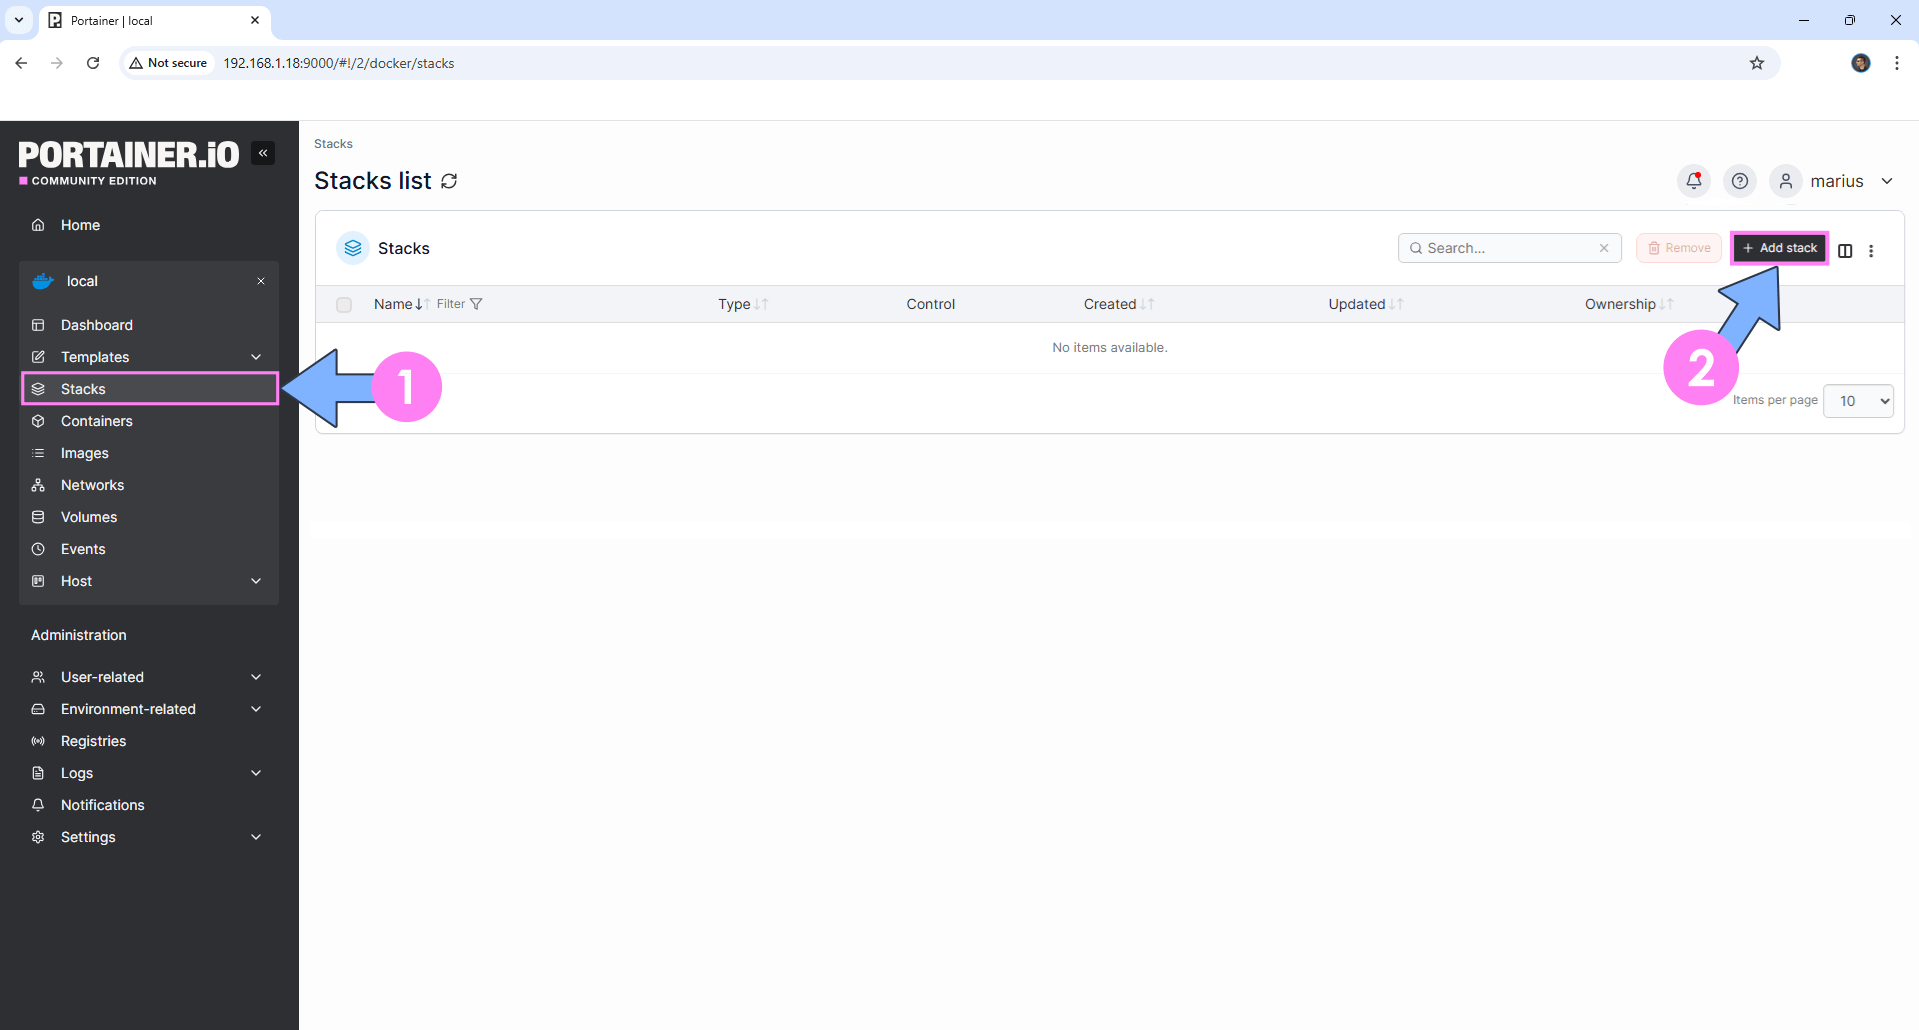
On the left sidebar in Portainer, click on Stacks then + Add stack. Follow the instructions in the image below.
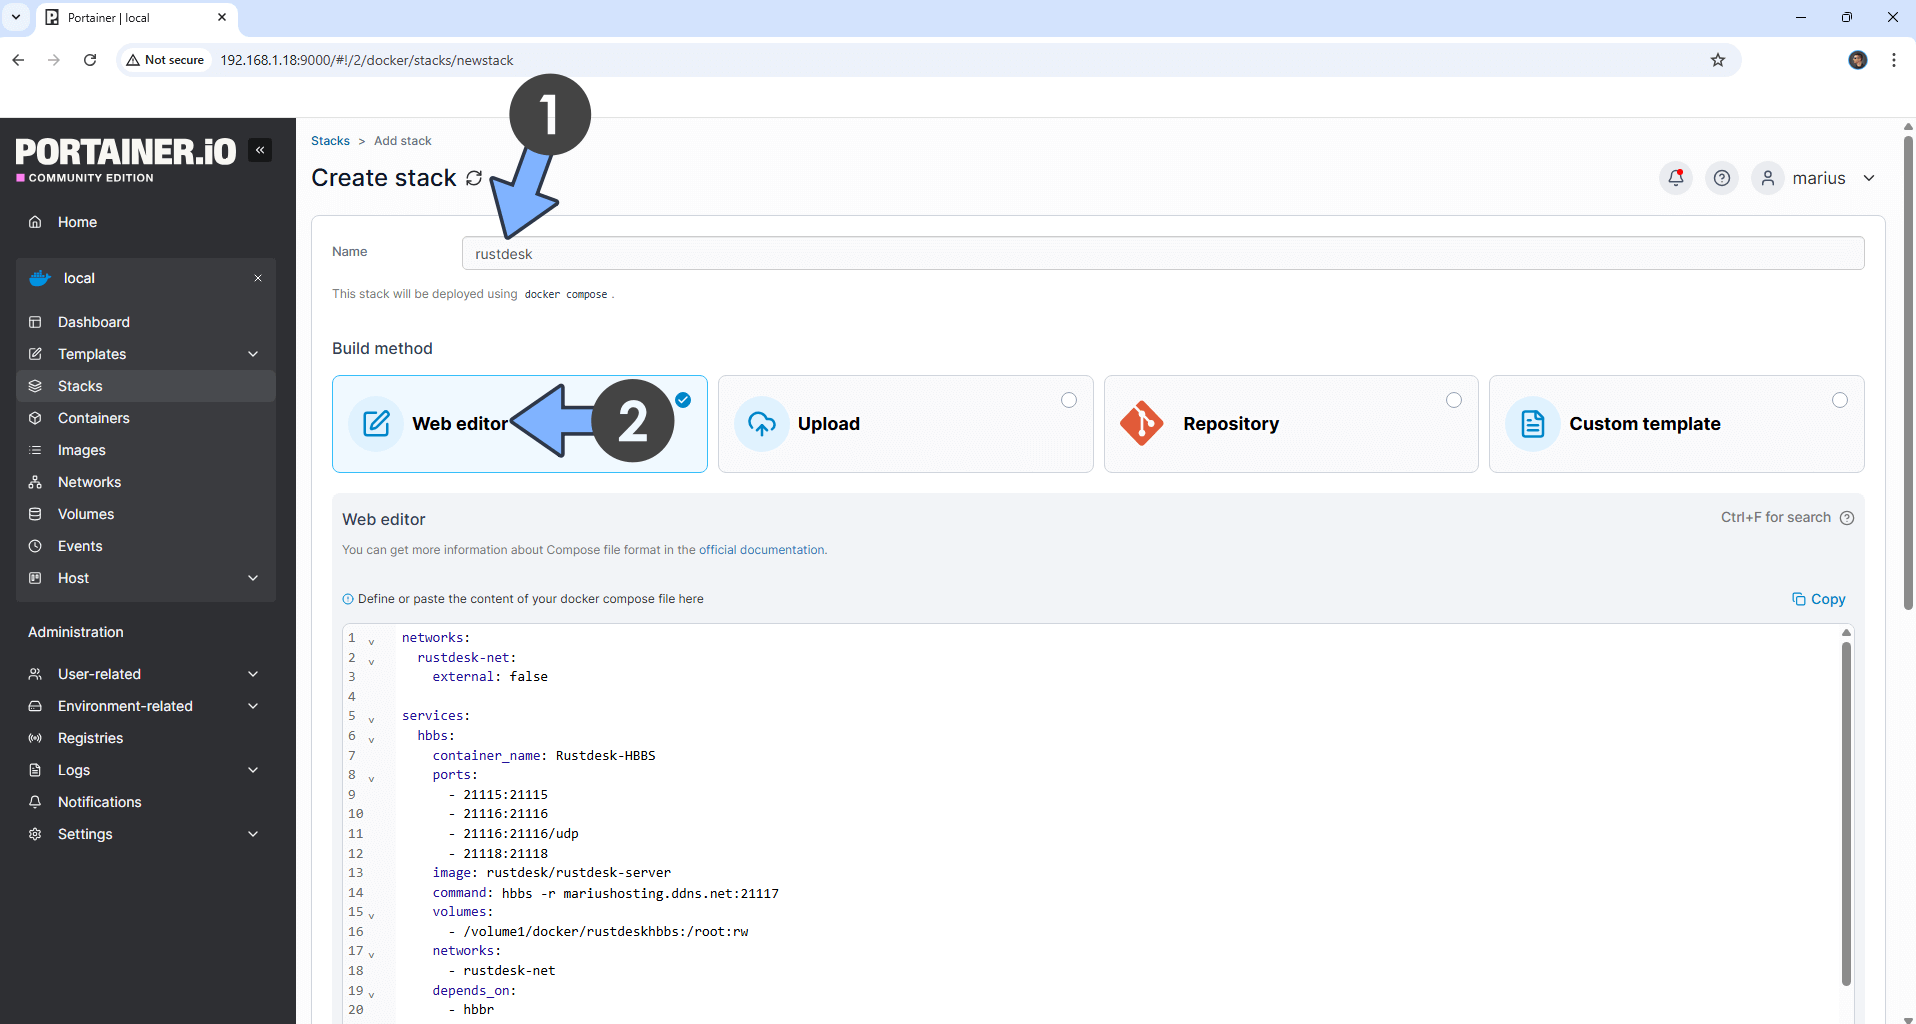
STEP 8
In the Name field type in rustdesk. Follow the instructions in the image below.
networks:
  rustdesk-net:
    external: false

services:
  hbbs:
    container_name: Rustdesk-HBBS
    ports:
      - 21115:21115
      - 21116:21116
      - 21116:21116/udp
      - 21118:21118
    image: rustdesk/rustdesk-server
    command: hbbs -r yourname.ddns.net:21117
    volumes:
      - /volume1/docker/rustdeskhbbs:/root:rw
    networks:
      - rustdesk-net
    depends_on:
      - hbbr
    restart: on-failure:5

  hbbr:
    container_name: Rustdesk-HBBR
    ports:
      - 21117:21117
      - 21119:21119
    image: rustdesk/rustdesk-server
    command: hbbr
    volumes:
      - /volume1/docker/rustdeskhbbr:/root:rw
    networks:
      - rustdesk-net
    restart: on-failure:5
Note: Before you paste the code above in the Web editor area, add your own NO IP DDNS address that you have previously created at STEP 3 followed by :21117
STEP 9
Scroll down on the page until you see a button named Deploy the stack. Click on it. Follow the instructions in the image below. The installation process can take up to a few minutes. It will depend on your Internet speed connection.

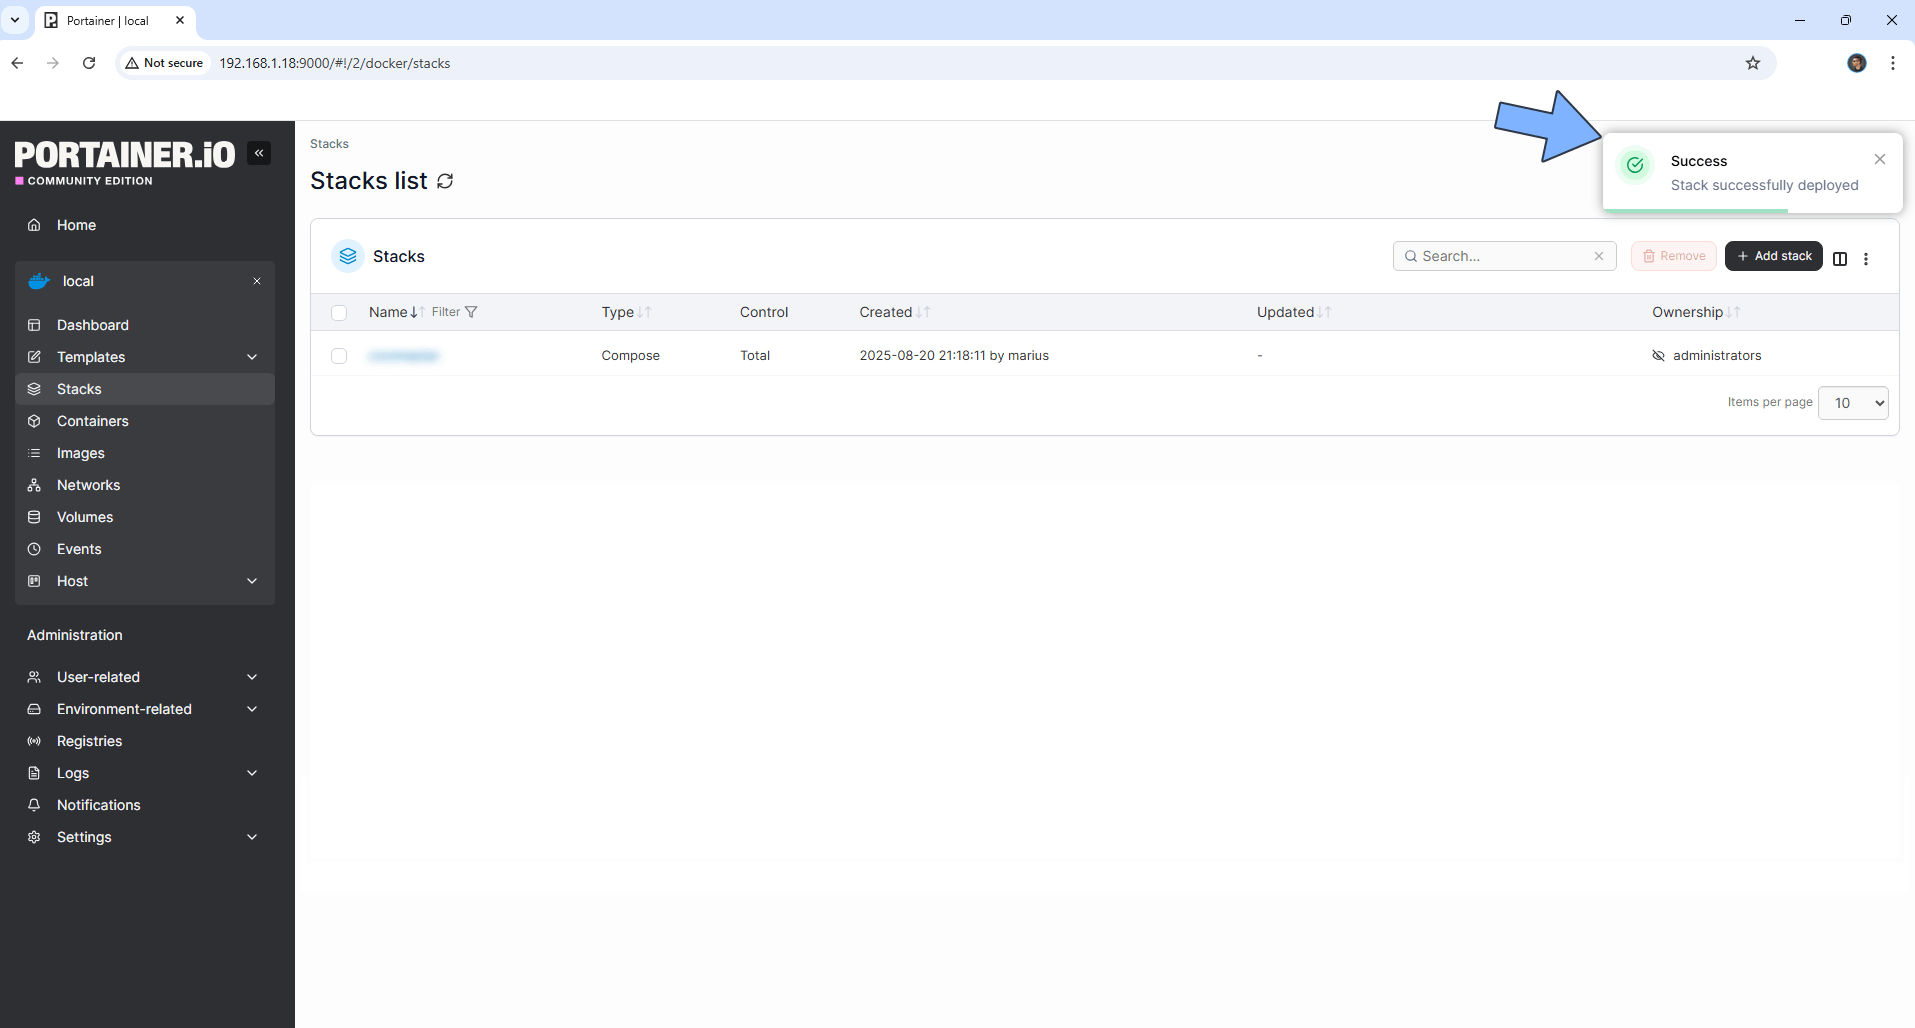
STEP 10
If everything goes right, you will see the following message at the top right of your screen: “Success Stack successfully deployed“.
STEP 11
Click to open your rustdeskhbbs folder that you have previously created at STEP 5. Follow the instructions in the image below.
STEP 12
Right click on the .pub file, then click Download. Follow the instructions in the image below.

STEP 13
Download the RustDesk software for your computer from the official RustDesk website for Windows | Ubuntu | Mac | AppImage | Flatpak | Suse | Arch Linux. Once you have installed it, open it, then click the 3 dots on the left sidebar. Follow the instructions in the image below.
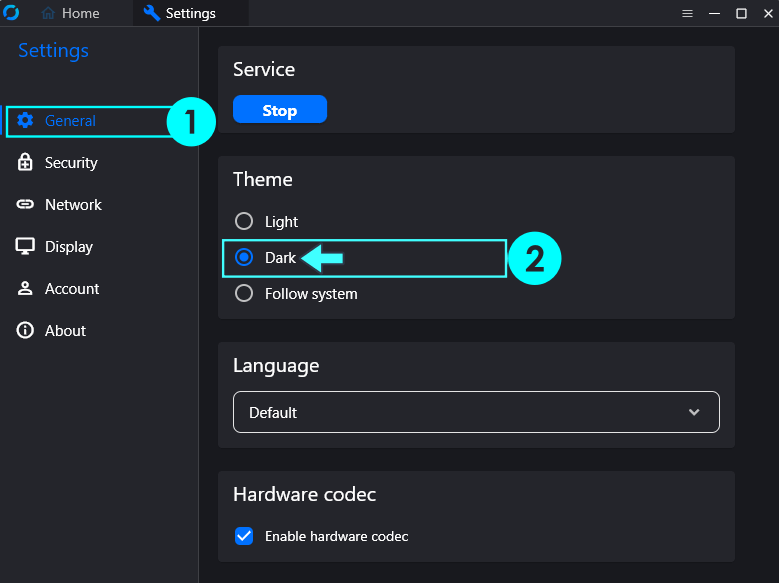
STEP 14
On the left sidebar, click General and choose your favorite theme color. Follow the instructions in the image below.
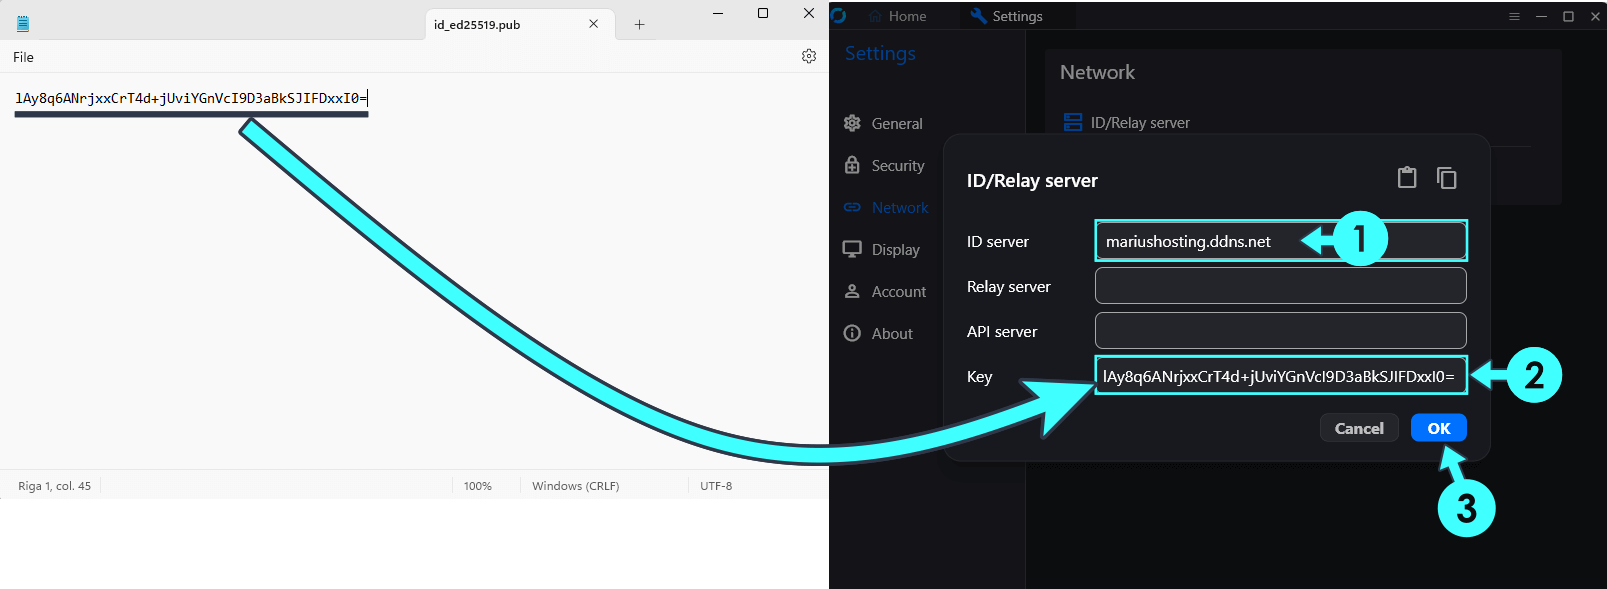
STEP 15
On the left sidebar, click Network, then ID/Relay server. Follow the instructions in the image below.

STEP 16
A new pop up window will open. On the ID Server area type in your own NO IP DDNS address that you have previously created at STEP 3 and added at STEP 8 without https:// at the beginning. With notepad, open the .pub file that you have previously downloaded at STEP 12; inside this will you will find your own KEY. Copy the key in the RustDesk client Key area, then click OK. Follow the instructions in the image below.
STEP 17
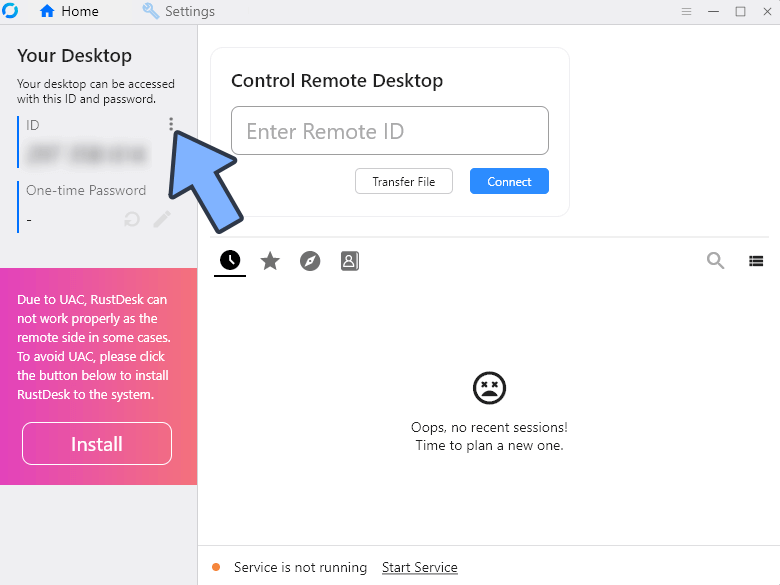
Once you go back to Home, you should see a “Ready” green dot statement in the RustDesk application.

STEP 18
🟢Please Support My work by Making a Donation. Almost 99,9% of the people that install something using my guides forget to support my work, or just ignore STEP 1. I’ve been very honest about this aspect of my work since the beginning: I don’t run any ADS, I don’t require subscriptions, paid or otherwise, I don’t collect IPs, emails, and I don’t have any referral links from Amazon or other merchants. I also don’t have any POP-UPs or COOKIES. I have repeatedly been told over the years how much I have contributed to the community. It’s something I love doing and have been honest about my passion since the beginning. But I also Need The Community to Support me Back to be able to continue doing this work.
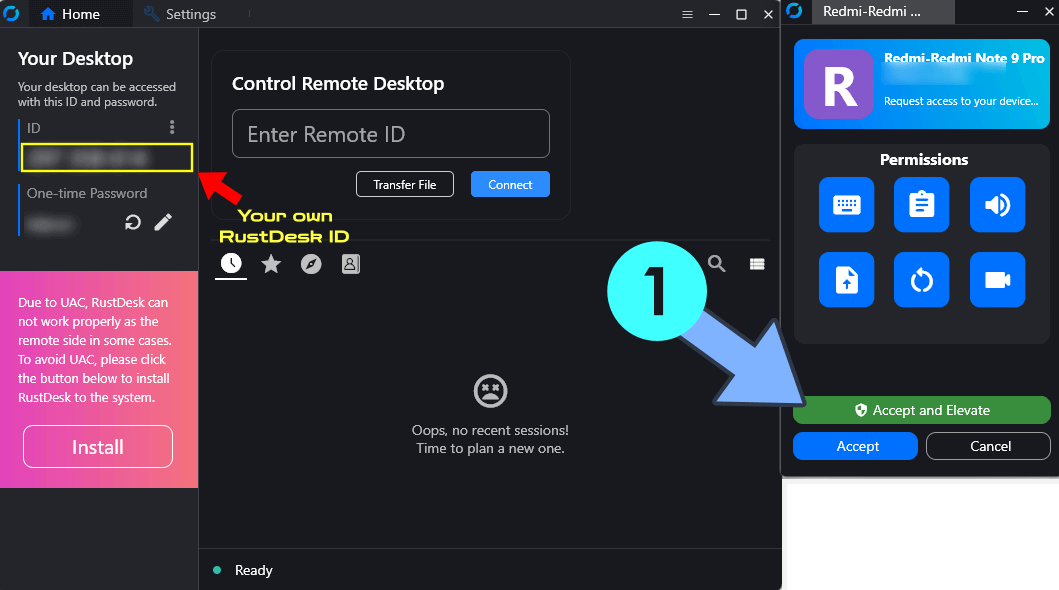
STEP 19
When someone wants to connect to your computer, you only need to provide them with your RustDesk ID. After they enter your RustDesk Remote ID and proceed to Connect, you will get a pop-up; click Accept and Elevate to give them permission to connect.
Enjoy RustDesk on your UGREEN NAS!
🆙Note/Update/Container: How to Update Your Docker Containers on UGREEN NAS Using Portainer.
🐳Note: How to Create Docker Shortcuts on Desktop.
🆕Note: How to Update Portainer to the latest version.
🆕Note: How to Clean Docker.
This post was updated on Monday / March 9th, 2026 at 10:48 AM