

Antimatter is a community-maintained fork of Mattermost that removes commercial restrictions, user/message limits, and other paywalled or enterprise-only elements, delivering a fully unrestricted open-source self-hosted team collaboration platform focused on chat and core features without the corporate overhead. In my homelab I’ve been running it for days as the central hub for family and a few friends. I use it for group chats, sharing links and files. It’s lightweight and reliable. Mattermost is the original product that increasingly puts limits and paid walls on previously free features. Antimatter is the cleaned-up, unrestricted fork that keeps only the open-source parts, removes all the commercial restrictions and nagging, and aims to stay fully free for self-hosters. In this step by step guide I will show you how to install Antimatter on your UGREEN NAS using Docker and Dockhand.
This guide works perfectly with the latest Antimatter main tag release.
STEP 1
Please Support My work by Making a Donation.
STEP 2
Install Dockhand using my step by step guide. If you already have Dockhand installed on your UGREEN NAS, skip this STEP. ⚠️Attention: Make sure you have installed the latest Dockhand version.
STEP 3
⚠️Mandatory: Enable HTTPS on your UGREEN NAS.
STEP 4
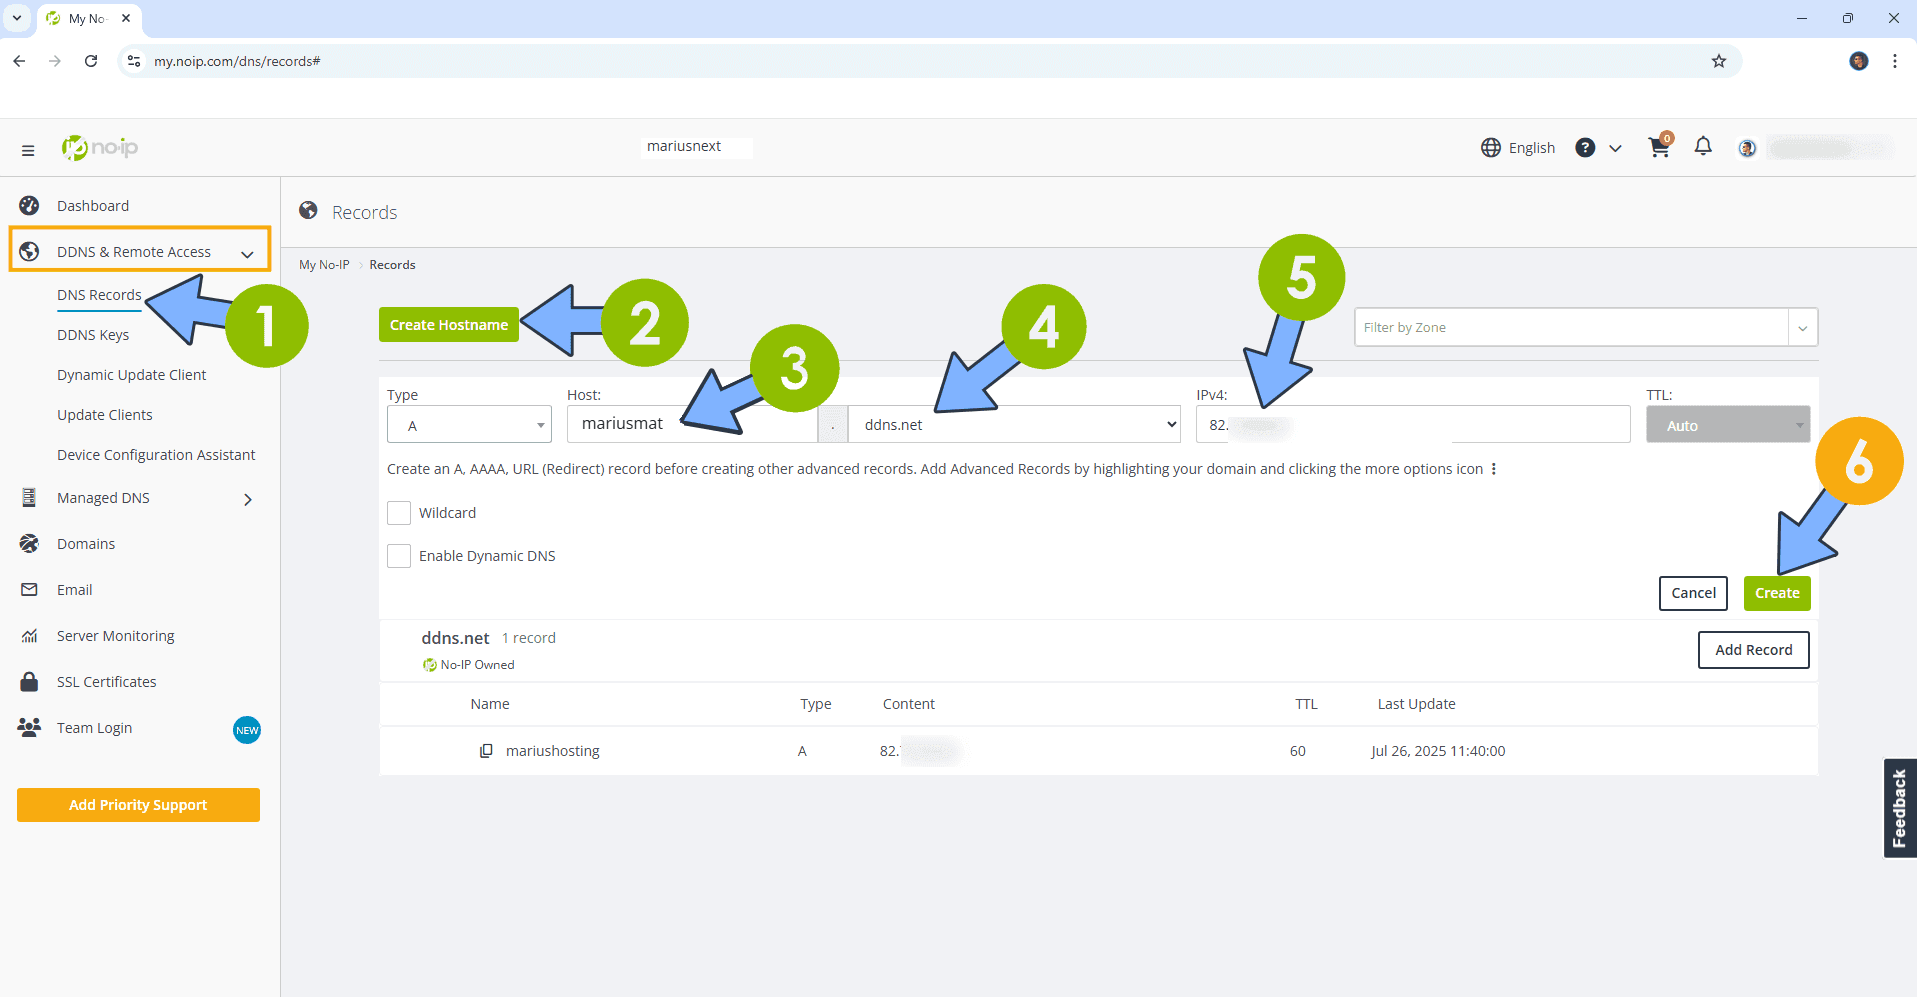
Create a new hostname on the noip website using your noip account. For example, I have created mariusmat as Host and I use the free ddns.net domain. In the IP Address area, type in your own IPV4 IP address from your ISP, then click Create. Follow the instructions in the image below.
STEP 5
⚠️Mandatory: Add Read & Write Permissions to the Docker Folder.
STEP 6
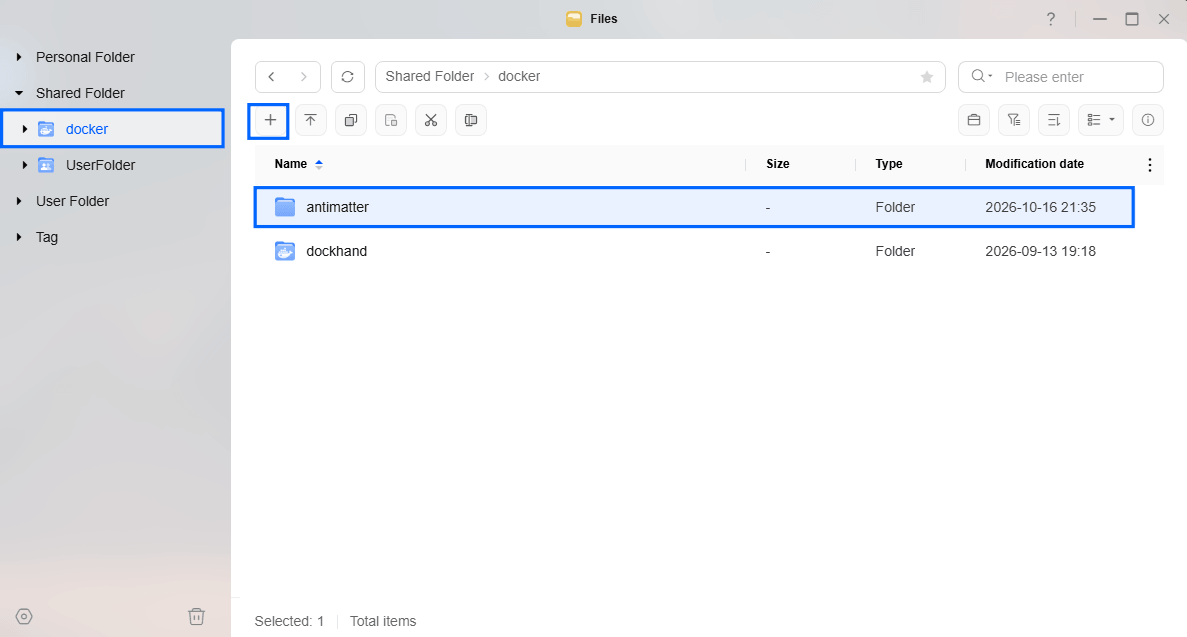
Go to Files and open the docker folder. Inside the docker folder, create one new folder and name it antimatter. Follow the instructions in the image below.
Note: Be careful to enter only lowercase, not uppercase letters.
STEP 7
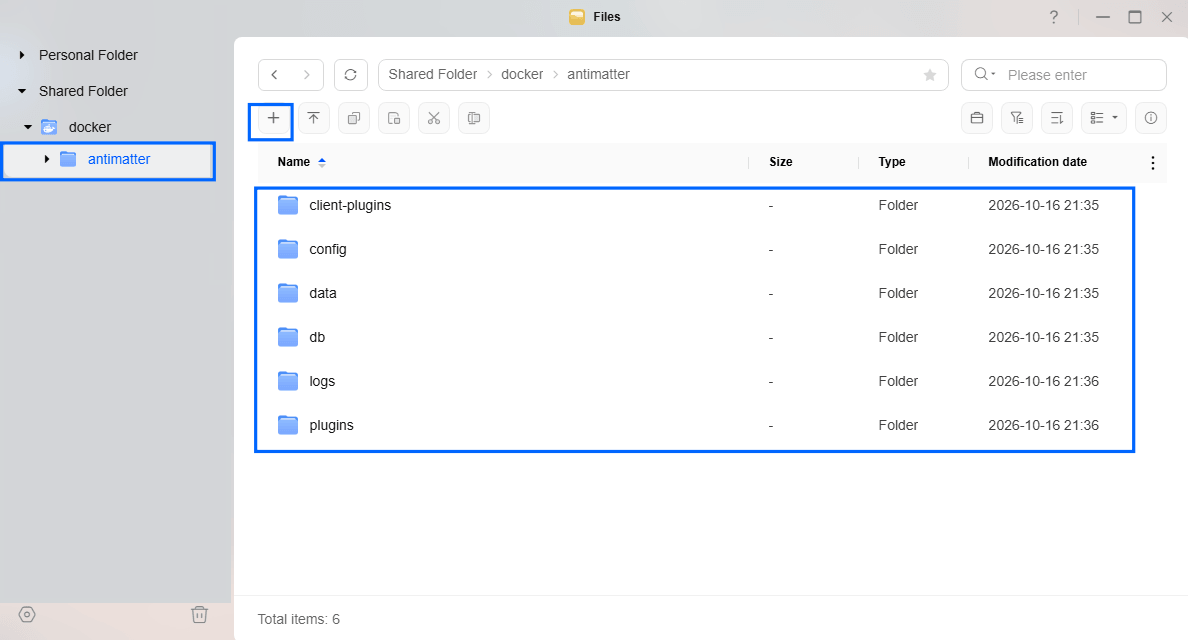
Now create six new folders inside the antimatter folder that you have previously created at STEP 10 and name them client-plugins, config, data, db, logs, plugins. Follow the instructions in the image below.
Note: Be careful to enter only lowercase, not uppercase letters.
STEP 8
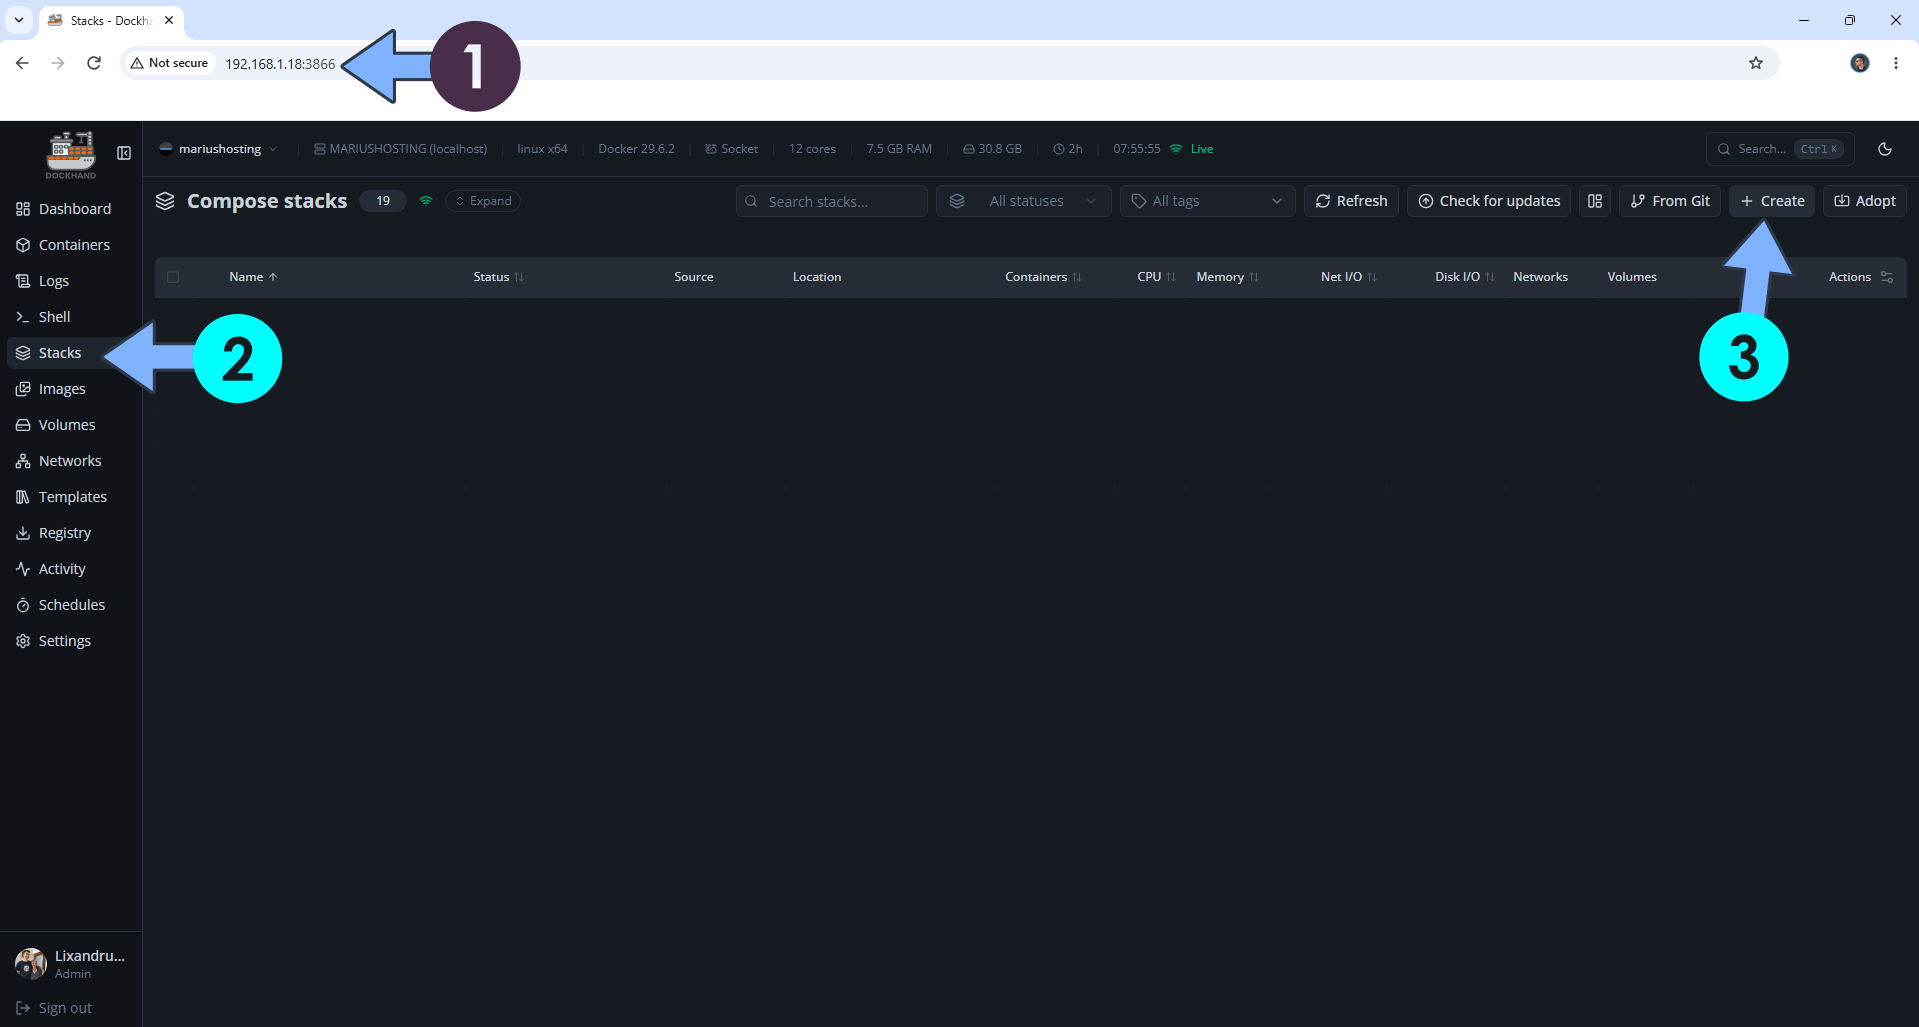
Open your browser and type in http://synology-ip-address:3866 to connect to your Dockhand container. On the left sidebar, click Stacks then + Create. Follow the instructions in the image below.
STEP 9
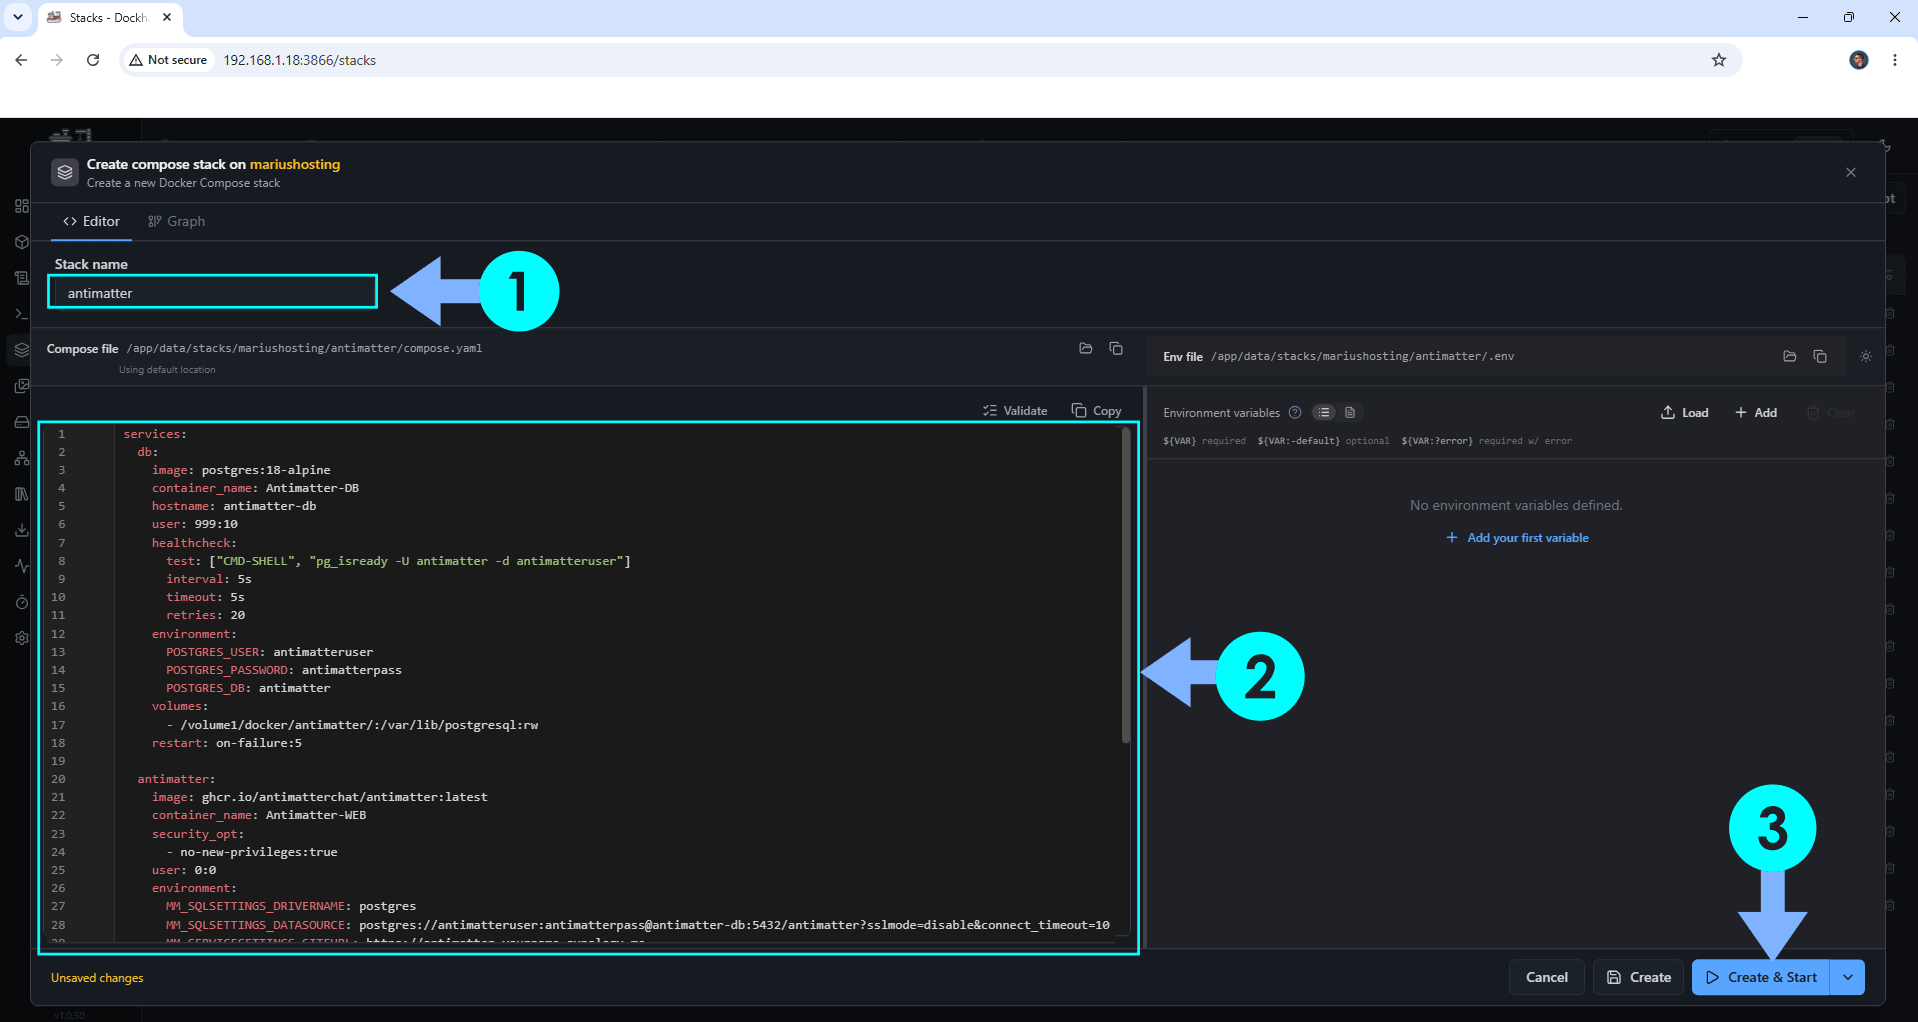
In the Stack name field, type in antimatter. ⚠️Warning: Type in the name in lowercase letters. The installation process can take up to a few seconds/minutes. It will depend on your Internet speed connection. Follow the instructions in the image below.
services:
  db:
    image: postgres:18-alpine
    container_name: Antimatter-DB
    hostname: antimatter-db
    user: 999:10
    healthcheck:
      test: ["CMD-SHELL", "pg_isready -U antimatter -d antimatteruser"]
      interval: 5s
      timeout: 5s
      retries: 20
    environment:
      POSTGRES_USER: antimatteruser
      POSTGRES_PASSWORD: antimatterpass
      POSTGRES_DB: antimatter
    volumes:
      - /volume1/docker/antimatter/:/var/lib/postgresql:rw
    restart: on-failure:5

  antimatter:
    image: ghcr.io/antimatterchat/antimatter:latest
    container_name: Antimatter-WEB
    security_opt:
      - no-new-privileges:true
    user: 0:0
    environment:
      MM_SQLSETTINGS_DRIVERNAME: postgres
      MM_SQLSETTINGS_DATASOURCE: postgres://antimatteruser:antimatterpass@antimatter-db:5432/antimatter?sslmode=disable&connect_timeout=10
      MM_SERVICESETTINGS_SITEURL: https://antimatter.ddns.net
      MM_BLEVESETTINGS_INDEXDIR: /antimatter/data/bleve-indexes
      TZ: Europe/Bucharest
    ports:
      - 8405:8065
      #- 8443:8443/udp
      #- 8443:8443/tcp
    volumes:
      - /volume1/docker/antimatter/config:/antimatter/config:rw
      - /volume1/docker/antimatter/data:/antimatter/data:rw
      - /volume1/docker/antimatter/logs:/antimatter/logs:rw
      - /volume1/docker/antimatter/plugins:/antimatter/plugins:rw
      - /volume1/docker/antimatter/client-plugins:/antimatter/client/plugins:rw
    depends_on:
      db:
        condition: service_healthy
    restart: on-failure:5
Note: Before you paste the code above in the Web editor area below, change the value numbers for user with your own UID and GID values. (Follow my step by step guide on how to do this.) 999 is my personal UID value and 10 is my personal GID value. You have to type in your own values.
Note: Before you paste the code above in the Stack editor area below, change the value for MM_SERVICESETTINGS_SITEURL and type in your own NO IP DDNS with https:// at the beginning that you have previously created at STEP 4.
Note: Before you paste the code above in the Stack editor area below, change the value for TZ. (Select your current Time Zone from this list.)
STEP 10
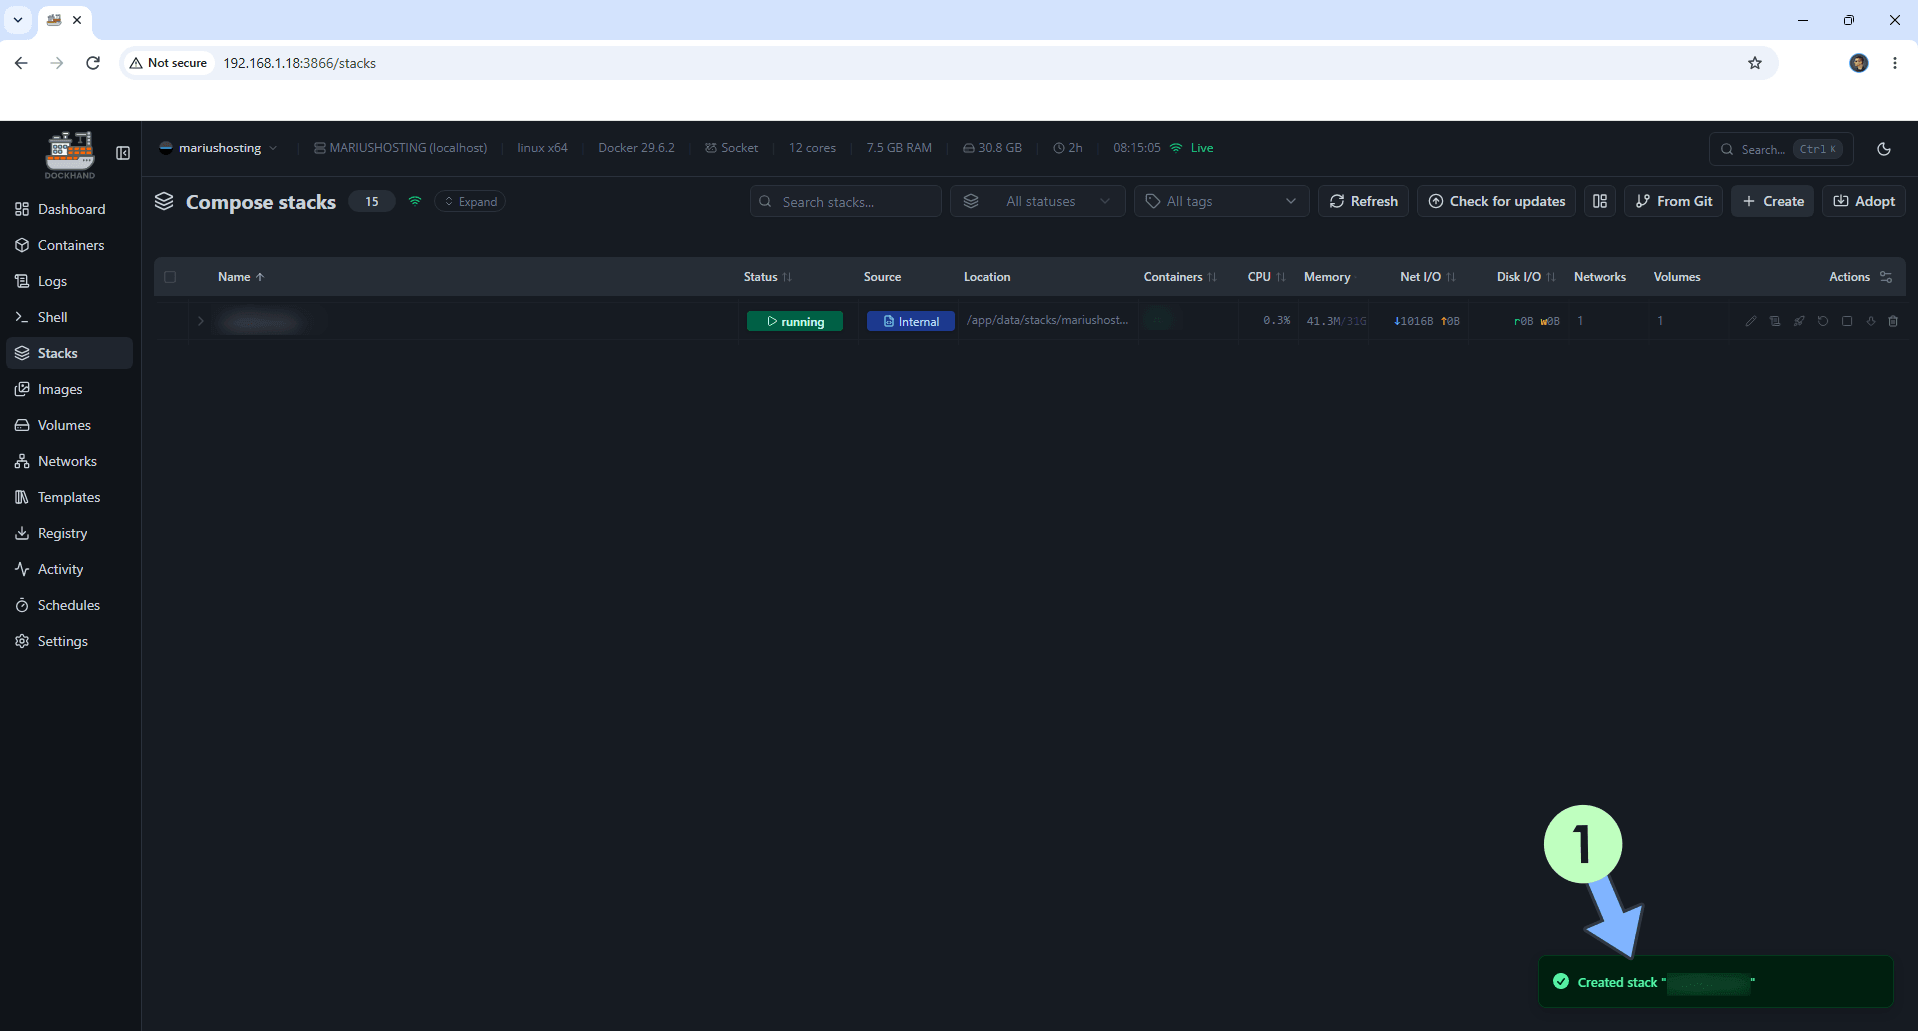
If everything goes right, you will see the following message at the bottom right of your screen: “Created stack “antimatter”“.
STEP 11
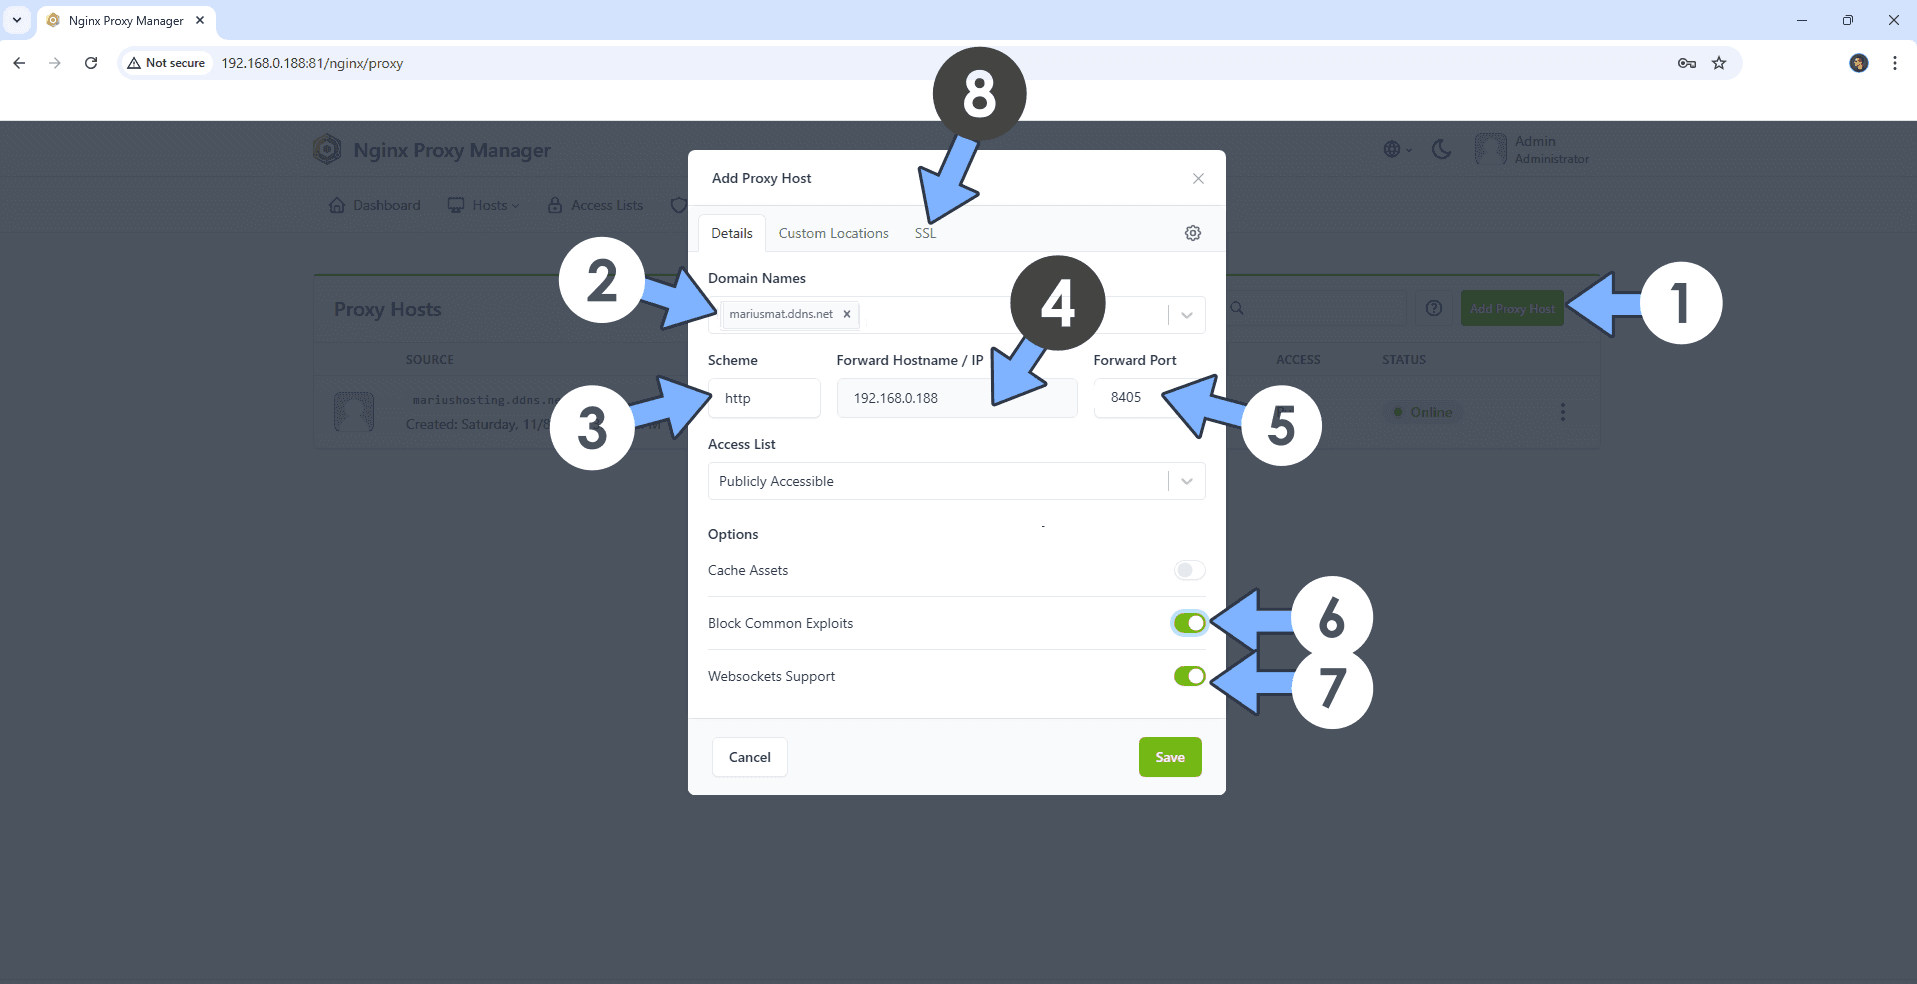
Open your Nginx Proxy Manager container that you have previously installed at STEP 3. Click Add Proxy Host. A new pop up window will open. Add the following details:
Domain Names: Type in your own noip domain name that you have previously created at STEP 4.
Scheme: http
Forward Hostname/IP: Type in the local NAS IP of your UGREEN NAS.
Forward Port: Type in the Antimatter local Port that is 8405
Check Block Common Exploits
Check Websockets Support
Click the SSL tab. Follow the instructions in the image below.
STEP 12
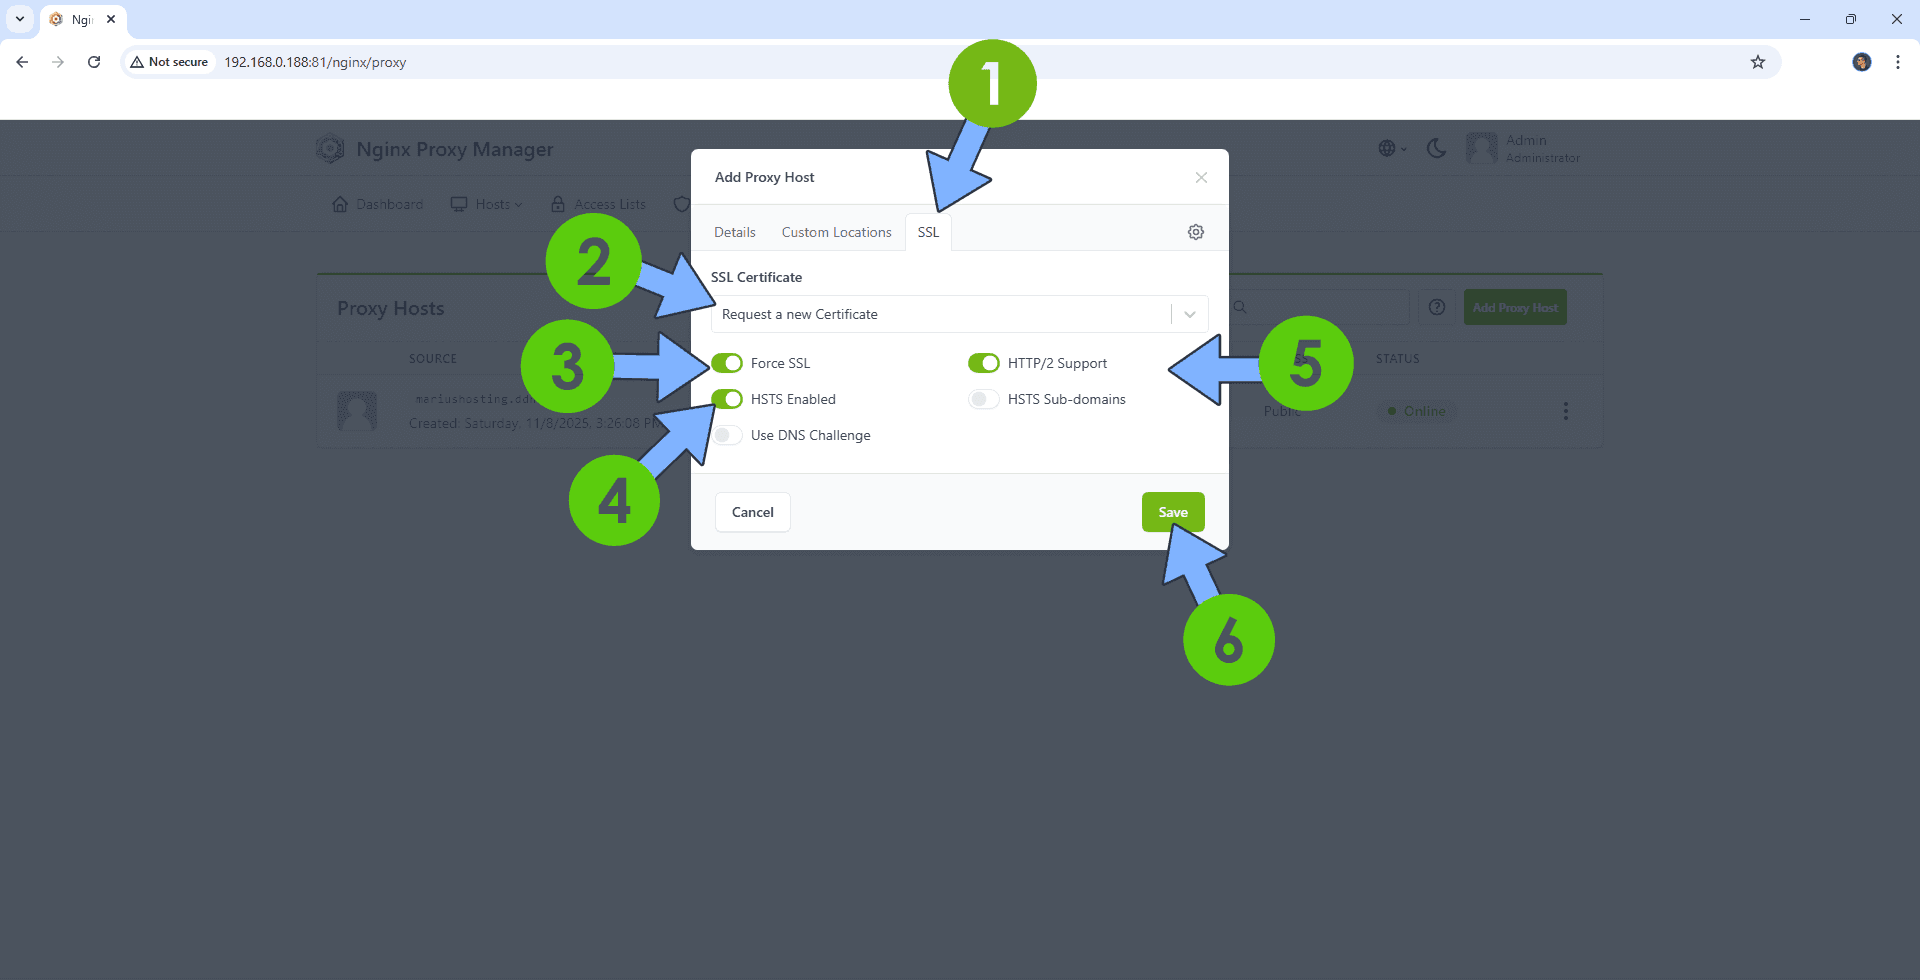
After you click the SSL tab, add the following details:
SSL Certificate: Request a new SSL Certificate
Check: Force SSL
Check: HSTS Enabled
Check: HTTP/2 Support
Click Save. Follow the instructions in the image below.
STEP 13
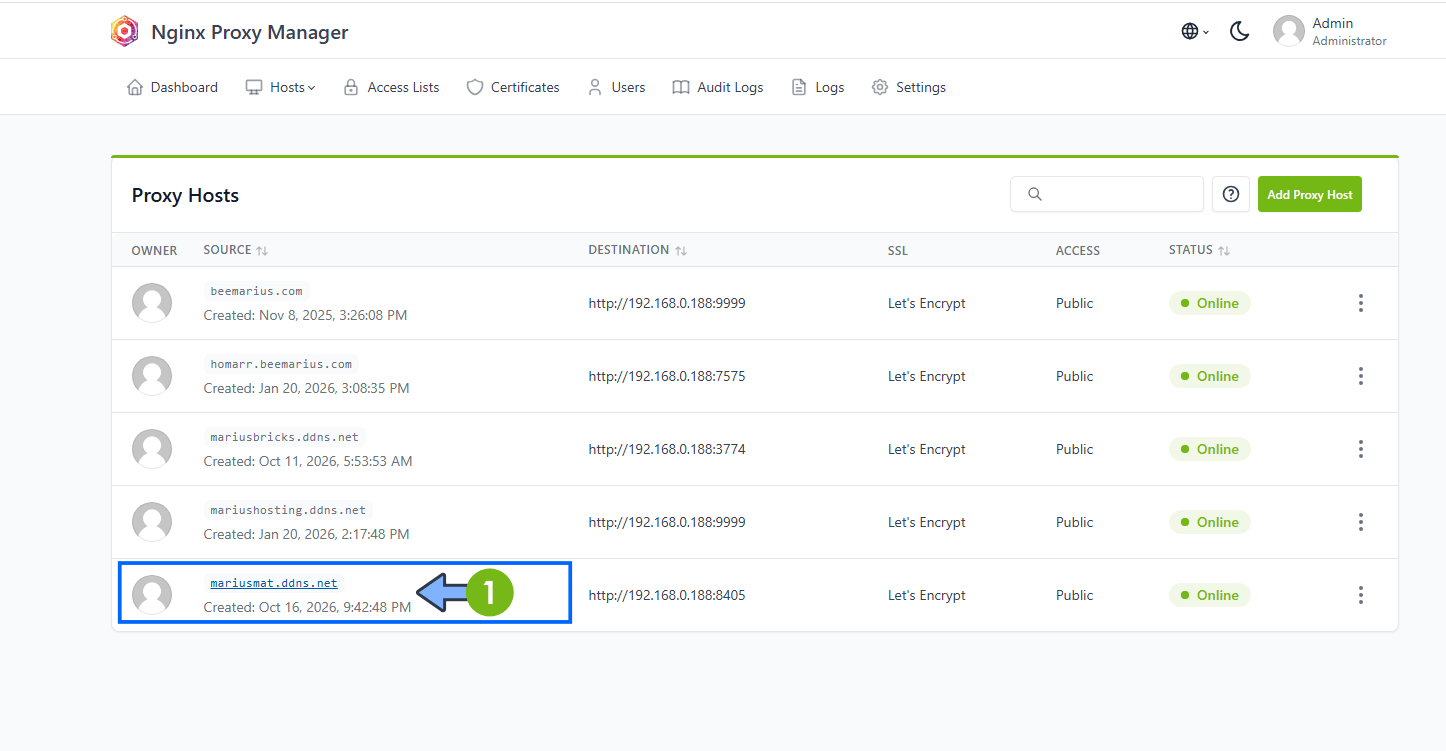
In the Proxy Hosts area, if everything goes right, you will see that your hostname has been generated. Click on it. Follow the instructions in the image below.
STEP 14
🟢Please Support My work by Making a Donation. Almost 99,9% of the people that install something using my guides forget to support my work, or just ignore STEP 1. I’ve been very honest about this aspect of my work since the beginning: I don’t run any ADS, I don’t require subscriptions, paid or otherwise, I don’t collect IPs, emails, and I don’t have any referral links from Amazon or other merchants. I also don’t have any POP-UPs or COOKIES. I have repeatedly been told over the years how much I have contributed to the community. It’s something I love doing and have been honest about my passion since the beginning. But I also Need The Community to Support me Back to be able to continue doing this work.
STEP 15
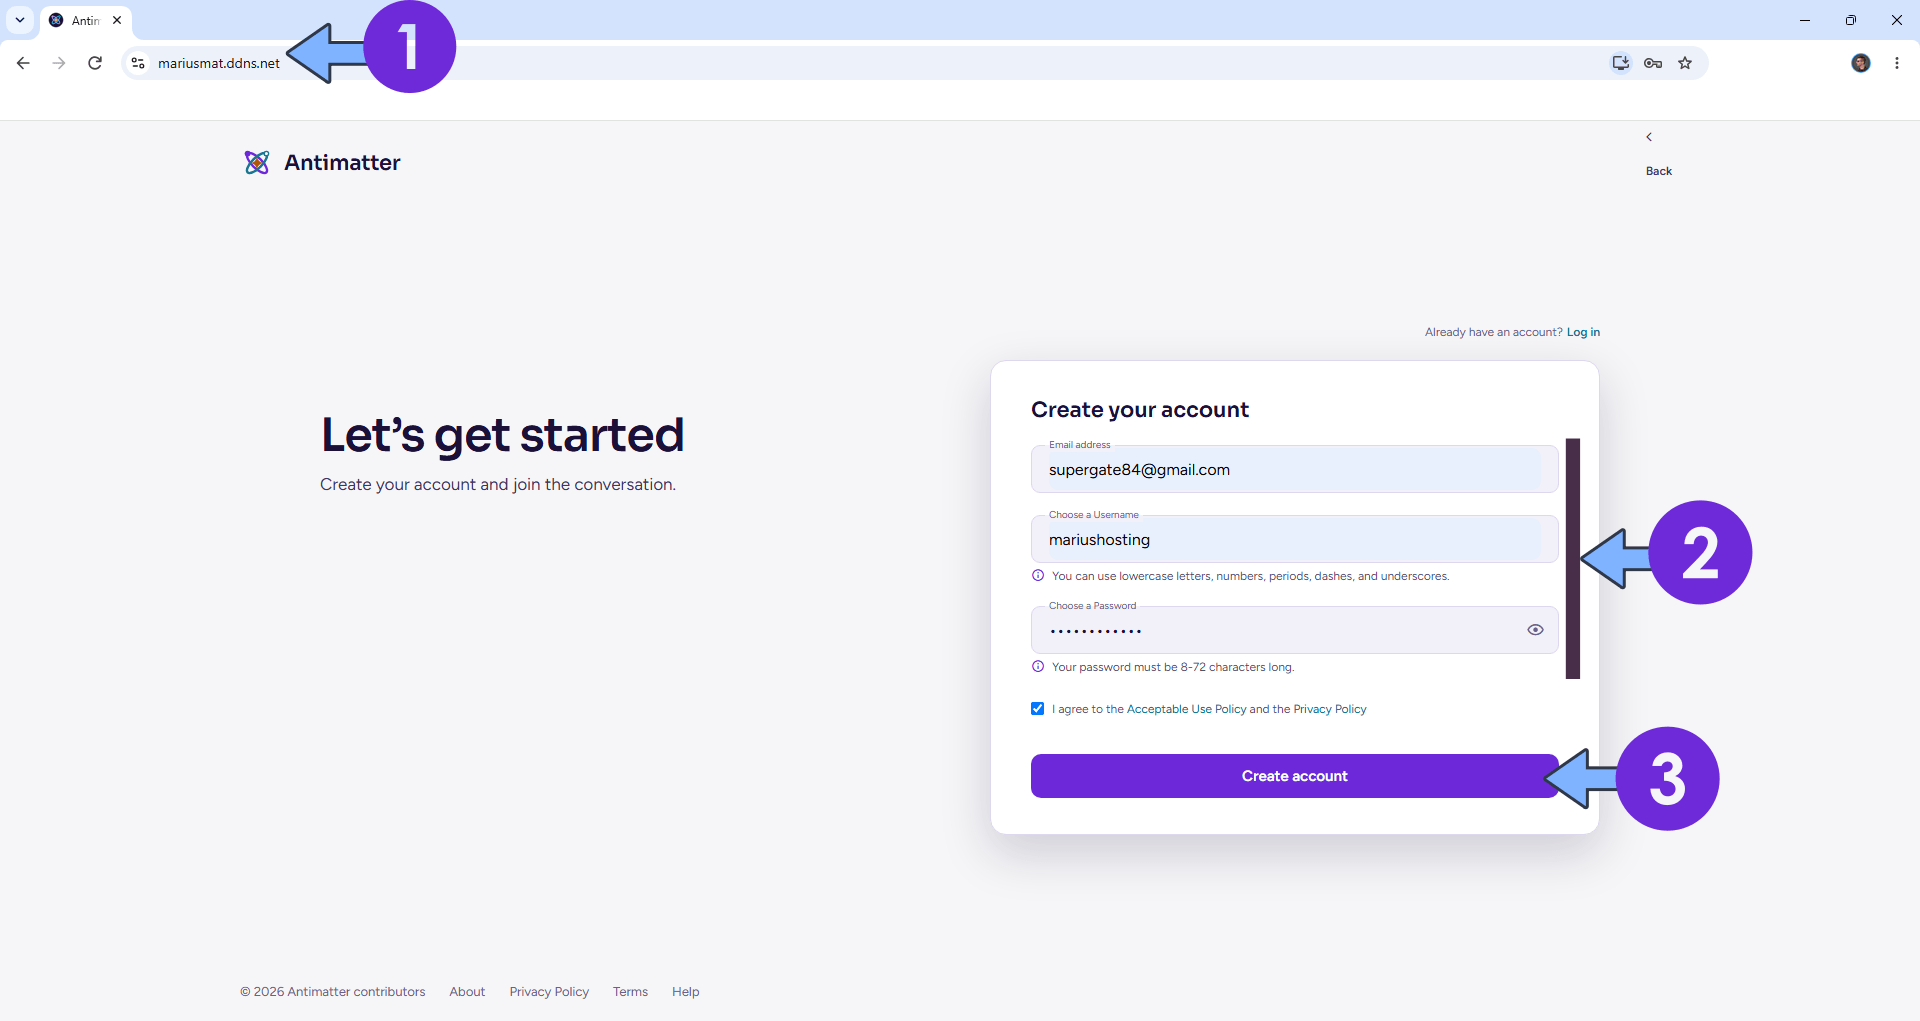
Now open your browser and type in your HTTPS/SSL certificate like this https://mariusmat.ddns.net that you have previously created at STEP 4. In my case it’s https://mariusmat.ddns.net Add your own credentials. Email, Username and Password then click Create Account. Follow the instructions in the image below.
STEP 16
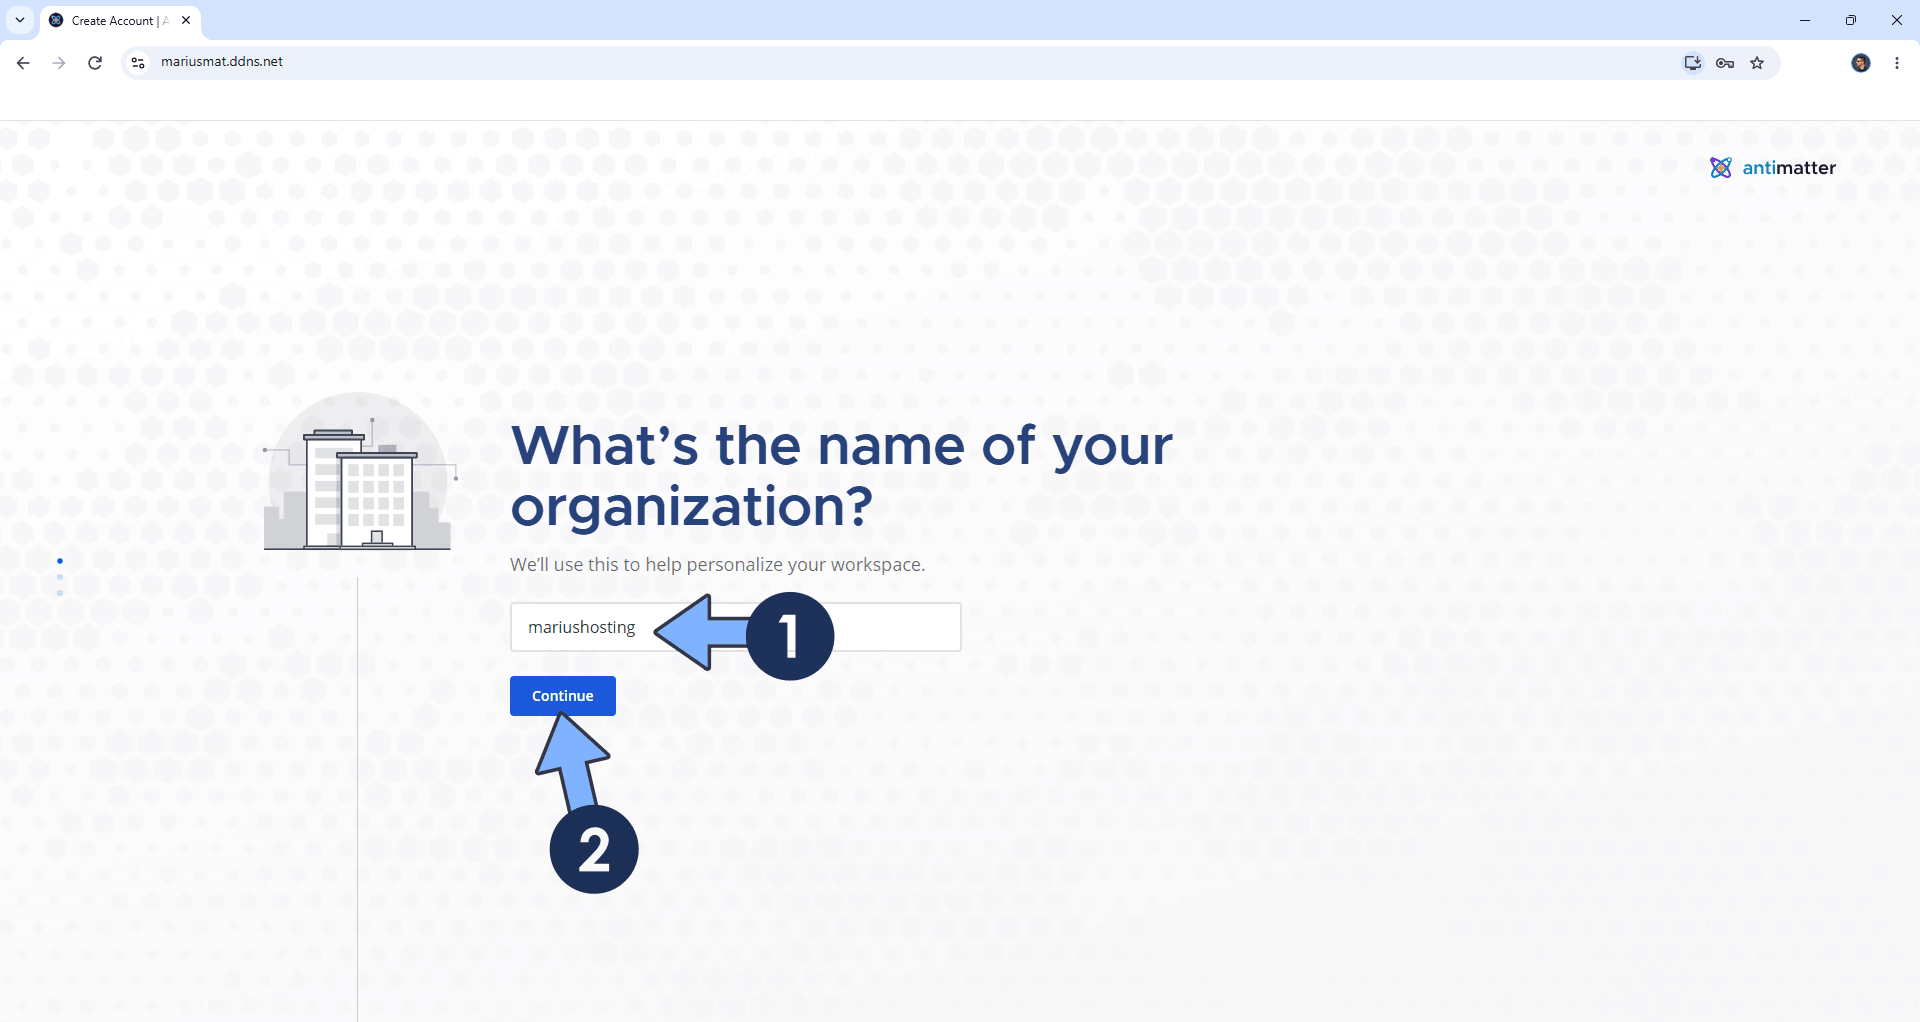
Type in your organization name then click Continue. Follow the instructions in the image below.
STEP 17
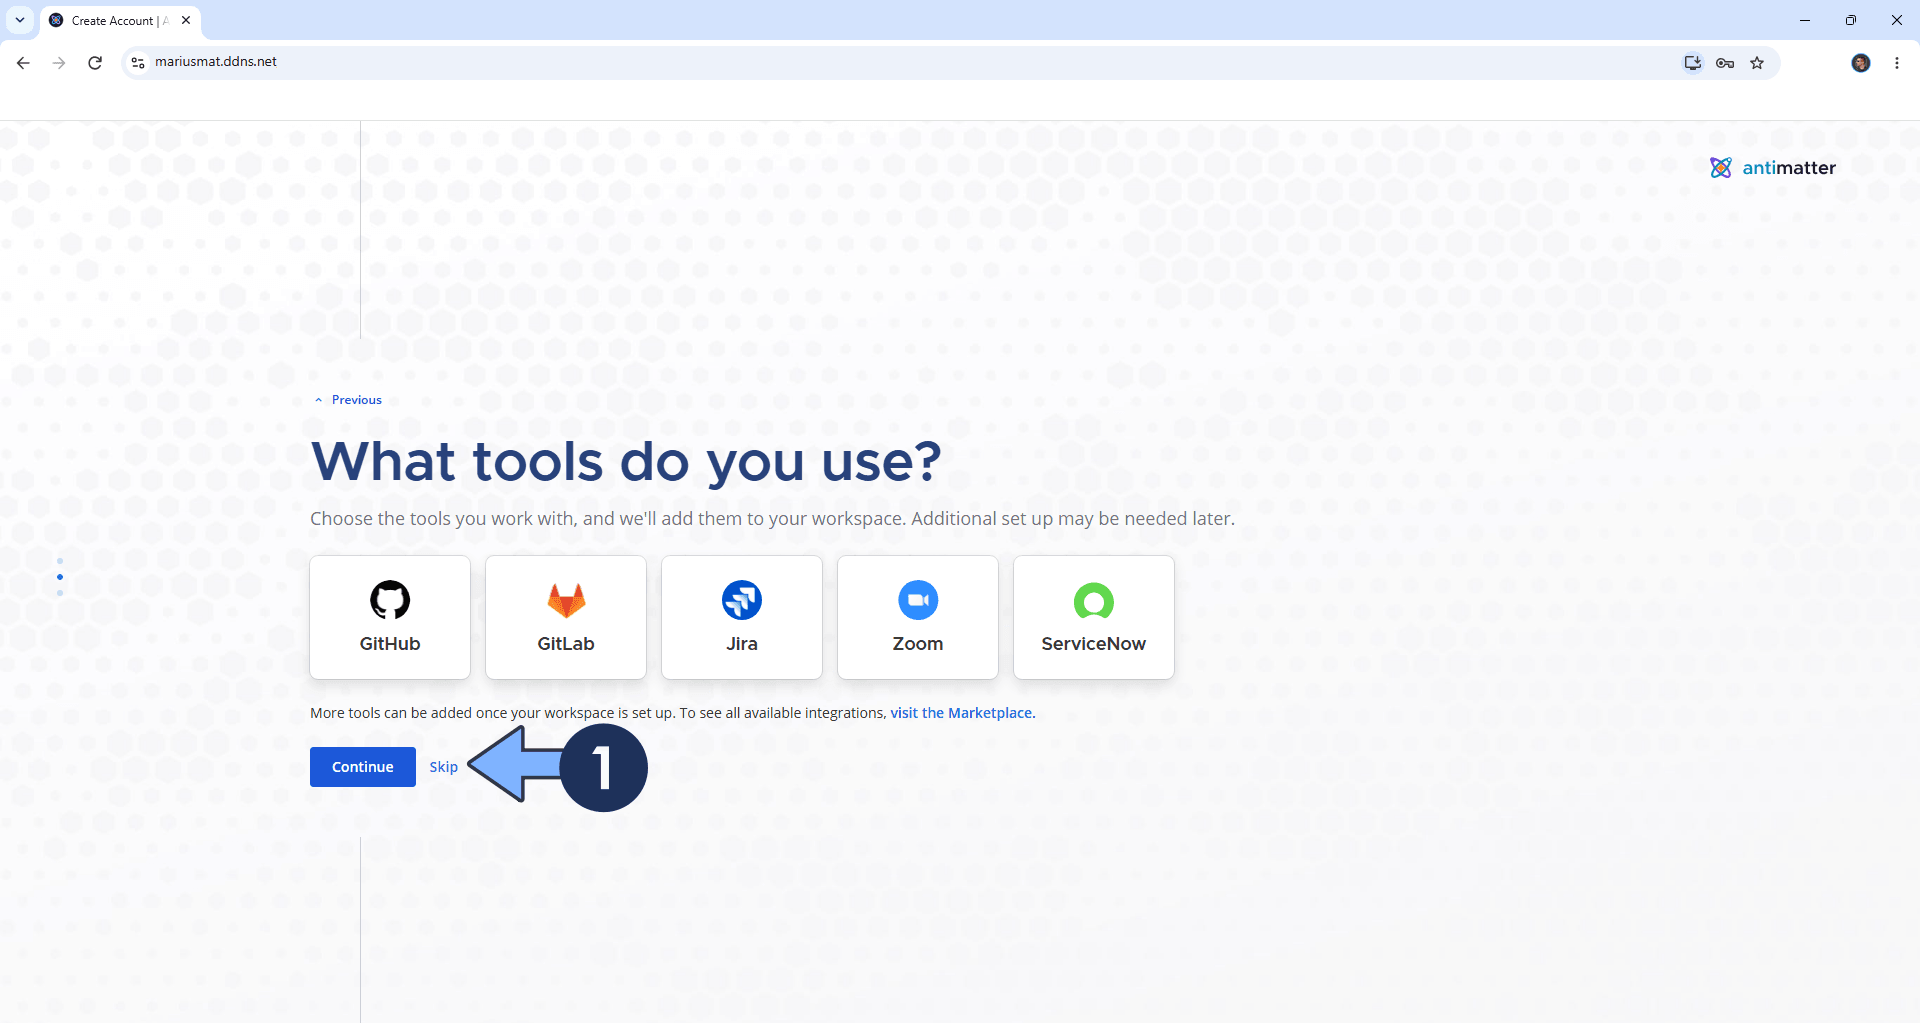
Click Continue or select the tools you work with or Skip to add later. Follow the instructions in the image below.
STEP 18
Click Finish setup. Follow the instructions in the image below.
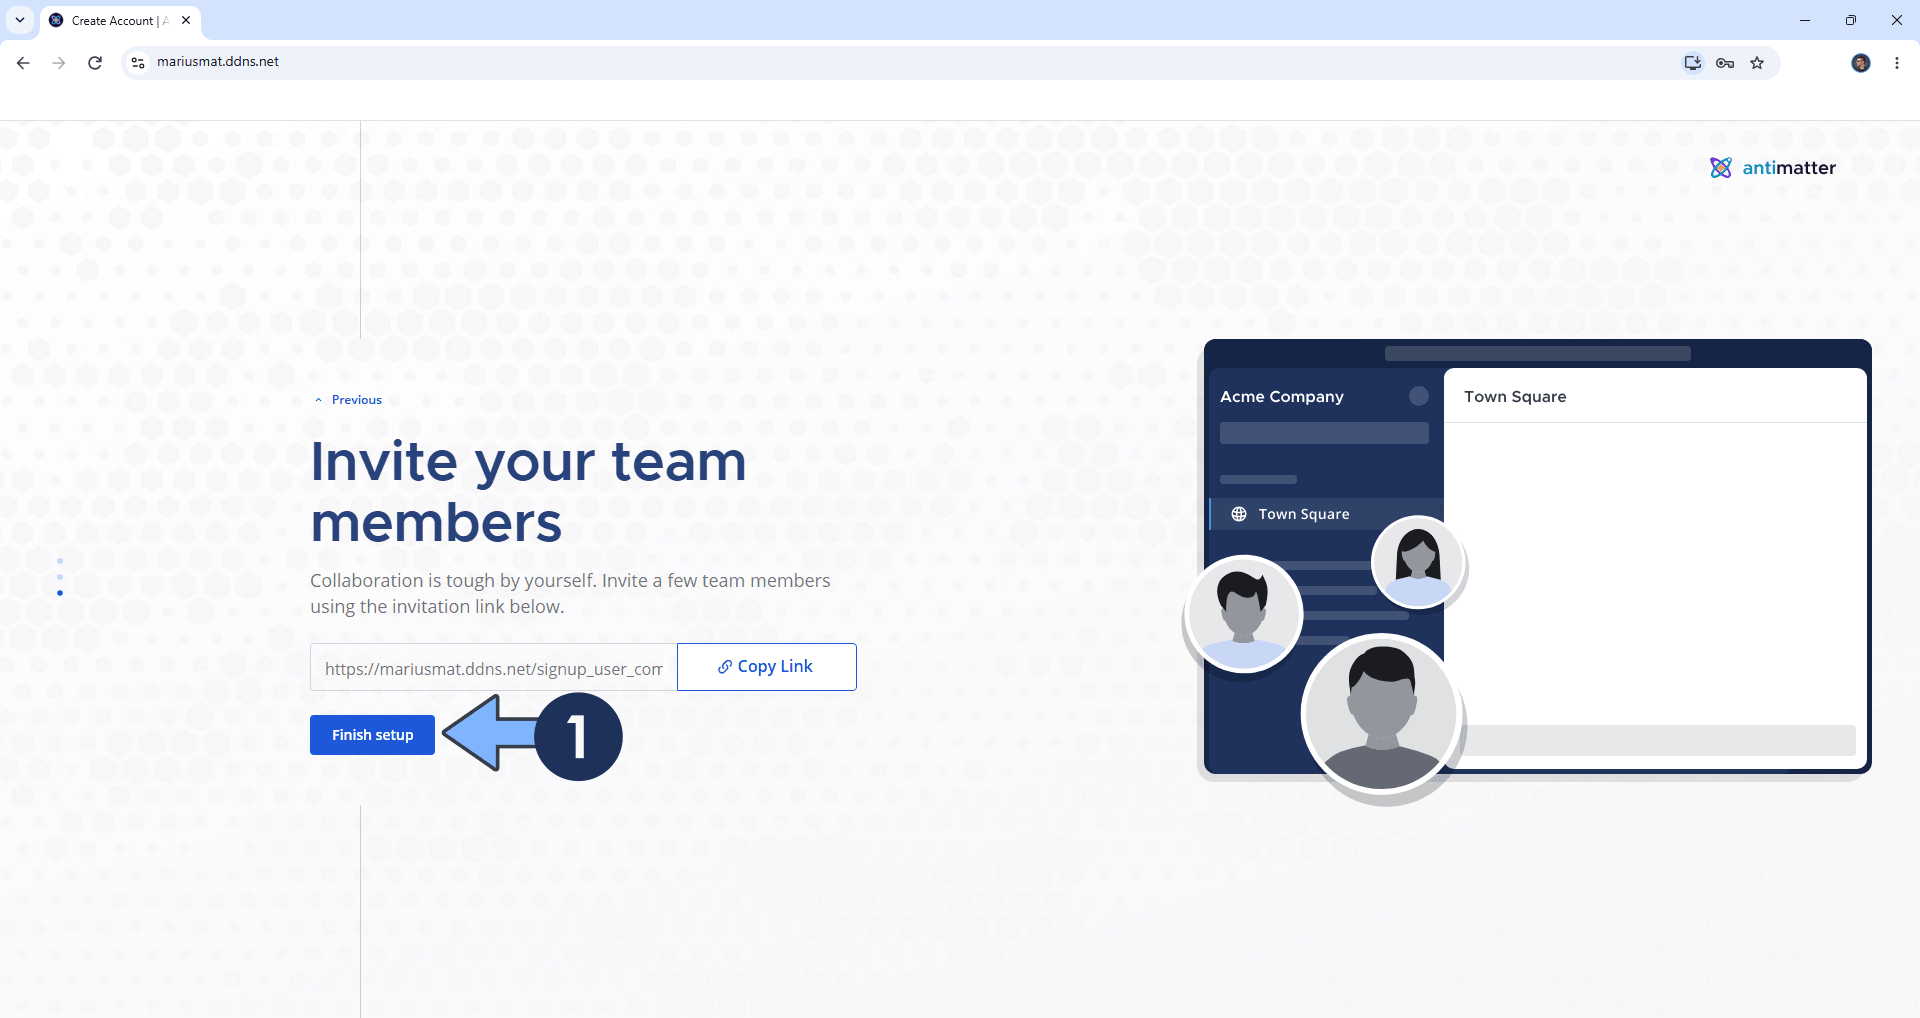
STEP 19
Select Hybrid. Click Apply. Follow the instructions in the image below.
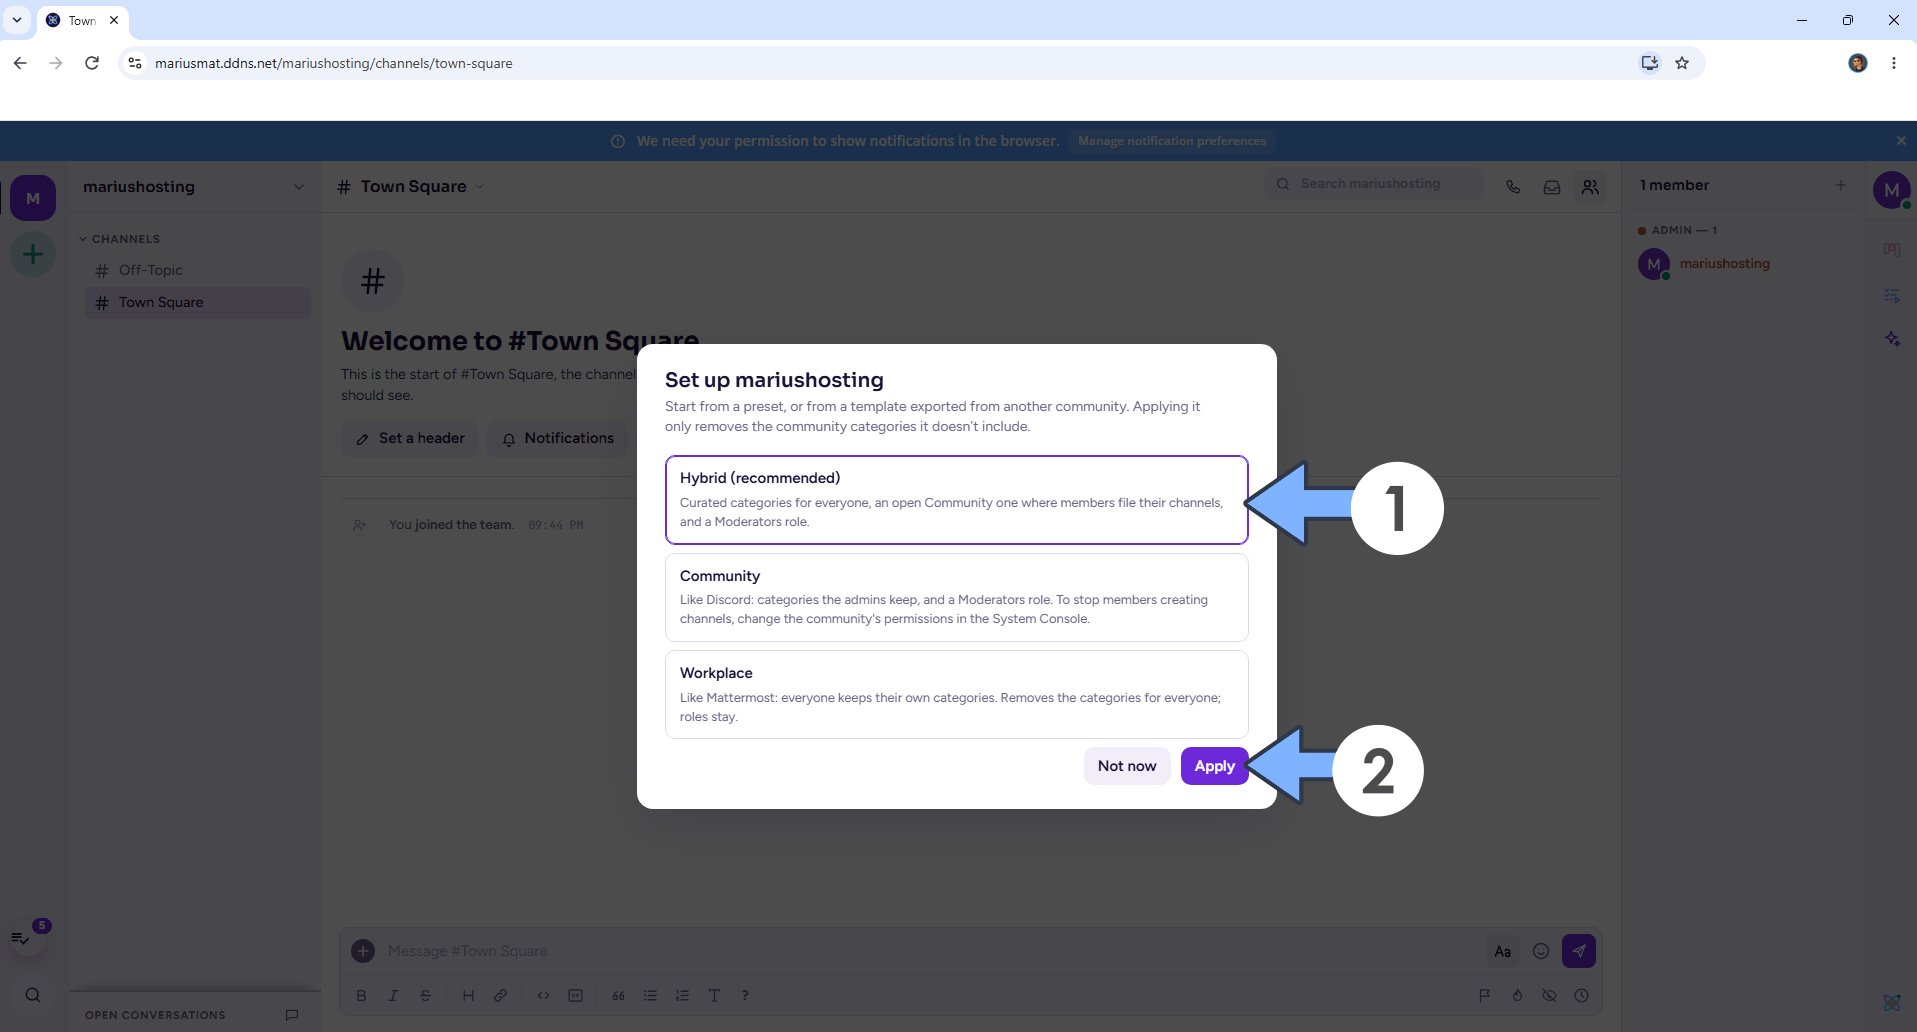
STEP 20
At the top of the page, click on the user icon then Profile & Settings. Follow the instructions in the image below.
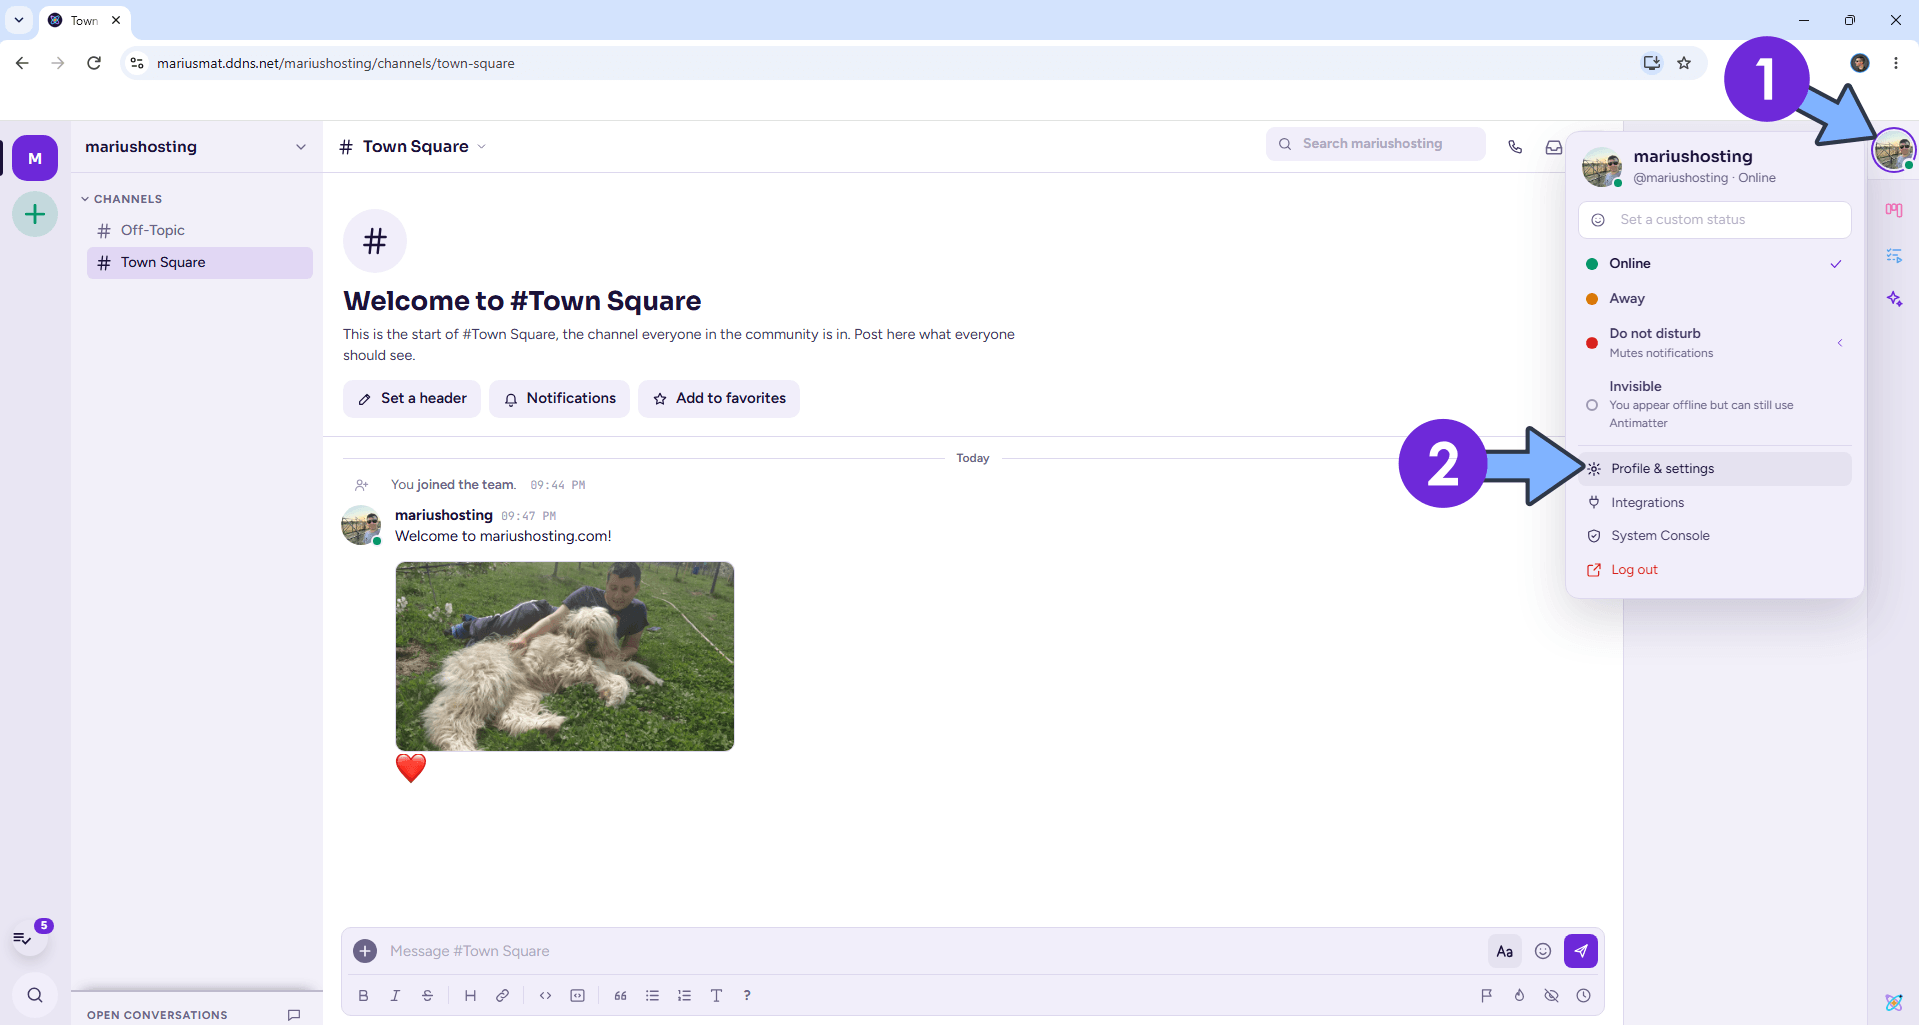
STEP 21
Click Appearance. Click OLED. Follow the instructions in the image below.
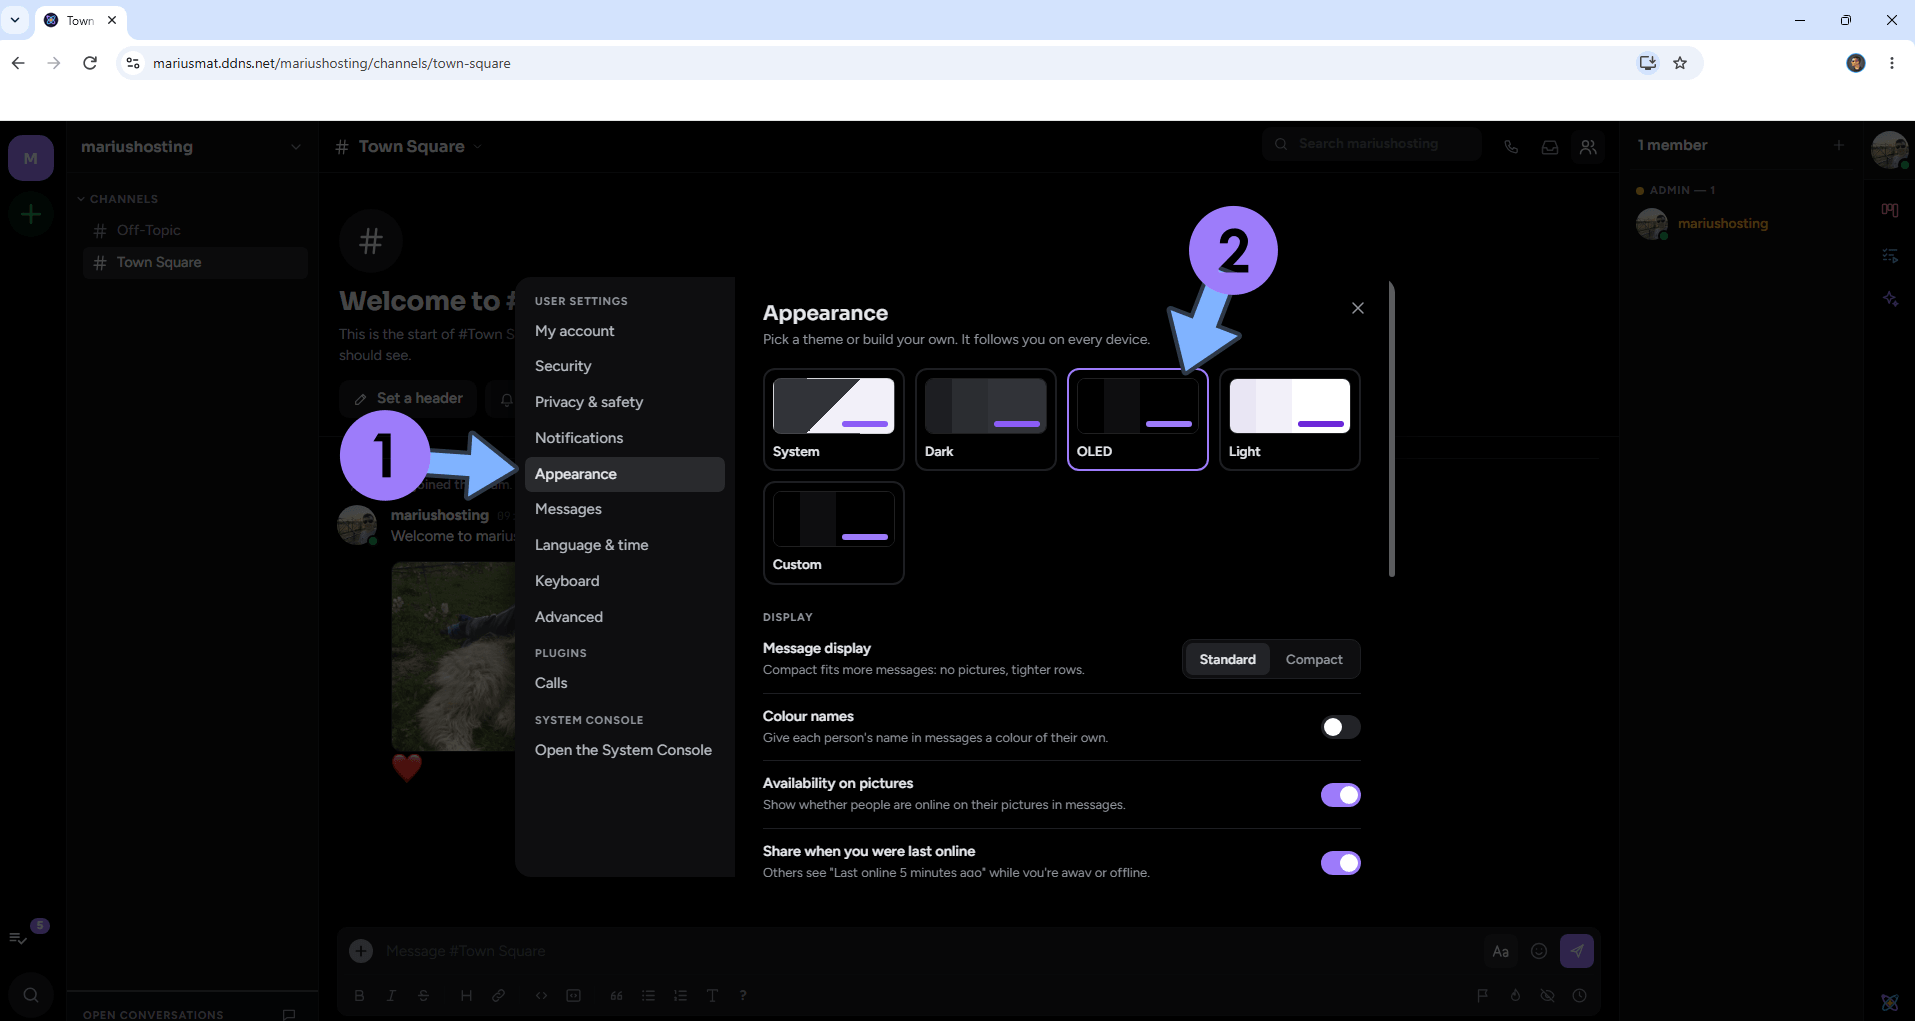
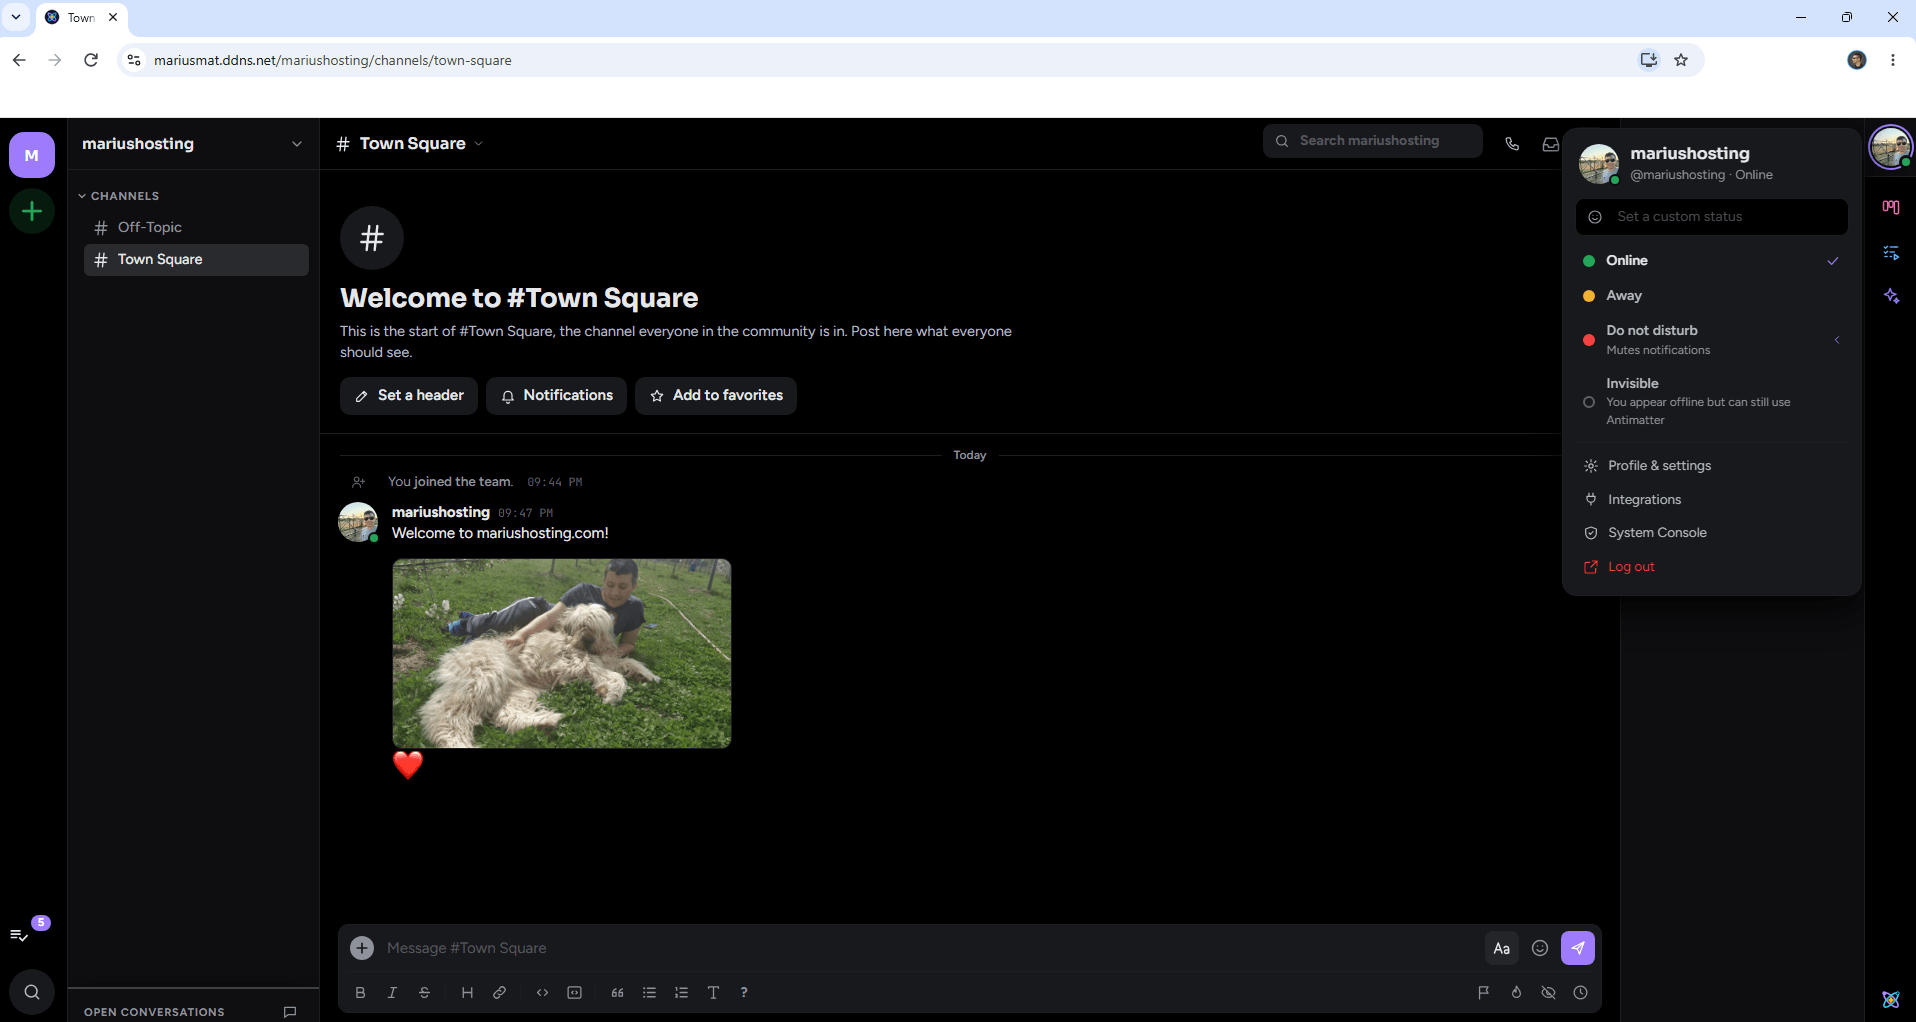
STEP 22
Your new theme at a glance!
STEP 23
How to Set up Email Notifications in Antimatter.
Enjoy Antimatter on your UGREEN NAS!
🆙Note/Update/Container: How to Update Your Docker Containers on UGREEN NAS Using Dockhand.
🐳Note: How to Create Docker Shortcuts on Desktop.
🆕Note: How to Update Dockhand to the latest version.
🆕Note: How to Clean Docker with Dockhand.
This post was updated on Friday / October 16th, 2026 at 11:40 PM