

AFFiNE is a next-gen knowledge base that brings planning, sorting, and creating all together. Form your knowledge console at your wish. Open-source, privacy-first, and always free. AFFiNE is an alternative to Notion and Miro. It’s a workspace with fully merged docs, whiteboards and databases. In this step by step guide I will show you how to install AFFiNe on your UGREEN NAS using Docker & Dockhand.
STEP 1
Please Support My work by Making a Donation.
STEP 2
Install Dockhand using my step by step guide. If you already have Dockhand installed on your UGREEN NAS, skip this STEP. Attention: Make sure you have installed the latest Dockhand version.
STEP 3
⚠️Mandatory: Enable HTTPS on your UGREEN NAS.
STEP 4
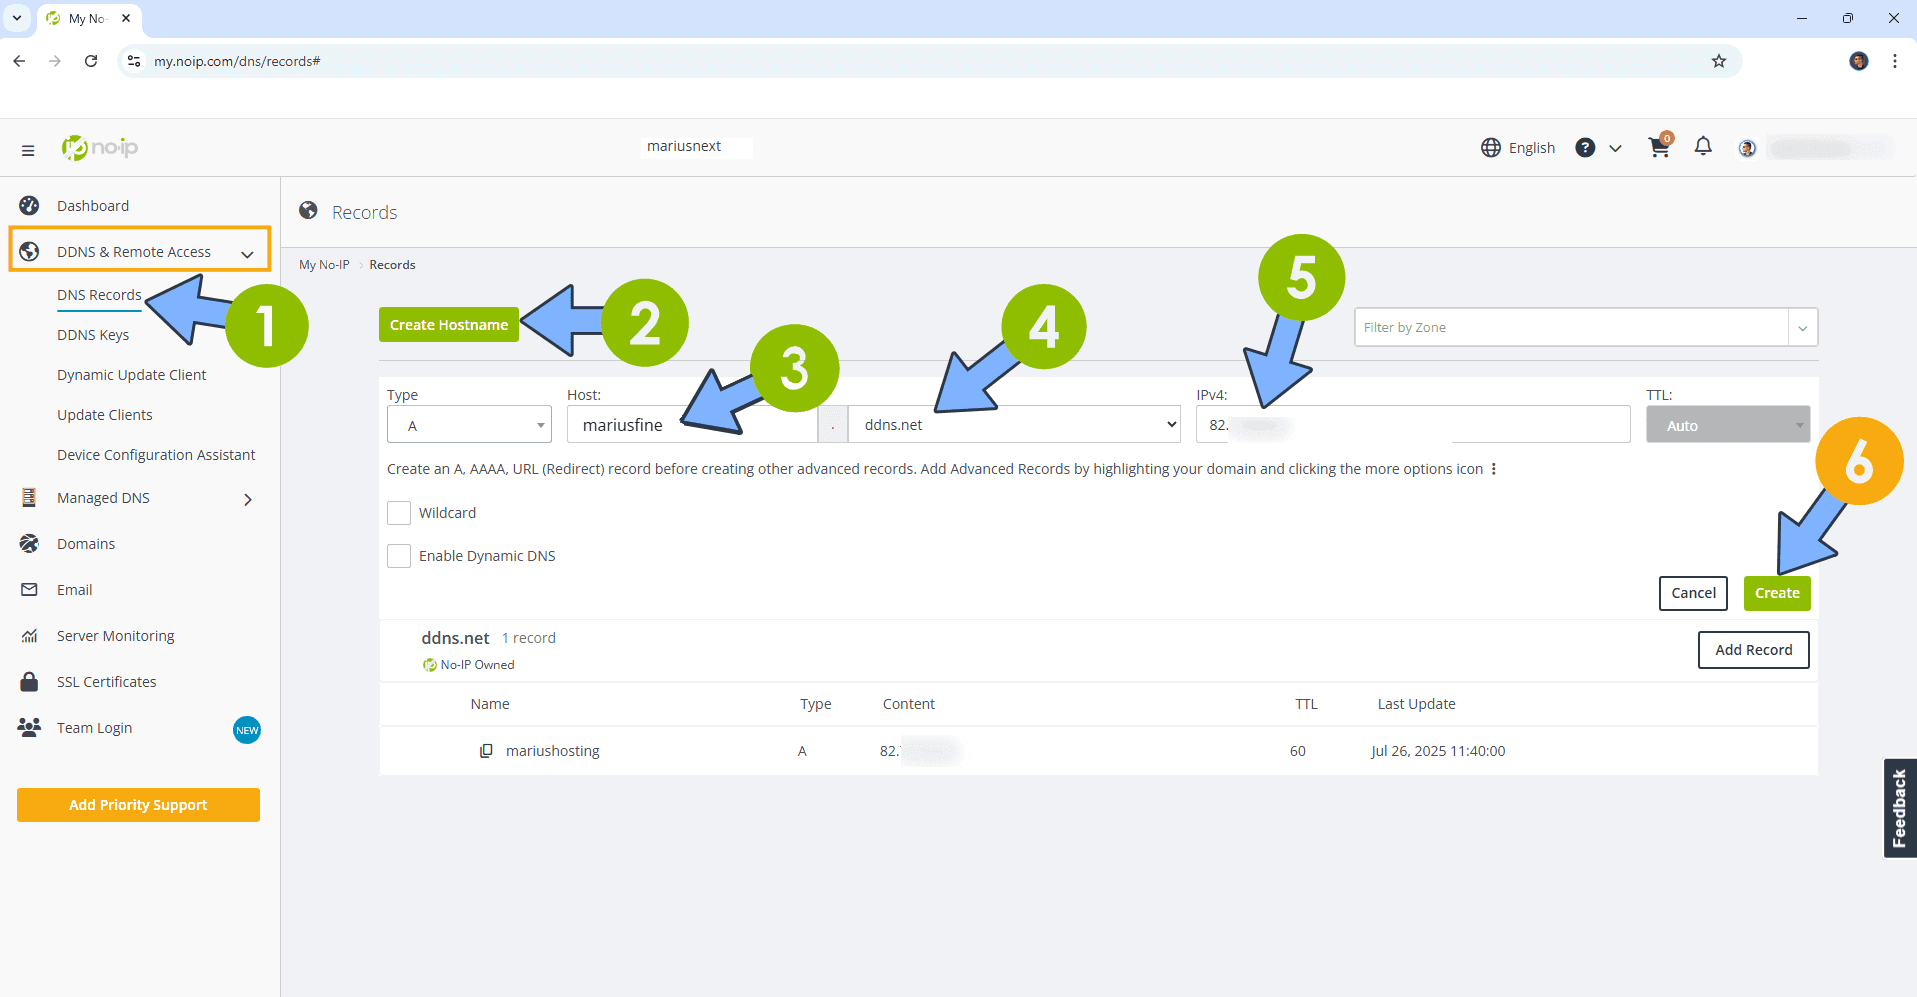
Create a new hostname on the noip website using your noip account. For example, I have created mariusfine as Host and I use the free ddns.net domain. In the IP Address area, type in your own IPV4 IP address from your ISP, then click Create. Follow the instructions in the image below.
STEP 5
⚠️Mandatory: Add Read & Write Permissions to the Docker Folder.
STEP 6
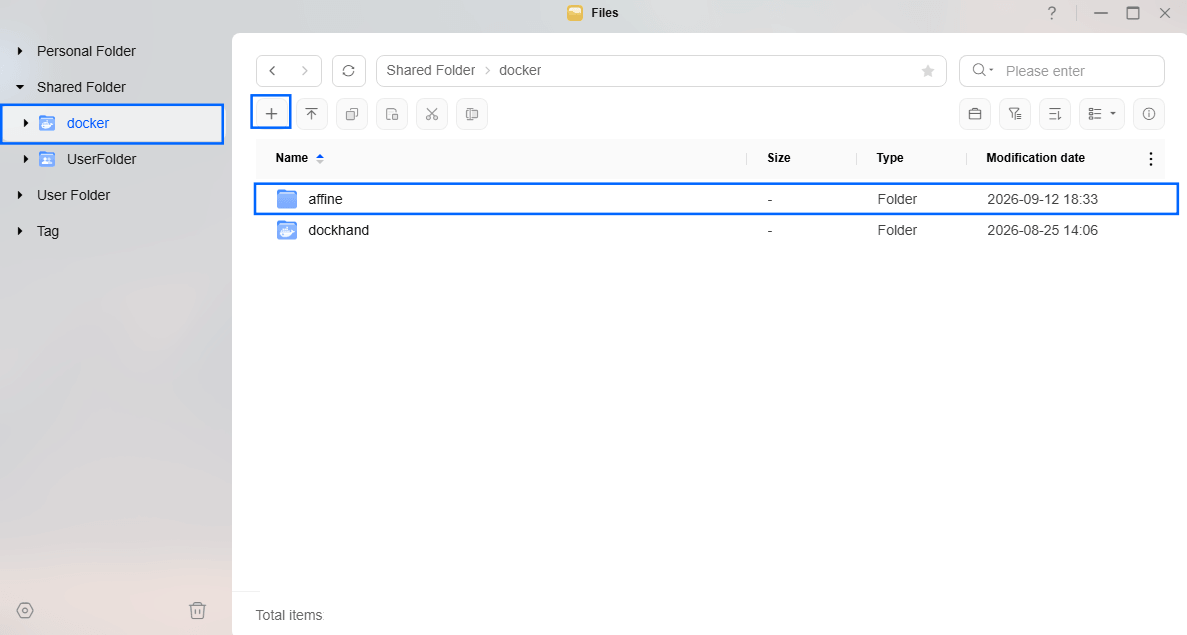
Go to Files and open the docker folder. Inside the docker folder, create one new folder and name it affine. Follow the instructions in the image below.
Note: Be careful to enter only lowercase, not uppercase letters.
STEP 7
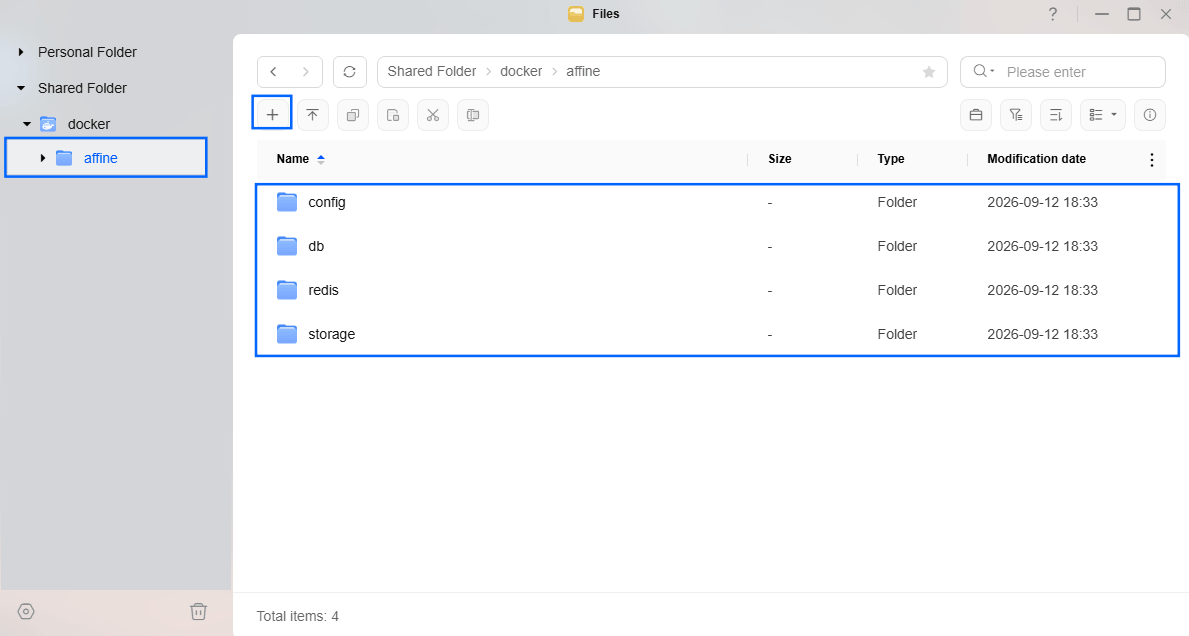
Now create four new folders inside the affine folder that you have previously created at STEP 6 and name them storage, redis, db, config. Follow the instructions in the image below.
Note: Be careful to enter only lowercase, not uppercase letters.
STEP 8
Follow my step by step guide on how to activate SMTP for your Gmail account. This step is mandatory. Note: If you don’t want to use the easiest way for SMTP with Google and you already have SMTP details from your own Mail Server, you can just skip this STEP and use your personalized email SMTP details instead.
STEP 9
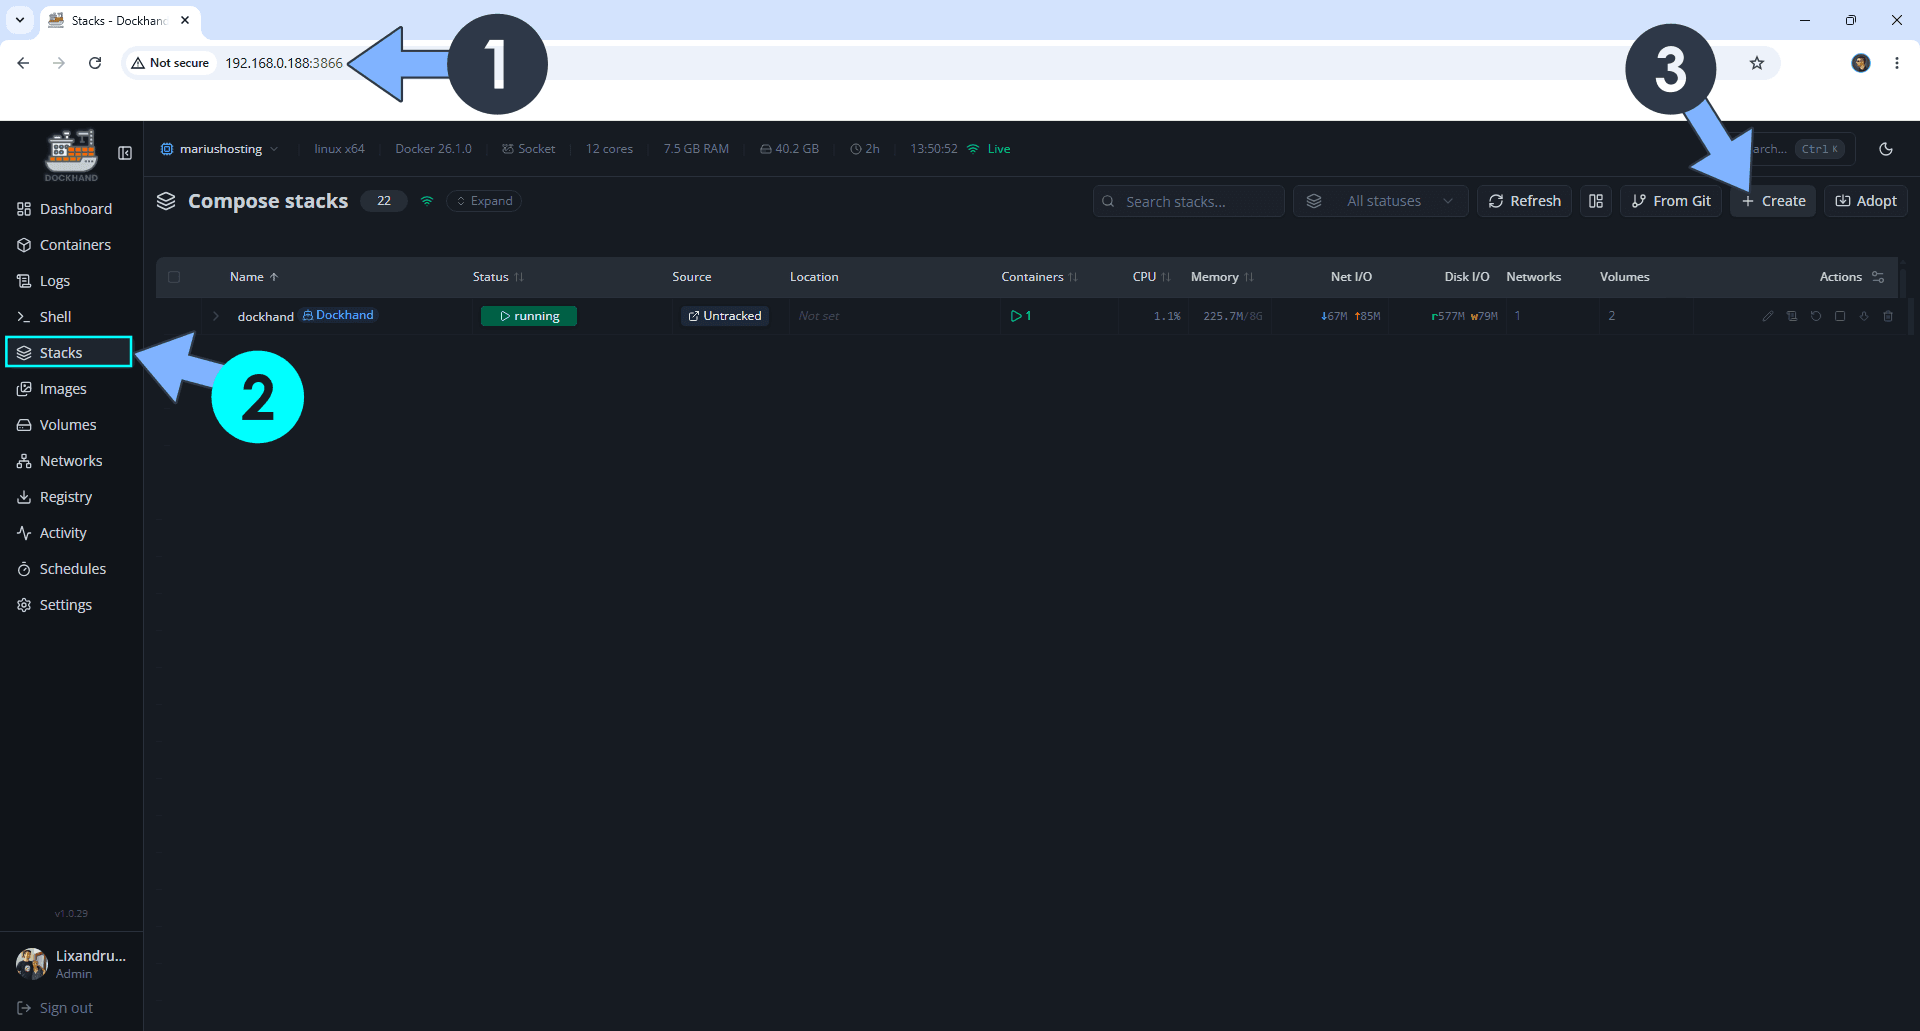
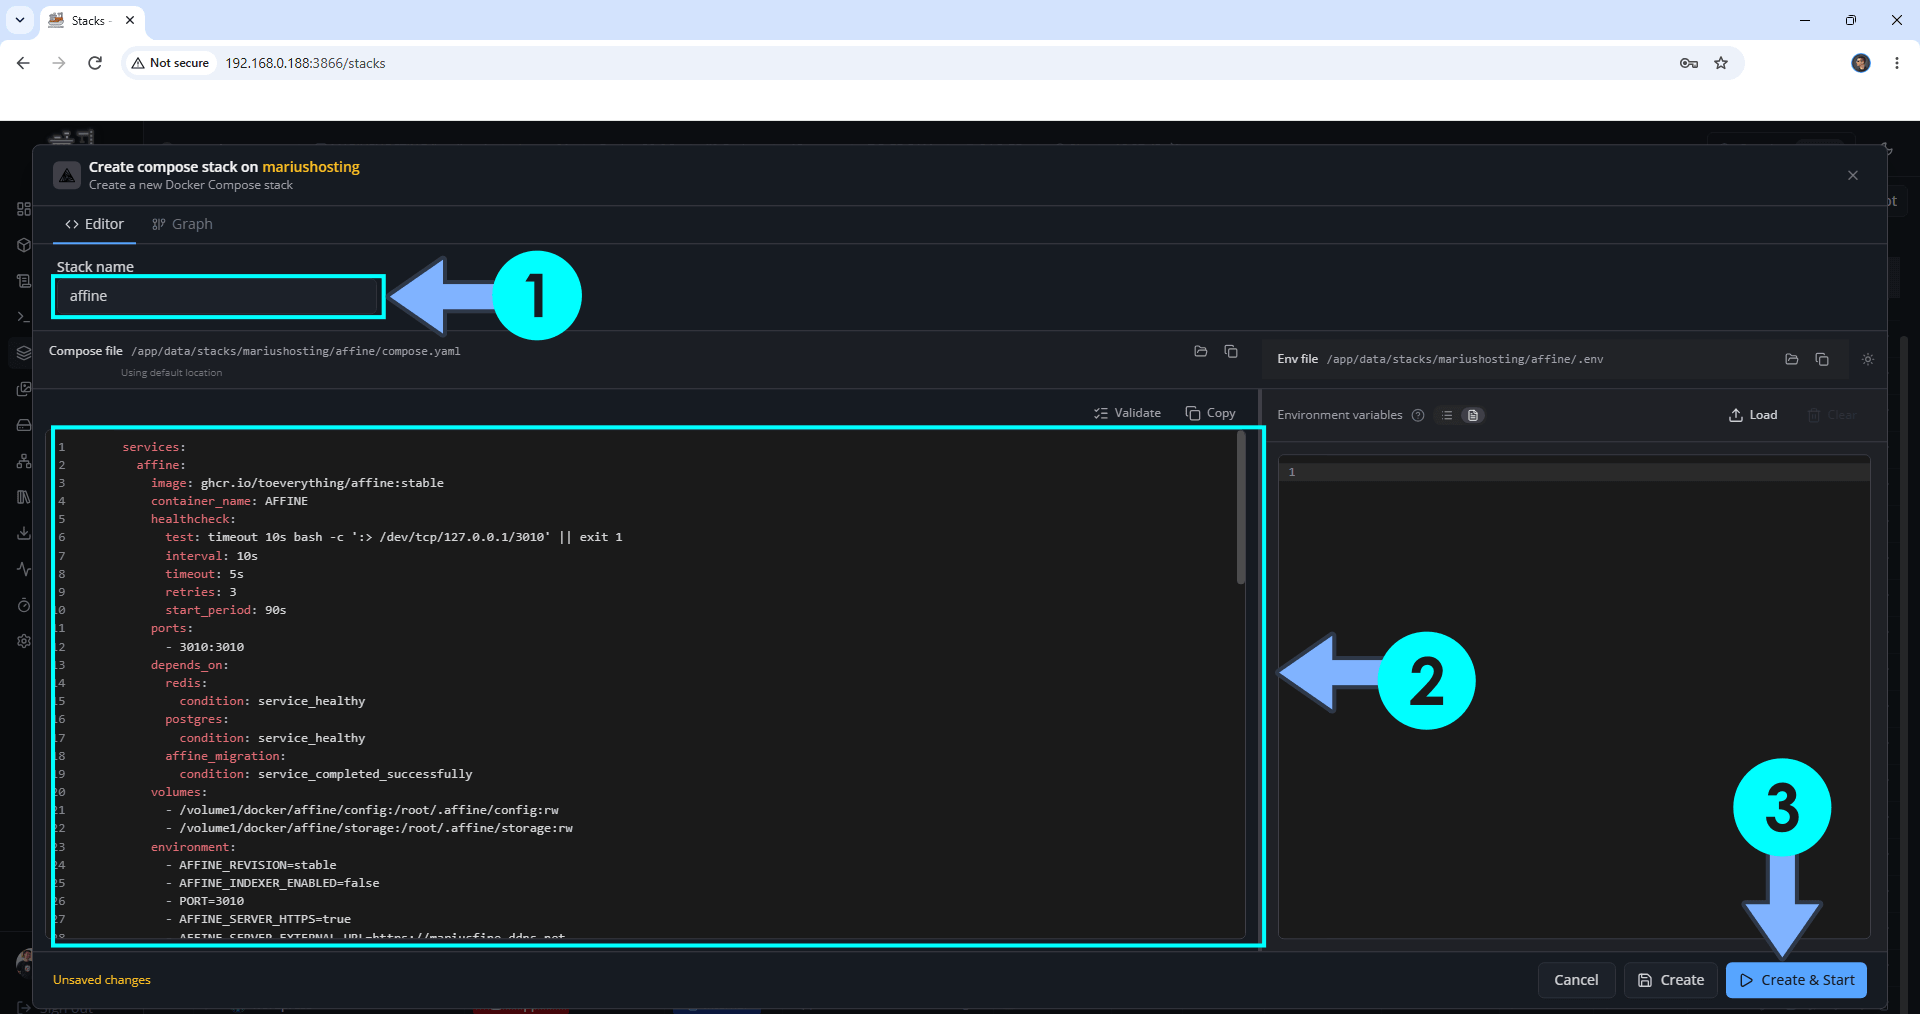
Open your browser and type in http://ugreen-ip-address:3866 to connect to your Dockhand container. On the left sidebar, click Stacks then + Create. Follow the instructions in the image below.
STEP 10
In the Stack name field, type in affine. ⚠️Warning: Type in the name in lowercase letters. The installation process can take up to a few seconds/minutes. It will depend on your Internet speed connection. Follow the instructions in the image below.
services:
  affine:
    image: ghcr.io/toeverything/affine:stable
    container_name: AFFINE
    healthcheck:
      test: timeout 10s bash -c ':> /dev/tcp/127.0.0.1/3010' || exit 1
      interval: 10s
      timeout: 5s
      retries: 3
      start_period: 90s
    ports:
      - 3010:3010
    depends_on:
      redis:
        condition: service_healthy
      postgres:
        condition: service_healthy
      affine_migration:
        condition: service_completed_successfully
    volumes:
      - /volume1/docker/affine/config:/root/.affine/config:rw
      - /volume1/docker/affine/storage:/root/.affine/storage:rw
    environment:
      - AFFINE_REVISION=stable
      - AFFINE_INDEXER_ENABLED=false
      - PORT=3010
      - AFFINE_SERVER_HTTPS=true
      - AFFINE_SERVER_EXTERNAL_URL=https://mariusfine.ddns.net
      - MAILER_HOST=smtp.gmail.com
      - MAILER_PORT=465
      - MAILER_USER=Your-own-gmail-address
      - MAILER_PASSWORD=Your-own-app-password
      - MAILER_SENDER=Affine
      - REDIS_SERVER_HOST=redis
      - DATABASE_URL=postgres://affineuser:affinepass@postgres:5432/affine?sslmode=disable
      - NODE_ENV=production
      - AFFINE_ADMIN_EMAIL=yourown@email
      - AFFINE_ADMIN_PASSWORD=Mariushosting84##
      - DB_DATA_LOCATION=~/.affine/self-host/postgres/pgdata
      - UPLOAD_LOCATION=~/.affine/self-host/storage
      - CONFIG_LOCATION=~/.affine/self-host/config
    restart: on-failure:5

  affine_migration:
    image: ghcr.io/toeverything/affine:stable
    container_name: Affine_MIGRATION
    volumes:
      - /volume1/docker/affine/config:/root/.affine/config:rw
      - /volume1/docker/affine/storage:/root/.affine/storage:rw
    command: ['sh', '-c', 'node ./scripts/self-host-predeploy.js']
    environment:
      - REDIS_SERVER_HOST=redis
      - DATABASE_URL=postgres://affineuser:affinepass@postgres:5432/affine?sslmode=disable
      - AFFINE_INDEXER_ENABLED=false
      - DB_DATA_LOCATION=~/.affine/self-host/postgres/pgdata
      - UPLOAD_LOCATION=~/.affine/self-host/storage
      - CONFIG_LOCATION=~/.affine/self-host/config
    depends_on:
      postgres:
        condition: service_healthy
      redis:
        condition: service_healthy

  redis:
    image: redis:latest
    container_name: AFFINE-REDIS
    volumes:
      - /volume1/docker/affine/redis:/data:rw
    healthcheck:
      test: ['CMD', 'redis-cli', '--raw', 'incr', 'ping']
      interval: 10s
      timeout: 5s
      retries: 5
    restart: on-failure:5

  postgres:
    image: pgvector/pgvector:pg18
    container_name: AFFINE-DB
    user: 999:10
    volumes:
      - /volume1/docker/affine/db:/var/lib/postgresql:rw
    healthcheck:
      test: ["CMD", "pg_isready", "-q", "-d", "affine", "-U", "affineuser"]
      interval: 10s
      timeout: 5s
      retries: 5
    environment:
      POSTGRES_USER: affineuser
      POSTGRES_PASSWORD: affinepass
      POSTGRES_DB: affine
      POSTGRES_INITDB_ARGS: '--data-checksums'
    restart: on-failure:5
Note: Before you paste the code above in the Web editor area below, change the value for AFFINE_SERVER_EXTERNAL_URL and type in your own NO IP DDNS with https:// at the beginning that you have previously created at STEP 4.
Note: Before you paste the code above in the Web editor area below, change the value for MAILER_USER and type in your own Gmail address. STEP 8.
Note: Before you paste the code above in the Web editor area below, change the value for MAILER_PASSWORD and type in your own Gmail app password. STEP 8.
Note: Before you paste the code above in the Web editor area below, change the value for AFFINE_ADMIN_EMAIL and type in your own email address. You will need this email later at STEP 17.
Note: Before you paste the code above in the Web editor area below, change the value for AFFINE_ADMIN_PASSWORD and type in your own affine password. You will need this password later at STEP 17. ⚠️Warning: Make sure you have an uppercase letter, two numbers and two special characters in the password.
Note: Before you paste the code above in the Stack editor area below, change the value numbers for user with your own UID and GID values. (Follow my step by step guide on how to do this.) 999 is my personal UID value and 10 is my personal GID value. You have to type in your own values.
STEP 11
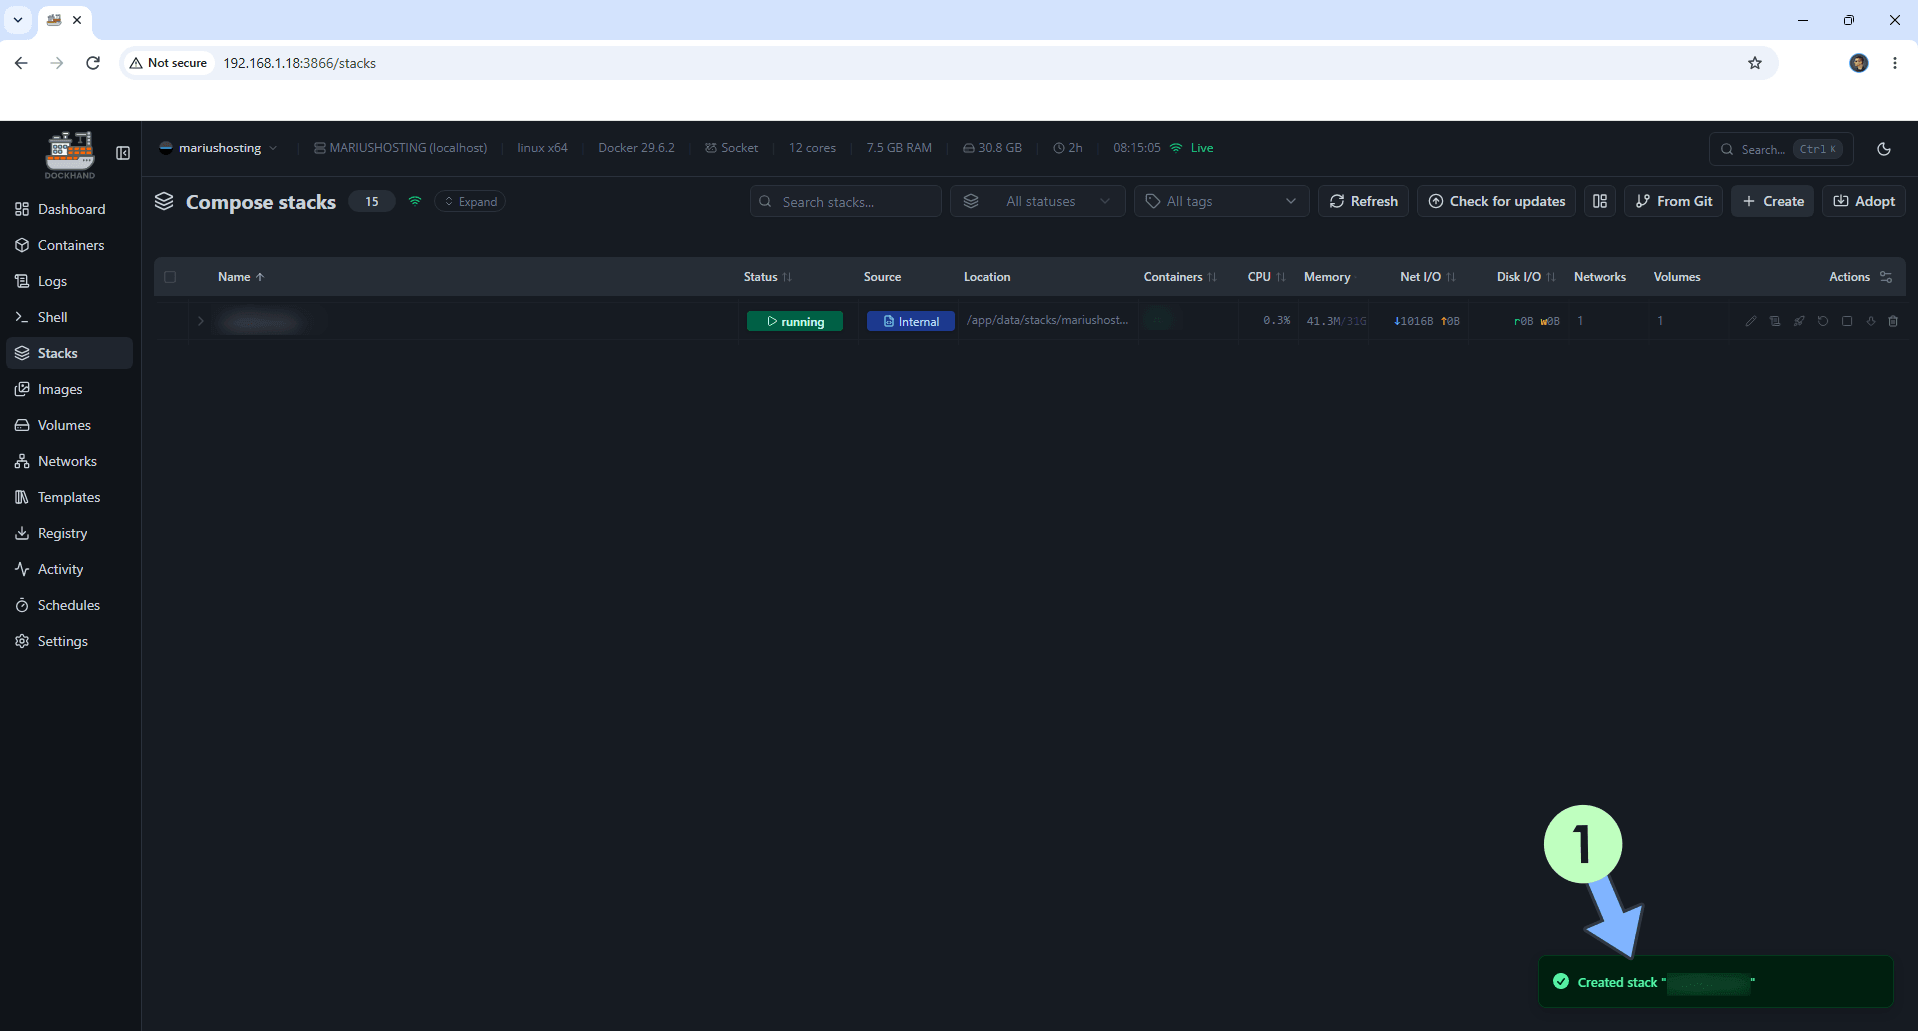
If everything goes right, you will see the following message at the bottom right of your screen: “Created stack “affine”“.
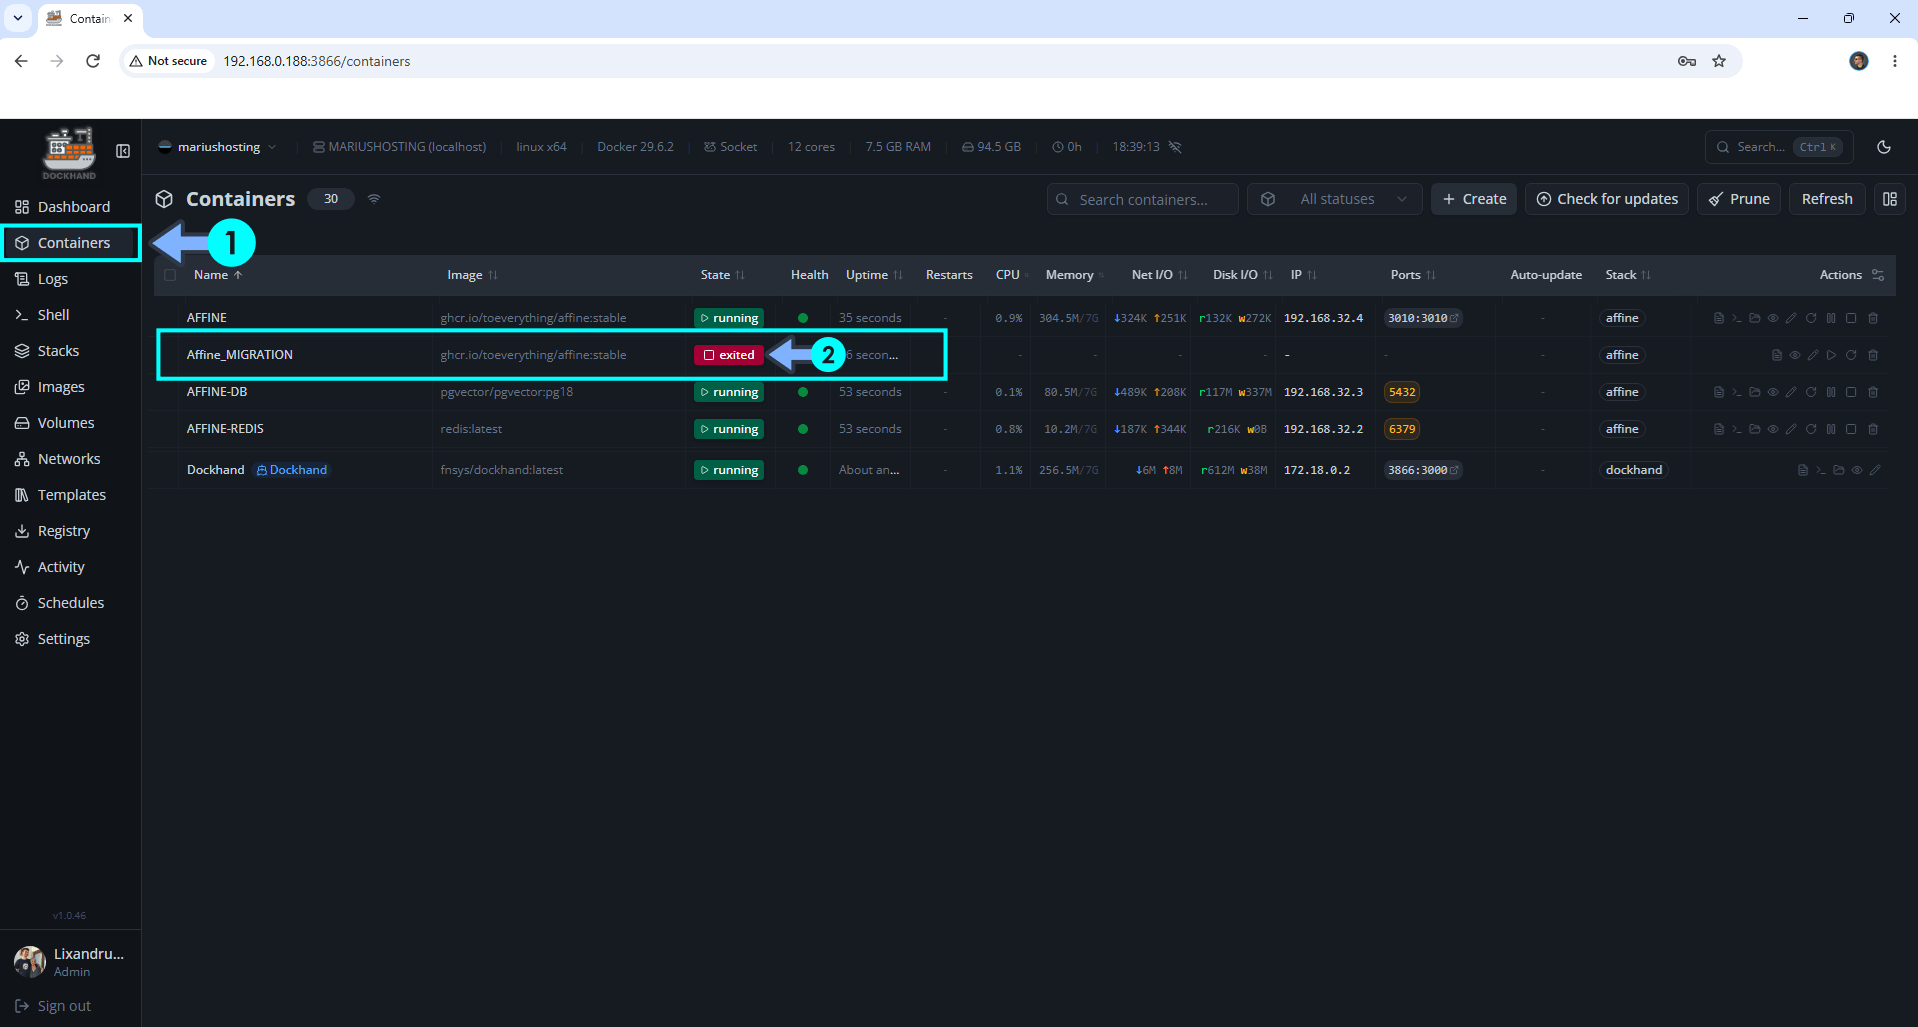
⚠️Note: After a couple of seconds/minutes, your container Affine-MIGRATION will be marked as “exited“. This is normal behavior. Go straight to the next STEP.
STEP 12
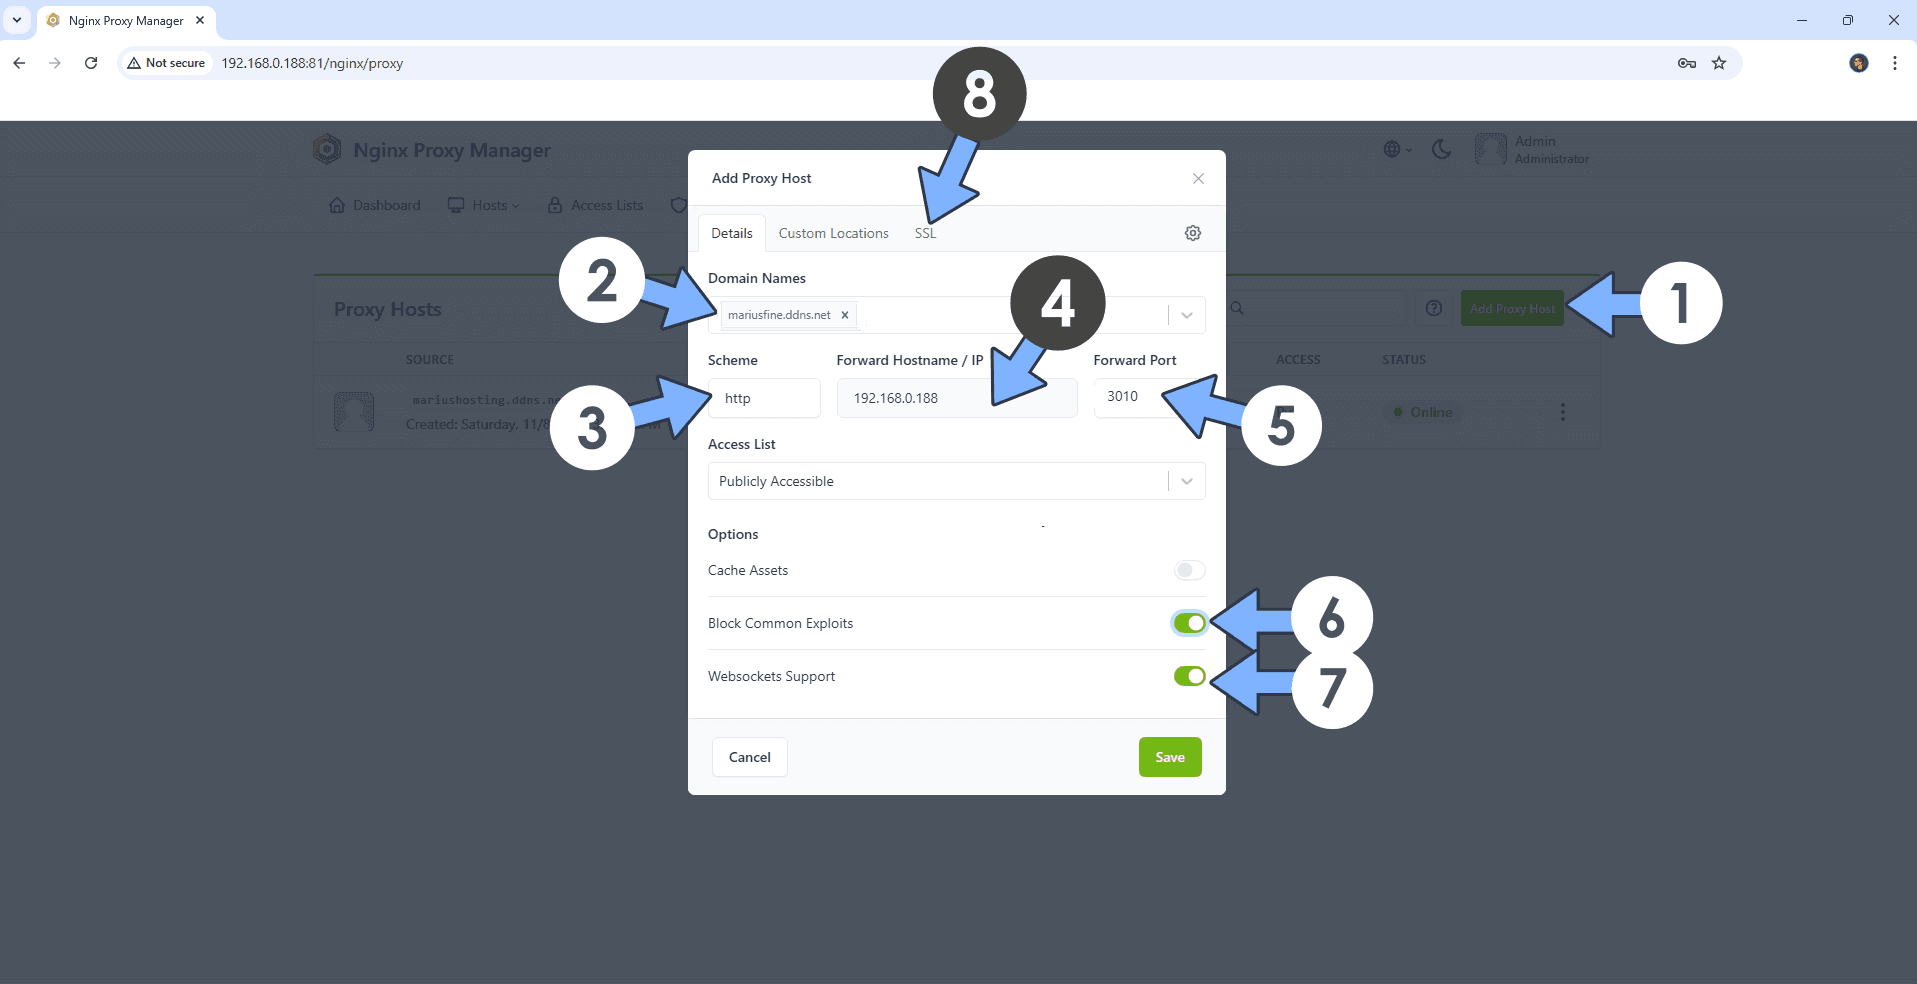
Open your Nginx Proxy Manager container that you have previously installed at STEP 3. Click Add Proxy Host. A new pop up window will open. Add the following details:
Domain Names: Type in your own noip domain name that you have previously created at STEP 4.
Scheme: http
Forward Hostname/IP: Type in the local NAS IP of your UGREEN NAS.
Forward Port: Type in the Affine local Port that is 3010
Check Block Common Exploits
Check Websockets Support
Click the SSL tab. Follow the instructions in the image below.
STEP 13
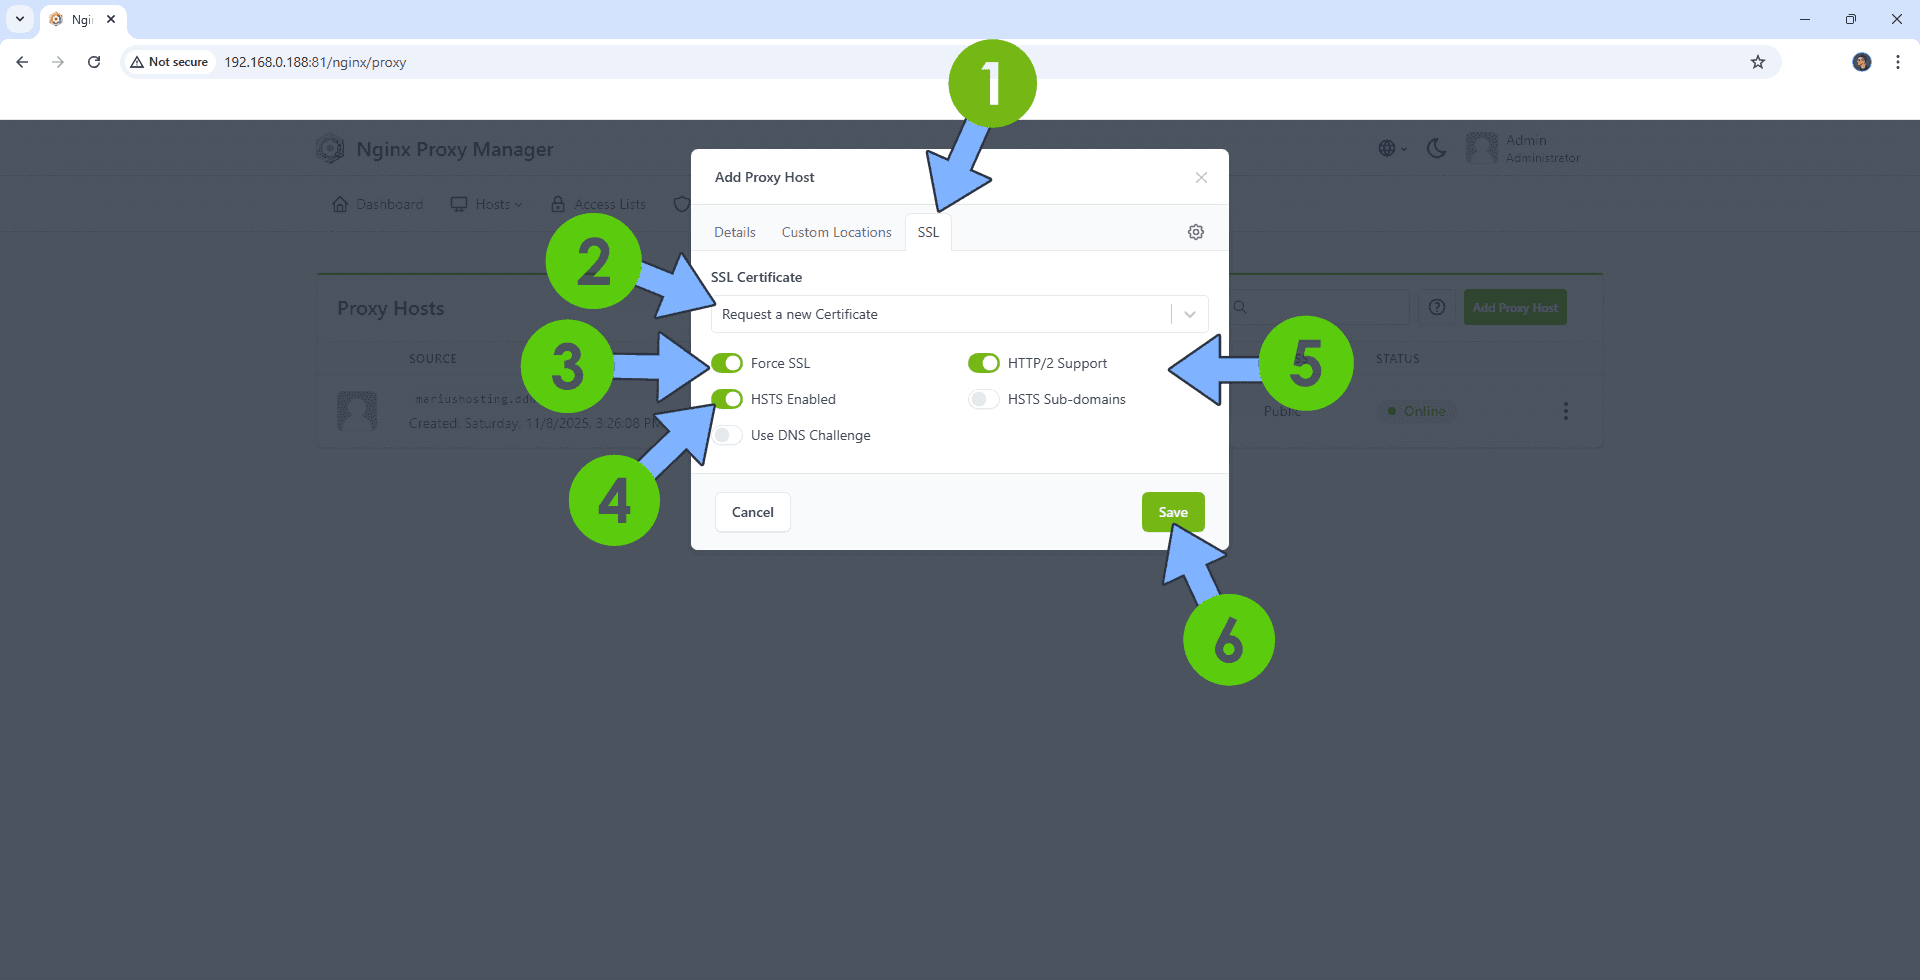
After you click the SSL tab, add the following details:
SSL Certificate: Request a new SSL Certificate
Check: Force SSL
Check: HSTS Enabled
Check: HTTP/2 Support
Click Save. Follow the instructions in the image below.
STEP 14
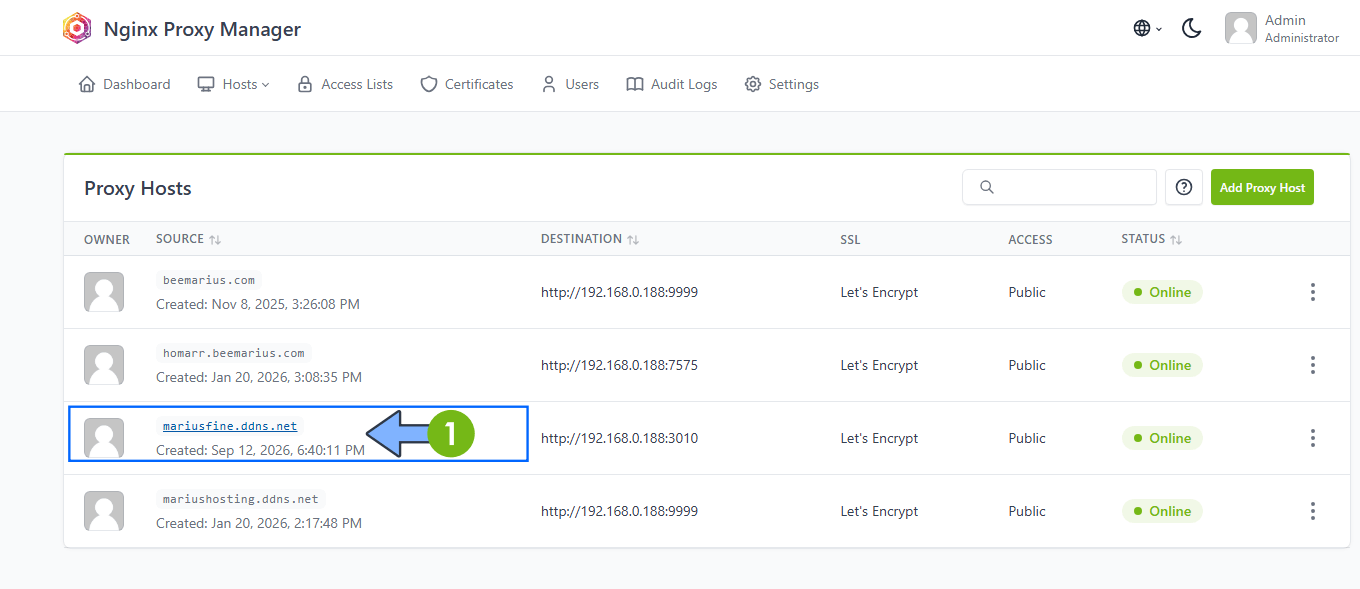
In the Proxy Hosts area, if everything goes right, you will see that your hostname has been generated. Click on it. Follow the instructions in the image below.
STEP 15
🟢Please Support My work by Making a Donation. Almost 99,9% of the people that install something using my guides forget to support my work, or just ignore STEP 1. I’ve been very honest about this aspect of my work since the beginning: I don’t run any ADS, I don’t require subscriptions, paid or otherwise, I don’t collect IPs, emails, and I don’t have any referral links from Amazon or other merchants. I also don’t have any POP-UPs or COOKIES. I have repeatedly been told over the years how much I have contributed to the community. It’s something I love doing and have been honest about my passion since the beginning. But I also Need The Community to Support me Back to be able to continue doing this work.
STEP 16
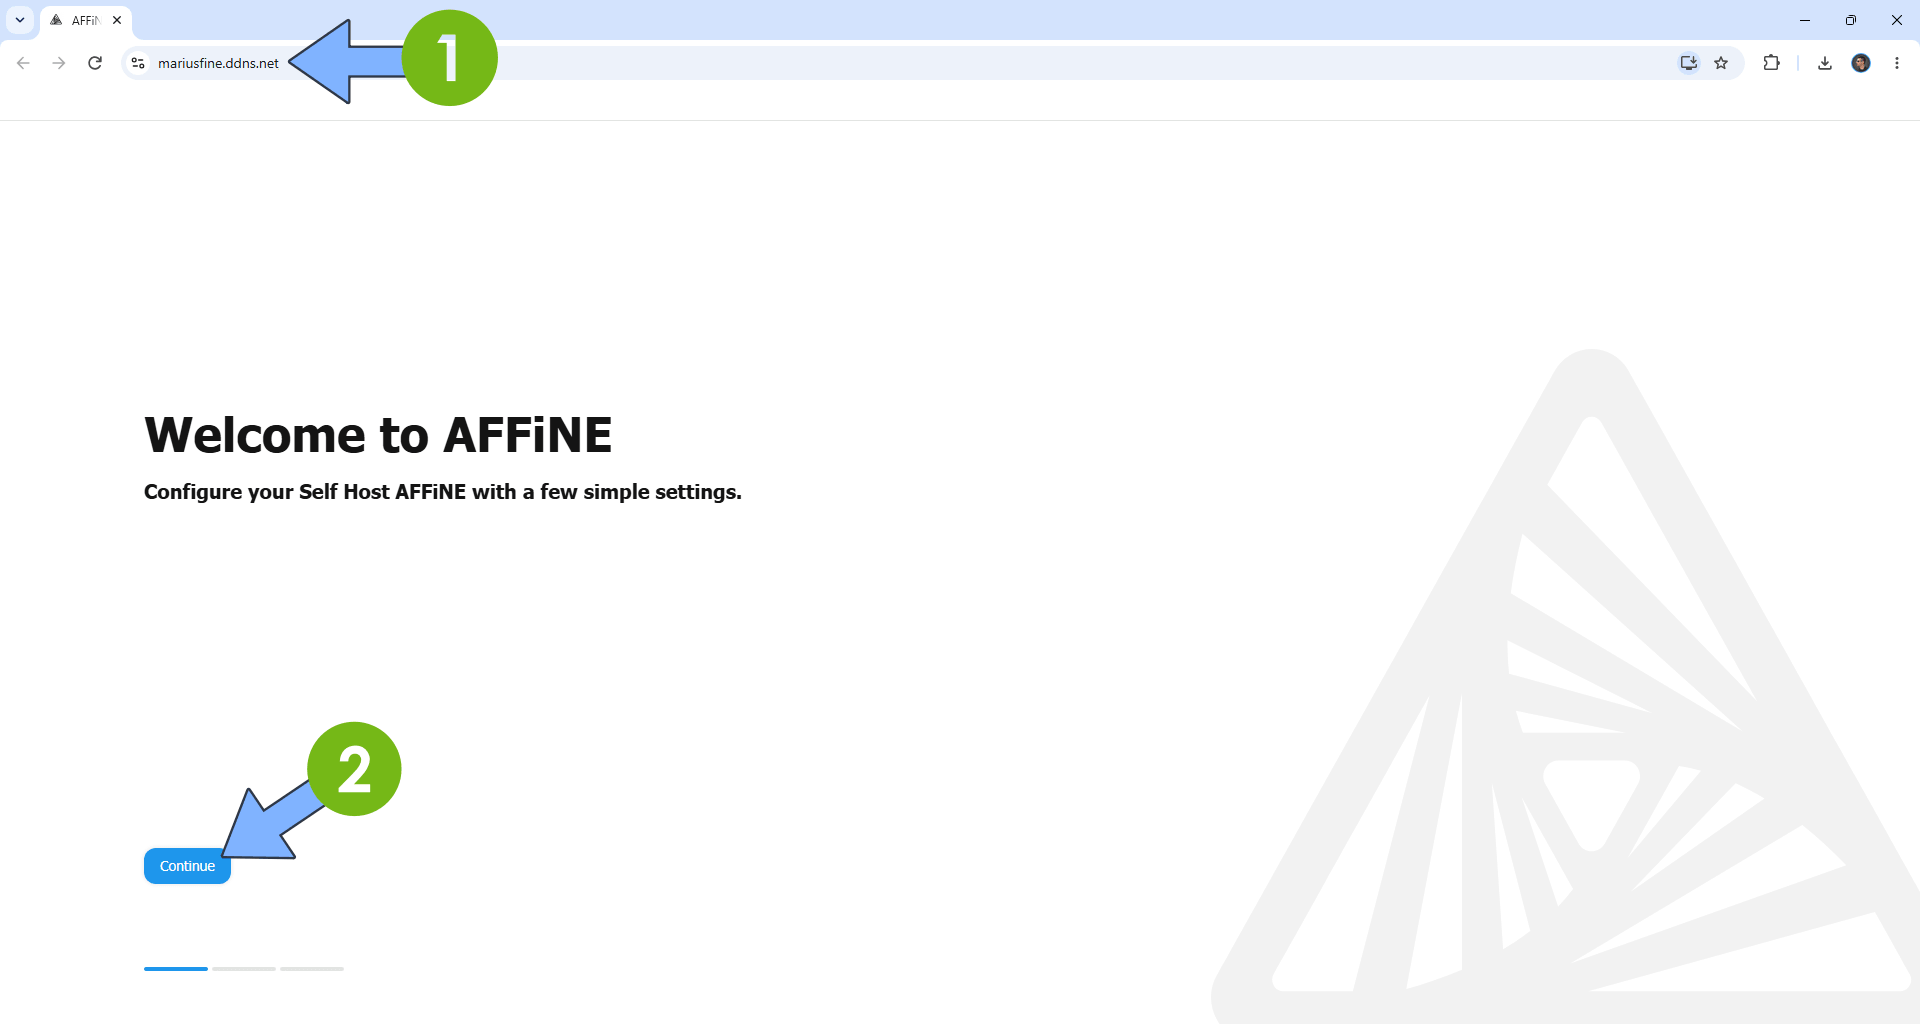
Now open your browser and type in your HTTPS/SSL certificate like this https://yourname.ddns.net that you have previously created at STEP 4. In my case it’s https://mariusfine.ddns.net Click Continue. Follow the instructions in the image below.
STEP 17
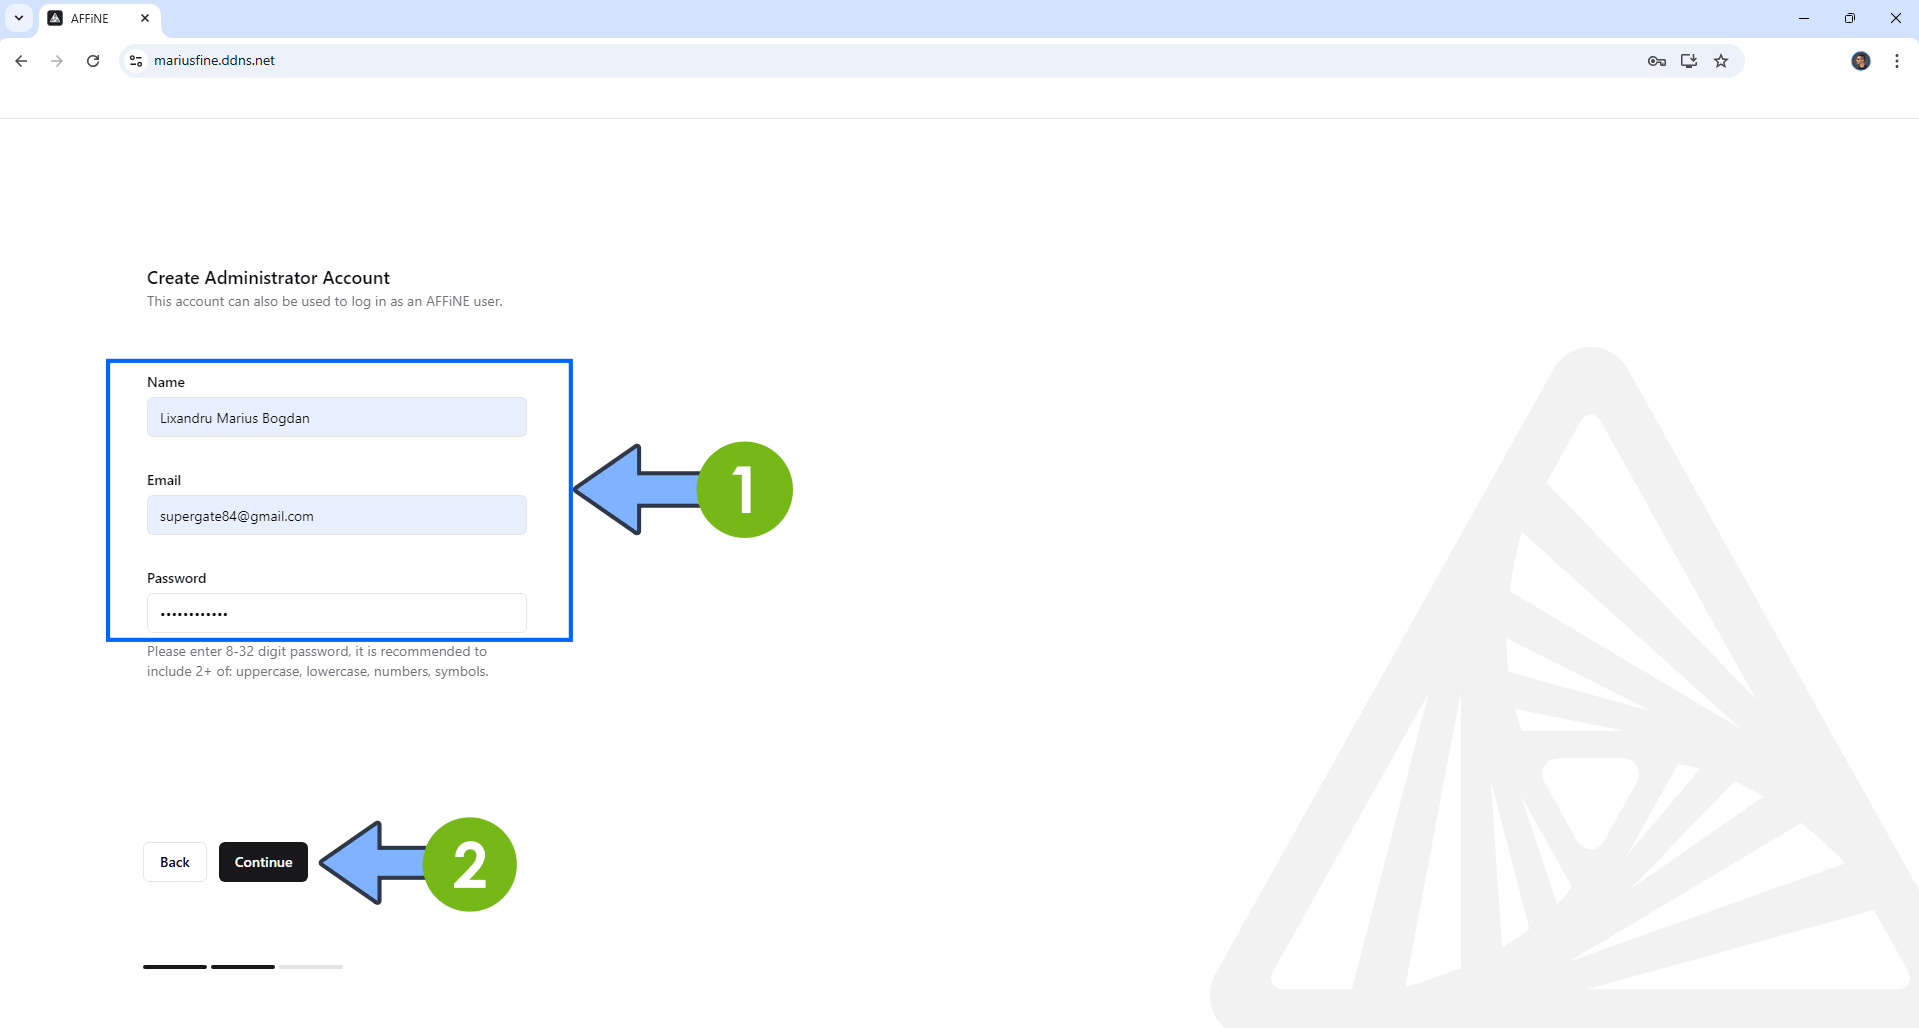
Add your Administrator details, then click Continue. Follow the instructions in the image below.
STEP 18
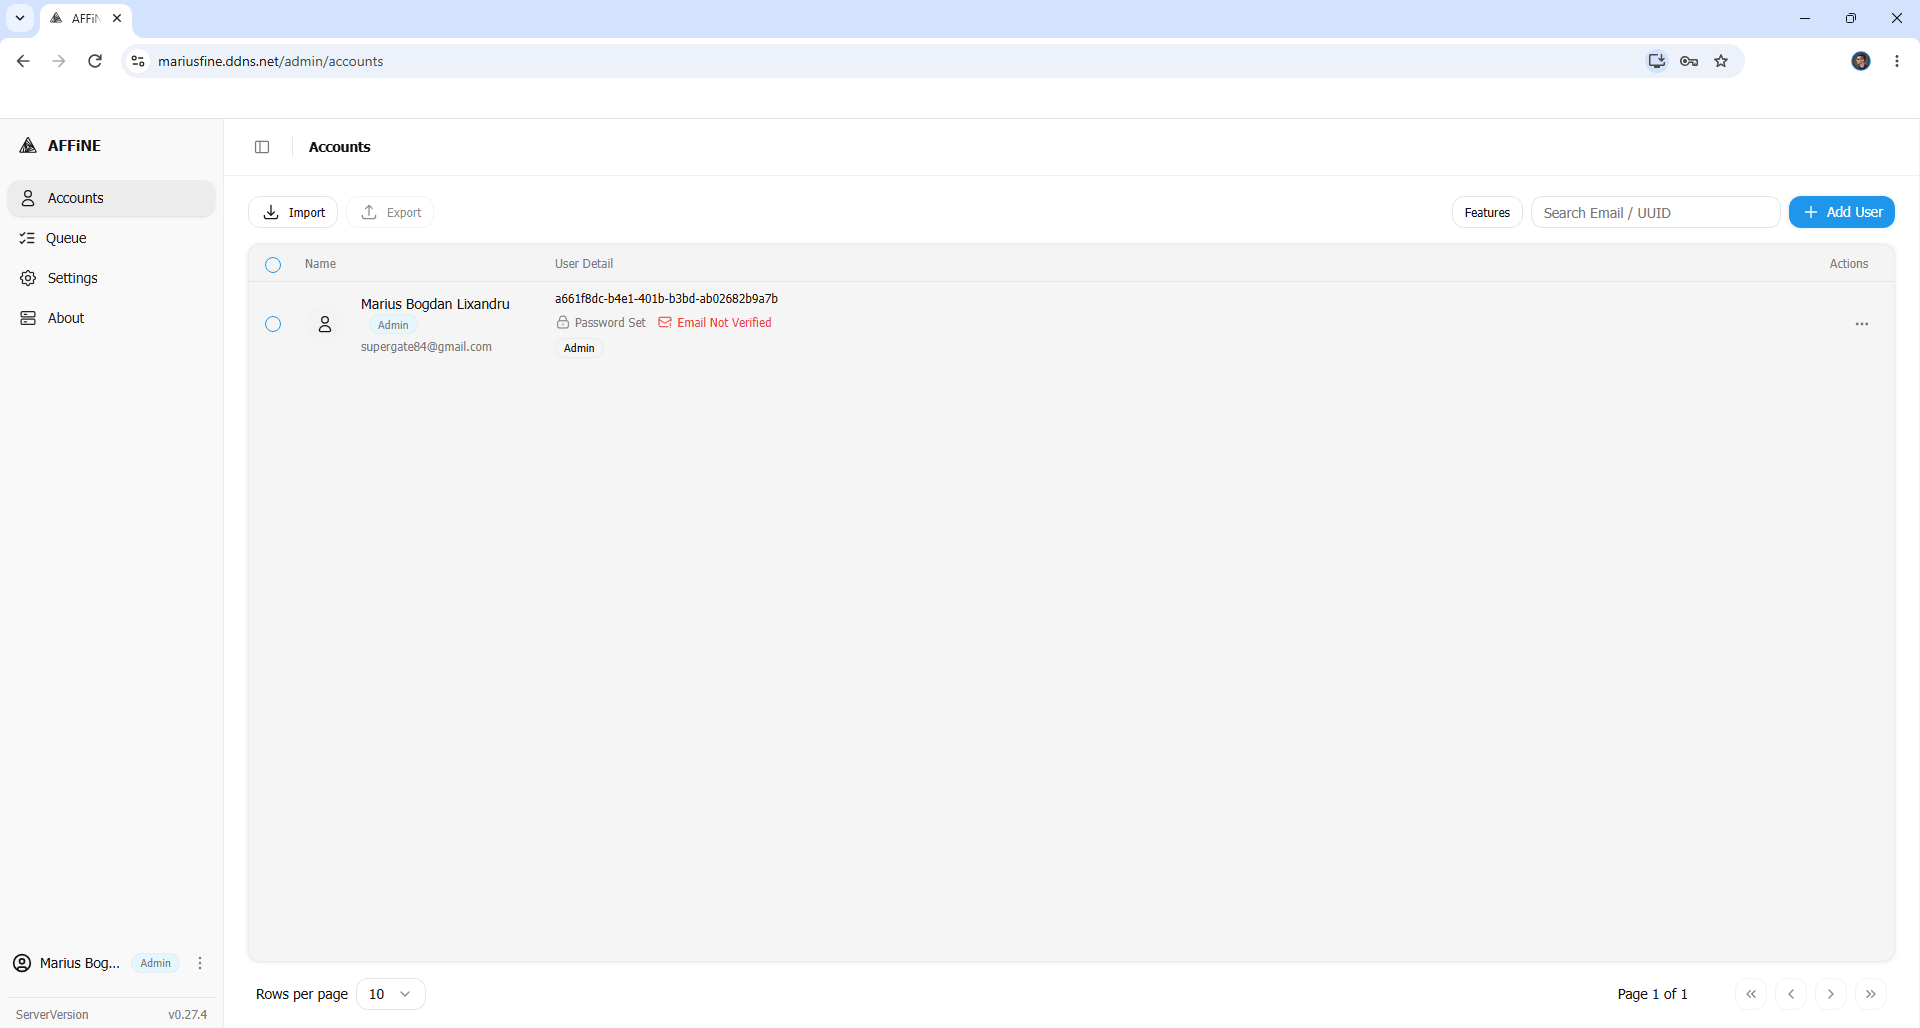
Your Administrator details at a glance!
STEP 19
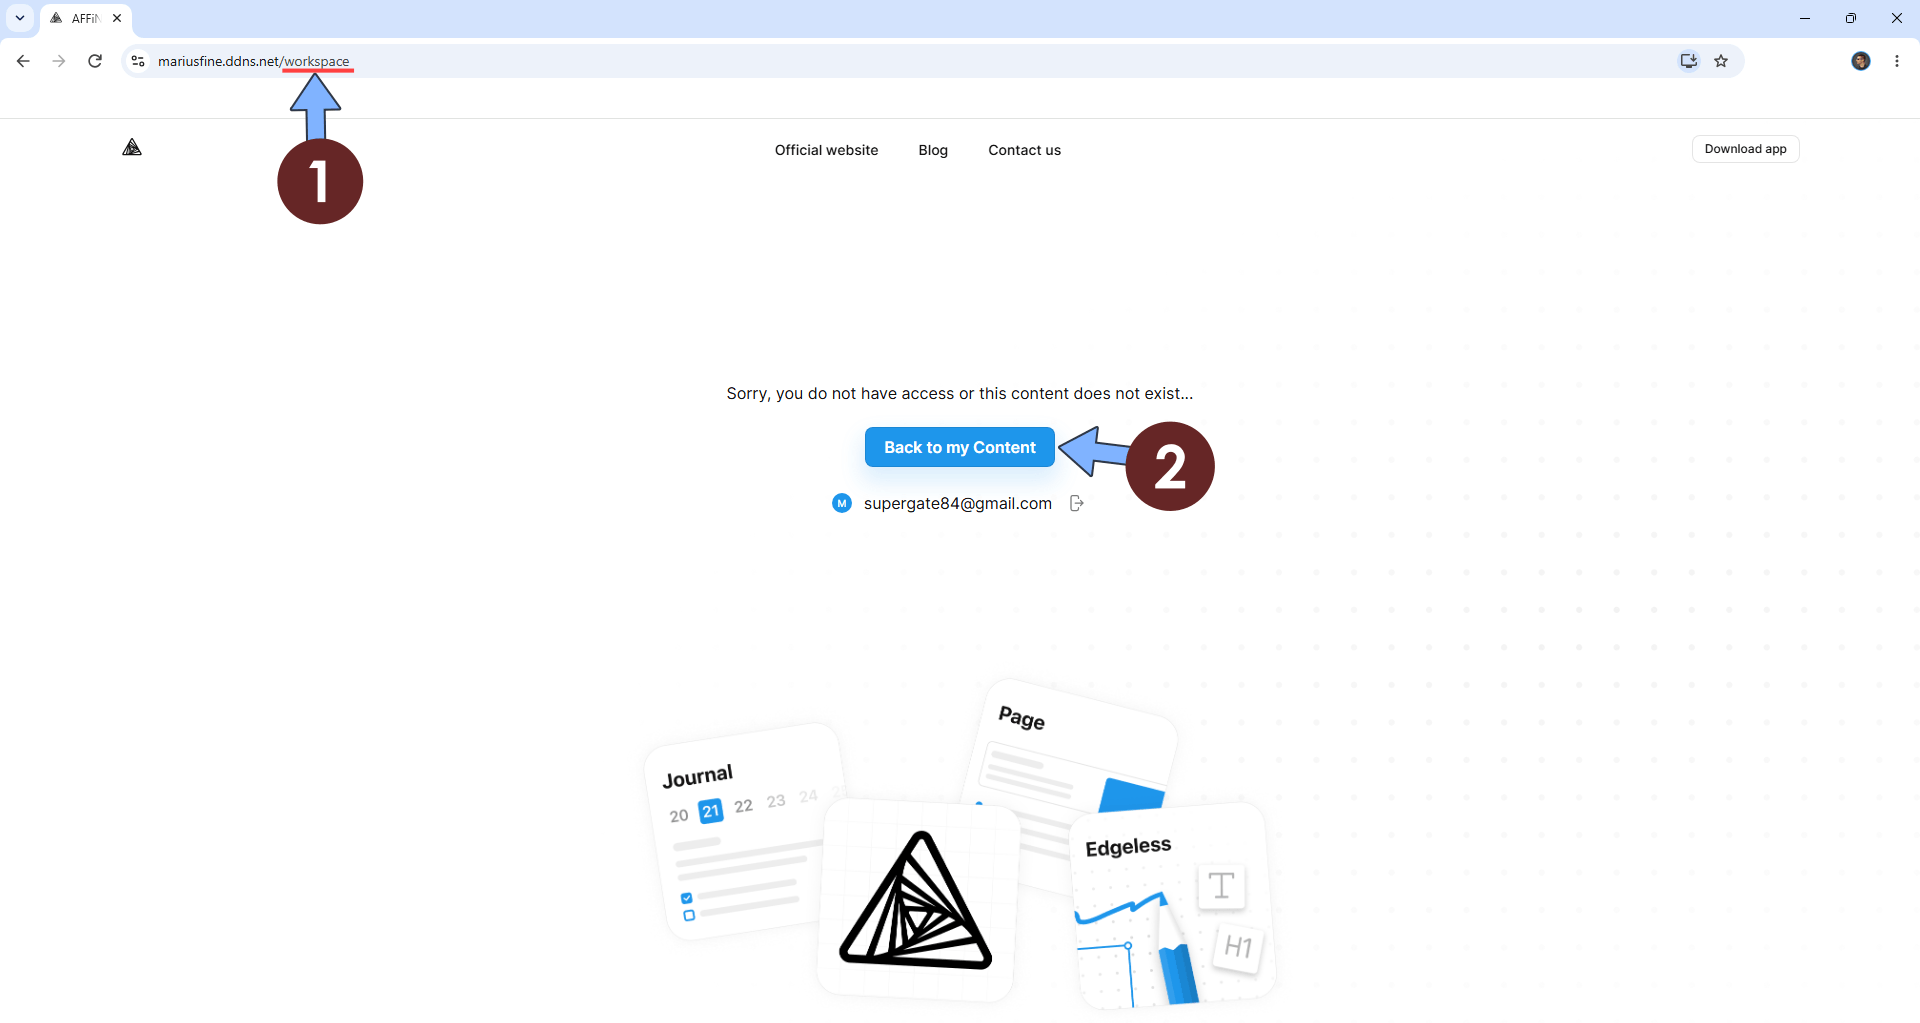
Now open your browser and type in your HTTPS/SSL certificate like this https://yourname.ddns.net/workspace In my case it’s https://mariusfine.ddns.net/workspace – Click Back to my Content. Follow the instructions in the image below.
Note: Your live website will be at https://yourname.ddns.net/workspace and your administrator dashboard will be at https://yourname.ddns/admin
STEP 20
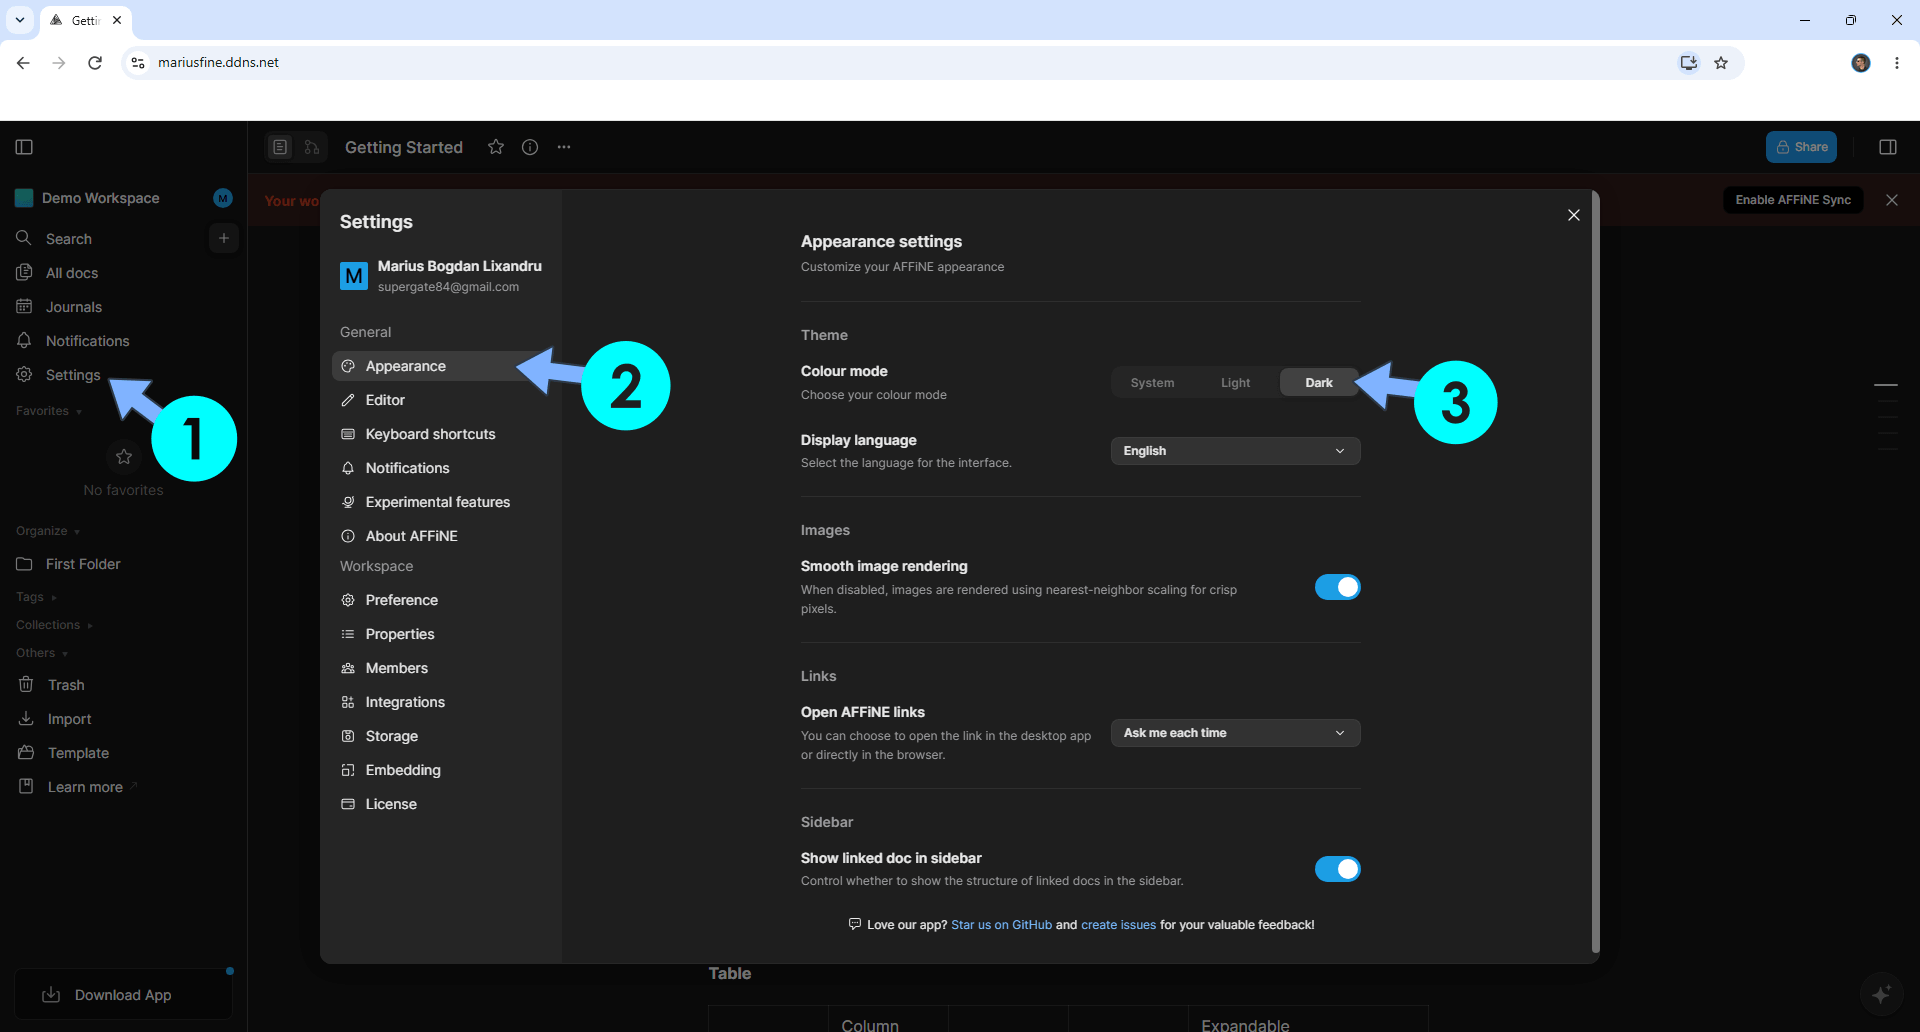
On the left sidebar, click Settings. Under Appearance, click Dark to switch the theme to dark. Follow the instructions in the image below.
STEP 21
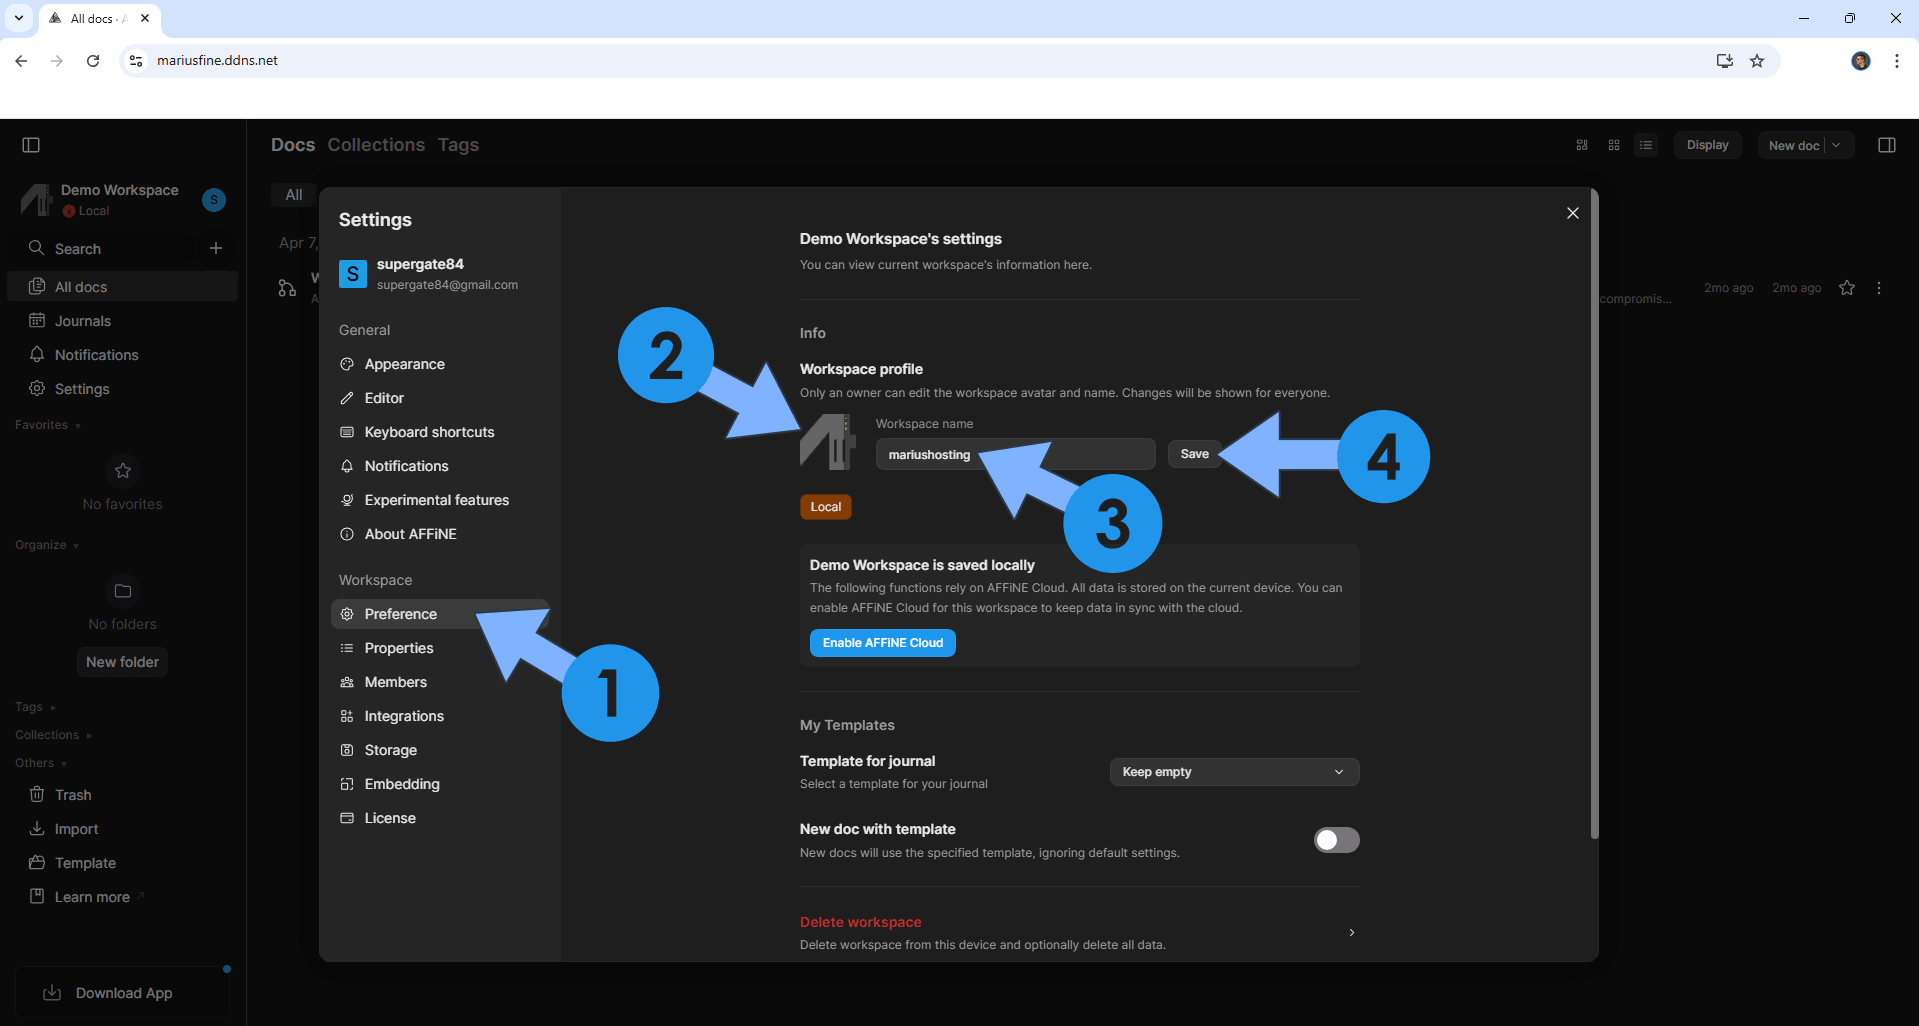
Click on Preference. Change your workspace icon and name. Click Save to save the settings. Follow the instructions in the image below.
STEP 22
Your AFFiNE instance at a glance!
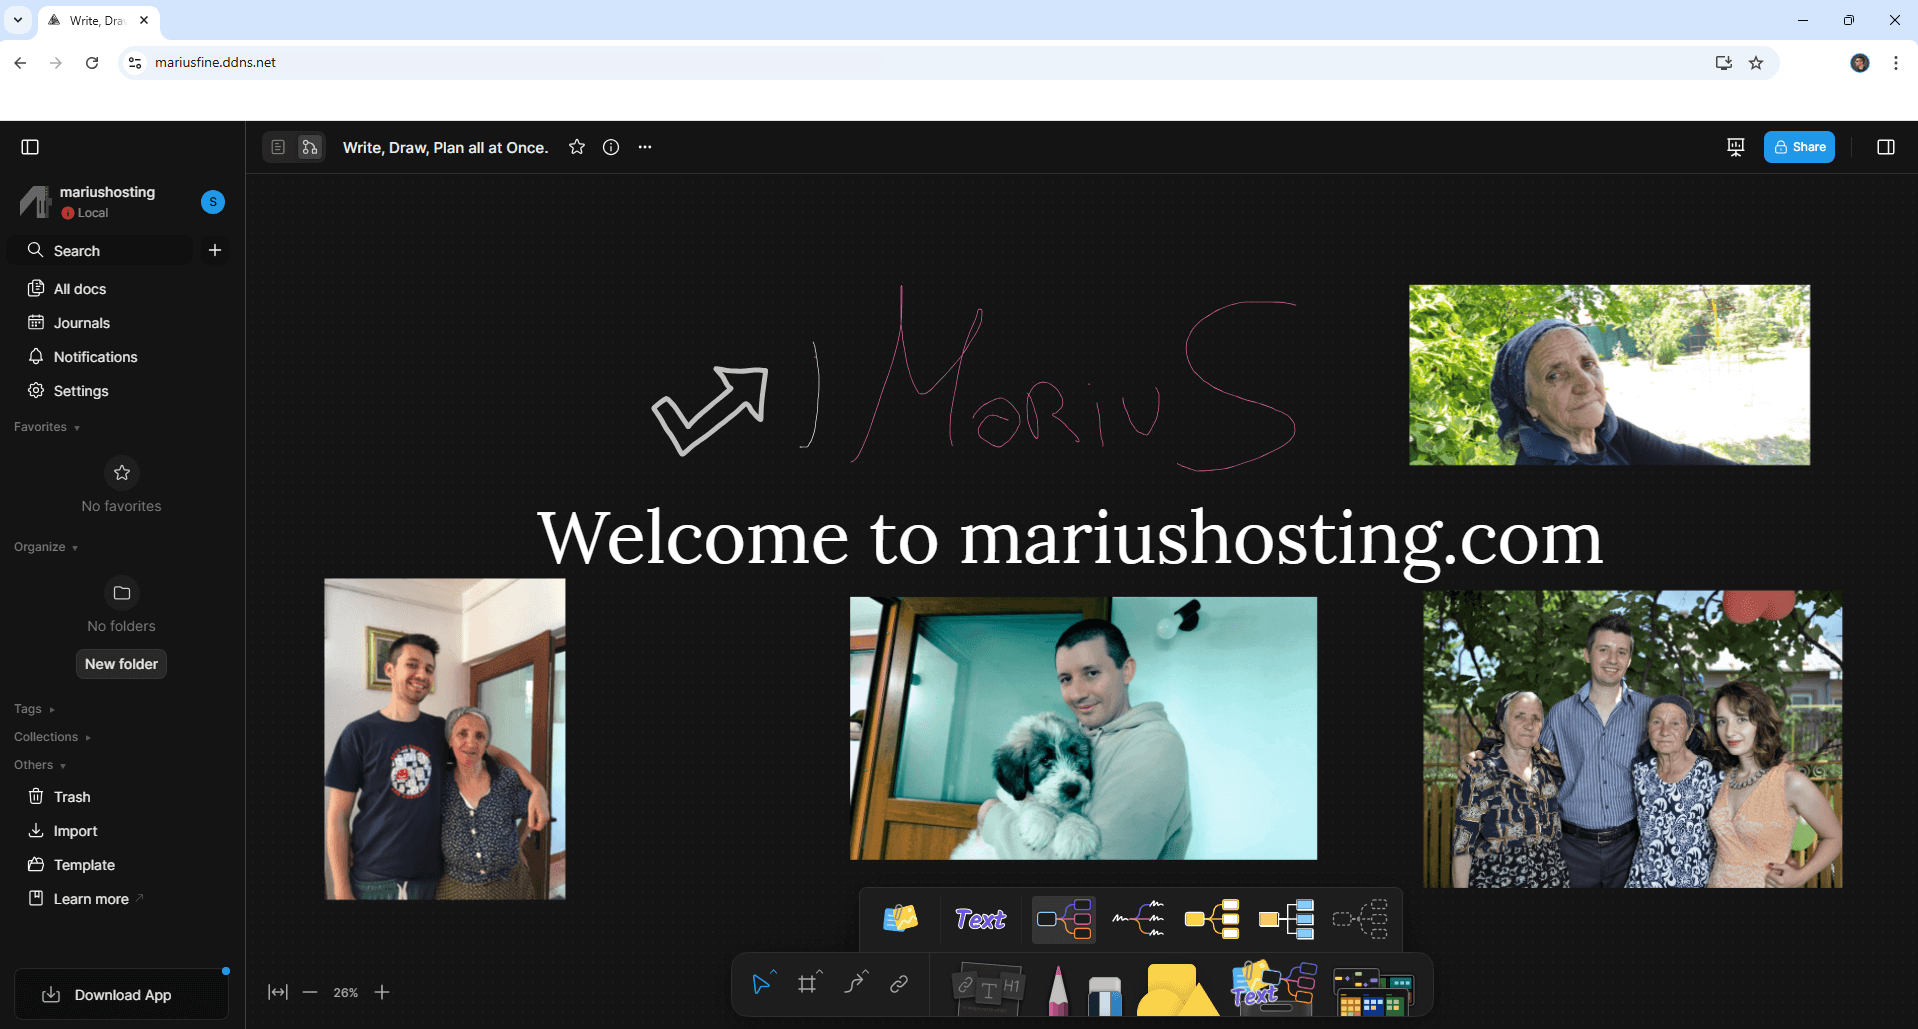
Enjoy AFFiNE on your UGREEN NAS!
🆙Note/Update/Container: How to Update Your Docker Containers on UGREEN NAS Using Dockhand.
🐳Note: How to Create Docker Shortcuts on Desktop.
🆕Note: How to Update Dockhand to the latest version.
🆕Note: How to Clean Docker.
This post was updated on Sunday / October 4th, 2026 at 9:58 PM