
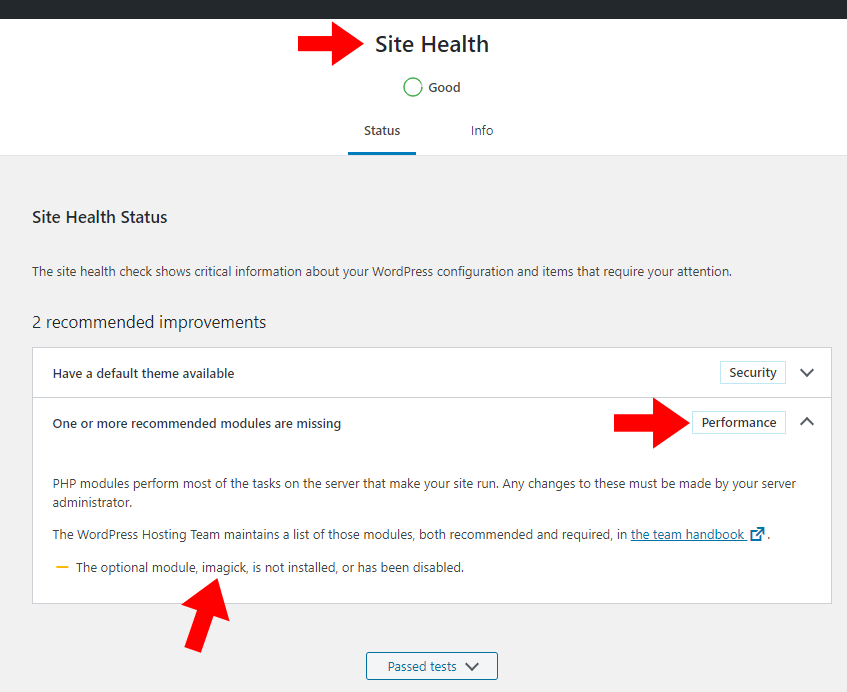
Since WordPress 5.2, you can see an option named “Site Health” under the Tools menu. The Site Health check shows critical information about your WordPress configuration and items that require your attention.

When we scan our WordPress site hosted on Synology NAS with “Site Health”, under the Performance area of Site Health we encounter an error: One or more recommended modules are missing “The optional module, imagick, is not installed, or has been disabled”.
Imagick is a native php extension to create and modify images using the ImageMagick API. ImageMagick is a software suite to create, edit, and compose bitmap images. It can read, convert and write images in a variety of formats (over 100), including DPX, EXR, GIF, JPEG, JPEG-2000, PDF, PhotoCD, PNG, Postscript, SVG, and TIFF. ImageMagick is not a “PHP Utility”, it’s a command line utility that existed before PHP. It can be used by many programs, or by people directly, to manipulate images. Imagick is a native implementation of the ImageMagick API for PHP.
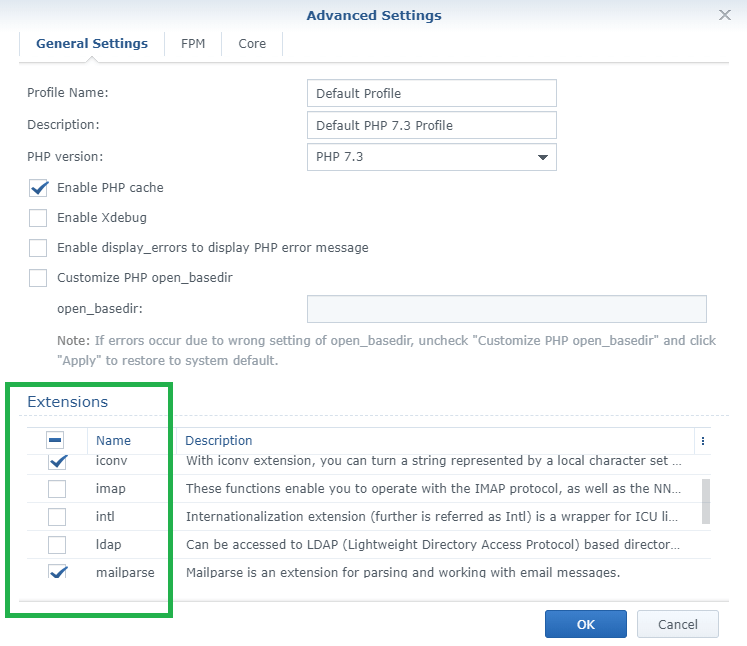
So, when we go to WebStation / PHP Settings / Default PHP 7.3 profile / Edit, under the area “Extension”, we can’t find the PHP extension imagick in our General Settings.
(Updated) Read at the end of article. After many tests, I was unable to install the missing imagick extension. Even if I could have done it, it’s not easy for everyone to implement it because you would need different types of knowledge. Installing this extension manually could create problems in the future with the new PHP updates released by Synology.
Although the official Synology community forum is full of such requests that you can find here, Synology still hasn’t given an official answer, but I hope this article that will be sent as a feature suggestion will make a difference. I also sent this article to several Synology Staff members and I will be updating it when someone gives me an official answer.
The only thing left for us to do is roll up our sleeves and send “feature suggestion” to this official page. Everyone is hoping that the next PHP 7.0 – 7.2 and 7.3 “update” will support the imagick extension on Synology NAS.
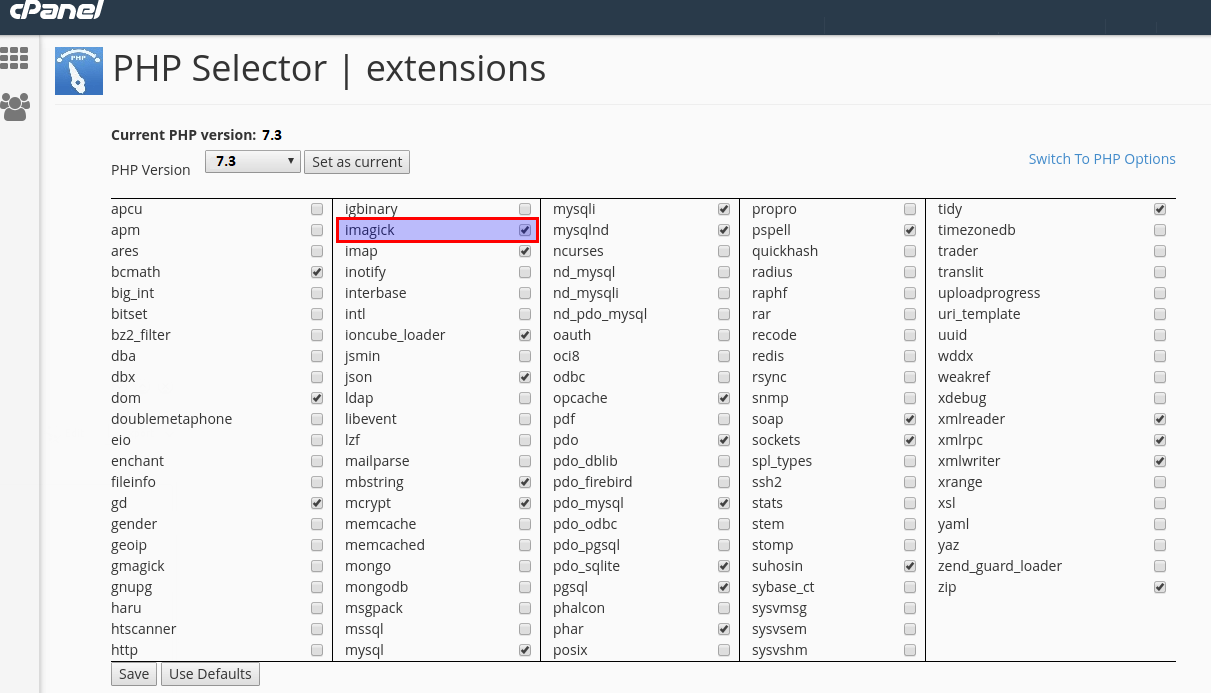
If you are host your WordPress blog on a cPanel hosting you will find imagick under your PHP selector / Extension
UPDATE 27.12.2019
Synology Release PHP 7.3.11 on 24th December 2019 but still today the imagick extension is not there.
UPDATE 18.01.2020
Actually, you can install imagick extension by following this step by step guide provided to me by Jeffery Telford. Tested on my side and works perfectly.
STEP 1
Please Support My work by Making a Donation.
STEP 2
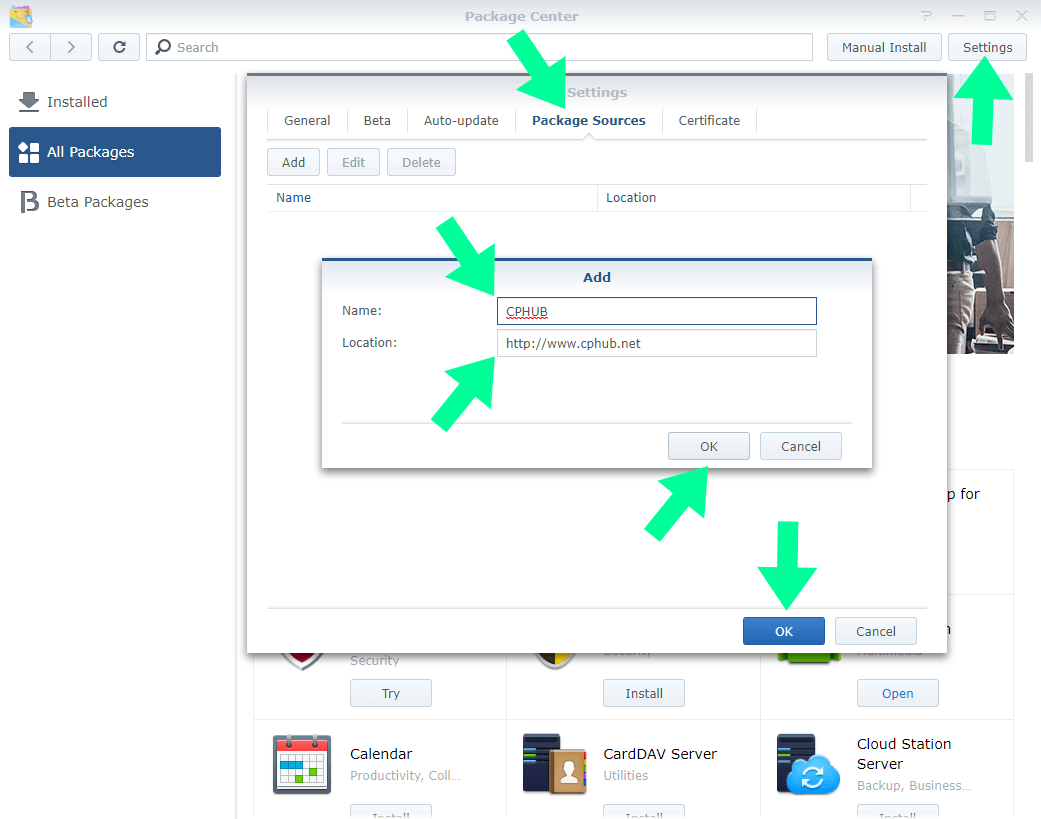
In Synology Package Center go to Settings and set the Trust Level to Synology and Trusted Sources. Add the following (if you don’t already
have it) packages source:
Name: CPHUB
Location: https://www.cphub.net
Click OK than click the Refresh button next the search bar to download the list of Community packages.
STEP 3
Install the “Easy Bootstrap Installer” package.
During the installation select Optware-NG iPKG. Next, set the link variant as Symbolic Link and the Optware Path Priority to “Synology before Optware”. (Note this last step only modifies the root login .profile)
STEP 4
SSH into your NAS server. Edit your login .profile and add the following line:
export PATH=$PATH:/opt/bin:/opt/sbin
Either relogin or source your .profile to modify your path so you can use Optware binaries without having to specify the full paths. UPDATE 11.08.2020 Only root .profile exists, and all ready edited by Easy Bootstrap.
STEP 5
Install the following Optware packages:
$sudo ipkg install autoconf gcc imagemagick liblzma0 ldd make nano perl pkgconfig
We’re going to use the ImageMagic shared objects and header files that come with Optware. It’s not exactly the latest and greatest version but
it’s still newer than the version that Ubuntu 18.04.3 is currently using. Building ImagicMagic is fairly straight forward in case you want to
use a newer version.
STEP 6
We now need a place to build the ImageMagicK PHP Extension. In my home folder I created a folder called “build” for this purpose.
$mkdir ~/build
Unfortnuately, Synology doesn’t provide the phpize or php-config scripts that comes with PHP so we are going to have to build one for our
specific version(s) of PHP. I only wanted to add the extension to PHP 7.3 but the instructions work with any version of PHP. Download the
source code for the major version(s) of PHP you want to build the extension for from the PHP downloads page.
$cd ~/build
$wget https://www.php.net/distributions/php-7.3.16.tar.xz
$tar xvf php-7.3.16.tar.xz
$cd php-7.3.16.tar.xz
We also need a place to install the built software. I choose to put mine under my build folder in subfolder called local/php73. This way I
if wanted to build for php72 I would put it local/php72.
Run the configure script and generate a Makefile:
$./configure --prefix=/var/services/homes/mariushosting/build/local/php73 --disable-all
Since we only want to build the phpize script using the –disable-all switch will prevent building any of the standard PHP extensions.
Note, you can’t use relative path with the configure script, so make sure you use your full home folder path in –prefix parameter.
Now go ahead and build and install PHP 7.3.
$make && make install
STEP 7
Now it’s time to build the actual PHP ImagicMagicK Extension.
$cd ~/build
$wget https://pecl.php.net/get/imagick-3.4.4.tgz
$tar xzvf imagick-3.4.4.tgz
$cd imagick-3.4.4
$../local/php73/bin/phpize
ImageMagic introduced a constant called LinearGRAYColorspace starting in version 6.9.9-29. Prior to 6.9.9-29 that constant did not exist.
The authors of the PHP ImagicK Extension have a bug in their code and are incorrectly including that constant as part of their pre-processor checks.
In order to successfully compile verson 3.4.4 against the version of ImageMagick included with Optware you just need to comment out one line of code.
Either manually comment out line 1504 in the imagick_helpers.c file or run the following sed command:
$sed -i 's+IMAGICK_REGISTER_CONST_LONG("COLORSPACE_LINEARGRAY", LinearGRAYColorspace);+/*IMAGICK_REGISTER_CONST_LONG("COLORSPACE_LINEARGRAY", LinearGRAYColorspace);*/+' imagick_helpers.c
Now we can build the extension and it should compile without any errors.
$./configure --prefix=/var/services/homes/mariushosting/build/local/php73 --with-php-config=/var/services/homes/mariushosting/build/local/php73/bin/php-config
$make
Confirm the extension compiled properly and all external references are resolved.
$ldd ~/build/imagick-3.4.4/modules/imagick.so
So long as you don’t see any “not founds” you now have a working PHP ImageMagicK Extension.
STEP 8
To use the extension you need to copy the imagick.so file to the PHP extenion_dir folder. You can determine the value of extension_dir using phpinfo().
$sudo cp ~/build/imagick-3.4.4/modules/imagick.so /usr/local/lib/php73/modules
To enable the extension in WebStation you need to edit the extension_list.json file for the version of PHP you just compiled against.
$sudo nano /volume1/@appstore/PHP7.3/misc/extension_list.json
Paste the following text just before “Intl”, that way things are nicely sorted in WebStation:
"imagick": {
"enable_default": true,
"desc": "Image Processing wrapper for the ImageMagicK Library."
},
Since we’re editing a Synology package file our edits will be lost when the package gets updated in the future so you’ll have to repeat this step whenever Synology updates PHP 7.x (which isn’t often, LOL)
STEP 9
You should now be able to modify a PHP 7.3 profile(s) in WebStation and enable the Imagick extension. Verify it’s working using phpinfo().
Other solution UPDATE 14.08.2020
You can add a .so Extension File in “/usr/local/lib/php*/modules/” where * is the PHP Version.
Next you’d get the Profile ID of the PHP Profile to which you’d want to add the Extension.
The Profile Information is available in “/usr/syno/etc/packages/WebStation/PHPSettings.json”.
Then you’d add the desired extension in “/usr/syno/etc/packages/WebStation/php_profile/<Profile_ID>/conf.d/user_settings.ini”.
Finally add the Extension to “/var/packages/PHPx.x/target/misc/extension_list.json” and reload the Profile:
“reload pkg-webstation-php-<Profile_ID>”.
Note: Follow How to install IPKG on Synology NAS.
This post was updated on Wednesday / September 16th, 2020 at 8:50 AM