
Formbricks is a solution for in-product micro-surveys that promises to supercharge your product experience. Formbricks provides a free and open source surveying platform. Gather feedback at every point in the user journey with beautiful in-app, website, link and email surveys. In this step by step guide I will show you how to install Formbricks on your UGREEN NAS using Docker & Dockhand.
💡Note:
This guide works perfectly with the latest Formbricks v6.0.2 release.
💡Note: Check out my guide on how to Install Formbricks on Your Synology NAS.
STEP 1
Please Support My work by Making a Donation.
STEP 2
Install Dockhand using my step by step guide. If you already have Dockhand installed on your UGREEN NAS, skip this STEP. Attention: Make sure you have installed the latest Dockhand version.
STEP 3
⚠️Mandatory: Enable HTTPS on your UGREEN NAS.
STEP 4
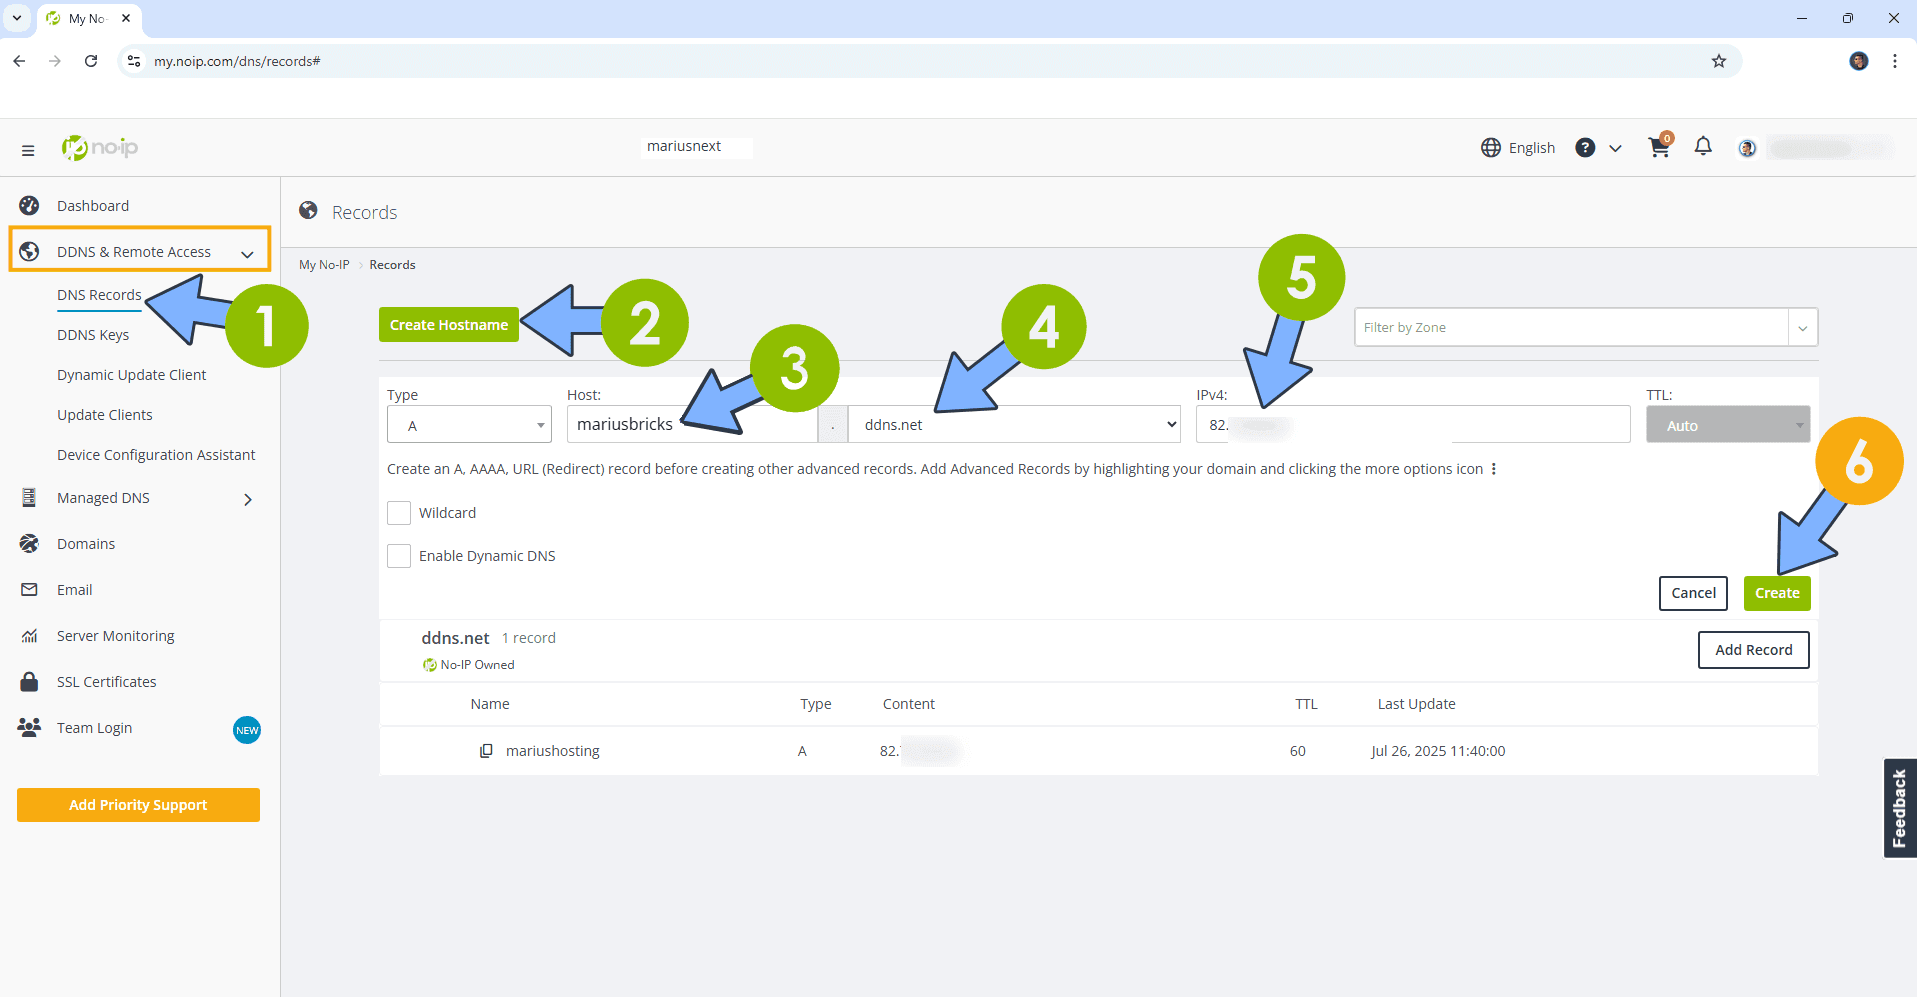
Create a new hostname on the noip website using your noip account. For example, I have created mariusbricks as Host and I use the free ddns.net domain. In the IP Address area, type in your own IPV4 IP address from your ISP, then click Create. Follow the instructions in the image below.
STEP 5
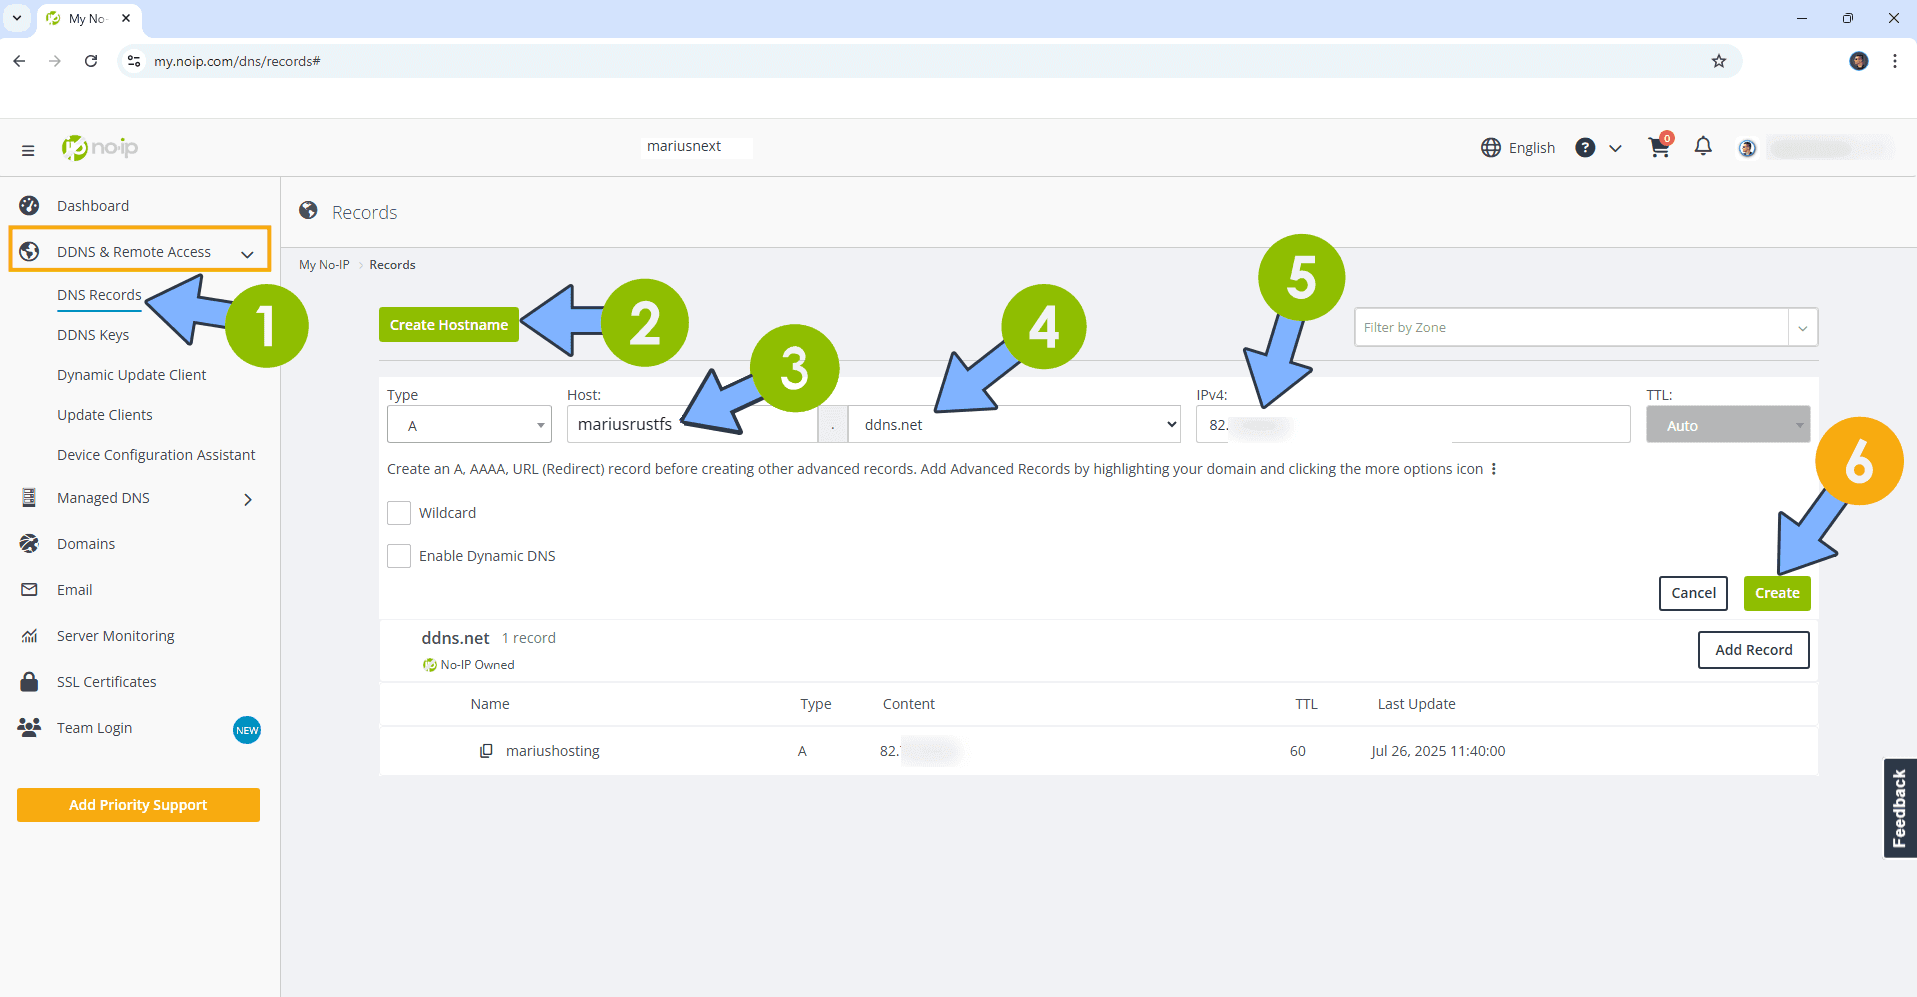
Create a new hostname on the noip website using your noip account. For example, I have created mariusrustfs as Host and I use the free ddns.net domain. In the IP Address area, type in your own IPV4 IP address from your ISP, then click Create. Follow the instructions in the image below.
STEP 6
⚠️Mandatory: Add Read & Write Permissions to the Docker Folder.
STEP 7
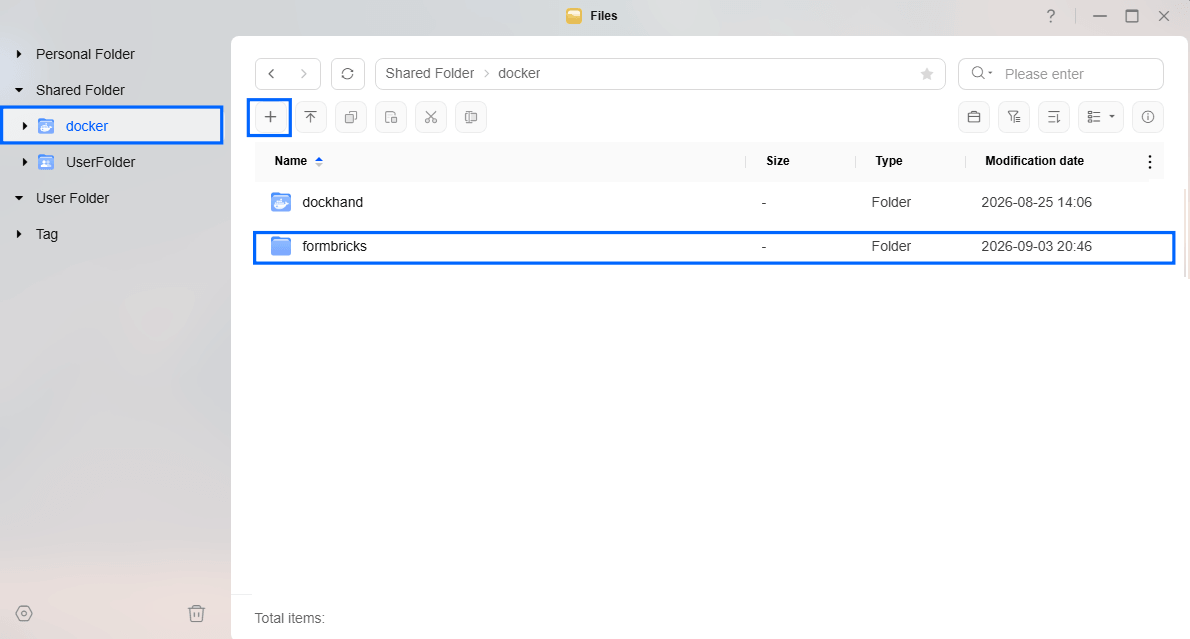
Go to Files and open the docker folder. Inside the docker folder, create one new folder and name it formbricks. Follow the instructions in the image below.
Note: Be careful to enter only lowercase, not uppercase letters.
STEP 8
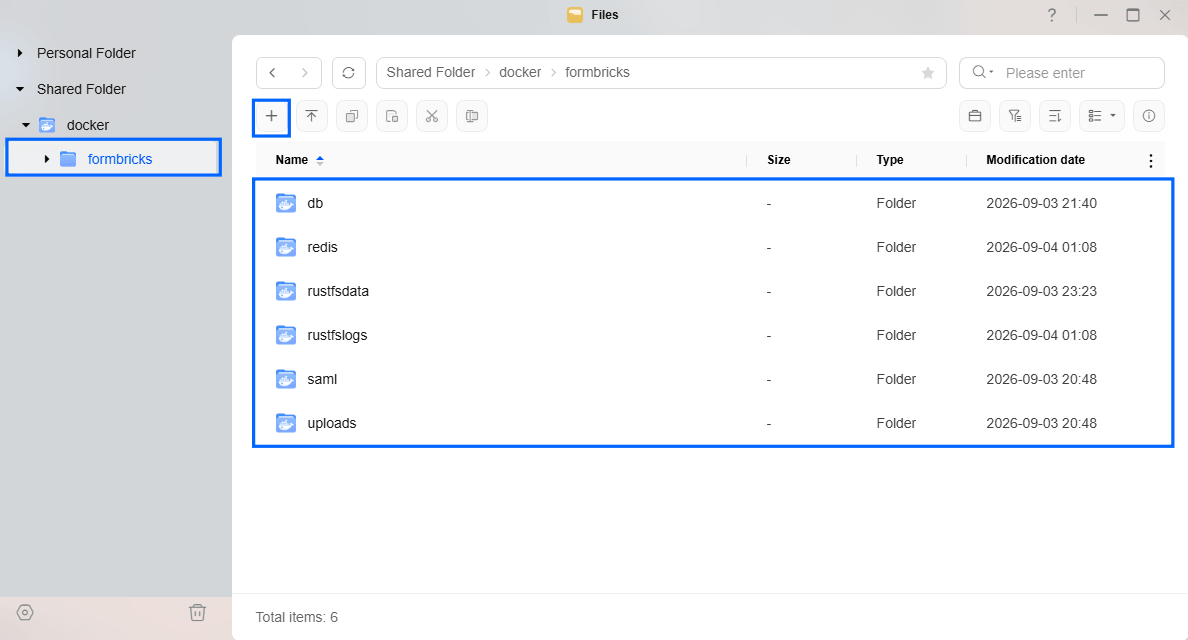
Now create six new folders inside the formbricks folder that you have previously created at STEP 7 and name them db, redis, rustfsdata, rustfslogs, saml, uploads. Follow the instructions in the image below.
Note: Be careful to enter only lowercase, not uppercase letters.
STEP 9
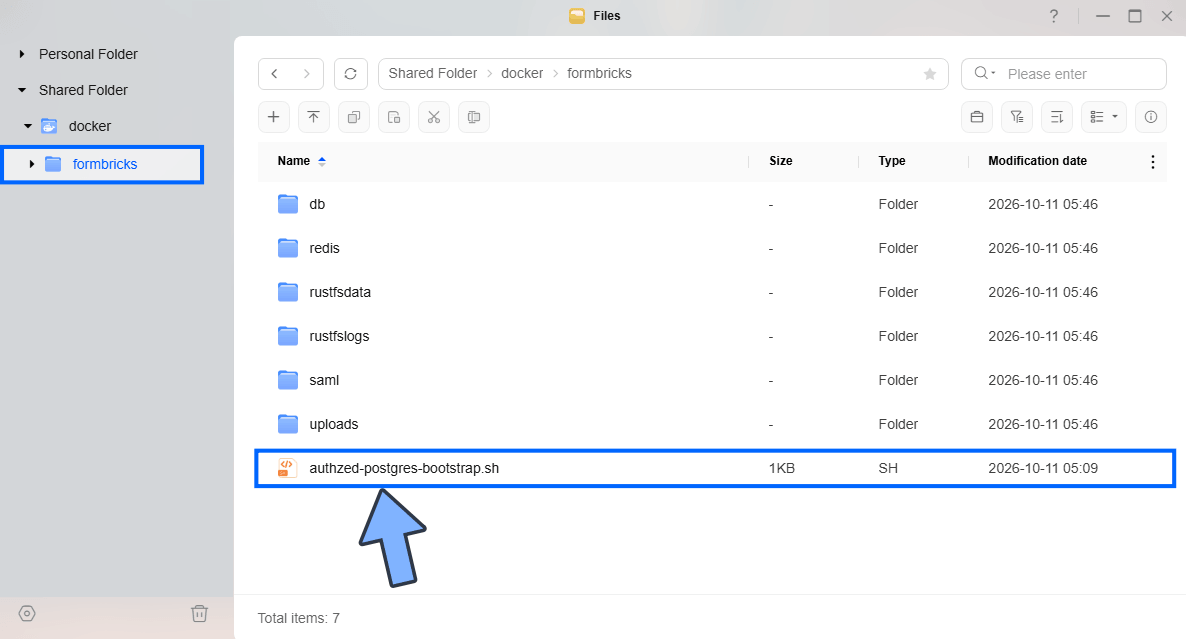
Download (click on the blue link below) then upload the authzed-postgres-bootstrap.sh file below in the formbricks folder that you have previously created at STEP 8. Follow the instructions in the image below. 🔒Note: Support my work to unlock the password. You can use this password to download any file on mariushosting forever!
👉🏻authzed-postgres-bootstrap.sh
STEP 10
Follow my step by step guide on how to activate SMTP for your Gmail account. This step is mandatory. Note: If you don’t want to use the easiest way for SMTP with Google and you already have SMTP details from your own Mail Server, you can just skip this STEP and use your personalized email SMTP details instead.
STEP 11
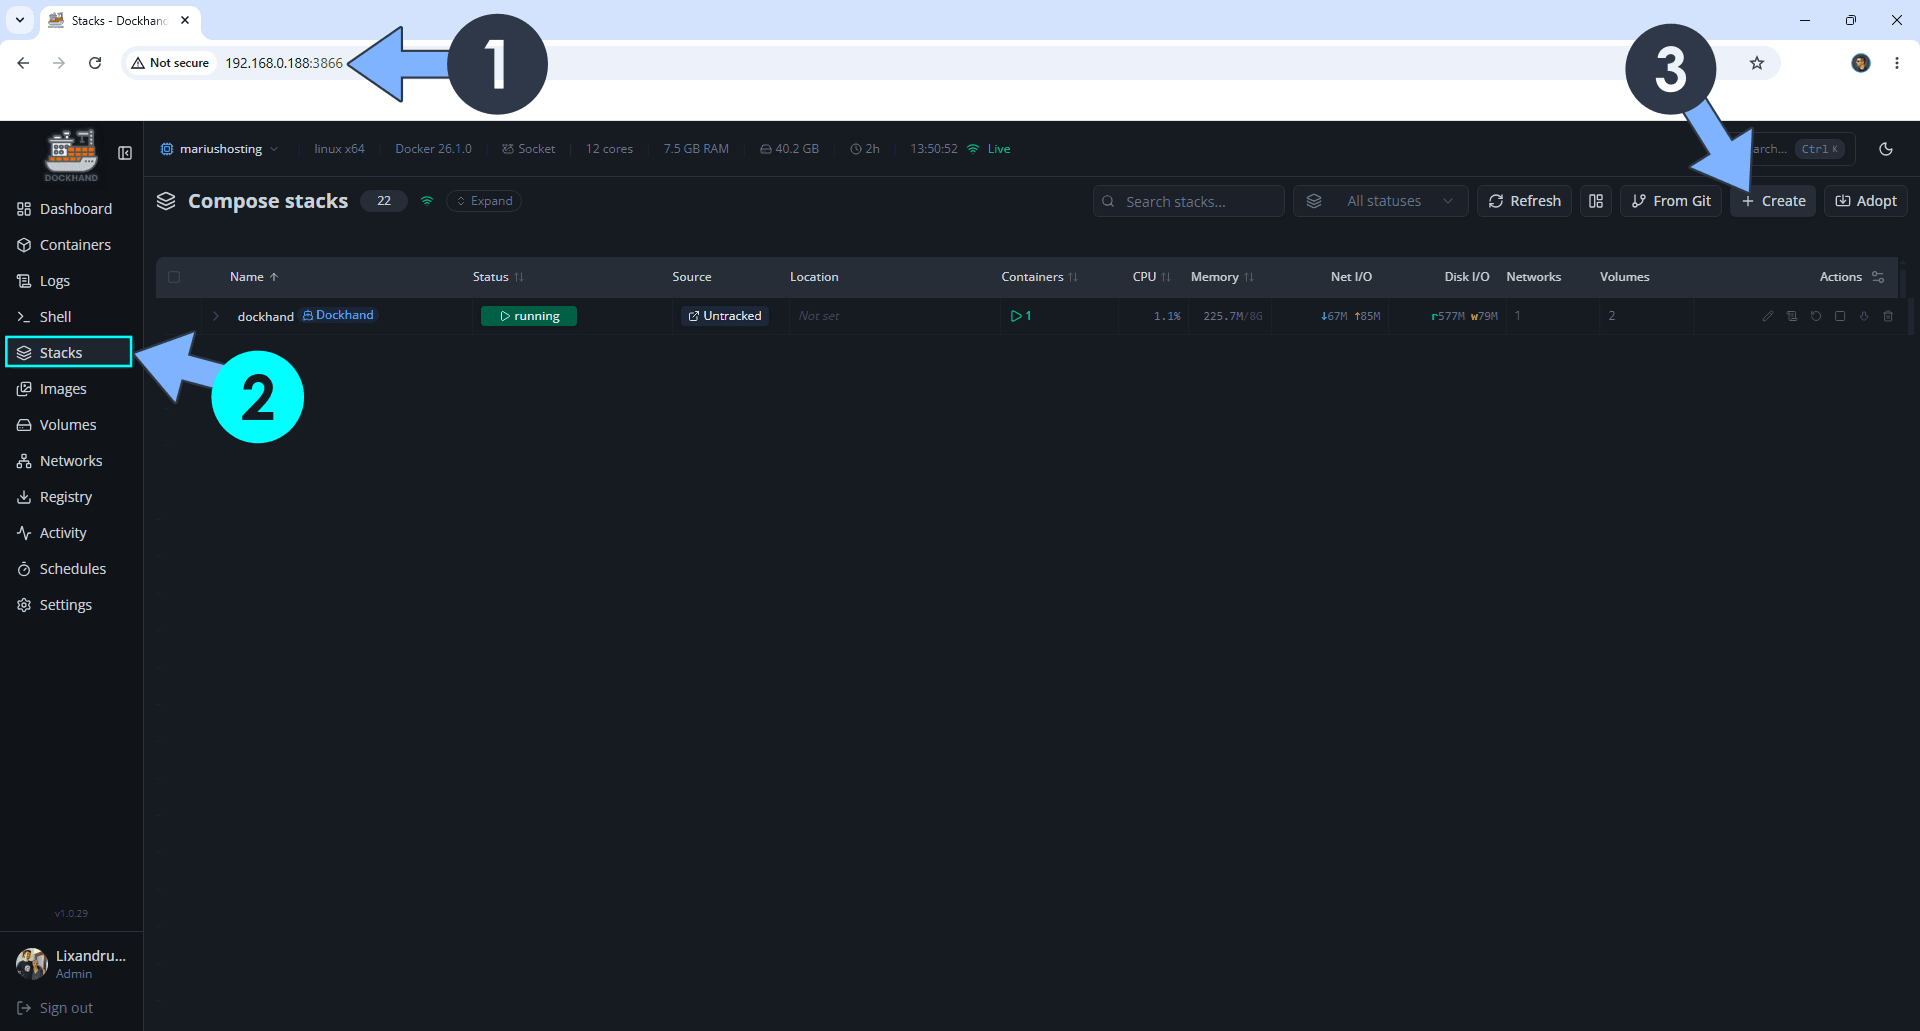
Open your browser and type in http://ugreen-ip-address:3866 to connect to your Dockhand container. On the left sidebar, click Stacks then + Create. Follow the instructions in the image below.
STEP 12
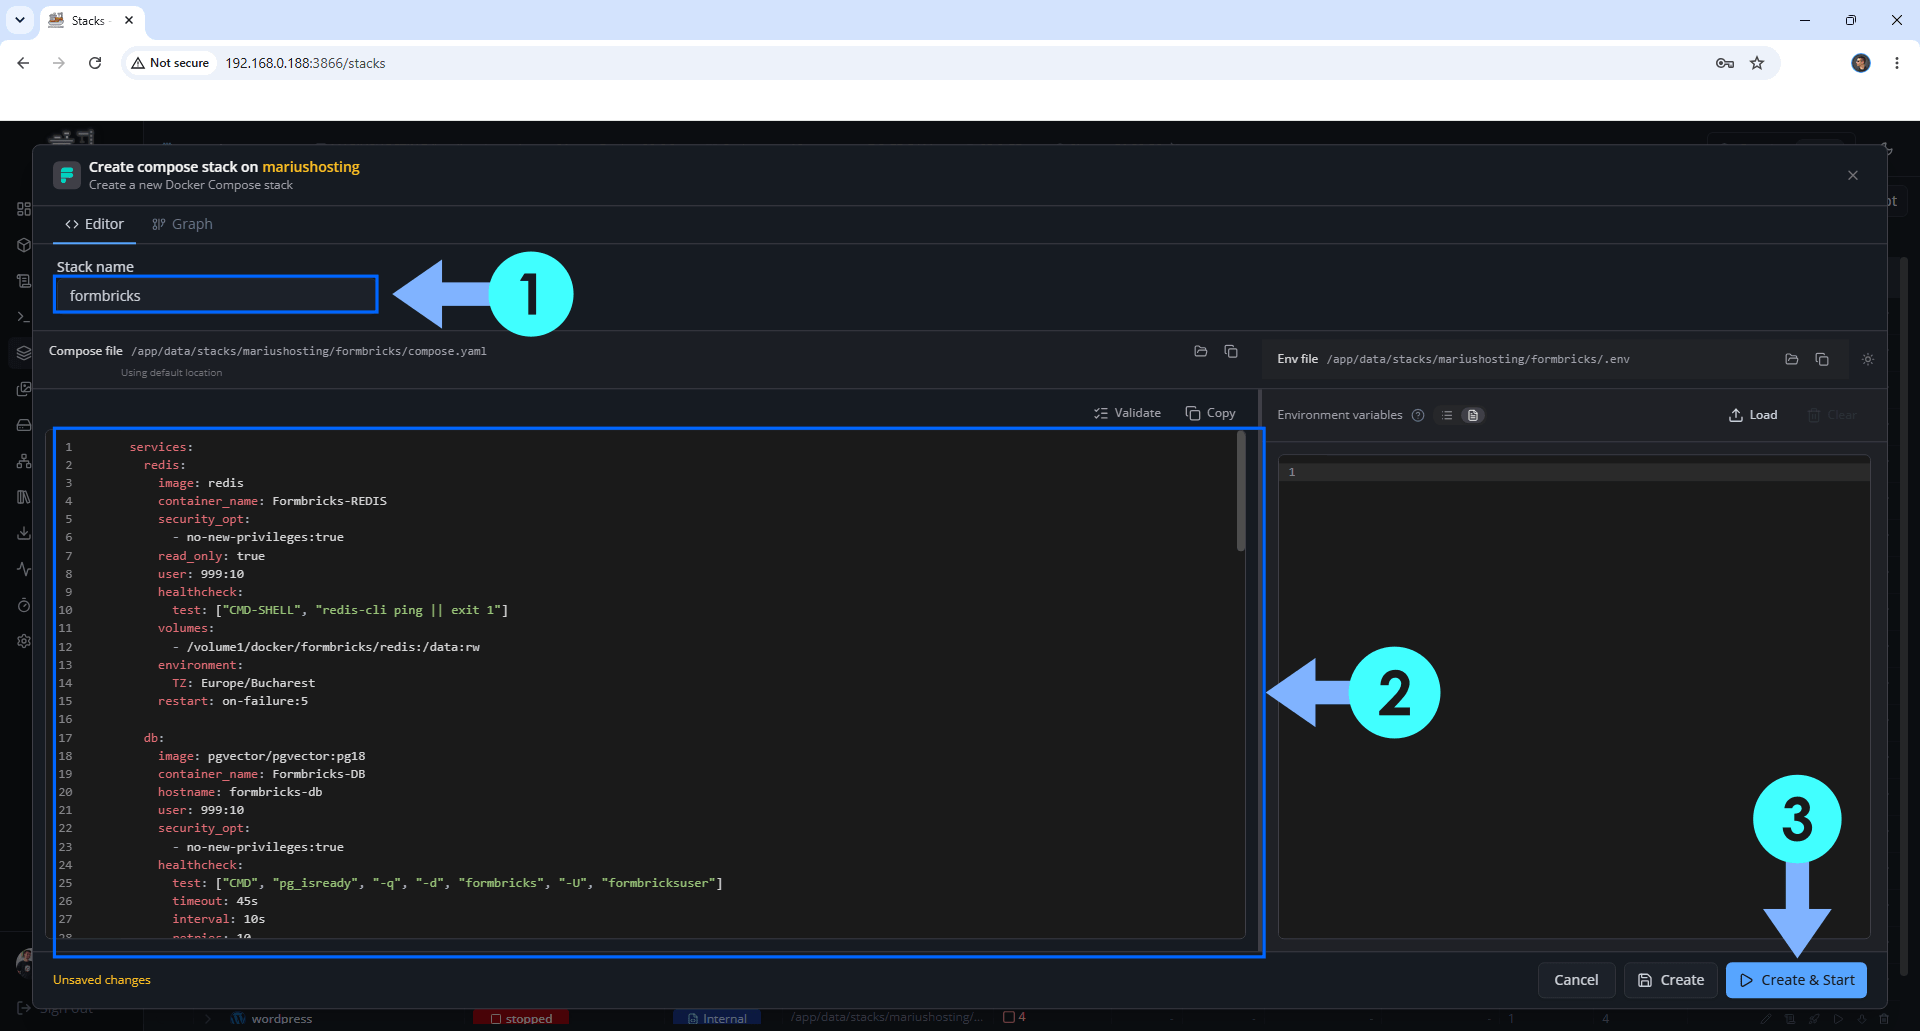
In the Stack name field, type in formbricks. ⚠️Warning: Type in the name in lowercase letters. The installation process can take up to a few seconds/minutes. It will depend on your Internet speed connection. Follow the instructions in the image below.
Note: Copy Paste the code below in the Dockhand Compose Stack then click Create & Start.
services:
  redis:
    image: redis
    container_name: Formbricks-REDIS
    security_opt:
      - no-new-privileges:true
    read_only: true
    user: 999:10
    healthcheck:
      test: ["CMD-SHELL", "redis-cli ping || exit 1"]
    volumes:
      - /volume1/docker/formbricks/redis:/data:rw
    environment:
      TZ: Europe/Bucharest
    restart: on-failure:5

  db:
    image: pgvector/pgvector:pg18
    container_name: Formbricks-DB
    hostname: formbricks-db
    user: 999:10
    security_opt:
      - no-new-privileges:true
    healthcheck:
      test: ["CMD", "pg_isready", "-q", "-d", "formbricks", "-U", "formbricksuser"]
      timeout: 45s
      interval: 10s
      retries: 10
    volumes:
      - /volume1/docker/formbricks/db:/var/lib/postgresql:rw
    environment:
      POSTGRES_DB: formbricks
      POSTGRES_USER: formbricksuser
      POSTGRES_PASSWORD: formbrickspass
    restart: on-failure:5

  authzed-db-bootstrap:
    image: pgvector/pgvector:pg18
    container_name: Formbricks-Authzed-Bootstrap
    restart: "no"
    entrypoint: ["/bin/sh", "/usr/local/bin/authzed-postgres-bootstrap.sh"]
    environment:
      POSTGRES_ADMIN_URL: postgresql://formbricksuser:formbrickspass@formbricks-db:5432/postgres?sslmode=disable
      AUTHZED_DATABASE_NAME: spicedb
      AUTHZED_DATABASE_USERNAME: spicedb
      AUTHZED_DATABASE_PASSWORD: abe3da279c66792836d87f91798e039d9444e1f9fd940f34d5b6bdaa0b567af5
    volumes:
      - /volume1/docker/formbricks/authzed-postgres-bootstrap.sh:/usr/local/bin/authzed-postgres-bootstrap.sh:ro
    depends_on:
      db:
        condition: service_healthy

  spicedb-migrate:
    image: authzed/spicedb:v1.52.0
    container_name: Formbricks-Authzed-SpiceDB-Migrate
    command: datastore migrate head
    environment:
      SPICEDB_DATASTORE_ENGINE: postgres
      SPICEDB_DATASTORE_CONN_URI: postgresql://spicedb:abe3da279c66792836d87f91798e039d9444e1f9fd940f34d5b6bdaa0b567af5@formbricks-db:5432/spicedb?sslmode=disable
      GOMAXPROCS: "2"
    depends_on:
      authzed-db-bootstrap:
        condition: service_completed_successfully
    restart: "no"

  spicedb:
    image: authzed/spicedb:v1.52.0
    container_name: Formbricks-SpiceDB
    healthcheck:
      test: ["CMD", "/usr/local/bin/grpc_health_probe", "-addr=localhost:50051"]
      interval: 5s
      timeout: 5s
      retries: 12
      start_period: 10s
    command: serve
    environment:
      SPICEDB_DATASTORE_ENGINE: postgres
      SPICEDB_DATASTORE_CONN_URI: postgresql://spicedb:abe3da279c66792836d87f91798e039d9444e1f9fd940f34d5b6bdaa0b567af5@formbricks-db:5432/spicedb?sslmode=disable
      SPICEDB_GRPC_PRESHARED_KEY: 8563d0d3ed3bb10ee34e1bc8157798b543e3c4360f71c0217a89e61f26a521de
      SPICEDB_LOG_FORMAT: json
      SPICEDB_LOG_LEVEL: info
      SPICEDB_TELEMETRY_ENDPOINT: ""
      GOMAXPROCS: "2"
    depends_on:
      spicedb-migrate:
        condition: service_completed_successfully
    restart: on-failure:5

  authzed-initialize:
    image: ghcr.io/formbricks/formbricks:latest
    container_name: Formbricks-Authzed-Initialize
    restart: "no"
    entrypoint: ["formbricks-authzed"]
    command: ["schema", "apply"]
    environment:
      DATABASE_URL: postgresql://formbricksuser:formbrickspass@formbricks-db:5432/formbricks?schema=public
      ENCRYPTION_KEY: unused
      CUBEJS_API_SECRET: unused
      CUBEJS_API_URL: http://localhost
      HUB_API_KEY: unused
      HUB_API_URL: http://localhost
      REDIS_URL: redis://redis:6379
      LOG_LEVEL: info
      AUTHZED_ENABLED: "true"
      AUTHZED_ENDPOINT: spicedb:50051
      AUTHZED_TOKEN: 8563d0d3ed3bb10ee34e1bc8157798b543e3c4360f71c0217a89e61f26a521de
      AUTHZED_SYSTEM_KEY: formbricks
      AUTHZED_INSECURE: "true"
      AUTHZED_CONSISTENCY: fully_consistent
    depends_on:
      spicedb:
        condition: service_healthy
      db:
        condition: service_healthy

  rustfs:
    image: rustfs/rustfs:latest
    container_name: Formbricks-RustFS
    user: 0:0
    healthcheck:
      test: ["CMD-SHELL", "nc -z 127.0.0.1 9000 || exit 1"]
      interval: 10s
      timeout: 5s
      retries: 3
      start_period: 90s
    environment:
      RUSTFS_SERVER_DOMAINS: mariusrustfs.ddns.net
      RUSTFS_CONSOLE_CORS_ALLOWED_ORIGINS: "*"
      RUSTFS_CORS_ALLOWED_ORIGINS: "*"
      RUSTFS_CONSOLE_ENABLE: true
      RUSTFS_ACCESS_KEY: marius
      RUSTFS_SECRET_KEY: mariushosting
    volumes:
      - /volume1/docker/formbricks/rustfsdata:/data:rw
      - /volume1/docker/formbricks/rustfslogs:/logs:rw
    ports:
      - 9541:9000
      - 9540:9001
    restart: on-failure:5

  formbricks:
    image: ghcr.io/formbricks/formbricks:latest
    container_name: Formbricks-B
    depends_on:
      db:
        condition: service_healthy
      redis:
        condition: service_started
      rustfs:
        condition: service_started
      spicedb:
        condition: service_healthy
      authzed-initialize:
        condition: service_completed_successfully
    ports:
      - 3774:3000
    volumes:
      - /volume1/docker/formbricks/uploads:/home/nextjs/apps/web/uploads/:rw
      - /volume1/docker/formbricks/saml:/home/nextjs/apps/web/saml-connection:rw
    environment:
      WEBAPP_URL: https://mariusbricks.ddns.net
      NEXTAUTH_URL: https://mariusbricks.ddns.net
      DATABASE_URL: postgresql://formbricksuser:formbrickspass@formbricks-db:5432/formbricks?schema=public
      NEXTAUTH_SECRET: dOxZYTTZgXKMHkqLBIQVImayQXAVWdzGBPuFJKggzcgvgPJPXpWzqzKaUOIOGGIr
      HUB_API_KEY: CTZHVLTgXtDEDUAuUZaDurpGPtZYEcEYVzWvDUHAmJxUoVHQGwPhmIiWfPuDFlrX
      CUBEJS_API_SECRET: 30fc3f00a323c728c81d1d3ef2bf207ceb14e00bf35998b651aa9f91777be190
      CRON_SECRET: c68e9d73282ed33f632c8dae2690061426e6df4aa243f6e4f0da96601bb6f63f
      ENCRYPTION_KEY: 5143d27b56ad198ad8fec4f180a7aaf206c8b8c3a63b0cf62d0f79a4071cf84a
      HUB_API_URL: http://localhost:8080
      CUBEJS_API_URL: http://localhost:4000
      CUBEJS_JWT_ISSUER: formbricks-web
      CUBEJS_JWT_AUDIENCE: formbricks-cube
      POSTGRES_PASSWORD: formbrickspass
      REDIS_URL: redis://redis:6379
      EMAIL_VERIFICATION_DISABLED: 1
      PASSWORD_RESET_DISABLED: 0
      SIGNUP_DISABLED: 0
      INVITE_DISABLED: 0
      MAIL_FROM: Your-own-gmail-address
      SMTP_USER: Your-own-gmail-address
      SMTP_PASSWORD: Your-own-app-password
      SMTP_HOST: smtp.gmail.com
      SMTP_PORT: 465
      SMTP_SECURE_ENABLED: 1
      S3_ACCESS_KEY: marius
      S3_SECRET_KEY: mariushosting
      S3_REGION: us-east-1
      S3_BUCKET_NAME: formbricks
      S3_ENDPOINT_URL: https://mariusrustfs.ddns.net
      S3_FORCE_PATH_STYLE: 1
      AUTHZED_ENABLED: "true"
      AUTHZED_ENDPOINT: spicedb:50051
      AUTHZED_TOKEN: 8563d0d3ed3bb10ee34e1bc8157798b543e3c4360f71c0217a89e61f26a521de
      AUTHZED_SYSTEM_KEY: formbricks
      AUTHZED_INSECURE: "true"
      AUTHZED_CONSISTENCY: fully_consistent
    restart: on-failure:5
Note: Before you paste the code above in the Stack editor area below, change the value numbers for user with your own UID and GID values. (Follow my step by step guide on how to do this.) 999 is my personal UID value and 10 is my personal GID value. You have to type in your own values.
Note: Before you paste the code above in the Stack editor area below, change the value for TZ. (Select your current Time Zone from this list.)
Note: Before you paste the code above in the Web editor area below, change the value for AUTHZED_DATABASE_PASSWORD. (Generate your own Random 64 🏅openssl rand -hex 32 length DATABASE_PASSWORD.) ⚠️Warning: This value should be the same for AUTHZED_DATABASE_PASSWORD and SPICEDB_DATASTORE_CONN_URI a total of 3 identical tokens. They are colored in green in the compose stack.
Note: Before you paste the code above in the Web editor area below, change the value for SPICEDB_GRPC_PRESHARED_KEY. (Generate your own Random 64 🏅openssl rand -hex 32 length SPICEDB_GRPC_PRESHARED_KEY.) ⚠️Warning: This value should be the same for SPICEDB_GRPC_PRESHARED_KEY and AUTHZED_TOKEN a total of 3 identical tokens. They are colored in gold in the compose stack.
Note: Before you paste the code above in the Web editor area below, change the value for RUSTFS_SERVER_DOMAINS and type in your own NO IP DDNS without https:// at the beginning that you have previously created at STEP 5.
Note: Before you paste the code above in the Web editor area below, change the value for RUSTFS_ACCESS_KEY and S3_ACCESS_KEY type in your own username. marius is an example for a username. Both usernames should be the same.
Note: Before you paste the code above in the Web editor area below, change the value for RUSTFS_SECRET_KEY and S3_SECRET_KEY and type in your own password. mariushosting is an example for a password. Both passwords should be the same.
Note: Before you paste the code above in the Stack editor area below, change the value for WEBAPP_URL and type in your own NO IP DDNS with https:// at the beginning that you have previously created at STEP 4.
Note: Before you paste the code above in the Stack editor area below, change the value for NEXTAUTH_URL and type in your own NO IP DDNS with https:// at the beginning that you have previously created at STEP 4.
Note: Before you paste the code above in the Web editor area below, change the value for NEXTAUTH_SECRET. (Generate your own Random 64 length NEXTAUTH_SECRET.)
Note: Before you paste the code above in the Web editor area below, change the value for HUB_API_KEY. (Generate your own Random 64 length ENCRYPTION_KEY.)
Note: Before you paste the code above in the Web editor area below, change the value for CUBEJS_API_SECRET. (Generate Your Own Free 🏅openssl rand -hex 32 CUBEJS_API_SECRET.)
Note: Before you paste the code above in the Web editor area below, change the value for CRON_SECRET. (Generate Your Own Free 🏅openssl rand -hex 32 CRON SECRET.)
Note: Before you paste the code above in the Web editor area below, change the value for ENCRYPTION_KEY. (Generate Your Own Free 🏅openssl rand -hex 32 ENCRYPTION_KEY.)
Note: Before you paste the code above in the Stack editor area below, change the value for MAIL_FROM and type in your own Gmail address. STEP 10.
Note: Before you paste the code above in the Stack editor area below, change the value for SMTP_USER and type in your own Gmail address. STEP 10.
Note: Before you paste the code above in the Stack editor area below, change the value for SMTP_PASSWORD and type in your own Gmail app password. STEP 10. ⚠️Warning: Do NOT confuse with your own Gmail password. This is the Gmail APP password.
Note: Before you paste the code above in the Stack editor area below, change the value for S3_ENDPOINT_URL and type in your own NO IP DDNS with https:// at the beginning that you have previously created at STEP 5.
STEP 13
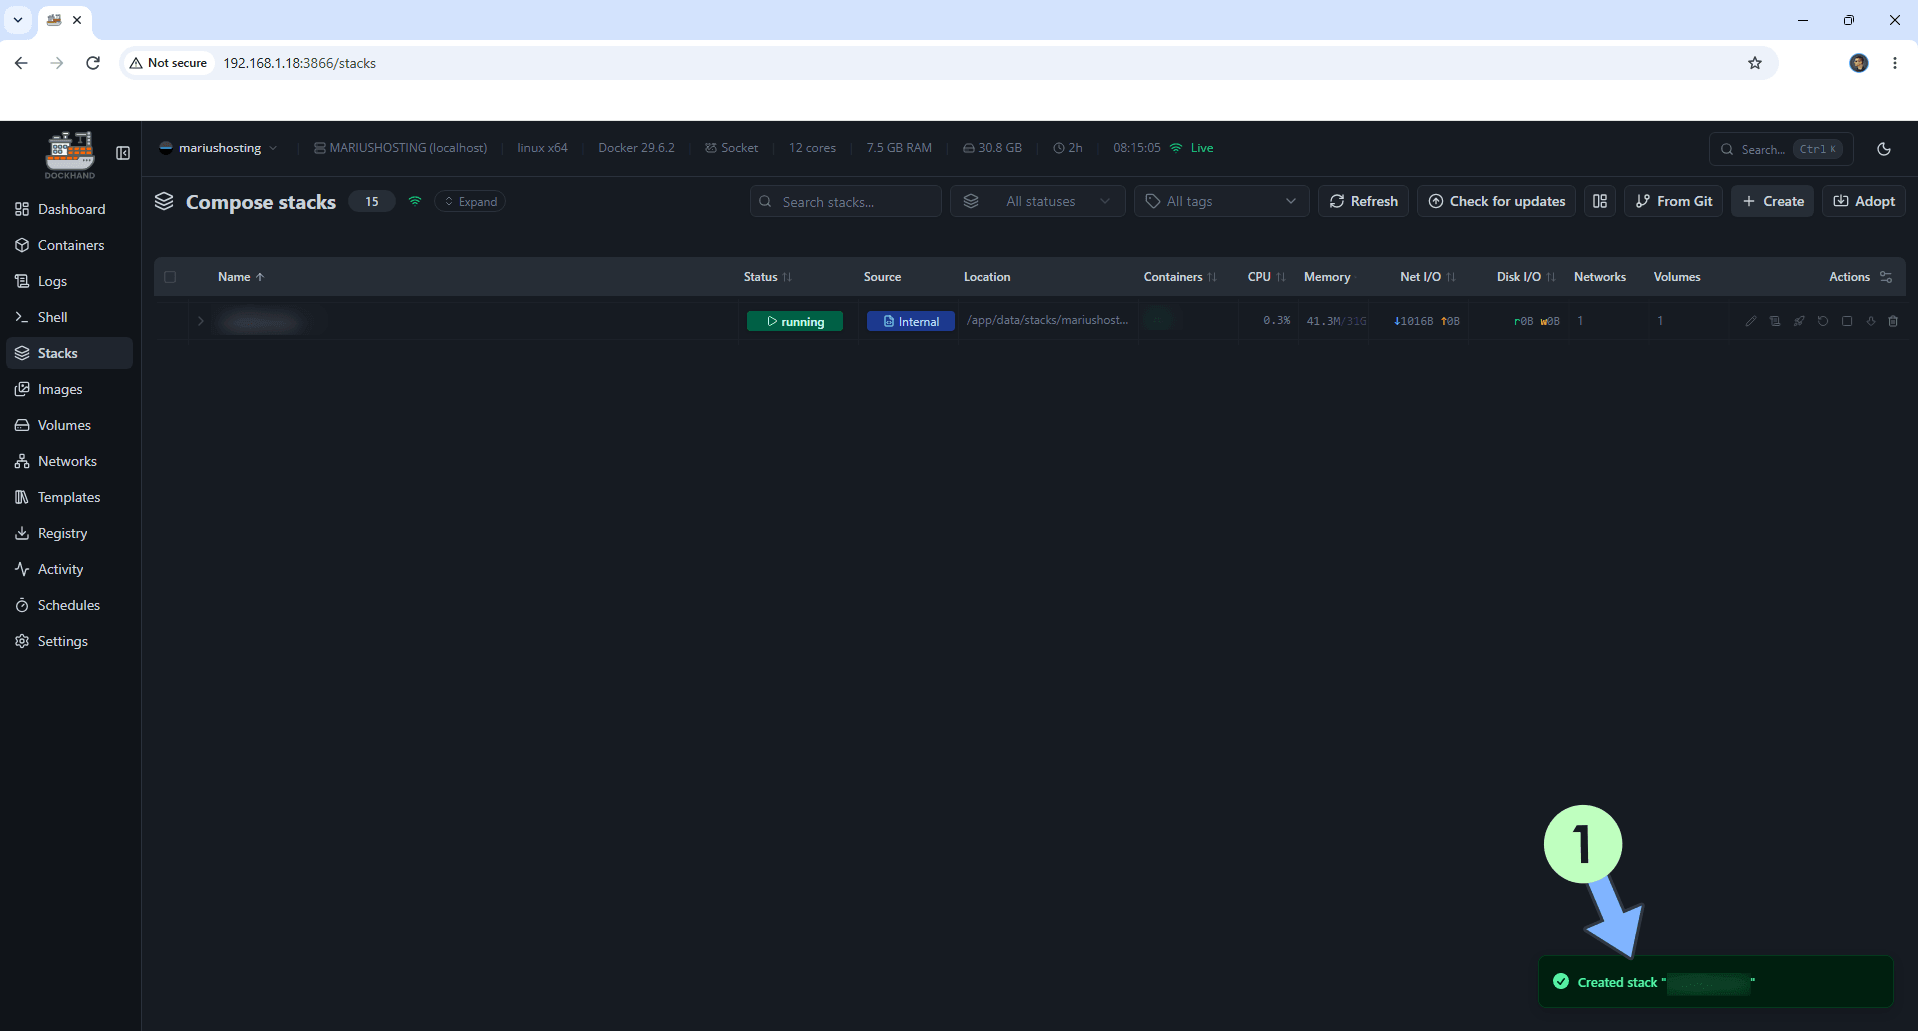
If everything goes right, you will see the following message at the bottom right of your screen: “Created stack “formbricks”“.
STEP 14
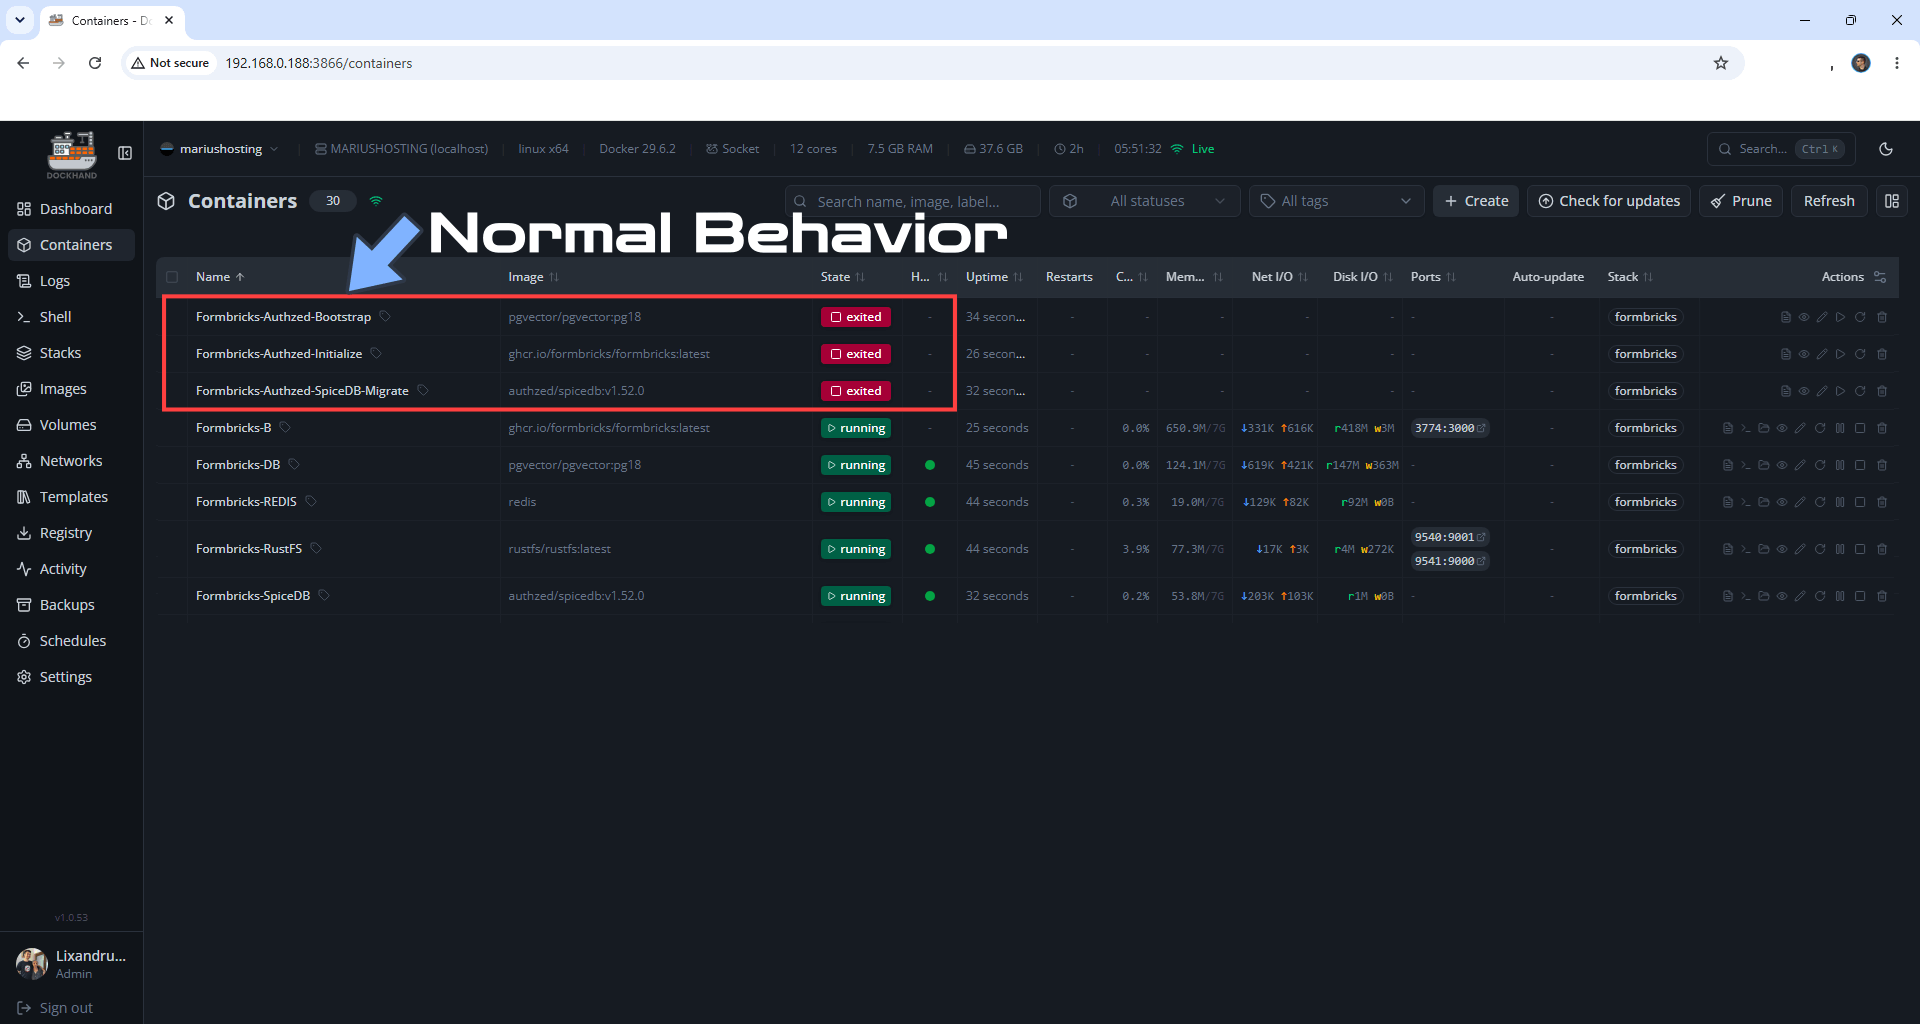
Now wait approximately 2 minutes. Go to Dockhand, left sidebar, and select Containers. Wait until the containers Formbrics-Authzed-Boostrap, Formbricks-Authzed-Initialize, Formbricks-Authzed-SpiceDB-Migrate are marked as exited. This is a normal behavior. Go straight to the next step.
STEP 15
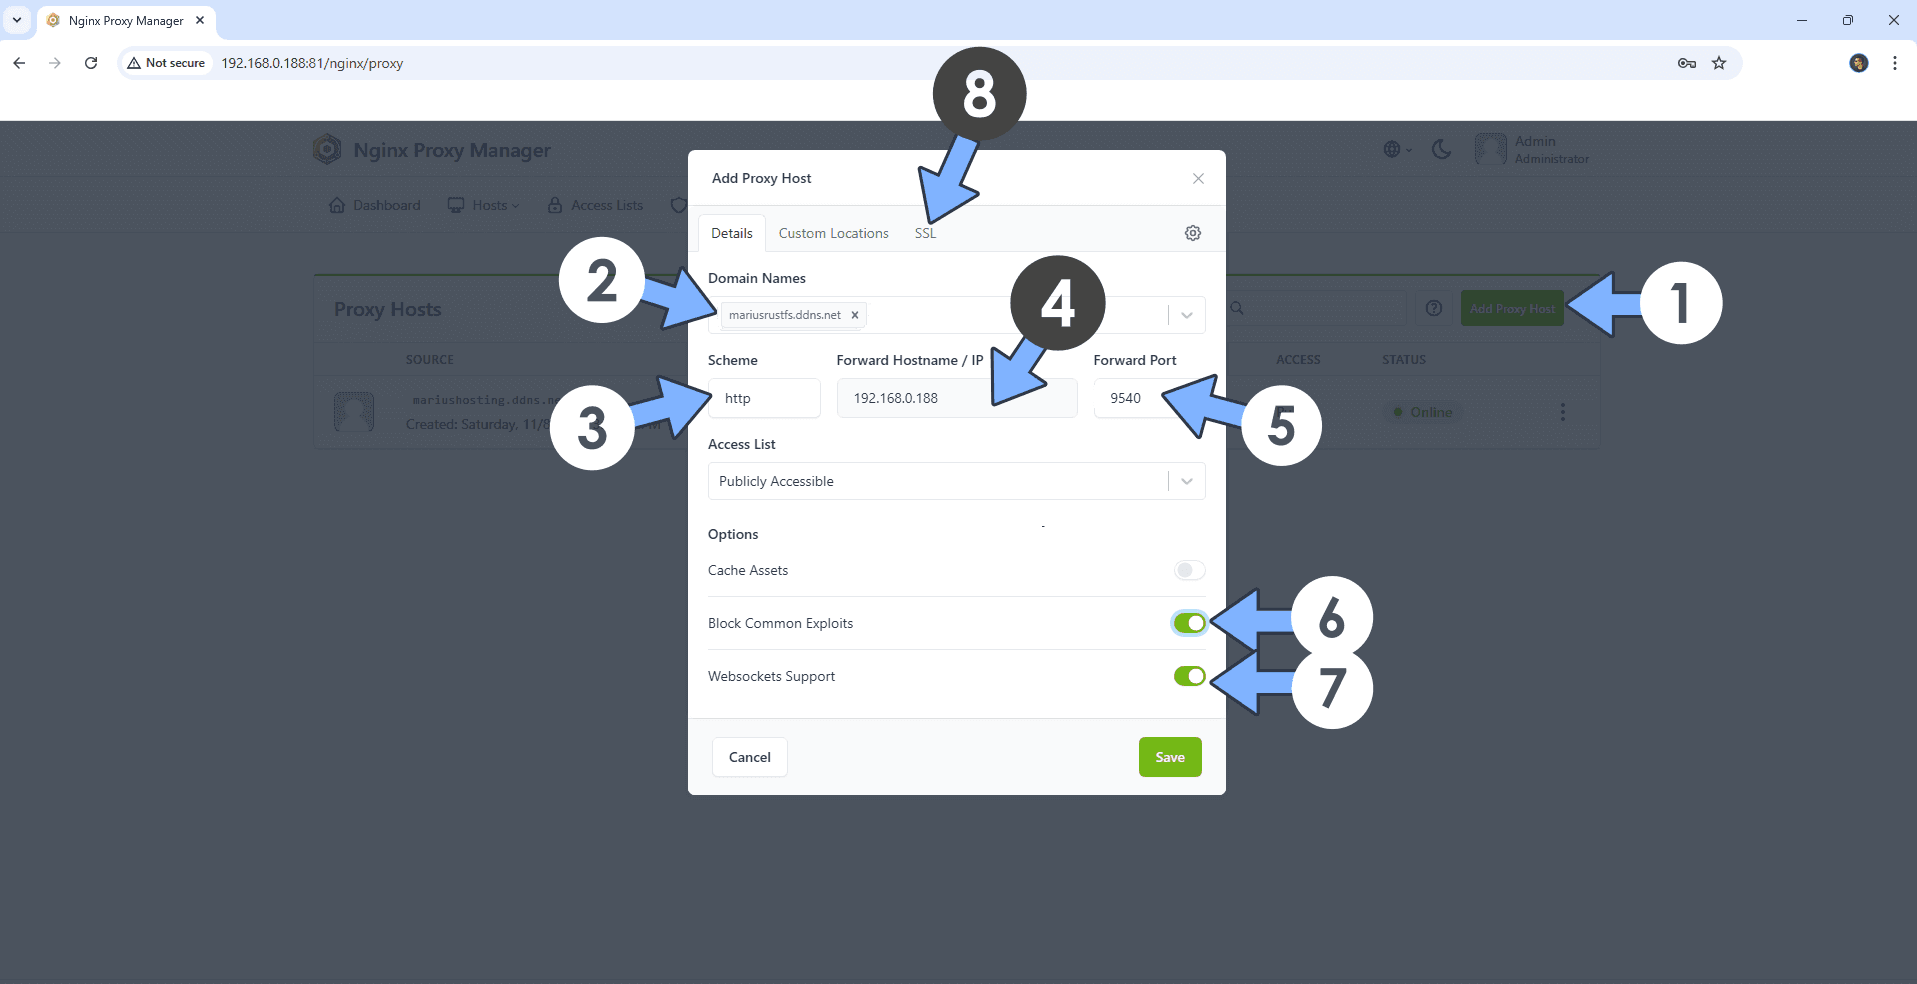
Open your Nginx Proxy Manager container that you have previously installed at STEP 3. Click Add Proxy Host. A new pop up window will open. Add the following details:
Domain Names: Type in your own noip domain name that you have previously created at STEP 5.
Scheme: http
Forward Hostname/IP: Type in the local NAS IP of your UGREEN NAS.
Forward Port: Type in the Rustfs local Port that is 9540
Check Block Common Exploits
Check Websockets Support
Click the SSL tab. Follow the instructions in the image below.
STEP 16
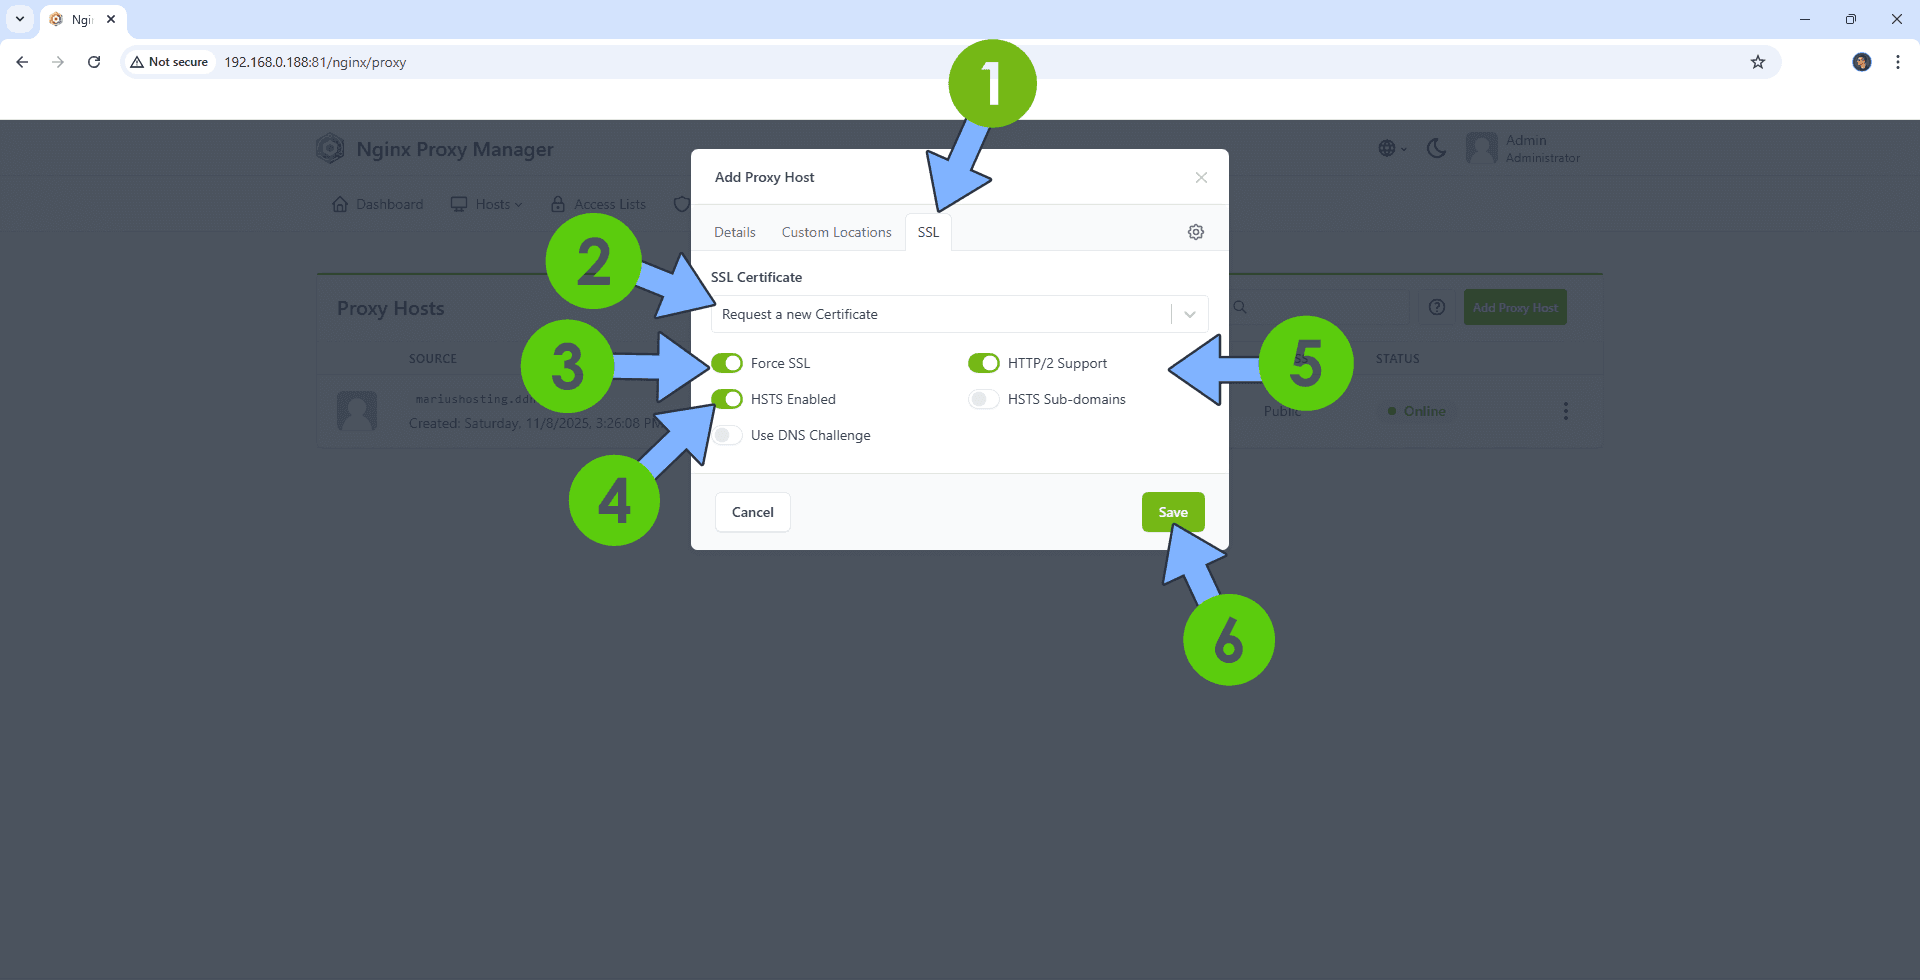
After you click the SSL tab, add the following details:
SSL Certificate: Request a new SSL Certificate
Check: Force SSL
Check: HSTS Enabled
Check: HTTP/2 Support
Click Save. Follow the instructions in the image below.
STEP 17
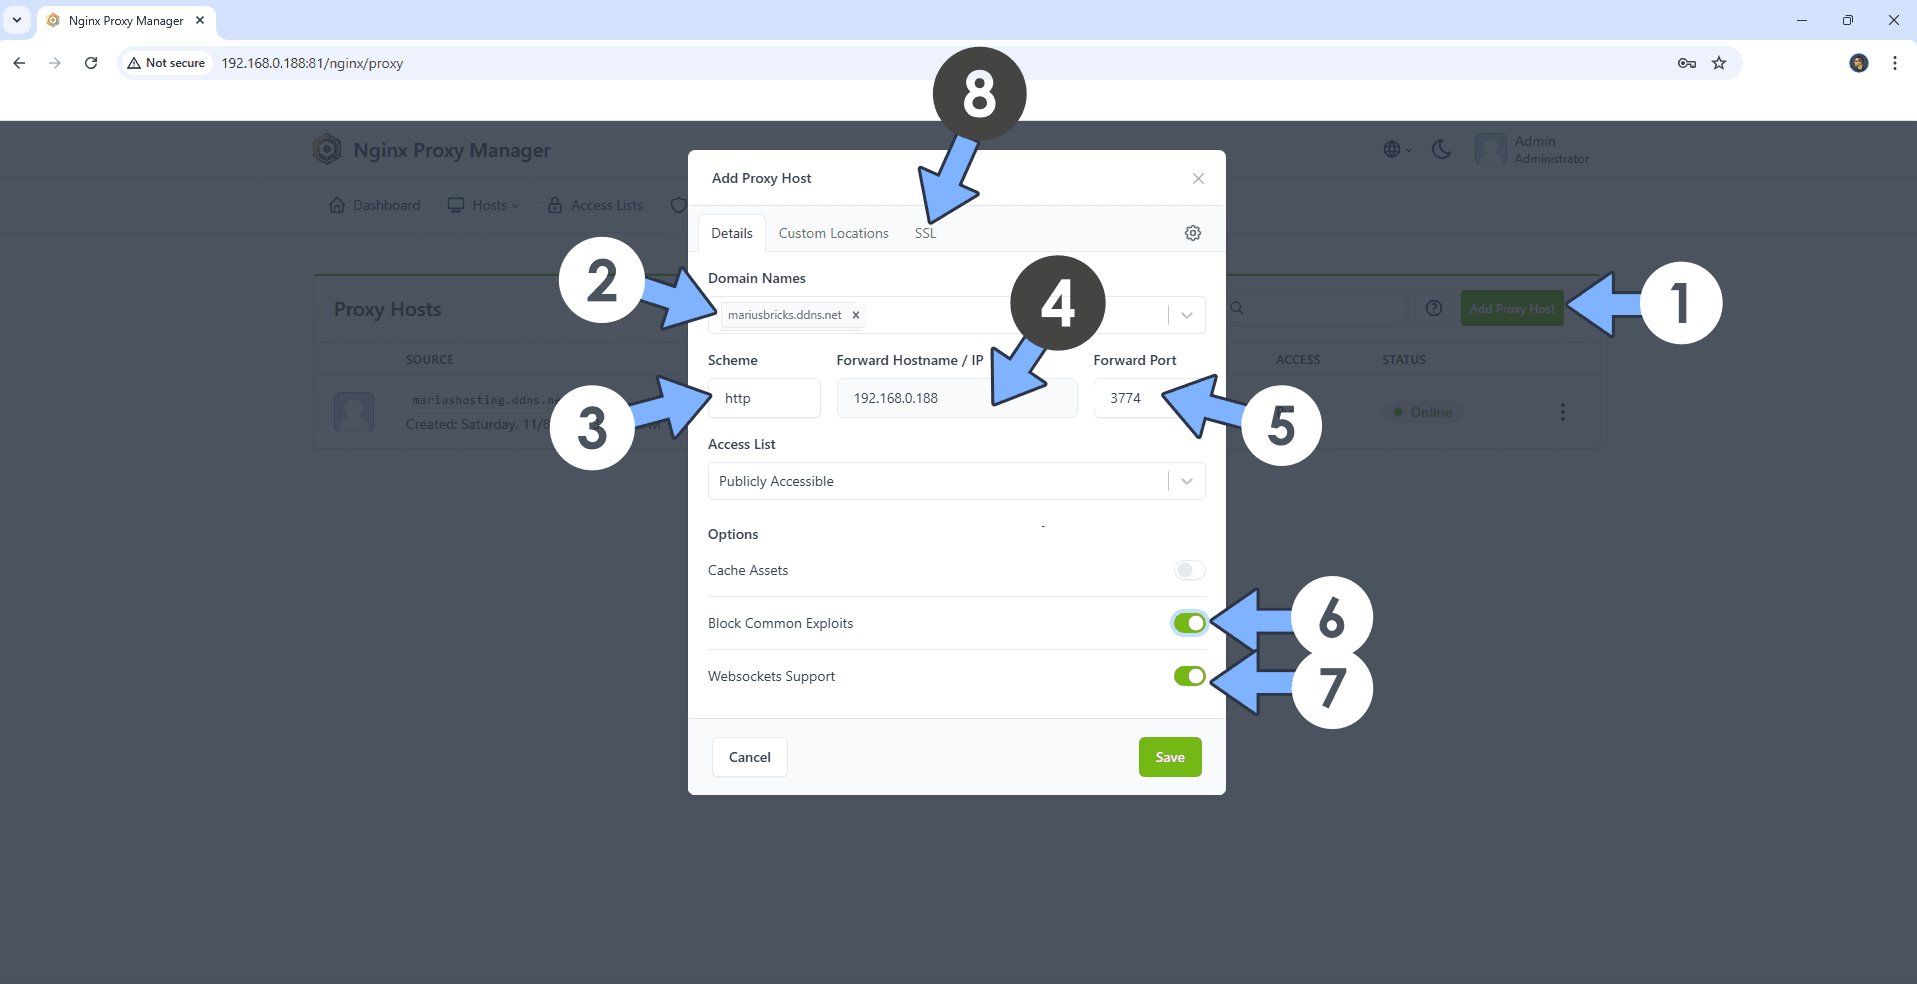
Open your Nginx Proxy Manager container that you have previously installed at STEP 3. Click Add Proxy Host. A new pop up window will open. Add the following details:
Domain Names: Type in your own noip domain name that you have previously created at STEP 4.
Scheme: http
Forward Hostname/IP: Type in the local NAS IP of your UGREEN NAS.
Forward Port: Type in the Formbricks local Port that is 3774
Check Block Common Exploits
Check Websockets Support
Click the SSL tab. Follow the instructions in the image below.
STEP 18
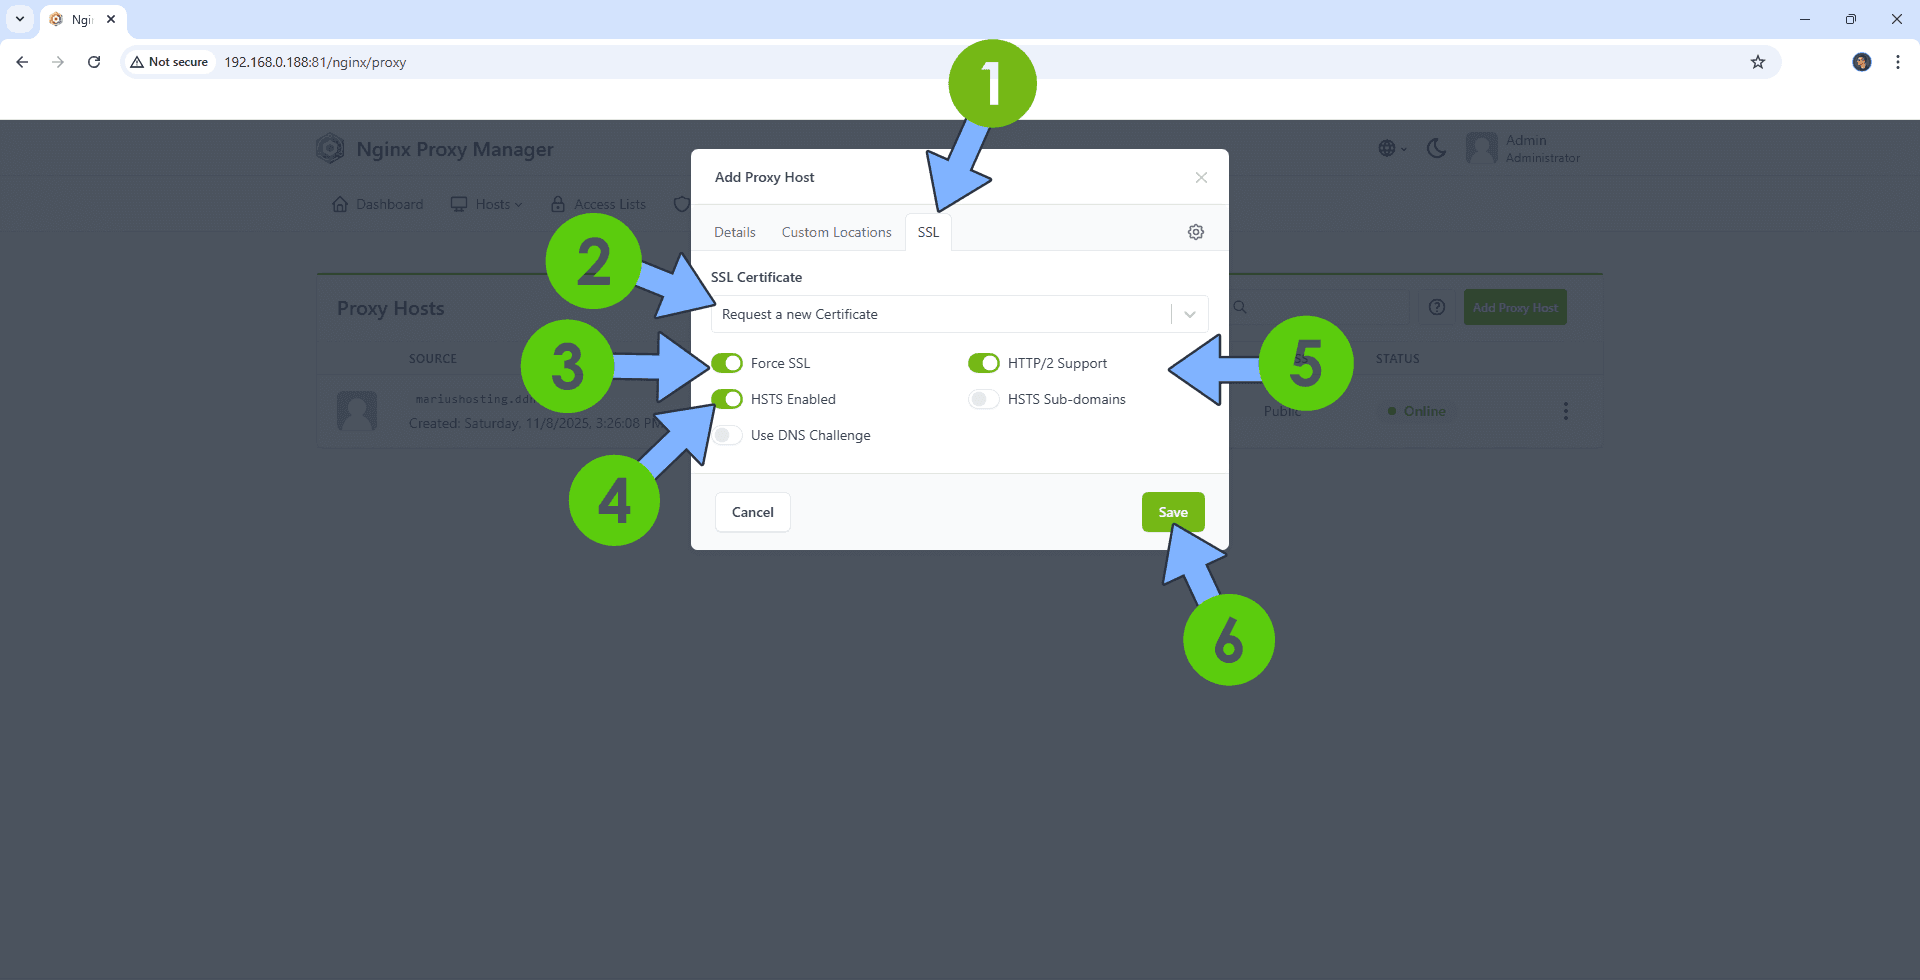
After you click the SSL tab, add the following details:
SSL Certificate: Request a new SSL Certificate
Check: Force SSL
Check: HSTS Enabled
Check: HTTP/2 Support
Click Save. Follow the instructions in the image below.
STEP 19
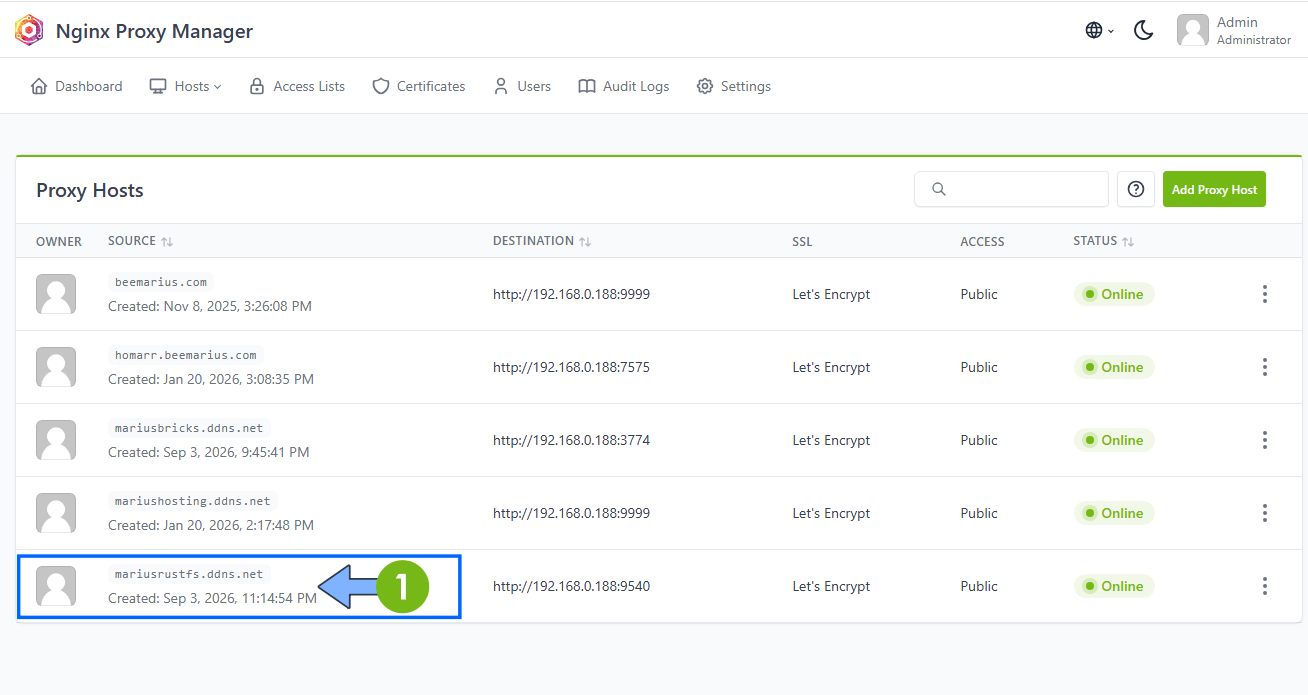
In the Proxy Hosts area, if everything goes right, you will see that your rustfs and formbricks hostnames have been generated. Click on your rustfs domain. Follow the instructions in the image below.
STEP 20
🟢Please Support My work by Making a Donation. Almost 99,9% of the people that install something using my guides forget to support my work, or just ignore STEP 1. I’ve been very honest about this aspect of my work since the beginning: I don’t run any ADS, I don’t require subscriptions, paid or otherwise, I don’t collect IPs, emails, and I don’t have any referral links from Amazon or other merchants. I also don’t have any POP-UPs or COOKIES. I have repeatedly been told over the years how much I have contributed to the community. It’s something I love doing and have been honest about my passion since the beginning. But I also Need The Community to Support me Back to be able to continue doing this work.
STEP 21
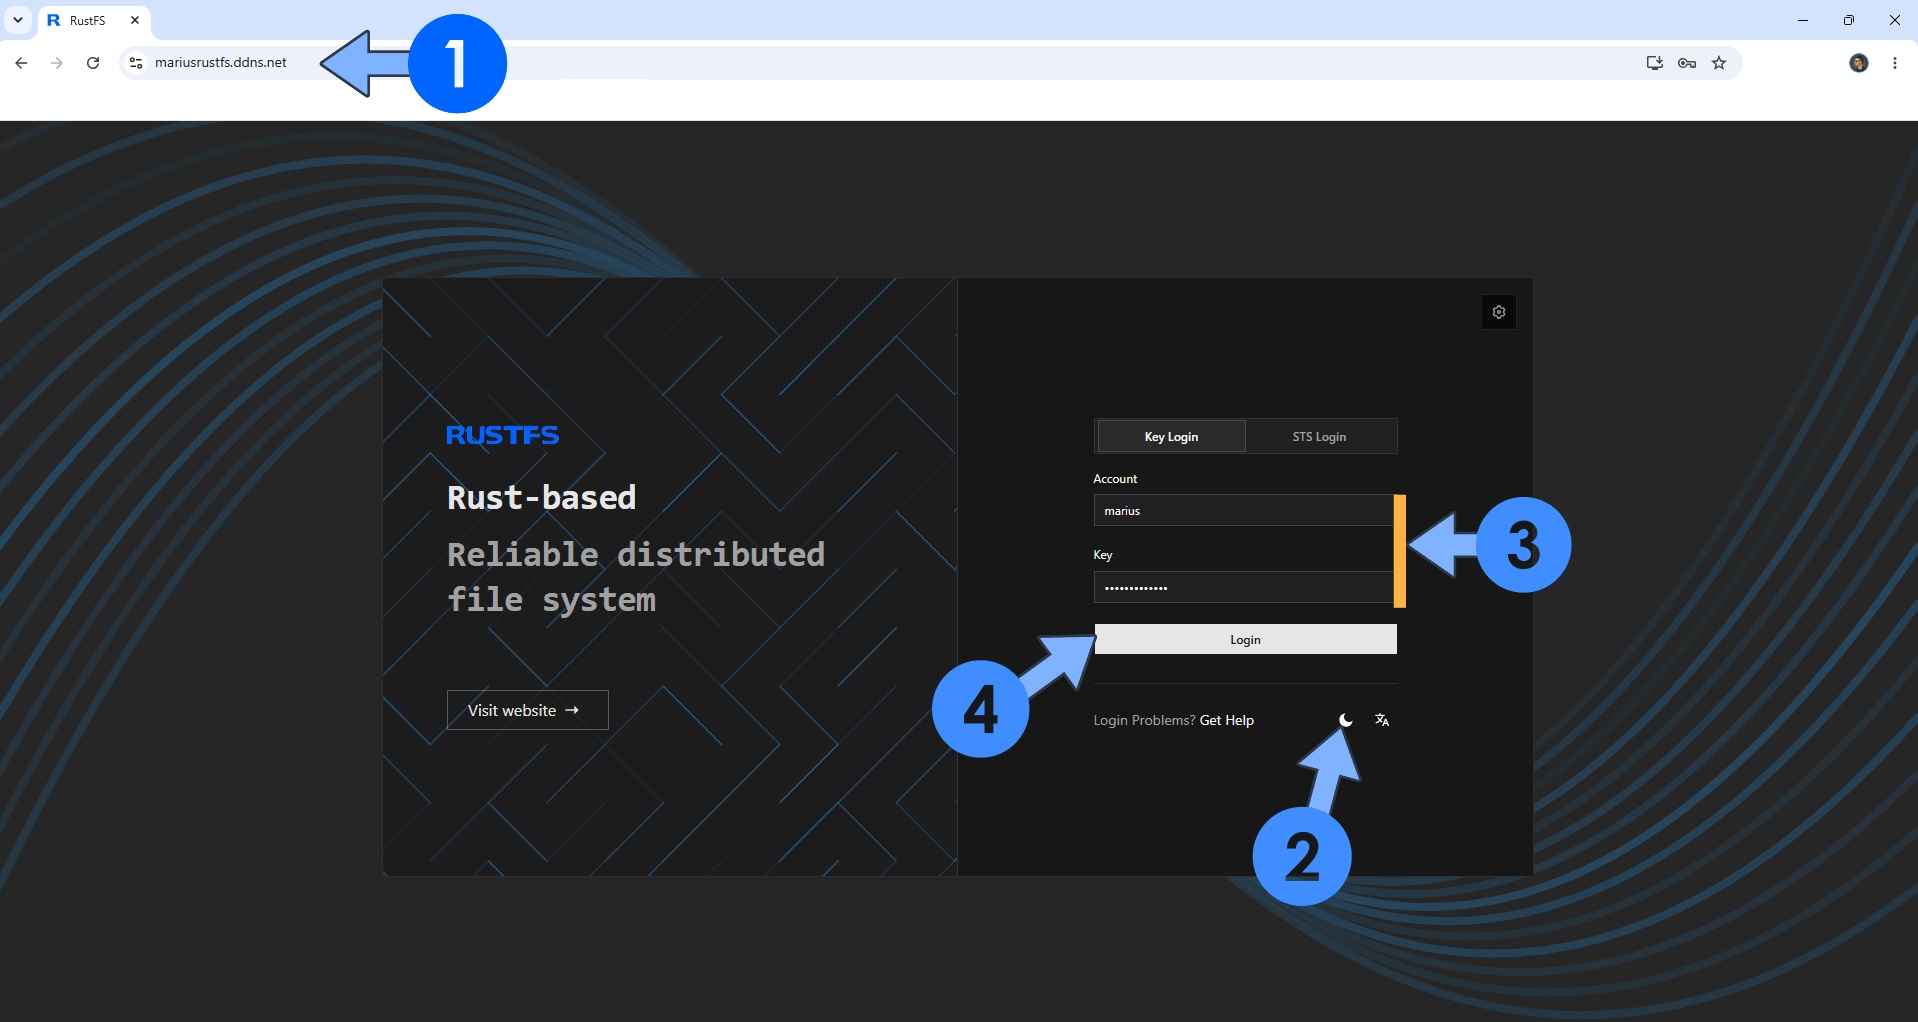
Now open your browser and type in your HTTPS/SSL certificate like this https://yourname.ddns.net that you have previously created at STEP 5. In my case it’s https://mariusrustfs.ddns.net If everything goes right, you will see the RustFS Login page. Switch the theme to Dark. In the Account area, type in your own Username (RUSTFS_ACCESS_KEY) that you have previously added at STEP 12. In the Key area, type in your own Password (RUSTFS_SECRET_KEY) that you have previously added at STEP 12. Click Login. Follow the instructions in the image below.
STEP 22
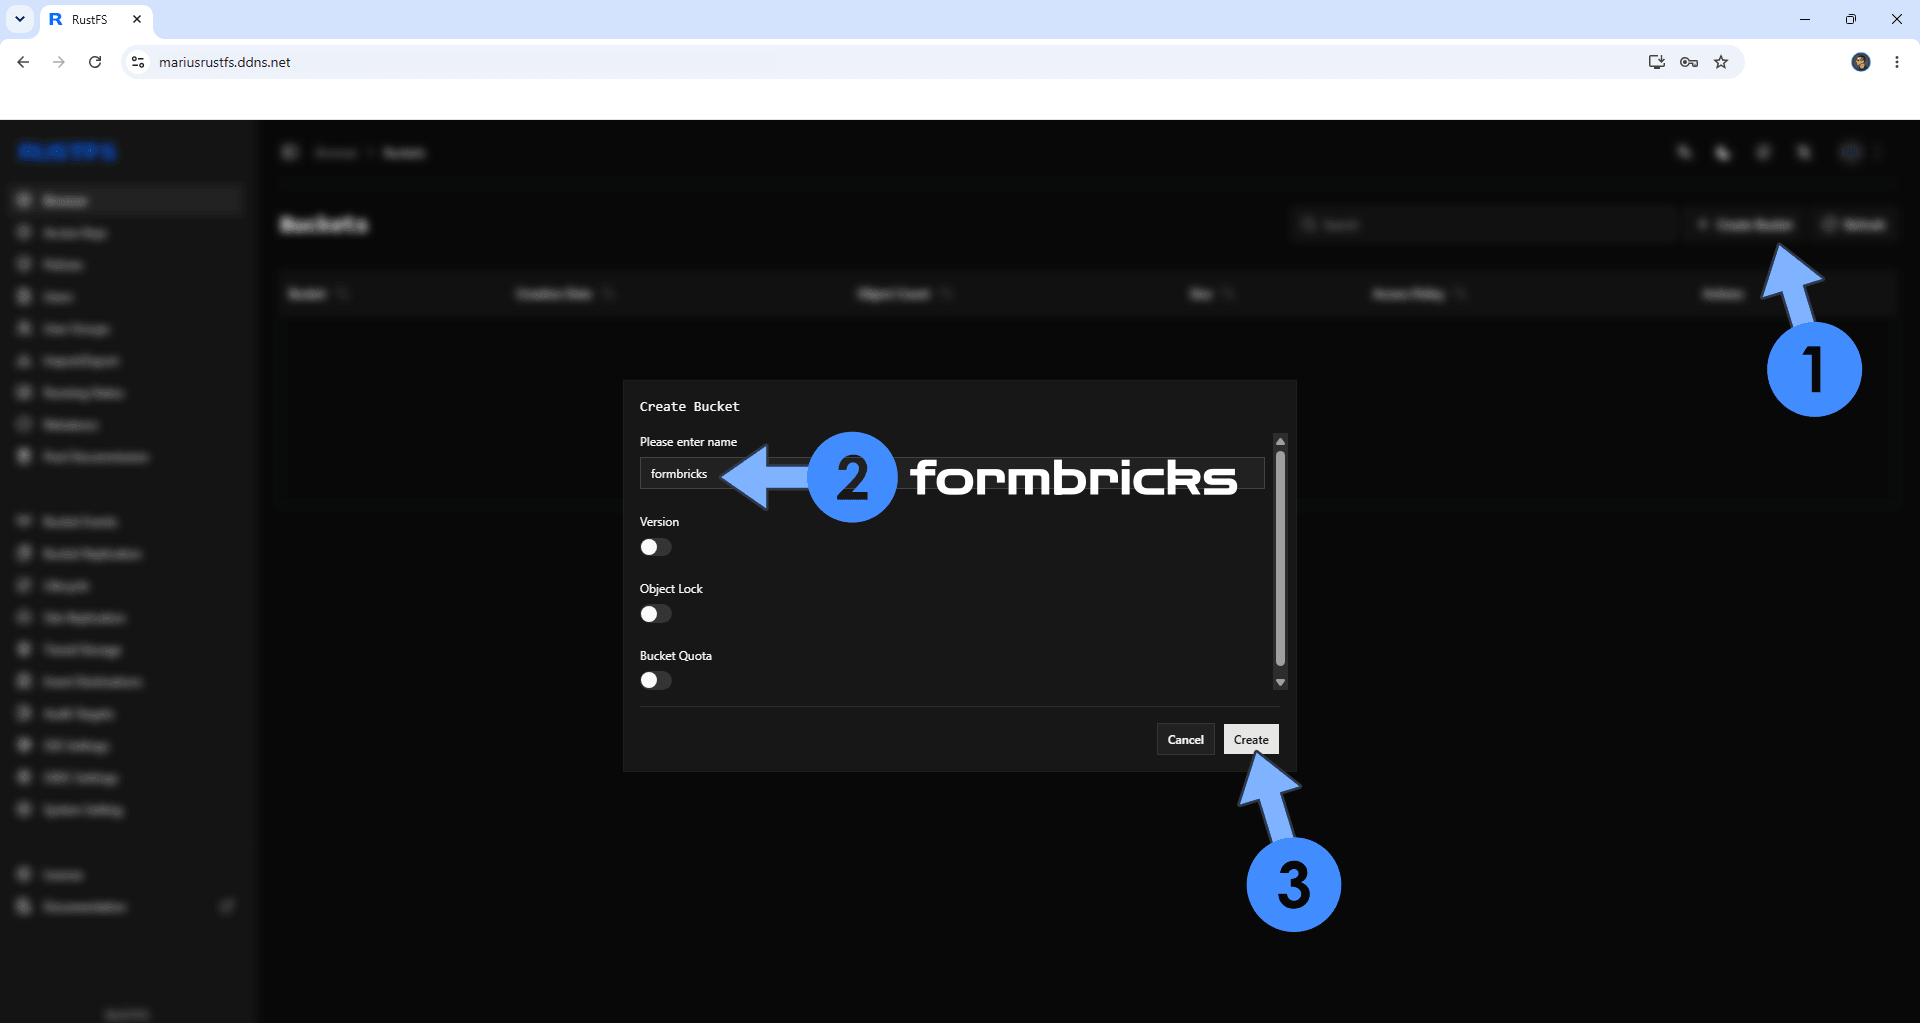
On the left sidebar, click Browser. Click + Create Bucket. Type in formbricks as the name for the Bucket. Click Create. Follow the instructions in the image below.
STEP 23
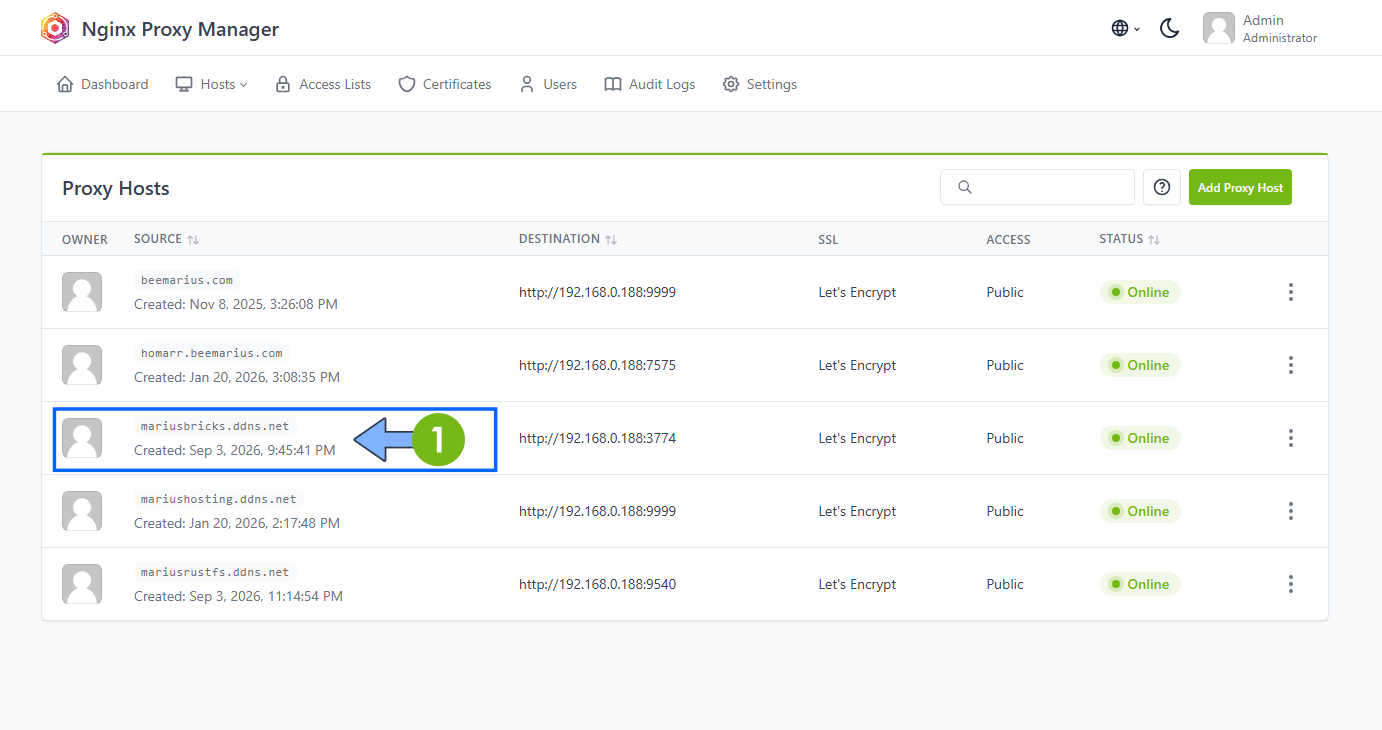
Go back to the Nginx Proxy Manager. In the Proxy Hosts area, if everything goes right, you will see that your formbricks hostname has been generated. Click on it. Follow the instructions in the image below.
STEP 24
🟢Please Support My work by Making a Donation. Almost 99,9% of the people that install something using my guides forget to support my work, or just ignore STEP 1. I’ve been very honest about this aspect of my work since the beginning: I don’t run any ADS, I don’t require subscriptions, paid or otherwise, I don’t collect IPs, emails, and I don’t have any referral links from Amazon or other merchants. I also don’t have any POP-UPs or COOKIES. I have repeatedly been told over the years how much I have contributed to the community. It’s something I love doing and have been honest about my passion since the beginning. But I also Need The Community to Support me Back to be able to continue doing this work.
STEP 25
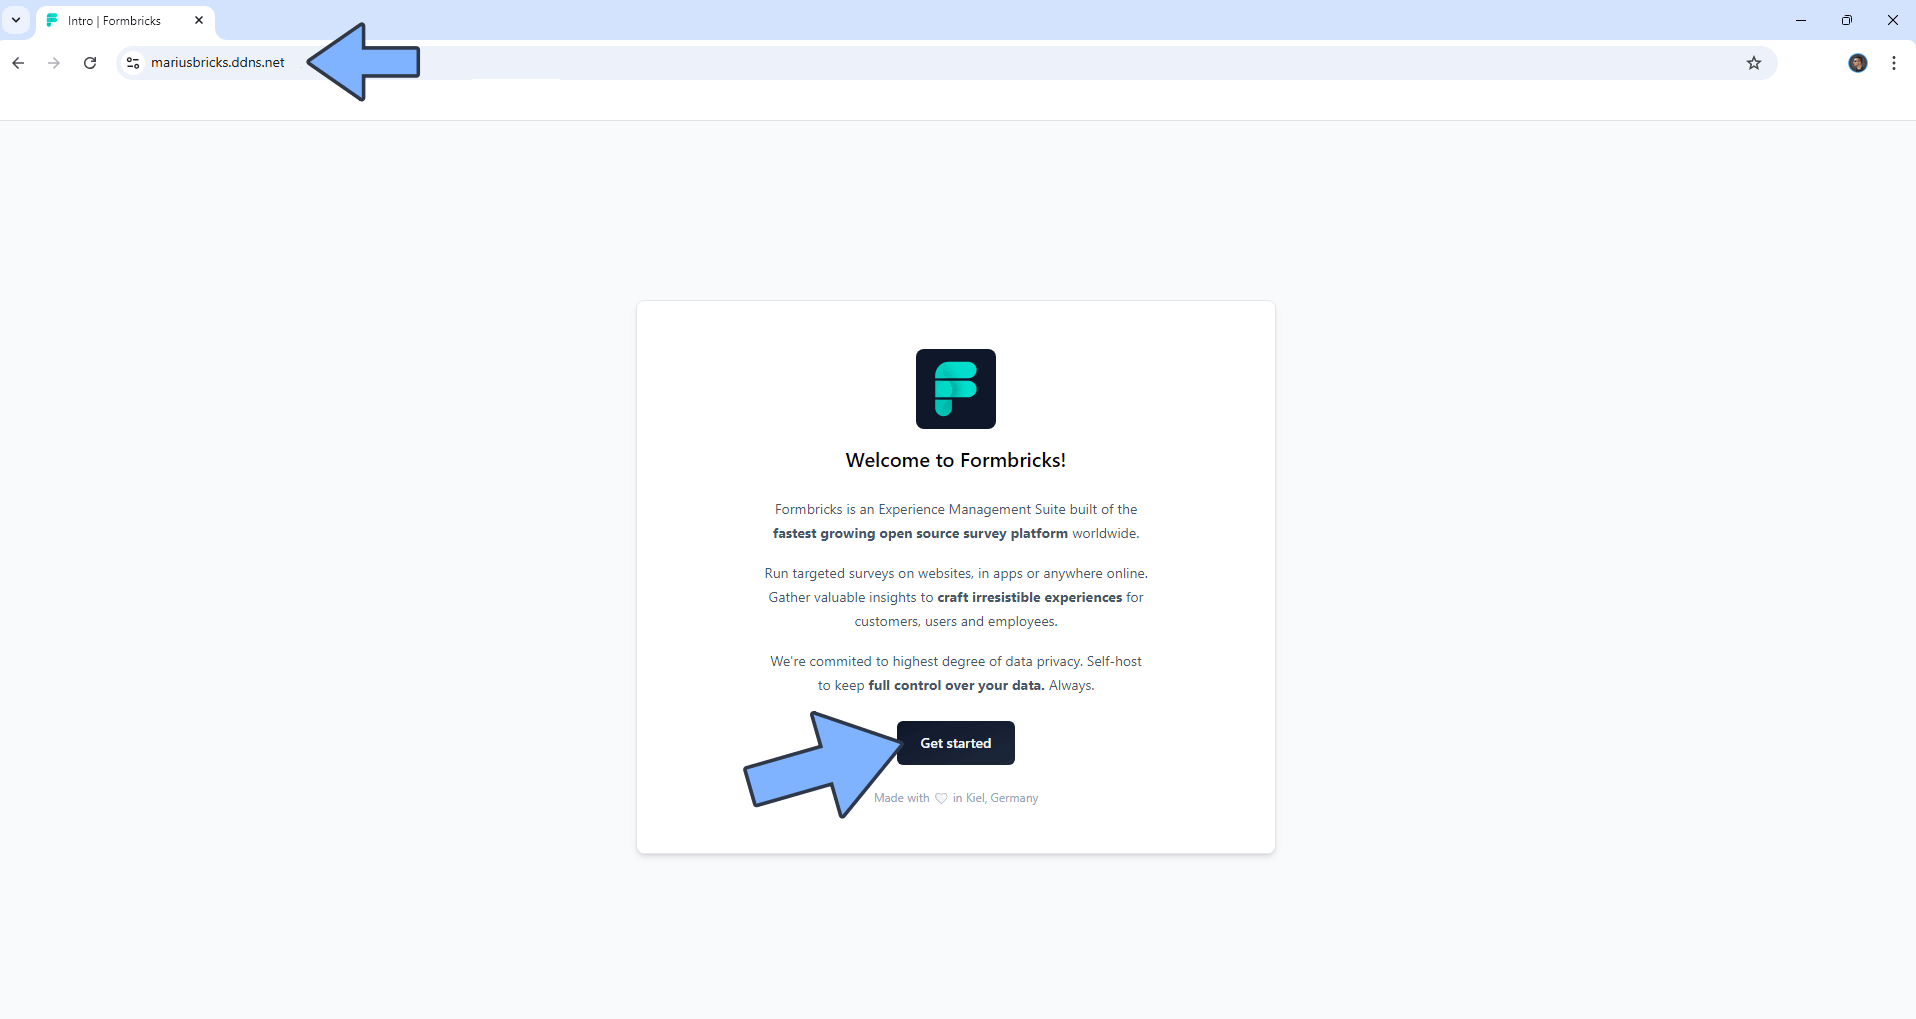
Now open your browser and type in your HTTPS/SSL certificate like this https://yourname.ddns.net In my case it’s https://mariusbricks.ddns.net If everything goes right, you will see the Formbricks Login Page. Click Get started. Follow the instructions in the image below.
STEP 26
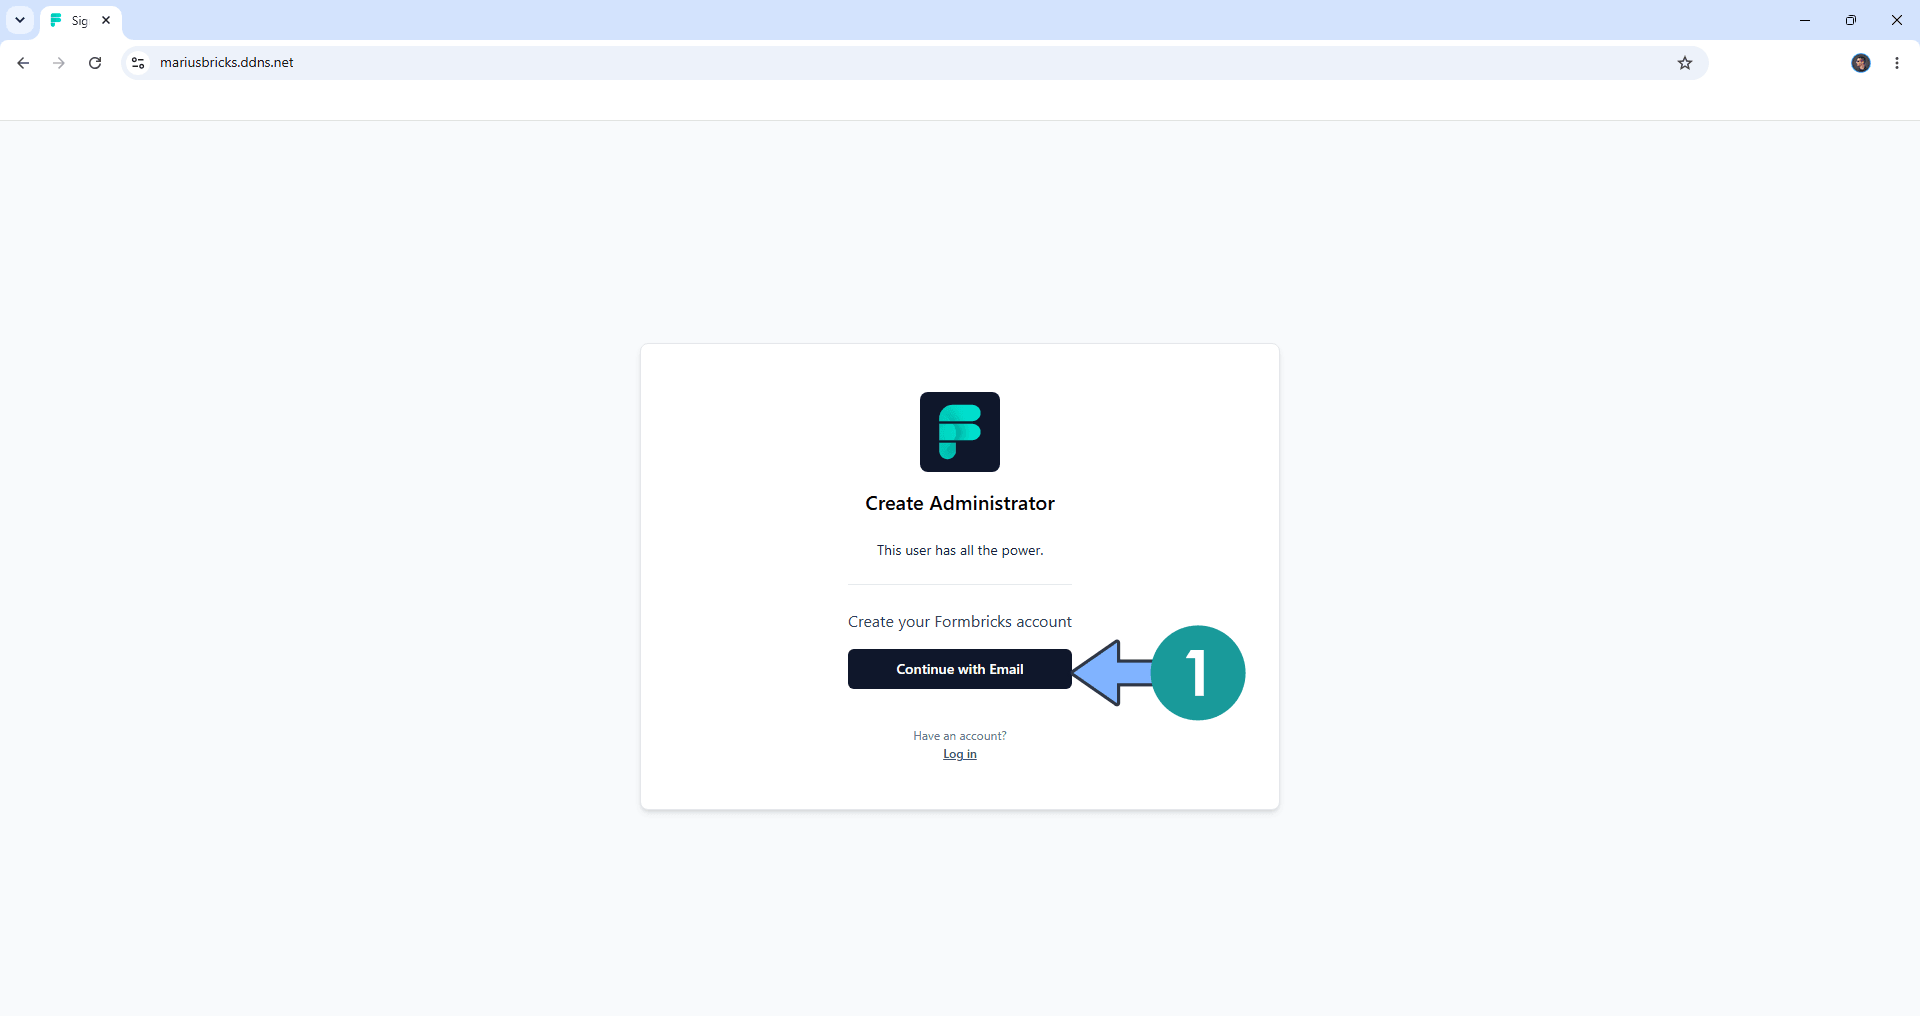
Click Continue with Email to Create your Administrator user. Follow the instructions in the image below.
STEP 27
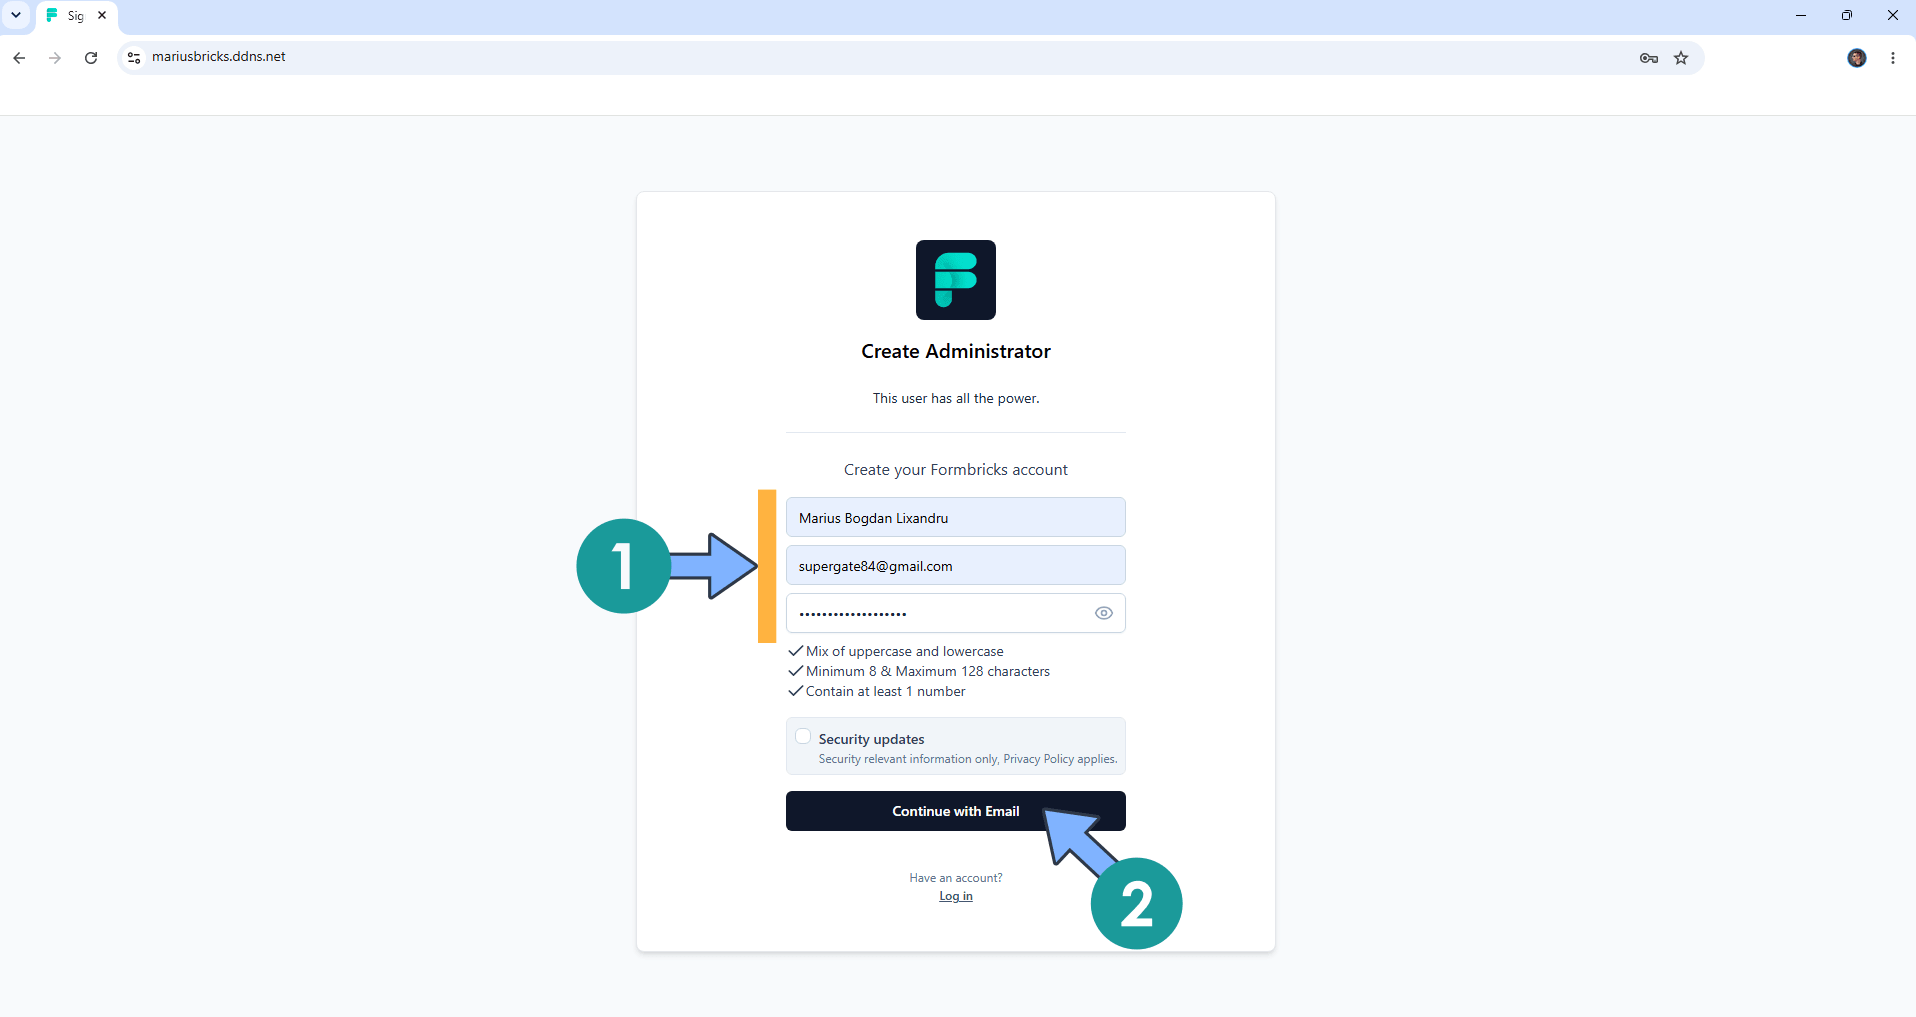
Type in your own details, then click Continue with Email. Follow the instructions in the image below.
STEP 28
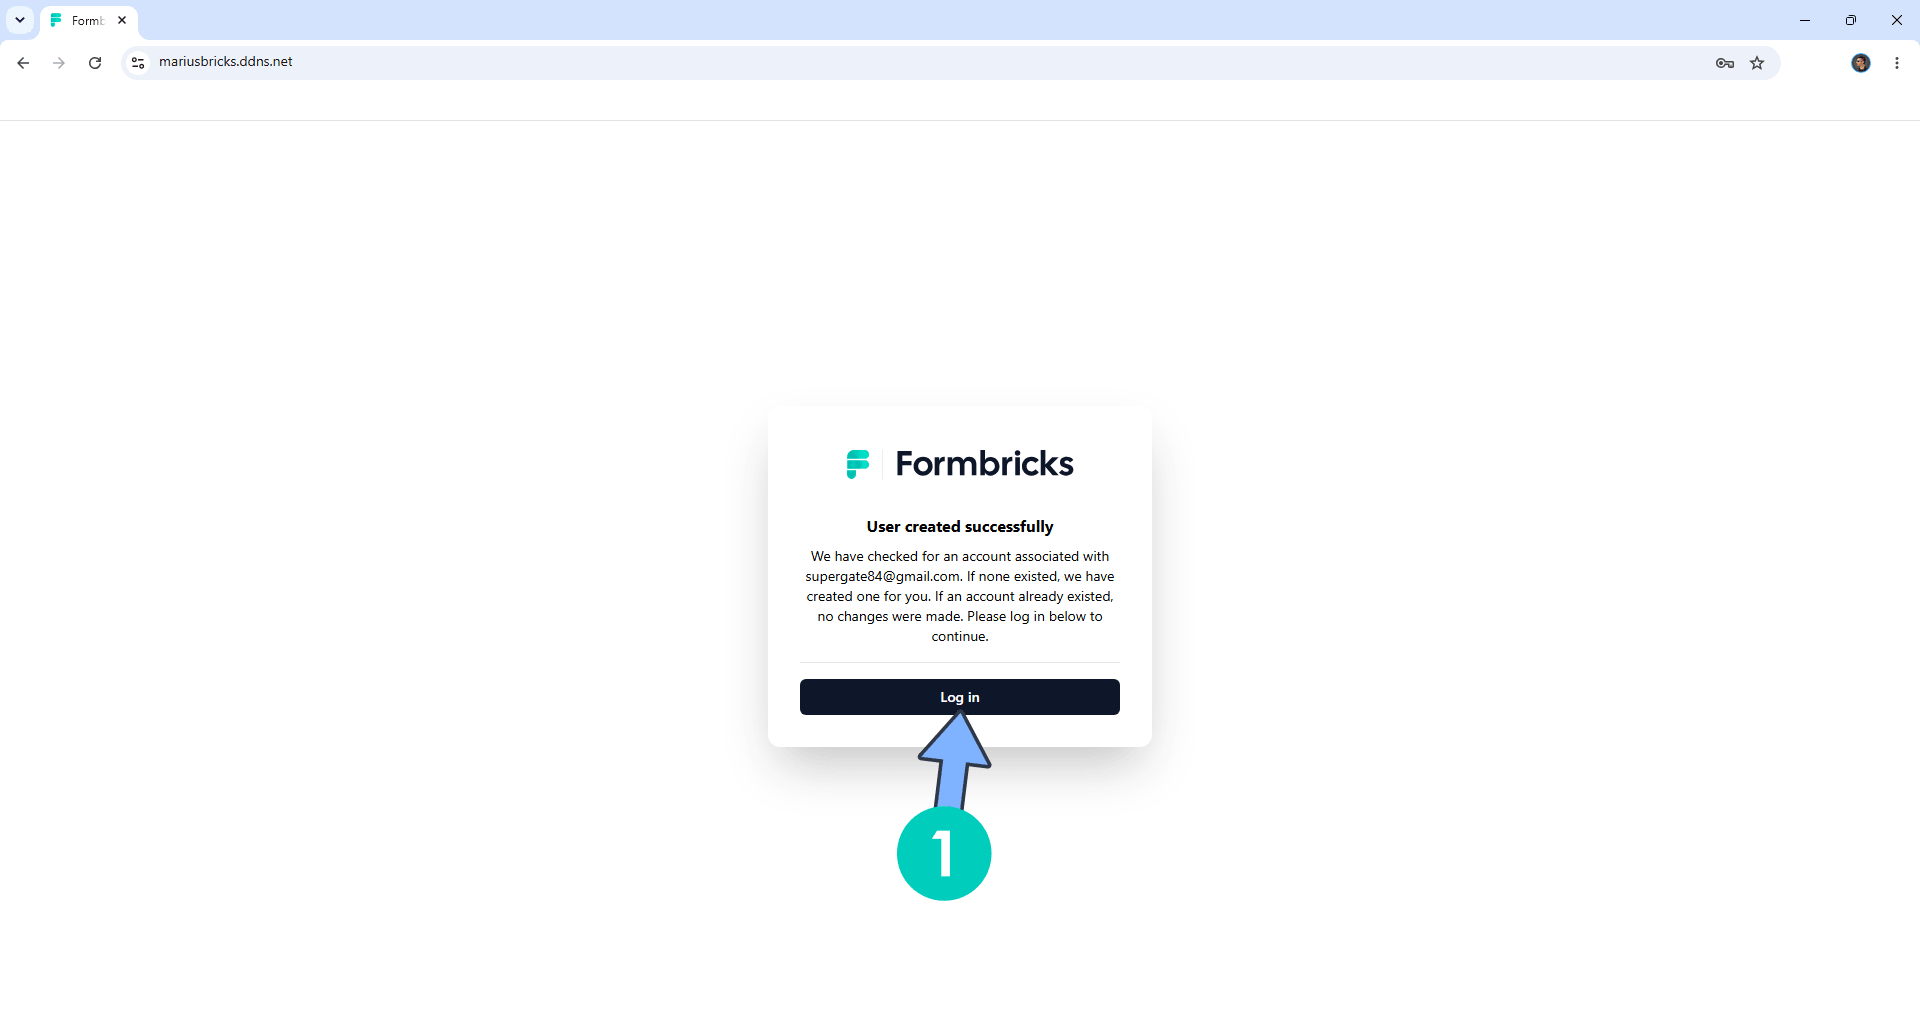
Click Log in. If you get some red error message when creating new user, ignore it the user is already created. Follow the instructions in the image below.
STEP 29
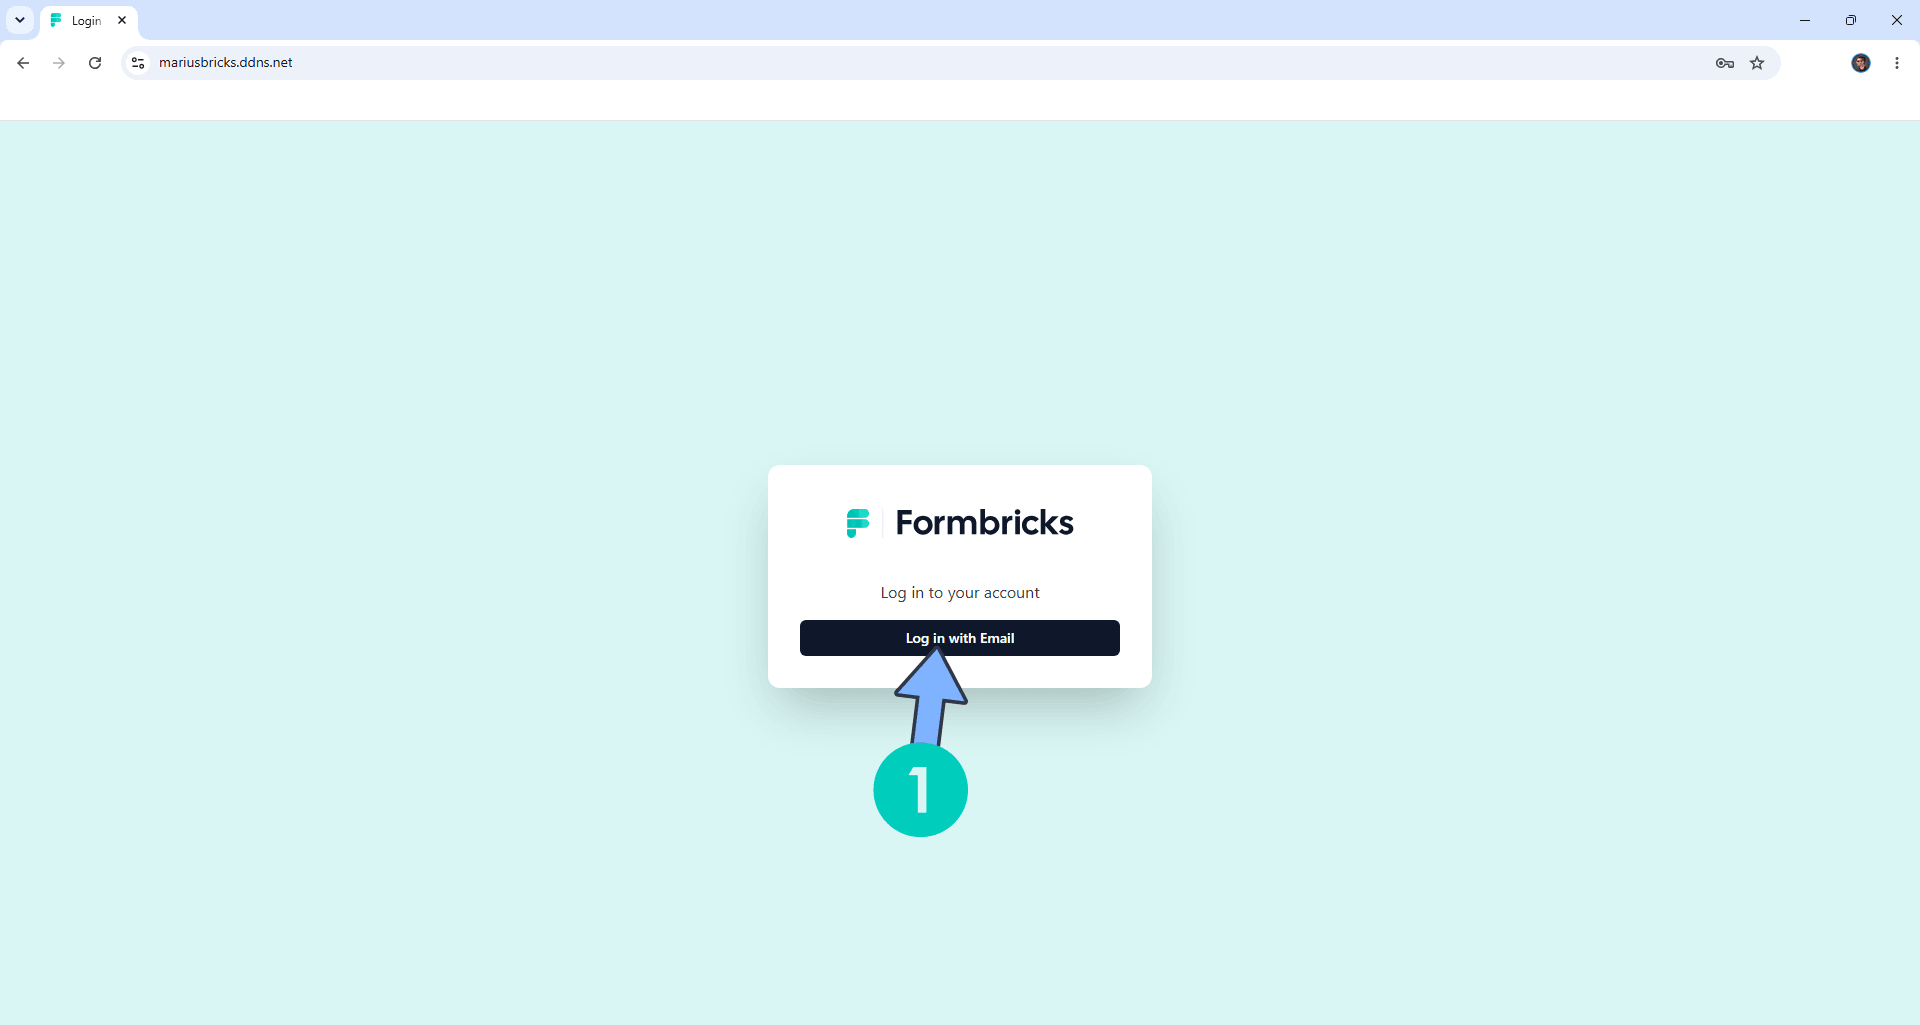
Click Login with Email. Follow the instructions in the image below.
STEP 30
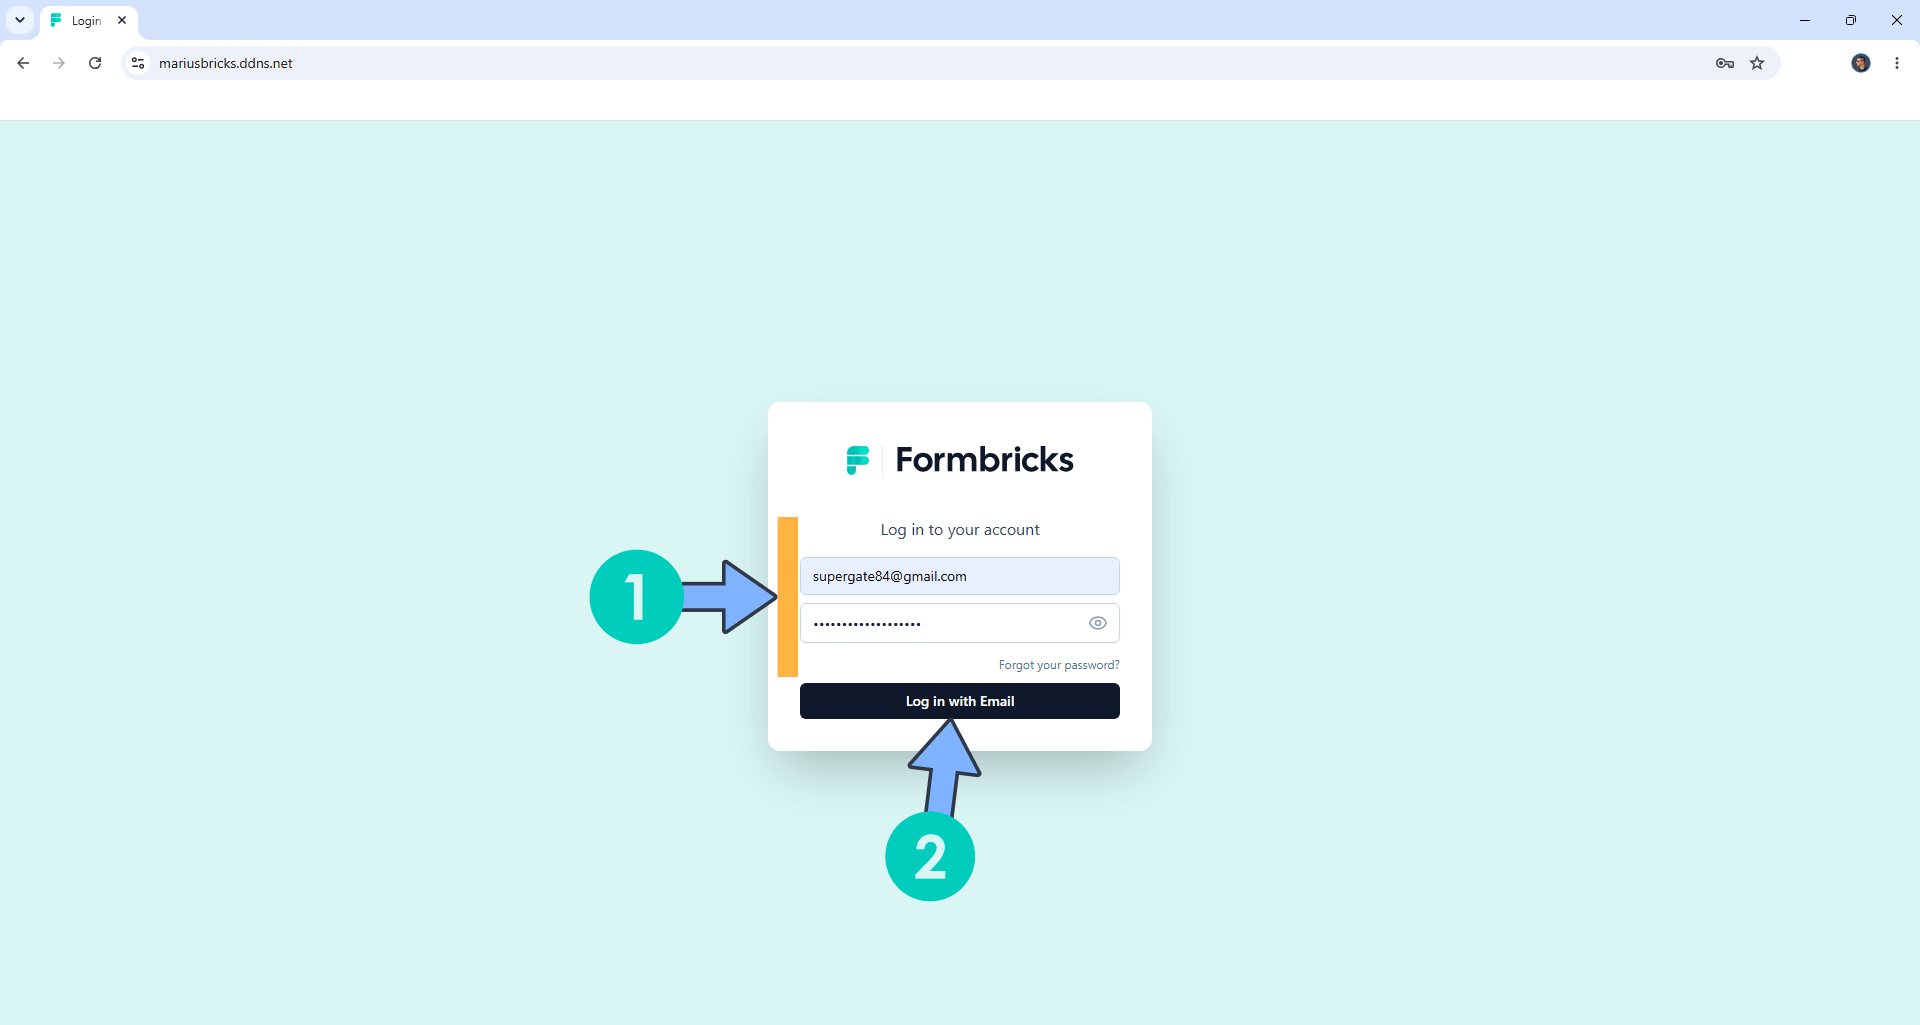
Type in your own Email and Password that you have previously created at STEP 27, then click Login with Email. Follow the instructions in the image below.
STEP 31
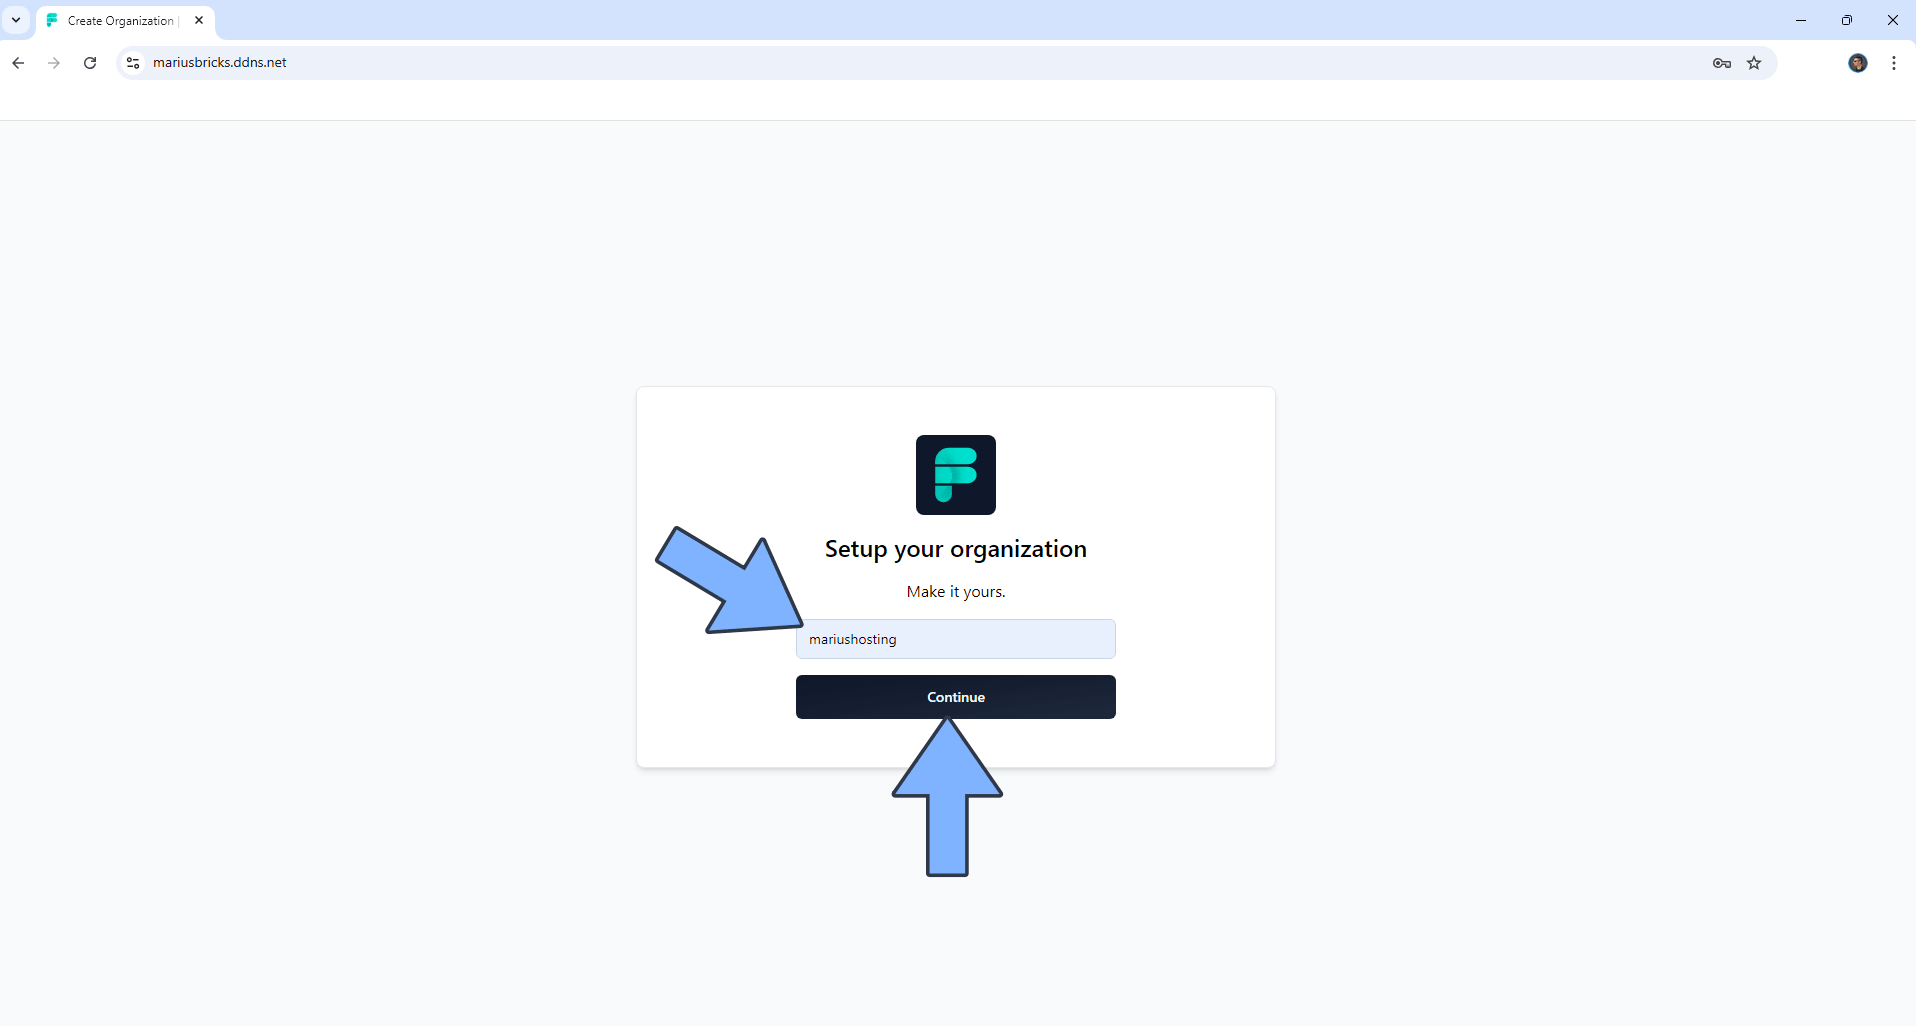
Type in a name for your organization, then click Continue. Follow the instructions in the image below.
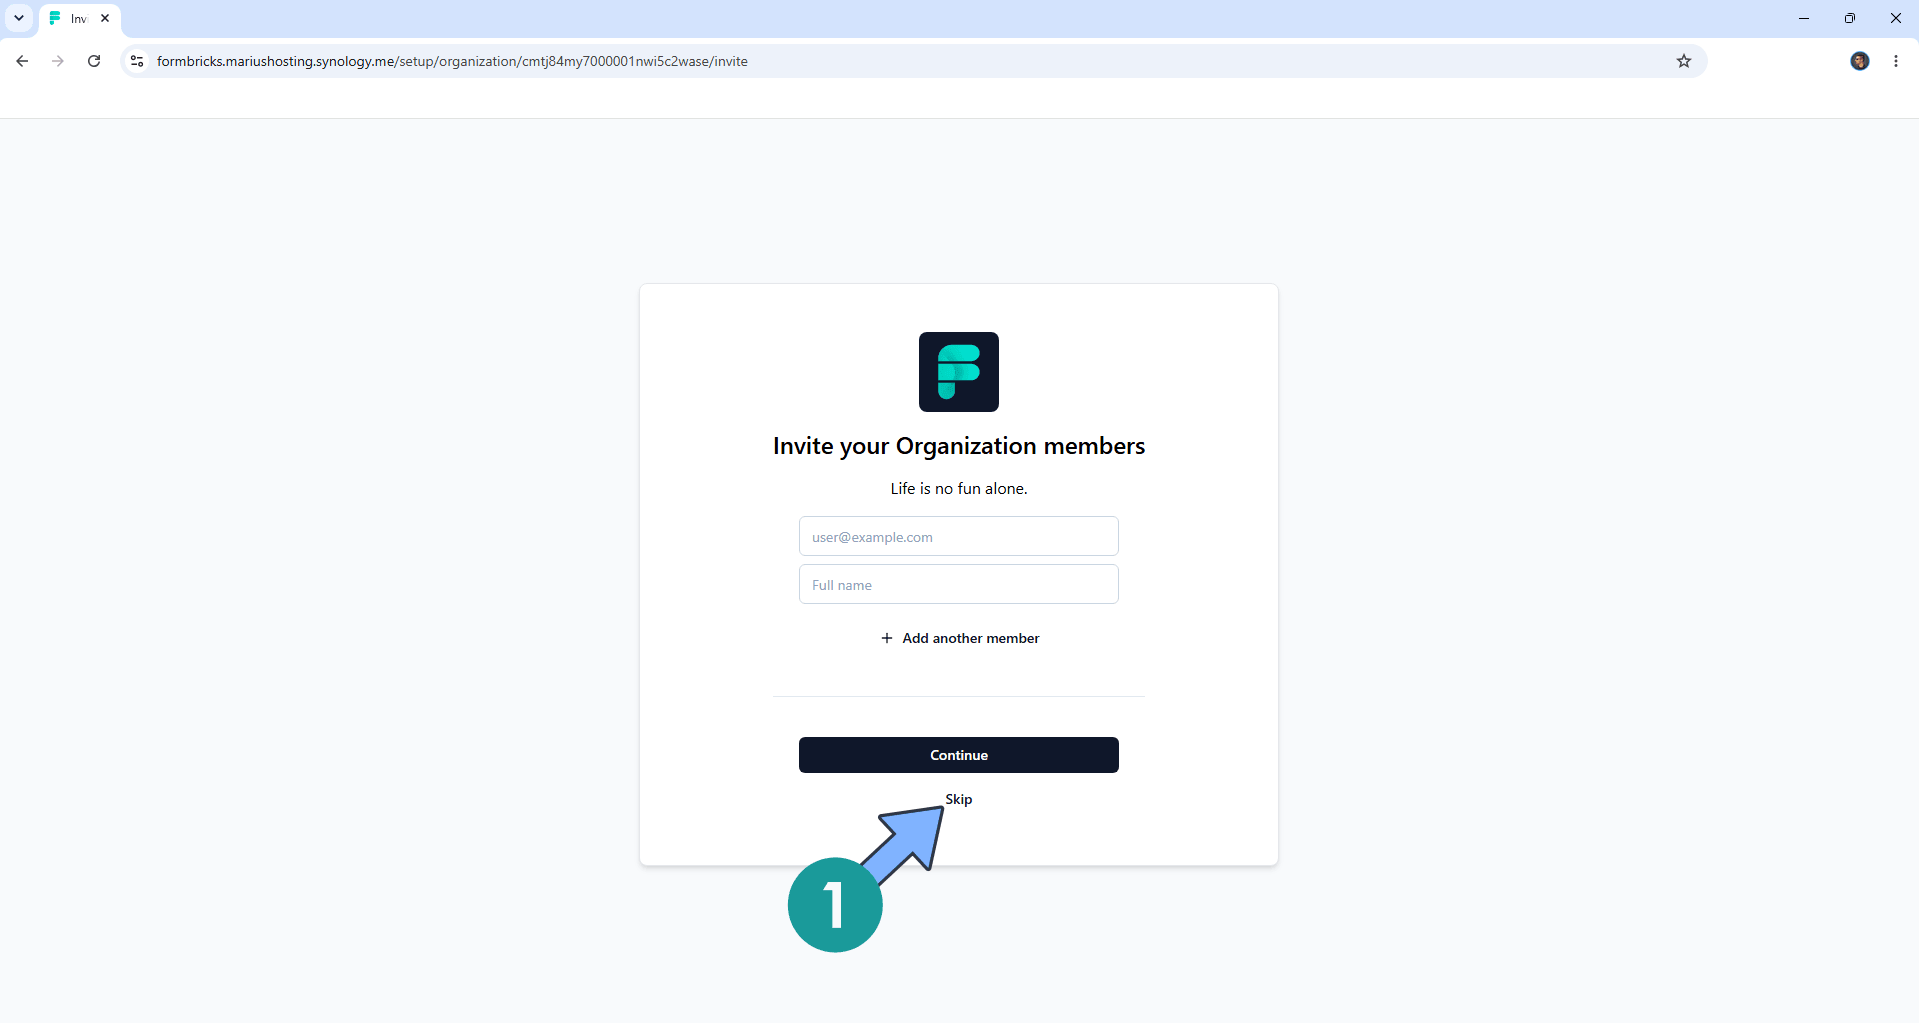
STEP 32
Invite a new member to your Organization via email, then click Continue or Skip to invite later. Follow the instructions in the image below.
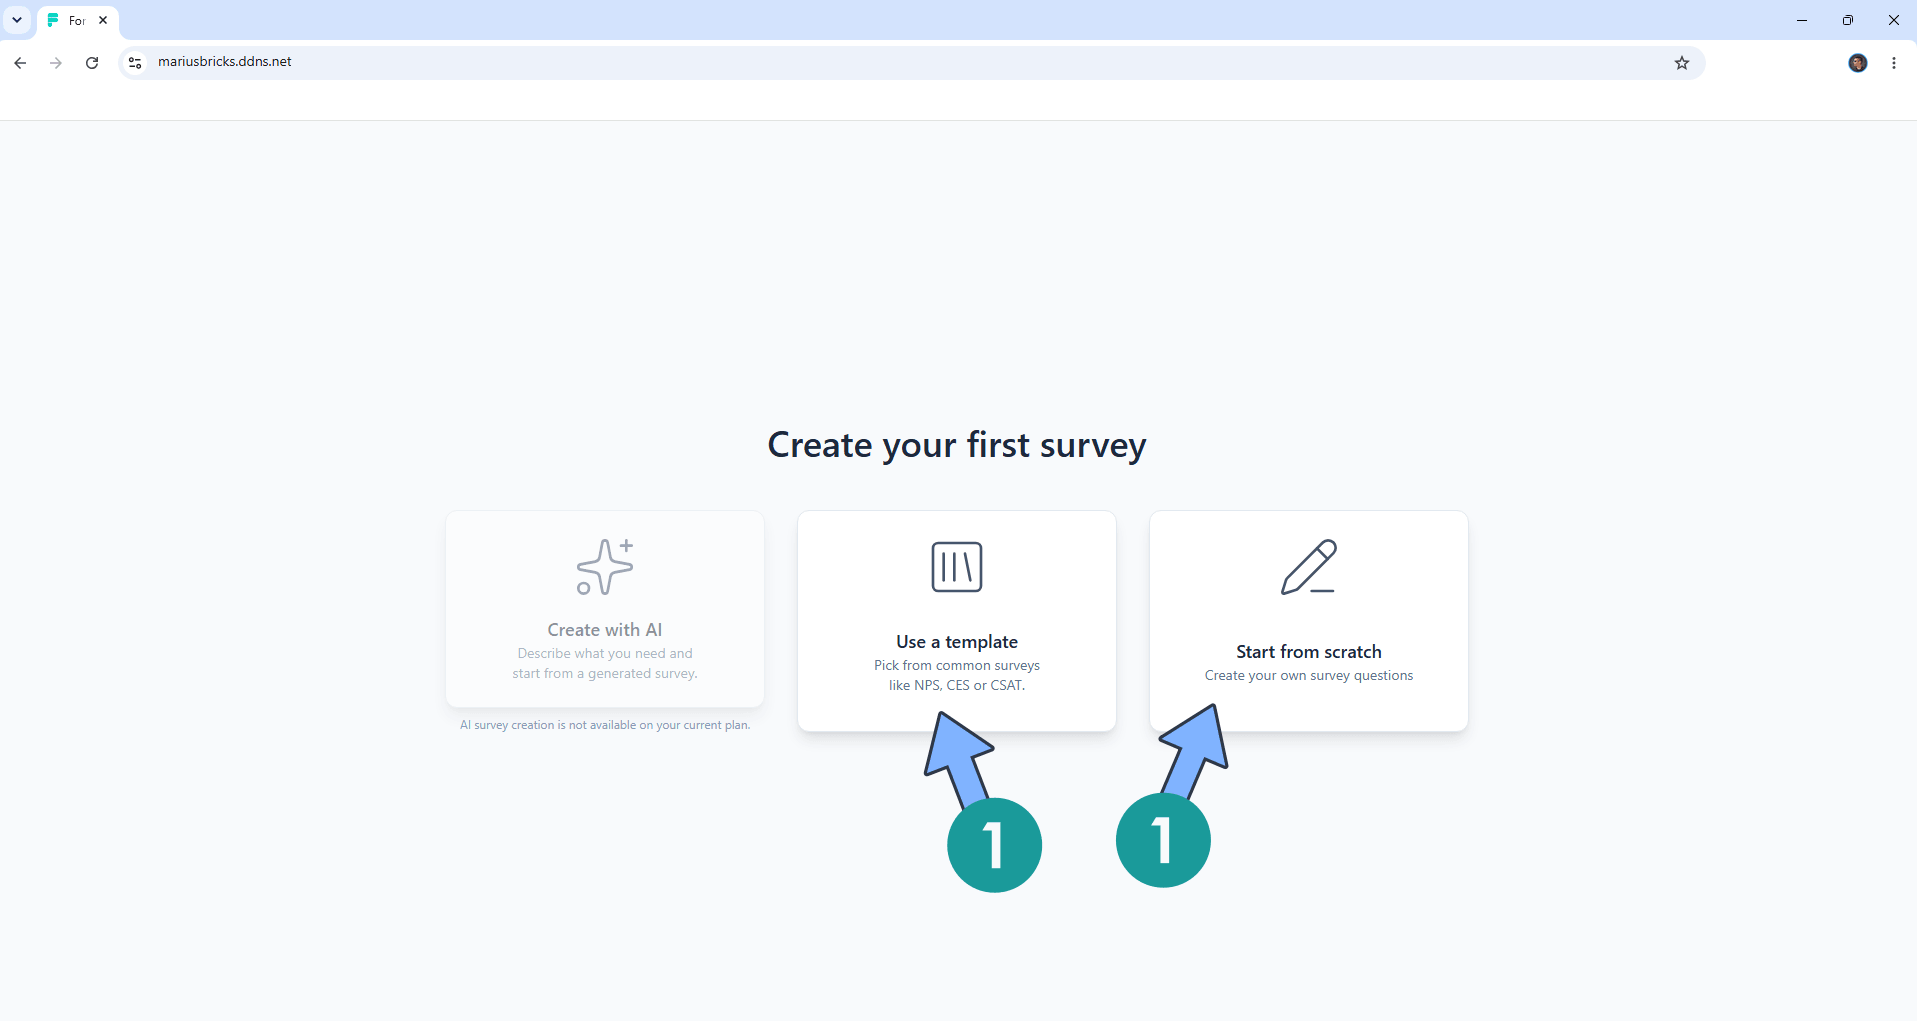
STEP 33
Use a predefined template or Start from scratch. After your selection, go straight to the next STEP.
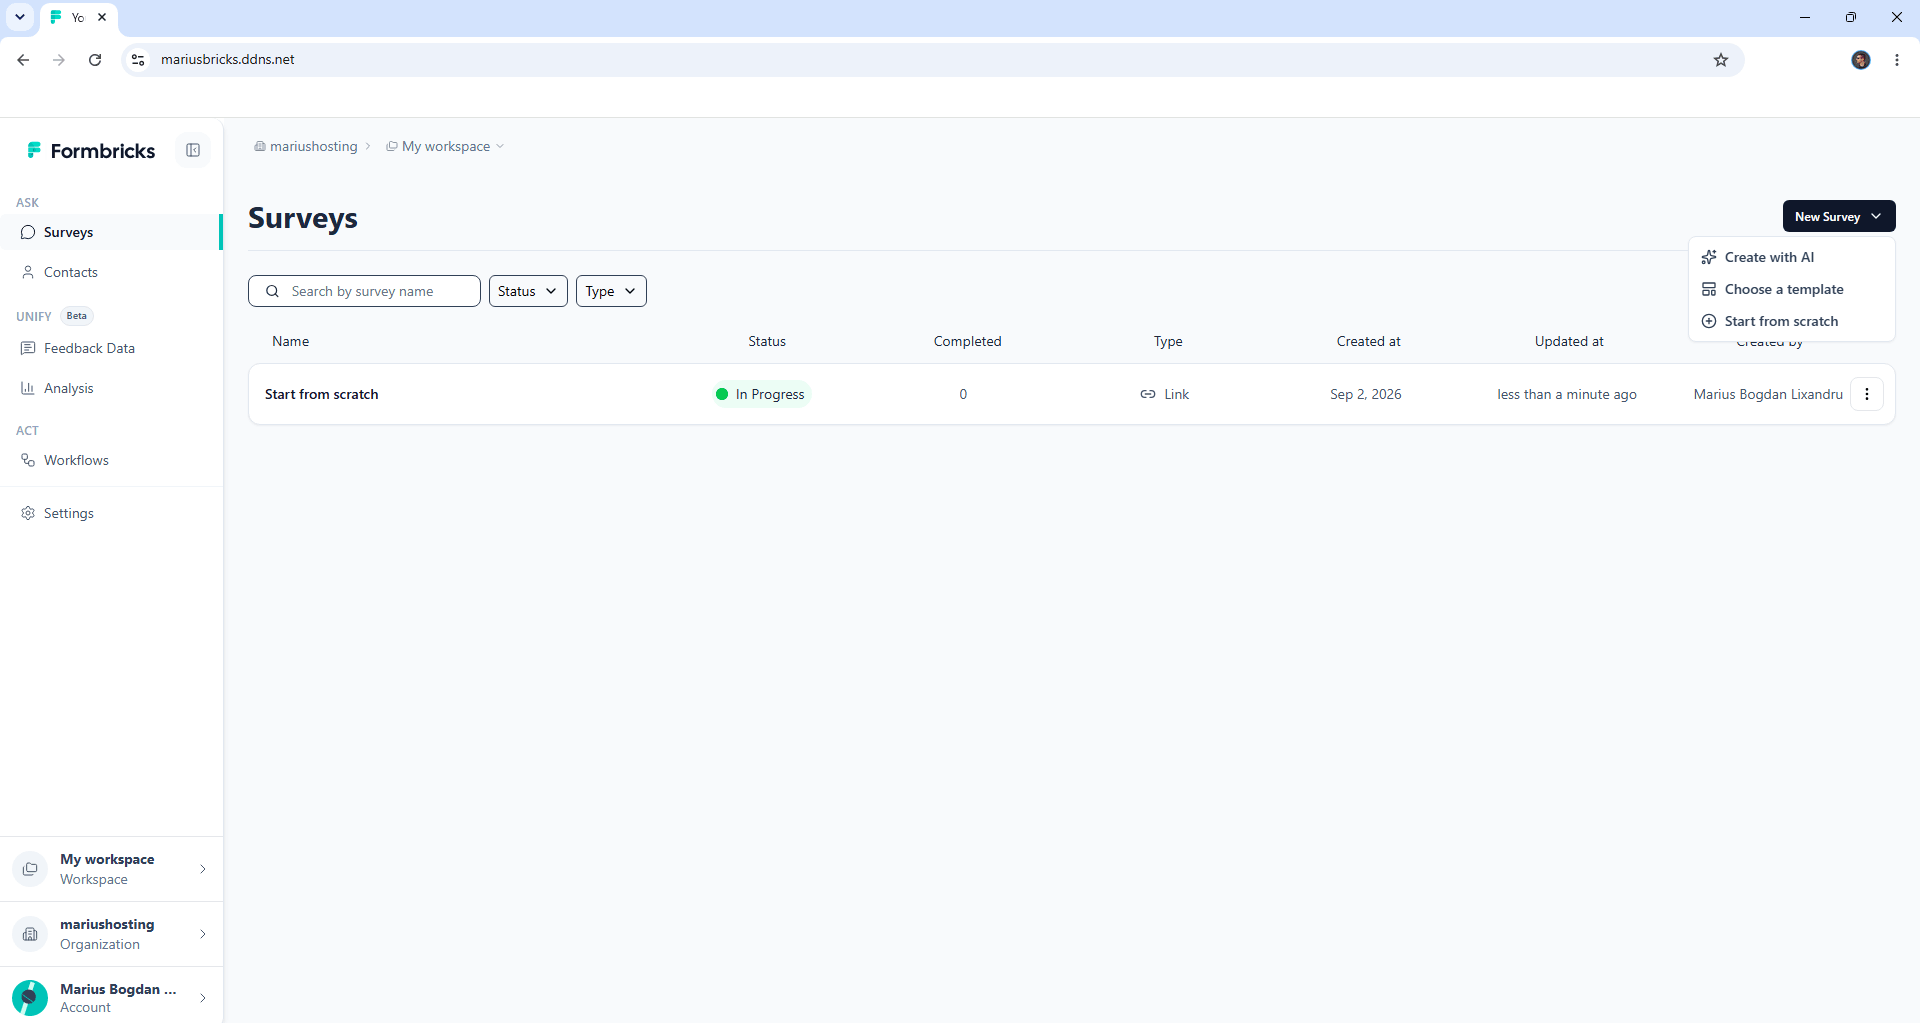
STEP 34
Your Formbricks dashboard at a glance!
STEP 35
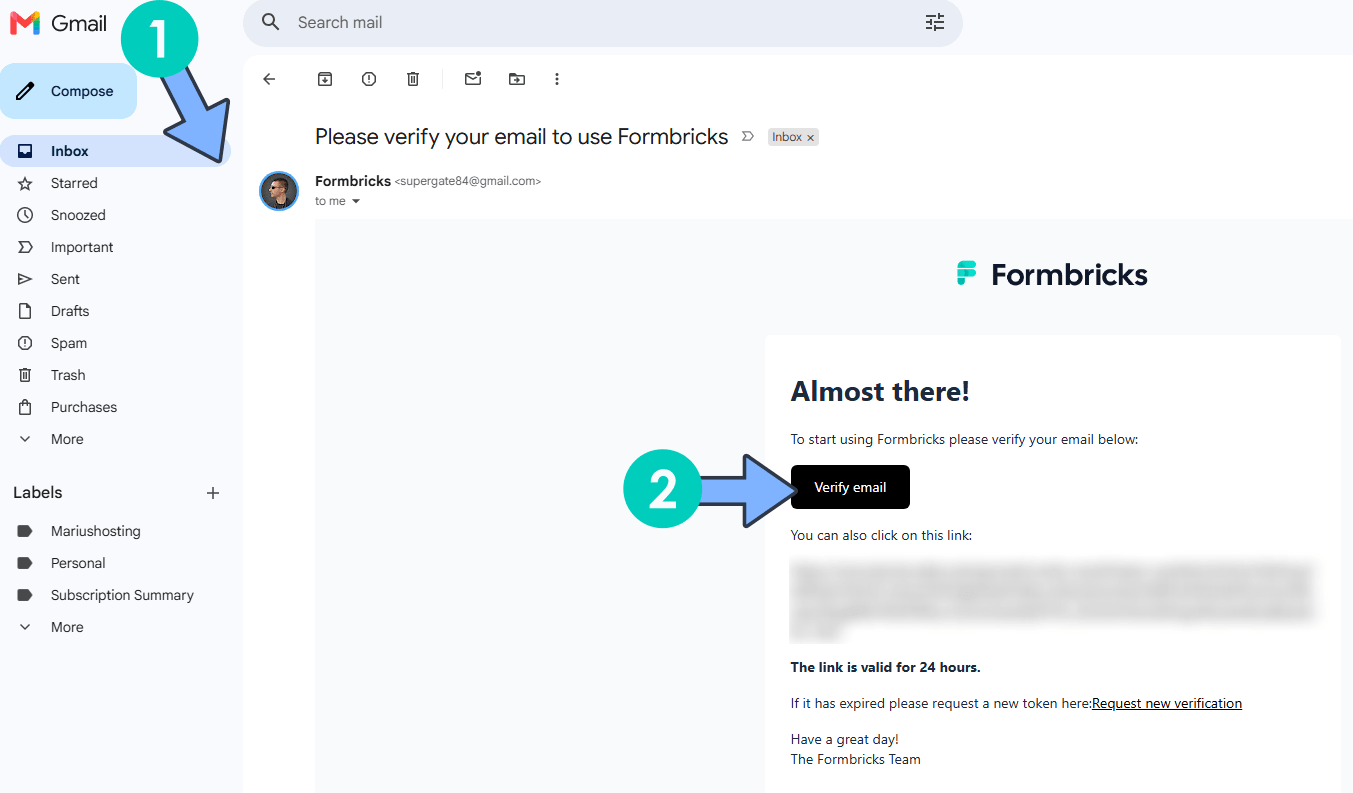
Confirm your email. Go to your gmail account then click Verify Email. ⚠️Note: You will receive the verification email only if you have correctly added MAIL_FROM, SMTP_USER and SMTP_PASSWORD at STEP 12. Go straight to the next STEP.
STEP 36
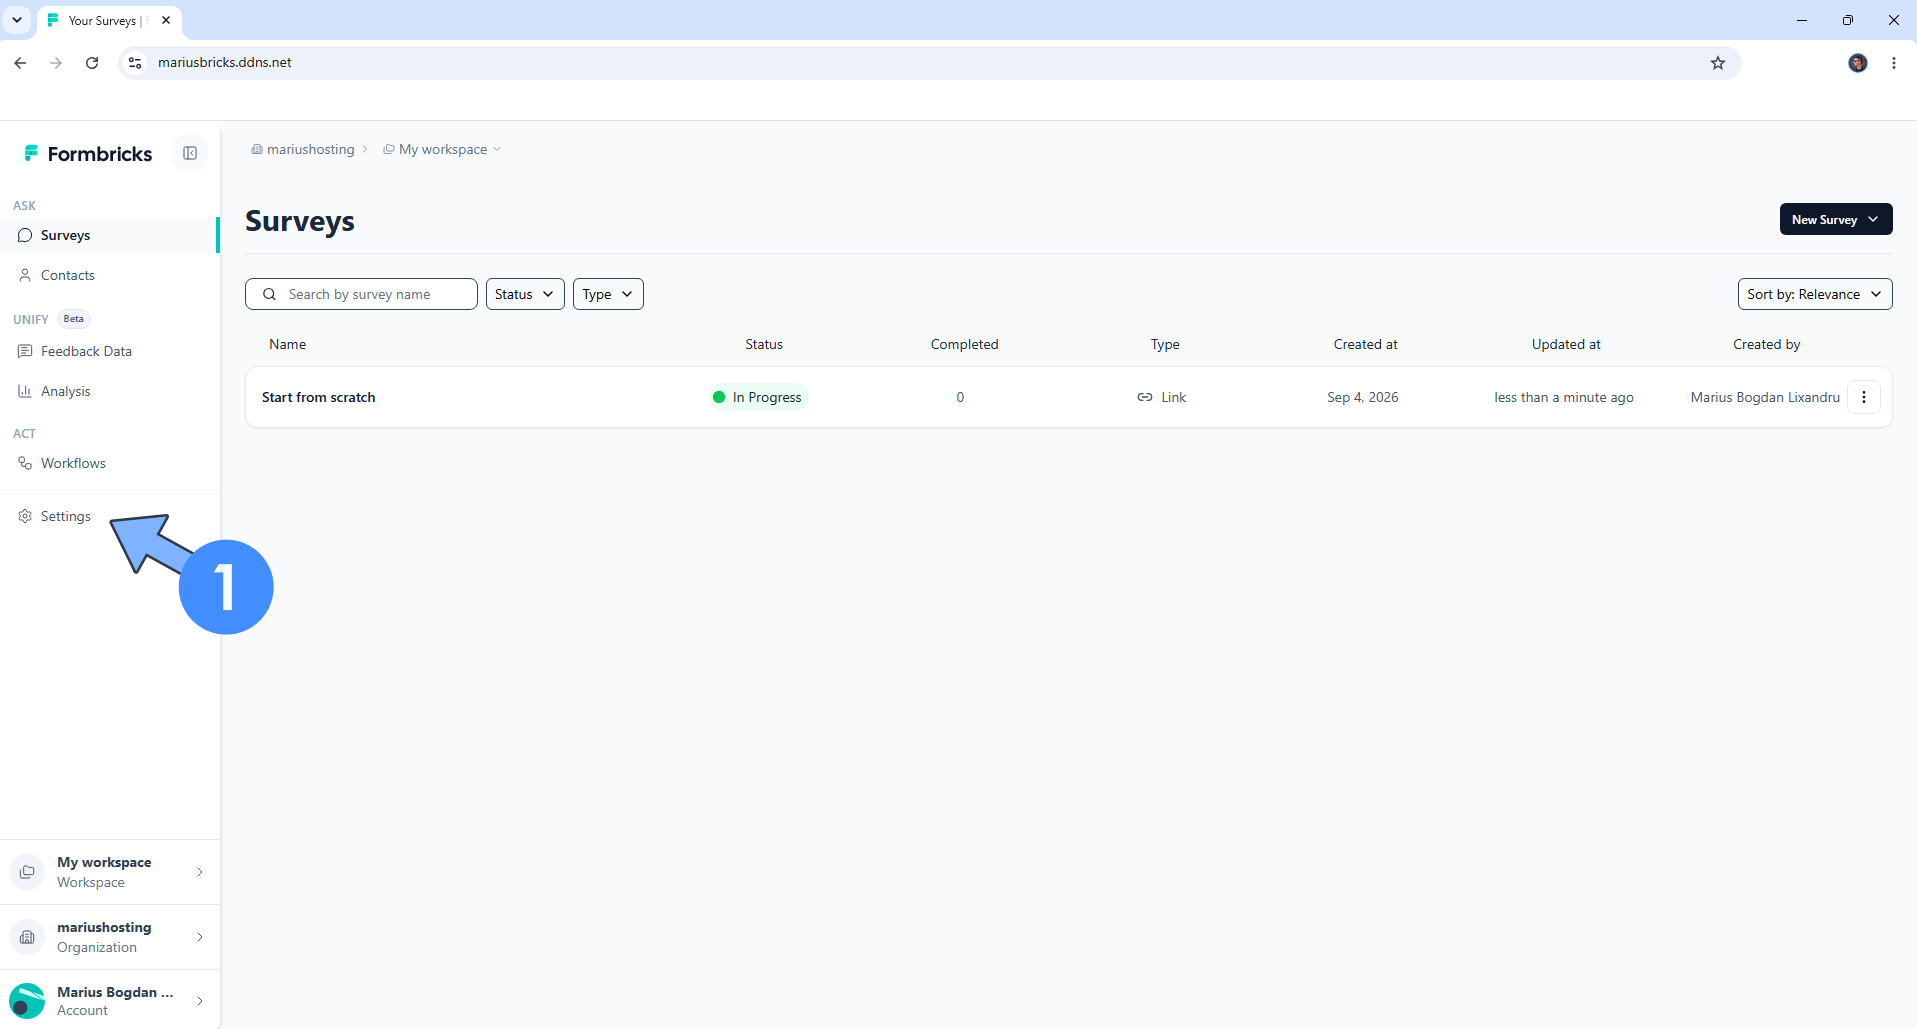
On the left sidebar, click Settings. Follow the instructions in the image below.
STEP 37
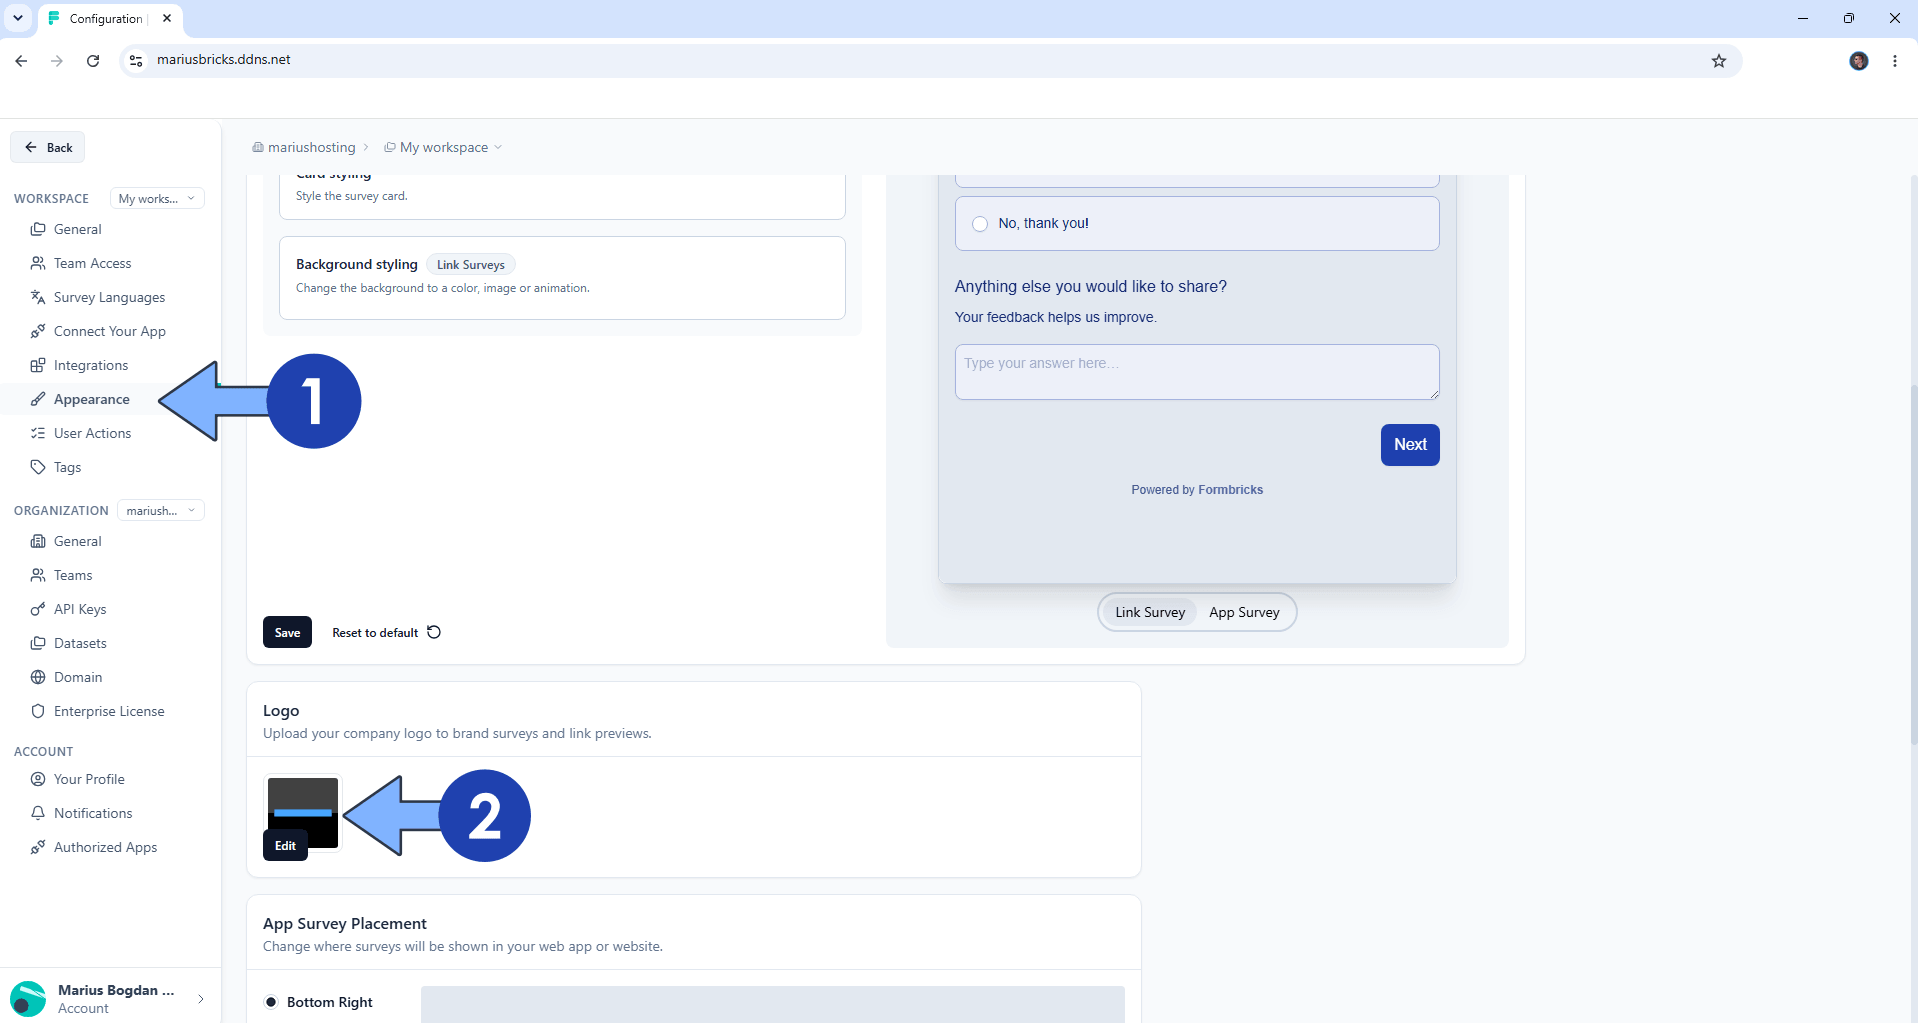
Click Appearance. Upload your own Logo. Follow the instructions in the image below.
Enjoy Formbricks on your UGREEN NAS!
🆘TROUBLESHOOTING
🆙Note/Update/Container: How to Update Your Docker Containers on UGREEN NAS Using Dockhand.
🐳Note: How to Create Docker Shortcuts on Desktop.
🆕Note: How to Update Dockhand to the latest version.
🆕Note: How to Clean Docker with Dockhand.
This post was updated on Sunday / October 11th, 2026 at 6:37 AM