Portainer is a lightweight management UI which allows you to easily manage your Docker host or Swarm cluster. Portainer is meant to be as simple to deploy as it is to use. It consists of a single container that can run on any Docker engine (Docker for Linux, Docker for Synology DSM and Docker for Windows are all supported). Portainer allows you to manage your Docker stacks, containers, images, volumes, networks and more! It is compatible with the standalone Docker engine and with Docker Swarm. In this step by step guide I will show you how to install Portainer on your Synology NAS using Docker. This guide works perfectly for the latest Portainer CE 2.39.0 release.
STEP 1
Please Support My work by Making a Donation.
STEP 2
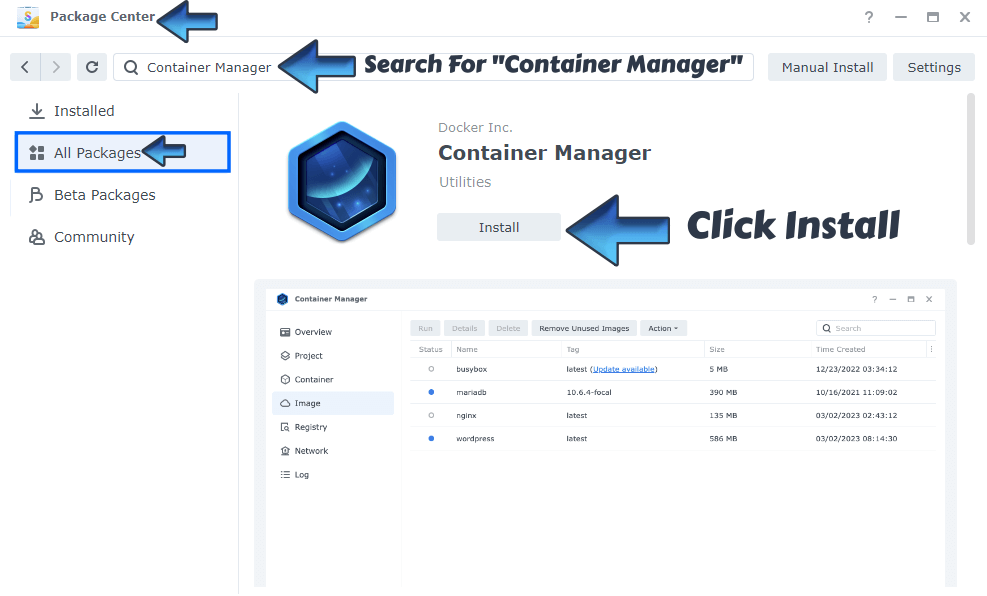
Install Container Manager via Synology “Package Center”. If you run an older DSM version (under 7.2), search for Docker instead of Container Manager.
STEP 3
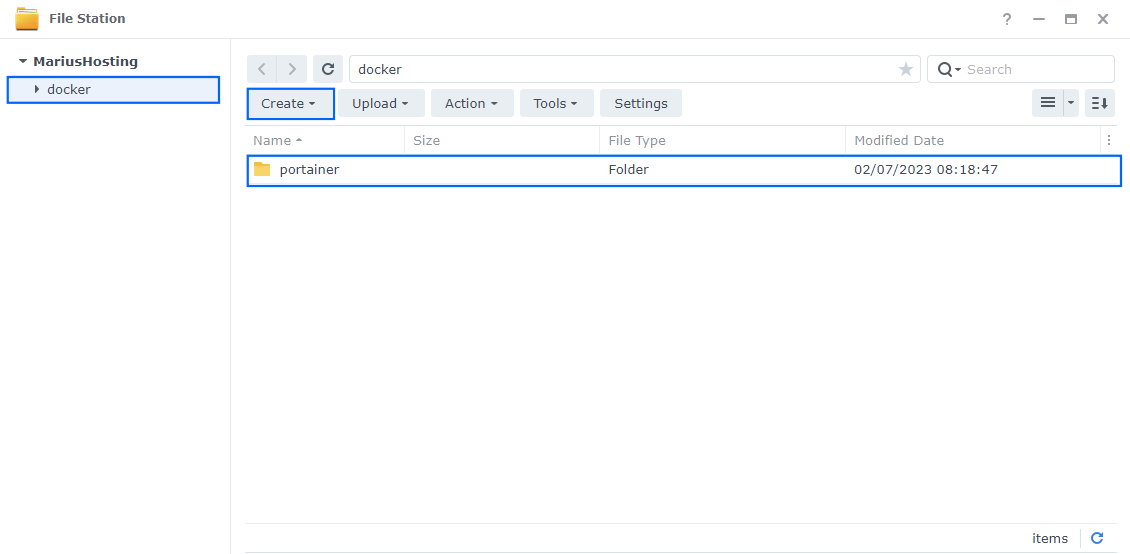
Go to File Station and open the docker folder. Inside the docker folder, create a new folder and name it portainer. Follow the instructions in the images below.
Note: Be careful enter to only lowercase, not uppercase letters.
STEP 4
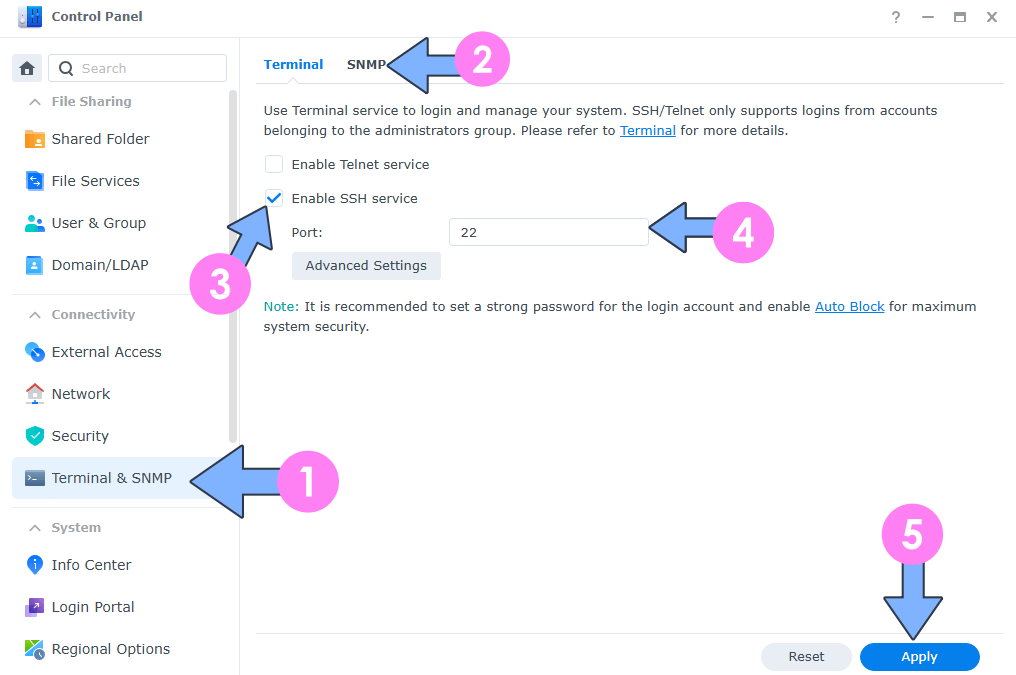
Go to Control Panel / Terminal & SNMP / Terminal tab. Check Enable SSH service on port 22 then click Apply. Follow the instructions in the images below.
STEP 5
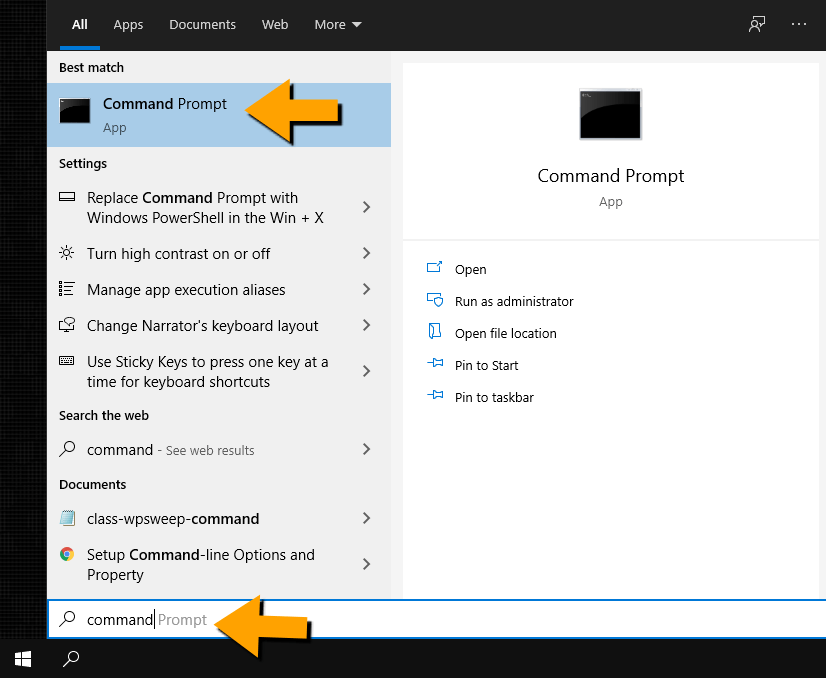
Now open Windows Command Prompt Client. Search for command prompt on your Windows PC. Follow the instructions in the image below. You can also use the PuTTY Client or Mac Z Shell (Client) if you are a Mac user. Refer to this guide if you are a beginner: How to SSH into a Synology NAS
STEP 6
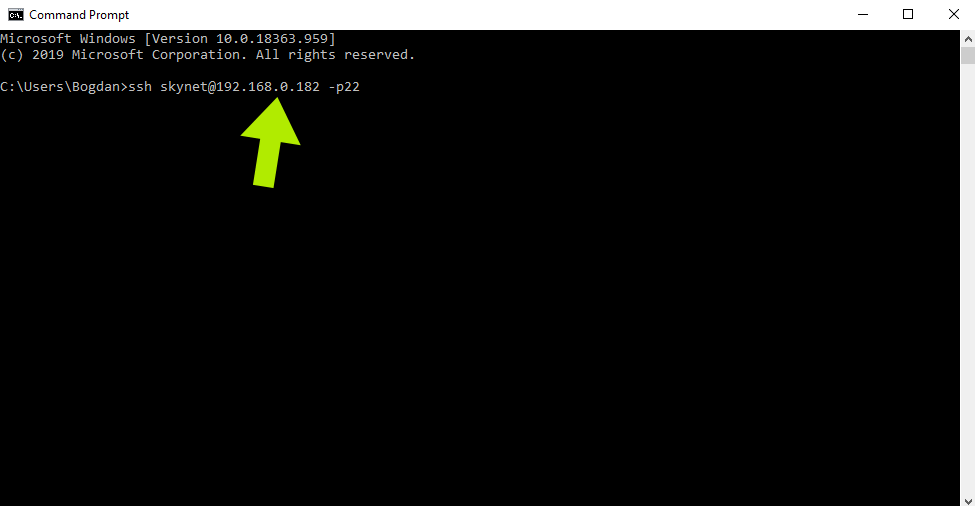
On Windows 11, open Command Prompt or use PuTTY or Mac Z Shell and type ssh yourNASusername@yourNASip -p22 then enter. Follow the instructions in the image below.
STEP 7
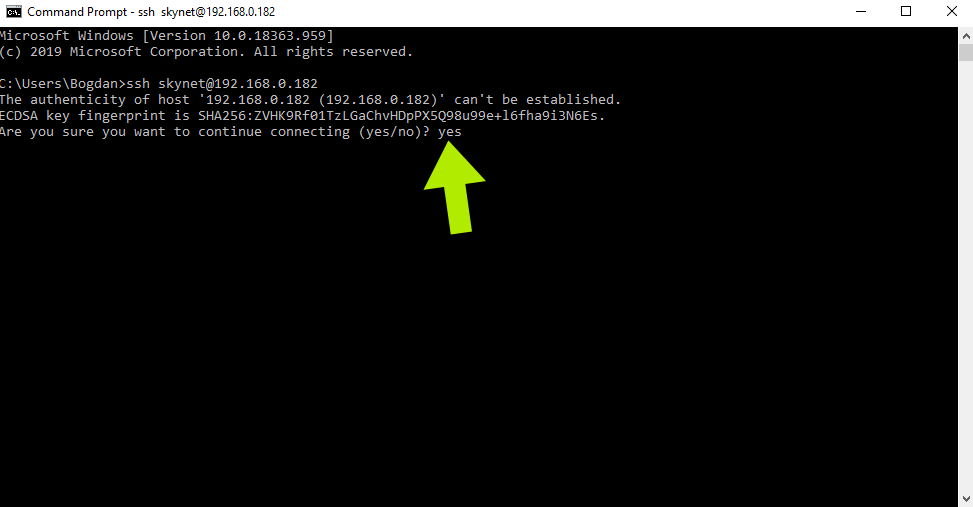
In Command Prompt, this message “Are you sure you want to continue connecting (yes/no)?” can sometimes appear, so type yes then enter. Follow the instructions in the image below.
STEP 8
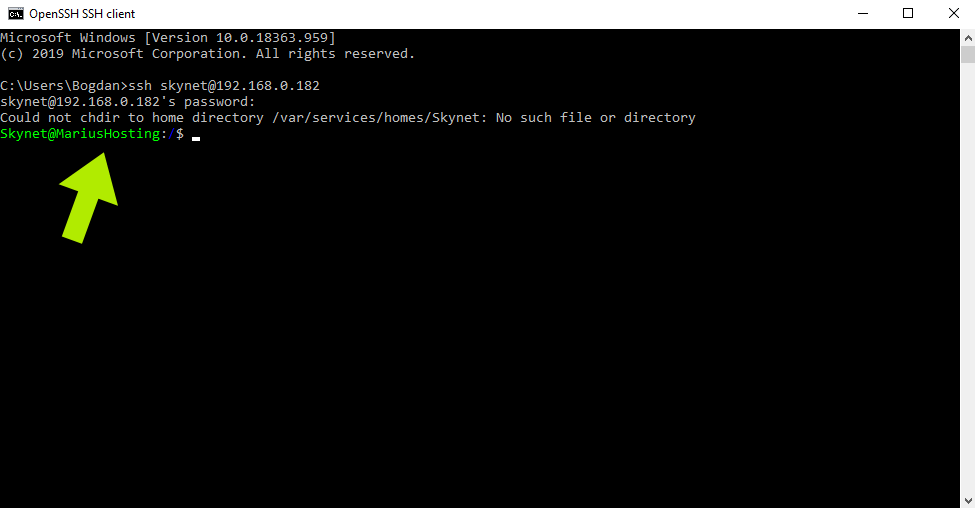
After you press enter, you will be prompted to type in your NAS password. Type it in and press enter. ⚠️Warning: When you enter the password, the command prompt will not show the written password. Just type in your password and hit enter. Follow the instructions in the image below. Your command prompt will look like this:
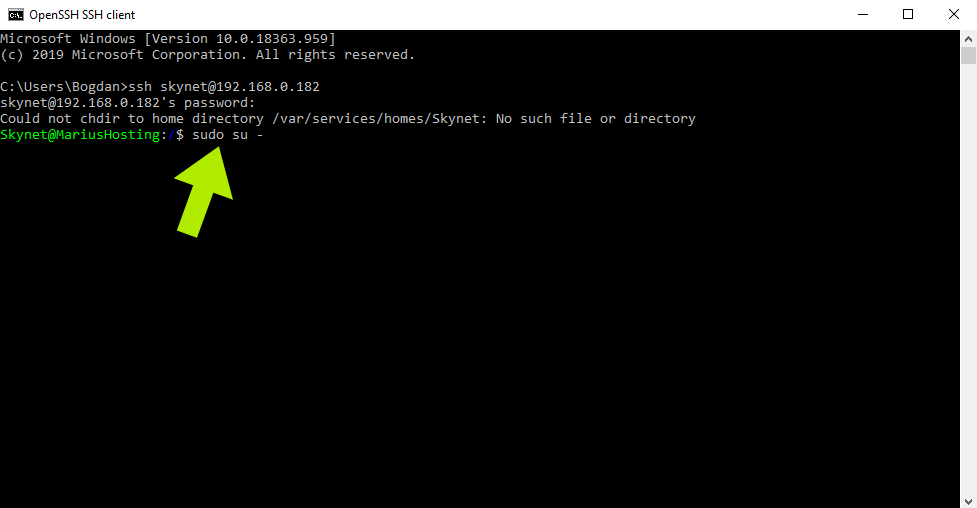
STEP 9
Now type:
sudo su -
Then press enter. Follow the instructions in the image below.
The su command switches to root user with high privileges.
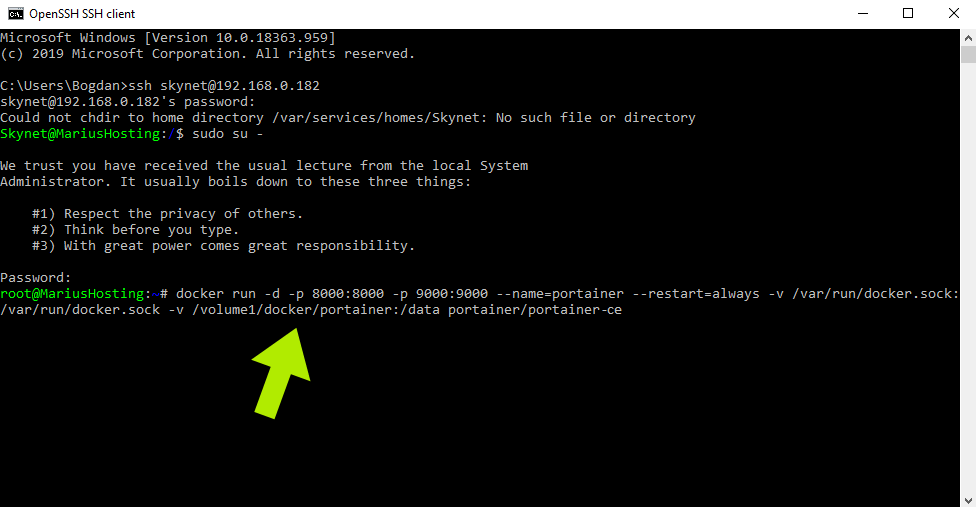
STEP 10
After you press enter, you will be prompted to type in your NAS password then press enter. ⚠️Warning: When you enter the password, the command prompt will not show the written password. Just type in your password and hit enter. Now you have full root access to your NAS. Follow the instructions in the image below.
STEP 11
Copy/Paste the code below in your client then press enter.
docker run -d -p 8000:8000 -p 9000:9000 --name=portainer --restart=always -v /var/run/docker.sock:/var/run/docker.sock -v /volume1/docker/portainer:/data portainer/portainer-ce
Follow the instructions in the image below.
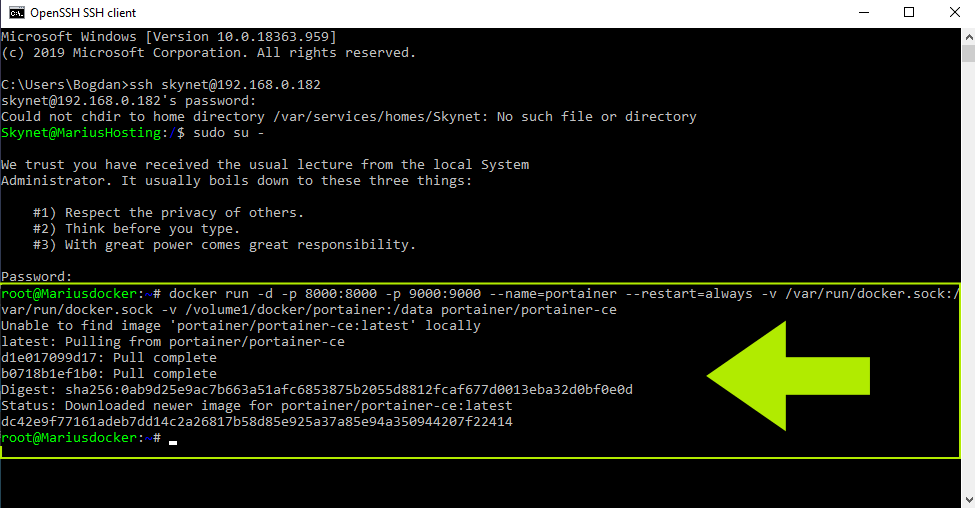
STEP 12
After you press enter, the installation of the docker Portainer image will start and should be done in a few seconds or minutes, depending on your Internet speed connection. Follow the instructions in the image below. At this step, you can also Install Watchtower to automatically update containers on your Docker.
STEP 13
Open your browser and type in http://Synology-ip-address:9000 Follow the instructions in the image below. Choose a Username and a strong Password, confirm the password, then press Create user.

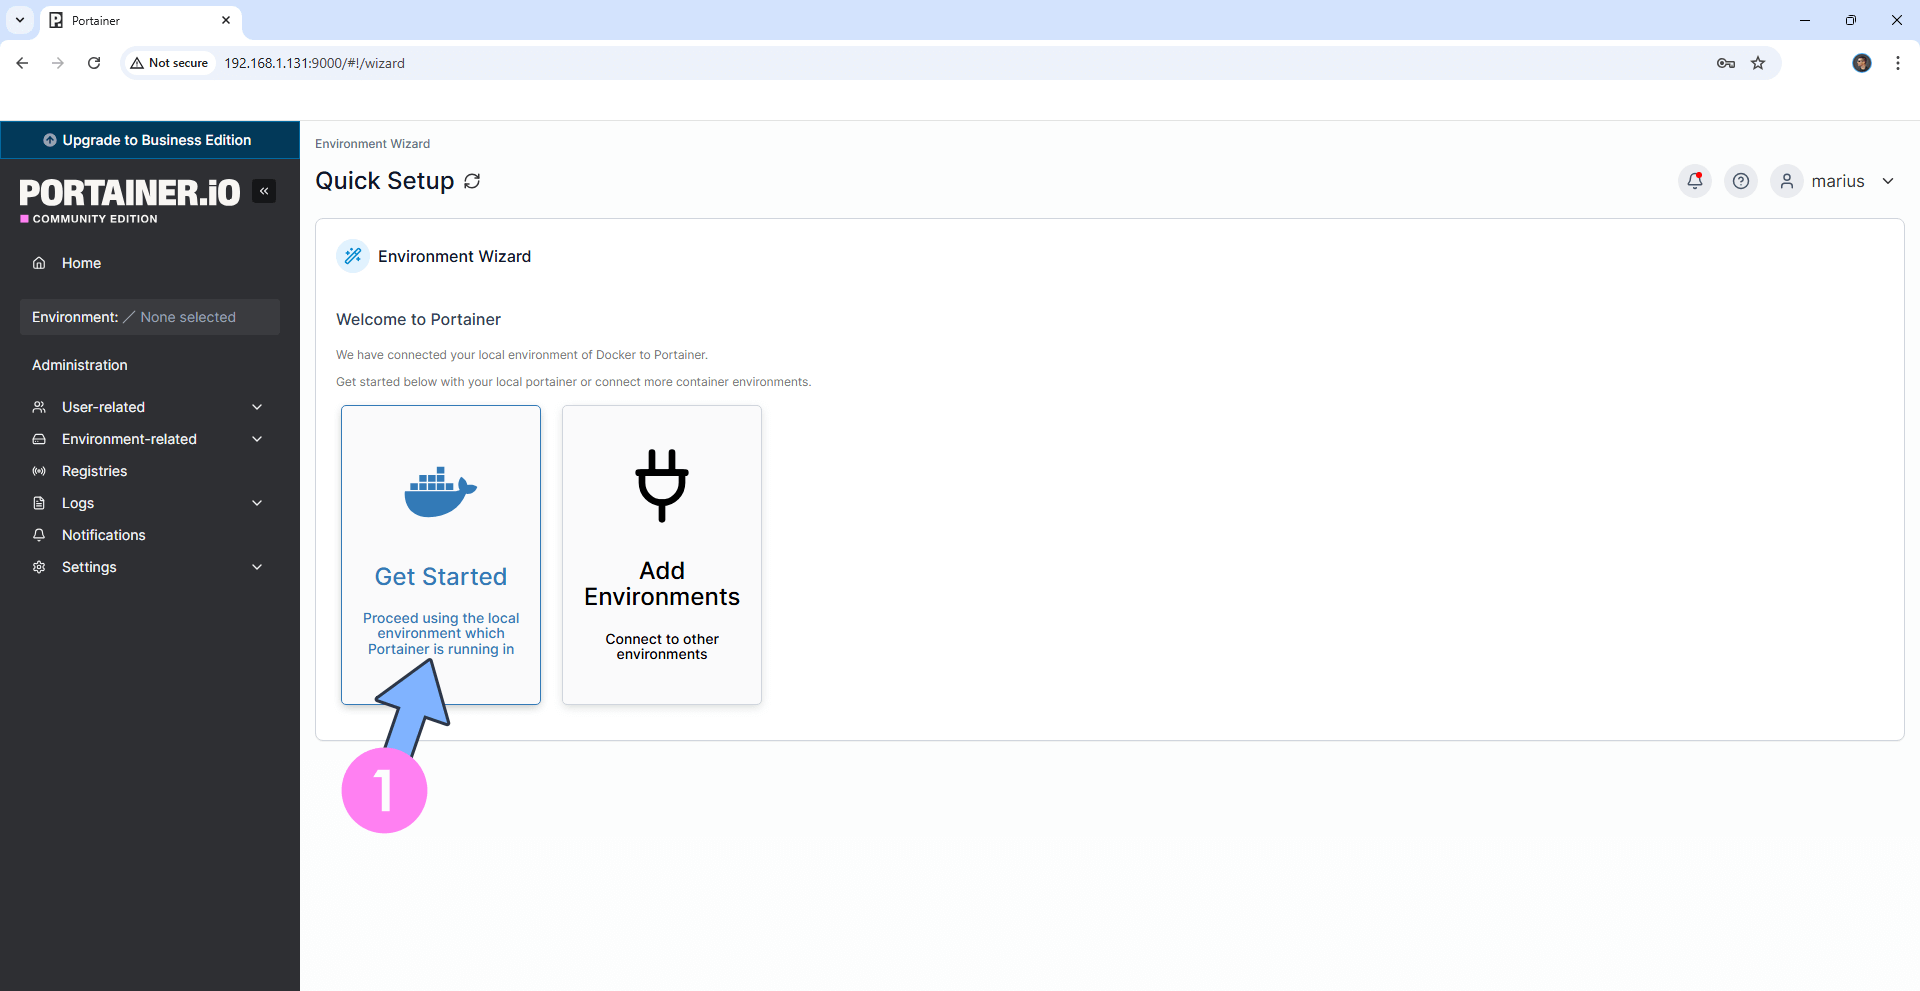
STEP 14
Click Get Started (proceed using the local environment in which Portainer is running in). Follow the instructions in the image below.
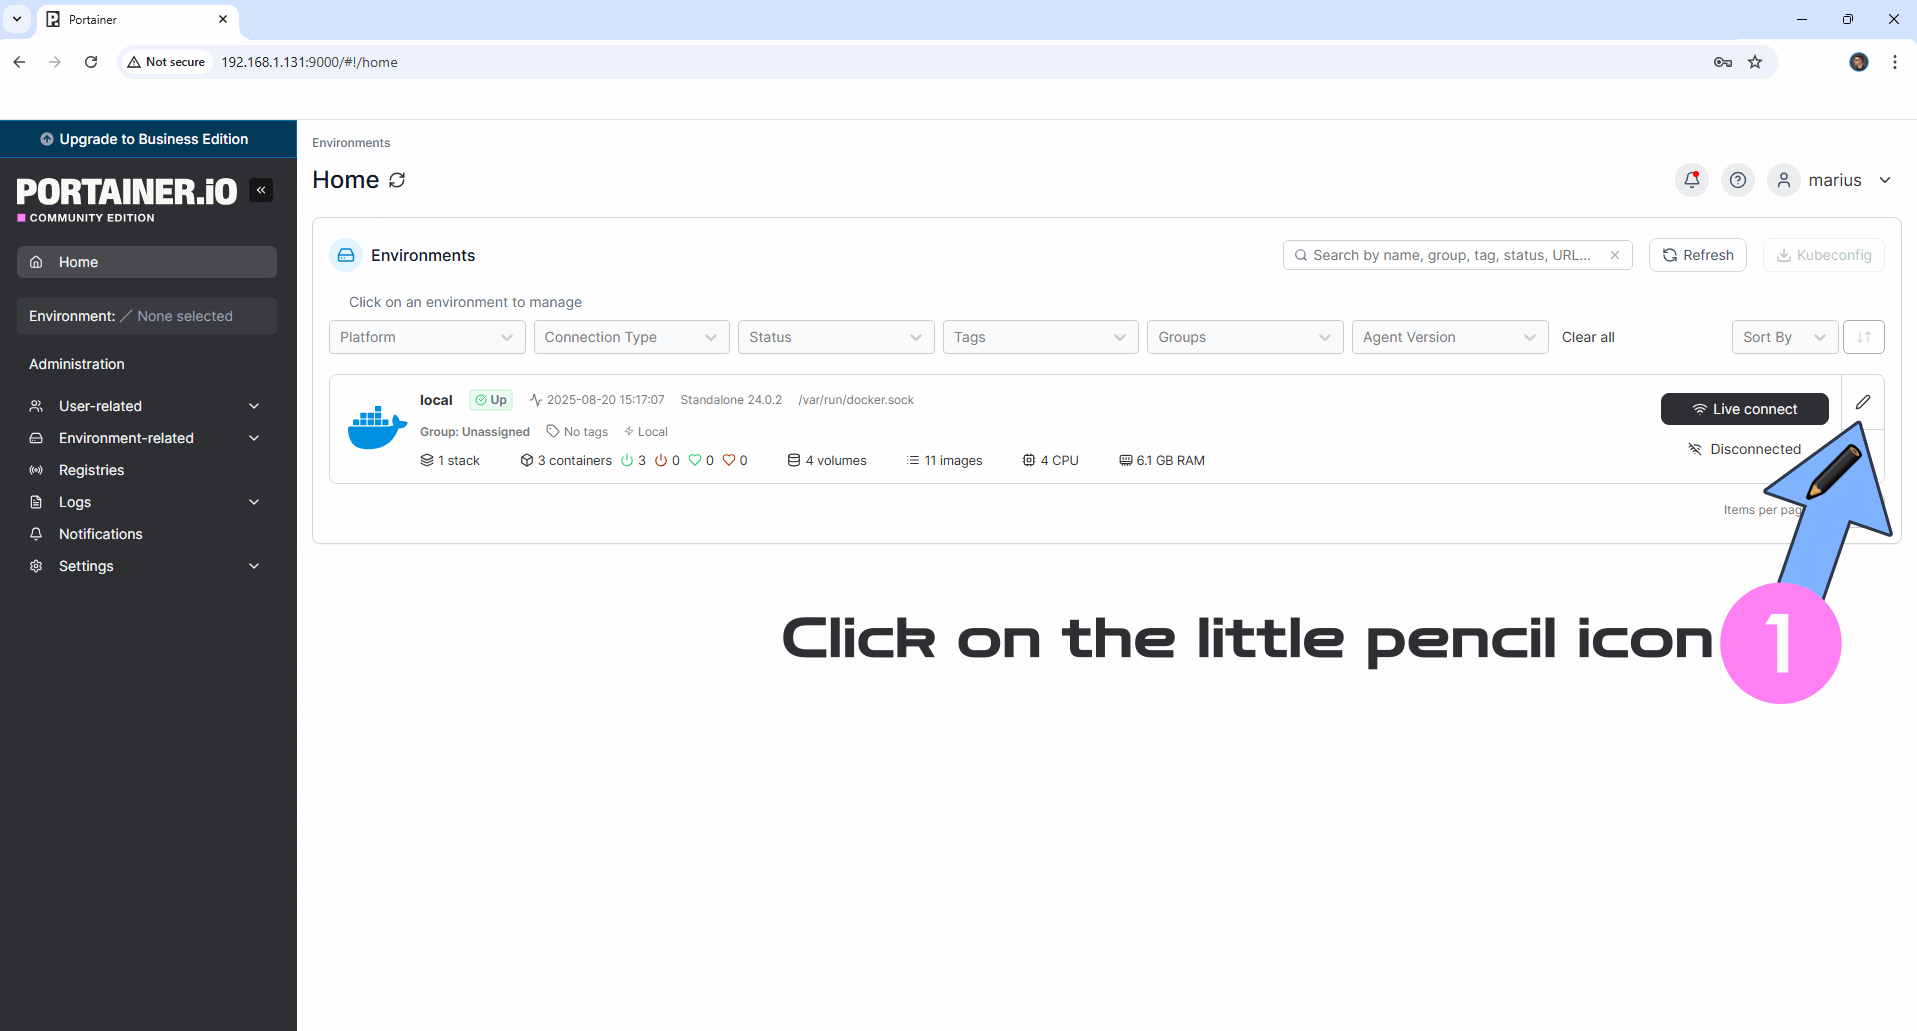
STEP 15
On the right in the Environments are, click on the little pencil icon. Follow the instructions in the image below.
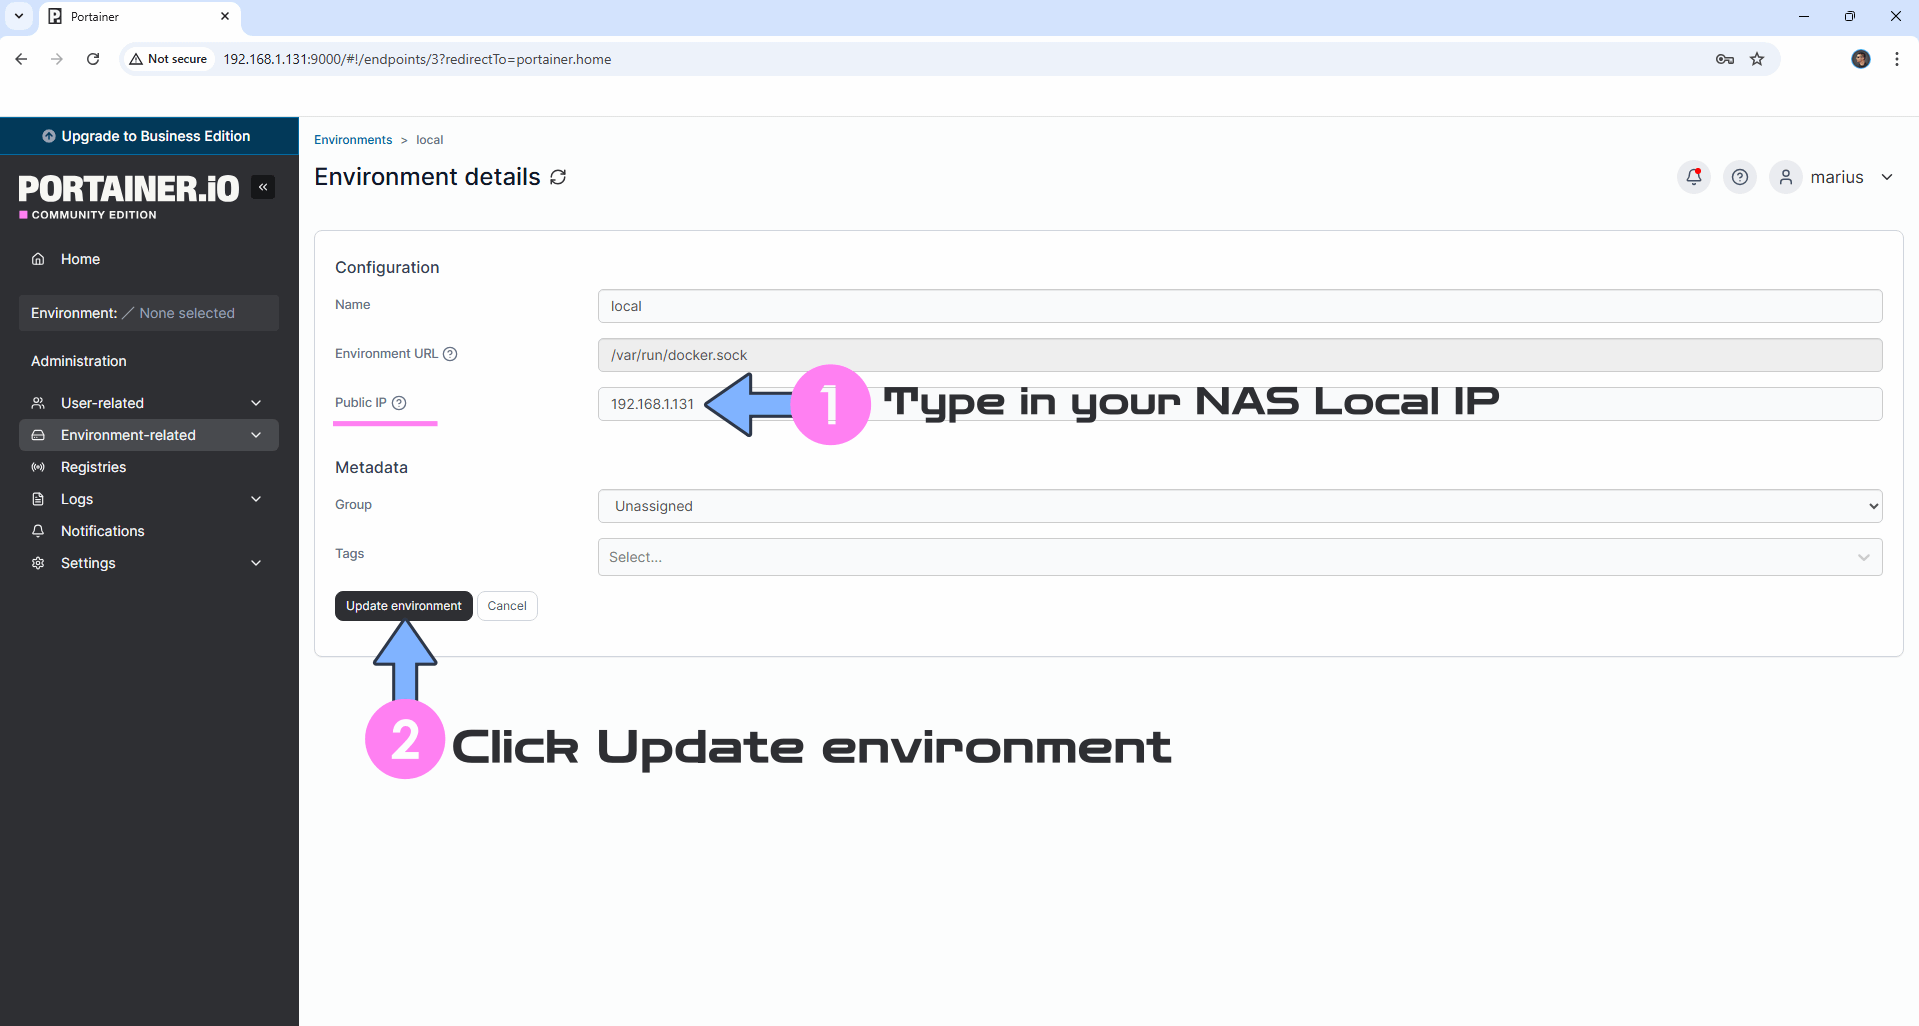
STEP 16
After you click on the little pencil icon, a new page will open. On the Public IP area, type in your own NAS Local IP which, in my case, is 192.168.1.131 then click Update environment. Follow the instructions in the image below.
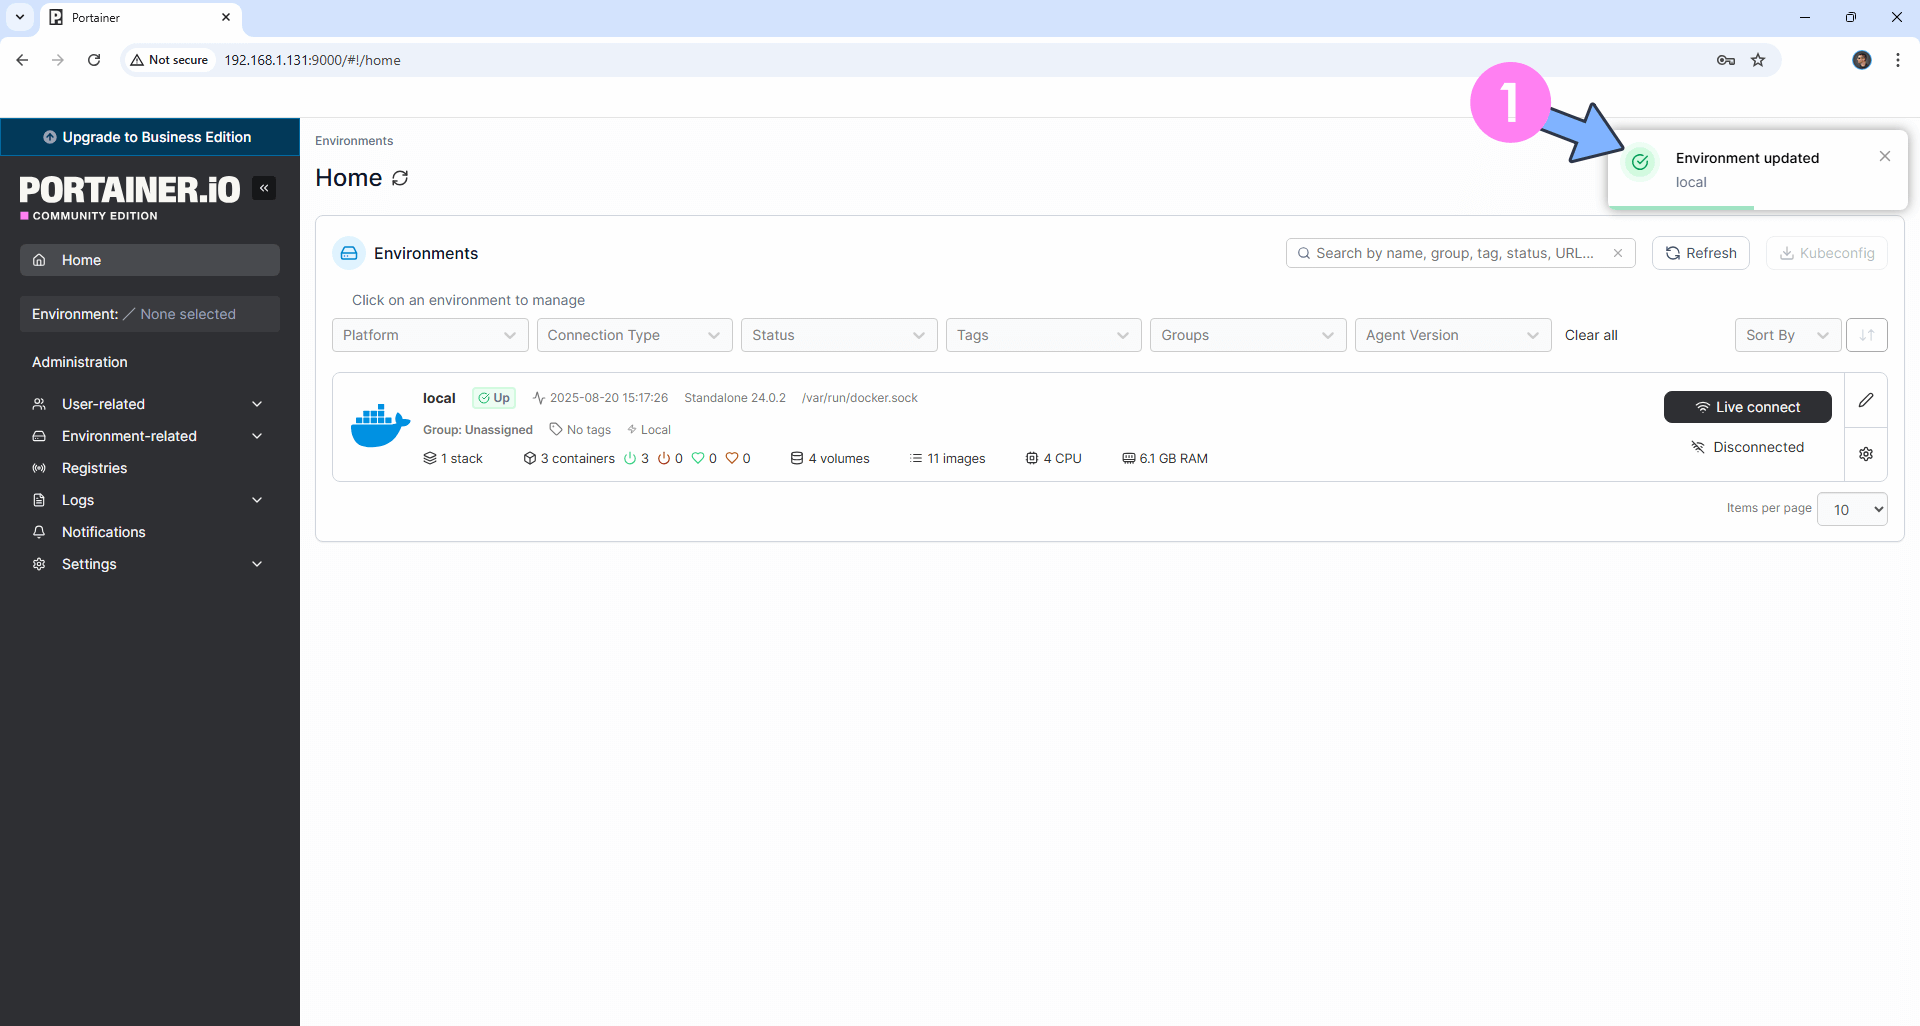
STEP 17
If everything goes right, you will see this message at the top right of your screen: “Environment updated“. Go straight to the next STEP.
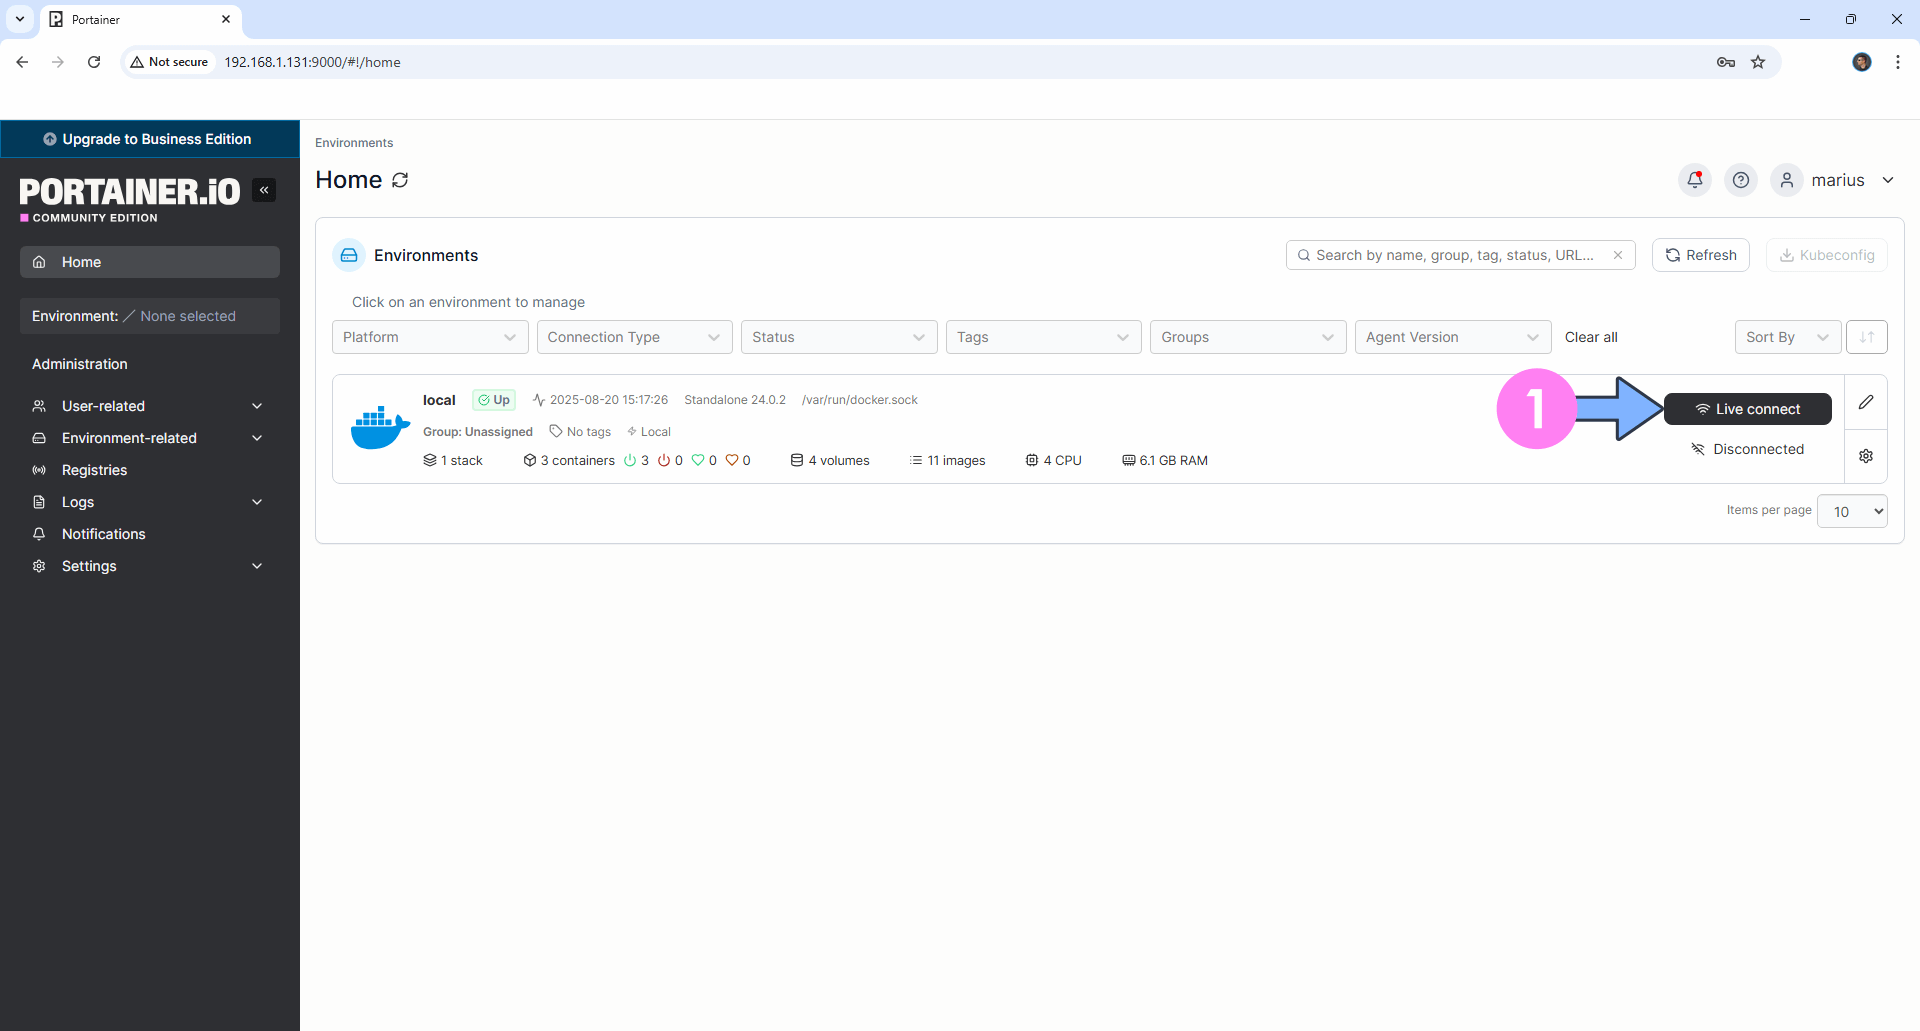
STEP 18
Click Live connect. Follow the instructions in the image below.
STEP 19
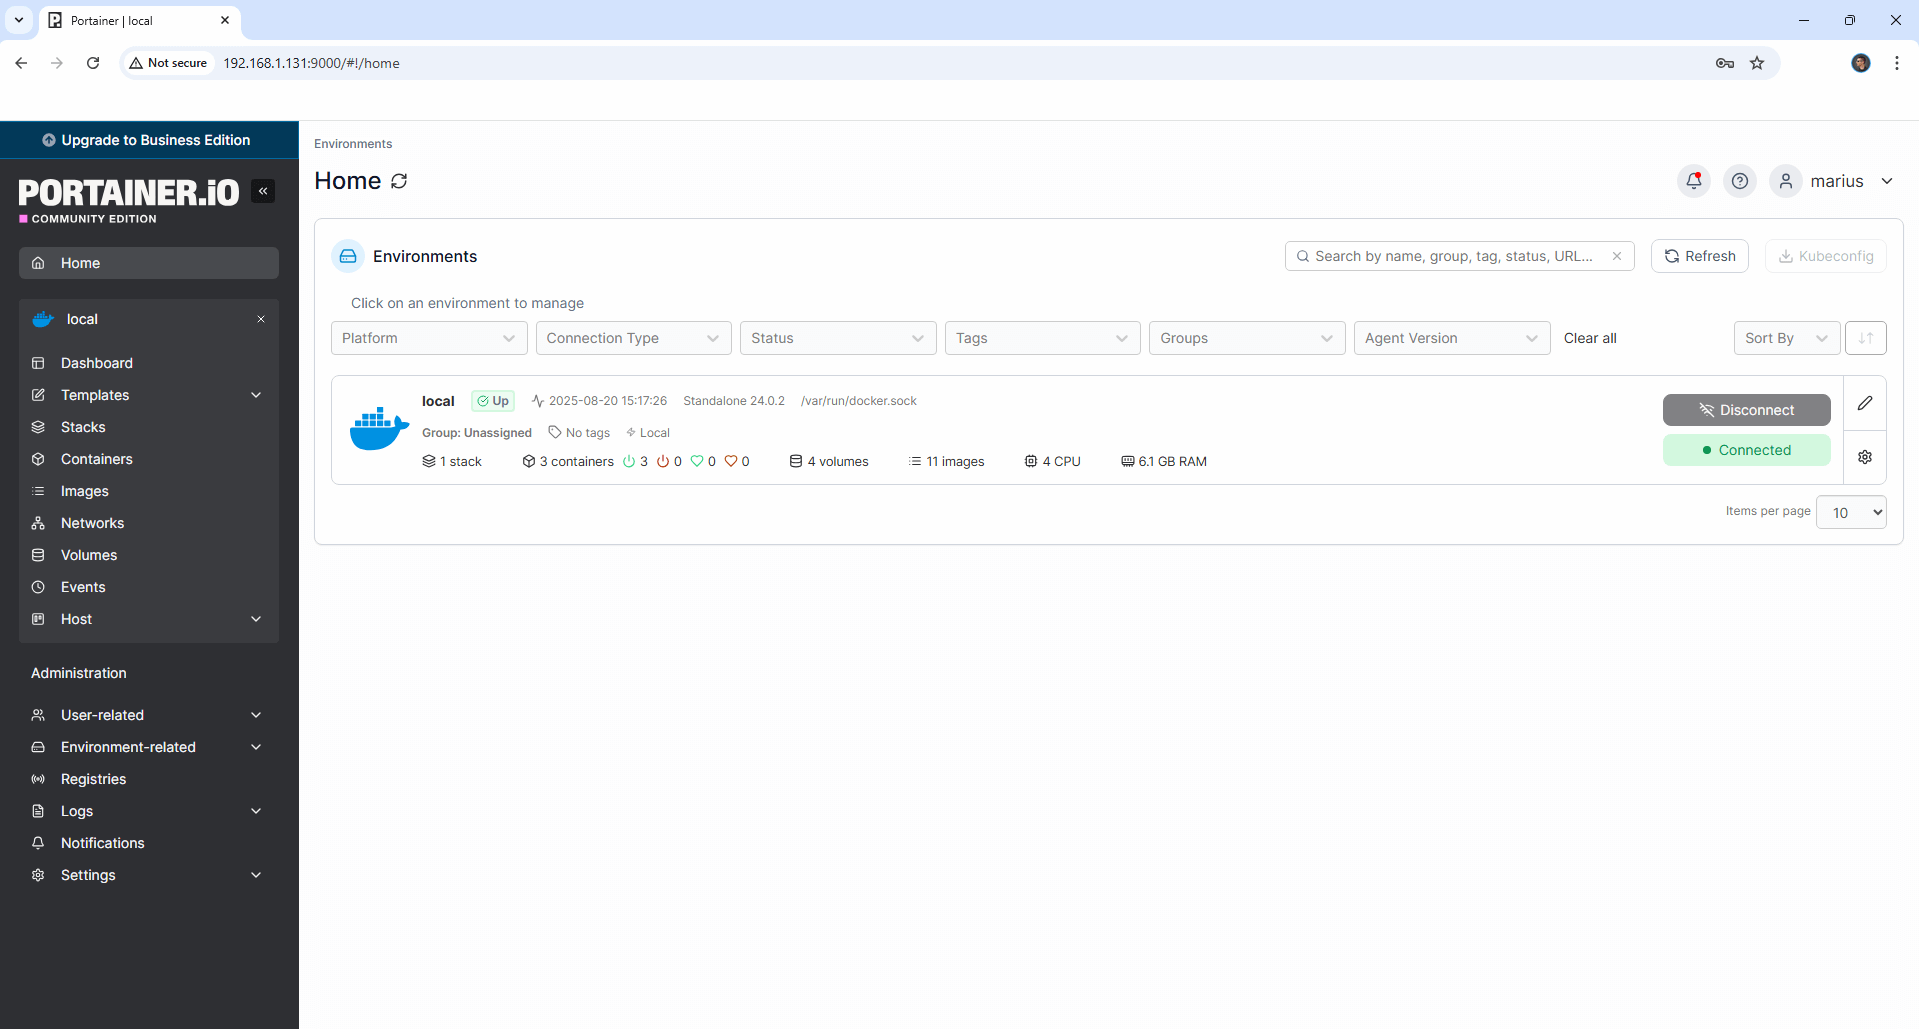
Your Dashboard will look like this. Go straight to the next STEP.
STEP 20
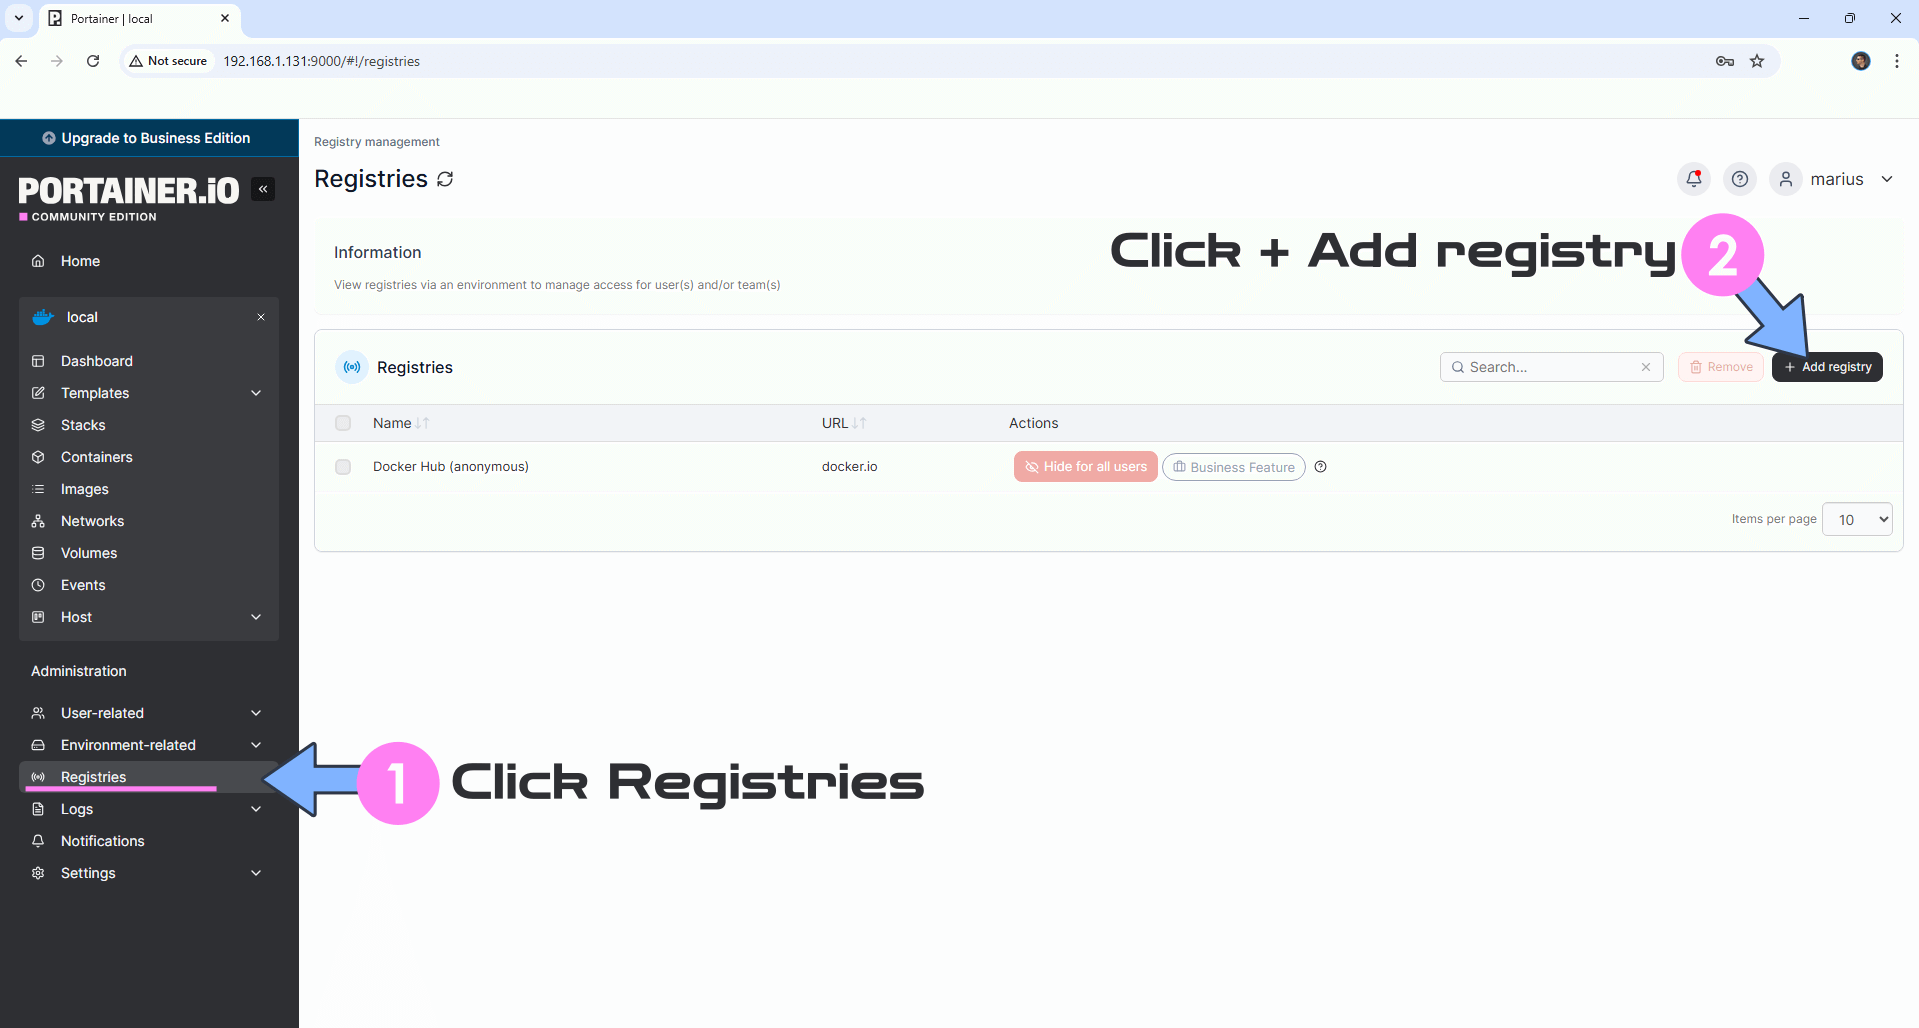
On the left Portainer sidebar, click on Registries then Click + Add registry. Follow the instructions in the image below.
STEP 21
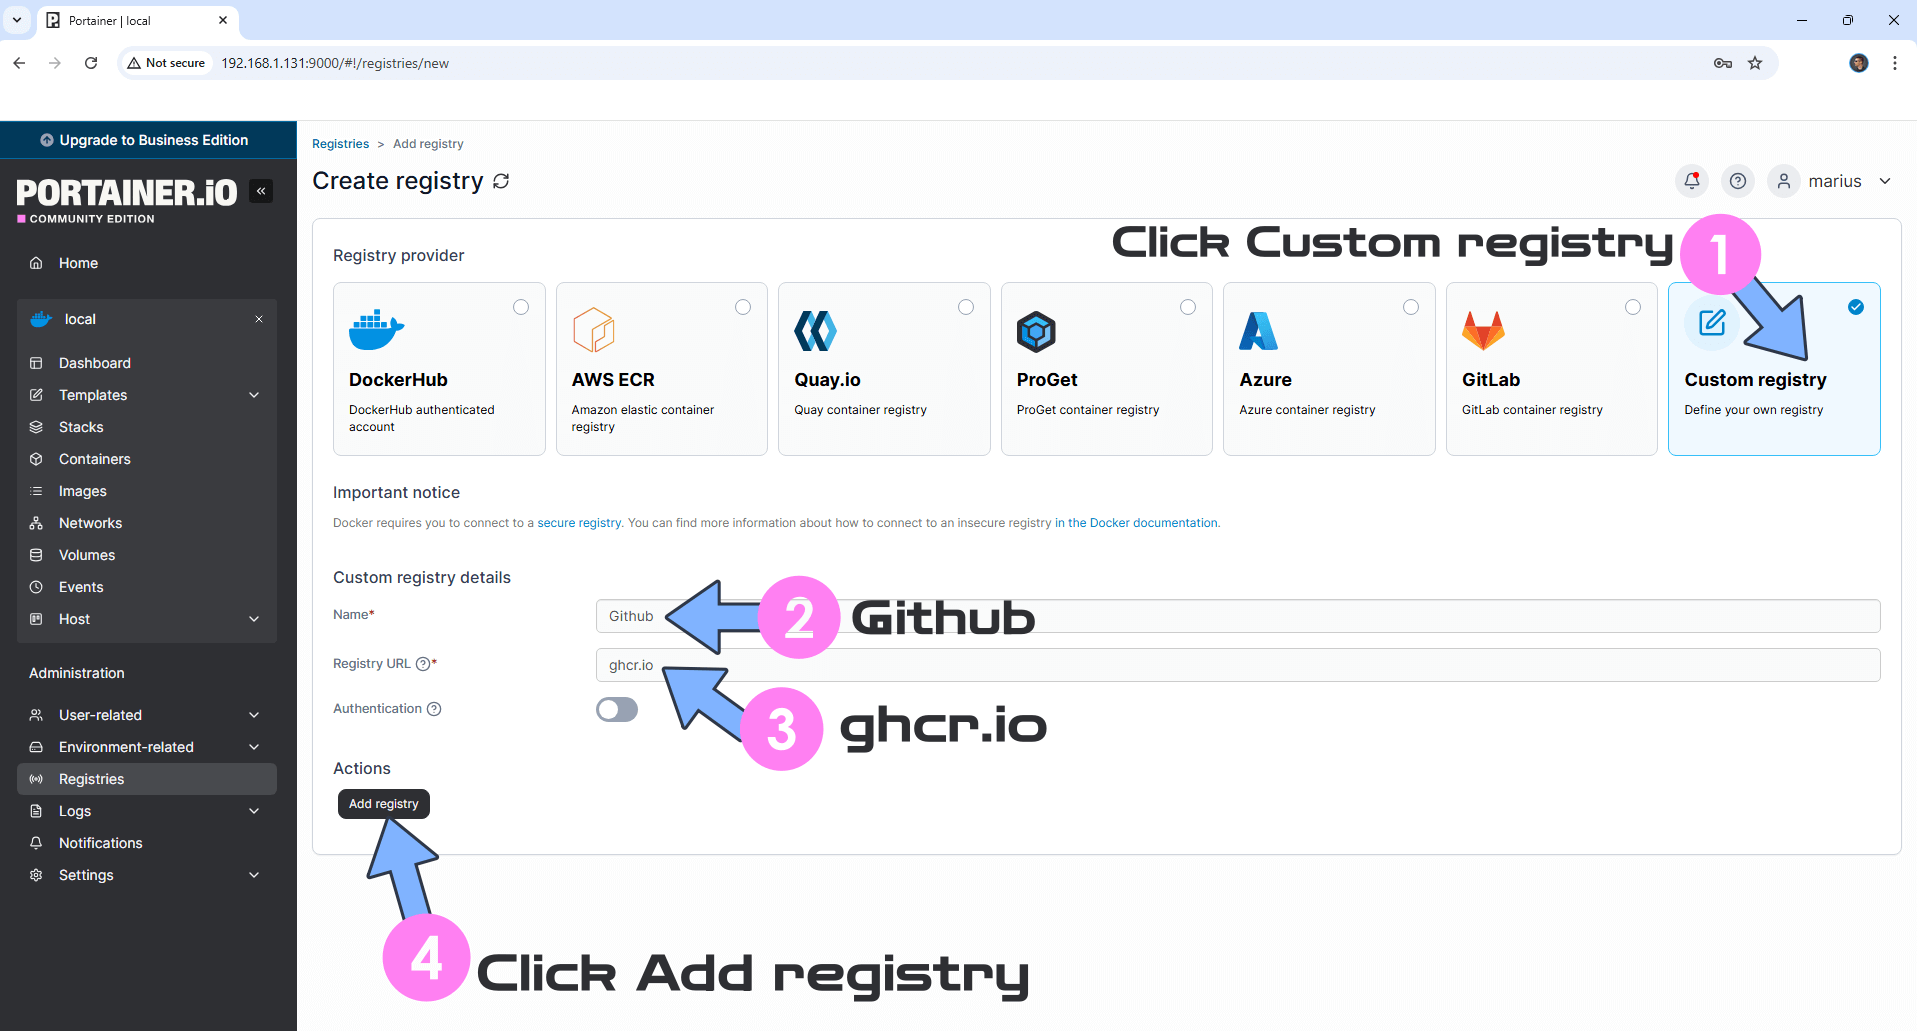
Click on Custom registry. In the Name field area type in Github and in the Registry URL area type in ghcr.io
Click Add registry to save the settings. Follow the instructions in the image below.
Note: The ghcr.io registry is mandatory if you want to update Docker containers via Portainer that are served via the Github registry.
Click on +Add registry then Custom registry. In the Name field area type in CODEBERG and in the Registry URL area type in codeberg.org
Click Add registry to save the settings. Follow the instructions in the image below.
Note: The codeberg.org registry is mandatory if you want to update Docker containers via Portainer that are served via the codeberg.org registry.
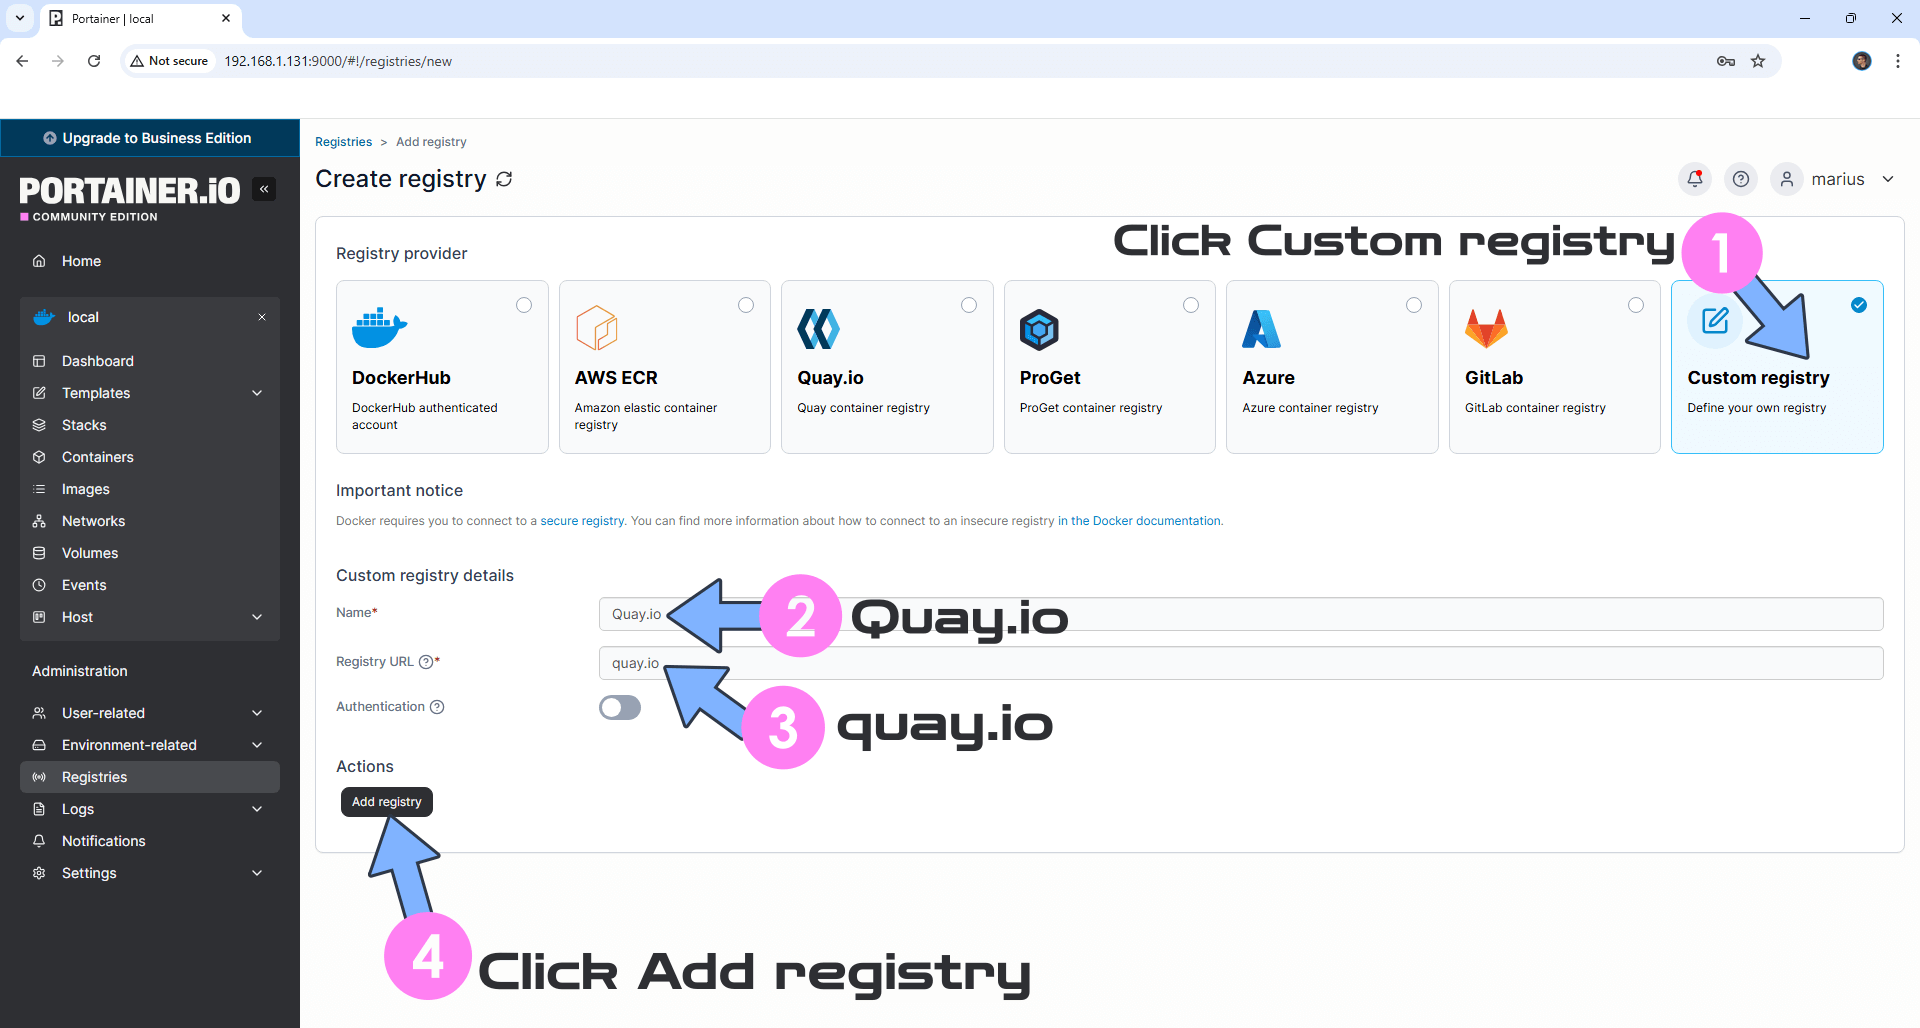
Click on +Add registry then Custom registry. In the Name field area type in Quay.io and in the Registry URL area type in quay.io
Click Add registry to save the settings. Follow the instructions in the image below.
Note: The quay.io registry is mandatory if you want to update Docker containers via Portainer that are served via the quay.io registry.

STEP 22
If everything goes right, your Registries area will look like this. Go straight to the next STEP.

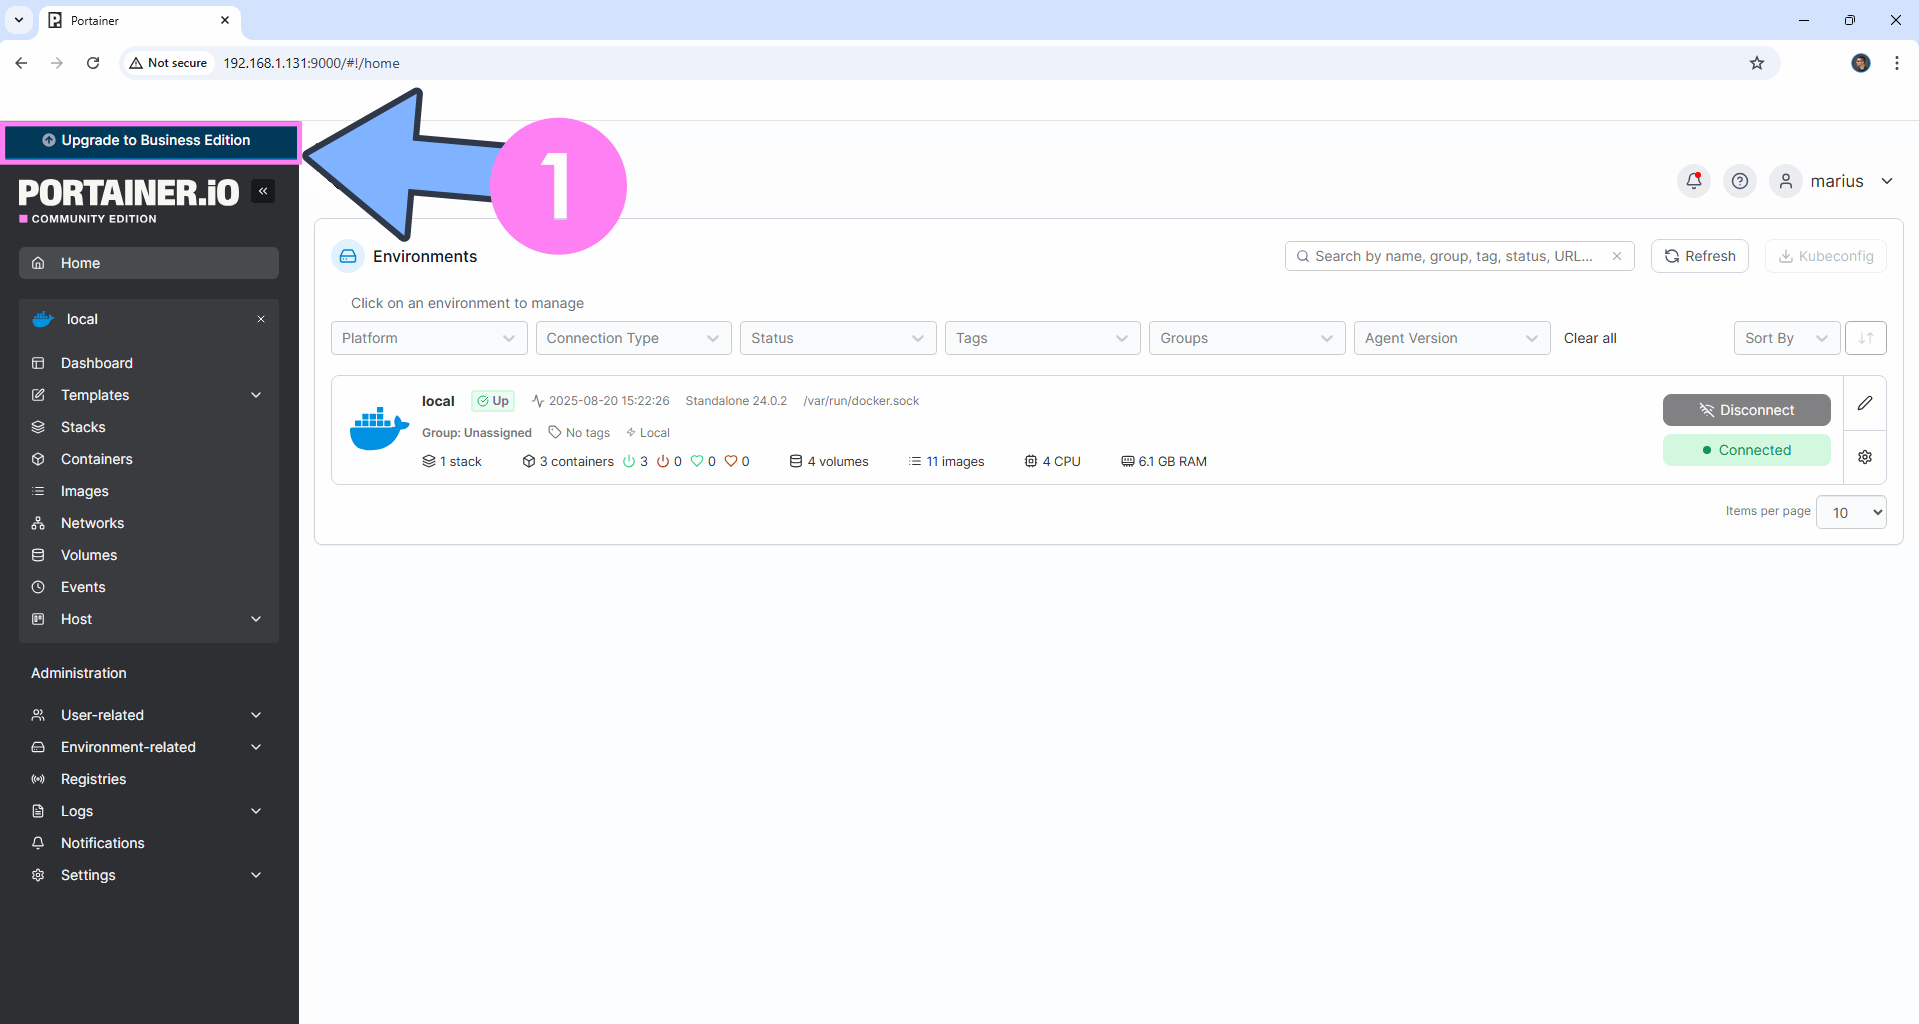
STEP 23
Follow the steps below to remove the blue attention seeker “Upgrade to Business Edition” button.
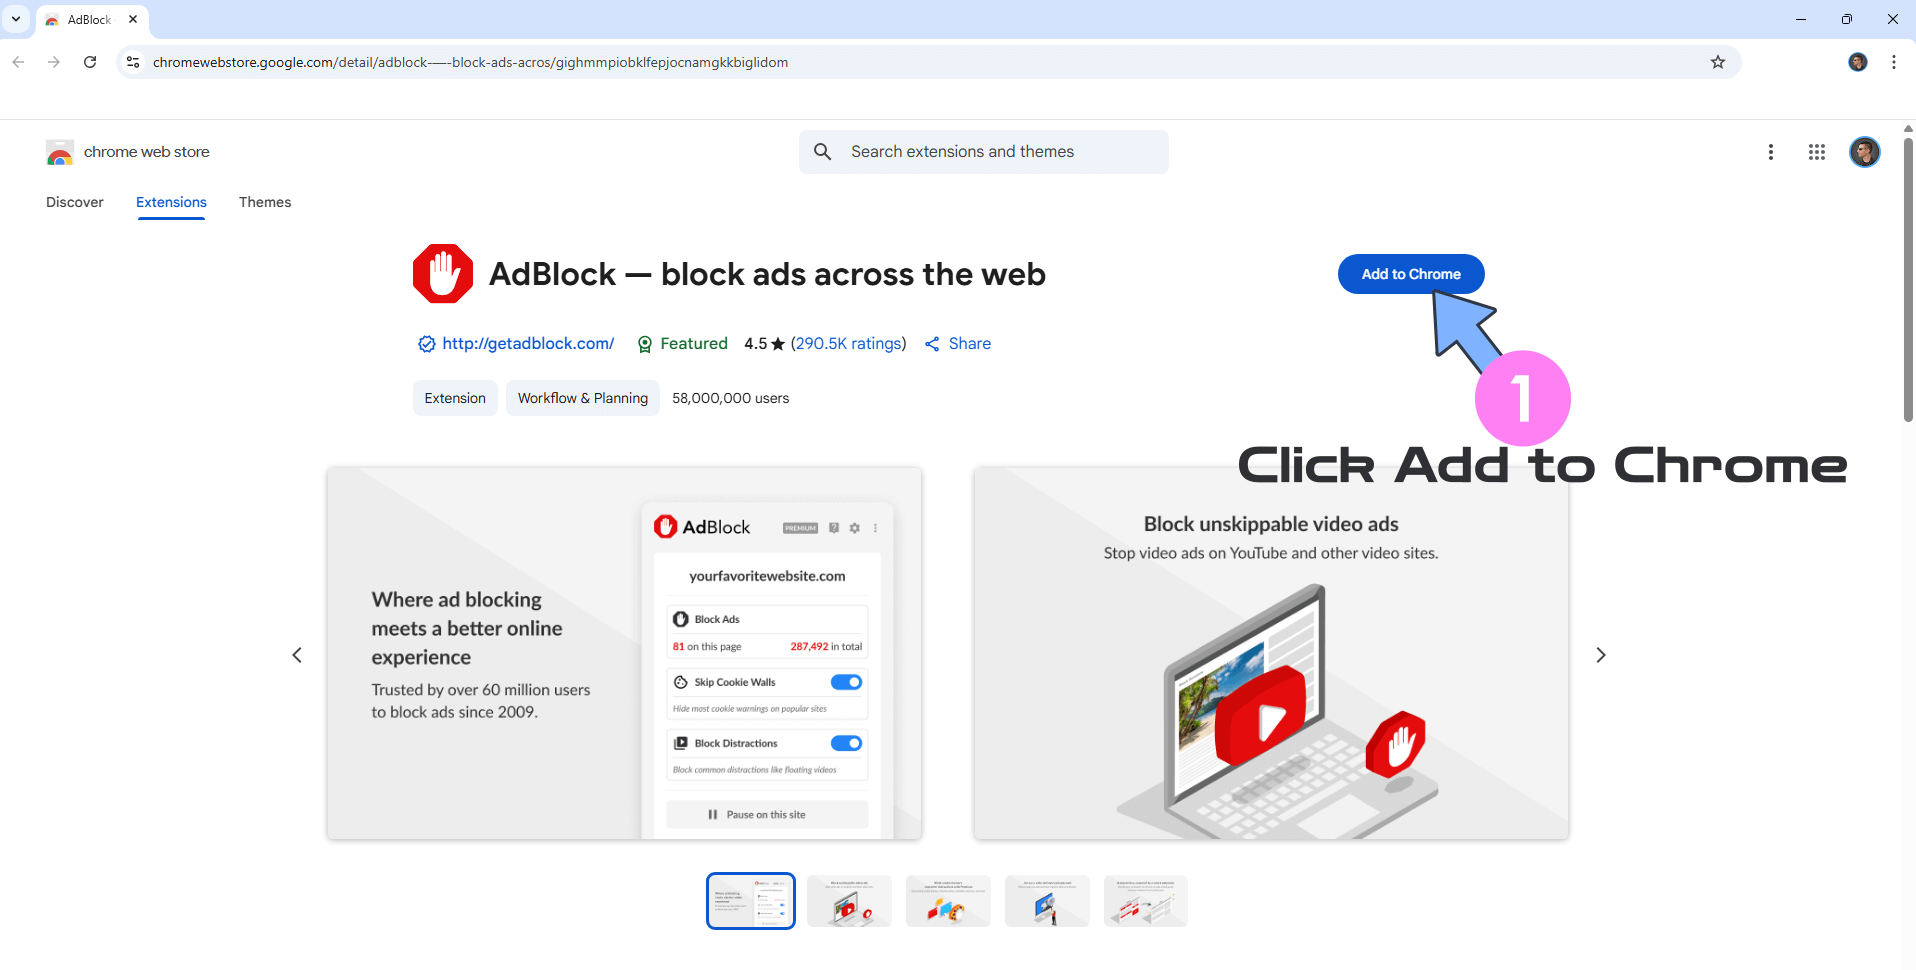
Download (click on the blue link below) the adBlocker extension for Chrome. Click to Add to Chrome. Follow the instructions in the image below.
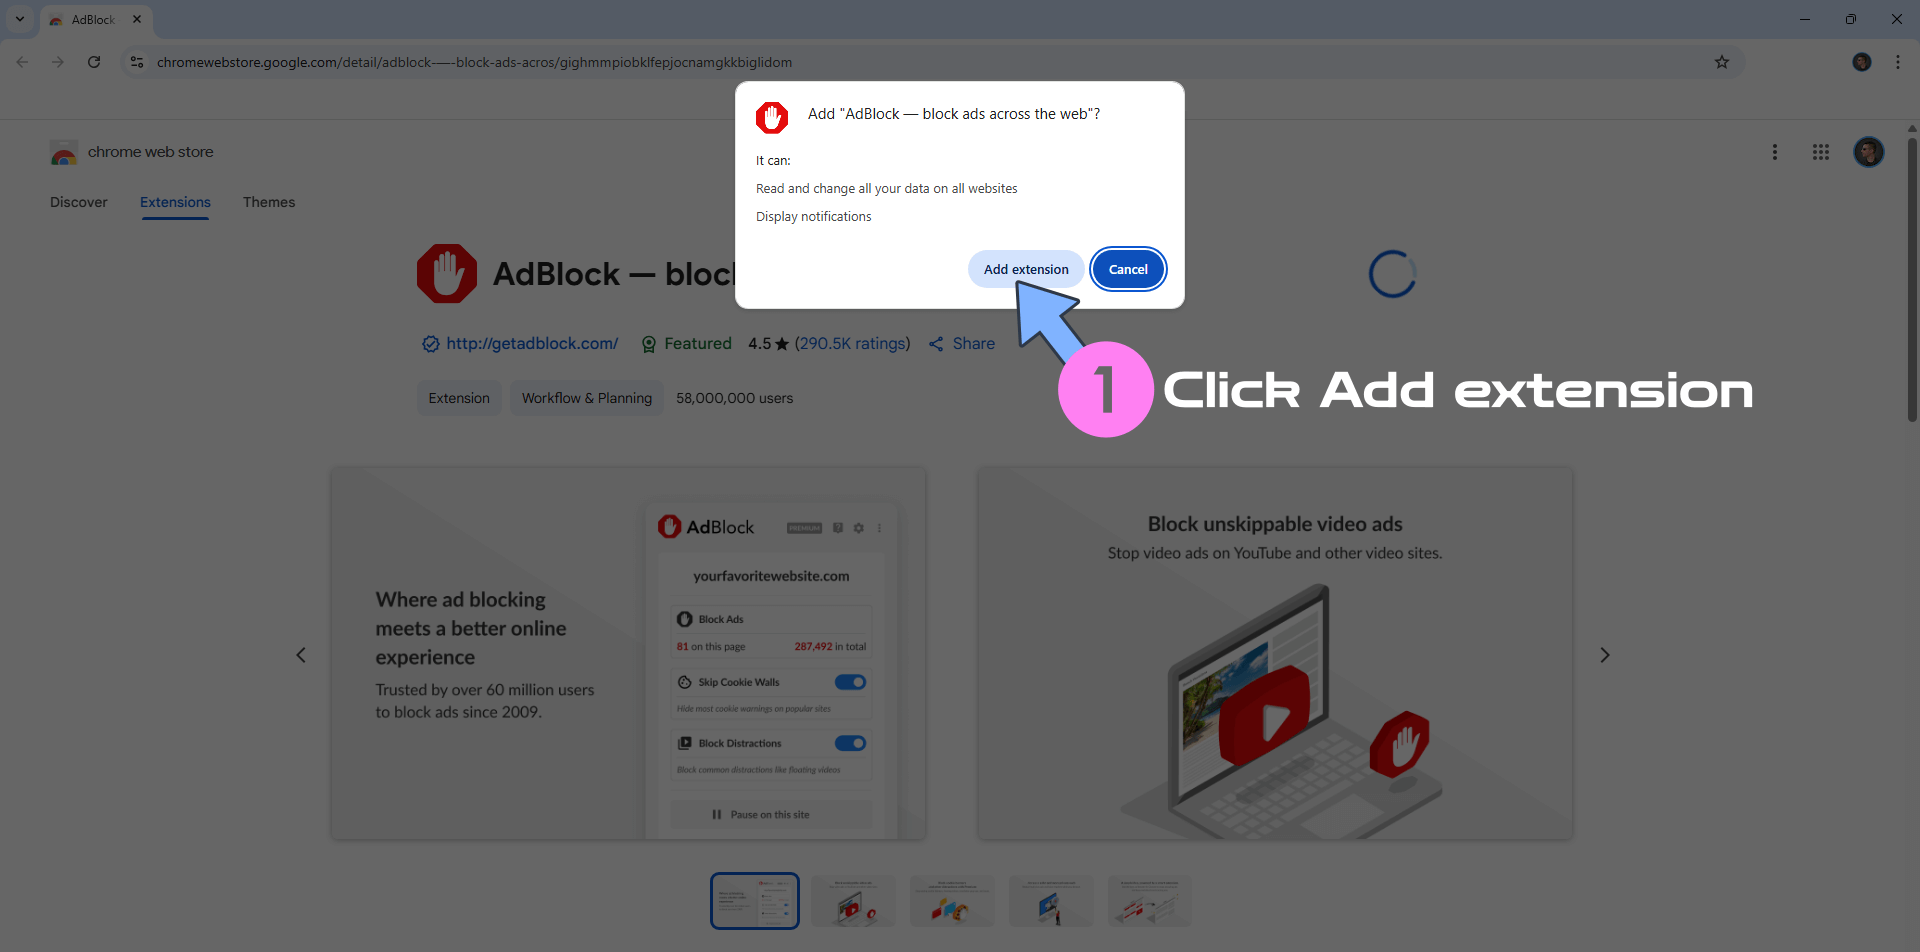
Click Add extension. Follow the instructions in the image below.
STEP 24
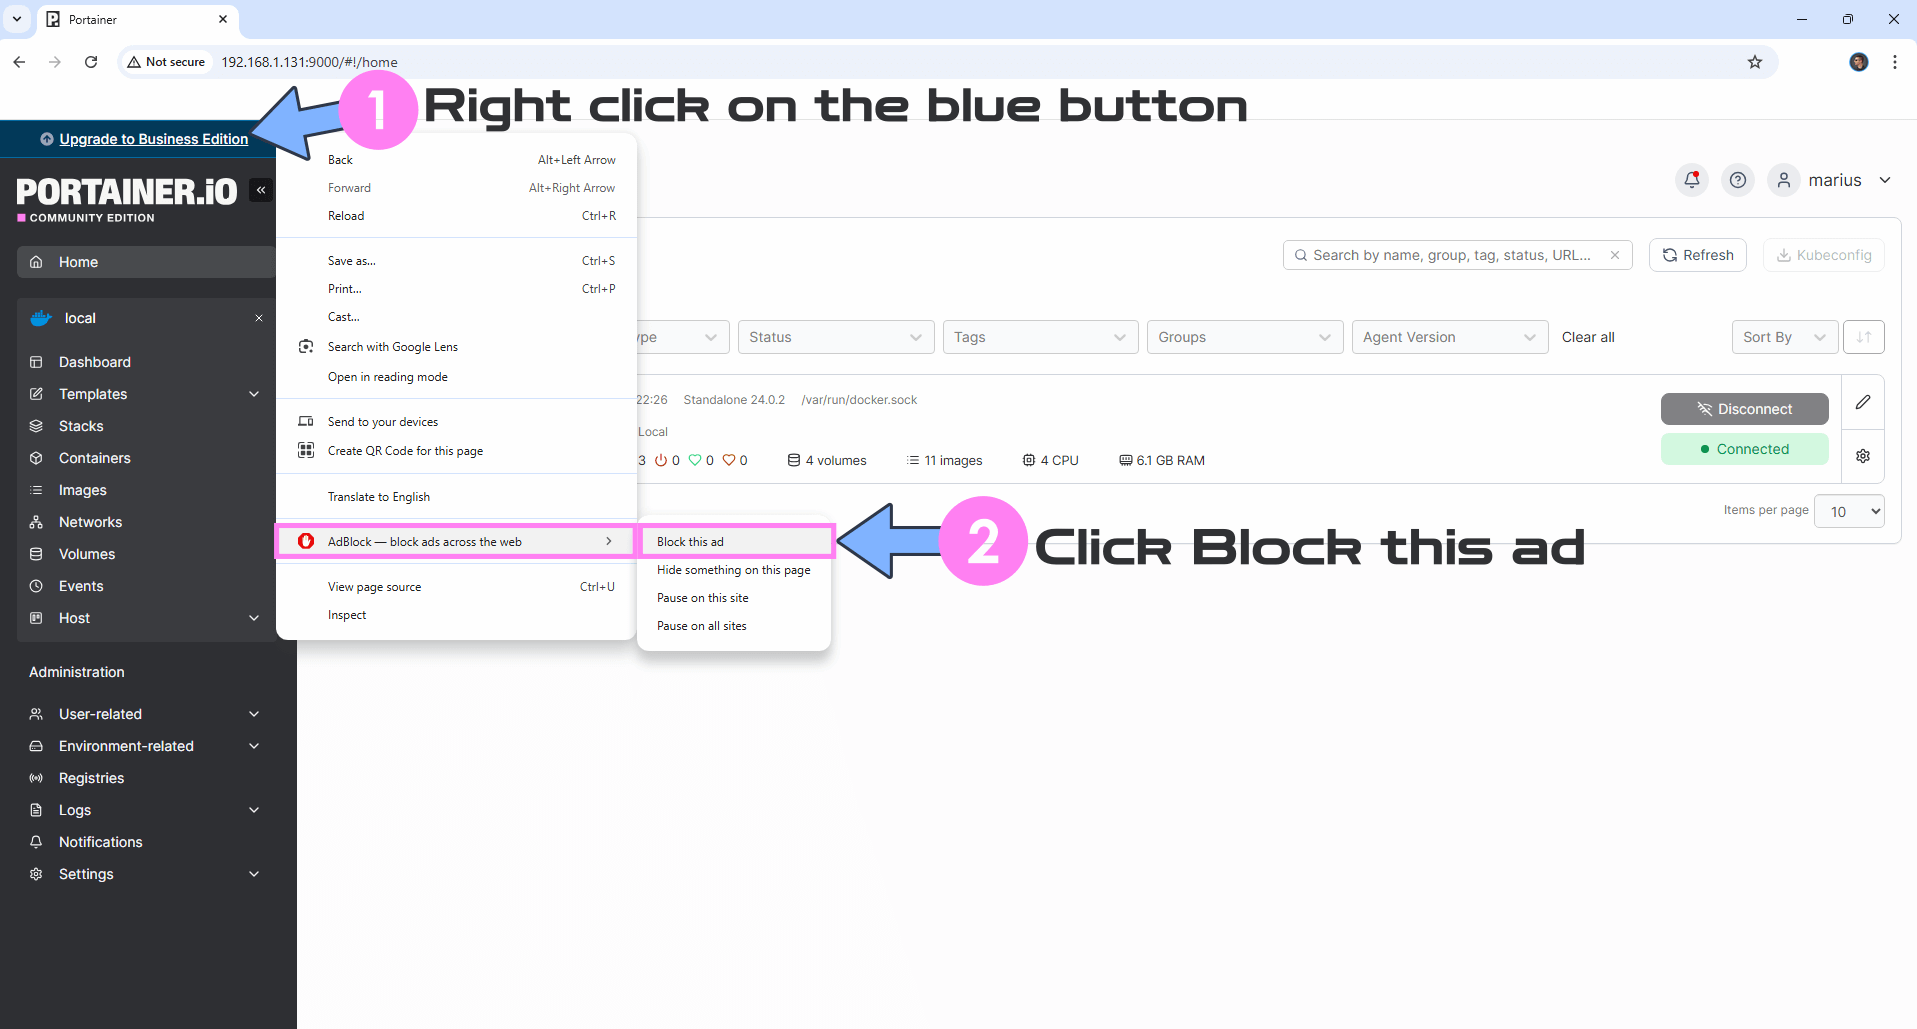
Go Back to your Portainer page. Right click on the blue “Upgrade to Business Edition” button. Select AdBlock then Block this ad. Follow the instructions in the image below.
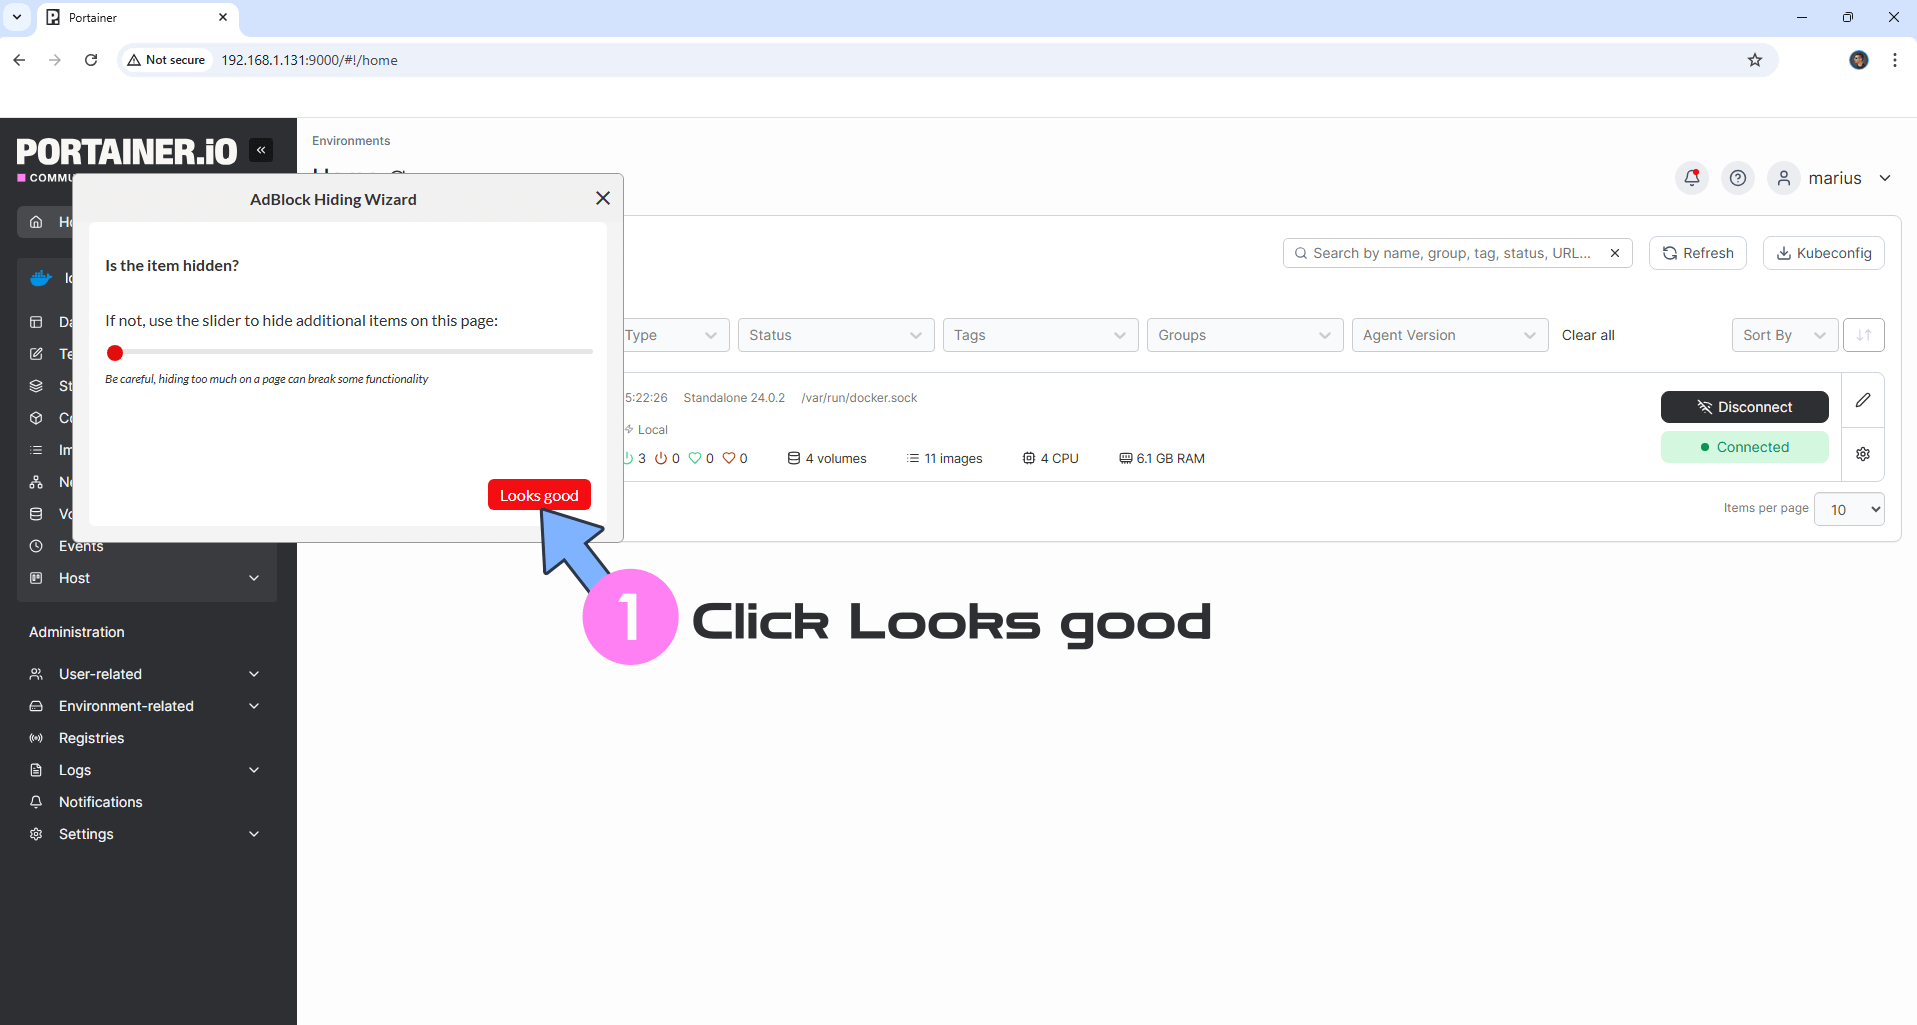
STEP 25
Click Looks good. Follow the instructions in the image below.
Click Confirm. Follow the instructions in the image below.
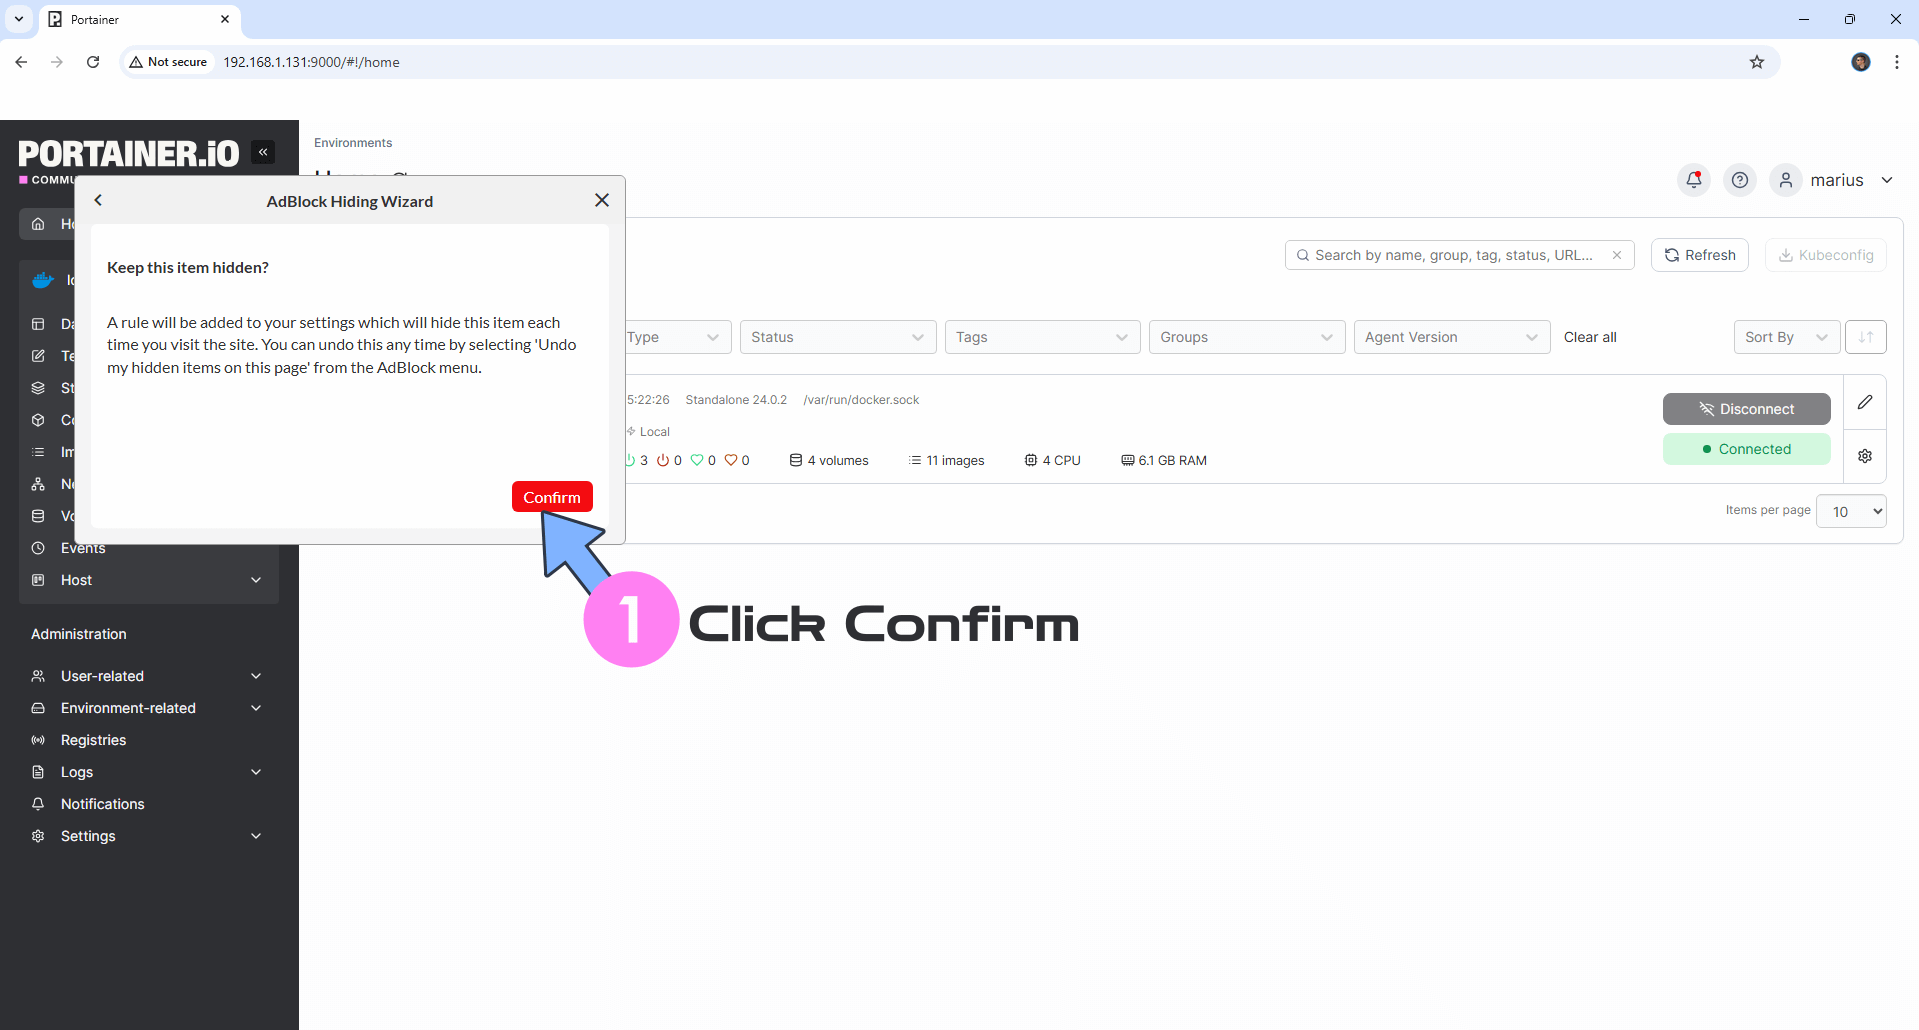
Enjoy your Portainer without the blue attention seeker “Upgrade to Business Edition” button.
Enjoy Portainer!
If you encounter issues by using this container, make sure to check out the Common Docker issues article.
Note: If you want to run Portainer over HTTPS, check out my article How to Run Docker Containers Over HTTPS. In order to make Portainer work via HTTPS, it’s mandatory to activate WebSocket. ⚠️Note: If you are using a reverse proxy with Portainer, ensure you add the TRUSTED_ORIGINS environment variable to the code at STEP 11, as shown in the example below.
docker run -d -p 8000:8000 -p 9000:9000 --name=portainer --restart=always -v /var/run/docker.sock:/var/run/docker.sock -v /volume1/docker/portainer:/data -e TRUSTED_ORIGINS=portainer.yourname.synology.me portainer/portainer-ceNote: If you use a different volume than volume1, for example volume2, you need to change the following line at STEP 11
-v /volume1/docker/portainer:/data \
with
-v /volume2/docker/portainer:/data \
Note: How to Backup Portainer.
Note: Find out how to update the Portainer container with the latest image.
Note: How to Reset Portainer Password.
Note: How to Back Up Docker Containers on your Synology NAS.
Note: How to Change Portainer Logo With Your Own Logo.
Note: How to Activate Dark Mode in Portainer.
Note: Can I run Docker on my Synology NAS? See the supported models.
Note: How to Free Disk Space on Your NAS if You Run Docker.
Note: How to Schedule Start & Stop For Docker Containers.
Note: How to Activate Email Notifications.
Note: How to Add Access Control Profile on Your NAS.
Note: How to Change Docker Containers Restart Policy.
Note: How to Use Docker Containers With VPN.
Note: Convert Docker Run Into Docker Compose.
Note: How to Clean Docker.
Note: How to Clean Docker Automatically.
Note: Best Practices When Using Docker and DDNS.
Note: Some Docker Containers Need WebSocket.
Note: Find out the Best NAS Models For Docker.
Note: Activate Gmail SMTP For Docker Containers.
Note: CE stands for Community Edition.
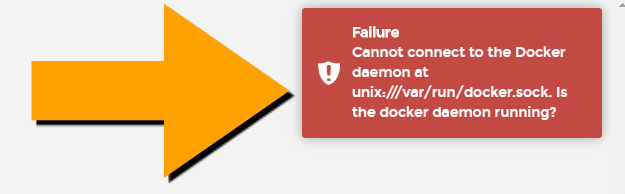
Note: If you receive the message: “Failure Cannot connect to the Docker daemon at unix:///var/run/docker.sock. Is the docker daemon running?” This happens when you try to install Portainer using the Docker Package through registry on your NAS without following the step by step guide in this article, especially STEP 11.
This post was updated on Sunday / April 5th, 2026 at 11:06 PM