Many Synology users are looking for the best methods on how to get NAS notifications on their mobile phone. Often times, they are looking to receive their NAS notifications on various messaging services such as Telegram, WhatsApp etc., but that’s just making things difficult. Here at mariushosting.com we like simple methods that are also recommended officially. So when it comes to activating your NAS notifications on your mobile phone, we should take a look at Synology’s built-in system that does just that: sends notifications on your mobile phone. And the great thing is that it’s an easy system, free of charge and fully functional, a breath of fresh air compared to complicated guides. In this article I will show you how easy it is to implement Synology’s mobile Push Service Notification on your mobile phone.
STEP 1
Please Support My work by Making a Donation.
STEP 2
- If you have an Android phone, in Play Store, search for the Synology application called DS Finder. If you have an Apple phone, in Apple Store, search for the Synology application called DS Finder. Follow the instructions in the first screenshot below.
- After installing the DS Finder app, open it and click on Select device, then click on the three dots at the top right. You will find 3 options: Add existing device, Install new device and Settings. Click on the first option called Add existing device. Follow the instructions in the second screenshot below.
- You will be prompted to add your synology.me DDNS address or your QuickConnect ID. If you already have a synology DDNS, just add yourname.synology.me then your NAS username and password. After that, check HTTPS and Verify certificate and hit the SIGN IN button. Follow the instructions in the third screenshot below.
- You are done. Now check “Notifications“. Follow the instructions in the fourth screenshot below.
Note: If you use a DDNS without reverse proxy you have to add in the Account field Screenshot 3 yourname.synology.me:5001 instead yourname.synology.me with the port number you have set for your DSM https access. The standard one is 5001 for HTTPS connections.
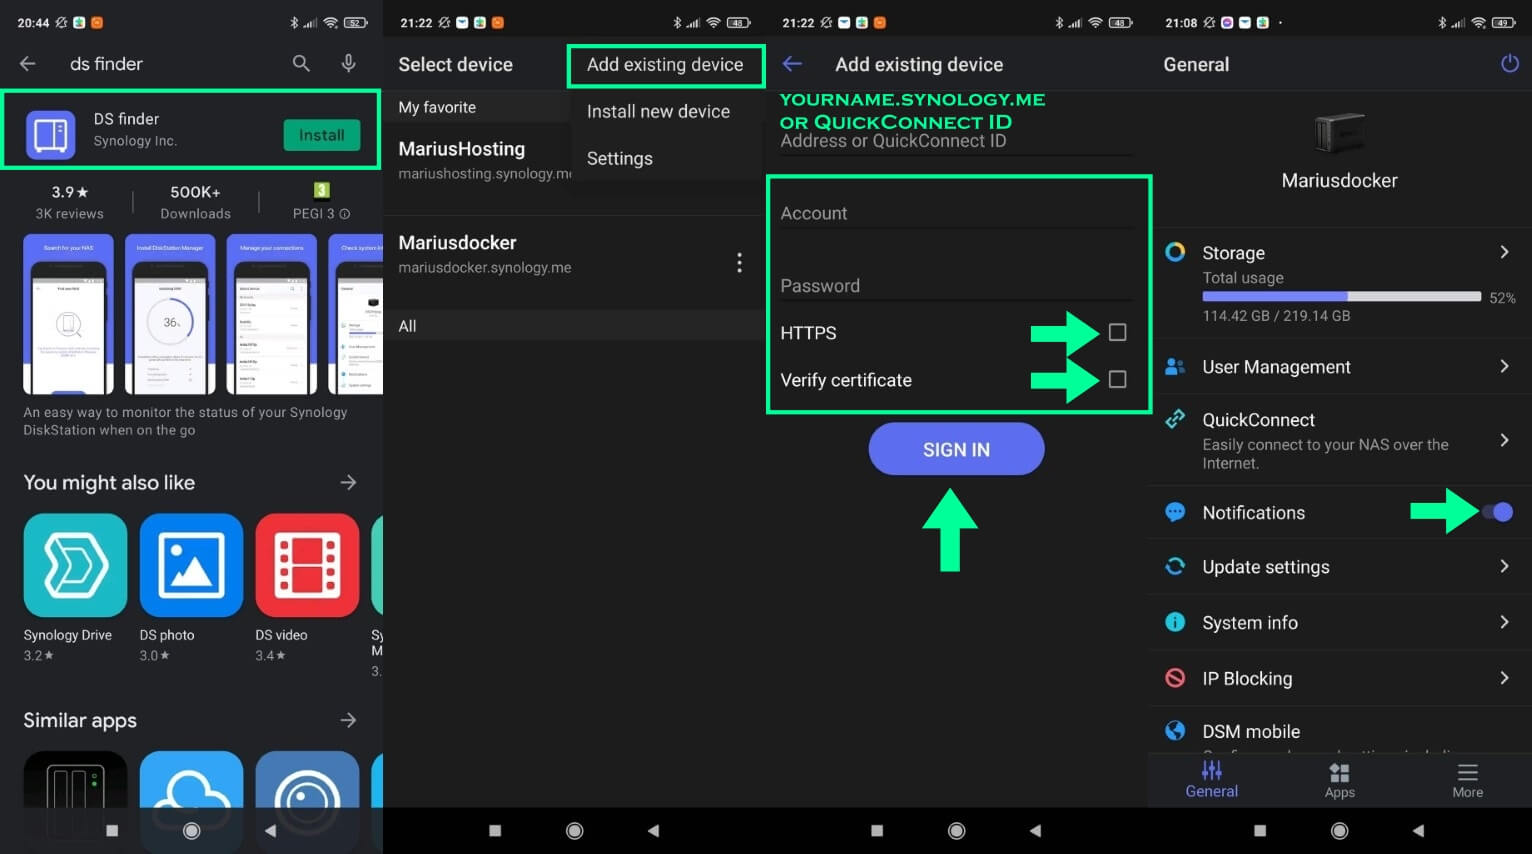
Note: The screenshots above are numbered like this: 1, 2, 3, 4 from left to right.
Note: What is DS Finder? DS finder allows you to set up and manage your Synology NAS, sends you NAS-related notifications, and opens your door to the world of Synology apps. And yes, all these features can be accessed directly from your phone, so wave goodbye to complicated setup and management with DS finder!
Note: Difference Between DDNS and QuickConnect.
STEP 3
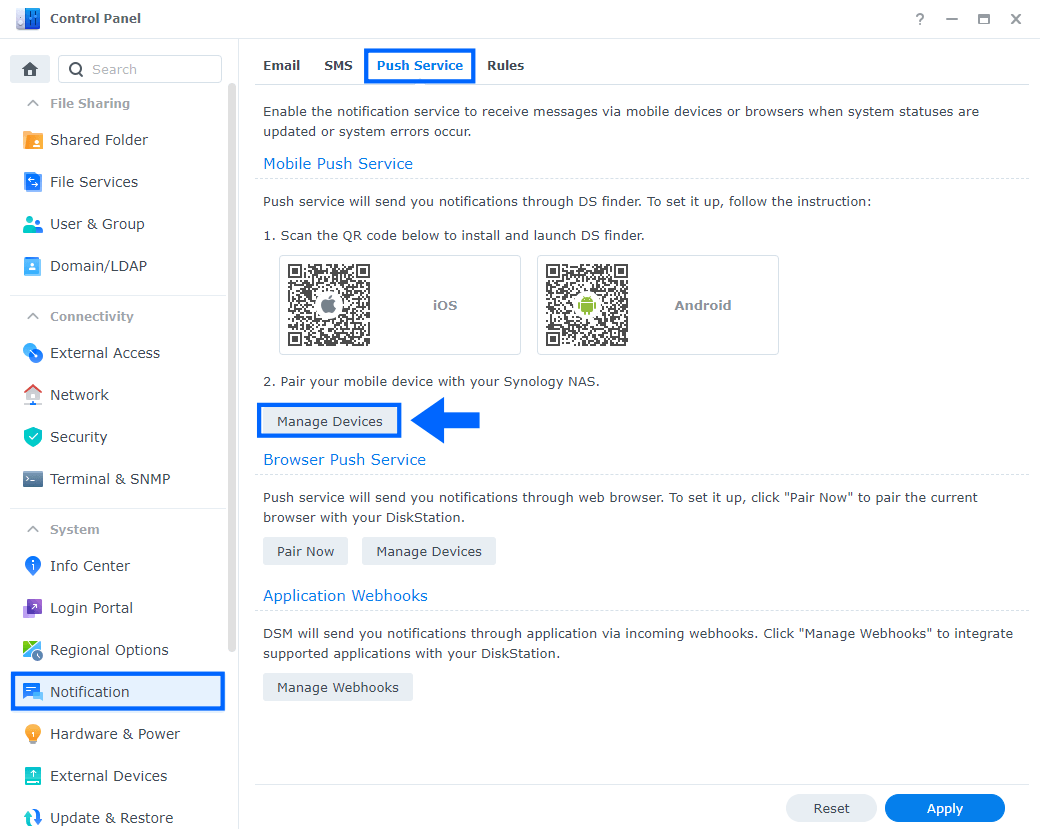
If you have DSM 7 installed, go to Control Panel / Notification / Push Service / click Manage Devices.
STEP 4
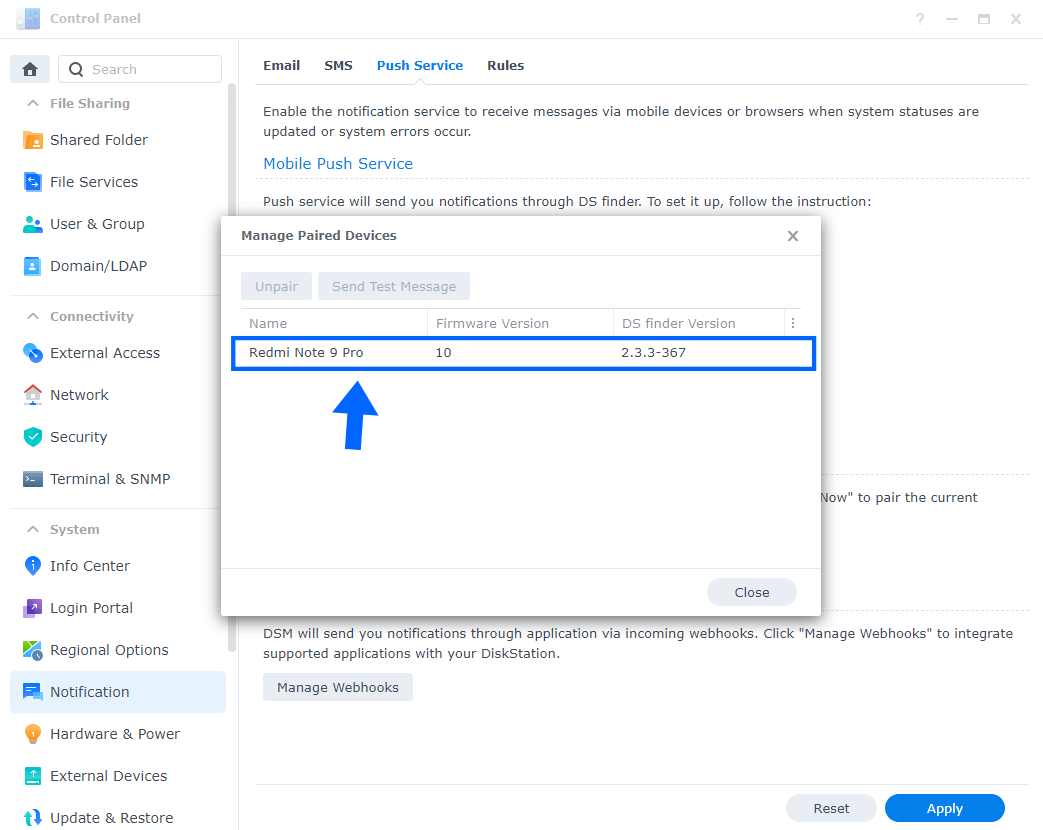
Once you click Manage devices on STEP 3, you will find your Phone Name (Paired Device) that was automatically recognized via DS Finder when you Signed in at STEP 2 Screenshot 3. No action needed.
STEP 5
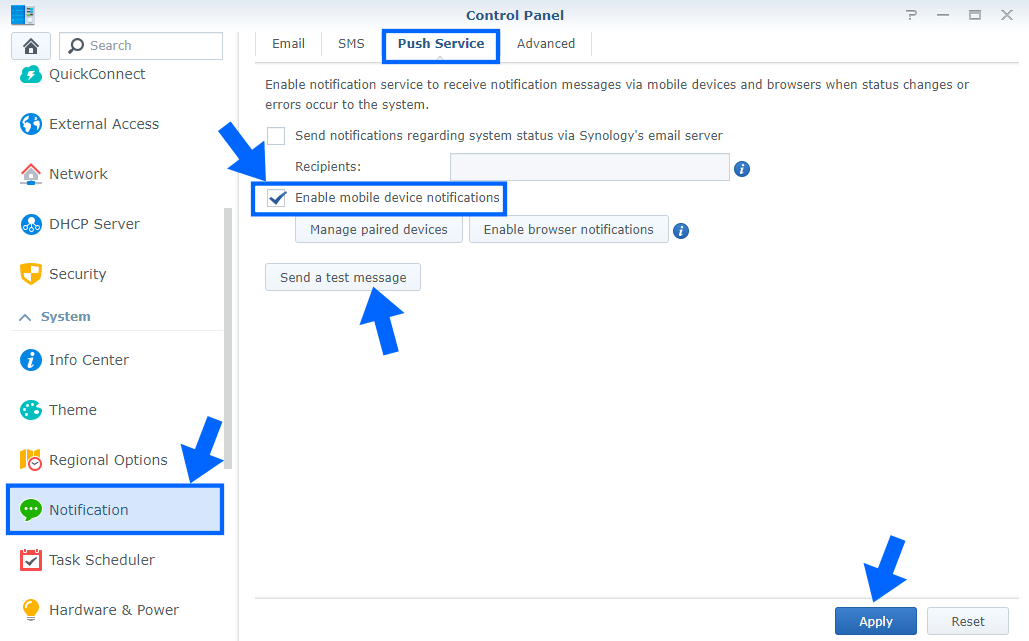
If you have DSM 6.2.4 installed, go to Control Panel / Notification / Push Service / check Enable mobile device notifications. If you click Manage paired devices, you will be able to see your phone name in a pop up window. You can also send a test message to test if notifications work.
STEP 6
Go back to STEP 1 or you will deal with karma 🙂.
STEP 7
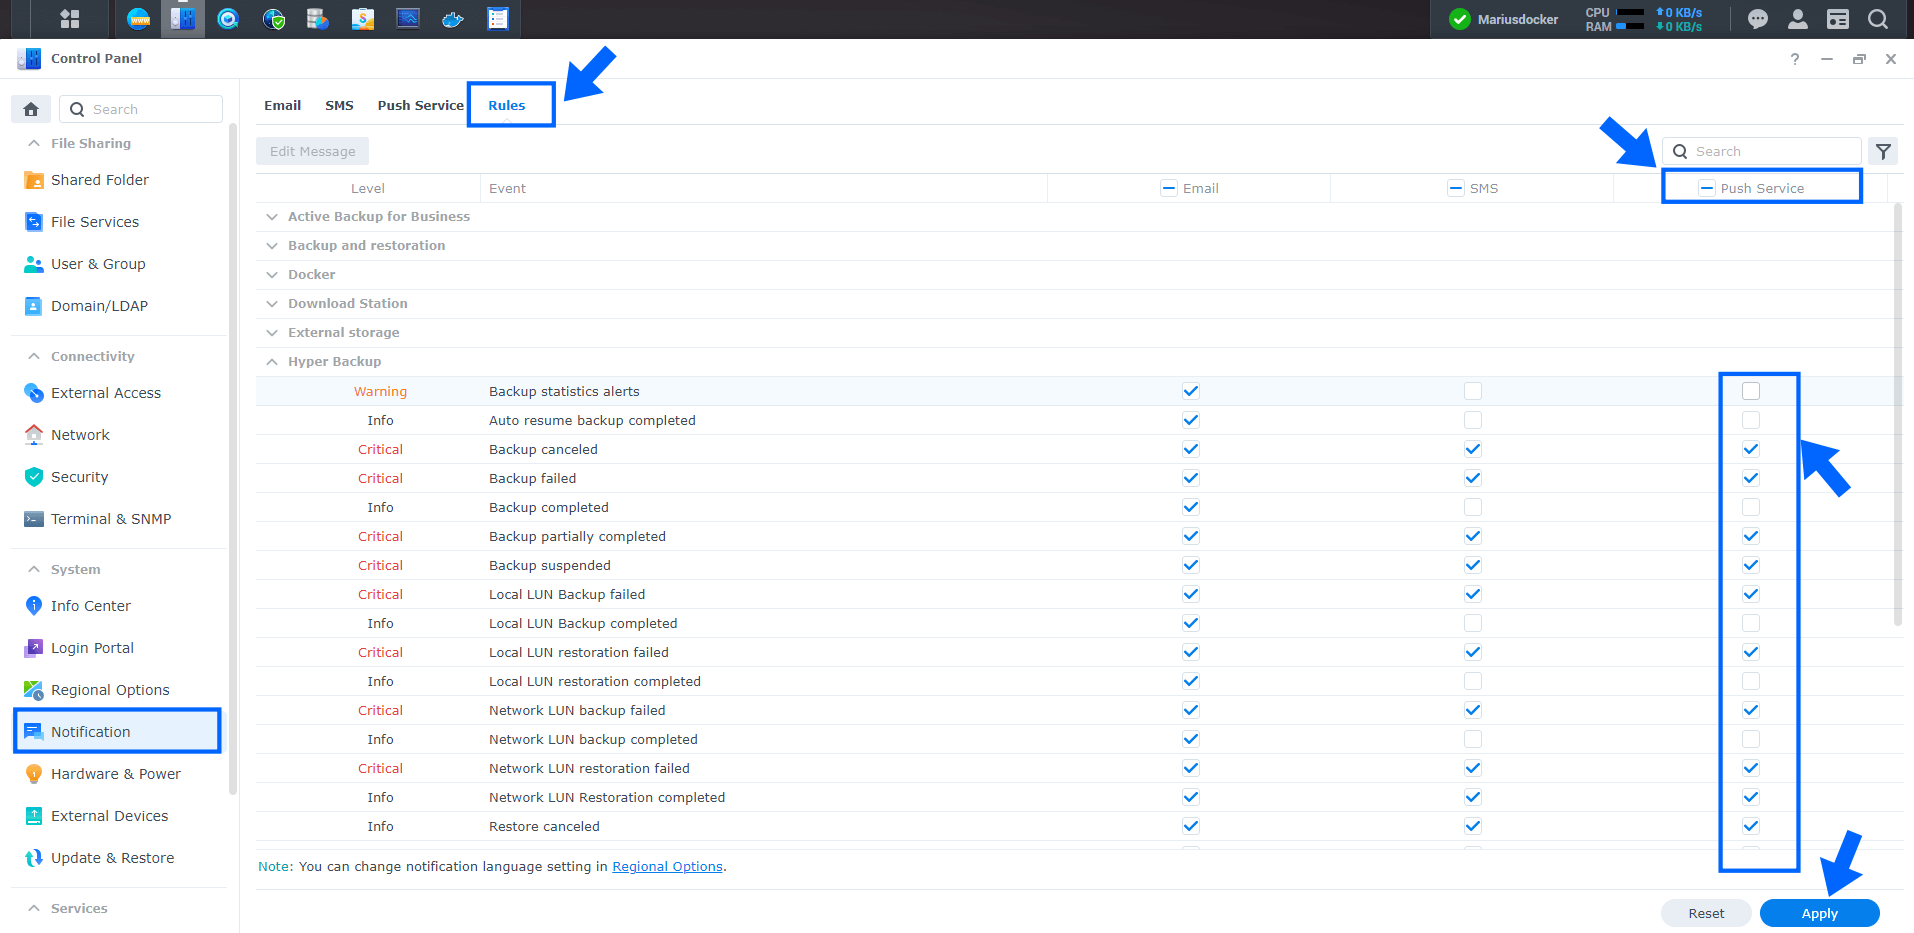
To configure the rules for Mobile “Push Notifications”, go to Control Panel / Notification / Rules tab then check which notifications you want to receive on your mobile phone.
Note: At STEP 2 Screenshot 3, if you decide to use a DDNS, in the Address field you have to type in your Synology DDNS or other DDNS provider, without the https before the name. So, for example, your DDNS will look like yourname.synology.me and not https:// yourname.synology.me
Note: You will receive a notification in your paired mobile phone automatically in DS Finder everytime a new event occurs with your Synology NAS.
Note: With DS Finder you can restart your NAS remotely even if you are not at home. You can remotely control the temperature of your NAS, its disks and many other very useful options.
This post was updated on Wednesday / August 10th, 2022 at 10:11 PM
