
In 2026, for a serious self-hosted setup, it’s almost always better to use your own personal domain rather than relying solely on a free hostname from services like No-IP, DuckDNS, Dynu, etc. Why is it (almost always) better to use your own personal domain instead of a NO-IP / DuckDNS / similar hostname for self-hosting? A personal domain costs very little, gives you complete control, eliminates a ton of future headaches, and makes your setup look professional instead of “2010 basement stuff”. The configuration I’m suggesting below requires a STATIC IP from your ISP, and whether you can get one depends on the country you’re in. To use the various Docker services on my UGREEN NAS, I decided to go with the domain name beemarius dot com, which cost me less than 5 euros for a full year and allows me unlimited subdomains, unlike NO-IP DDNS.
STEP 1
Please Support My work by Making a Donation.
STEP 2
Go to Control Panel / Device Connection / Portal settings tab/ in the Web port (HTTP) area, type in 9999. Click Apply. 📋Note: I use port 9999 as an example; you can change this port later after you better understand the function.

STEP 3
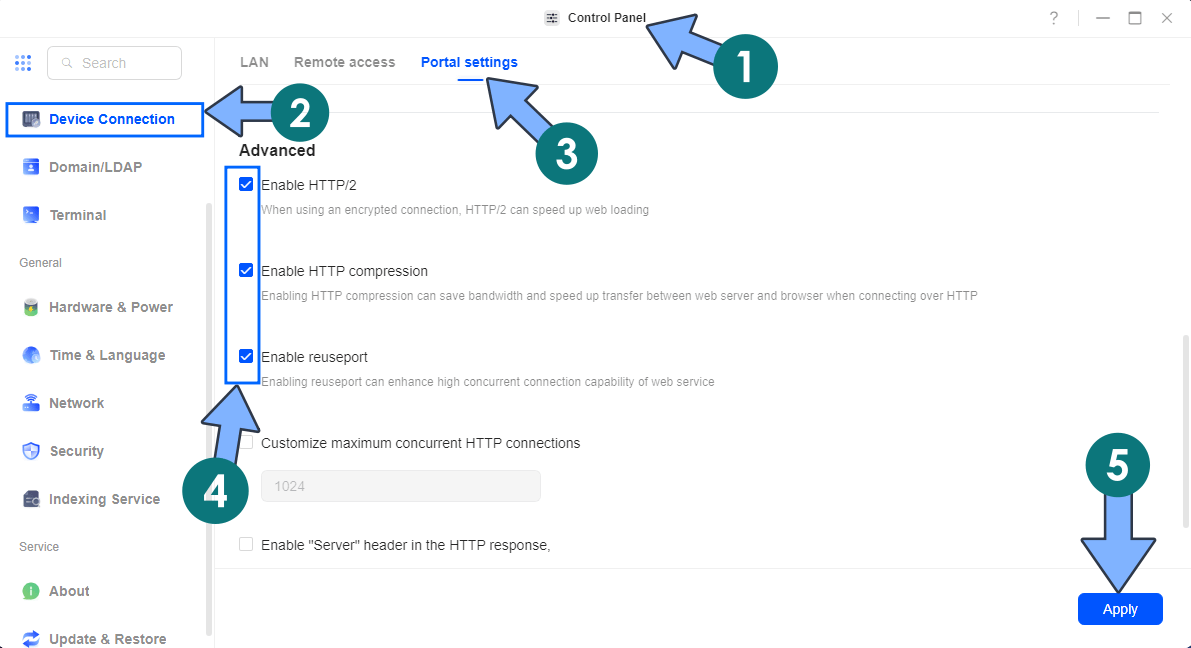
Go to Control Panel / Device Connection / Portal settings tab/ in the Advanced area, check the following options:
Enable HTTP/2
Enable HTTP compression
Enable reuseport
Click Apply. Follow the instructions in the image below.
STEP 4
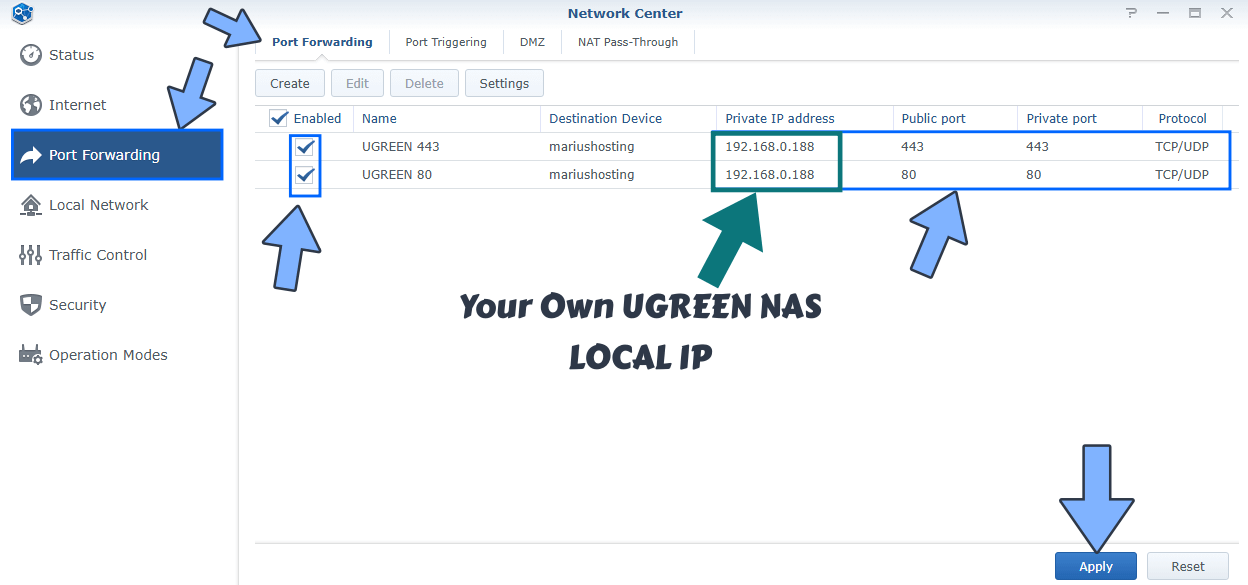
Be sure to open the necessary ports through your router settings, both TCP/UDP. Most people forget to port forward their ports in their router settings. If the ports that point to your UGREEN NAS device are not opened, all the services you have activated on those specific ports will not work. This is a step overlooked by many, but essential for the perfect functioning of HTTPS. All you need to do is give your UGREEN NAS device permissions on ports 80 and 443 both TCP and UDP. Follow the instructions in the image below and remember that different routers have a different interface than the one presented in this image below. Currently I’m using a Synology RT6600ax router. Note: Ports 80 and 443 are mandatory to validate the Let’s Encrypt SSL certificate. With this free online tool, you can check if your ports 80 and 443 are 🟩opened and not 🟥closed. If they are closed, you should check your port forwarding settings again until they are marked as opened.
STEP 5
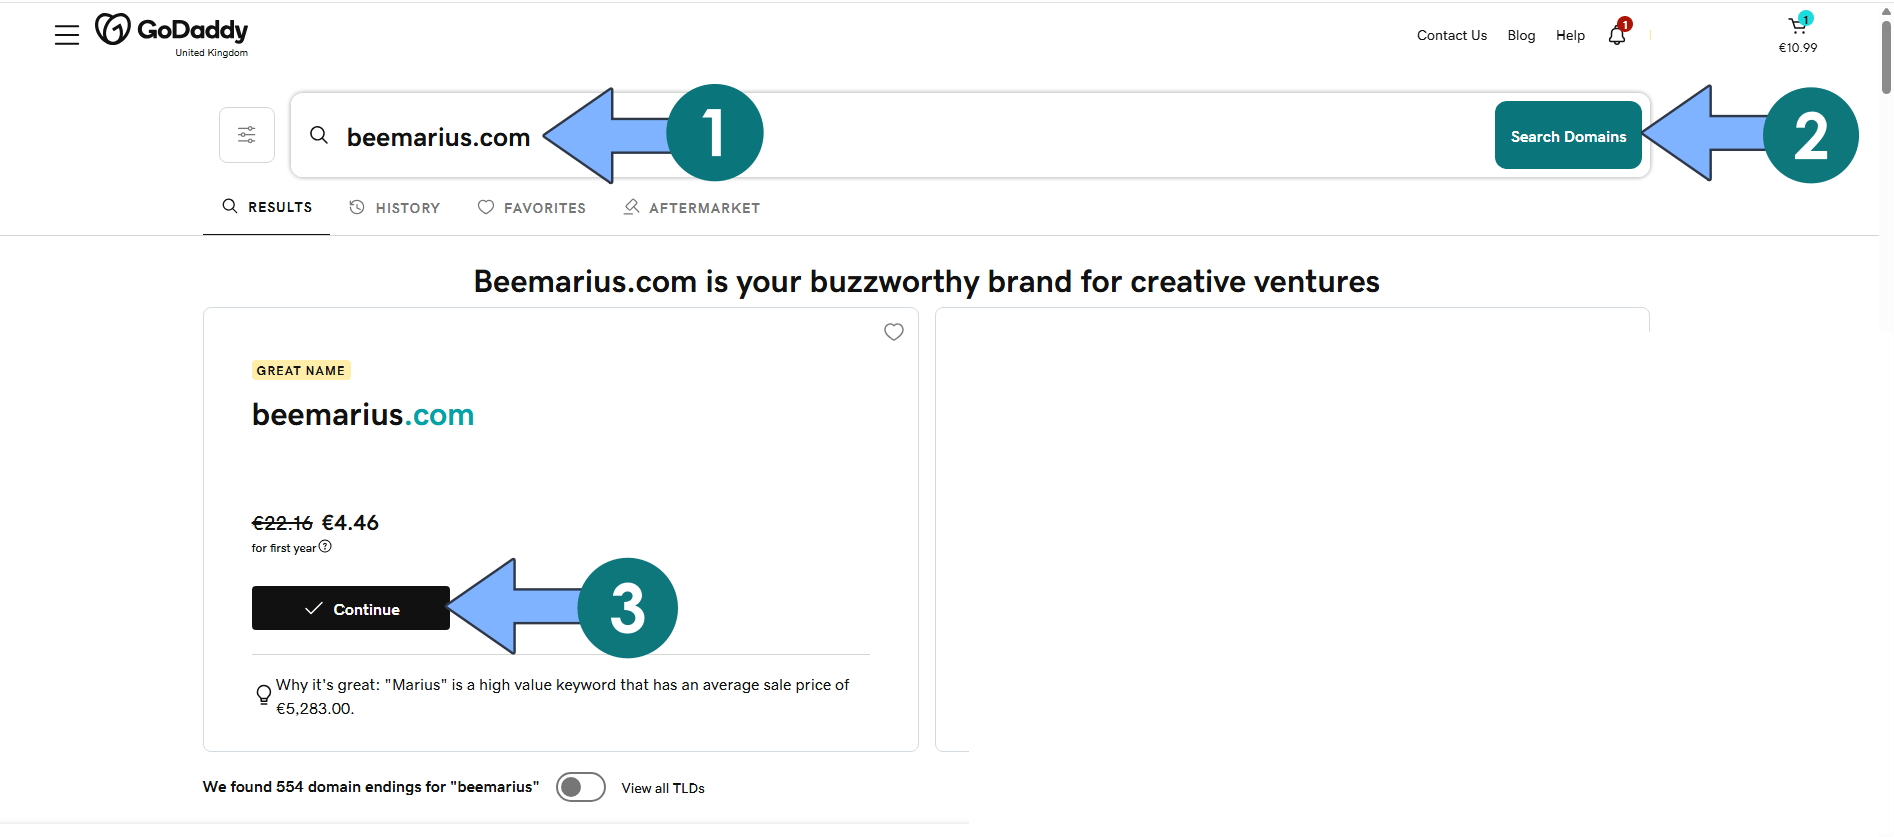
Launch your browser, then go to the GoDaddy website by clicking on the blue link below. 📋Note: You can use other Domain Registrar Services, but in my screenshot examples below, I will be using GoDaddy because it’s cheap, fast, and works out of the box.
Search for your favorite Domain Name. Once you find one you like, click Continue to proceed with buying it.
STEP 6
Once you’ve bought the domain name, click Manage Products to manage your domain names through the GoDaddy web interface. Click Manage to manage your domain DNS. Follow the instructions in the image below.

STEP 7
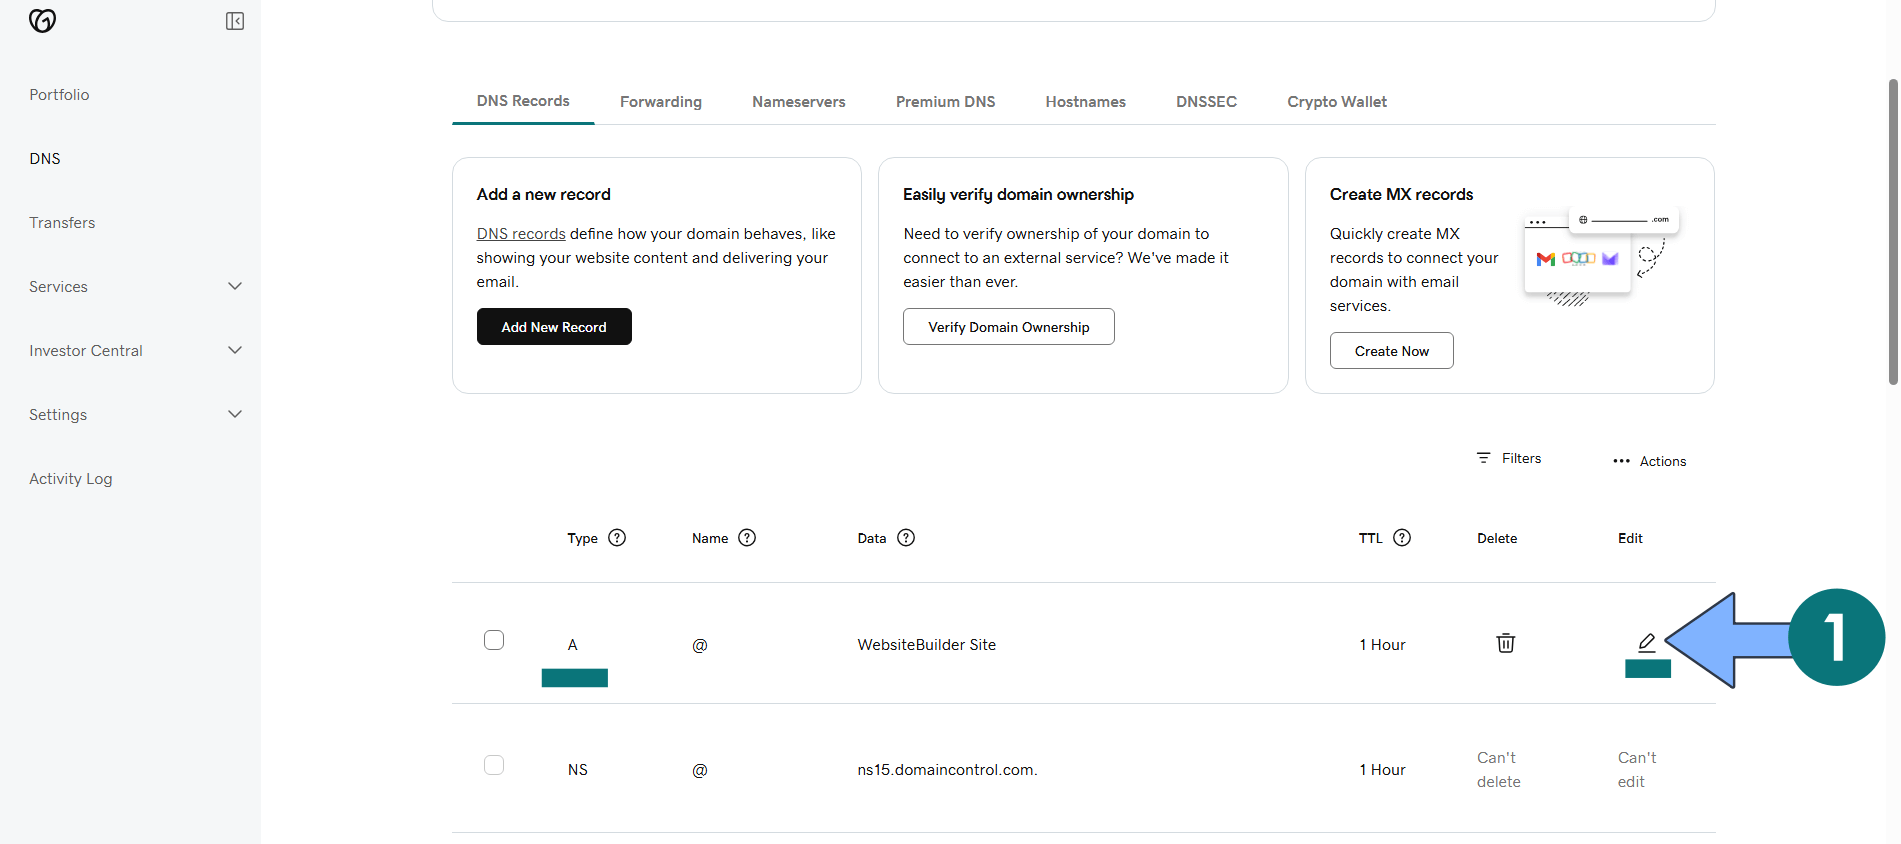
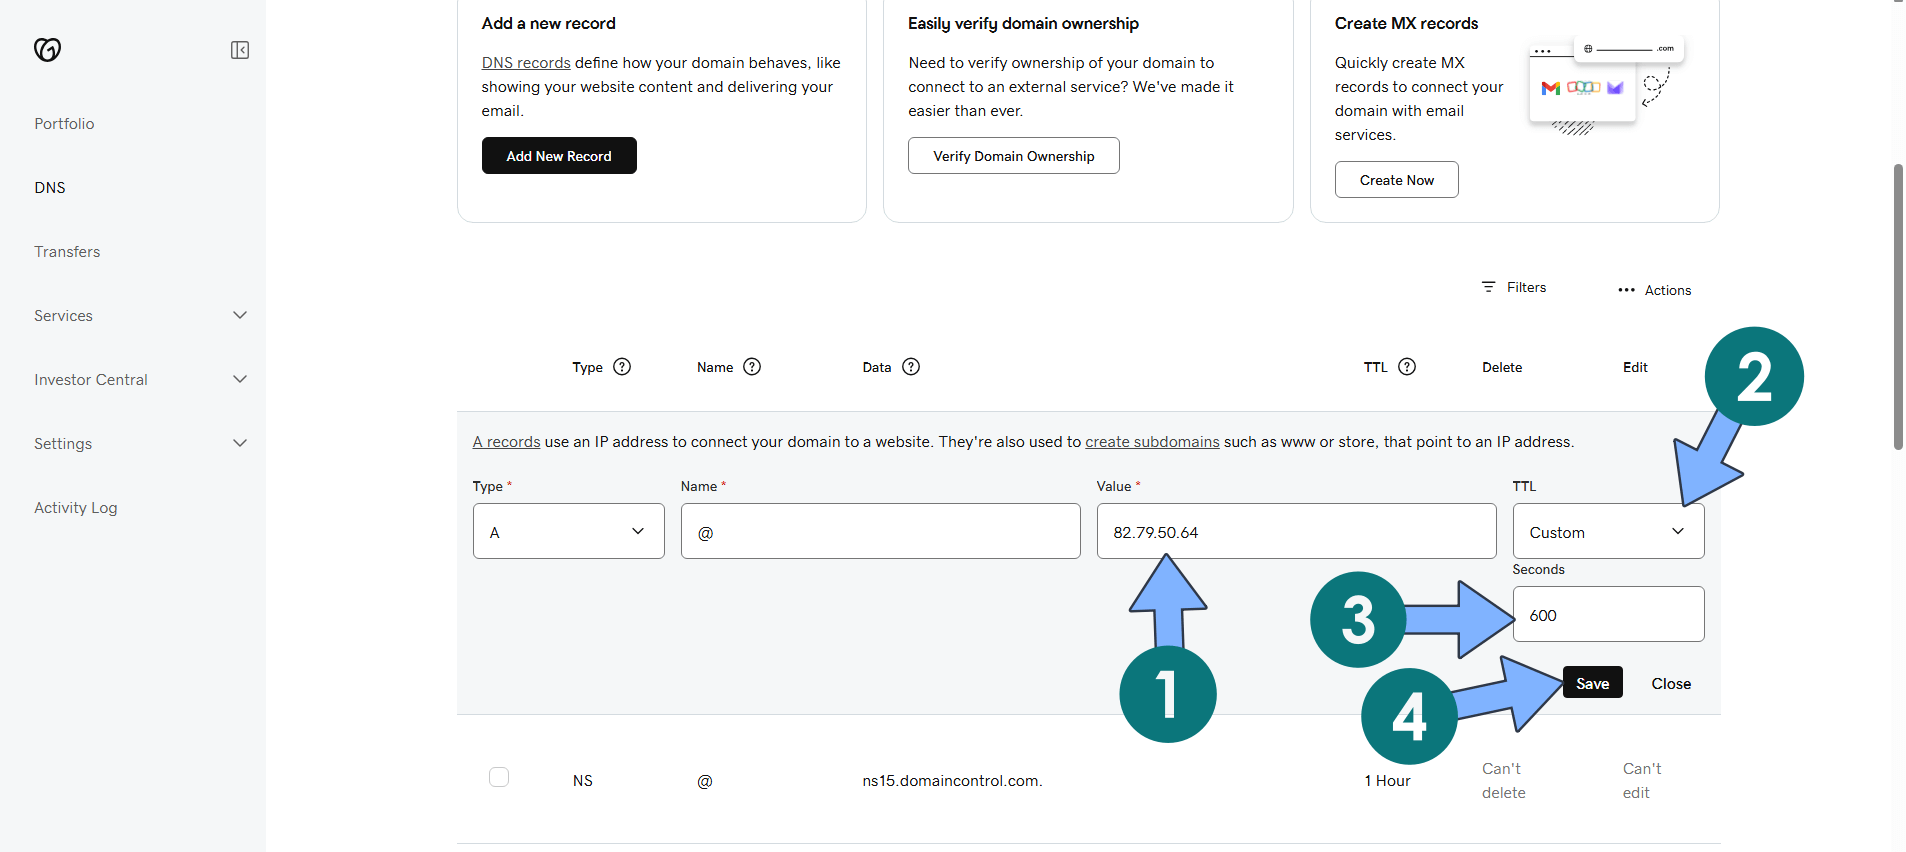
On the A record area, click the EDIT icon to edit your current A Record. Follow the instructions in the image below. 📑Note: An A record (most commonly called a DNS A record) is one of the most fundamental and widely used types of records in the Domain Name System (DNS). The “A” stands for Address, and its main job is to map a domain name (or subdomain) to an IPv4 address, the numerical address that computers use to locate each other on the internet, so, in this case, the static IP assigned by your ISP.
STEP 8
On the Value area, type in the STATIC IP assigned by your ISP. On the TTL area select Custom then type in 600 seconds. In GoDaddy’s DNS management, setting a TTL to “custom 600 seconds” means you’re choosing a Time to Live website value of 600 seconds (which equals 10 minutes) for that specific DNS record. Click Save. Your Static IP in the A record will be live in approximately 10 minutes. This Value tells the internet where to find your website or server. 📑Note: The updated A record (with the new static IP) should start working for most people within about 10 minutes, thanks to the short 600-second TTL. In rare cases, it could take longer (up to 1–2 hours) due to how some internet providers cache DNS info.
STEP 9
Alright, you’ve just saved your DNS changes on GoDaddy. Now comes the boring part: time to wait for propagation to do its thing. With the TTL set to 600 seconds (10 minutes), most people should start seeing their new static IP within 10–30 minutes… but just to be safe, in some corners of the internet (especially with certain lazy ISPs), it could take up to 1 hour before everything is perfectly updated everywhere. So, what do you say? Go grab yourself a nice coffee (or tea, water, whatever you fancy), take a breather for a few minutes… and if you feel like supporting the work I do on mariushosting, don’t forget to support me. Almost 99,9% of the people that install something using my guides forget to support my work, or just ignore STEP 1. I’ve been very honest about this aspect of my work since the beginning: I don’t run any ADS, I don’t require subscriptions, paid or otherwise, I don’t collect IPs, emails, and I don’t have any referral links from Amazon or other merchants. I also don’t have any POP-UPs or COOKIES. I have repeatedly been told over the years how much I have contributed to the community. It’s something I love doing and have been honest about my passion since the beginning. But I also Need The Community to Support Me Back to be able to continue doing this work.
STEP 10
Has an hour passed? Good, let’s proceed to STEP 10. Install Nginx Proxy Manager using my step by step guide. If you already have Nginx Proxy Manager installed on your UGREEN NAS, skip this STEP. ⚠️Attention: Mandatory STEP.
STEP 11
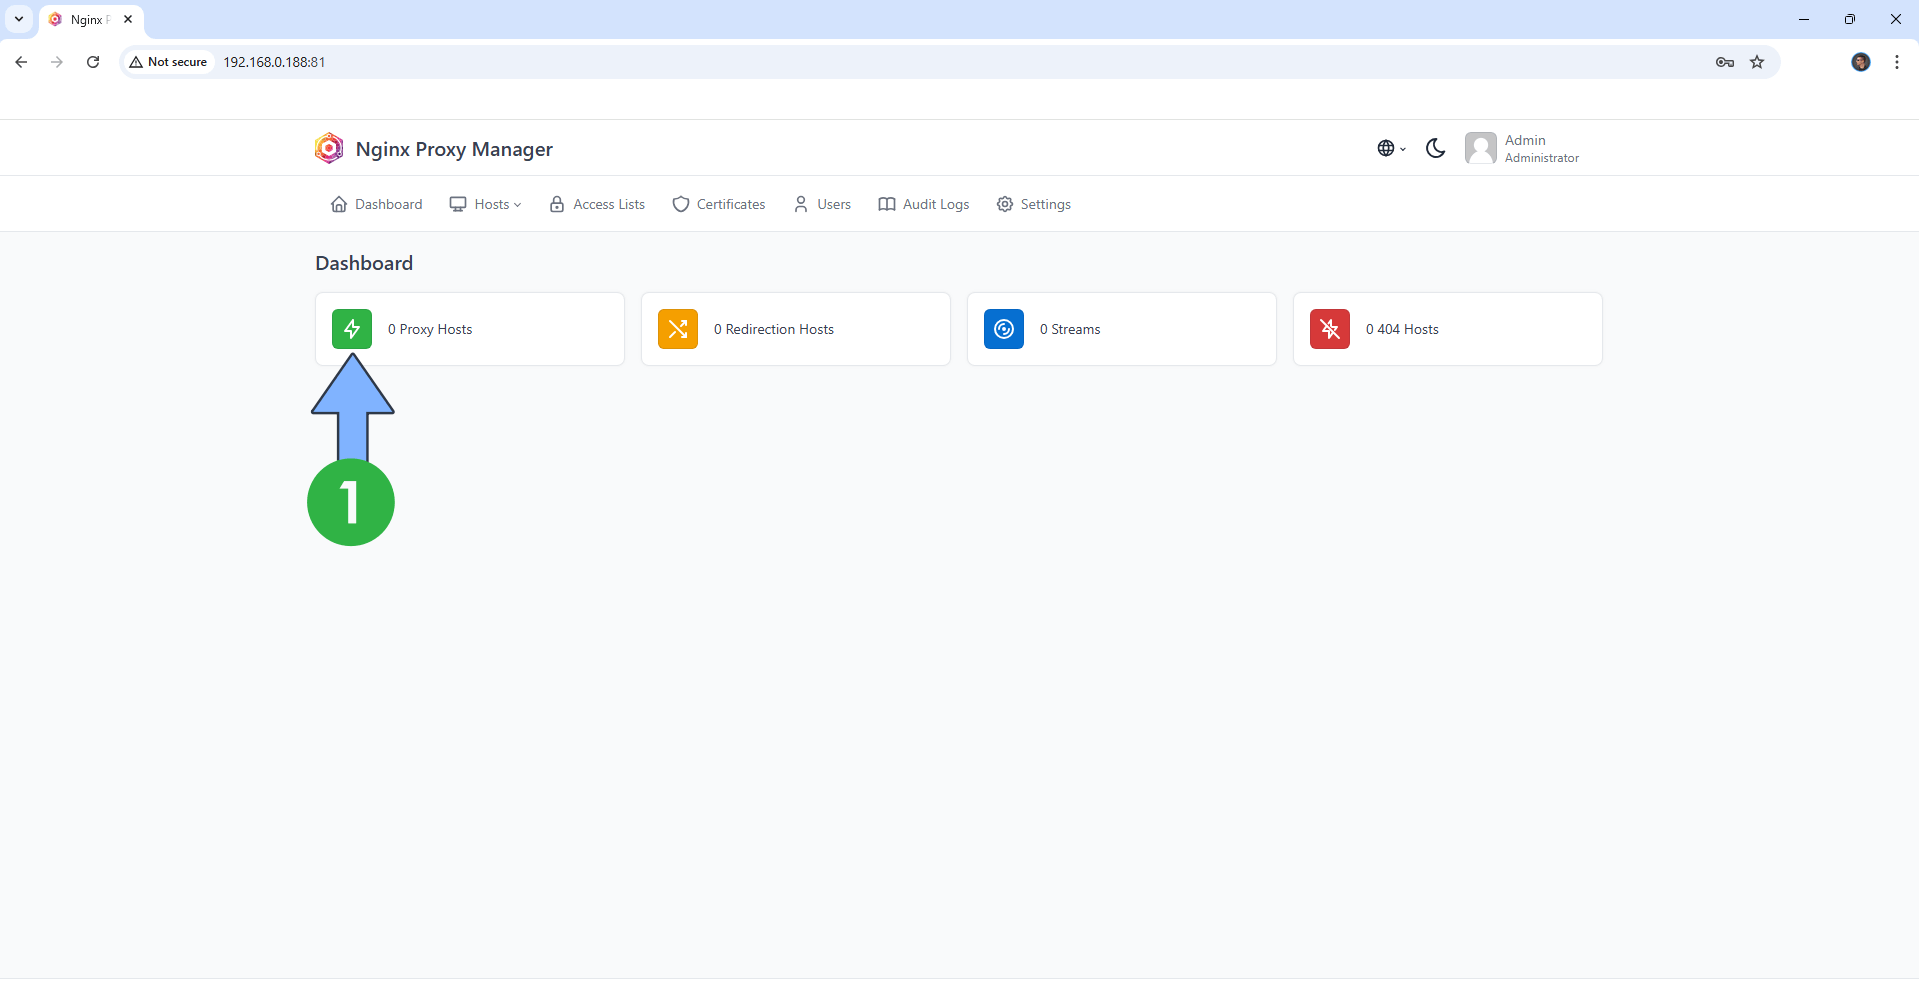
Access your Nginx Proxy Manager that you have previously installed at STEP 10. Click Proxy Hosts. Follow the instructions in the image below.
STEP 12
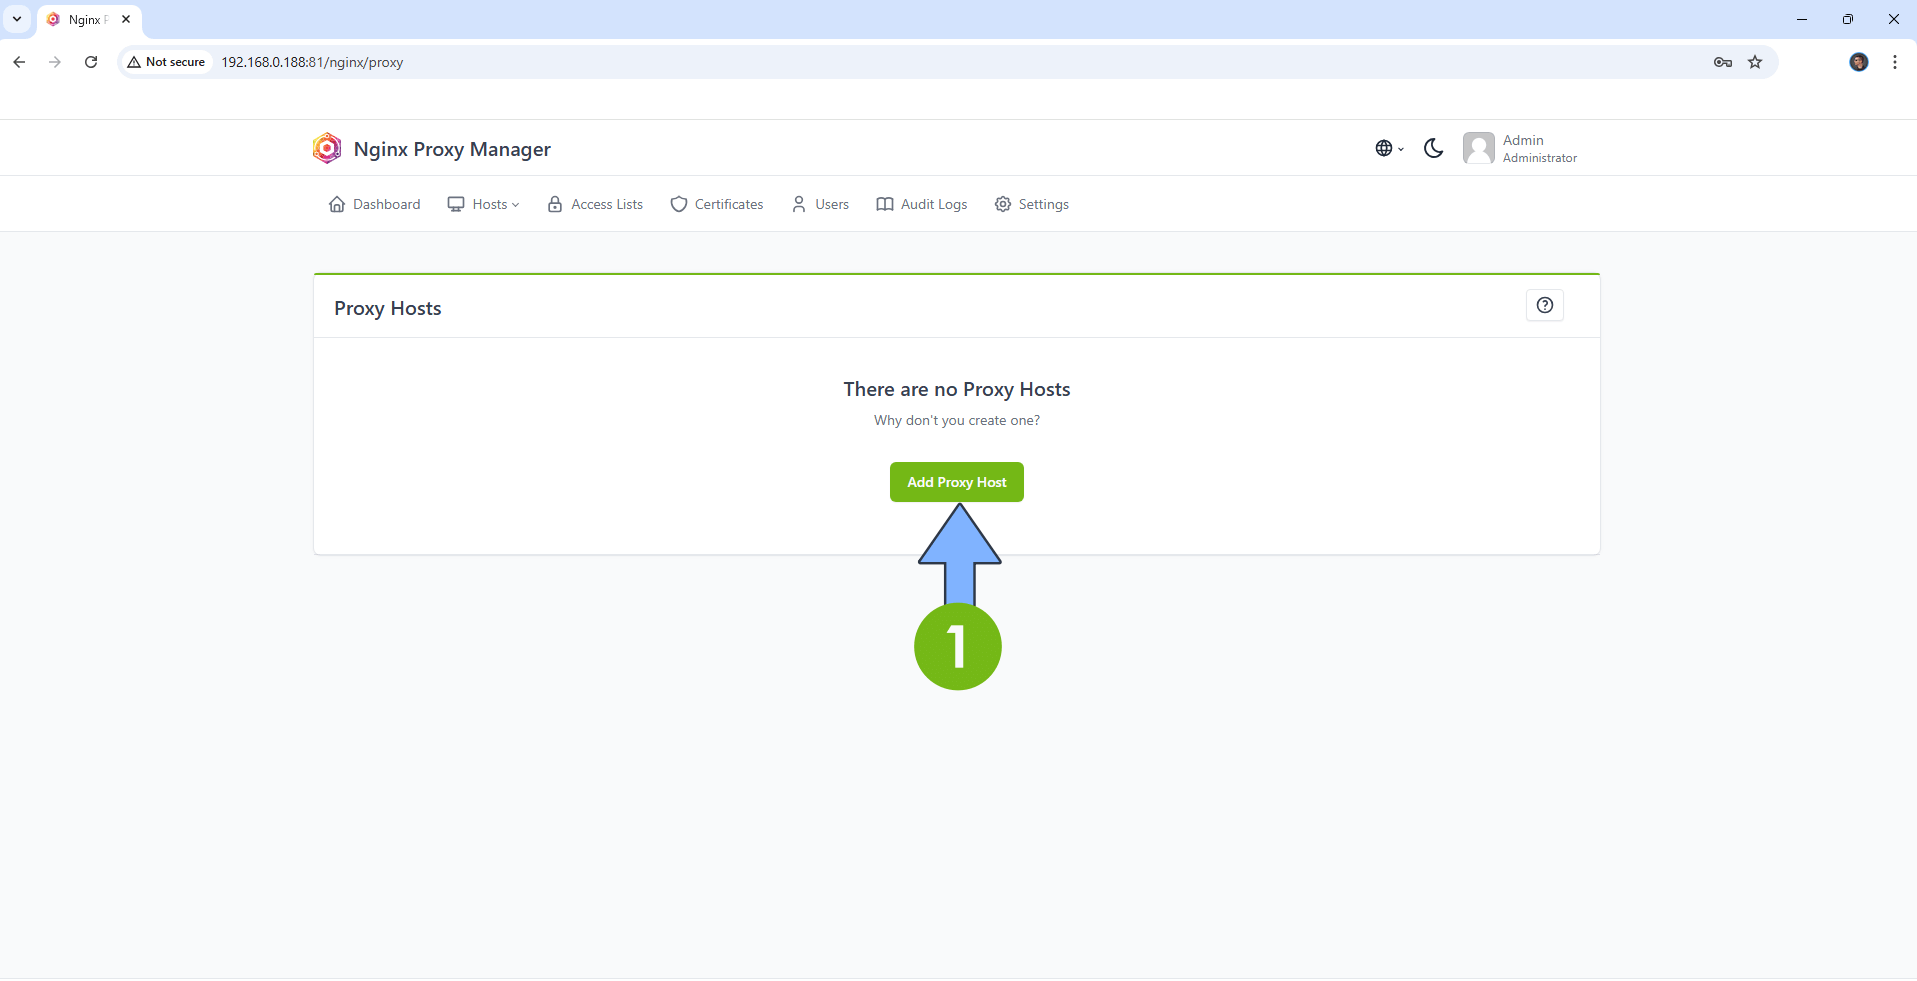
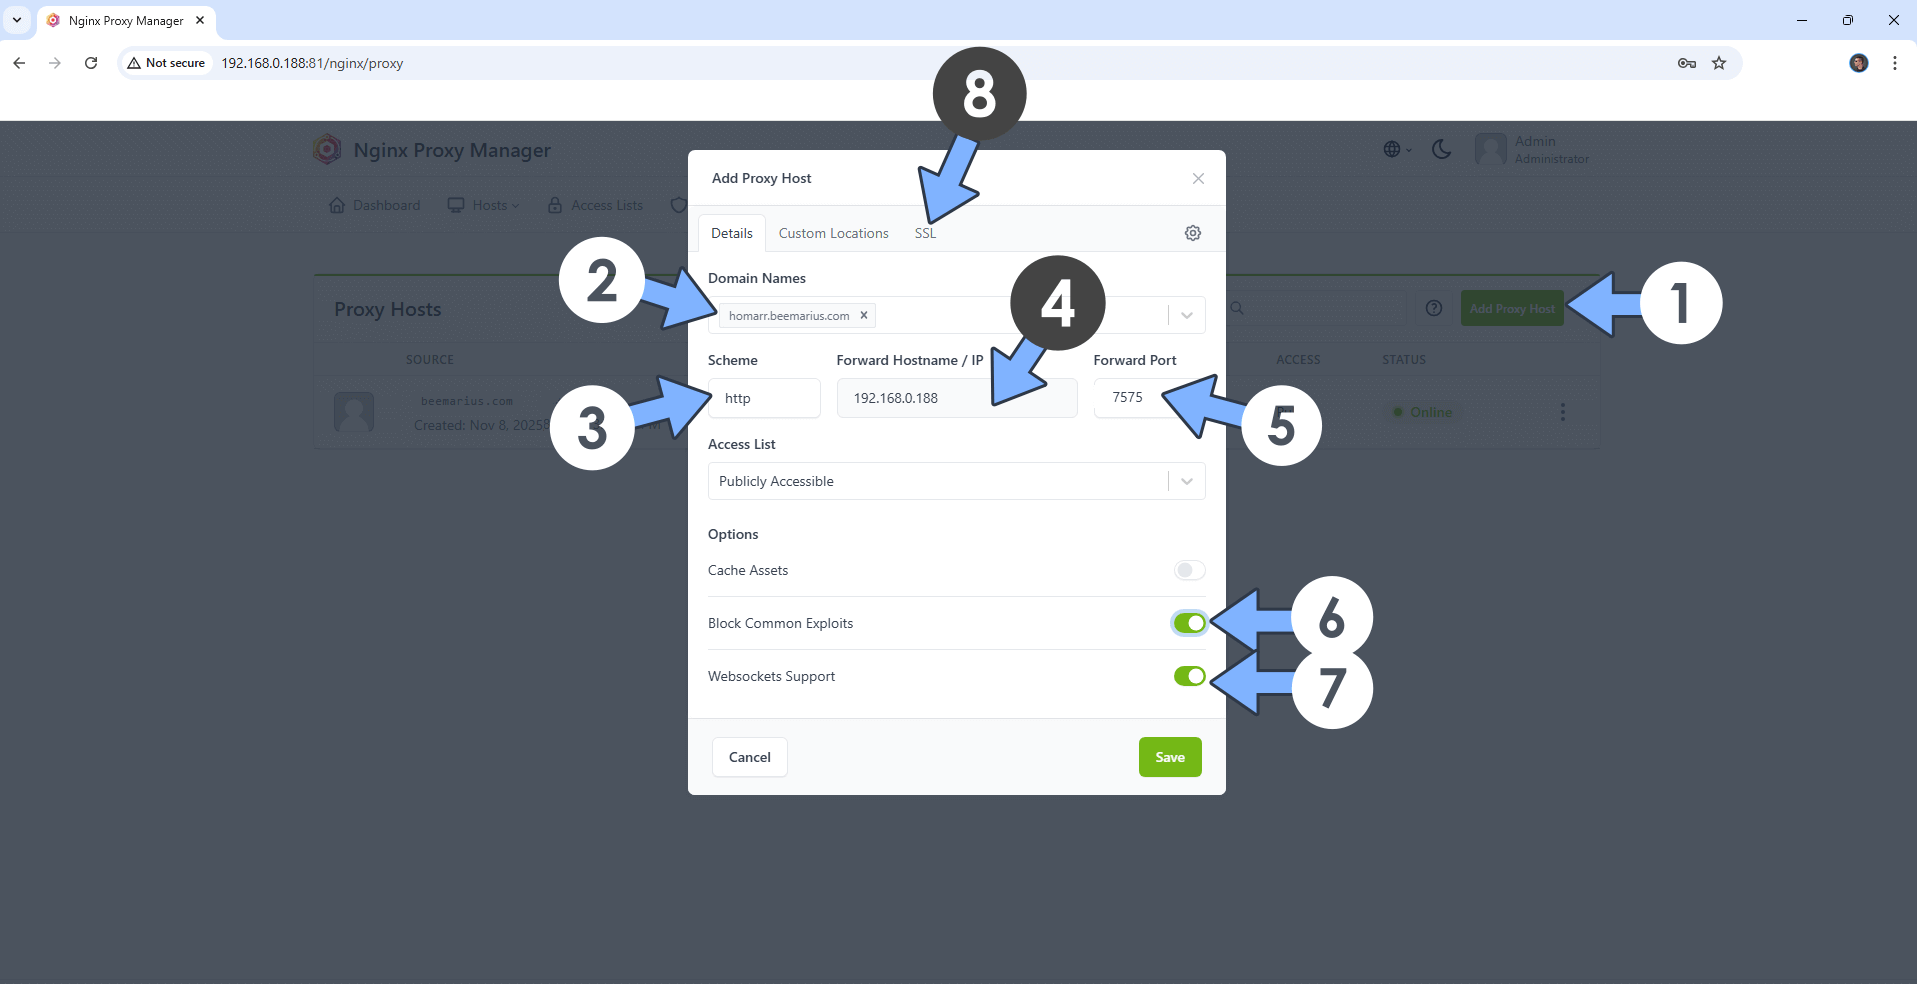
Click Add Proxy Host. Follow the instructions in the image below.
STEP 13
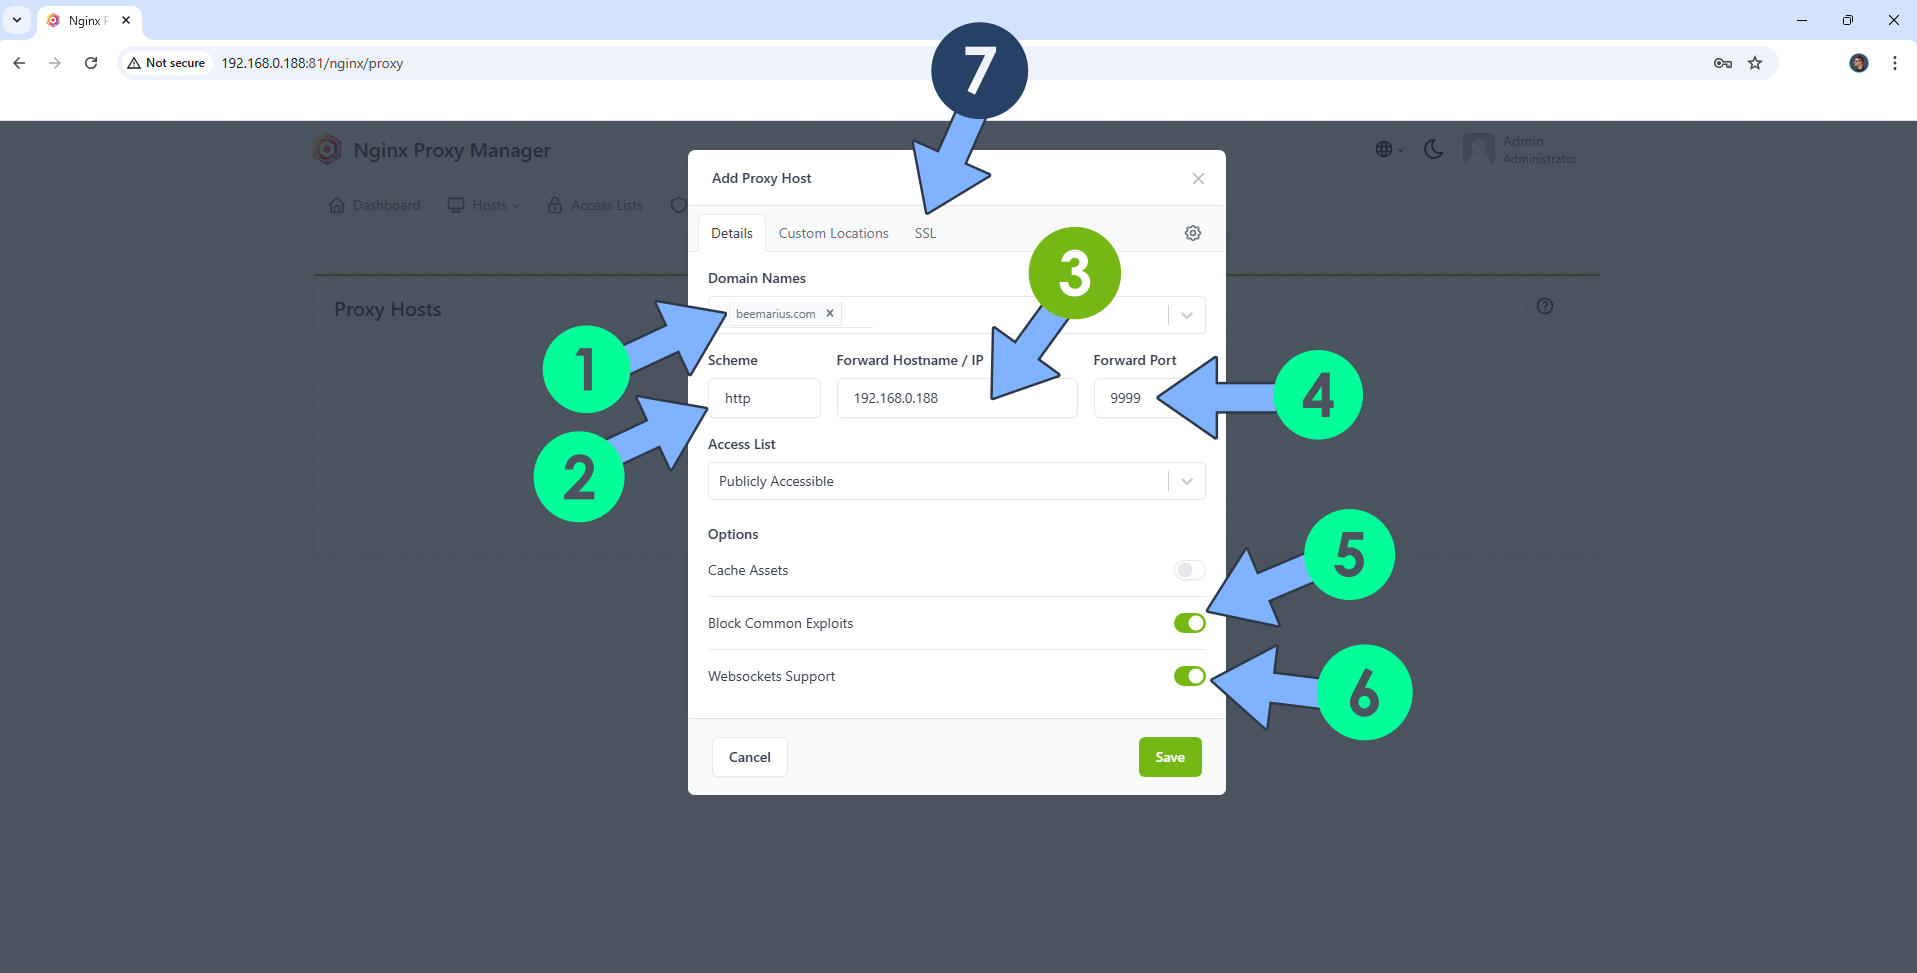
A new pop up window will open. Add the following details:
Domain Names: Type in your own domain name that you have previously bought at STEP 5.
Scheme: http
Forward Hostname/IP: Type in the local NAS IP of your UGREEN NAS.
Forward Port: Type in the Web (HTTP) port that you have previously added at STEP 2.
Check Block Common Exploits
Check Websockets Support
Click the SSL tab. Follow the instructions in the image below.
STEP 14
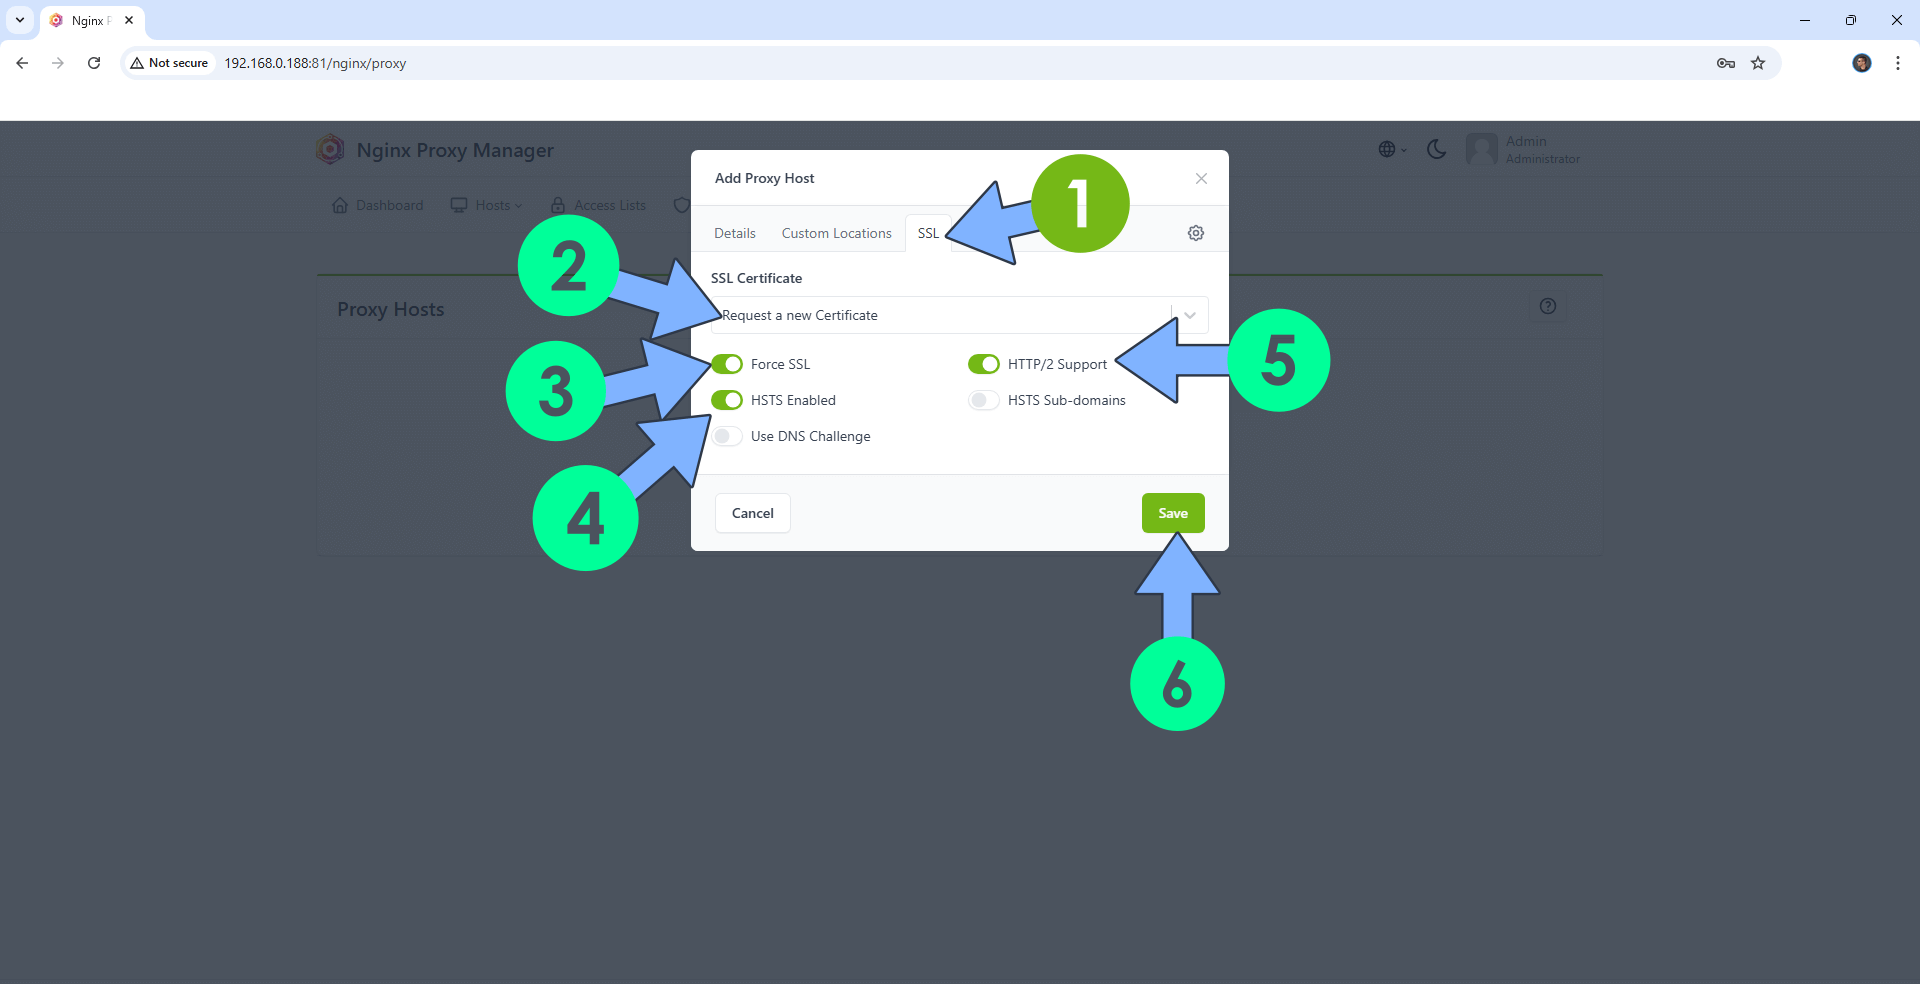
After you click the SSL tab, add the following details:
SSL Certificate: Request a new SSL Certificate
Check: Force SSL
Check: HSTS Enabled
Check: HTTP/2 Support
Click Save. Follow the instructions in the image below.
STEP 15
In the Proxy Hosts area, if everything goes right, you will see that your hostname has been generated. Click on it. Follow the instructions in the image below.

STEP 16
With this free online tool, you can check if your ports 80 and 443 are 🟩opened and not 🟥closed. If they are closed, you should check your port forwarding settings at STEP 4 again until they are marked as opened.
STEP 17
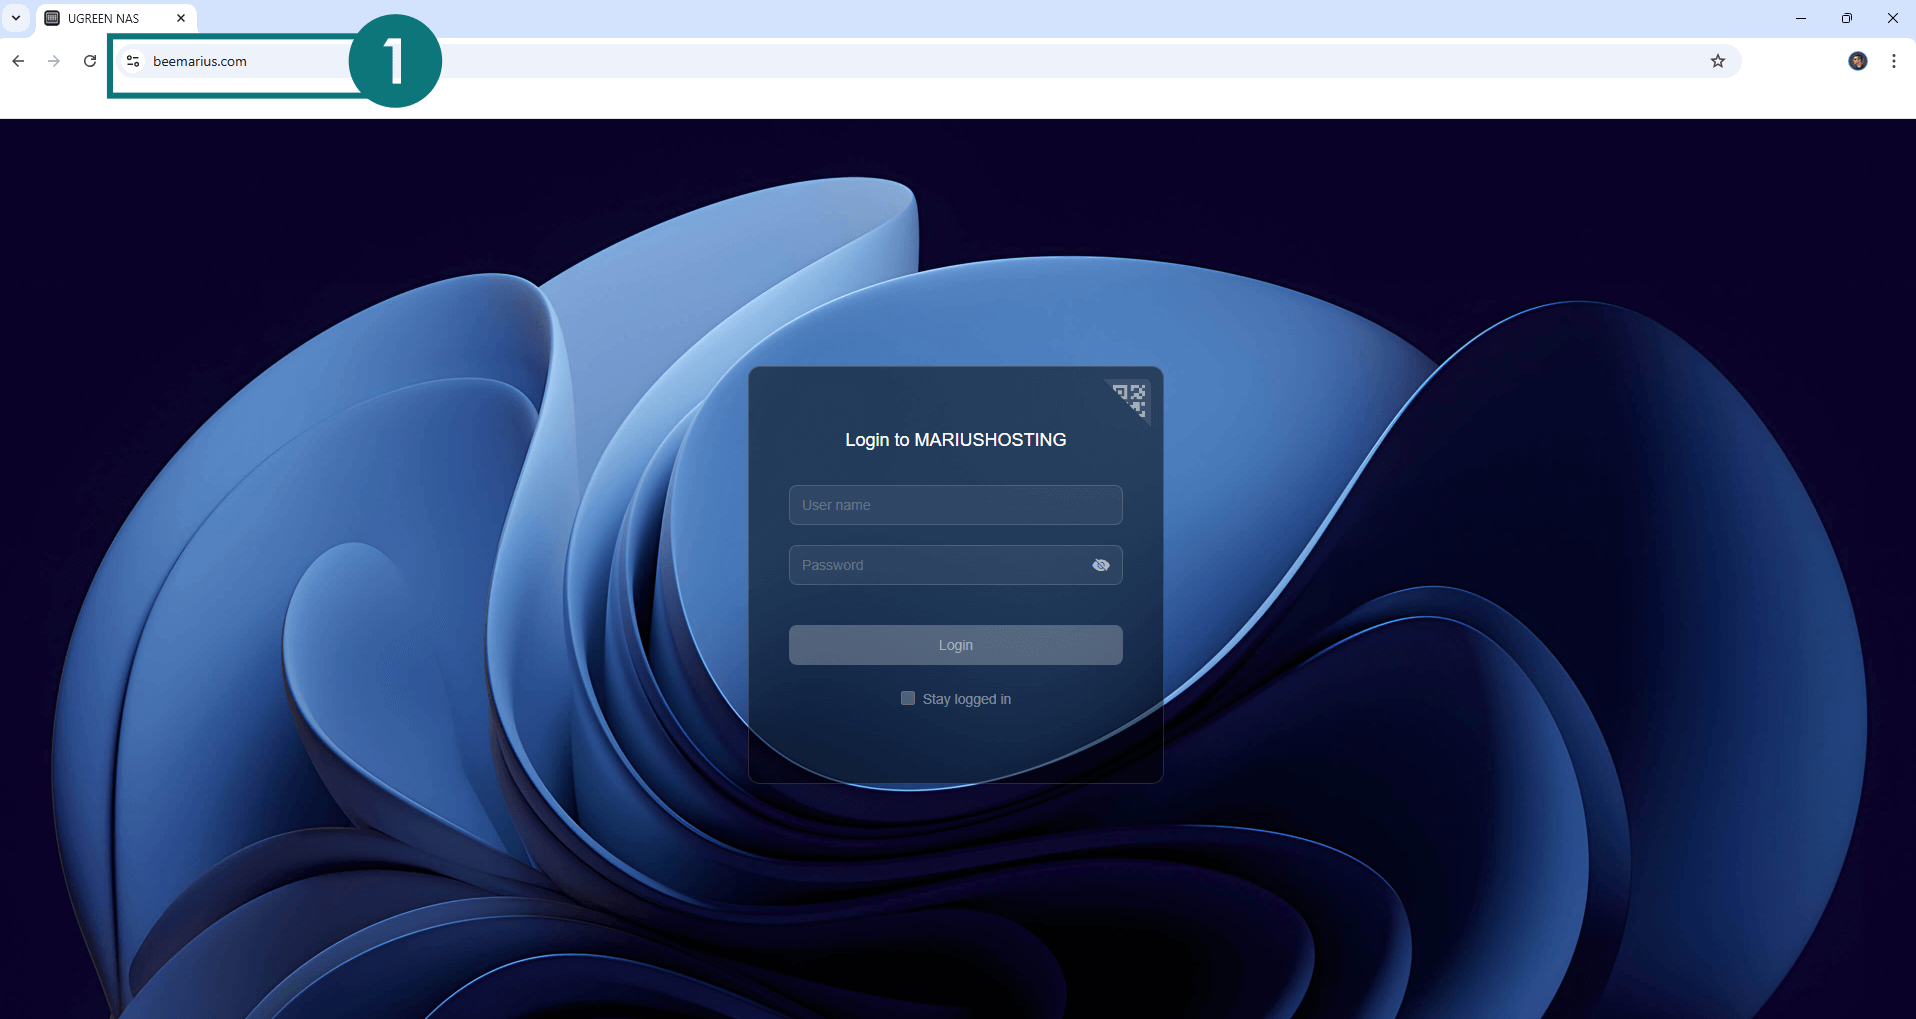
You can now access your UGREEN NAS via HTTPS / SSL Certificate and your own Domain Name from anywhere.
STEP 18
Now, I will show you how to add a new hostname to a specific Docker container. I will use Homarr as an example.
Install Homarr using my step by step guide. If you already have Homarr installed on your UGREEN NAS, skip this STEP. ⚠️Attention: Mandatory STEP.
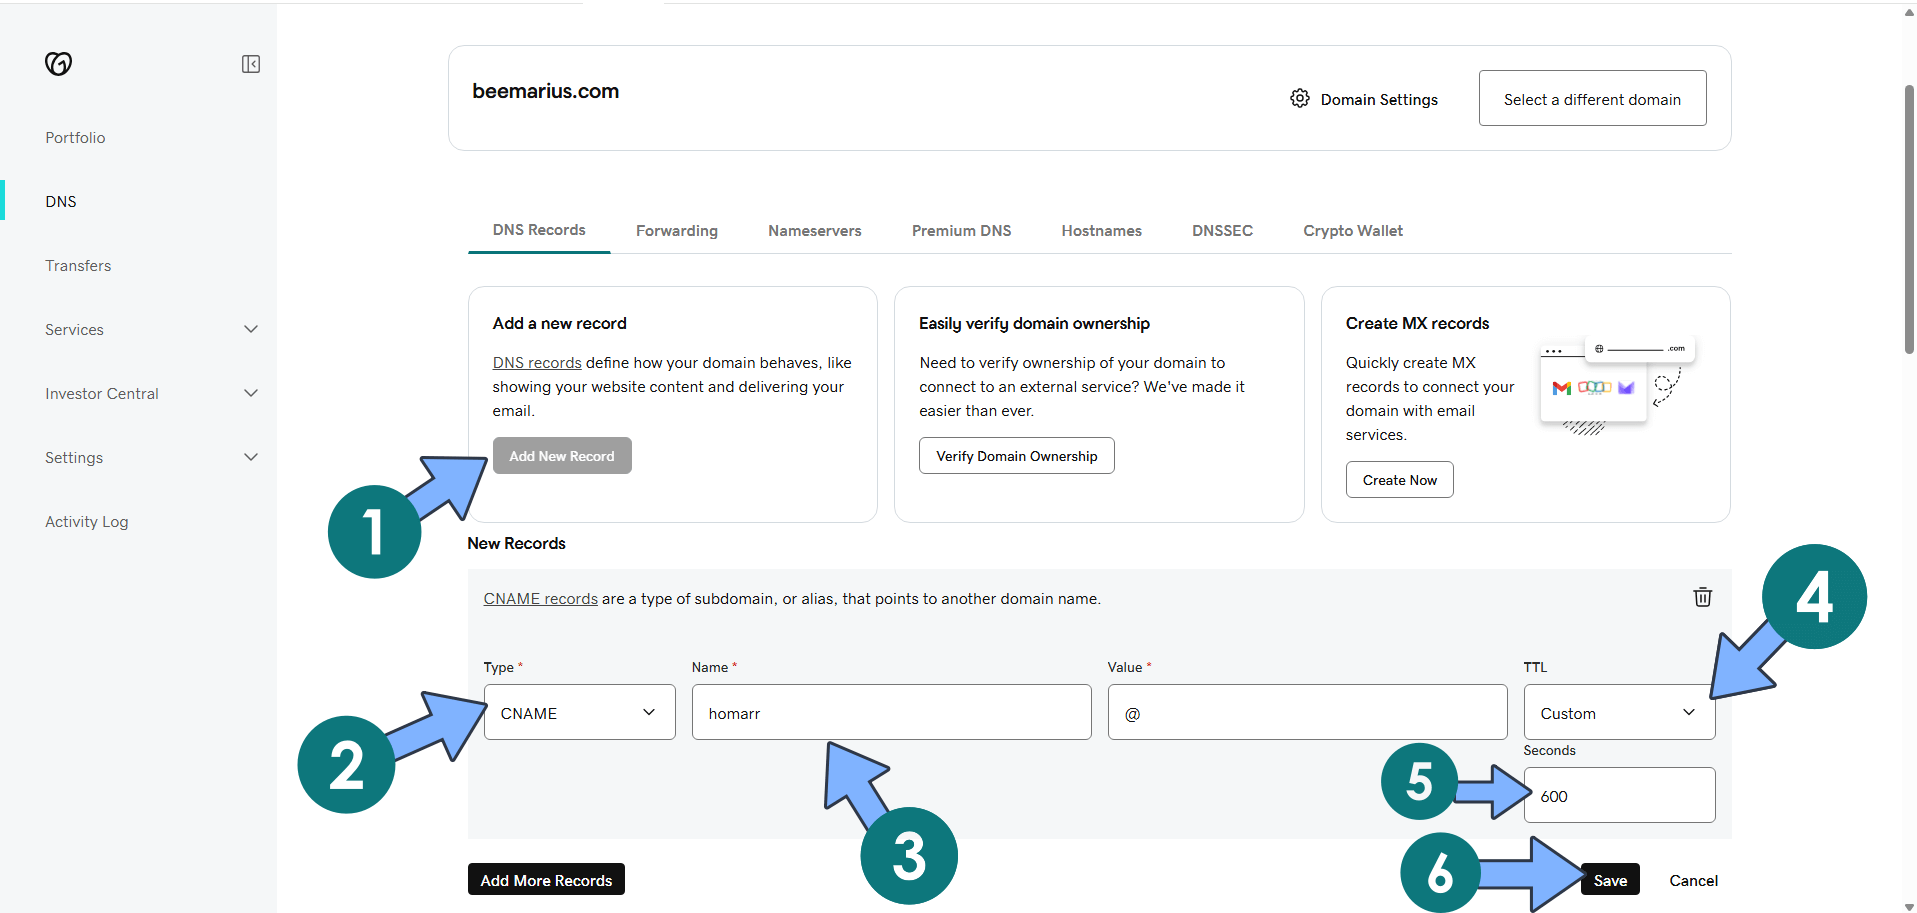
Go to GoDaddy or your domain registrar. Click Manage Products to manage your own domain names through the GoDaddy web interface. Click Manage to manage your domain DNS. Follow the instructions in the image below.

STEP 19
Click Add New Record. Select CNAME. Add the name, for example, homarr. On the Value area, type in @. On the TTL area, select Custom then type in 600 seconds. In GoDaddy’s DNS management, setting a TTL to “custom 600 seconds” means you’re choosing a Time to Live website value of 600 seconds (which equals 10 minutes) for that specific DNS record. Click Save. 📑Note: The updated CNAME (with the new static IP) should start working for most people within about 10 minutes thanks to the short 600-seconds TTL.
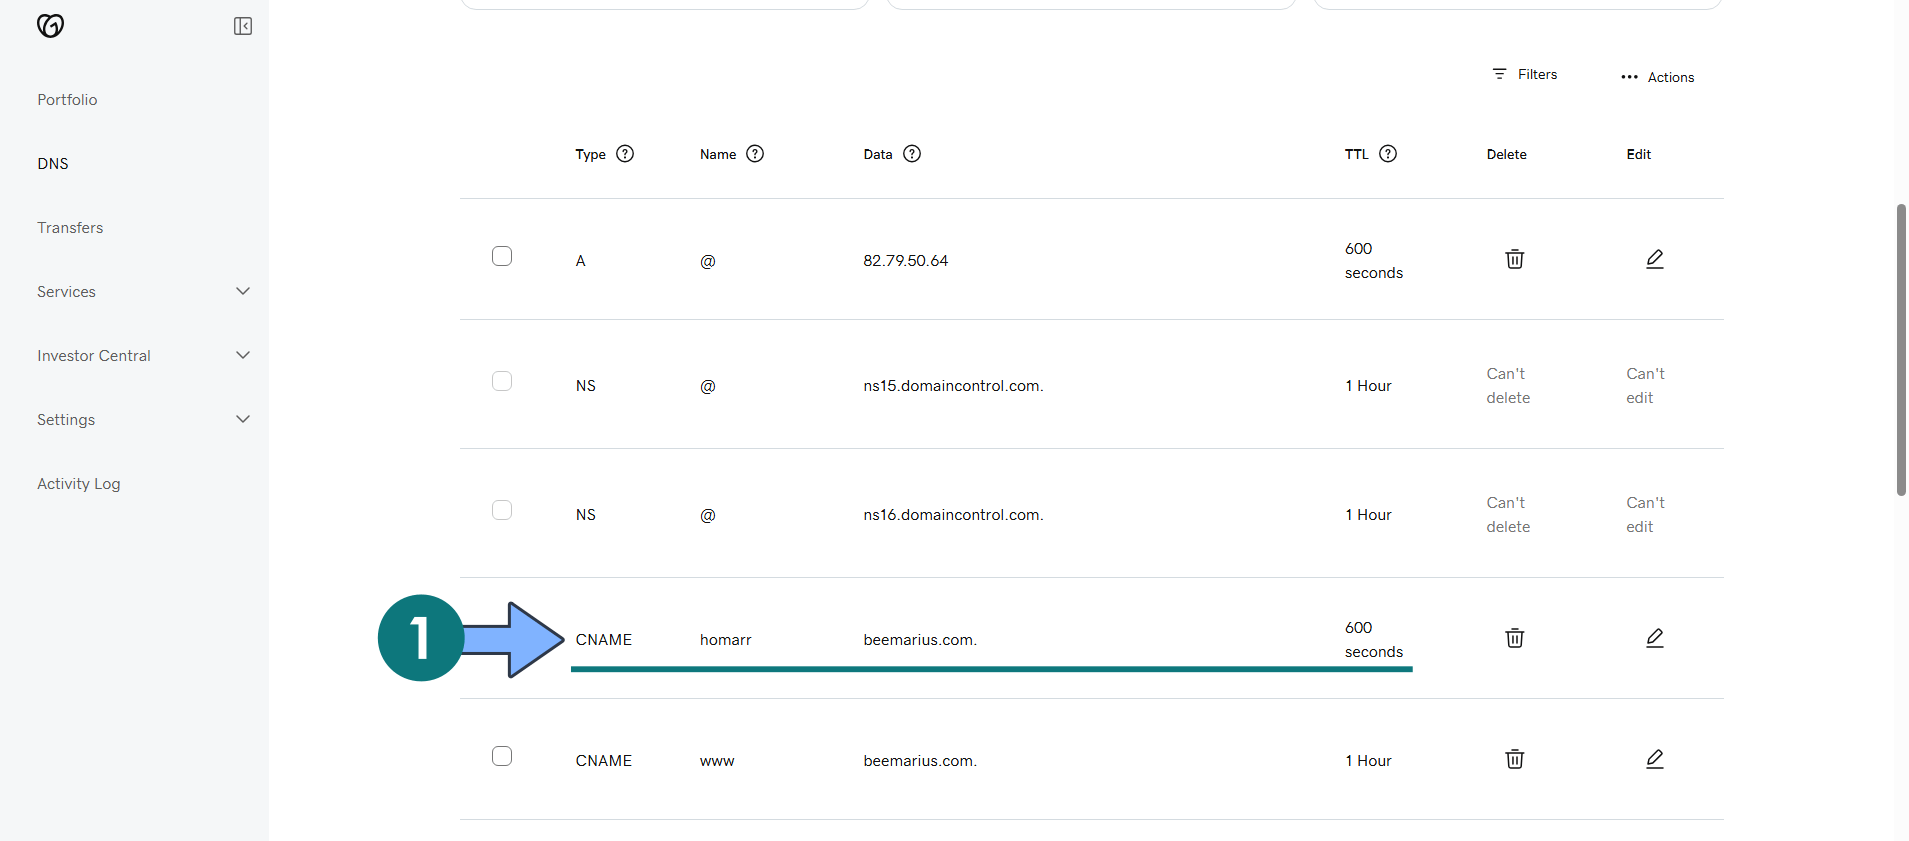
STEP 20
Your CNAME will look like this once created. Go straight to the next STEP.
STEP 21
If 10 minutes have passed since the CNAME was created, proceed with this STEP. Open your Nginx Proxy Manager container that you have previously installed at STEP 10. Click Add Proxy Host. A new pop up window will open. Add the following details:
Domain Names: Type in your own CNAME plus domain name that you have previously created at STEP 19.
Scheme: http
Forward Hostname/IP: Type in the local NAS IP of your UGREEN NAS.
Forward Port: Type in the Homarr local Port that is 7575
Check Block Common Exploits
Check Websockets Support
Click the SSL tab. Follow the instructions in the image below.
STEP 22
After you click the SSL tab, add the following details:
SSL Certificate: Request a new SSL Certificate
Check: Force SSL
Check: HSTS Enabled
Check: HTTP/2 Support
Click Save. Follow the instructions in the image below.

STEP 23
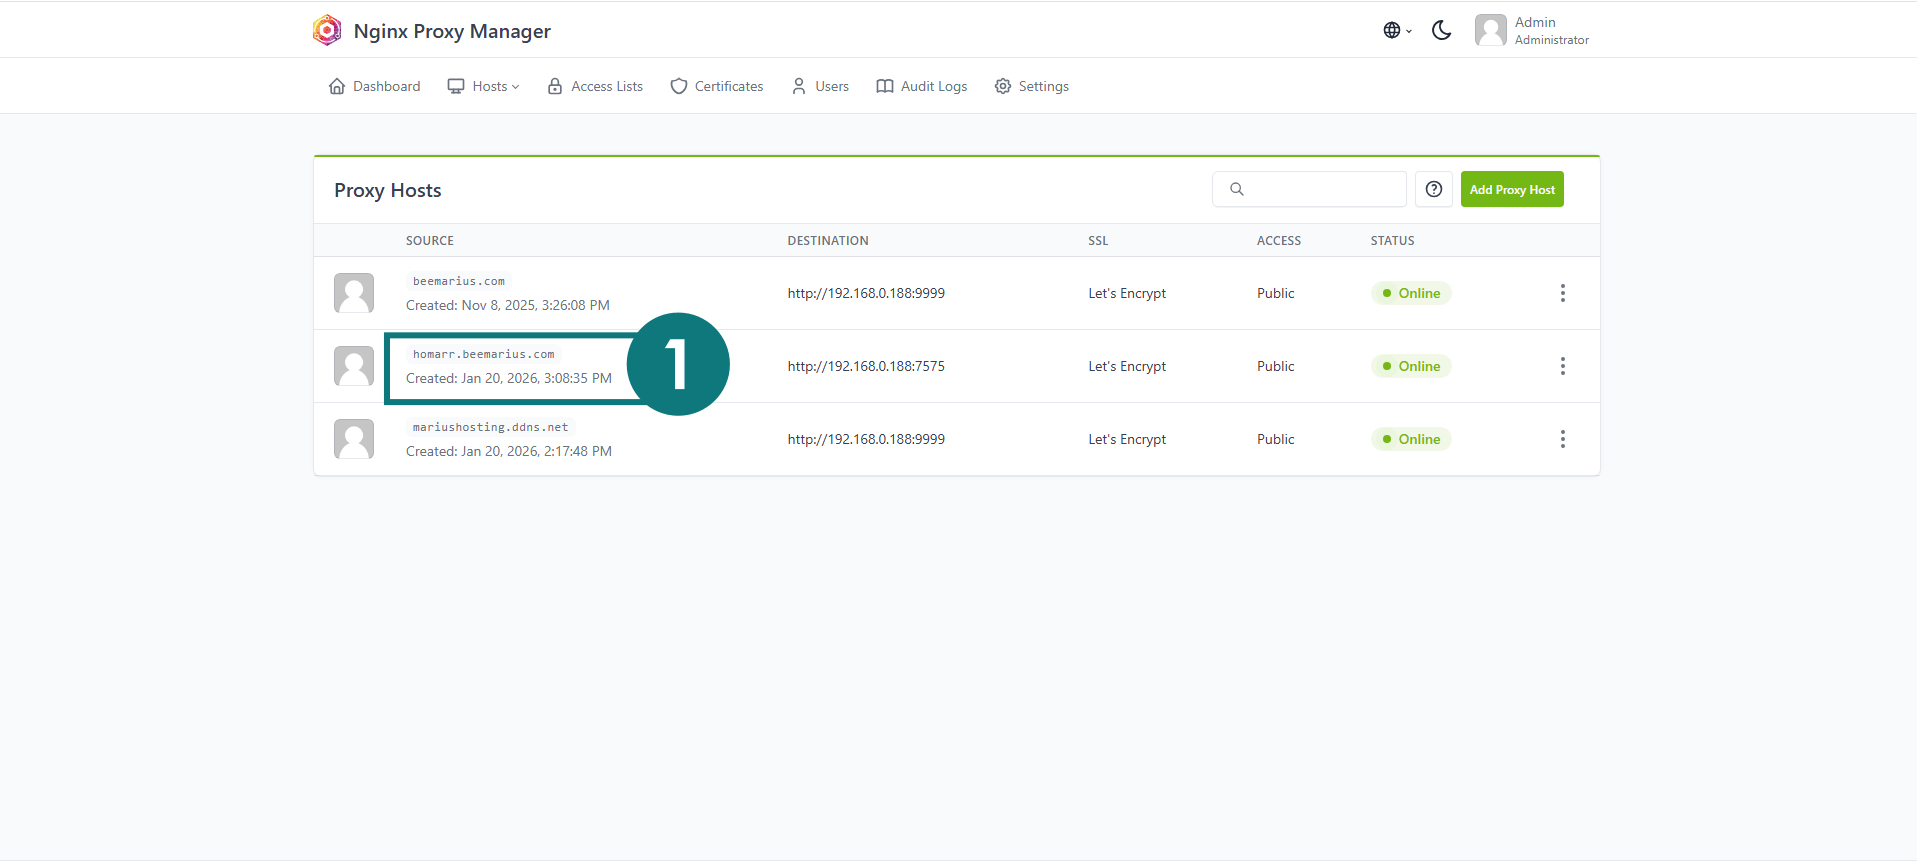
In the Proxy Hosts area, if everything goes right, you will see that your hostname has been generated. Click on it. Follow the instructions in the image below.
STEP 24
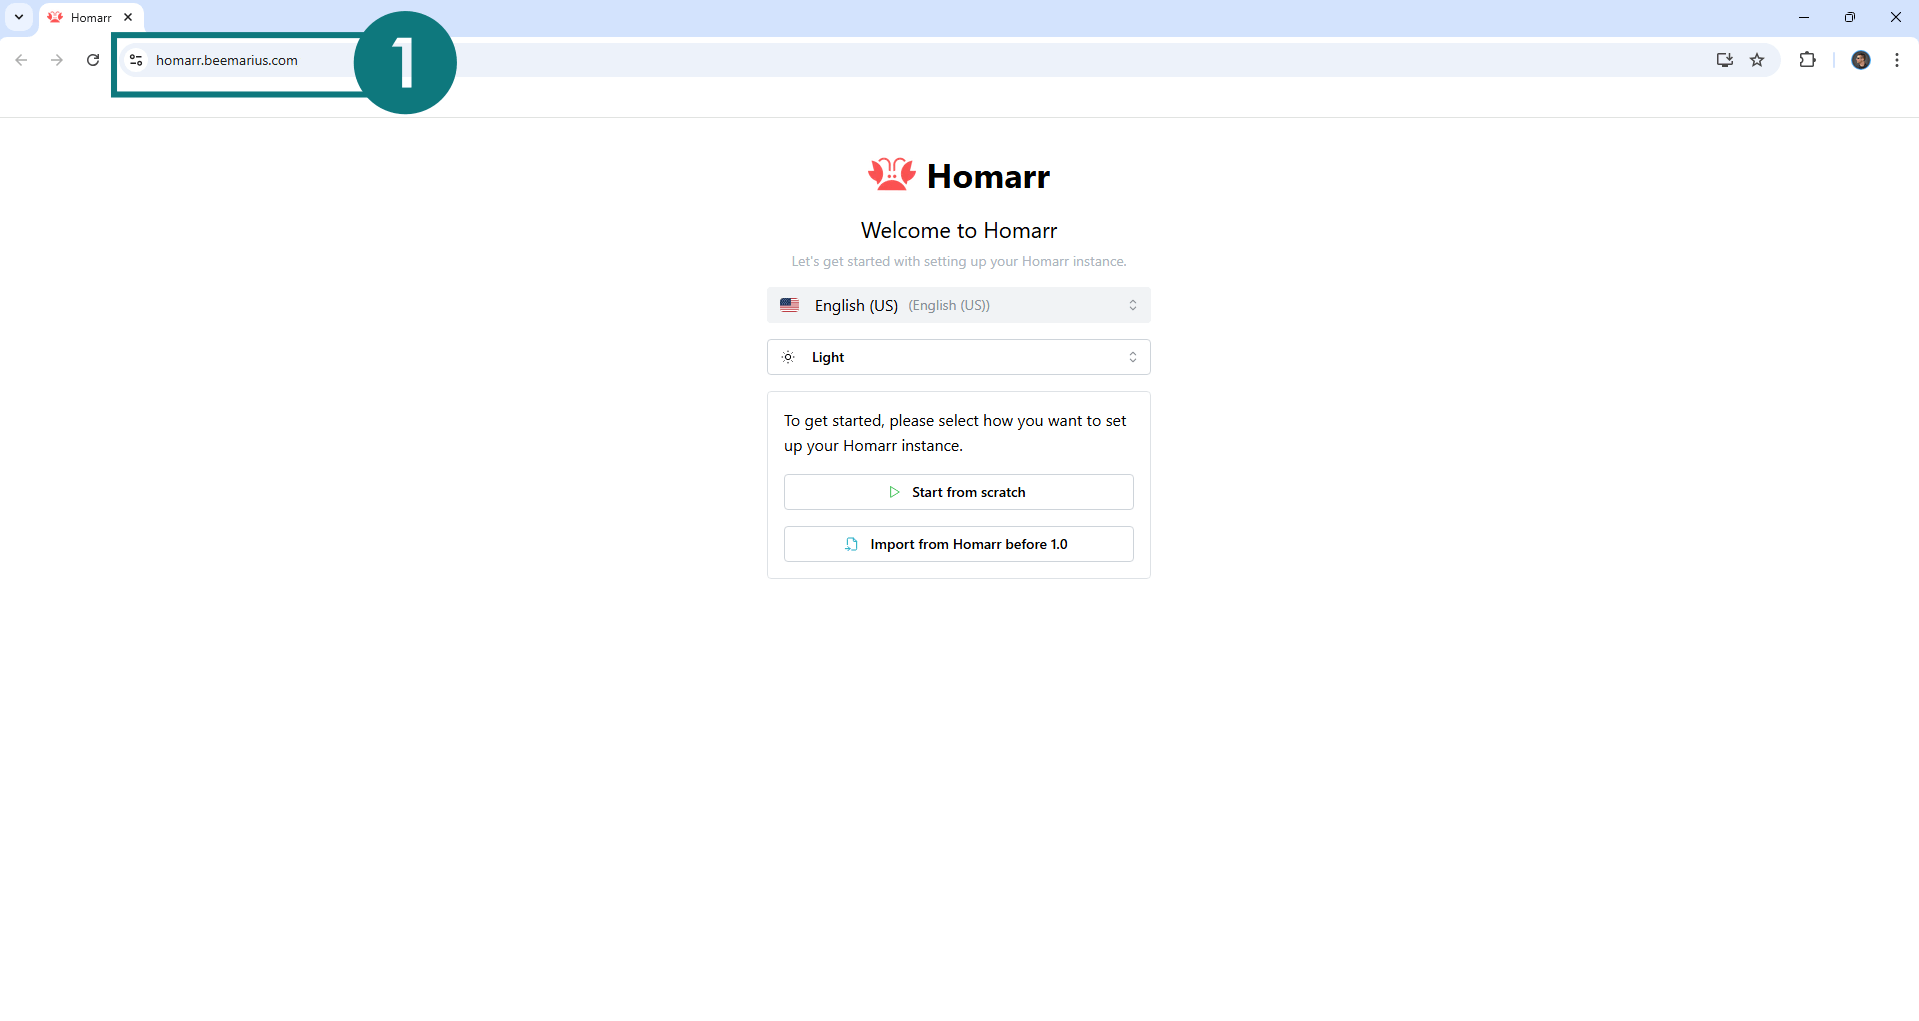
You can now access your Homarr Docker container via HTTPS / SSL Certificate and your OWN Domain Name from anywhere.
STEP 25
From now on, you can create as many CNAME (Subdomains) as you want for every Docker container that you want to expose over the Internet using your personalized subdomain+domain. The procedure is the same as per the instructions from STEP 19 to STEP 23.
This post was updated on Saturday / January 31st, 2026 at 1:56 PM