
ERPNext is a full-featured business management solution that helps SMEs record all their business transactions in a single system. With ERPNext, SMEs can make informed, fact-based, timely decisions to remain ahead of the competition. It serves as the backbone of a business, adding strength, transparency, and control to your growing enterprise. ERPNext will help you: track all invoices and payments, know what quantity of which product is available in stock, identify and track your key performance indicators (KPIs), identify open customer queries, manage employee payrolls, assign tasks and follow up on them, maintain a database of all your customers, suppliers, and contacts, prepare quotations, track your budgets and spending, determine effective selling price based on the actual raw material, machinery, and effort cost, get reminders on maintenance schedules and publish your website. In this step by step guide I will show you how to install ERPNext on your UGREEN NAS using Docker & Portainer. Note: Before installing this container, ensure you are using SSDs for better performance, as the container may struggle to start on older HDDs.
STEP 1
Please Support My work by Making a Donation.
STEP 2
Install Portainer using my step by step guide. If you already have Portainer installed on your UGREEN NAS, skip this STEP. Attention: Make sure you have installed the latest Portainer version.
STEP 3
⚠️Mandatory: Enable HTTPS on your UGREEN NAS.
STEP 4
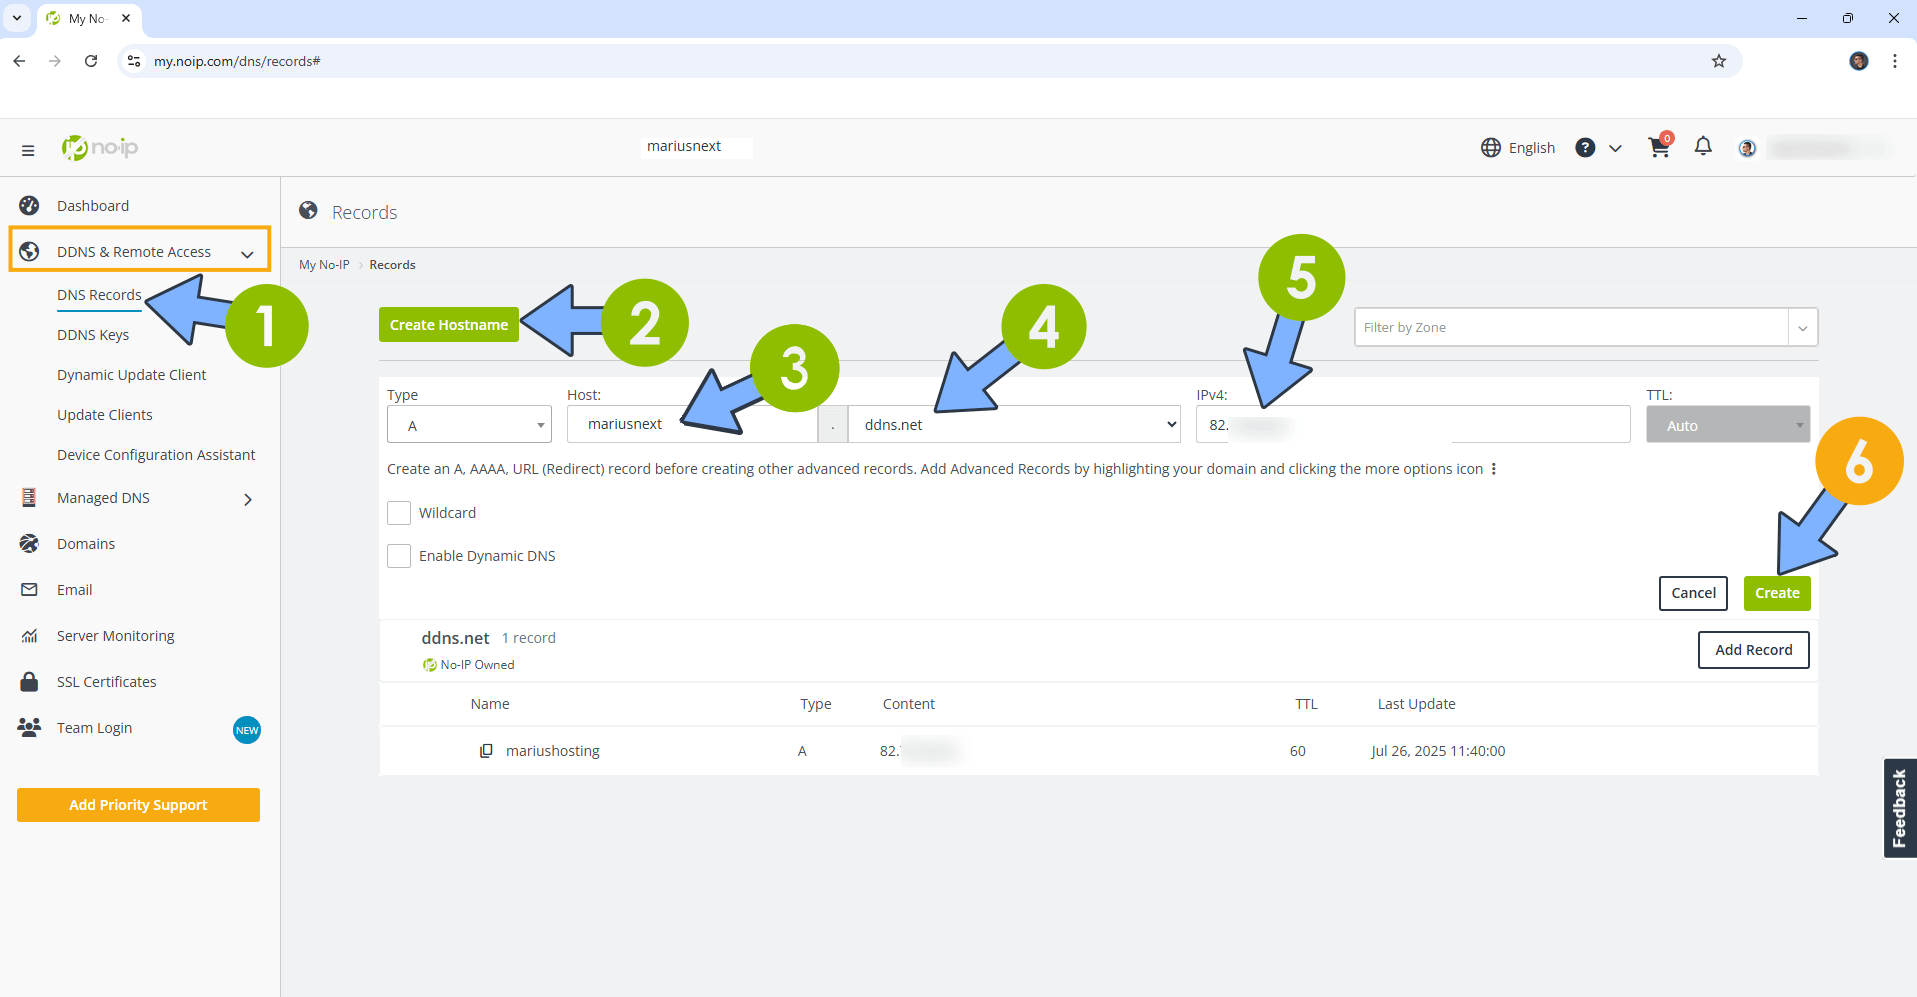
Create a new hostname on the noip website using your noip account. For example, I have created mariusnext as Host and I use the free ddns.net domain. In the IP Address area, type in your own IPV4 IP address from your ISP, then click Create. Follow the instructions in the image below.
STEP 5
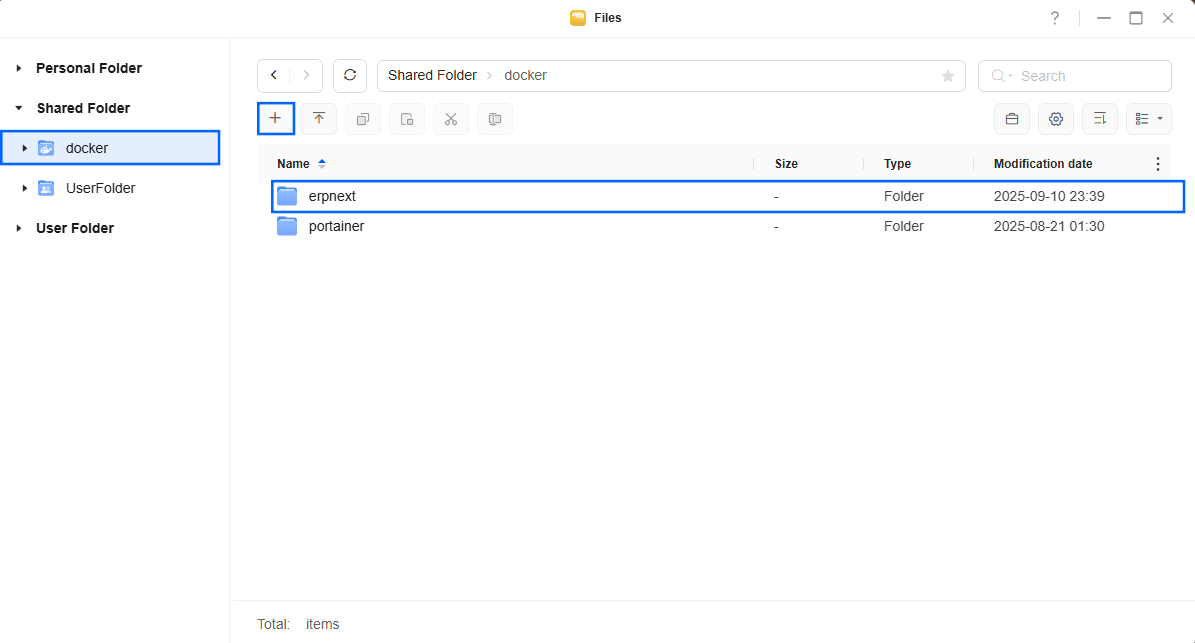
Go to Files and open the docker folder. Inside the docker folder, create one new folder and name it erpnext. Follow the instructions in the image below.
Note: Be careful to enter only lowercase, not uppercase letters.
STEP 6
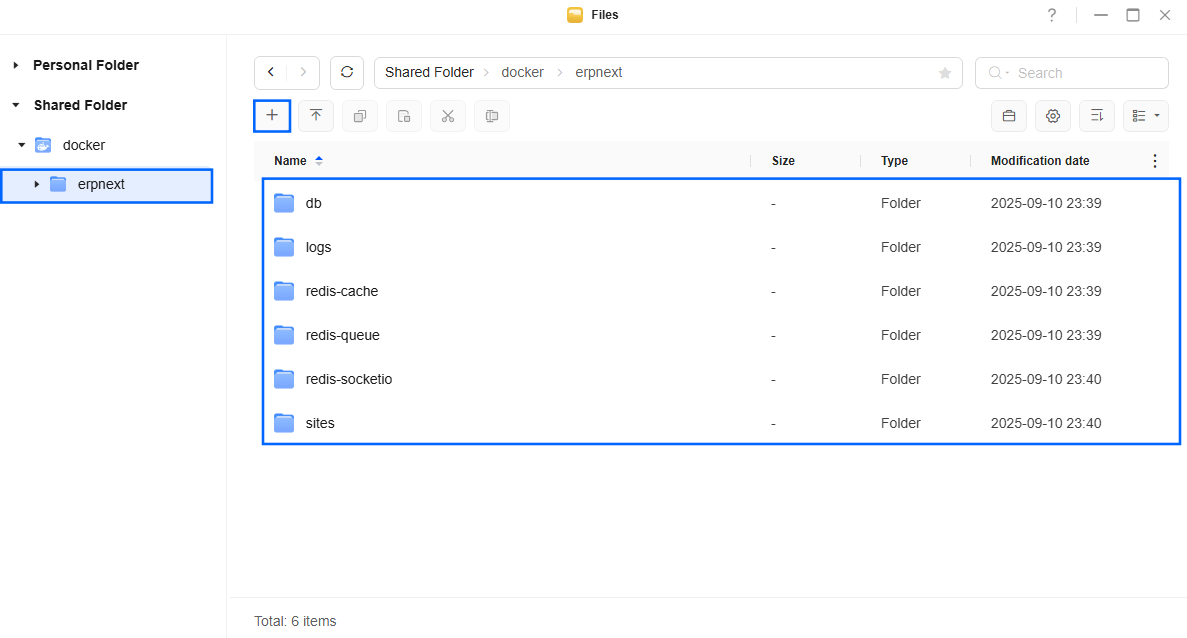
Now create six new folders inside the erpnext folder that you have previously created at STEP 5 and name them db, logs, redis-cache, redis-queue, redis-socketio, sites. Follow the instructions in the image below.
Note: Be careful to enter only lowercase, not uppercase letters.
STEP 7
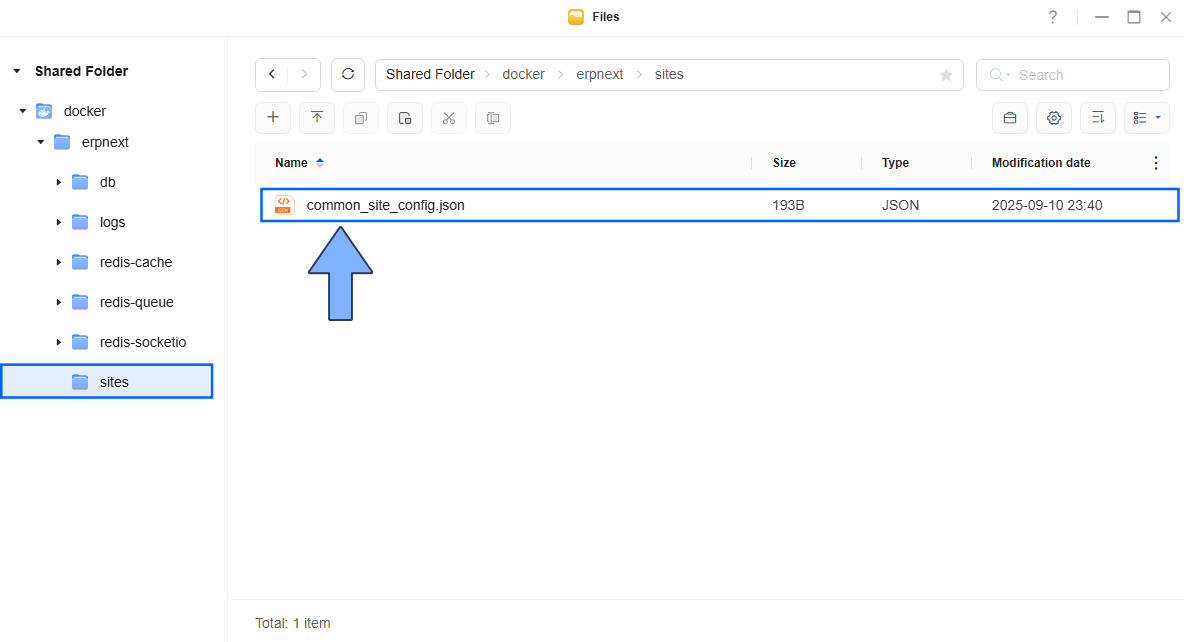
Download (click on the blue link below) then upload the common_site_config.json file below in the site folder that you have previously created at STEP 6. Follow the instructions in the image below. 🔒Note: Support my work to unlock the password. You can use this password to download any file on mariushosting forever!
STEP 8
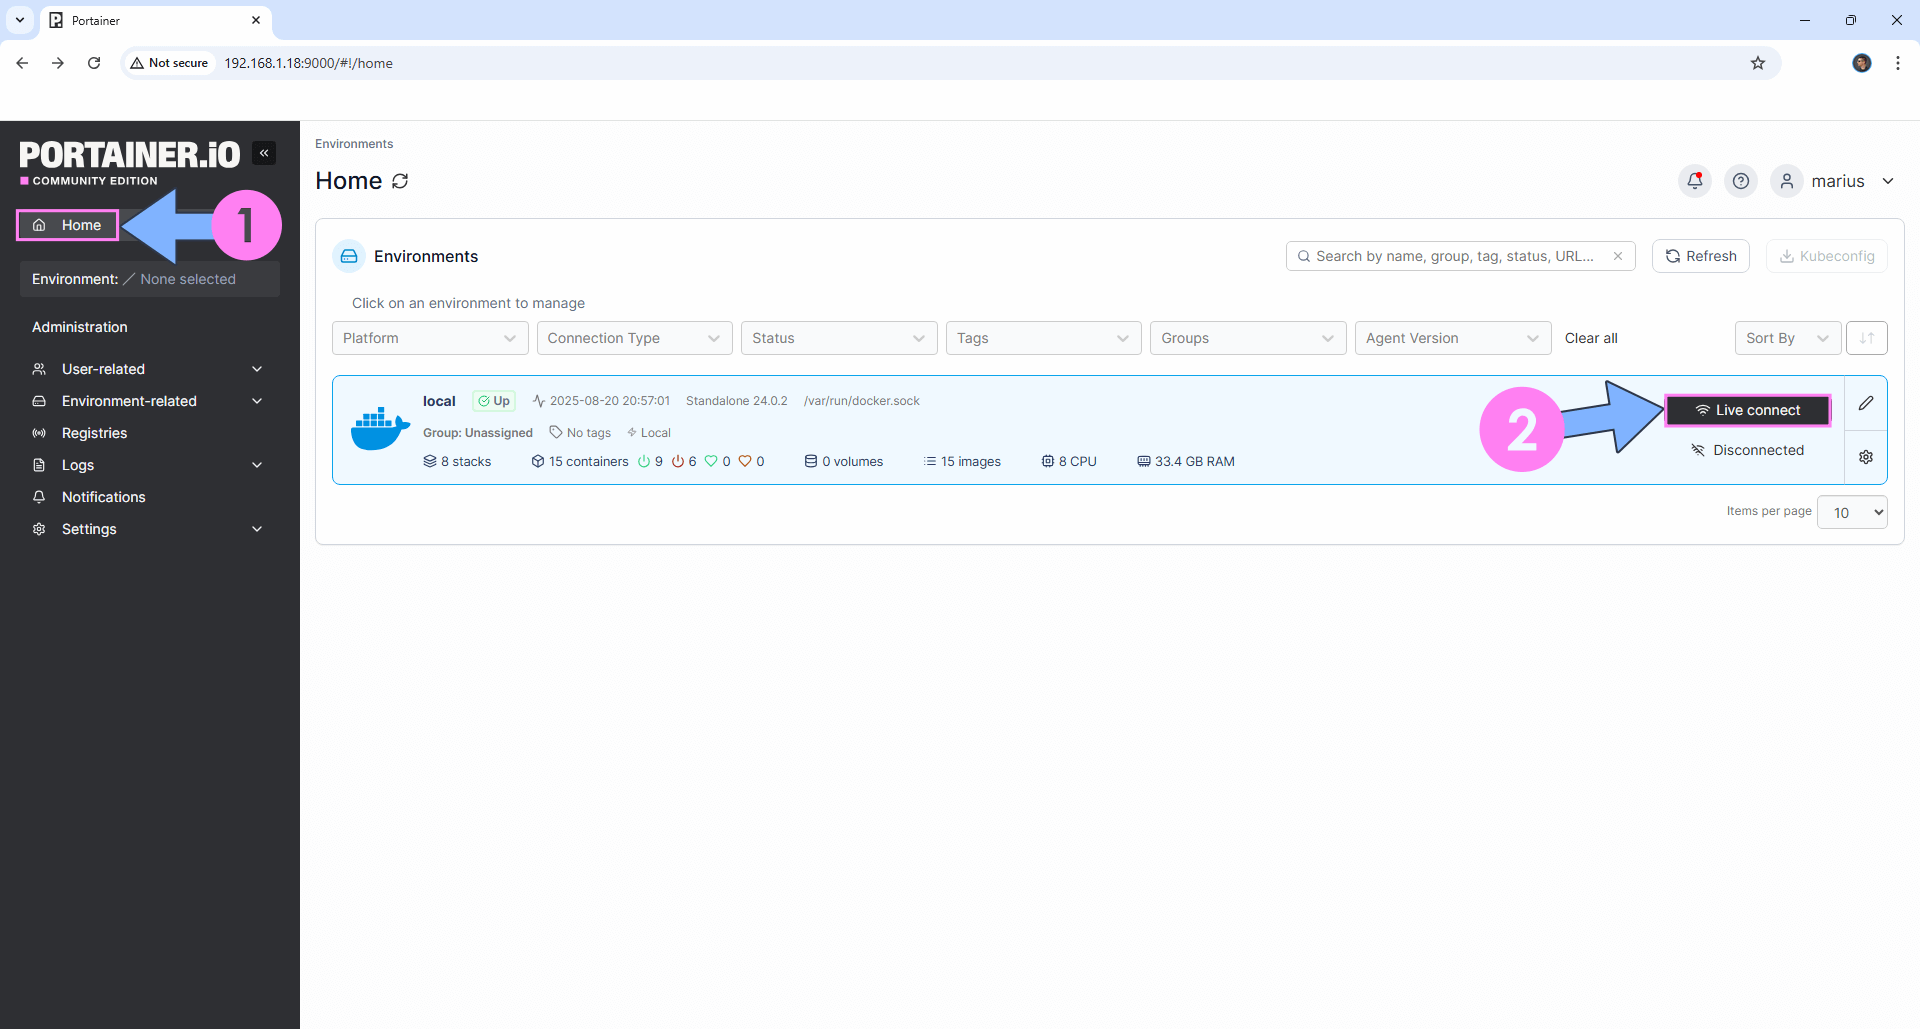
Log into Portainer using your username and password. On the left sidebar in Portainer, click on Home then Live connect. Follow the instructions in the image below.
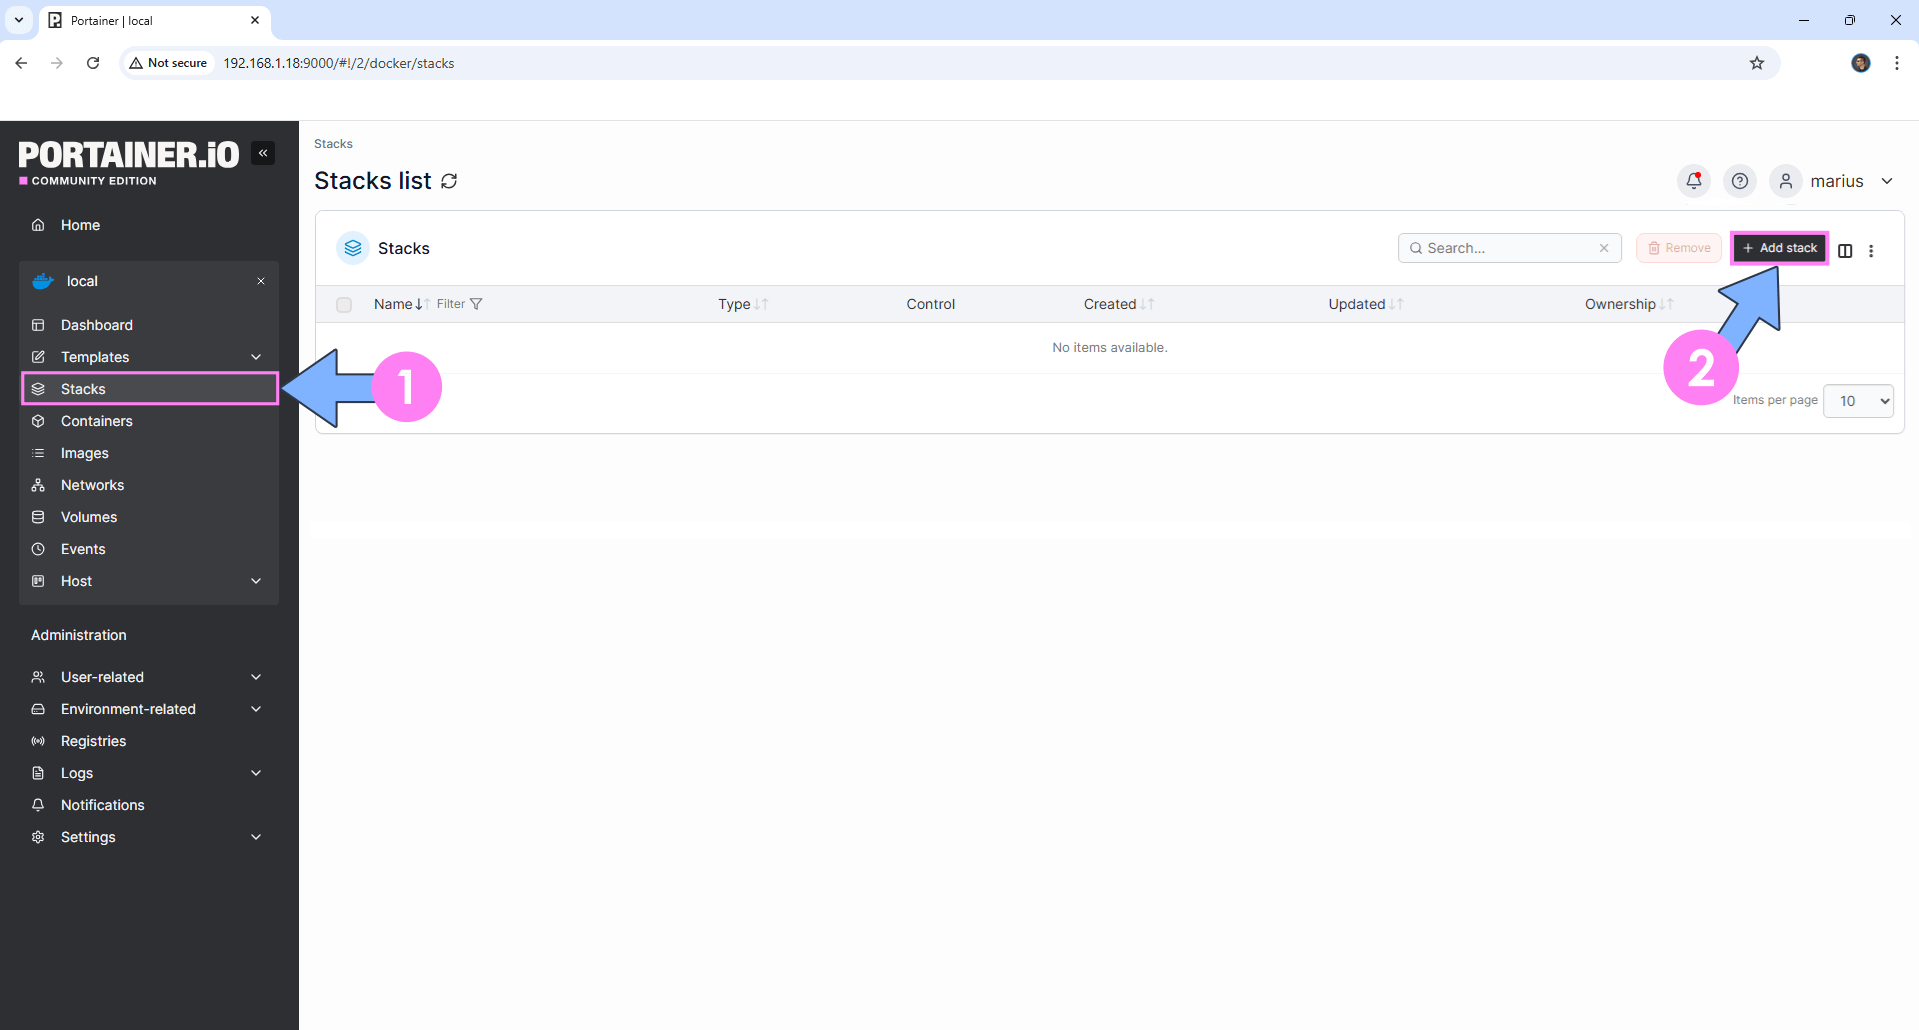
On the left sidebar in Portainer, click on Stacks then + Add stack. Follow the instructions in the image below.
STEP 9
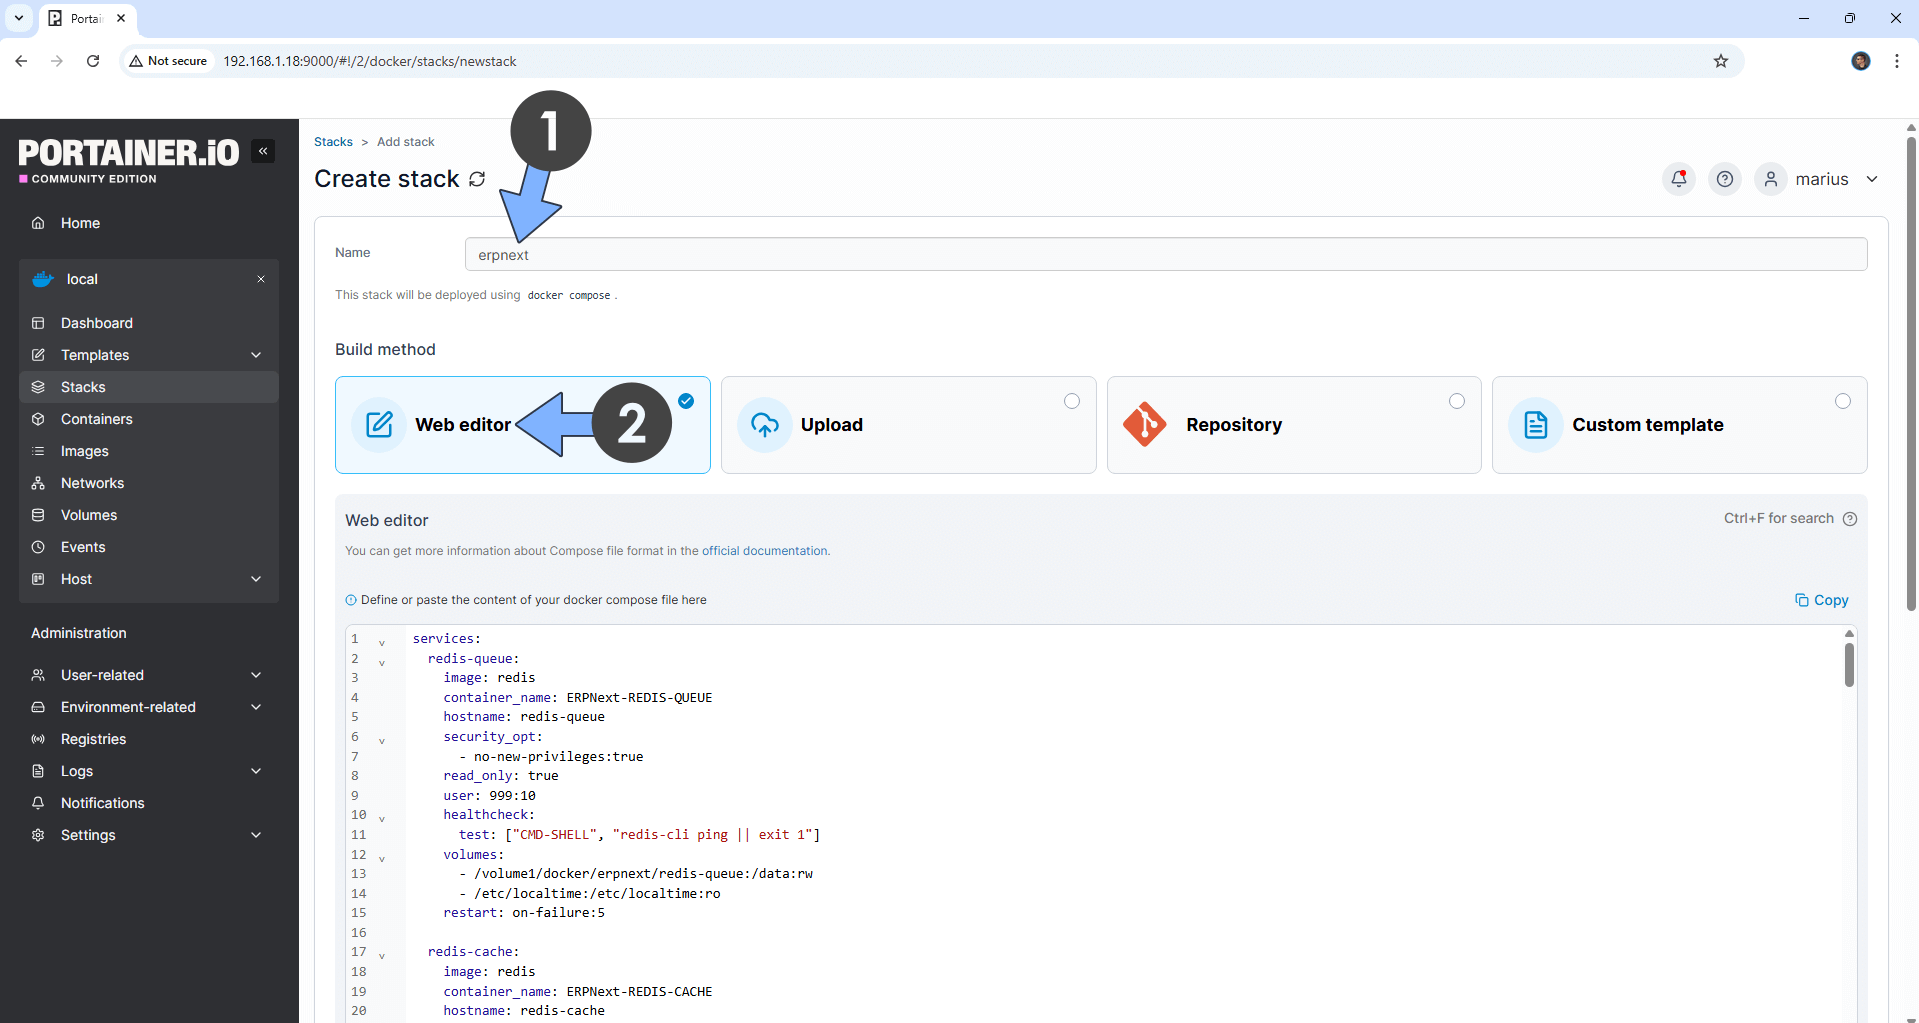
In the Name field type in erpnext. Follow the instructions in the image below.
services:
  redis-queue:
    image: redis
    container_name: ERPNext-REDIS-QUEUE
    hostname: redis-queue
    security_opt:
      - no-new-privileges:true
    read_only: true
    user: 999:10
    healthcheck:
      test: ["CMD-SHELL", "redis-cli ping || exit 1"]
    volumes:
      - /volume1/docker/erpnext/redis-queue:/data:rw
      - /etc/localtime:/etc/localtime:ro
    restart: on-failure:5

  redis-cache:
    image: redis
    container_name: ERPNext-REDIS-CACHE
    hostname: redis-cache
    security_opt:
      - no-new-privileges:true
    read_only: true
    user: 999:10
    healthcheck:
      test: ["CMD-SHELL", "redis-cli ping || exit 1"]
    volumes:
      - /volume1/docker/erpnext/redis-cache:/data:rw
      - /etc/localtime:/etc/localtime:ro
    restart: on-failure:5

  redis-socketio:
    image: redis
    container_name: ERPNext-REDIS-SOCKETIO
    hostname: redis-socketio
    security_opt:
      - no-new-privileges:true
    read_only: true
    user: 999:10
    healthcheck:
      test: ["CMD-SHELL", "redis-cli ping || exit 1"]
    volumes:
      - /volume1/docker/erpnext/redis-socketio:/data:rw
      - /etc/localtime:/etc/localtime:ro
    restart: on-failure:5

  db:
    image: mariadb:10.8-jammy
    command:
      - --character-set-server=utf8mb4
      - --collation-server=utf8mb4_unicode_ci
      - --skip-character-set-client-handshake
    container_name: ERPNext-DB
    hostname: erpnext-db
    security_opt:
      - no-new-privileges:true
    user: 999:10
    healthcheck:
      test: ["CMD-SHELL", "mysqladmin ping -u root -prootpass | grep 'mysqld is alive' || exit 1"]
    volumes:
      - /volume1/docker/erpnext/db:/var/lib/mysql:rw
      - /etc/localtime:/etc/localtime:ro
    environment:
      MYSQL_ROOT_PASSWORD: rootpass
    restart: on-failure:5

  configurator:
    image: frappe/erpnext:latest
    container_name: ERPNext-CONFIGURATOR
    entrypoint:
      - bash
      - -c
    command:
      - >
        ls -1 apps > sites/apps.txt;
        bench set-config -g db_host erpnext-db;
        bench set-config -gp db_port 3306;
        bench set-config -g redis_cache "redis://redis-cache";
        bench set-config -g redis_queue "redis://redis-queue";
        bench set-config -g redis_socketio "redis://redis-socketio";
        bench set-config -gp socketio_port 9000;
    hostname: configurator
    security_opt:
      - no-new-privileges:true
    volumes:
      - /volume1/docker/erpnext/sites:/home/frappe/frappe-bench/sites:rw
      - /volume1/docker/erpnext/logs:/home/frappe/frappe-bench/logs:rw
      - /etc/localtime:/etc/localtime:ro
    environment:
      DB_HOST: erpnext-db
      DB_PORT: 3306
      REDIS_CACHE: redis-cache
      REDIS_QUEUE: redis-queue
      REDIS_SOCKETIO: redis-socketio
      SOCKETIO_PORT: 9000
    restart: "no"
    depends_on:
      redis-queue:
        condition: service_healthy
      redis-cache:
        condition: service_healthy
      redis-socketio:
        condition: service_healthy
      db:
        condition: service_healthy

  backend:
    image: frappe/erpnext:latest
    container_name: ERPNext-BACKEND
    hostname: backend
    security_opt:
      - no-new-privileges:true
    volumes:
      - /volume1/docker/erpnext/sites:/home/frappe/frappe-bench/sites:rw
      - /volume1/docker/erpnext/logs:/home/frappe/frappe-bench/logs:rw
      - /etc/localtime:/etc/localtime:ro
    depends_on:
      configurator:
        condition: service_completed_successfully
    restart: on-failure:5

  websocket:
    image: frappe/erpnext:latest
    container_name: ERPNext-WEBOSCKET
    command:
      - node
      - /home/frappe/frappe-bench/apps/frappe/socketio.js
    hostname: websocket
    security_opt:
      - no-new-privileges:true
    volumes:
      - /volume1/docker/erpnext/sites:/home/frappe/frappe-bench/sites:rw
      - /volume1/docker/erpnext/logs:/home/frappe/frappe-bench/logs:rw
      - /etc/localtime:/etc/localtime:ro
    depends_on:
      configurator:
        condition: service_completed_successfully
    restart: on-failure:5

  create-site:
    image: frappe/erpnext:latest
    container_name: ERPNext-CREATE-SITE
    entrypoint:
      - bash
      - -c
    command:
      - >
        wait-for-it -t 480 erpnext-db:3306;
        wait-for-it -t 480 redis-cache:6379;
        wait-for-it -t 480 redis-queue:6379;
        wait-for-it -t 480 redis-socketio:6379;
        export start=`date +%s`;
        until [[ -n `grep -hs ^ sites/common_site_config.json | jq -r ".db_host // empty"` ]] && \
          [[ -n `grep -hs ^ sites/common_site_config.json | jq -r ".redis_cache // empty"` ]] && \
          [[ -n `grep -hs ^ sites/common_site_config.json | jq -r ".redis_queue // empty"` ]];
        do
          echo "Waiting for sites/common_site_config.json to be created";
          sleep 5;
          if (( `date +%s`-start > 120 )); then
            echo "could not find sites/common_site_config.json with required keys";
            exit 1
          fi
        done;
        echo "sites/common_site_config.json found";
        bench new-site Frappe --no-mariadb-socket --mariadb-root-password=rootpass --admin-password=admin --install-app=erpnext --set-default;
    hostname: create-site
    security_opt:
      - no-new-privileges:true
    volumes:
      - /volume1/docker/erpnext/sites:/home/frappe/frappe-bench/sites:rw
      - /volume1/docker/erpnext/logs:/home/frappe/frappe-bench/logs:rw
      - /etc/localtime:/etc/localtime:ro
    restart: "no"
    depends_on:
      configurator:
        condition: service_completed_successfully

  queue-default:
    image: frappe/erpnext:latest
    container_name: ERPNext-QUEUE-DEFAULT
    command: bench worker --queue default
    hostname: queue-default
    security_opt:
      - no-new-privileges:true
    volumes:
      - /volume1/docker/erpnext/sites:/home/frappe/frappe-bench/sites:rw
      - /volume1/docker/erpnext/logs:/home/frappe/frappe-bench/logs:rw
      - /etc/localtime:/etc/localtime:ro
    depends_on:
      configurator:
        condition: service_completed_successfully
    restart: on-failure:5

  queue-long:
    image: frappe/erpnext:latest
    container_name: ERPNext-QUEUE-LONG
    command: bench worker --queue long
    hostname: queue-long
    security_opt:
      - no-new-privileges:true
    volumes:
      - /volume1/docker/erpnext/sites:/home/frappe/frappe-bench/sites:rw
      - /volume1/docker/erpnext/logs:/home/frappe/frappe-bench/logs:rw
      - /etc/localtime:/etc/localtime:ro
    depends_on:
      configurator:
        condition: service_completed_successfully
    restart: on-failure:5

  queue-short:
    image: frappe/erpnext:latest
    container_name: ERPNext-QUEUE-SHORT
    command: bench worker --queue short
    hostname: queue-short
    security_opt:
      - no-new-privileges:true
    volumes:
      - /volume1/docker/erpnext/sites:/home/frappe/frappe-bench/sites:rw
      - /volume1/docker/erpnext/logs:/home/frappe/frappe-bench/logs:rw
      - /etc/localtime:/etc/localtime:ro
    depends_on:
      configurator:
        condition: service_completed_successfully
    restart: on-failure:5

  scheduler:
    image: frappe/erpnext:latest
    container_name: ERPNext-SCHEDULER
    command: bench schedule
    hostname: scheduler
    security_opt:
      - no-new-privileges:true
    volumes:
      - /volume1/docker/erpnext/sites:/home/frappe/frappe-bench/sites:rw
      - /volume1/docker/erpnext/logs:/home/frappe/frappe-bench/logs:rw
      - /etc/localtime:/etc/localtime:ro
    depends_on:
      configurator:
        condition: service_completed_successfully
    restart: on-failure:5

  frontend:
    image: frappe/erpnext:latest
    container_name: ERPNext-FRONTEND
    command:
      - nginx-entrypoint.sh
    hostname: frontend
    security_opt:
      - no-new-privileges:true
    ports:
      - 8345:8080
    volumes:
      - /volume1/docker/erpnext/sites:/home/frappe/frappe-bench/sites:rw
      - /volume1/docker/erpnext/logs:/home/frappe/frappe-bench/logs:rw
      - /etc/localtime:/etc/localtime:ro
    environment:
      BACKEND: backend:8000
      FRAPPE_SITE_NAME_HEADER: Frappe
      SOCKETIO: websocket:9000
      UPSTREAM_REAL_IP_ADDRESS: 127.0.0.1
      UPSTREAM_REAL_IP_HEADER: X-Forwarded-For
      UPSTREAM_REAL_IP_RECURSIVE: "off"
      PROXY_READ_TIMOUT: 120
      CLIENT_MAX_BODY_SIZE: 50m
    depends_on:
      backend:
        condition: service_started
      websocket:
        condition: service_started
    restart: on-failure:5
Note: Before you paste the code above in the Web editor area below, change the value numbers for user with your own UID and GID values. (Follow my step by step guide on how to do this.) 999 is my personal UID value and 10 is my personal GID value. You have to type in your own values.
STEP 10
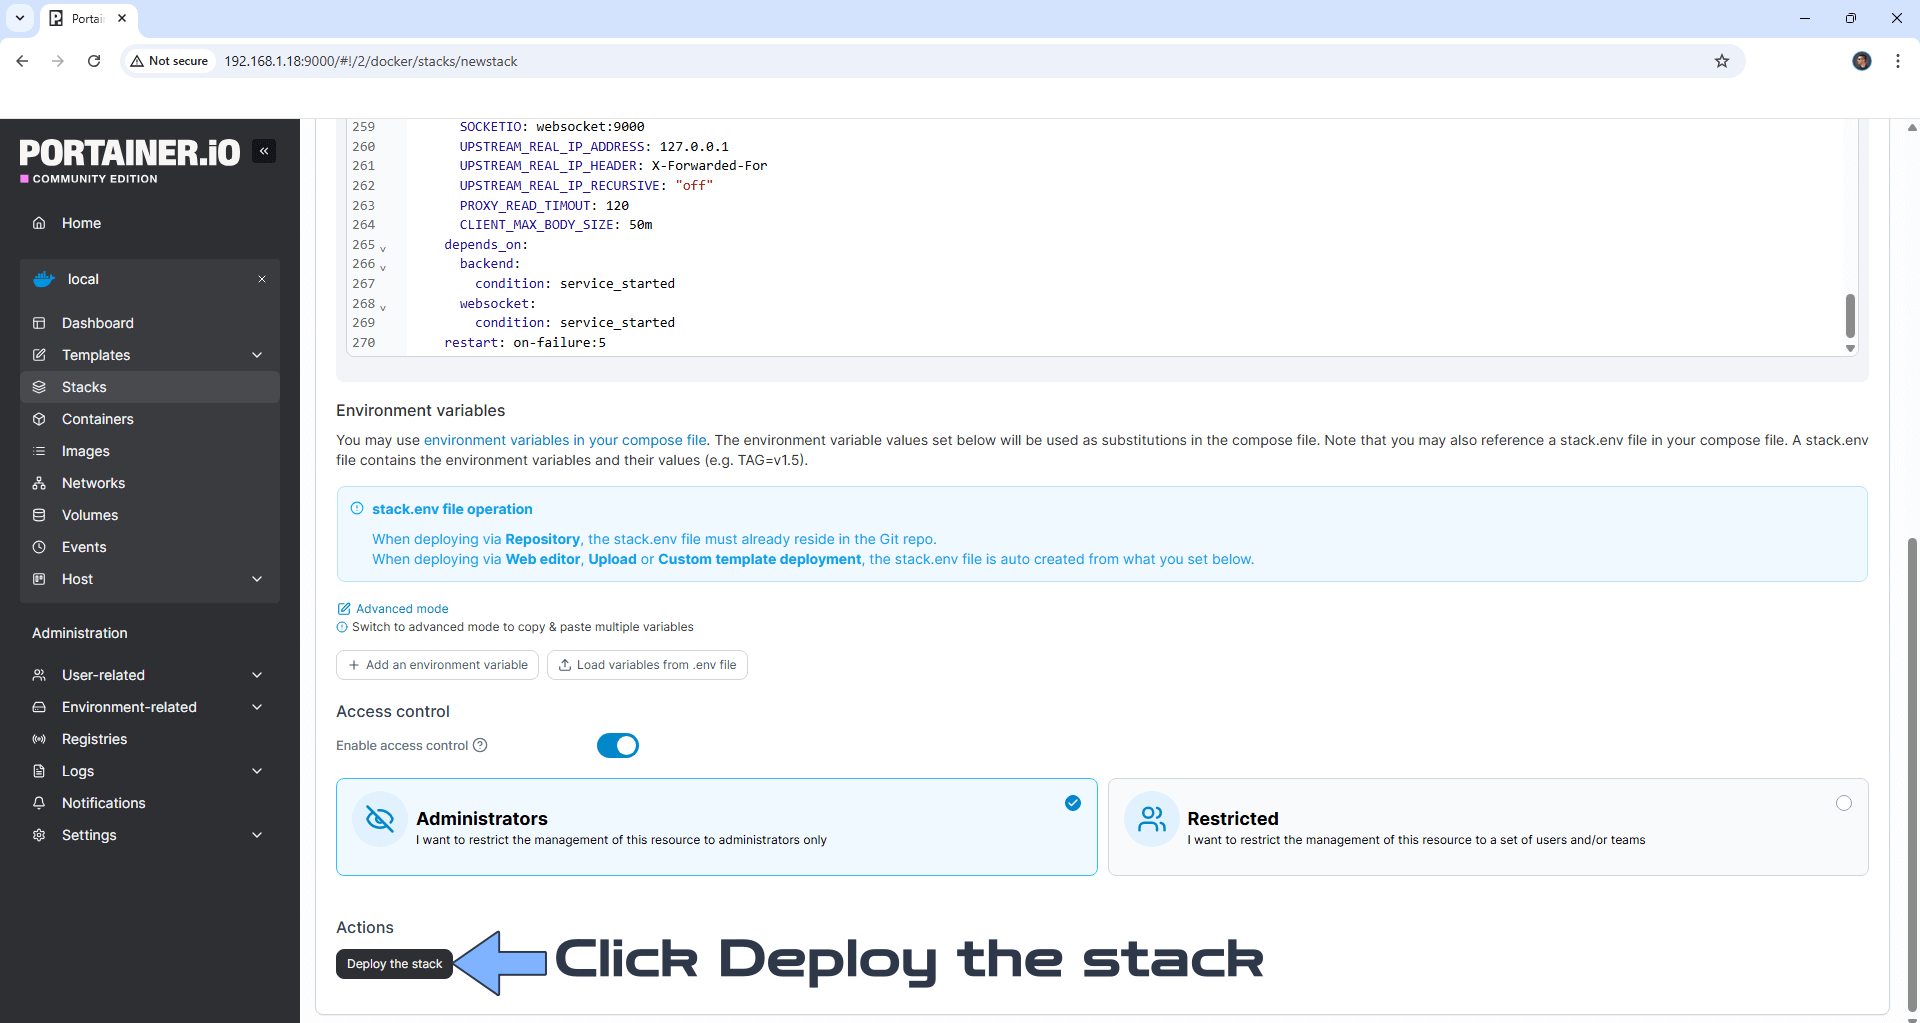
Scroll down on the page until you see a button named Deploy the stack. Click on it. Follow the instructions in the image below. The installation process can take up to a few minutes. It will depend on your Internet speed connection.
STEP 11
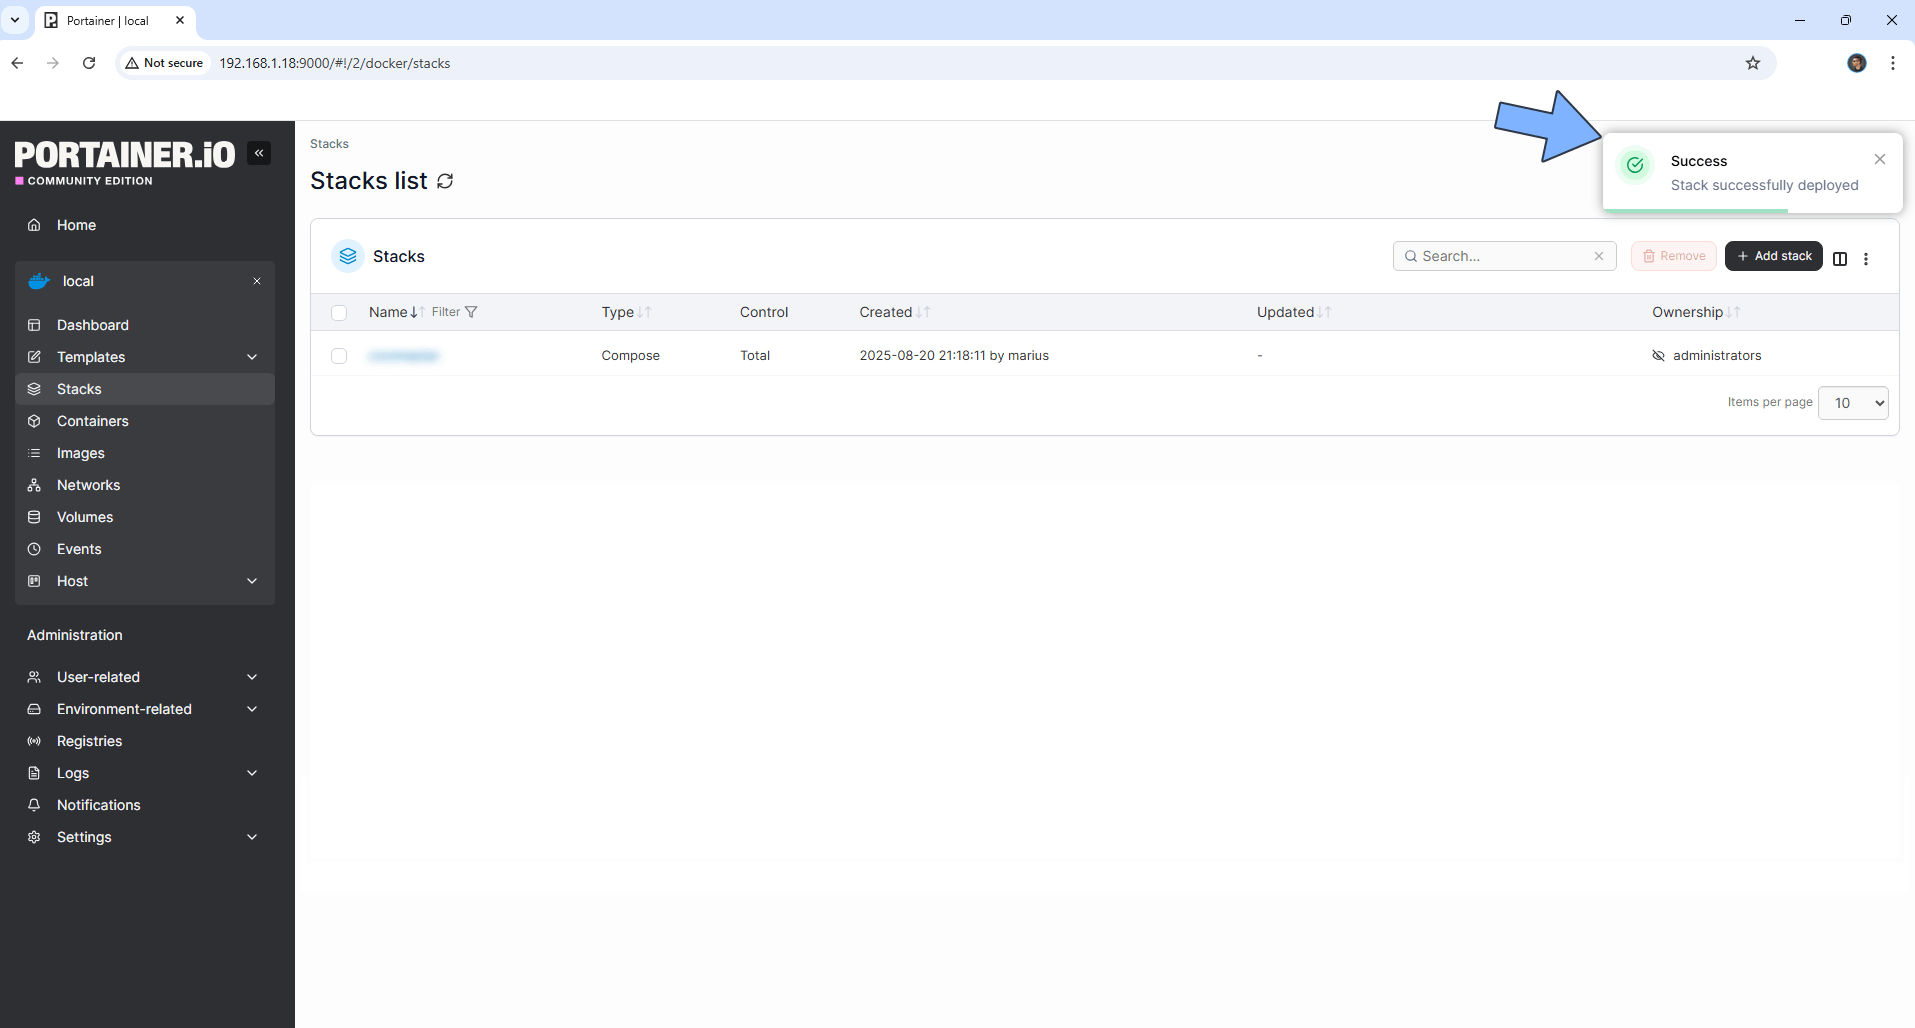
If everything goes right, you will see the following message at the top right of your screen: “Success Stack successfully deployed“.
STEP 12
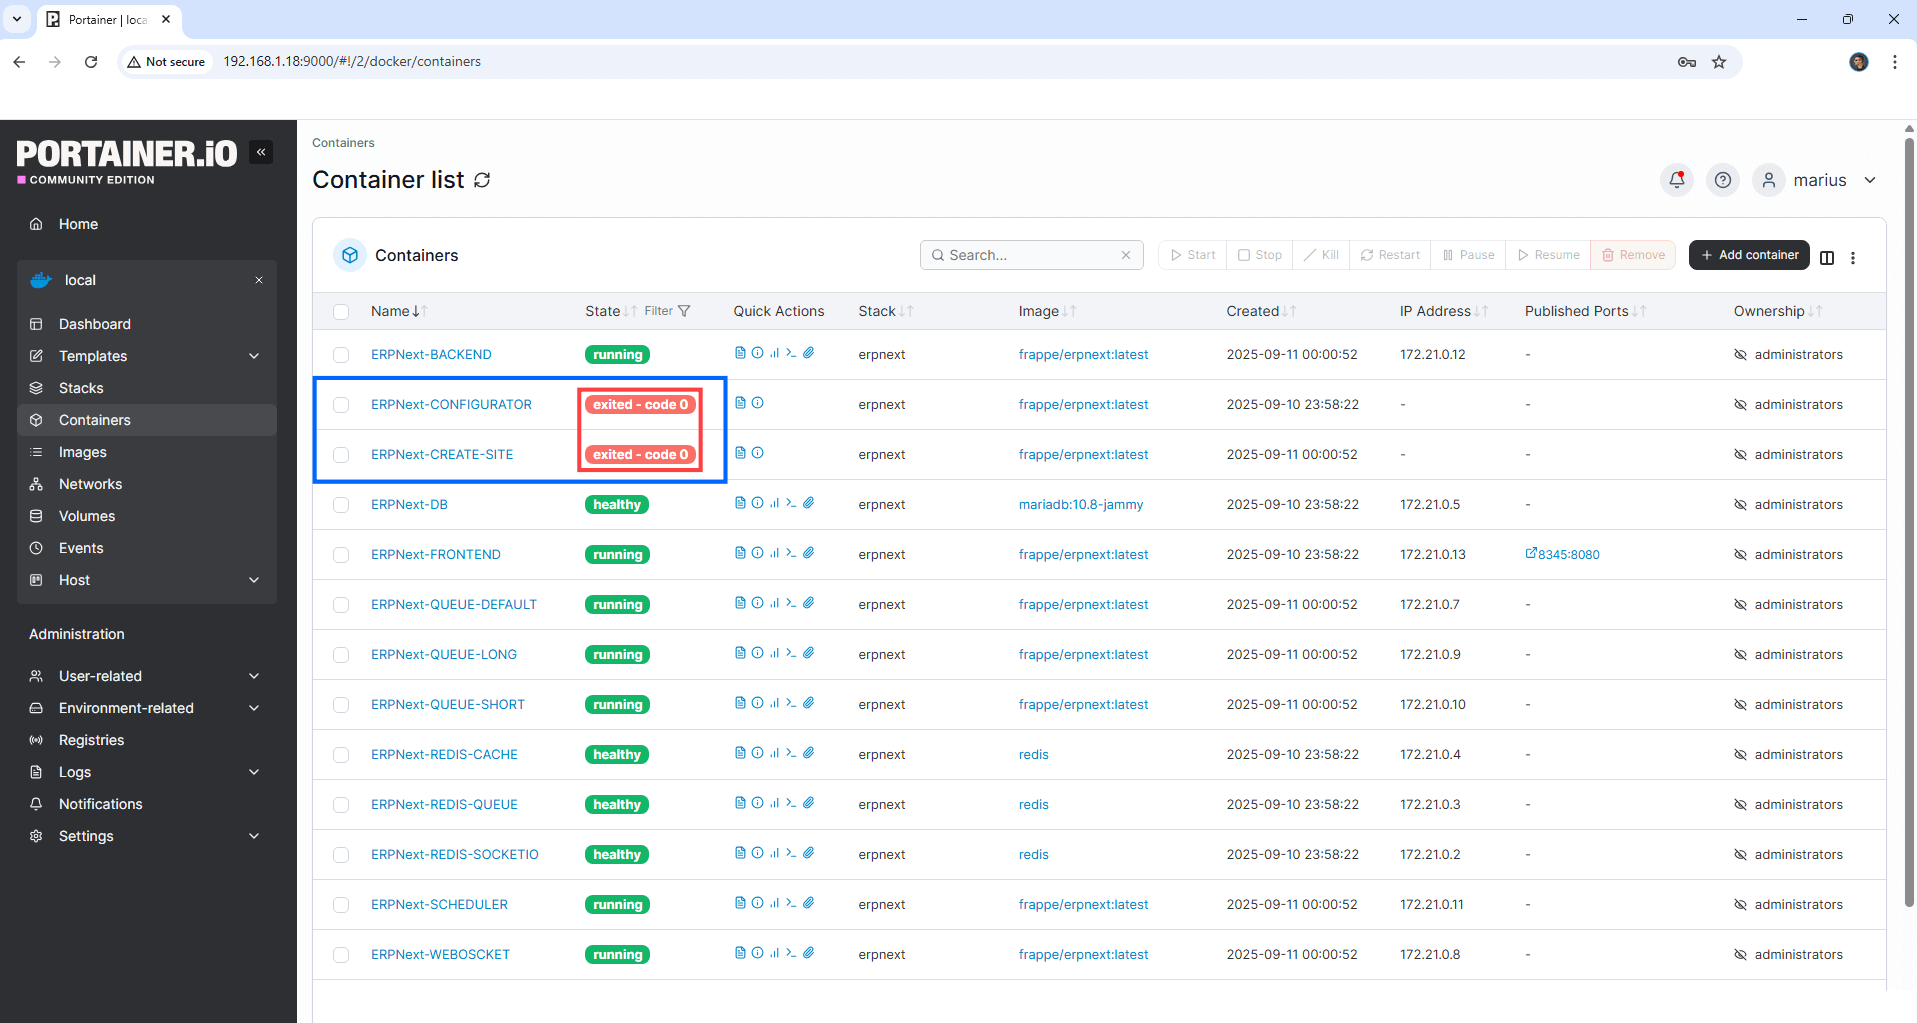
Please wait approximately 2 minutes for the installation to be completed. Once the installation is completed, you will see the ERPNext-CONFIGURATOR and ERPNext-CREATE-SITE containers with the status “exited – code 0” . Note: At first, you will only see the ERPNext-CONFIGURATOR container with the status exited. You need to wait too see the ERPNext-CREATE-SITE container with the exited status as well. Follow the instructions in the screenshot below. Go to the next STEP.
STEP 13
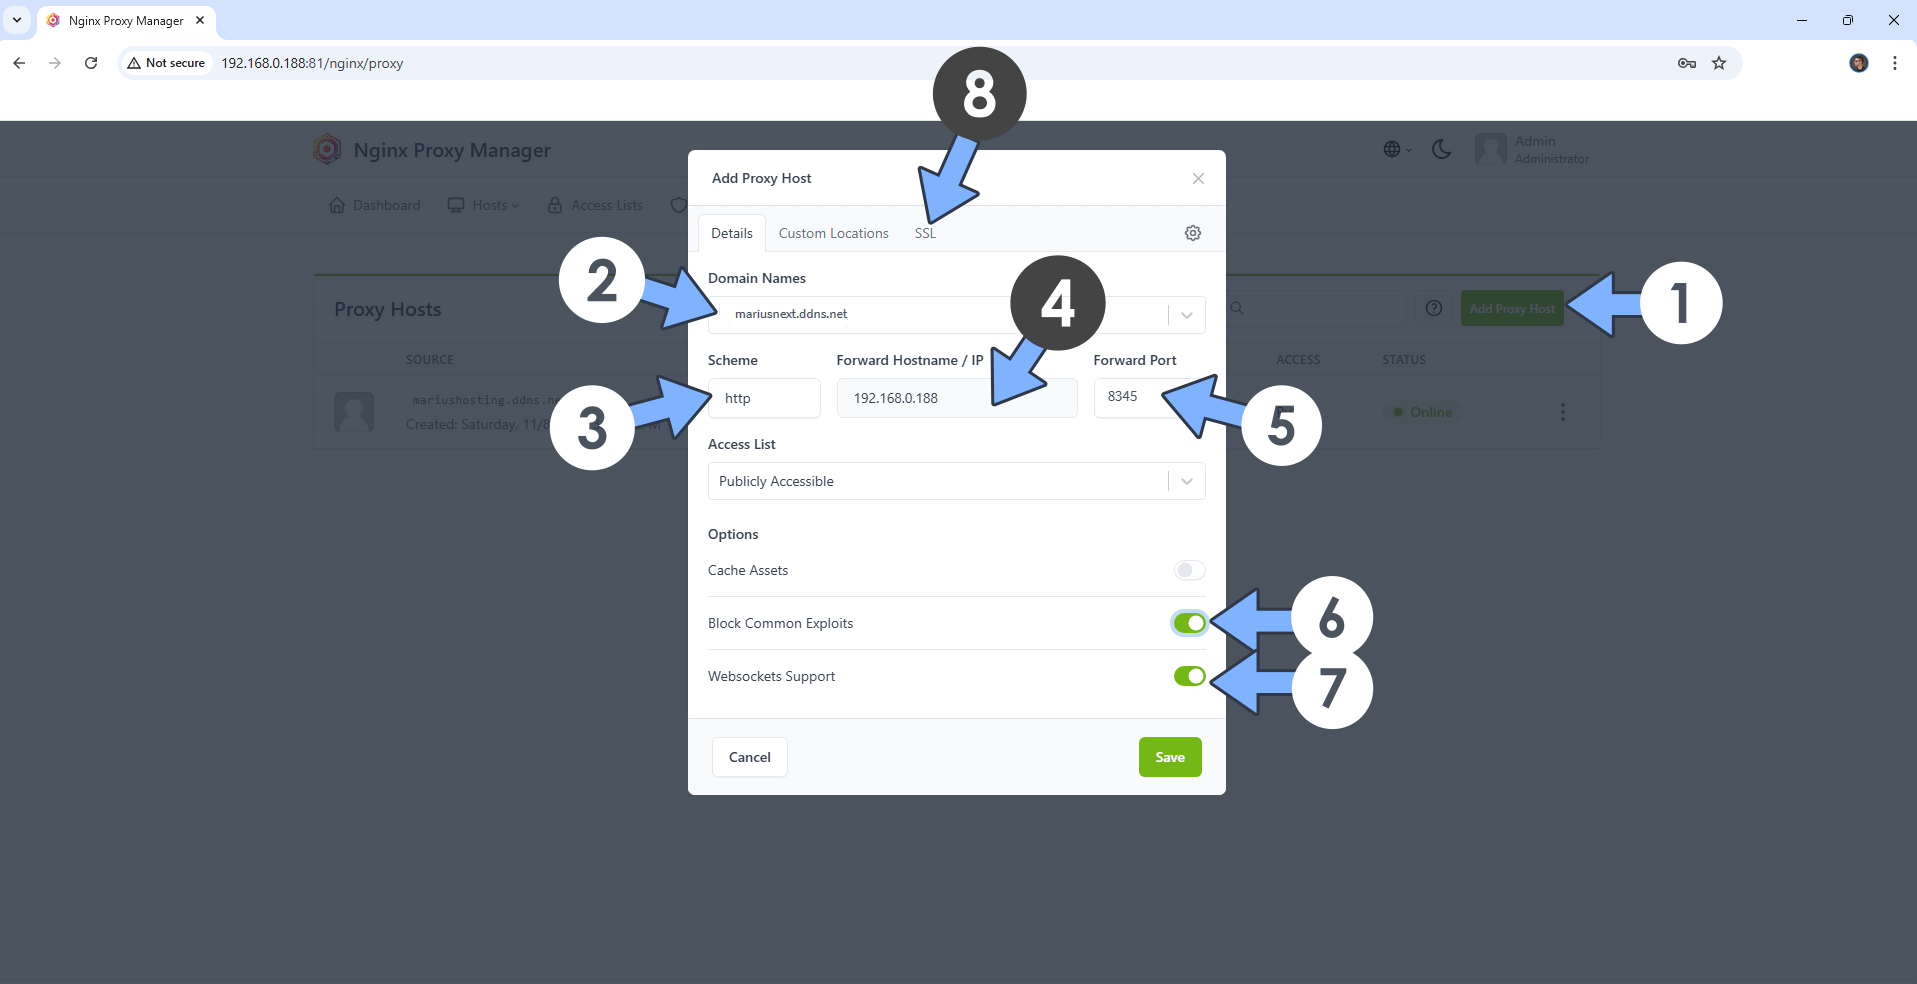
Open your Nginx Proxy Manager container that you have previously installed at STEP 3. Click Add Proxy Host. A new pop up window will open. Add the following details:
Domain Names: Type in your own noip domain name that you have previously created at STEP 4.
Scheme: http
Forward Hostname/IP: Type in the local NAS IP of your UGREEN NAS.
Forward Port: Type in the ERPNext local Port that is 8345
Check Block Common Exploits
Check Websockets Support
Click the SSL tab. Follow the instructions in the image below.
STEP 14
After you click the SSL tab, add the following details:
SSL Certificate: Request a new SSL Certificate
Check: Force SSL
Check: HSTS Enabled
Check: HTTP/2 Support
Click Save. Follow the instructions in the image below.

STEP 15
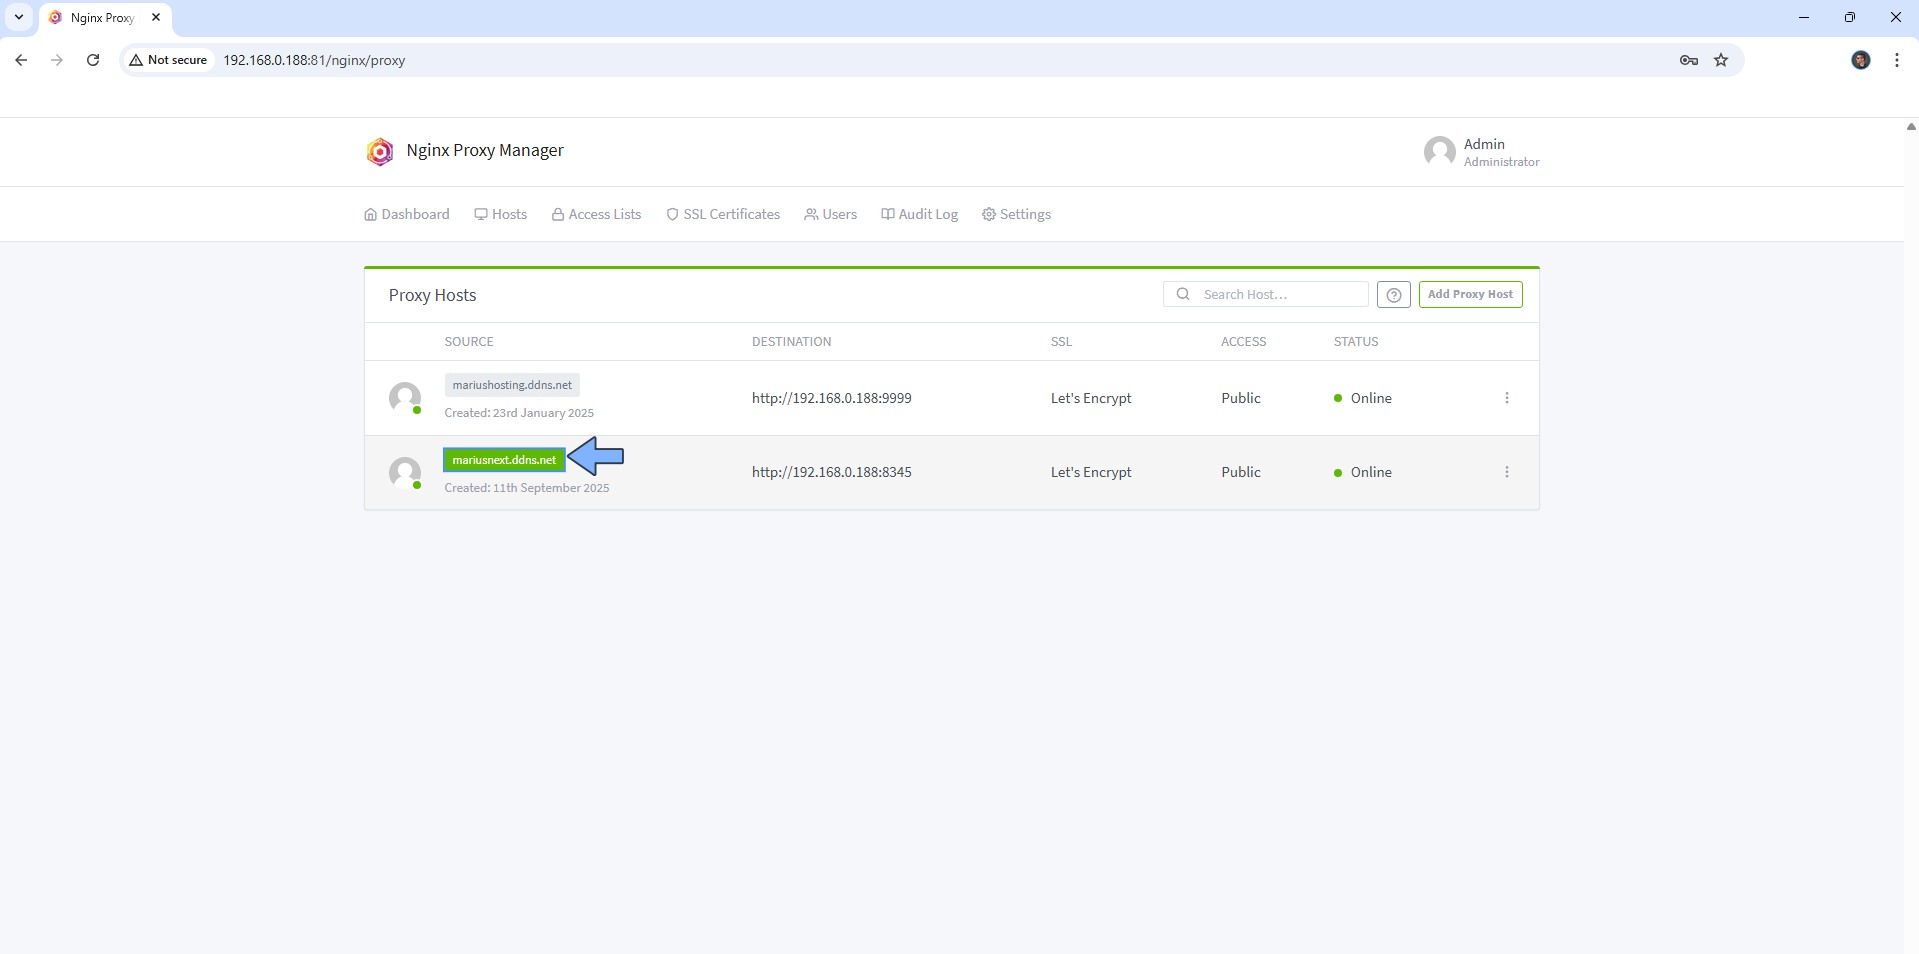
In the Proxy Hosts area, if everything goes right, you will see that your erpnext hostname has been generated. Click on it. Follow the instructions in the image below.
STEP 16
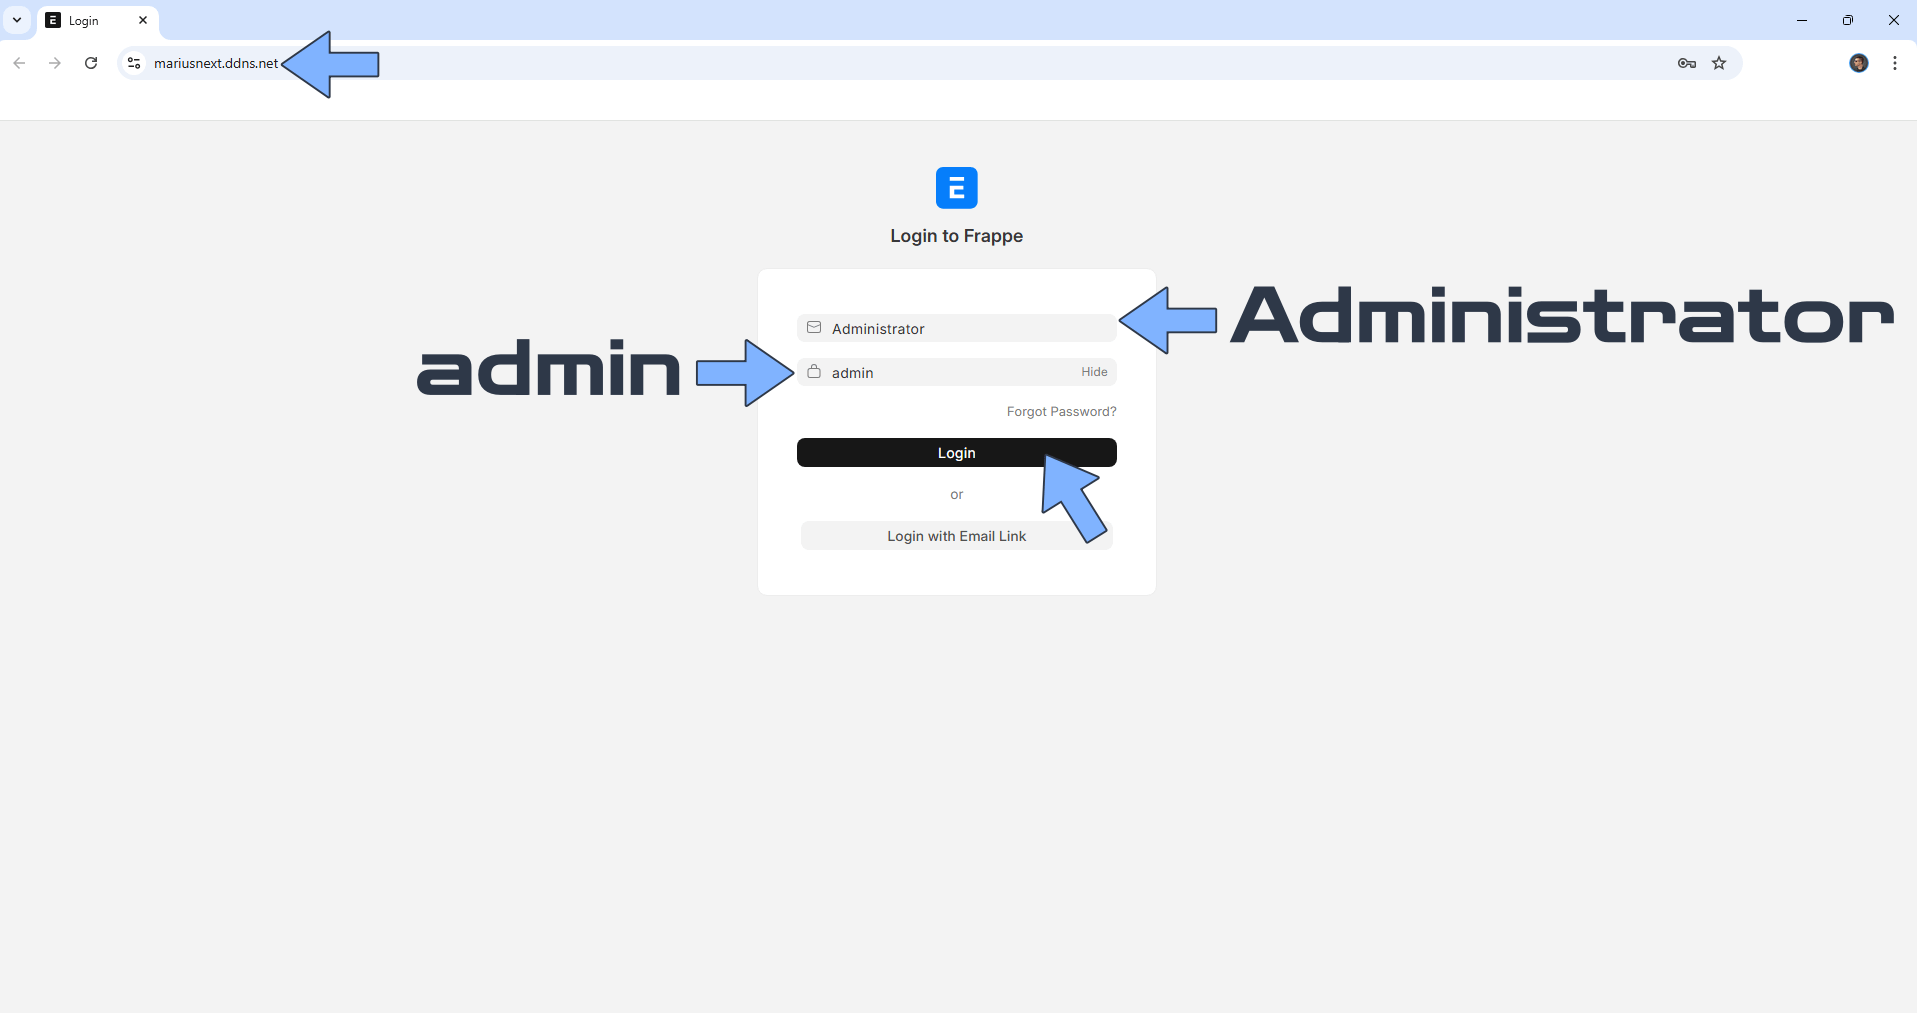
Now open your browser and type in your HTTPS/SSL certificate like this https://yourname.ddns.net In my case it’s https://mariusnext.ddns.net
If everything goes right, you will see the ERPNext Login Page. Type in the default Username and Password then click Login. Follow the instructions in the image below.
STEP 17
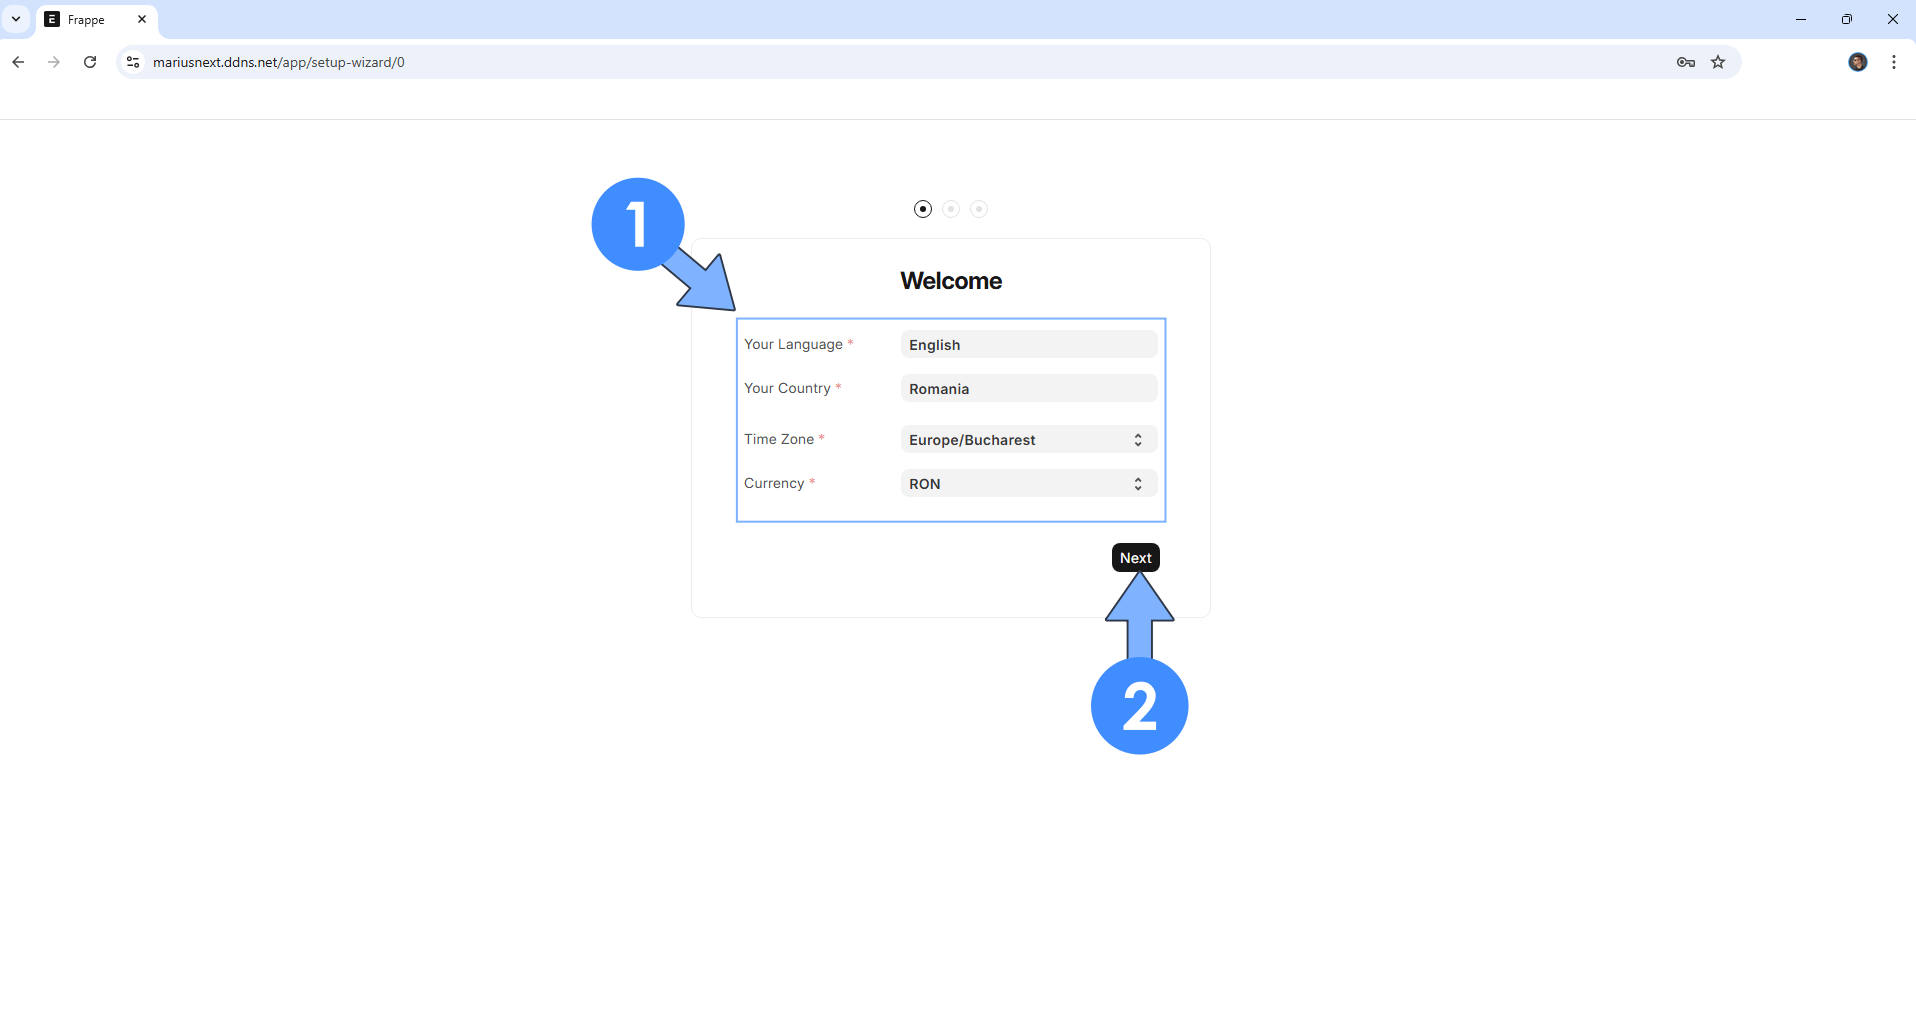
Choose your own Language, Country, Time Zone and Currency then click Next. Follow the instructions in the image below.
STEP 18
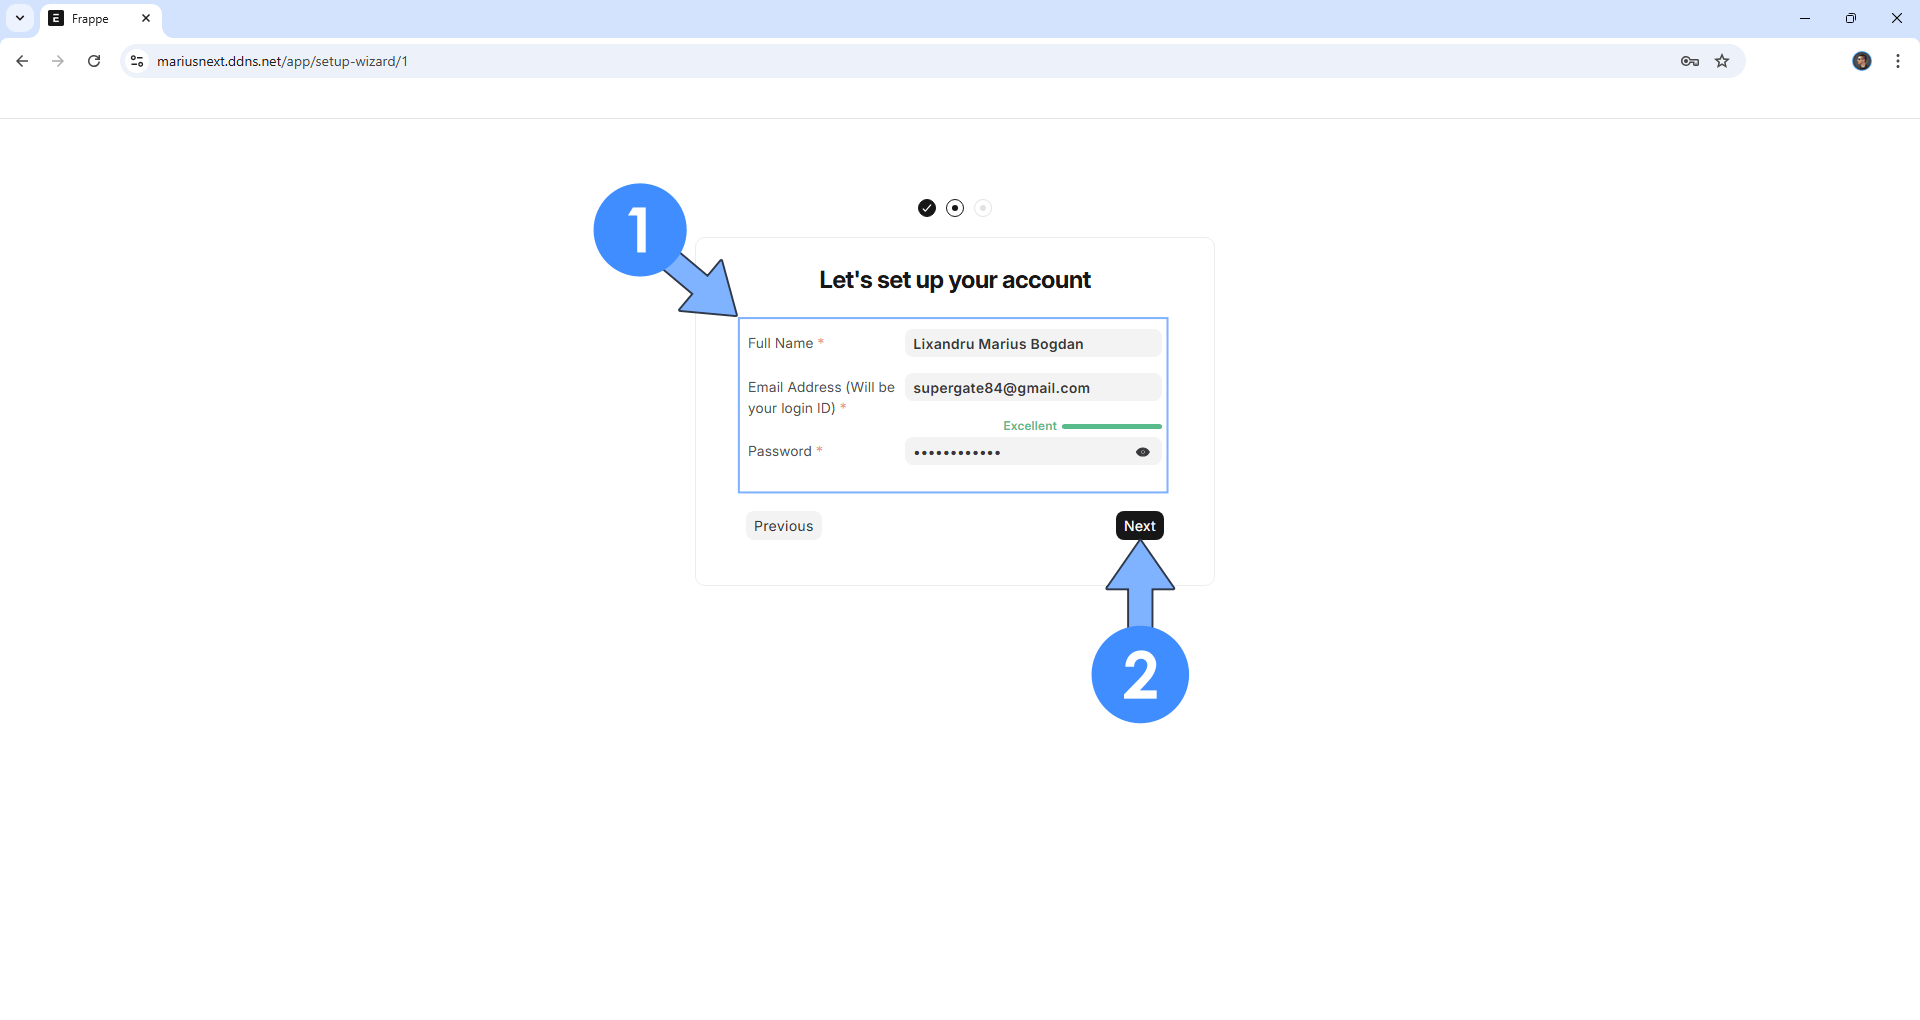
Type in your Full Name, Email and your own Password then click Next. Follow the instructions in the image below.
STEP 19
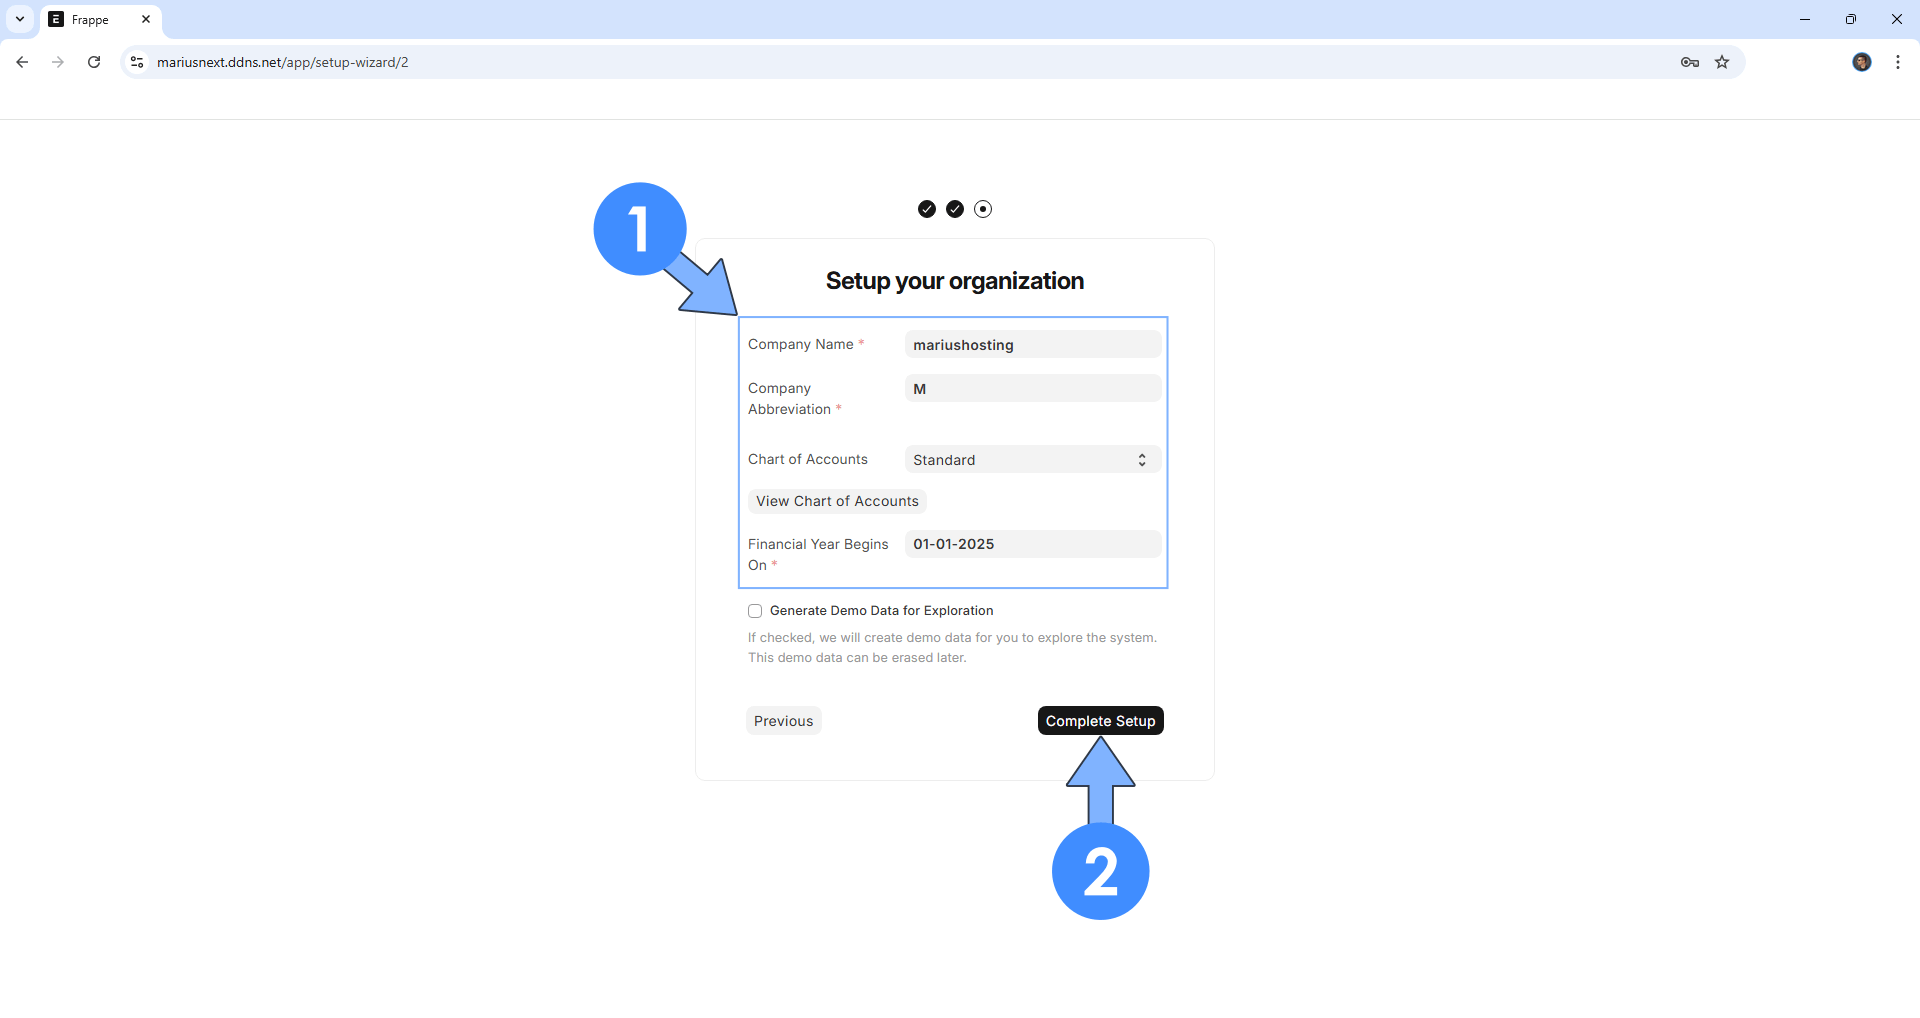
Type in your own Company name and select the Financial year begins then click Complete Setup. Follow the instructions in the image below.
STEP 20
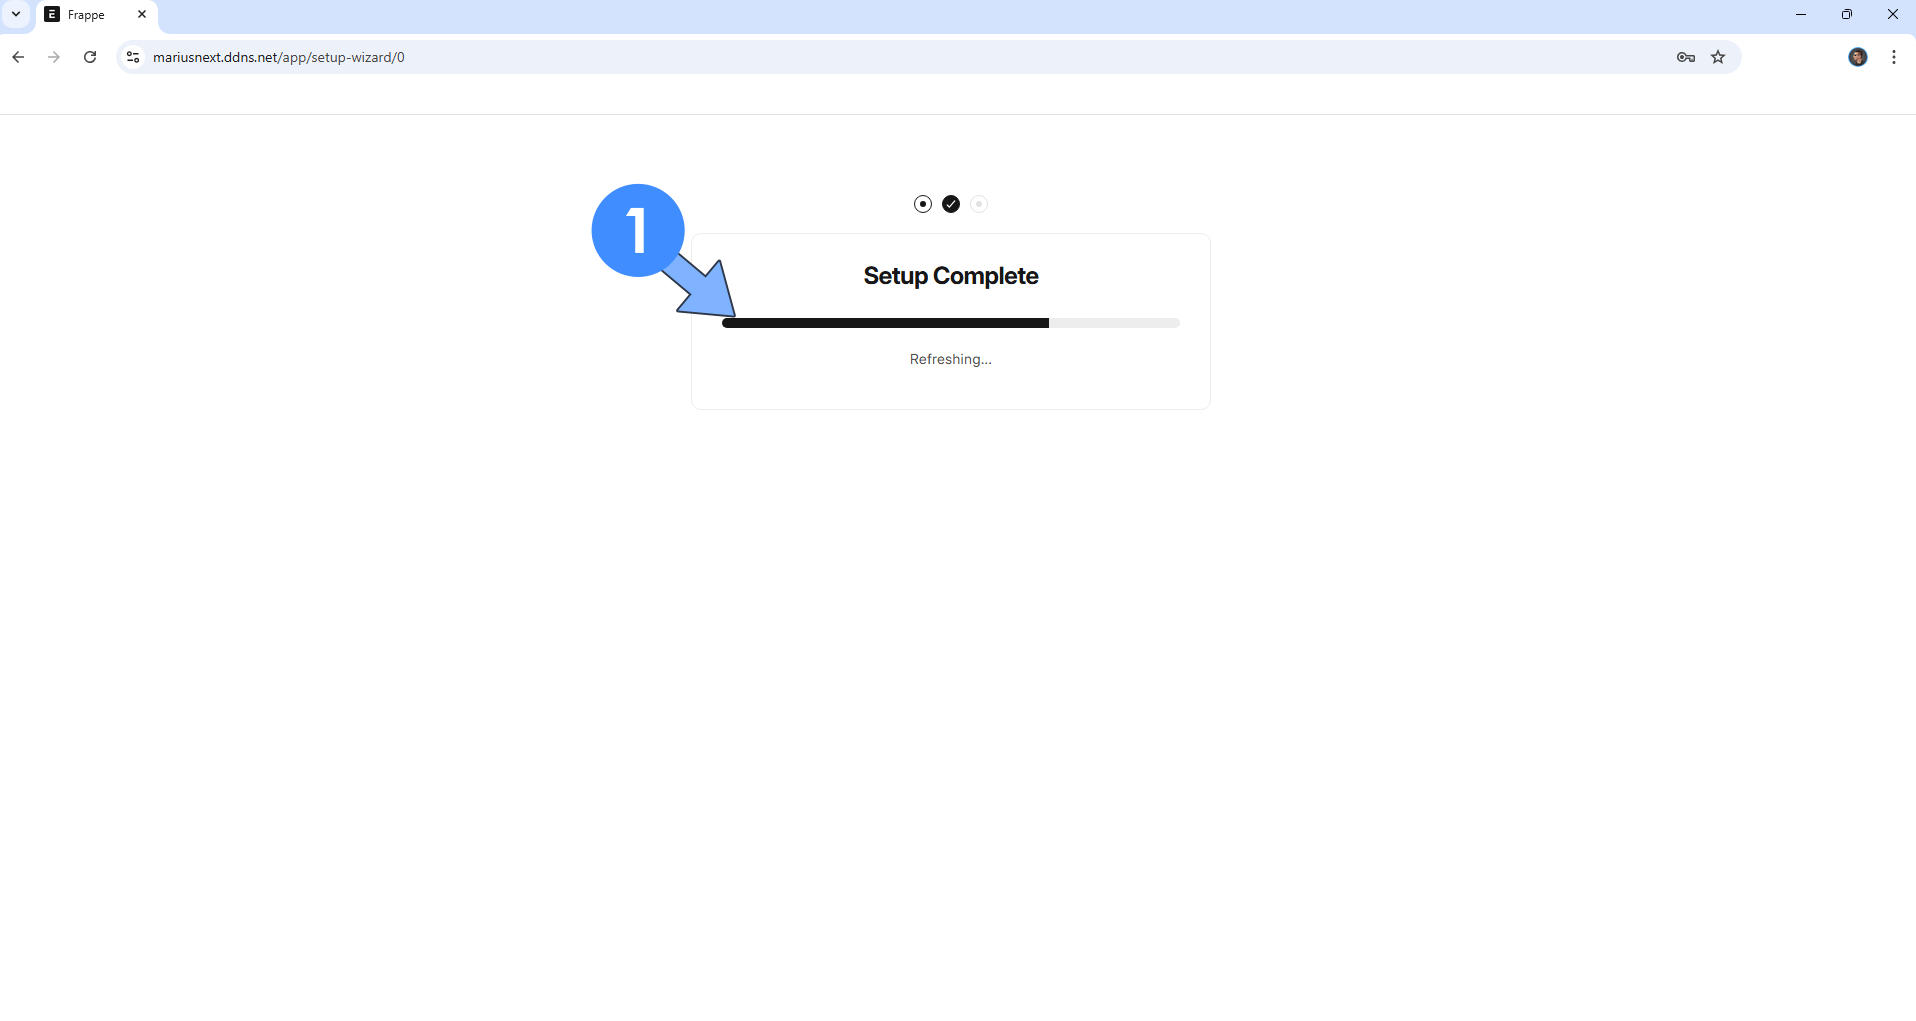
Wait some minutes until the setup is complete.
STEP 21
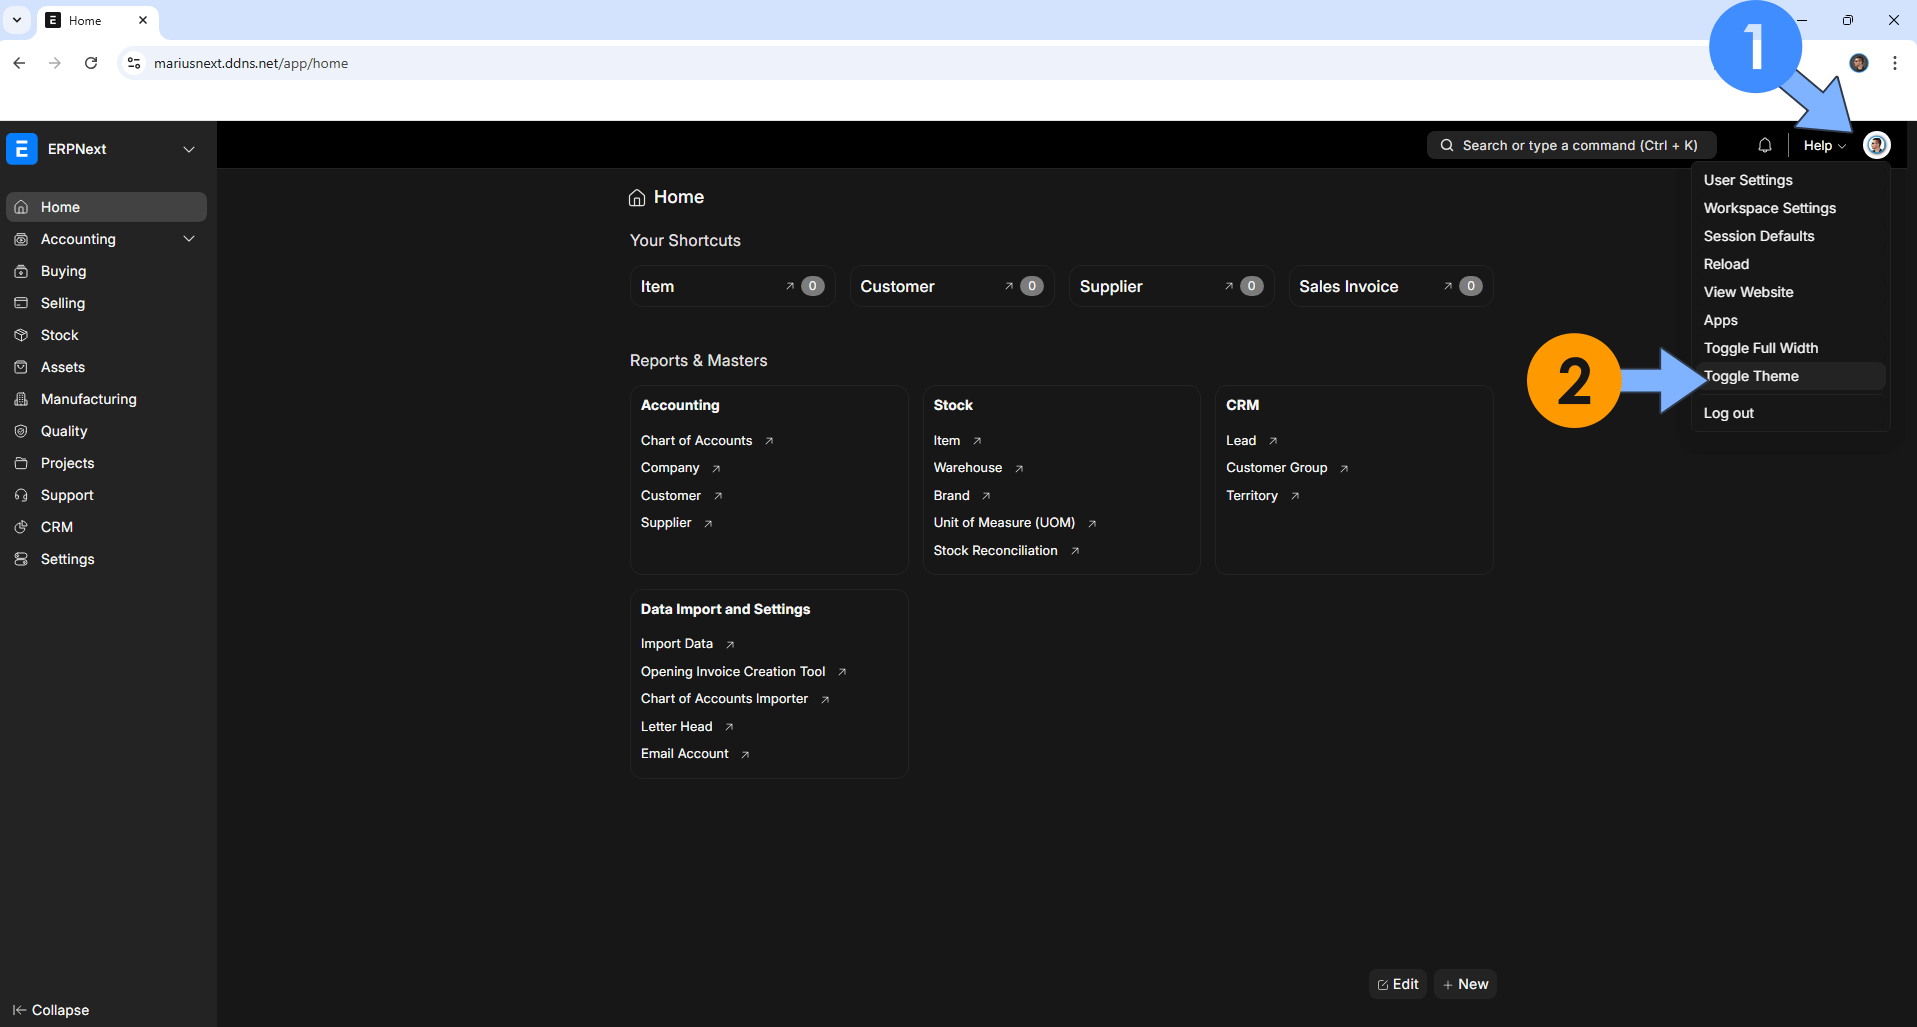
Your ERPNext Dashboard at a glance! At the top right of the page you can click Toggle Theme to change your theme to Dark Mode. Follow the instructions in the image below.
Enjoy ERPNext on your UGREEEN NAS!
⚠️Fix: If you experience permissions issues and your container doesn’t start, just change the following line in the compose stack at STEP 9
user: 999:10
with
user: 0:0
Then update the stack.
🆙Note/Update/Container: How to Update Your Docker Containers on UGREEN NAS Using Portainer.
🐳Note: How to Create Docker Shortcuts on Desktop.
🆕Note: How to Update Portainer to the latest version.
🆕Note: How to Clean Docker.
This post was updated on Monday / June 22nd, 2026 at 10:10 AM