Invidious is a free and open-source alternative frontend to YouTube. It is available as a Docker container, or from the GitHub master branch. It is intended to be used as a lightweight and privacy-respecting alternative to the official YouTube website. One of the best things about Invidious is that you can watch YouTube videos without ADS. In this step by step guide I will show you how to install Invidious on your UGREEN NAS using Docker and Portainer.
STEP 1
Please Support My work by Making a Donation.
STEP 2
Install Portainer using my step by step guide. If you already have Portainer installed on your UGREEN NAS, skip this STEP. Attention: Make sure you have installed the latest Portainer version.
STEP 3
⚠️Mandatory: Enable HTTPS on your UGREEN NAS.
STEP 4
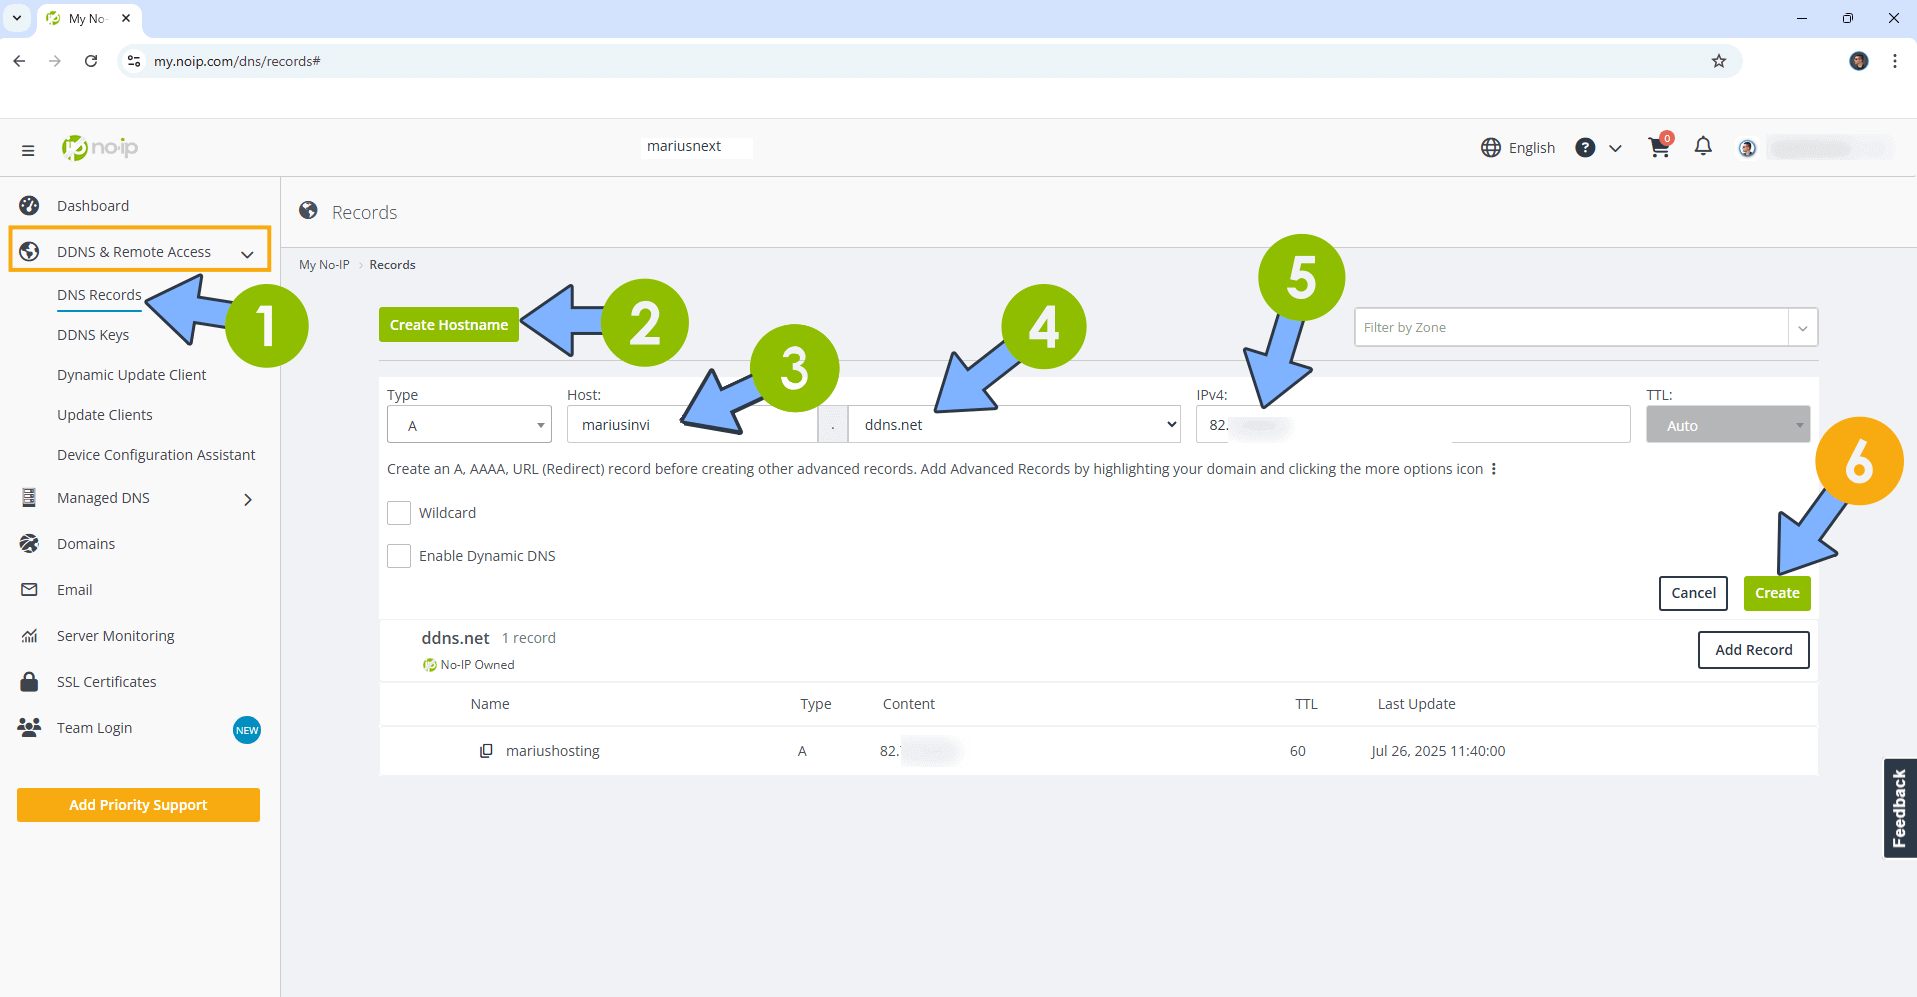
Create a new hostname on the noip website using your noip account. For example, I have created mariusinvi as Host and I use the free ddns.net domain. In the IP Address area, type in your own IPV4 IP address from your ISP, then click Create. Follow the instructions in the image below.
STEP 5
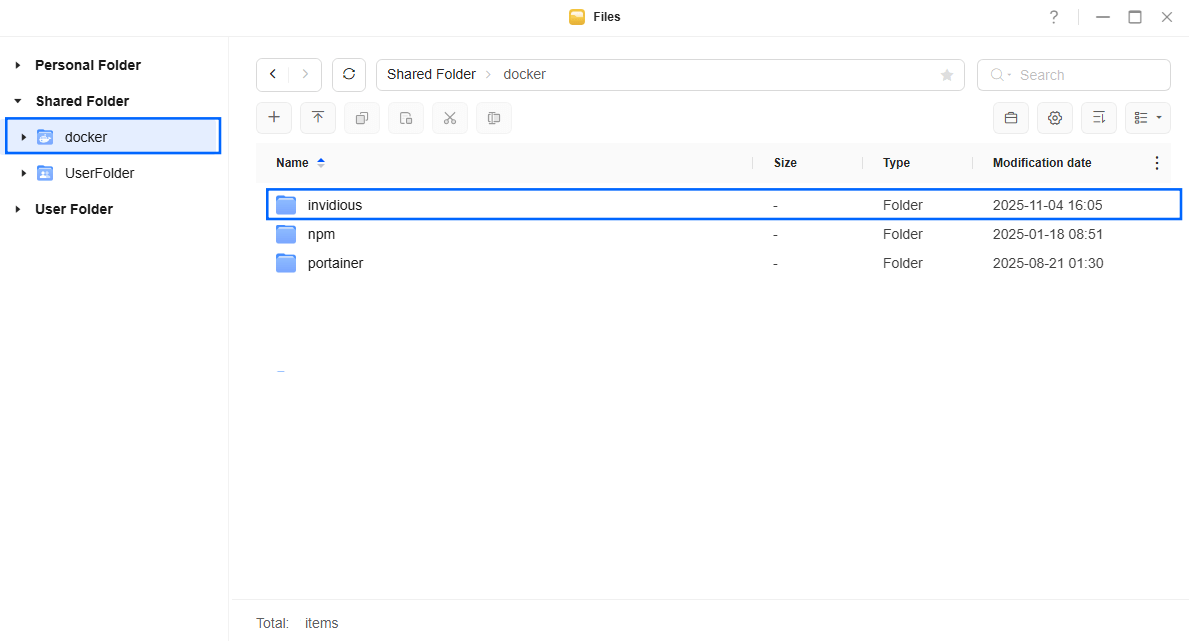
Go to Files and open the docker folder. Inside the docker folder, create one new folder and name it invidious. Follow the instructions in the image below.
Note: Be careful to enter only lowercase, not uppercase letters.
STEP 6
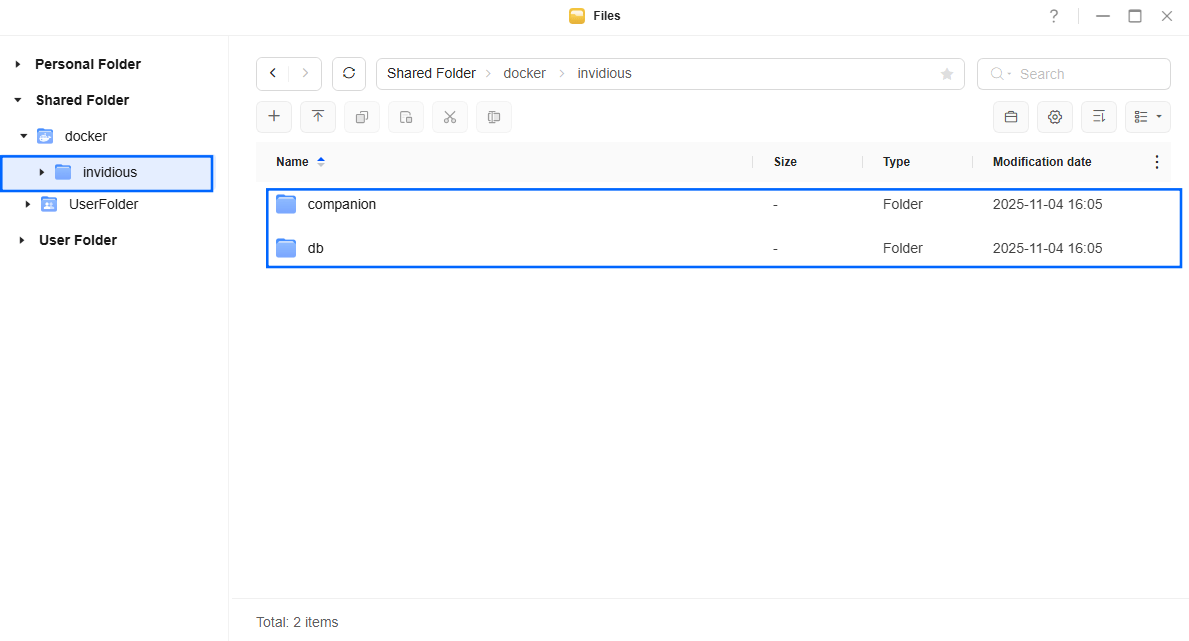
Now create two new folders inside the invidious folder that you have previously created at STEP 3 name them companion and db. Follow the instructions in the image below.
Note: Be careful to enter only lowercase, not uppercase letters.
STEP 7
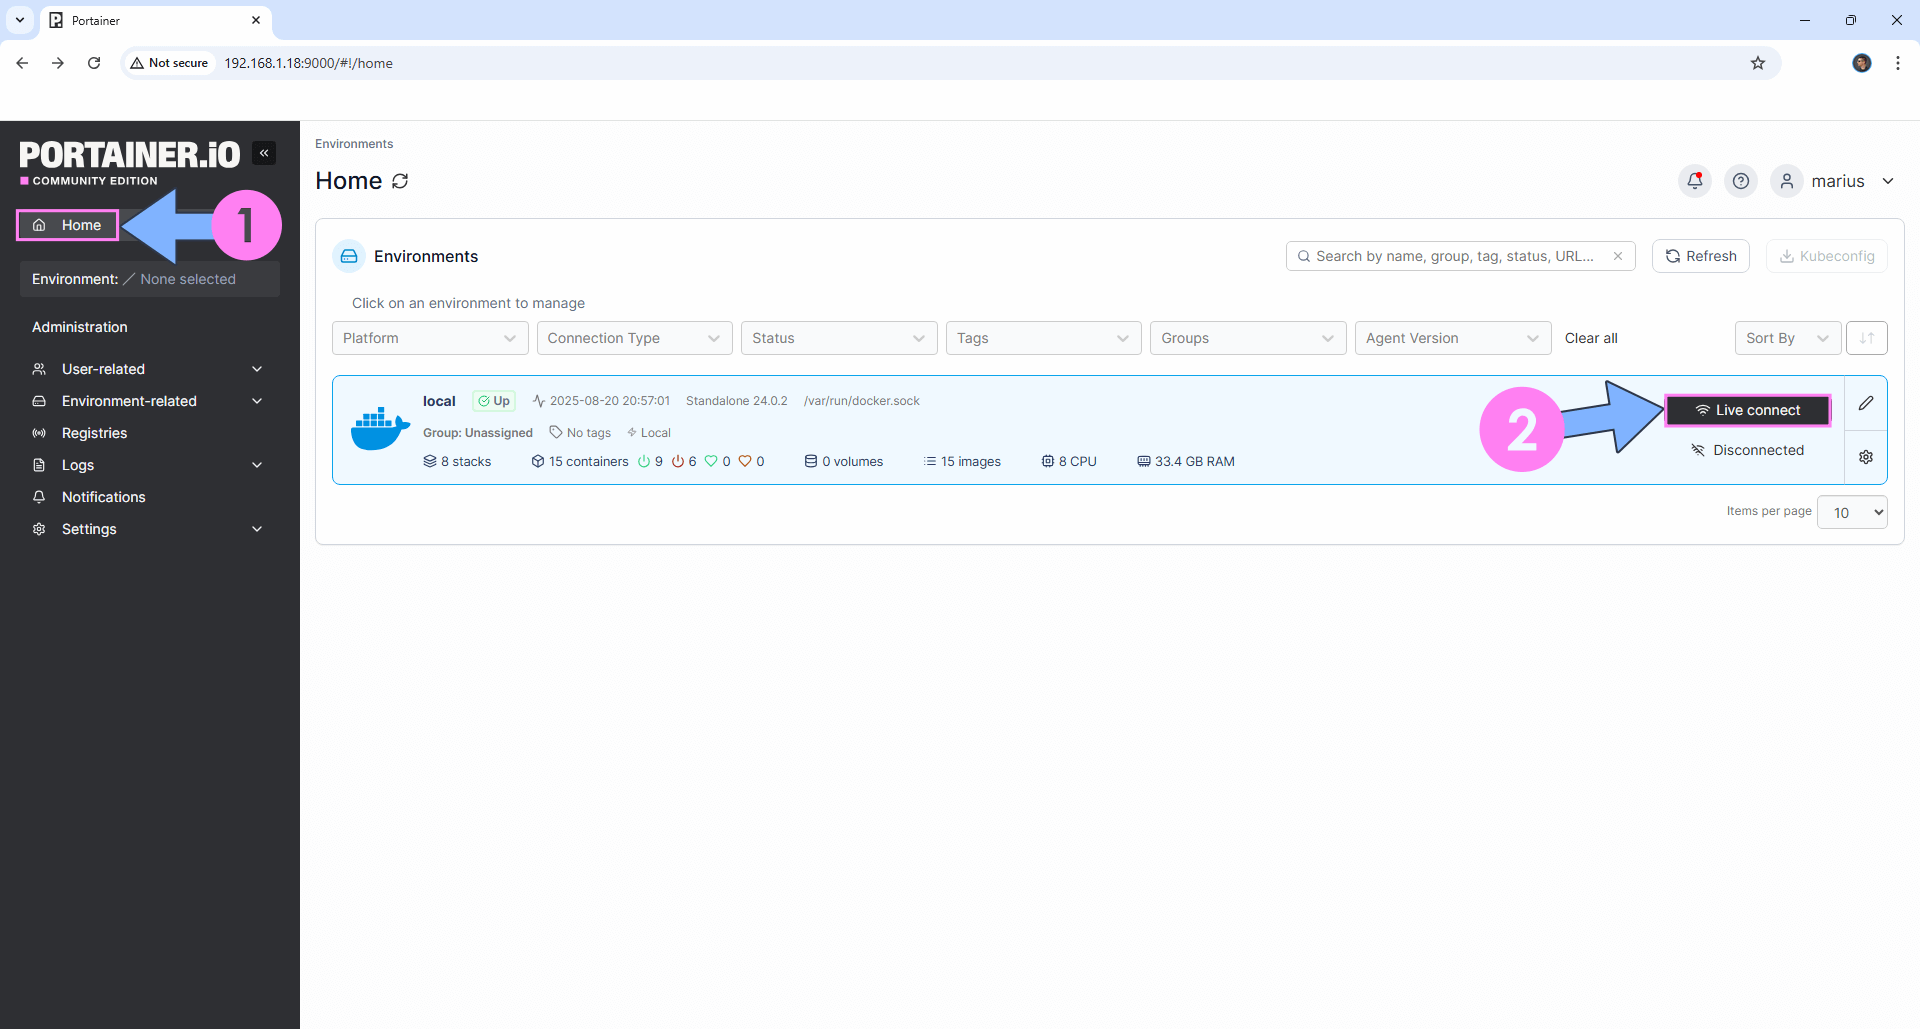
Log into Portainer using your username and password. On the left sidebar in Portainer, click on Home then Live connect. Follow the instructions in the image below.
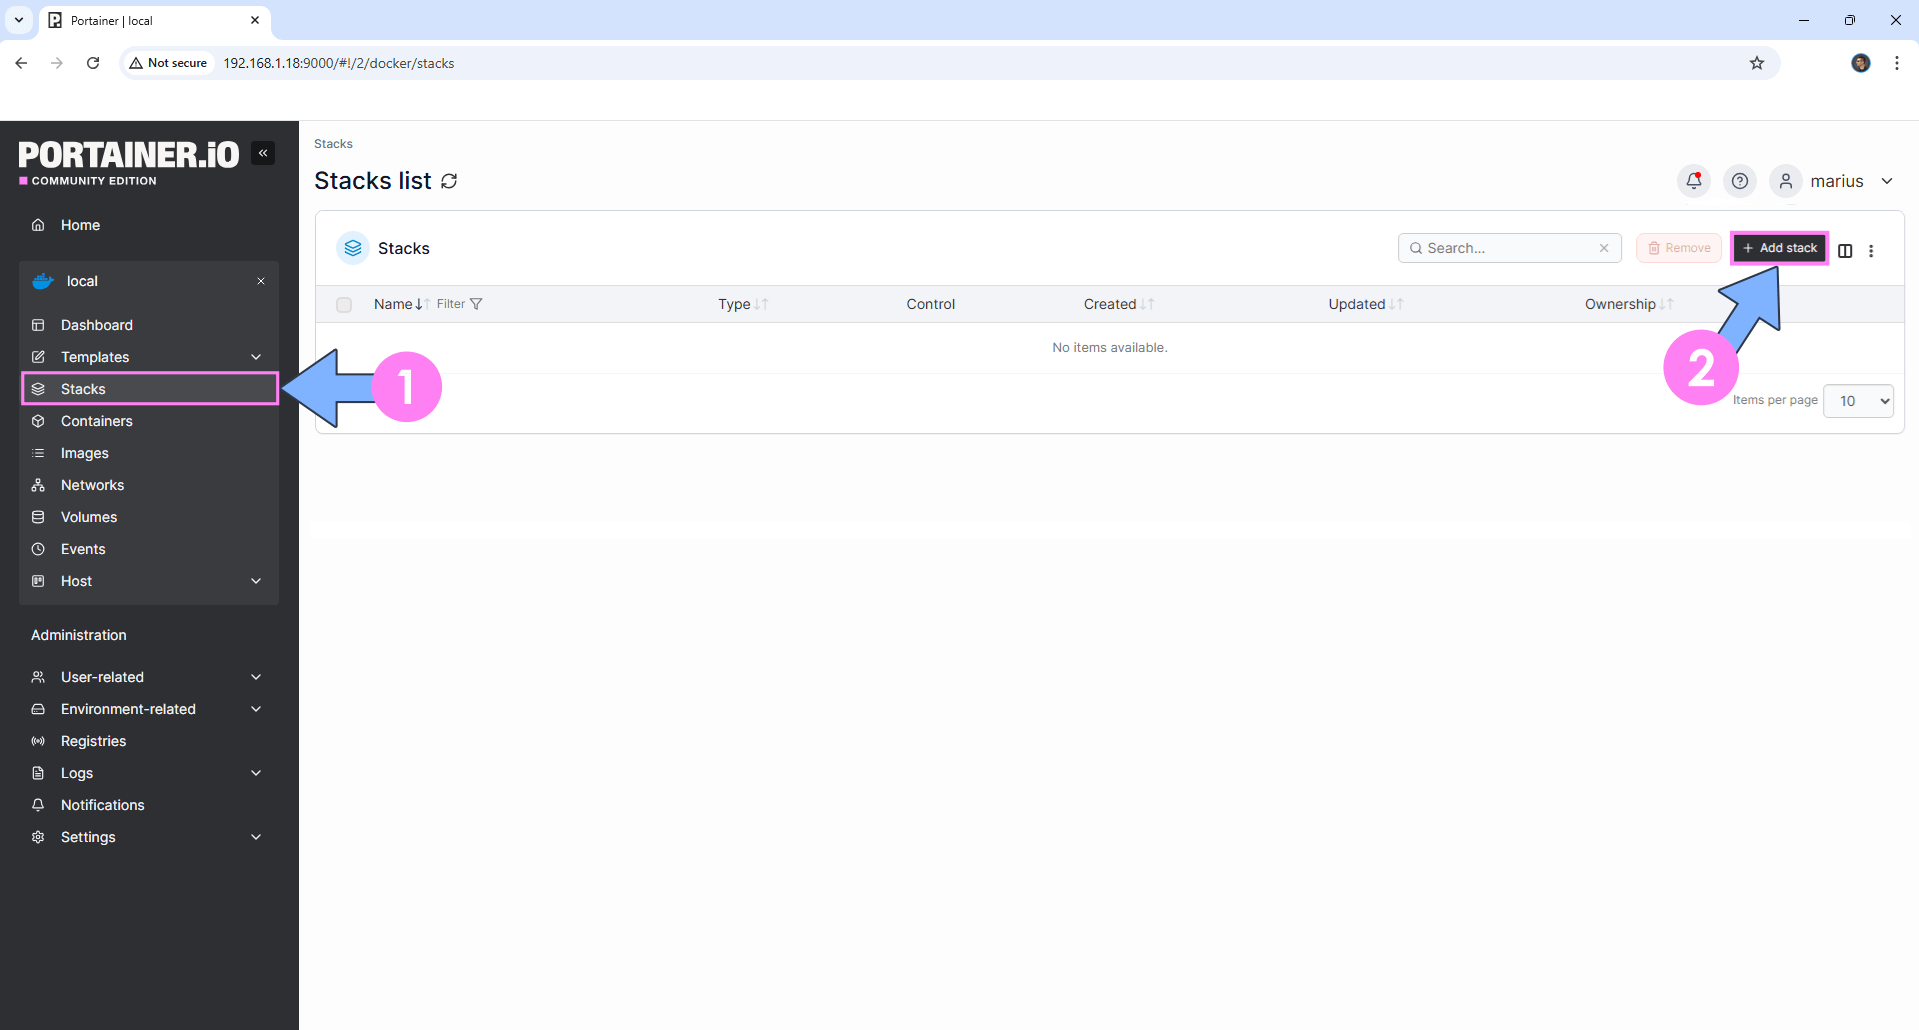
On the left sidebar in Portainer, click on Stacks then + Add stack. Follow the instructions in the image below.
STEP 8
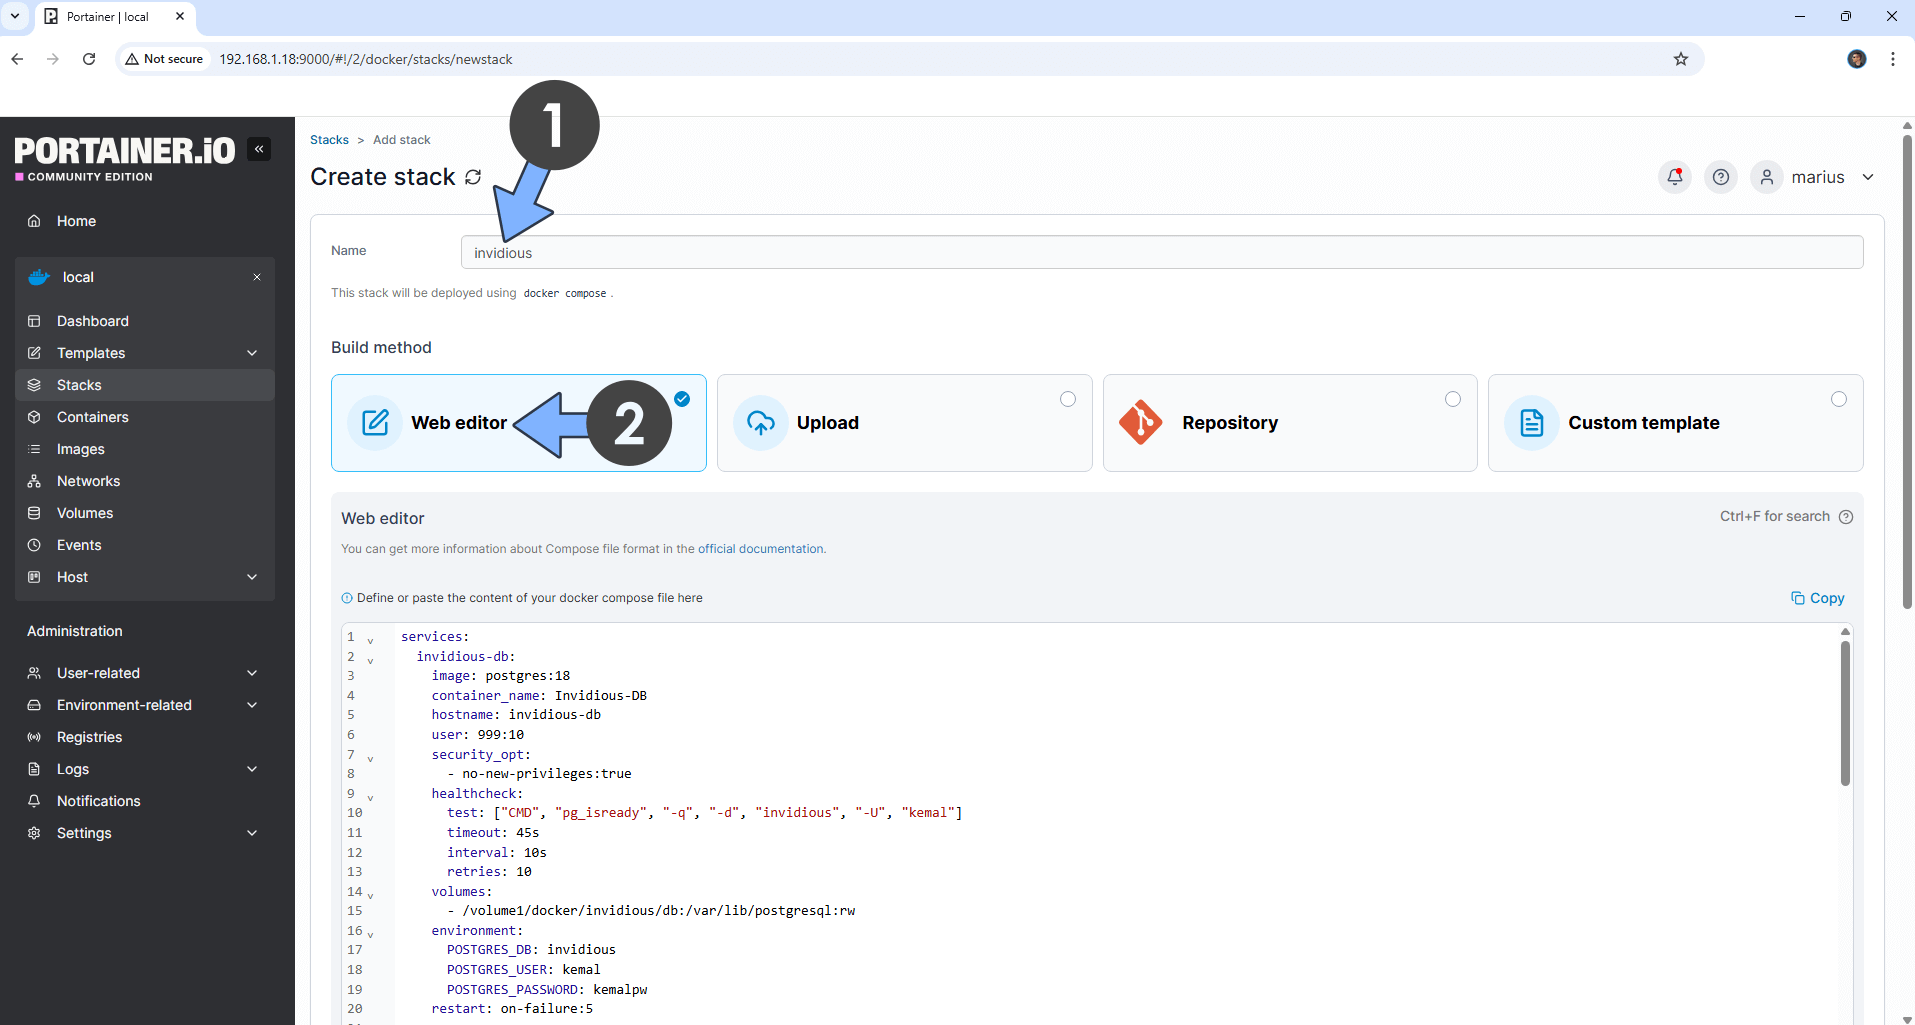
In the Name field type in invidious. Follow the instructions in the image below.
services:
  invidious-db:
    image: postgres:18
    container_name: Invidious-DB
    hostname: invidious-db
    user: 999:10
    security_opt:
      - no-new-privileges:true
    healthcheck:
      test: ["CMD", "pg_isready", "-q", "-d", "invidious", "-U", "kemal"]
      timeout: 45s
      interval: 10s
      retries: 10
    volumes:
      - /volume1/docker/invidious/db:/var/lib/postgresql:rw
    environment:
      POSTGRES_DB: invidious
      POSTGRES_USER: kemal
      POSTGRES_PASSWORD: kemalpw
    restart: on-failure:5

  invidious:
    image: quay.io/invidious/invidious:master
    container_name: Invidious
    healthcheck:
      test: ["CMD-SHELL", "nc -z 127.0.0.1 3000 || exit 1"]
      interval: 10s
      timeout: 5s
      retries: 3
      start_period: 90s
    hostname: invidious
    user: 999:10
    security_opt:
      - no-new-privileges:true
    ports:
      - 7601:3000
    environment:
      INVIDIOUS_CONFIG: |
        db:
          dbname: invidious
          user: kemal
          password: kemalpw
          host: invidious-db
          port: 5432
        check_tables: true
        captcha_enabled: false
        default_user_preferences:
          locale: ro
          region: RO
        external_port: 443
        check_tables: true
        invidious_companion:
          - private_url: "http://companion:8282/companion"
        invidious_companion_key: IjXhmpfeUFTvBpGK
        hmac_key: e8b09fcc0882e8b646beab0135027f748c39f27acb142b339a9b199acd3b0a2b
        domain: mariusinvi.ddns.net
        https_only: true
    restart: on-failure:5
    depends_on:
      invidious-db:
        condition: service_started
      companion:
        condition: service_started

  companion:
    image: quay.io/invidious/invidious-companion:latest
    container_name: Invidious-COMPANION
    environment:
      SERVER_SECRET_KEY: IjXhmpfeUFTvBpGK
    cap_drop:
      - ALL
    read_only: true
    volumes:
      - /volume1/docker/invidious/companion:/var/tmp/youtubei.js:rw
    security_opt:
      - no-new-privileges:true
    logging:
      options:
        max-size: "1G"
        max-file: "4"
    restart: on-failure:5
Note: Before you paste the code above in the Web editor area below, change the value numbers for user with your own UID and GID values. (Follow my step by step guide on how to do this.) 999 is my personal UID value and 10 is my personal GID value. You have to type in your own values.
Note: Before you paste the code above in the Web editor area below, change the value for locale and region. ro and RO are abbreviations for Romania. You should use your own locale and region abbreviations. For example, for the United States you should use locale: us region: US.
Note: Before you paste the code above in the Web editor area below, change the values for invidious_companion_key and SERVER_SECRET_KEY. Generate your free 16 length key. ⚠️Warning: Do NOT use more than 16 characters. invidious_companion_key and SERVER_SECRET_KEY should use the same identical key.
Note: Before you paste the code above in the Web editor area below, change the value for hmac_key. Generate your free hmac key using IT-TOOLS. Check out my screenshot to get an idea.
Note: Before you paste the code above in the Web editor area below, change the value for domain. Type in your own NO IP DDNS that you have previously created at STEP 4 without https:// at the beginning.
STEP 9
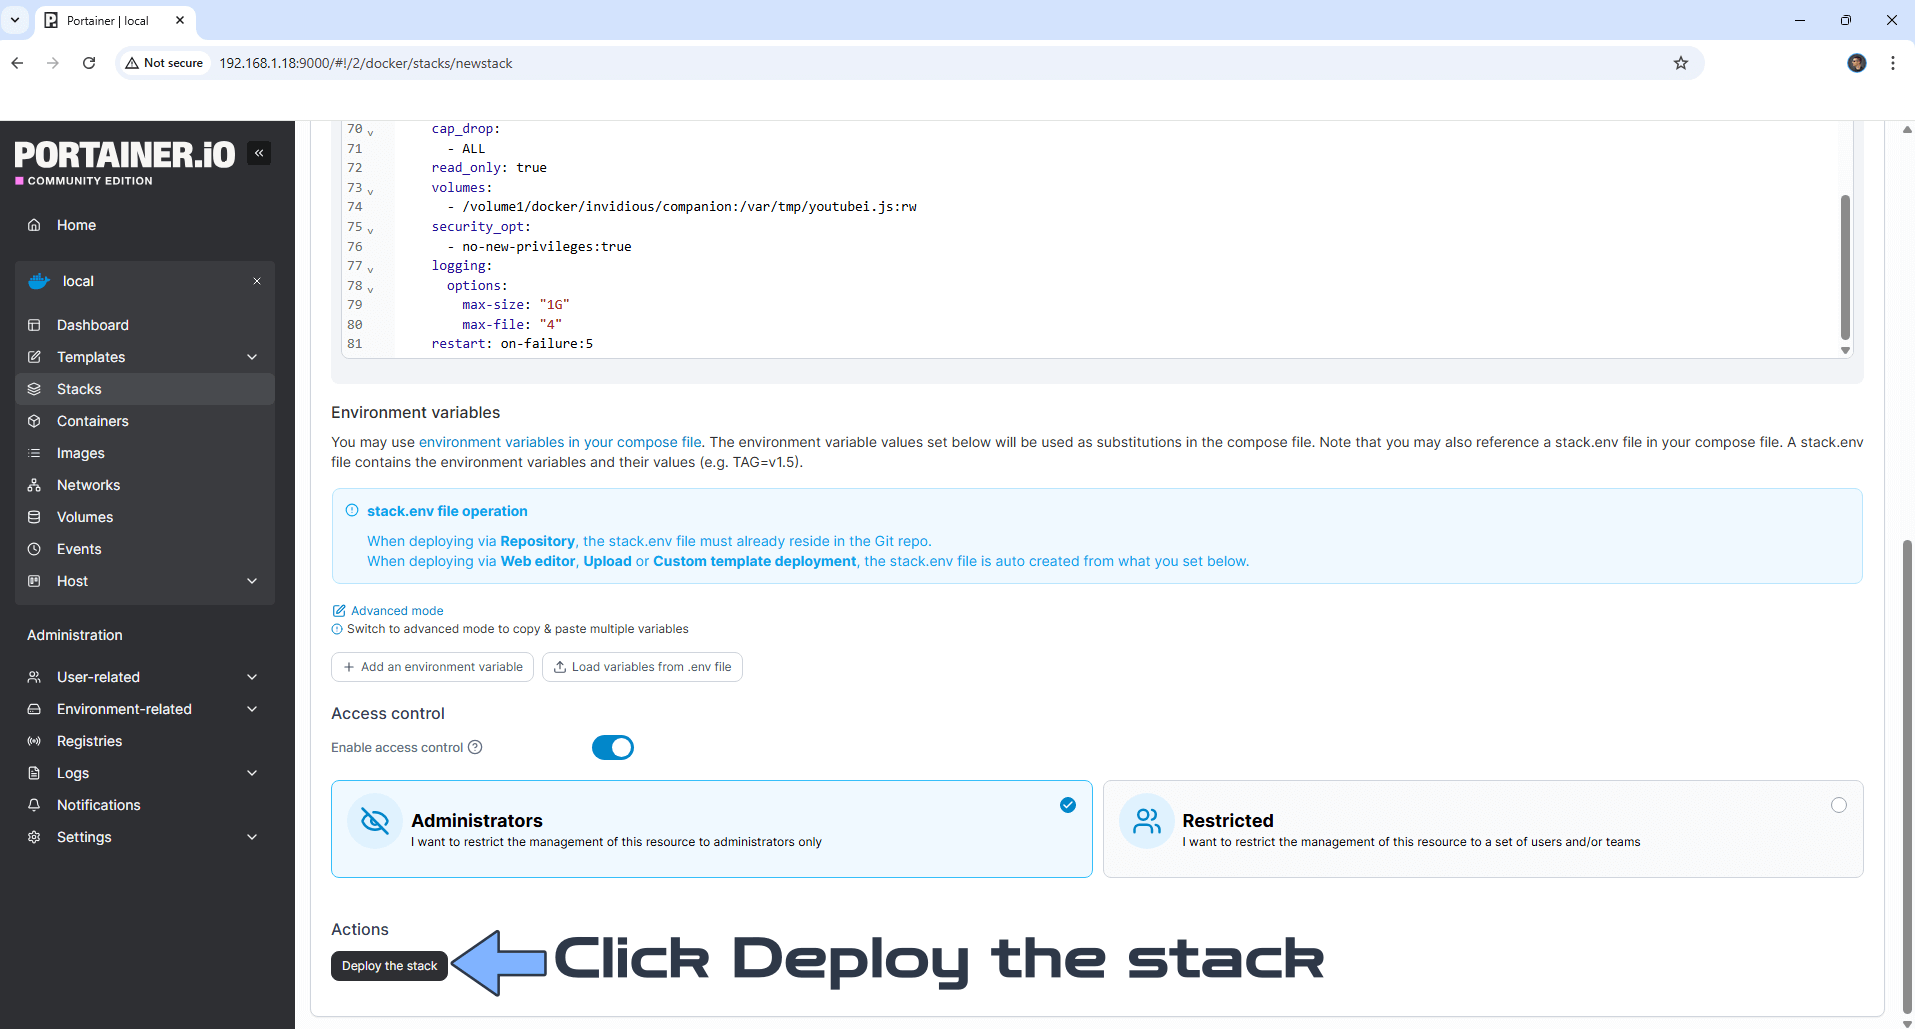
Scroll down on the page until you see a button named Deploy the stack. Click on it. Follow the instructions in the image below. The installation process can take up to a few minutes. It will depend on your Internet speed connection.
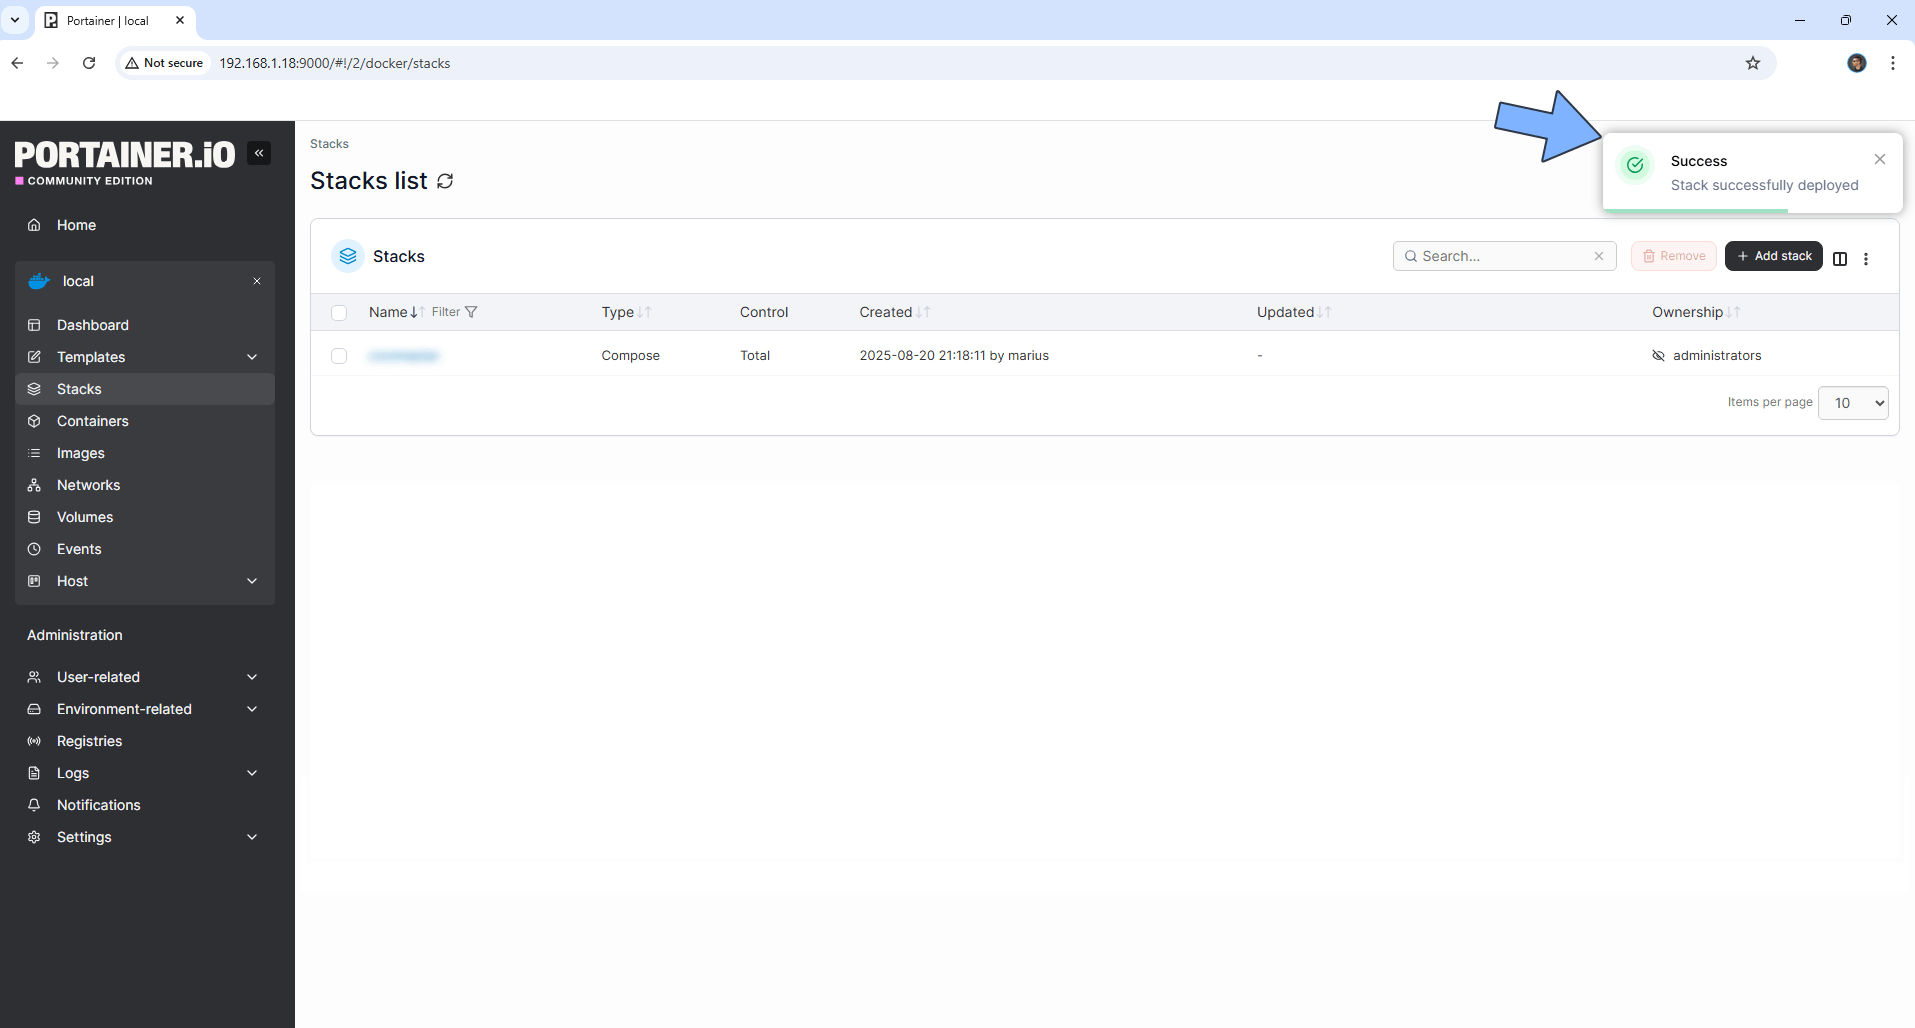
STEP 10
If everything goes right, you will see the following message at the top right of your screen: “Success Stack successfully deployed“.
STEP 11
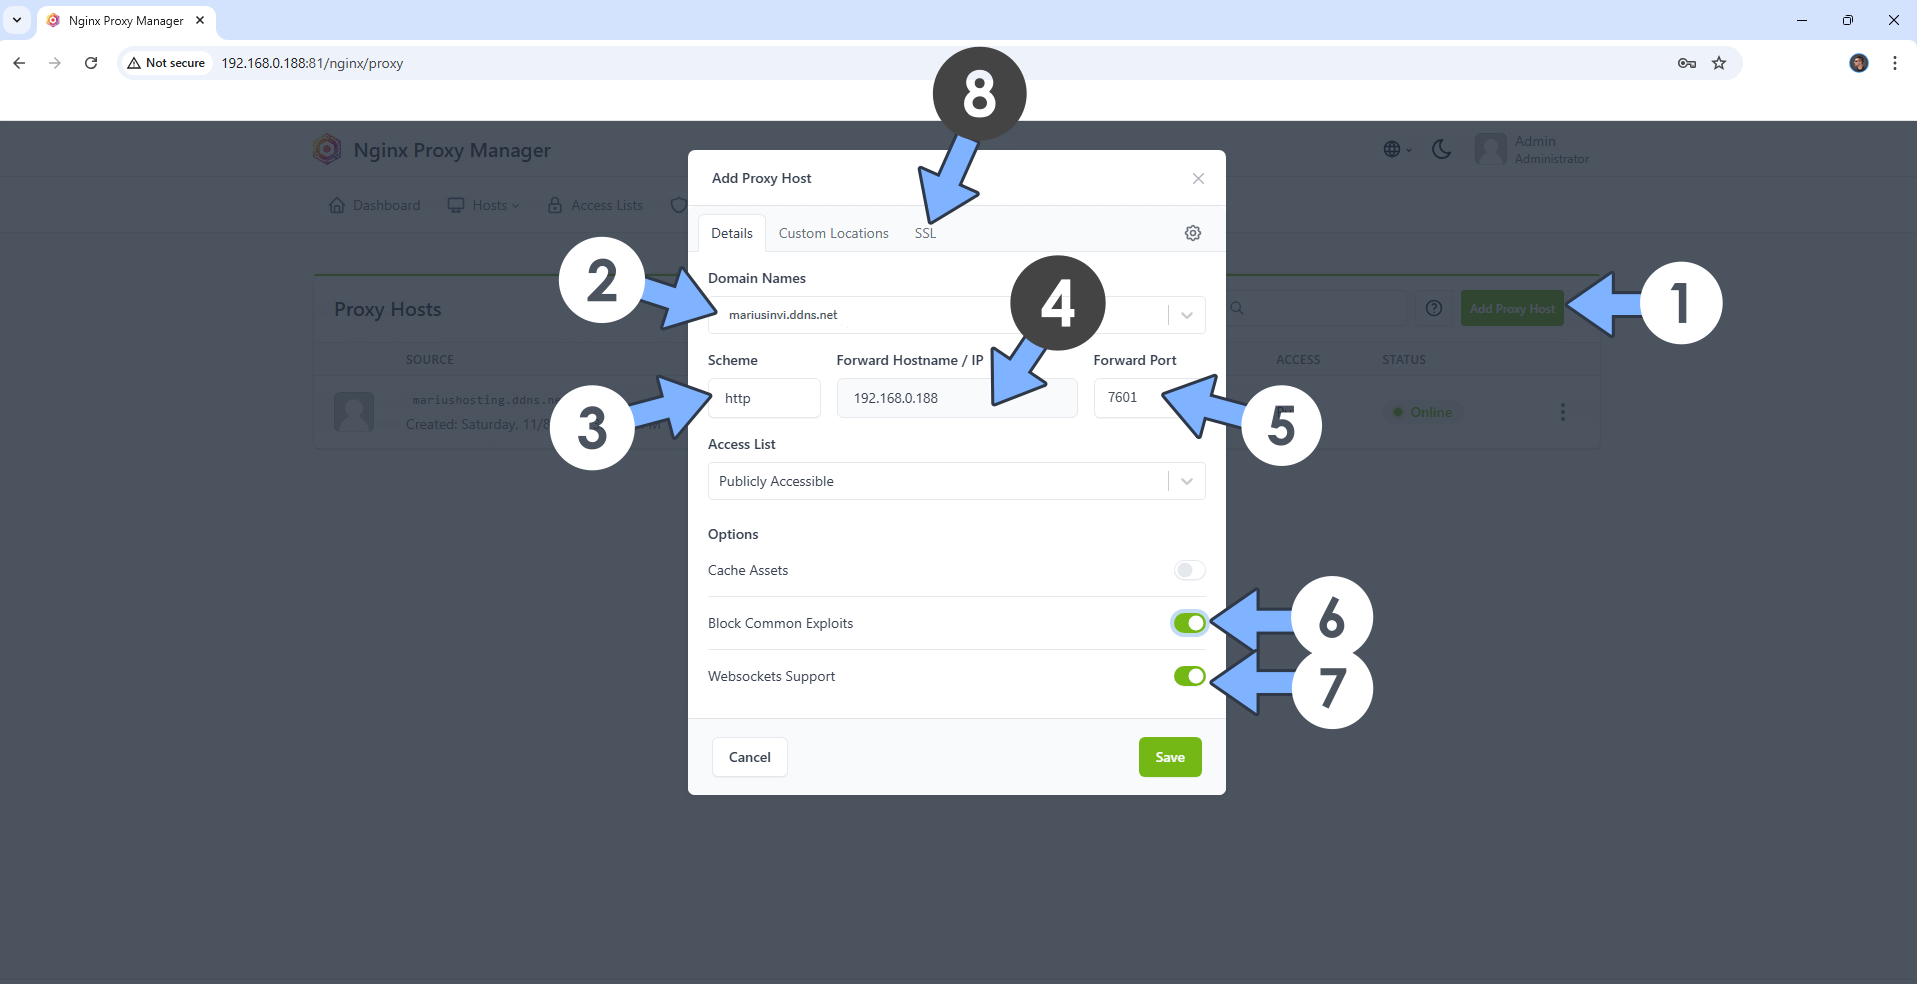
Open your Nginx Proxy Manager container that you have previously installed at STEP 3. Click Add Proxy Host. A new pop up window will open. Add the following details:
Domain Names: Type in your own noip domain name that you have previously created at STEP 4.
Scheme: http
Forward Hostname/IP: Type in the local NAS IP of your UGREEN NAS.
Forward Port: Type in the Invidious local Port that is 7601
Check Block Common Exploits
Check Websockets Support
Click the SSL tab. Follow the instructions in the image below.
STEP 12
After you click the SSL tab, add the following details:
SSL Certificate: Request a new SSL Certificate
Check: Force SSL
Check: HSTS Enabled
Check: HTTP/2 Support
Click Save. Follow the instructions in the image below.

STEP 13
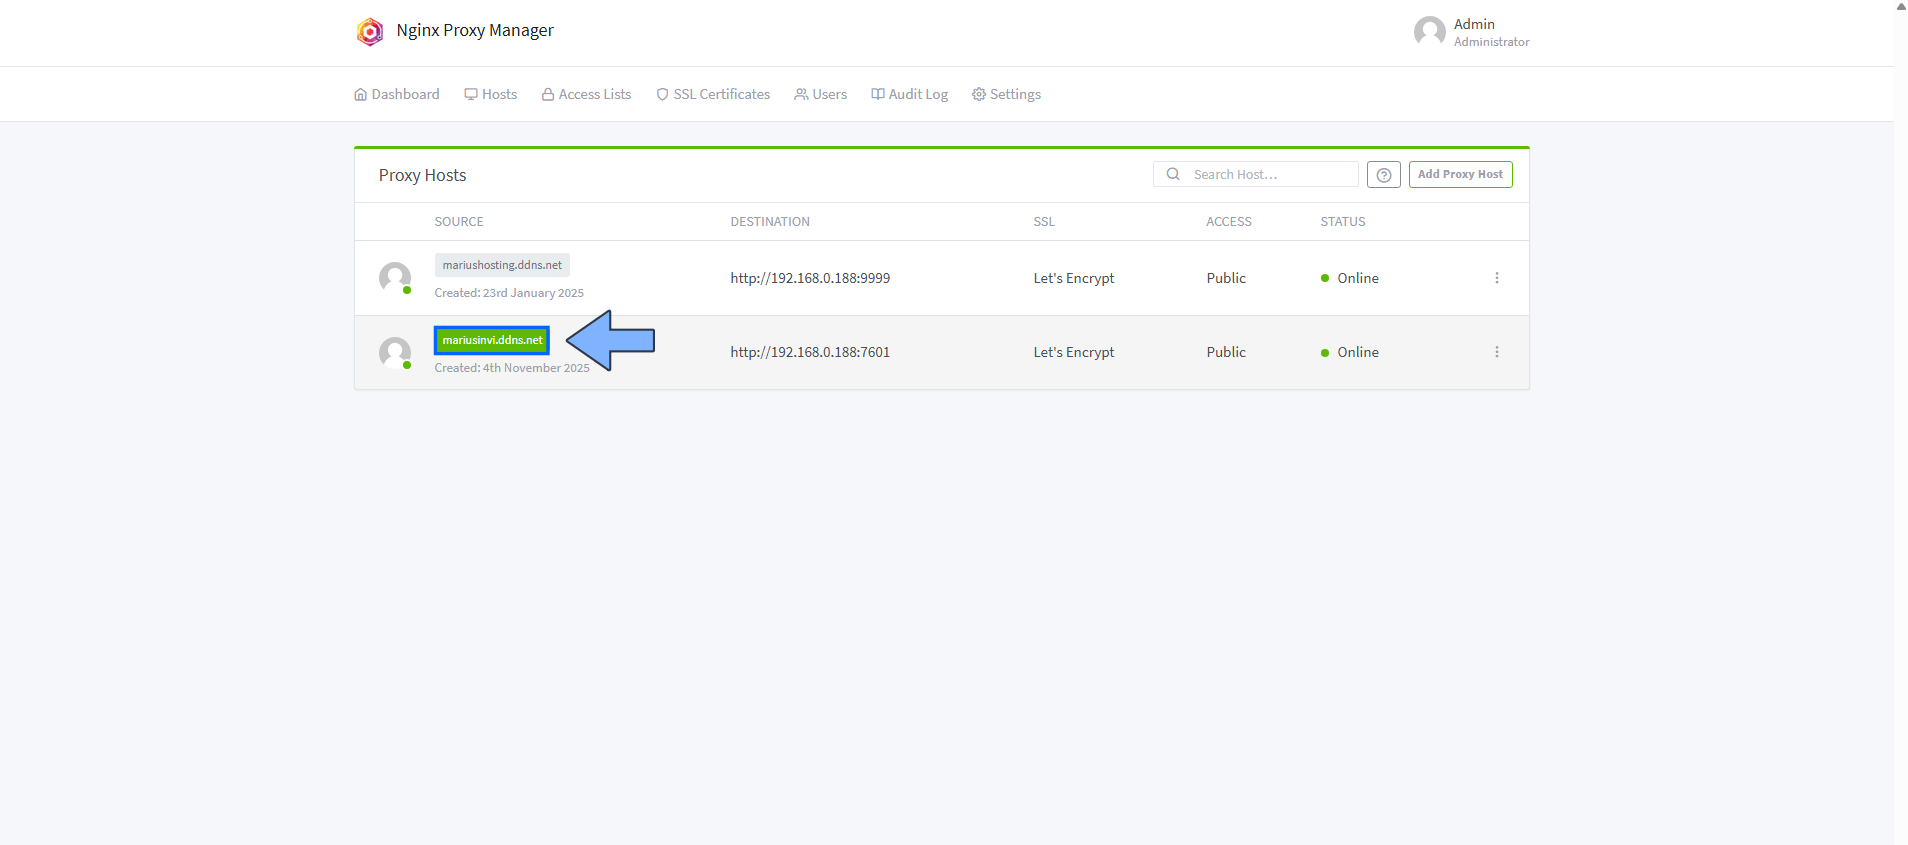
In the Proxy Hosts area, if everything goes right, you will see that your invidious hostname has been generated. Click on it. Follow the instructions in the image below.
STEP 14
🟢Please Support My work by Making a Donation. Almost 99,9% of the people that install something using my guides forget to support my work, or just ignore STEP 1. I’ve been very honest about this aspect of my work since the beginning: I don’t run any ADS, I don’t require subscriptions, paid or otherwise, I don’t collect IPs, emails, and I don’t have any referral links from Amazon or other merchants. I also don’t have any POP-UPs or COOKIES. I have repeatedly been told over the years how much I have contributed to the community. It’s something I love doing and have been honest about my passion since the beginning. But I also Need The Community to Support me Back to be able to continue doing this work.
STEP 15
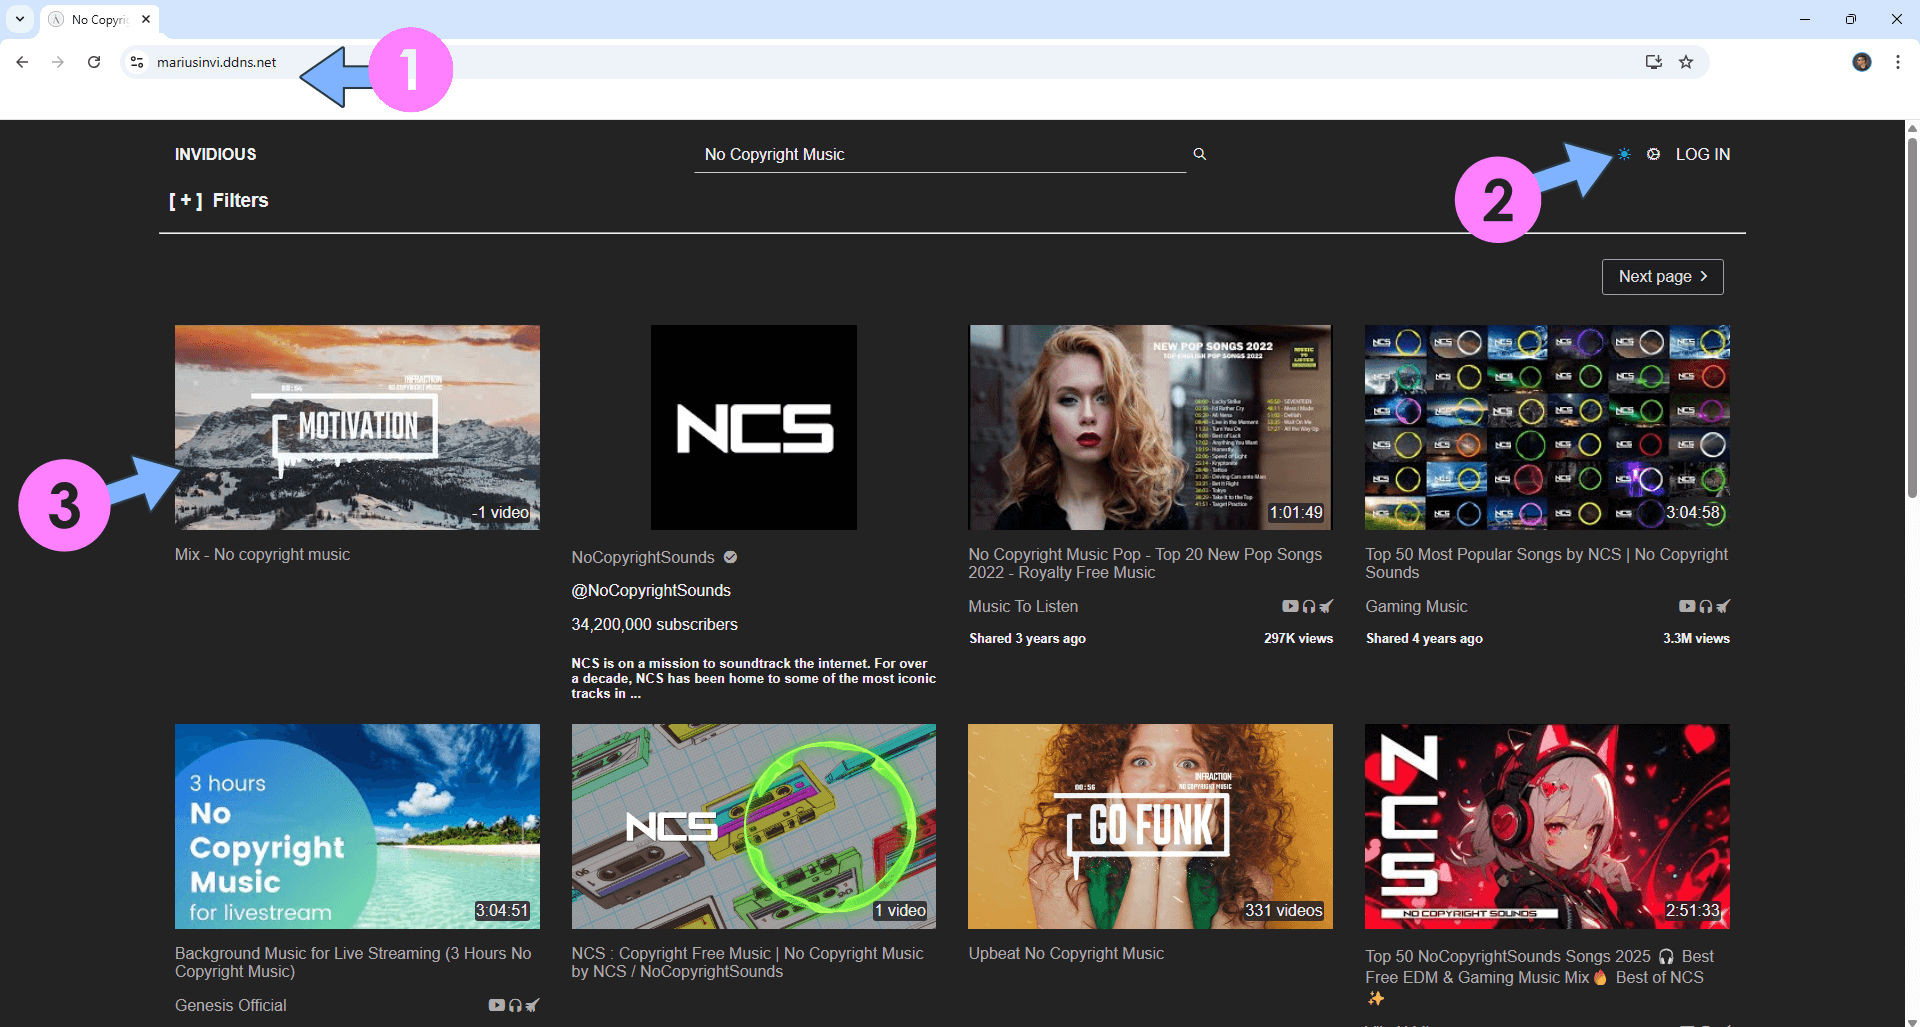
Now open your browser and type in your HTTPS/SSL certificate like this https://invidious.ddns.net In my case it’s https://mariusinvi.ddns.net If everything goes right, you will see the Invidious main page. Search for something then switch to Dark Mode. Follow the instructions in the image below.
STEP 16
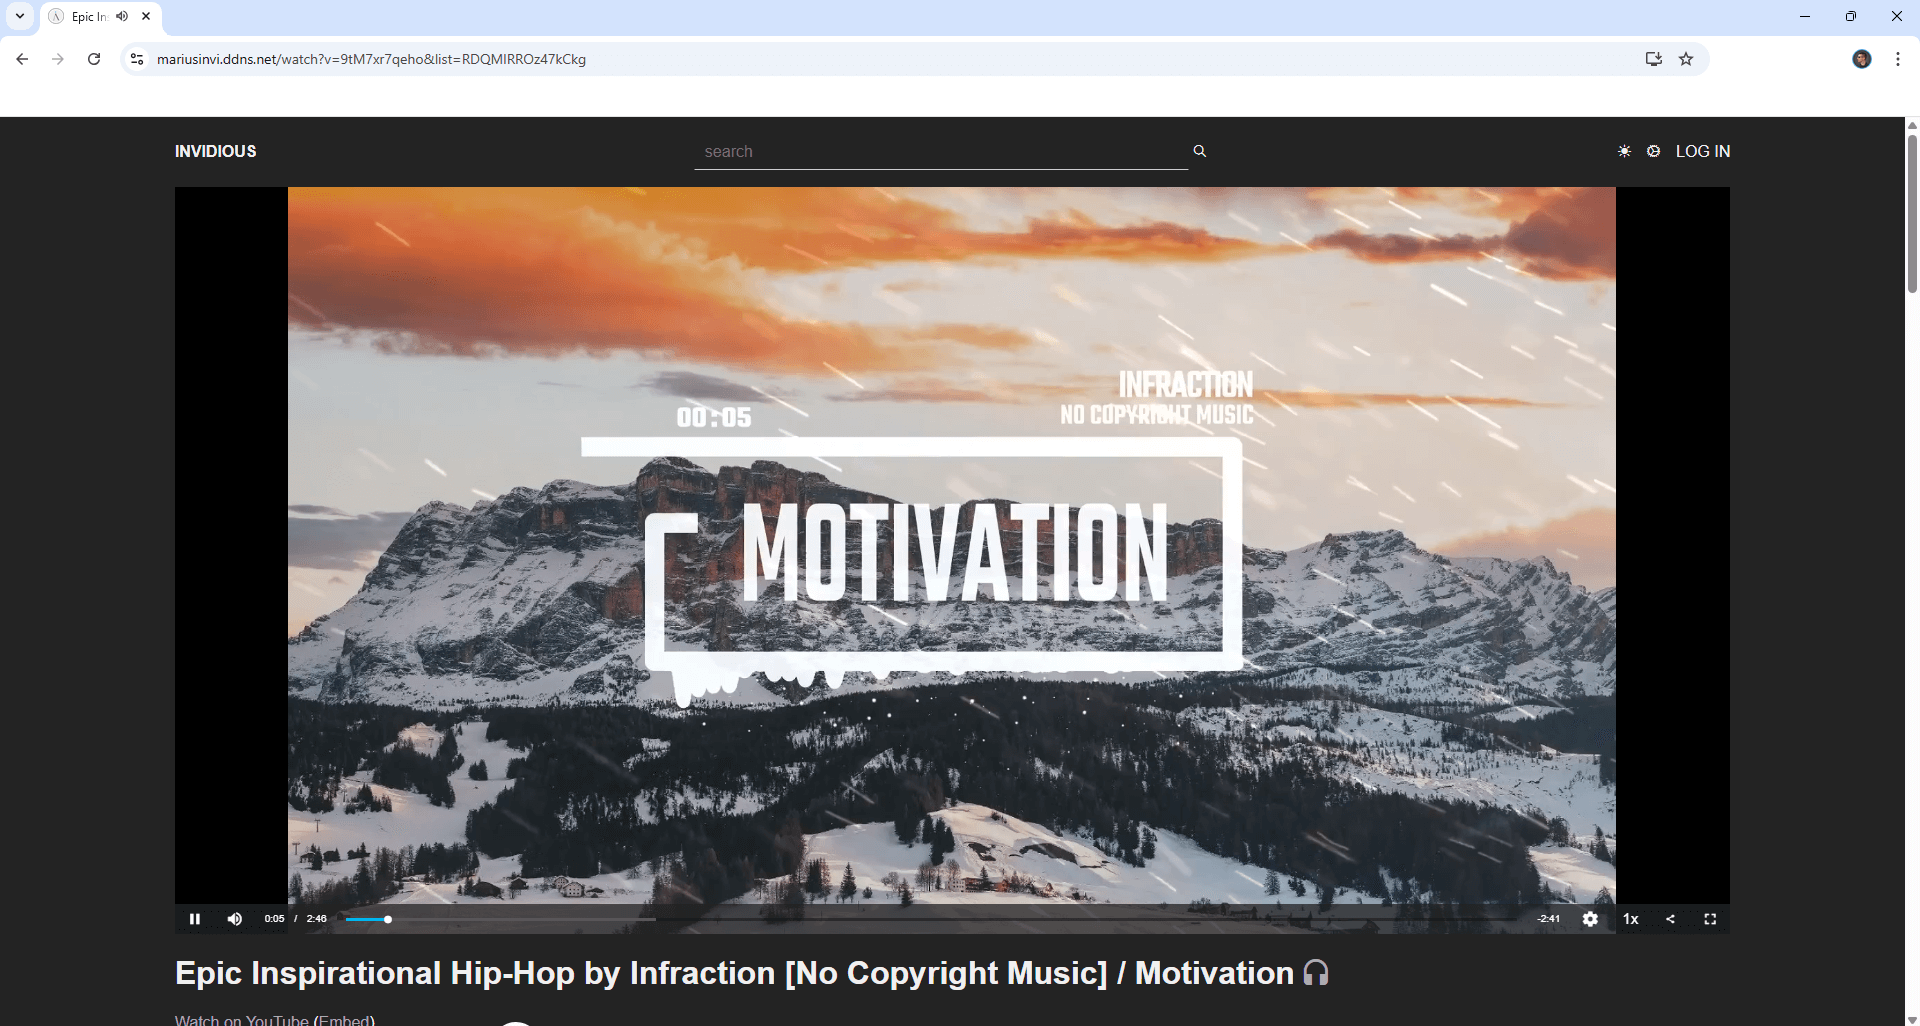
You can view your favorite video!
STEP 17
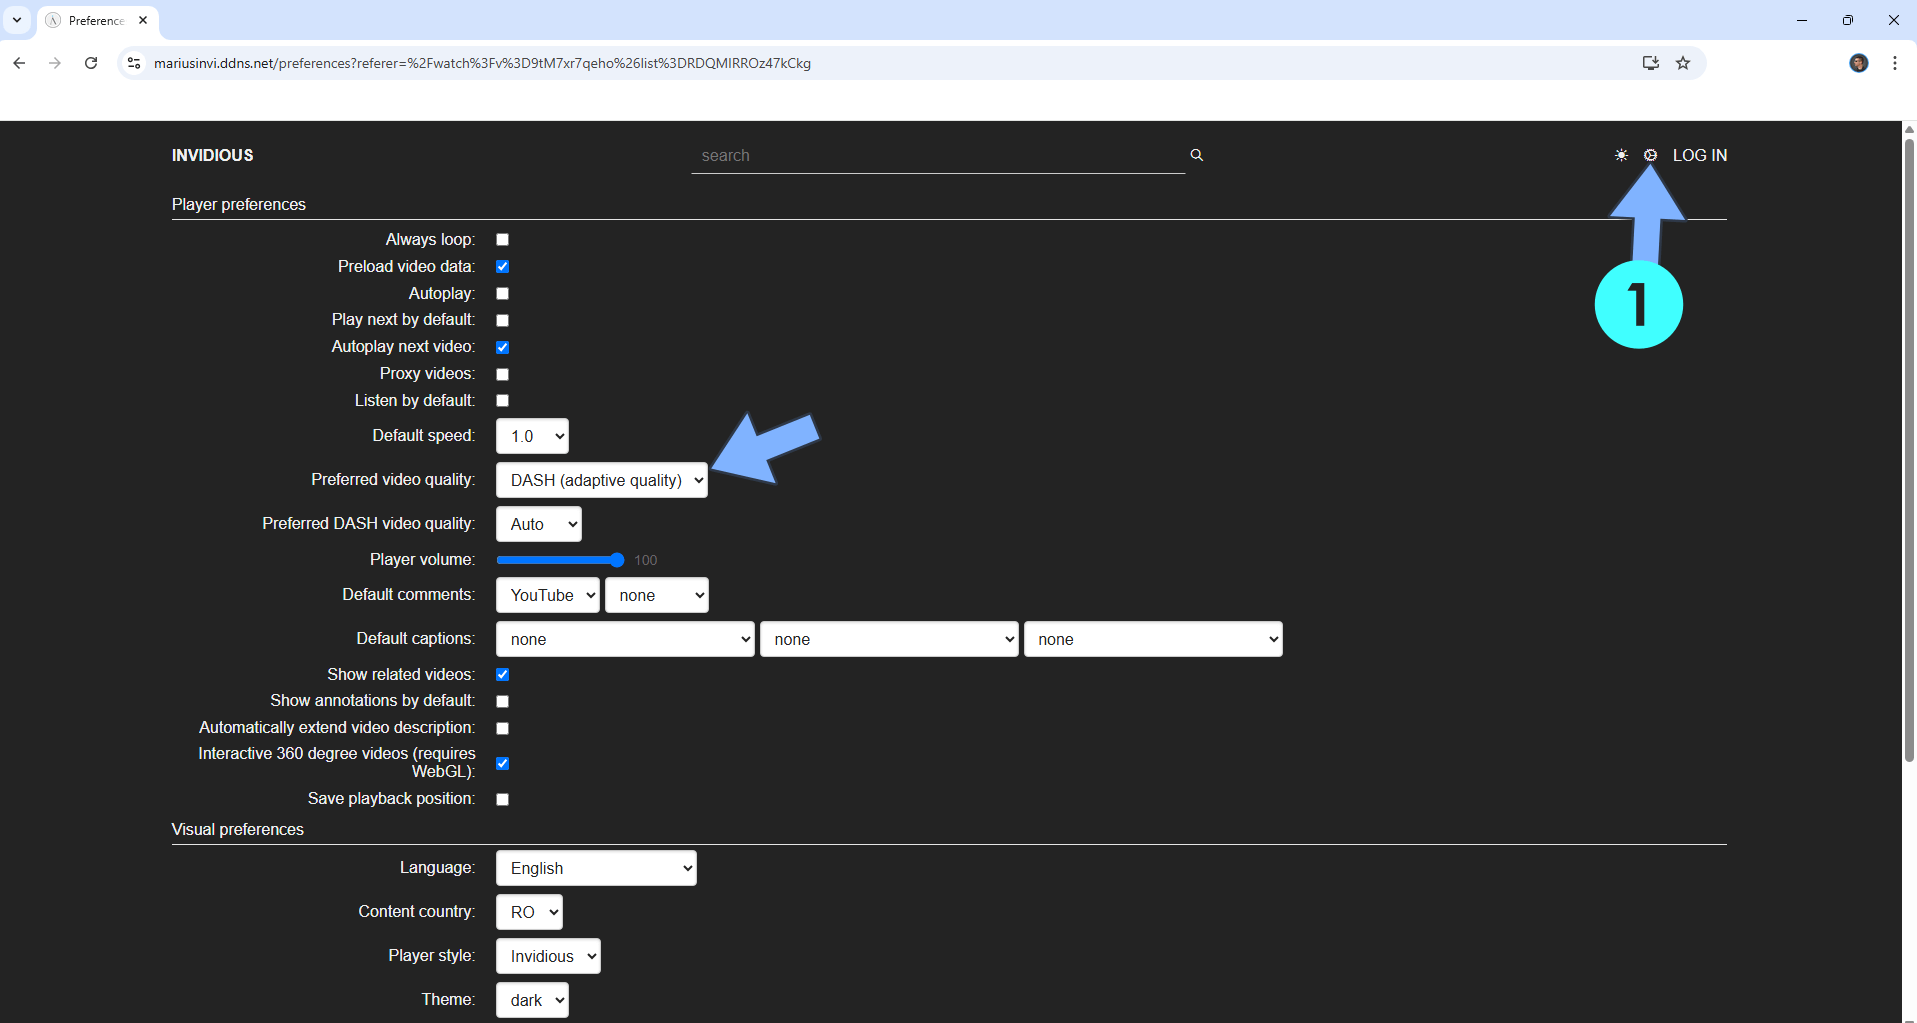
You can change multiple settings by clicking the gear icon at the top right of the page. ⚠️Warning: Select Preferred video quality HD720 if you struggle to play video with the standard settings. Follow the instructions in the image below.
Enjoy Invidious!
🆙Note/Update/Container: How to Update Your Docker Containers on UGREEN NAS Using Portainer.
🐳Note: How to Create Docker Shortcuts on Desktop.
🆕Note: How to Update Portainer to the latest version.
🆕Note: How to Clean Docker.
This post was updated on Thursday / March 5th, 2026 at 9:07 AM