Did you know WordPress installation automatically goes to a web/wordpress directory? This will make your URL link equal to http://www.example.com/wordpress. Would you like your domain to be accessible from http://www.example.com instead http://www.example.com/wordpress ?
Below, you will find a step by step guide on how to access
http://www.example.com/wordpress as http://www.example.com:
- Install the Synology WordPress Package as you usually would do, using Package Center.
- Login to your domain name at http://www.example.com/wordpress/wp-admin/
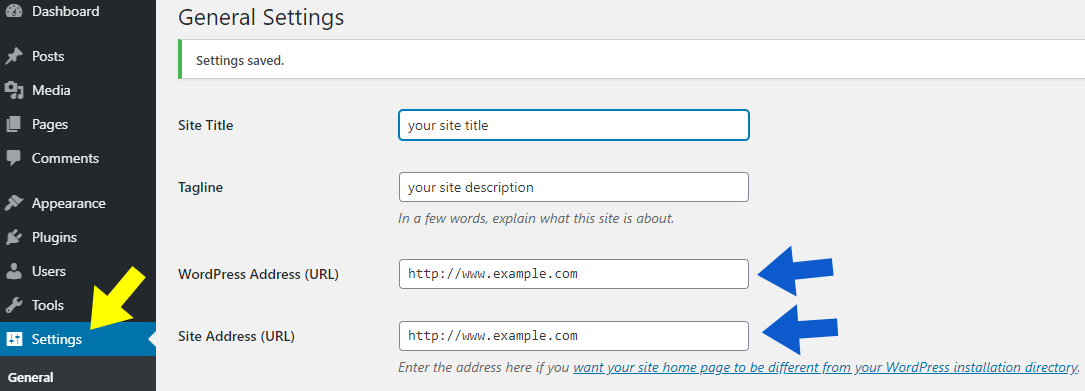
- Verify the WordPress address (URL) = http://www.example.com/wordpress
- Edit Site address (URL) to be http://www.example.com then save settings (follow the instructions in the image below).

- Use File Station to navigate to the wordpress folder residing under the web root folder.
- Copy (not move) the index.php and .htaccess files from the wordpress folder into the web root folder.
- Rename the original web root index.html file to index.html.old
- Edit the index.php within the web root folder to change ‘/wp-blog-header.php’ to ‘/wordpress/wp-blog-header.php’
- Save the change.
Additional information:
- Edit any permalinks (if you use them) from within http://www.example.com/wordpress/wp-admin/op … malink.php
- Open your website from http://www.example.com
- If the instructions above don’t work for you, go to WebStation / General Settings / Change HTTP back-end server to Apache 2.4 or viceversa to Nginx do some A/B tests.
If you want to get rid of problems like this one that can occur with the Synology WordPress Package, install the original WordPress version from wordpress.org or contact me for a step by step solution.
This post was updated on Tuesday / February 4th, 2020 at 11:55 PM
